持续集成
一、服务器准备
| IP | 主机名 | 配置 | 硬盘 | 系统 |
|---|---|---|---|---|
| 10.0.0.200 | Gitlab | 2核4G | 40G | Ubuntu |
| 10.0.0.201 | Nexus | 1核2G | 40G | Kylin |
| 10.0.0.202 | Jenkins | 1核2G | 40G | Kylin |
| 10.0.0.203 | Sonar | 1核2G | 40G | Kylin |
| 10.0.0.7 | Web | 1核1G | 40G | Kylin |
二、Git版本控制
企业常用的git版本
1.SVN
2.git

页面版的代码仓库
1.gihub 全球使用最多的代码仓库
2.gitlab 全球使用最多的私有代码仓库
3.gitee 码云 中国使用最多的代码仓库
三、git使用
1.配置当前代码仓库的使用角色
git环境 ubuntu 22.04

root@Gitlab:~# git --version
git version 2.34.1
root@Gitlab:~# git config --global user.name "lizhenya"
root@Gitlab:~# git config --global user.email "lizhenya@mail.com"
root@Gitlab:~# git config --global color.ui true
root@Gitlab:~# git config --list
user.name=lizhenya
user.email=lizhenya@mail.com
color.ui=true
root@Gitlab:~# cat .gitconfig
[user]
	name = lizhenya
	email = lizhenya@mail.com
[color]
	ui = true
2.初始化仓库
root@Gitlab:~/git_data# git init
hint: Using 'master' as the name for the initial branch. This default branch name
hint: is subject to change. To configure the initial branch name to use in all
hint: of your new repositories, which will suppress this warning, call:
hint:
hint: 	git config --global init.defaultBranch <name>
hint:
hint: Names commonly chosen instead of 'master' are 'main', 'trunk' and
hint: 'development'. The just-created branch can be renamed via this command:
hint:
hint: 	git branch -m <name>
Initialized empty Git repository in /root/git_data/.git/
root@oGitlab:~/git_data# ll
total 0
root@Gitlab:~/git_data# ll -a
total 12
drwxr-xr-x 3 root root 4096 Jun 12 12:39 ./
drwx------ 6 root root 4096 Jun 12 12:39 ../
drwxr-xr-x 7 root root 4096 Jun 12 12:39 .git/
root@Gitlab:~/git_data# ll .git/
total 32
drwxr-xr-x 2 root root 4096 Jun 12 12:39 branches/    #分支
-rw-r--r-- 1 root root   92 Jun 12 12:39 config       #配置文件
-rw-r--r-- 1 root root   73 Jun 12 12:39 description  #描述
-rw-r--r-- 1 root root   23 Jun 12 12:39 HEAD         #头部
drwxr-xr-x 2 root root 4096 Jun 12 12:39 hooks/       #勾子
drwxr-xr-x 2 root root 4096 Jun 12 12:39 info/
drwxr-xr-x 4 root root 4096 Jun 12 12:39 objects/     #项目 代码是以HASH存放
drwxr-xr-x 4 root root 4096 Jun 12 12:39 refs/        #缓存区  默认不存在
3.git区域名称
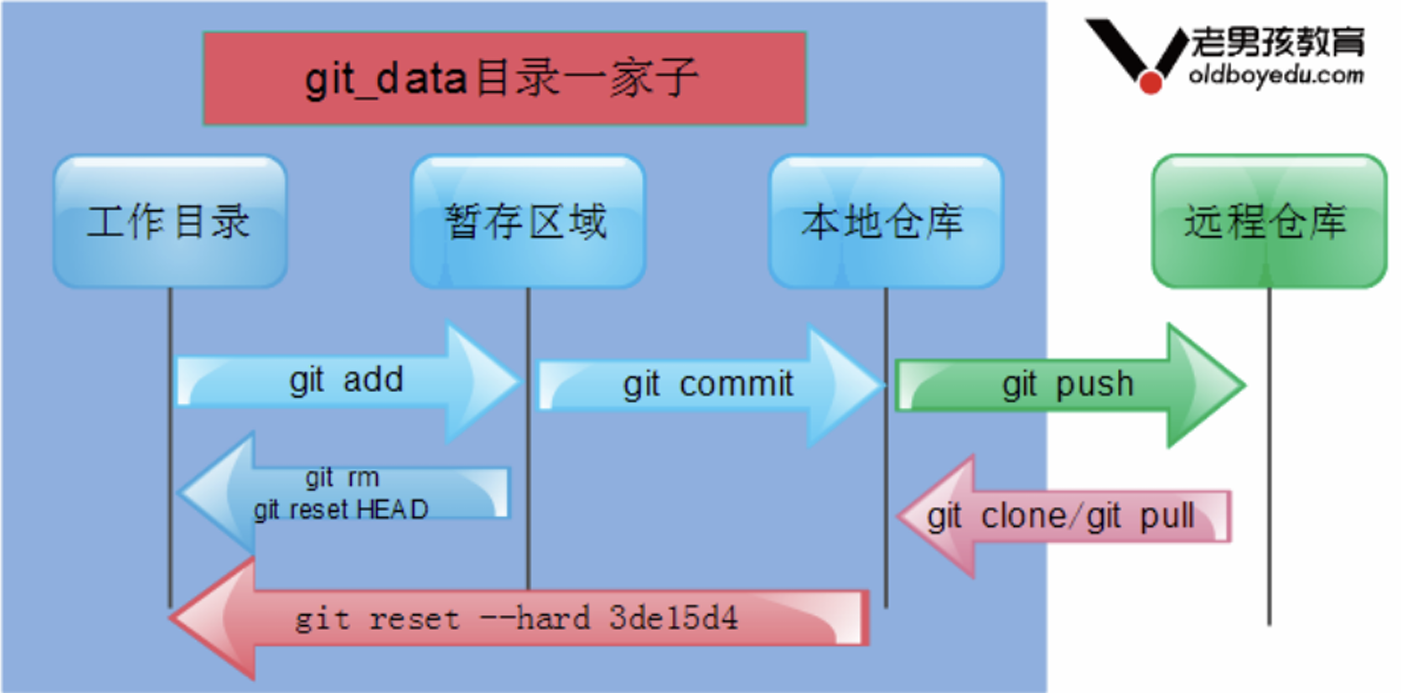
工作目录:  进入git_data目录 当前的位置称为工作目录  类似车间工人

暂存区域:  临时存放代码的地方,类似质检车间 有问题可以返回,没有问题可以保存到仓库

本地仓库:  存储代码的位置 类似工厂仓库

开发在工作目录写代码--->提交到暂存区域---->提交到本地仓库--->代码才真正的被管理。每次走当前这个流程相当于虚拟机做了一个快照的动作
1.txt---->暂存区域--->本地仓库   1.txt放到仓库
4.git常用命令
#git初始化命令
git init
#查看git仓库状态
git status

root@Gitlab:~/git_data# git status
On branch master

No commits yet

nothing to commit (create/copy files and use "git add" to track)
#将文件保存到本地仓库的流程
1.创建文件
root@Gitlab:~/git_data# touch a.txt
root@Gitlab:~/git_data# ll
total 0
-rw-r--r-- 1 root root 0 Jun 12 12:52 a.txt

2.将文件提交到暂存区
root@Gitlab:~/git_data# git add a.txt

3.将暂存区提交到本地仓库
root@Gitlab:~/git_data# git commit -m "创建a.txt"
[master (root-commit) 5d2cc4a] 创建a.txt
 1 file changed, 0 insertions(+), 0 deletions(-)
 create mode 100644 a.txt

4.提交完之后检查工作状态必须是干净的
root@Gitlab:~/git_data# git status
On branch master
nothing to commit, working tree clean

##注意
只要执行了一次commit,就相当于做了一个快照

例子:
root@Gitlab:~/git_data# touch b.txt
root@Gitlab:~/git_data# git add b.txt
root@Gitlab:~/git_data# git commit -m "创建b.txt"
[master 0f21b60] 创建b.txt
 1 file changed, 0 insertions(+), 0 deletions(-)
 create mode 100644 b.txt
#git删除文件
git rm -f a.txt
或者是直接使用rm -f a.txt

区别是git rm -f 会同时删除工作目录和暂存区,rm -f只会删除工作目录的文件
如果不小心rm -f删除了工作目录的文件,可以使用git restore 将文件从暂存区恢复
#git恢复文件
git restore a.txt
#查看历史提交日志
git log --oneline

例子:
root@Gitlab:~/git_data# git log --oneline
0f21b60 (HEAD -> master) 创建b.txt
5d2cc4a 创建a.txt
#git比对
git diff #比对工作目录和暂存区的不太
git diff --cached #比对暂存区和本地仓库的不同

例子:
root@Gitlab:~/git_data# echo bbbb>>b.txt
root@Gitlab:~/git_data# git diff b.txt
diff --git a/b.txt b/b.txt
index e69de29..b433656 100644
--- a/b.txt
+++ b/b.txt
@@ -0,0 +1 @@
+bbbb
root@Gitlab:~/git_data# git add b.txt
root@Gitlab:~/git_data# git diff --cached
diff --git a/b.txt b/b.txt
index e69de29..b433656 100644
--- a/b.txt
+++ b/b.txt
@@ -0,0 +1 @@
+bbbb
#版本回滚
git reset --hard 814acbb(版本)

例子:
root@Gitlab:~/git_data# git log --oneline
0f21b60 (HEAD -> master) 创建b.txt
5d2cc4a 创建a.txt
root@Gitlab:~/git_data# cat b.txt
bbbb
root@Gitlab:~/git_data# git reset --hard 5d2cc4a
HEAD is now at 5d2cc4a 创建a.txt
root@Gitlab:~/git_data# ll
total 0
-rw-r--r-- 1 root root 0 Jun 12 12:52 a.txt
#查看所有历史提交记录
git reflog

例子:
root@Gitlab:~/git_data# git reflog
5d2cc4a (HEAD -> master) HEAD@{0}: reset: moving to 5d2cc4a
0f21b60 HEAD@{1}: commit: 创建b.txt
5d2cc4a (HEAD -> master) HEAD@{2}: commit (initial): 创建a.txt
root@Gitlab:~/git_data# git reset --hard 0f21b60
HEAD is now at 0f21b60 创建b.txt
root@Gitlab:~/git_data# ll
total 0
-rw-r--r-- 1 root root 0 Jun 12 12:52 a.txt
-rw-r--r-- 1 root root 0 Jun 12 13:05 b.txt
5.git分支
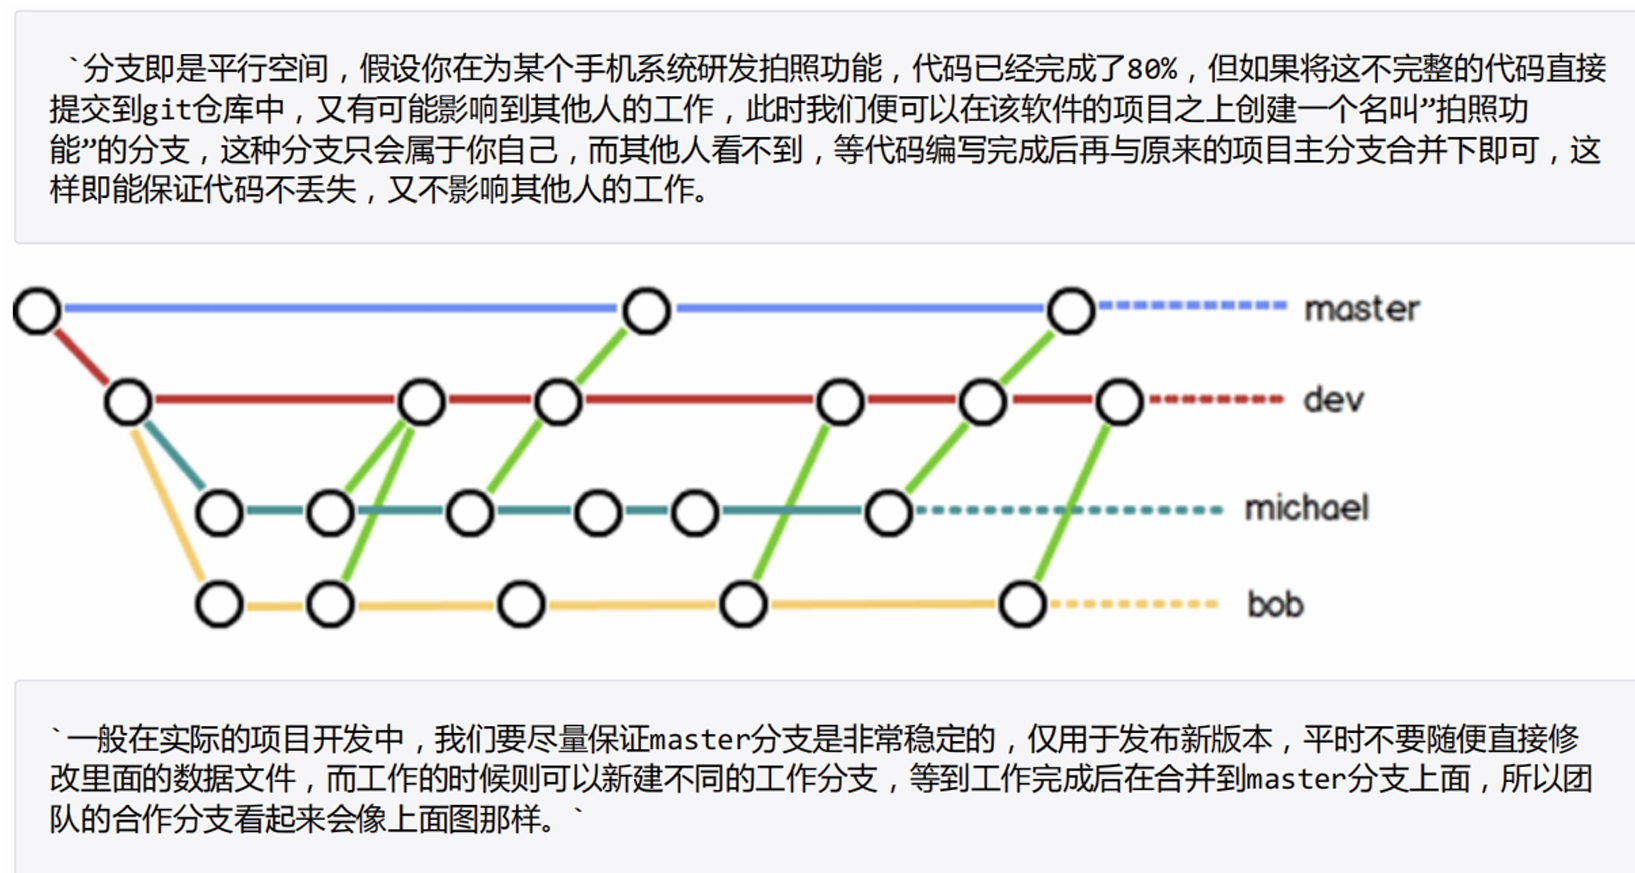
#查看分支
git branch

例子:
root@Gitlab:~/git_data# git branch
* master

#创建分支
git branch dev

#查看当前所在分支
git branch

例子:
root@Gitlab:~/git_data# git branch dev
root@Gitlab:~/git_data# git branch
  dev
* master

#切换到dev分支
git checkout dev

例子:
root@Gitlab:~/git_data# git checkout dev
Switched to branch 'dev'
#合并分支
创建新的文件c.txt
root@Gitlab:~/git_data# touch c.txt
root@Gitlab:~/git_data# git add .
root@Gitlab:~/git_data# git commit -m "创建文件c.txt"
[dev 7945528] 创建文件c.txt
 1 file changed, 0 insertions(+), 0 deletions(-)
 create mode 100644 c.txt

切换到master分支
root@Gitlab:~/git_data# git checkout master
Switched to branch 'master'
root@Gitlab:~/git_data# ll
total 0
-rw-r--r-- 1 root root 0 Jun 12 12:52 a.txt
-rw-r--r-- 1 root root 0 Jun 12 13:05 b.txt
root@Gitlab:~/git_data# git branch
  dev
* master

将dev中的代码合并到master分支
root@Gitlab:~/git_data# git merge dev
Updating 0f21b60..7945528
Fast-forward
 c.txt | 0
 1 file changed, 0 insertions(+), 0 deletions(-)
 create mode 100644 c.txt
root@Gitlab:~/git_data# ll
total 0
-rw-r--r-- 1 root root 0 Jun 12 12:52 a.txt
-rw-r--r-- 1 root root 0 Jun 12 13:05 b.txt
-rw-r--r-- 1 root root 0 Jun 12 13:16 c.txt

合并完后删除dev分支
root@Gitlab:~/git_data# git branch
  dev
* master
root@Gitlab:~/git_data# git branch -d dev
Deleted branch dev (was 7945528).
root@Gitlab:~/git_data# git branch
* master
#合并冲突
合并冲突测试
1. 确保当前在 master 分支
git checkout master
2. 创建并切换到 testing 分支
git checkout -b testing
3. 切回 master,修改并提交
git checkout master
echo "ccc" >> b.txt     # 或者修改 b.txt 第二行
git add b.txt
git commit -m "master 修改 b.txt"
4. 切换到 testing,修改并提交
git checkout testing
echo "ddd" >> b.txt     # 修改同一个位置
git add b.txt
git commit -m "testing 修改 b.txt"
5. 切回 master,合并
git checkout master
git merge testing       # 此时会产生冲突

解决方案
1. 查看冲突文件
cat b.txt
# 会看到类似这样的内容:
<<<<<<< HEAD
ccc
=======
ddd
>>>>>>> testing
2. 手动编辑 b.txt,保留您想要的内容
vim b.txt
# 例如只保留 ccc,或只保留 ddd,或两者都保留
3. 标记冲突已解决
git add b.txt
4. 完成合并
git commit -m "解决 b.txt 合并冲突"

或者直接使用命令
git merge --abort
放弃本次合并
6.git标签
标签也是指向了一次commit提交,是一个里程碑式的标签,回滚打标签直接加标签号,不需要加唯一字符串不好记
标签即为版本号

例子:
root@Gitlab:~/git_data# git log --oneline
7945528 (HEAD -> master) 创建文件c.txt
0f21b60 创建b.txt
5d2cc4a 创建a.txt

#给最早的一个hahs值打tag
root@Gitlab:~/git_data# git tag 5d2cc4a -m "v1.0稳定版本"
root@Gitlab:~/git_data# git tag
5d2cc4a
root@Gitlab:~/git_data# git tag -d 5d2cc4a
Deleted tag '5d2cc4a' (was a7b46ed)
root@Gitlab:~/git_data# git tag v1.0 5d2cc4a -m "v1.0稳定版本"
root@Gitlab:~/git_data# git tag
v1.0
root@Gitlab:~/git_data# git tag v1.1 0f21b60 -m "v1.1稳定版本"
root@Gitlab:~/git_data# git tag
v1.0
v1.1


#查看tag详细信息
root@Gitlab:~/git_data# git show v1.0
tag v1.0
Tagger: lizhenya <lizhenya@mail.com>
Date:   Fri Jun 12 13:24:57 2026 +0000

v1.0稳定版本

commit 5d2cc4a4739d7047399a28e8a3fd5502384347f3 (tag: v1.0)
Author: lizhenya <lizhenya@mail.com>
Date:   Fri Jun 12 12:53:21 2026 +0000

    创建a.txt

diff --git a/a.txt b/a.txt
new file mode 100644
index 0000000..e69de29

#通过tag回滚代码
root@Gitlab:~/git_data# git reset --hard v1.0
HEAD is now at 5d2cc4a 创建a.txt
root@Gitlab:~/git_data# git reset --hard v1.1
HEAD is now at 0f21b60 创建b.txt

#删除标签
git tag -d v1.1

root@Gitlab:~/git_data# git tag -d v1.1
Deleted tag 'v1.1' (was 5390c42)
root@Gitlab:~/git_data# git tag
v1.0
四、gitlab
GitLab 是一个用于仓库管理系统的开源项目。使用Git作为代码管理工具,并在此基础上搭建起来的web服务。可通过Web界面进行访问公开的或者私人项目。它拥有与Github类似的功能,能够浏览源代码,管理缺陷和注释。可以管理团队对仓库的访问,它非常易于浏览提交过的版本并提供一个文件历史库。团队成员可以利用内置的简单聊天程序(Wall)进行交流。它还提供一个代码片段收集功能可以轻松实现代码复用。
常用的网站:
官网:https://about.gitlab.com/
国内镜像:
https://mirrors.tuna.tsinghua.edu.cn/gitlab-ce/yum/
1.ubt安装gitlab
安装环境
1.Ubuntu 22.04
2.2核4G(实验) 生产至少6G
3.安装包 gitlab-ce_16.5.2-ce.0_amd64
4.禁用防火墙,关闭selinux

---------通过在线安装----------
#yum仓库更新
sudo apt-get update
#安装仓库依赖
sudo apt-get install -y curl openssh
server ca-certificates tzdata perl
#通过curl到的bash脚本然后交给bash执行
curl -L get.gitlab.cn | bash

安装gitlab
root@ubuntu:~#
EXTERNAL_URL="http://10.0.0.200" apt-get
install -y gitlab-jh

---------通过本地deb安装----------
1.上传deb包
2.安装
dpkg -i gitlab-ce_16.5.2-ce.0_amd64.deb
3.配置URL
vim /etc/gitlab/gitlab.rb
...
external_url 'http://10.0.0.200'
...
4.执行配置命令
gitlab-ctl reconfigure


#查看gitlab状态
gitlab-ctl status
#停止gitlab服务
gitlab-ctl stop
#启动gitlab服务
gitlab-ctl start

安装完成后访问10.0.0.200
默认用户: root
临时密码的问题
cat /etc/gitlab/initial_root_password
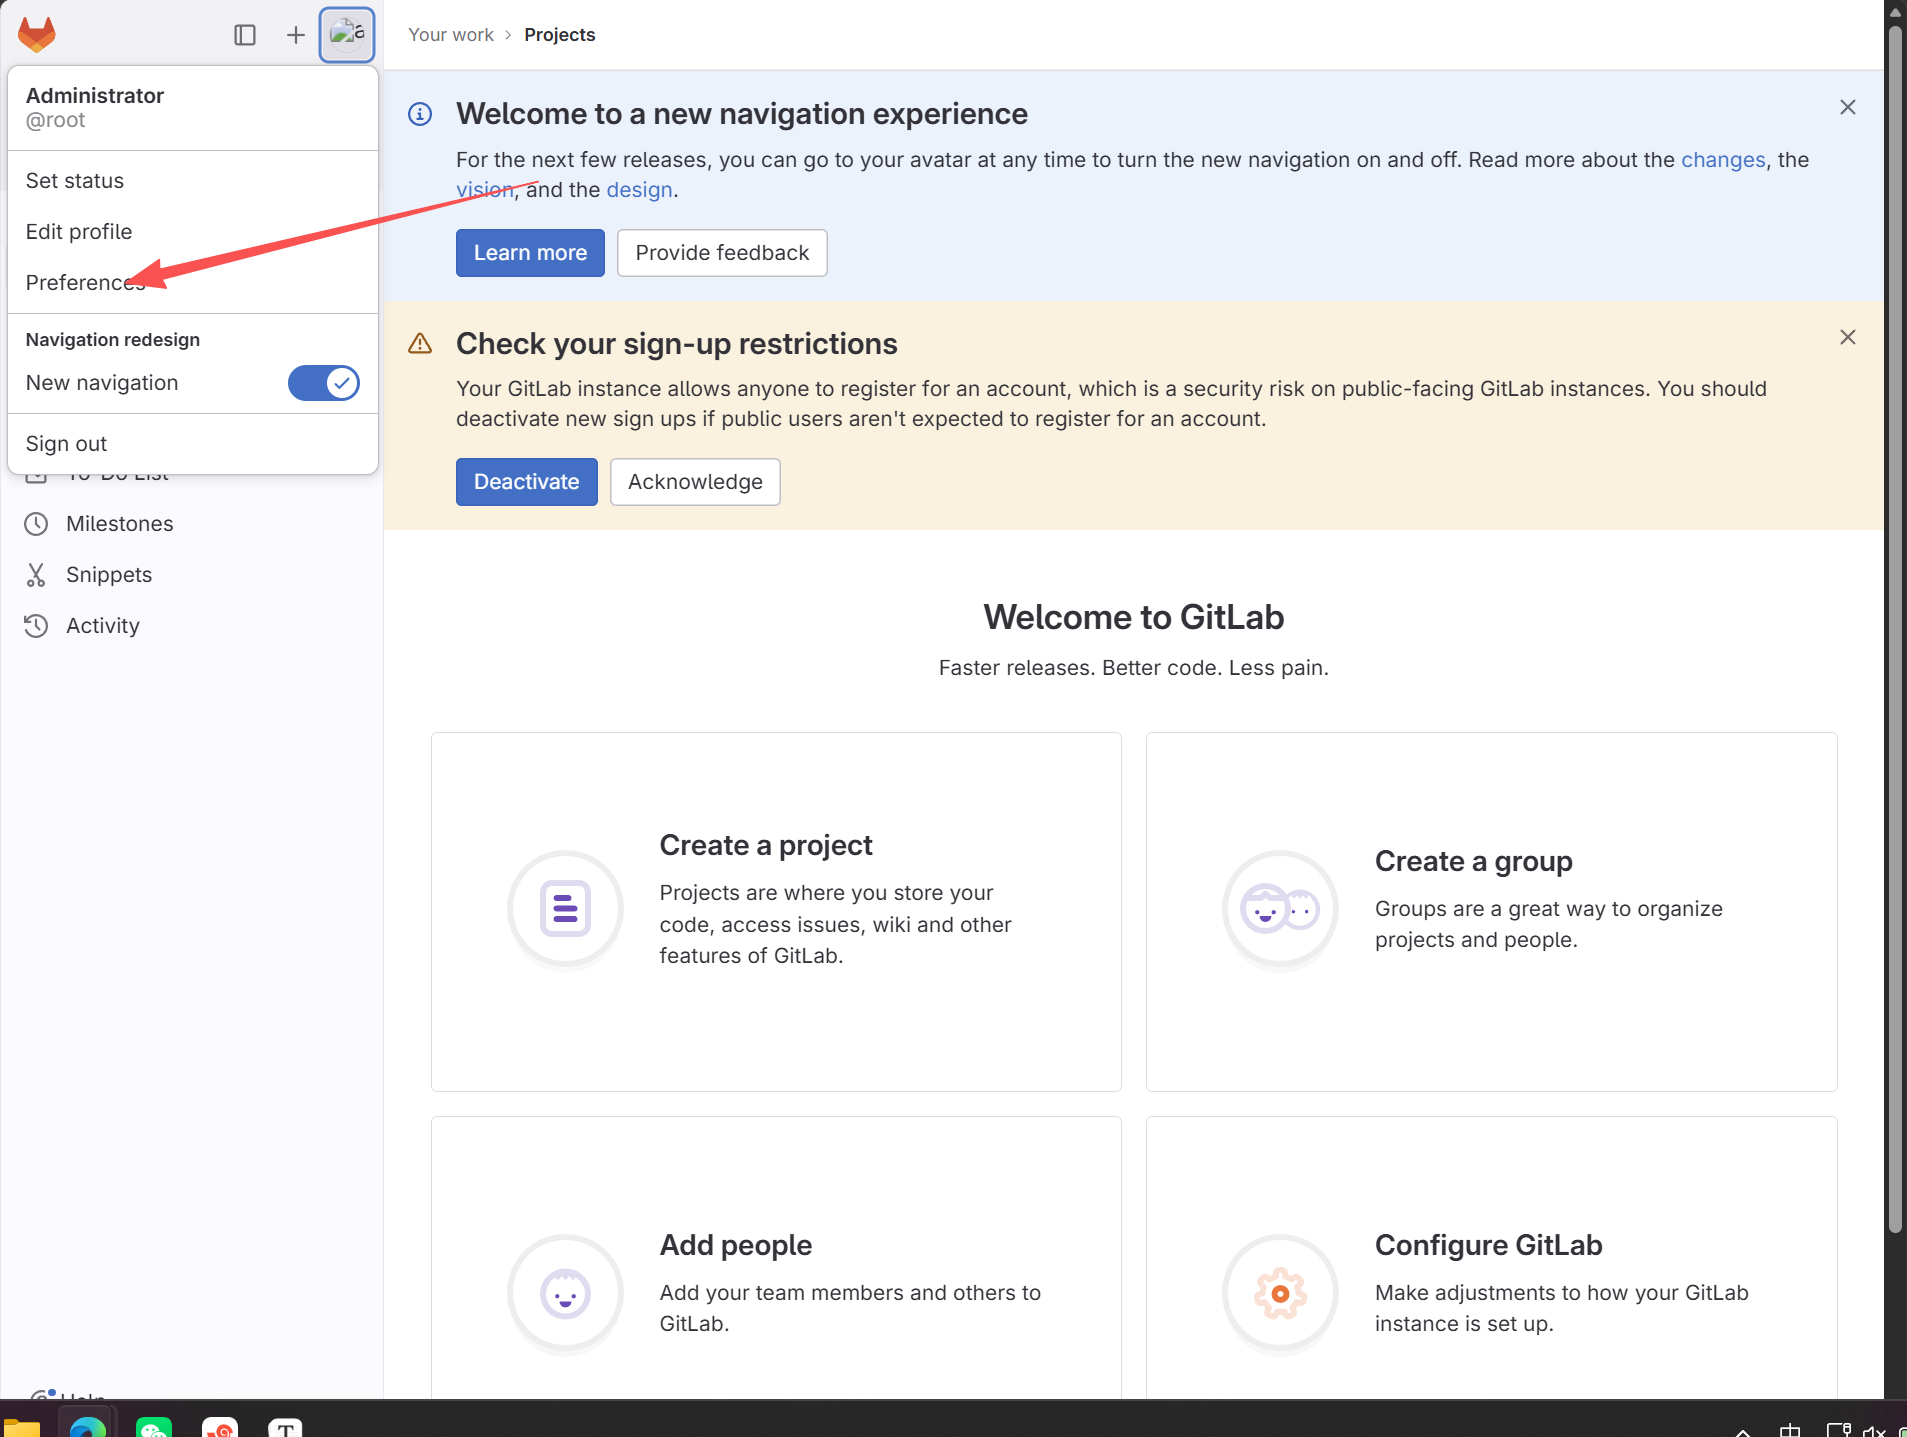
2.修改语言为中文
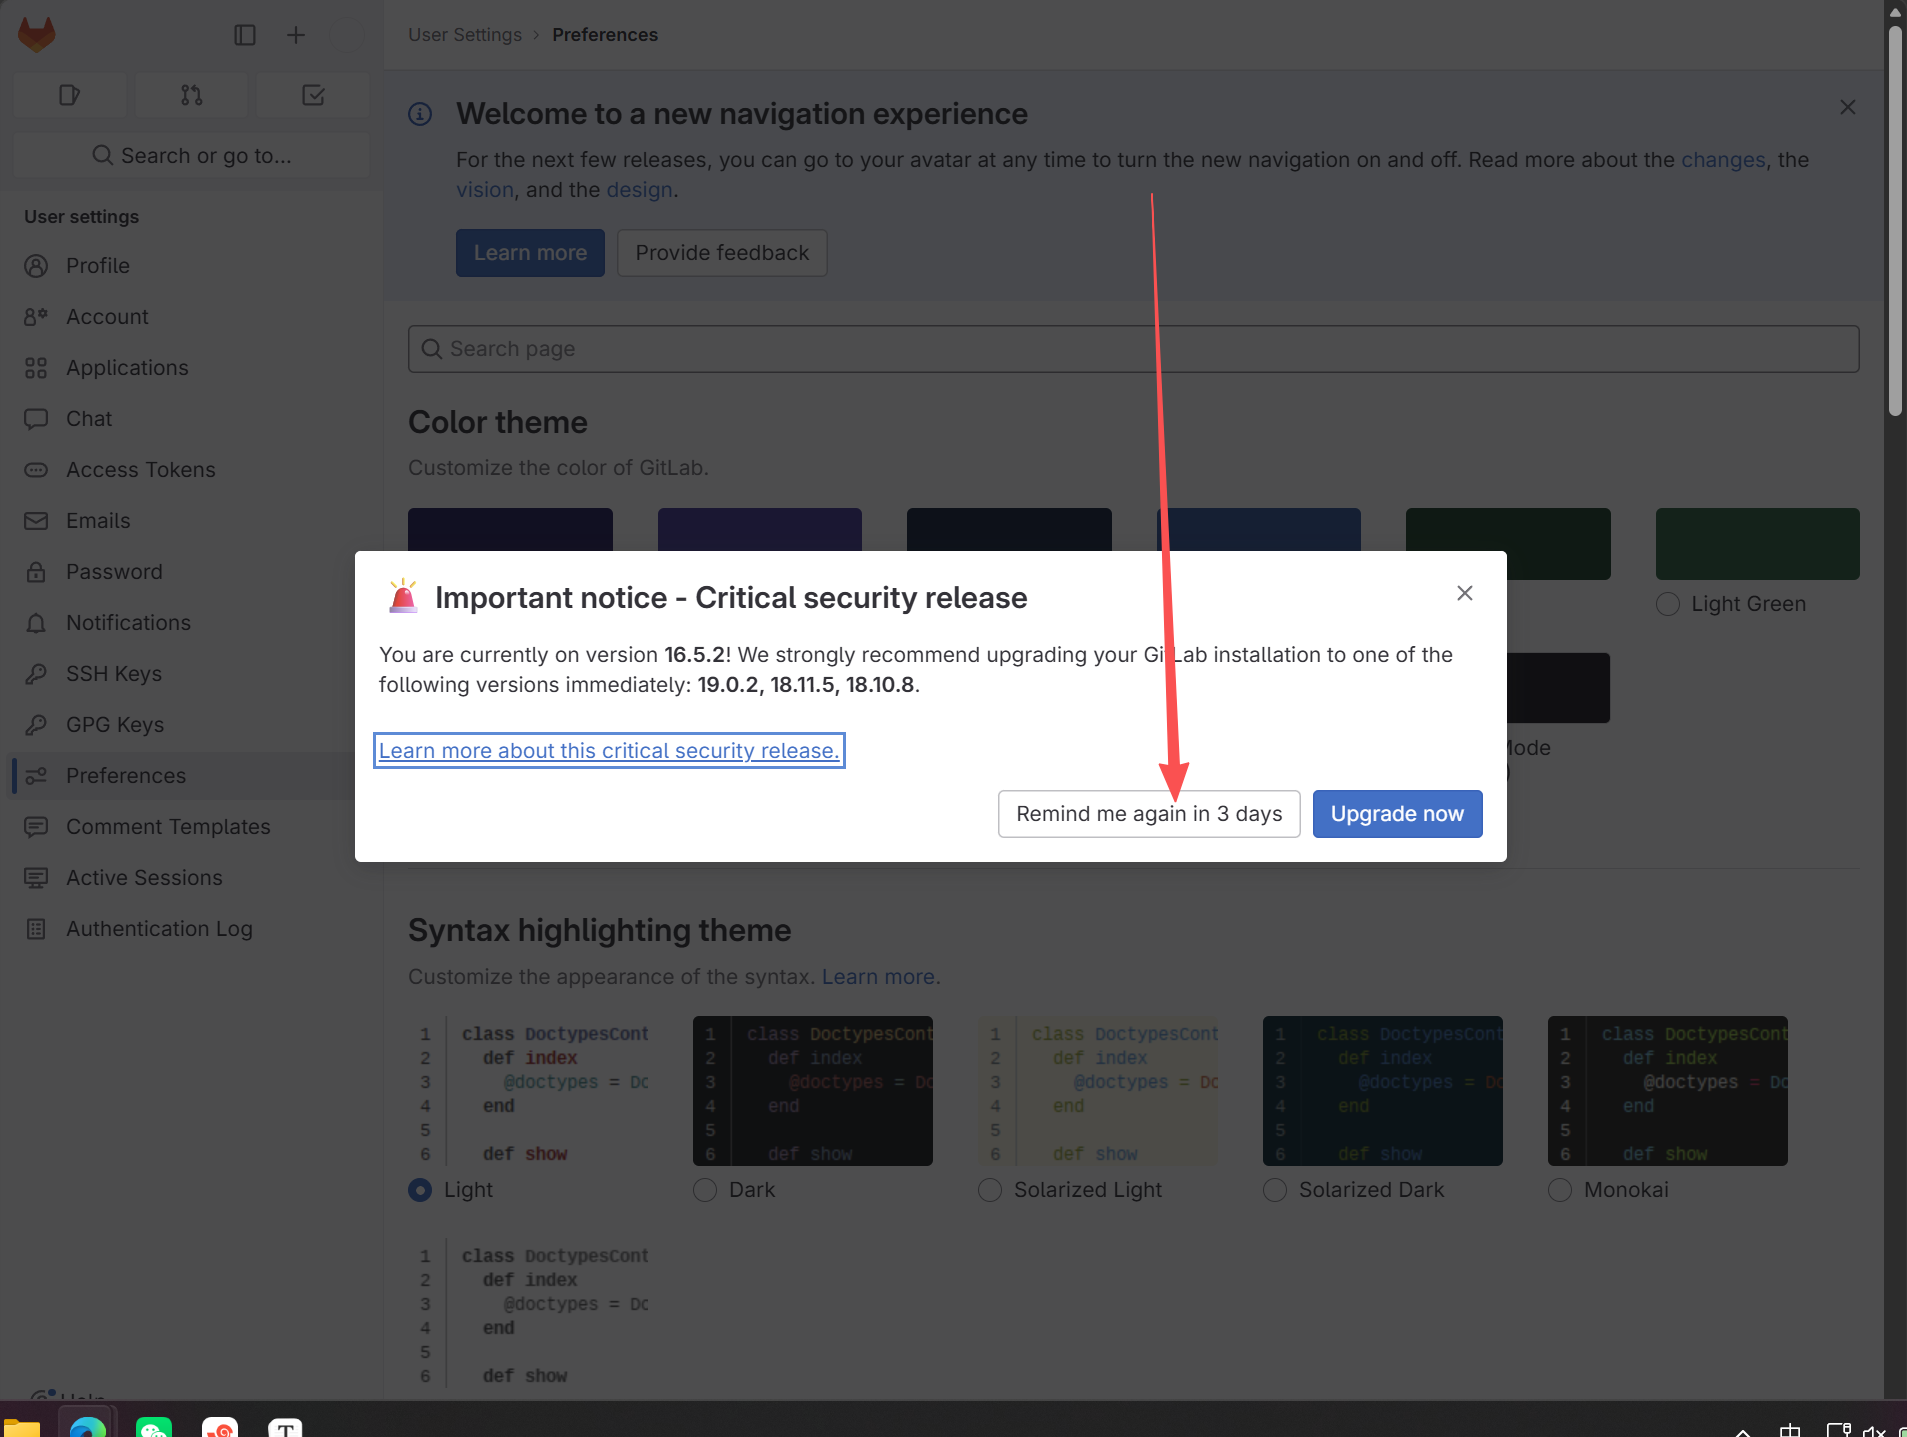
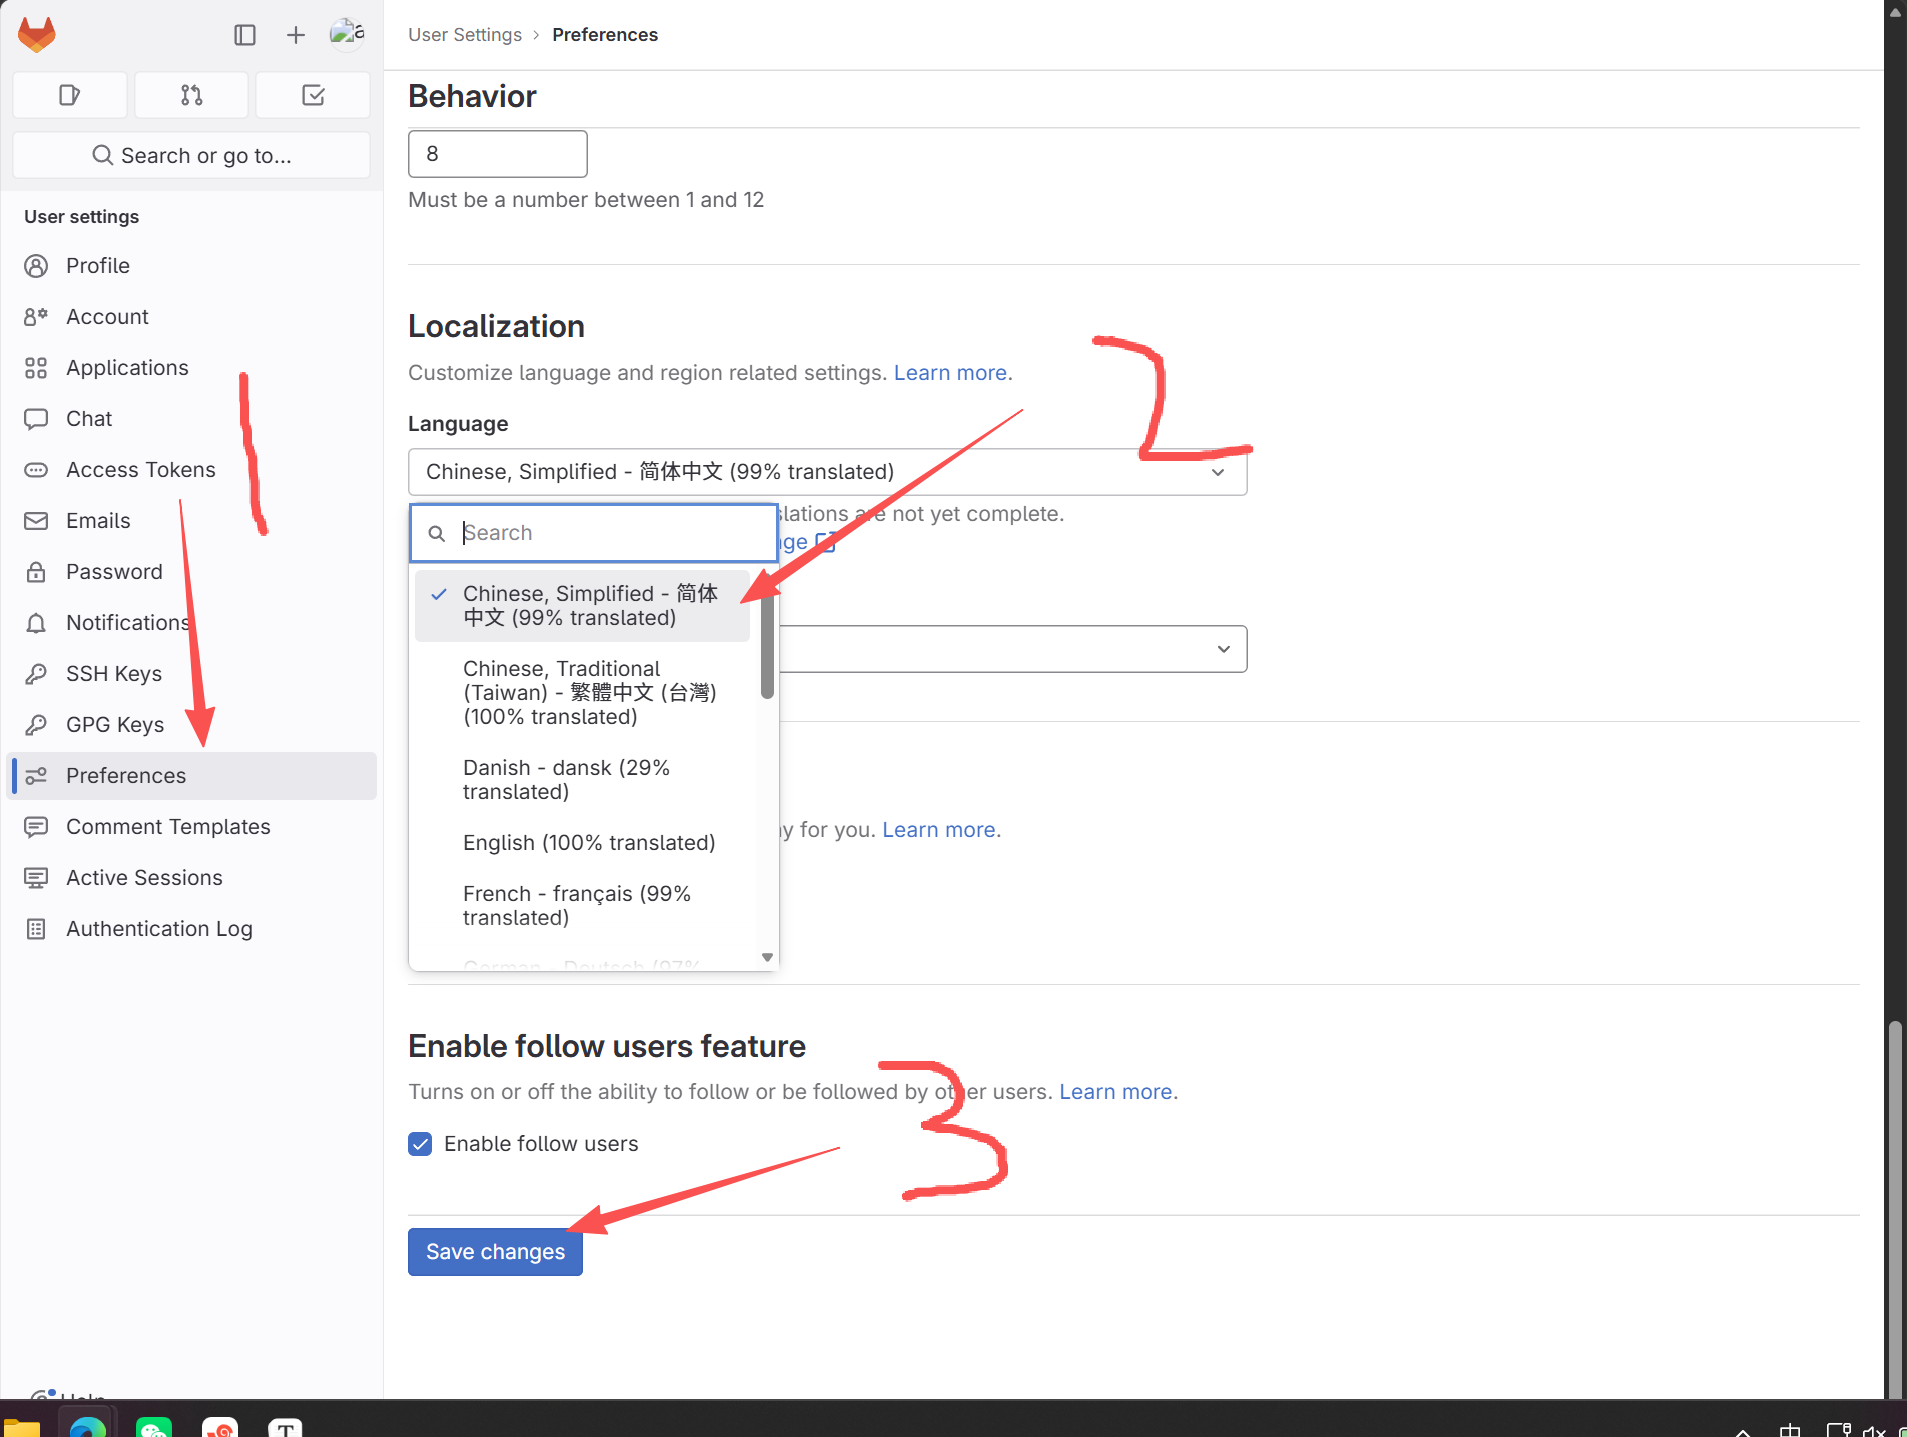
3.修改密码
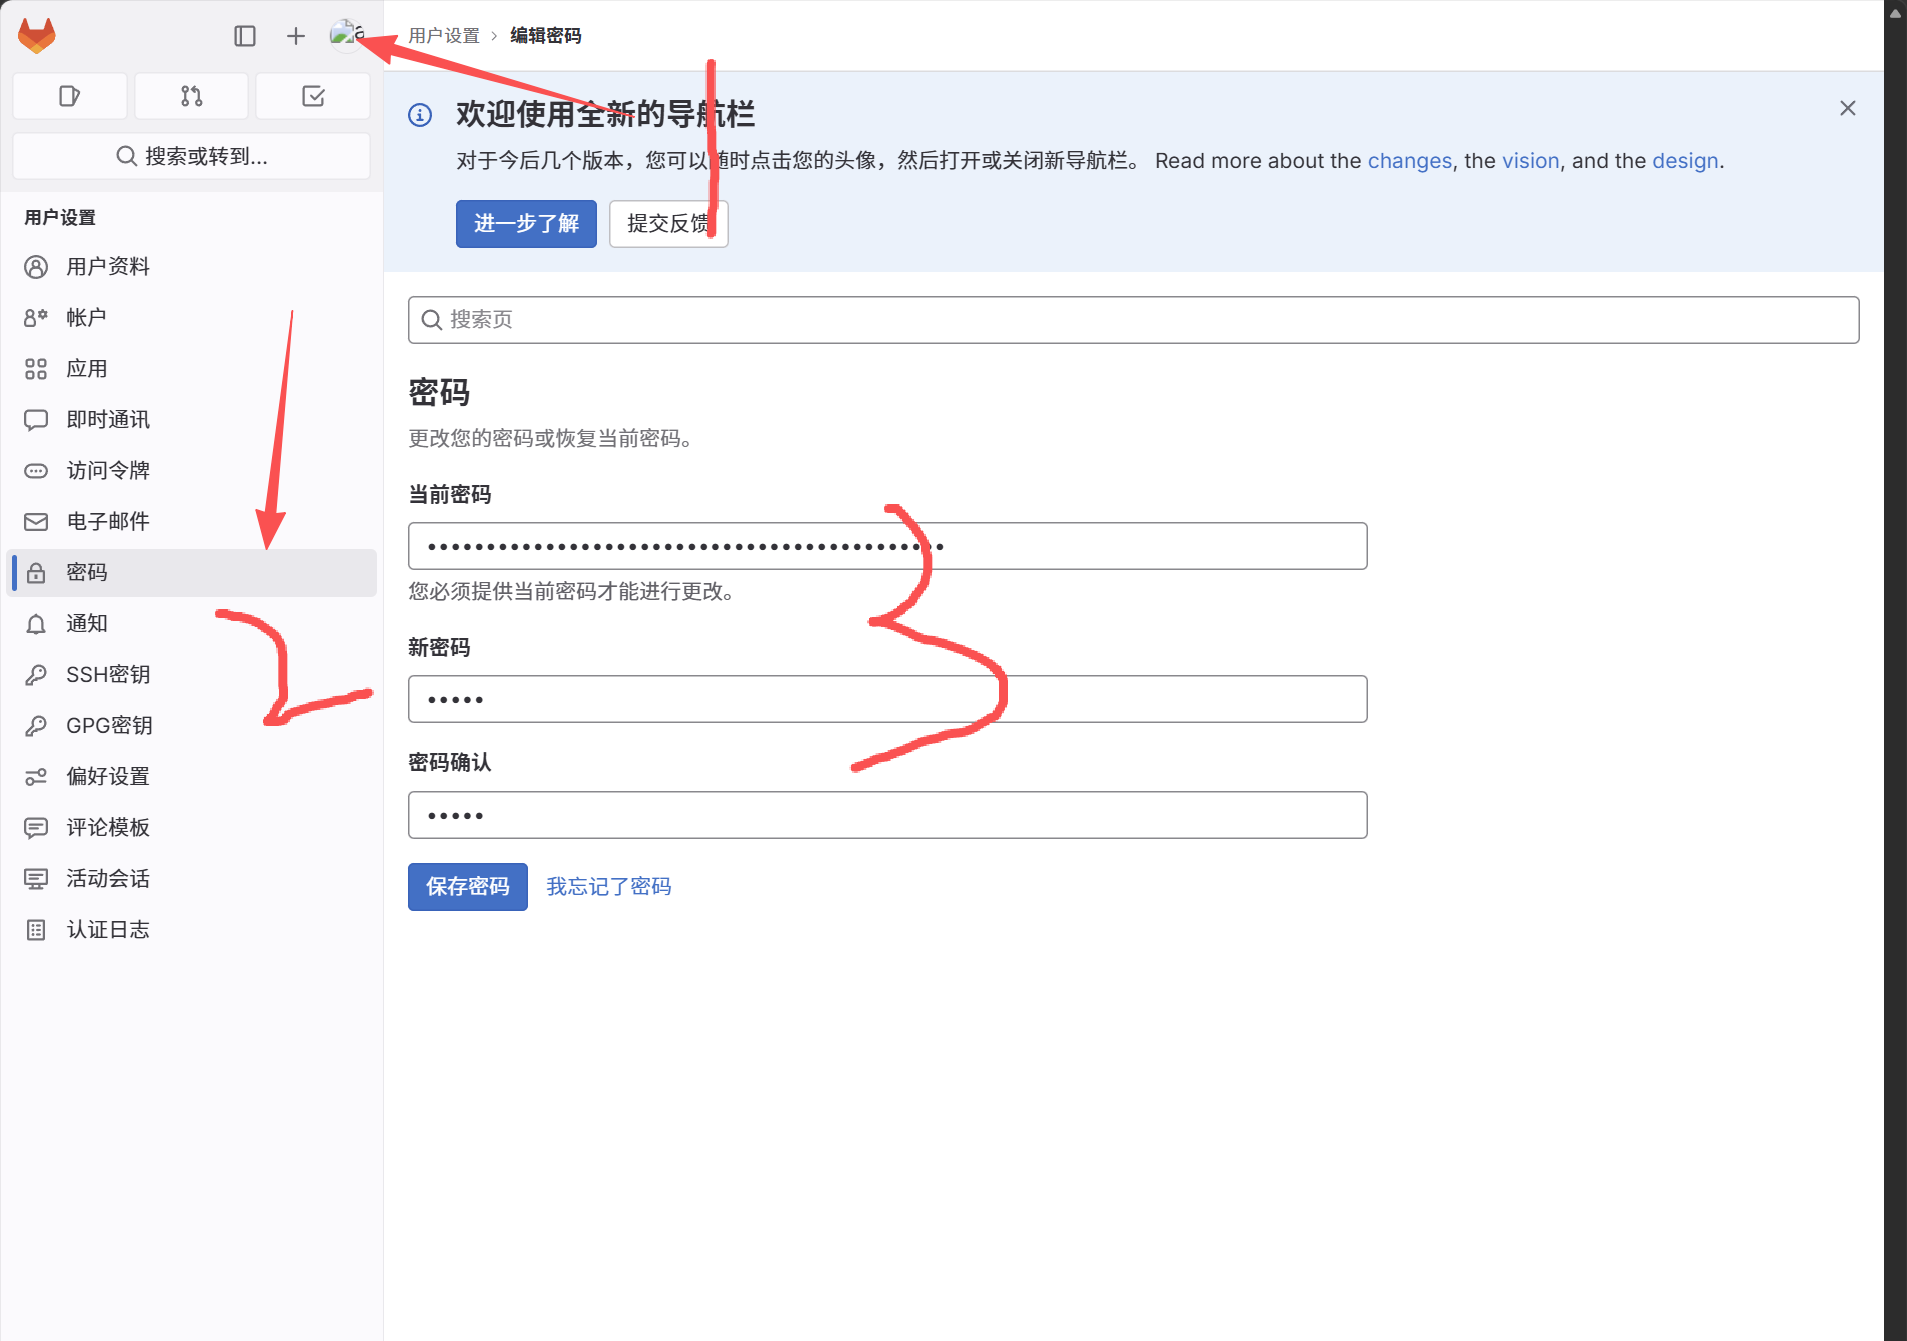
4.停用注册
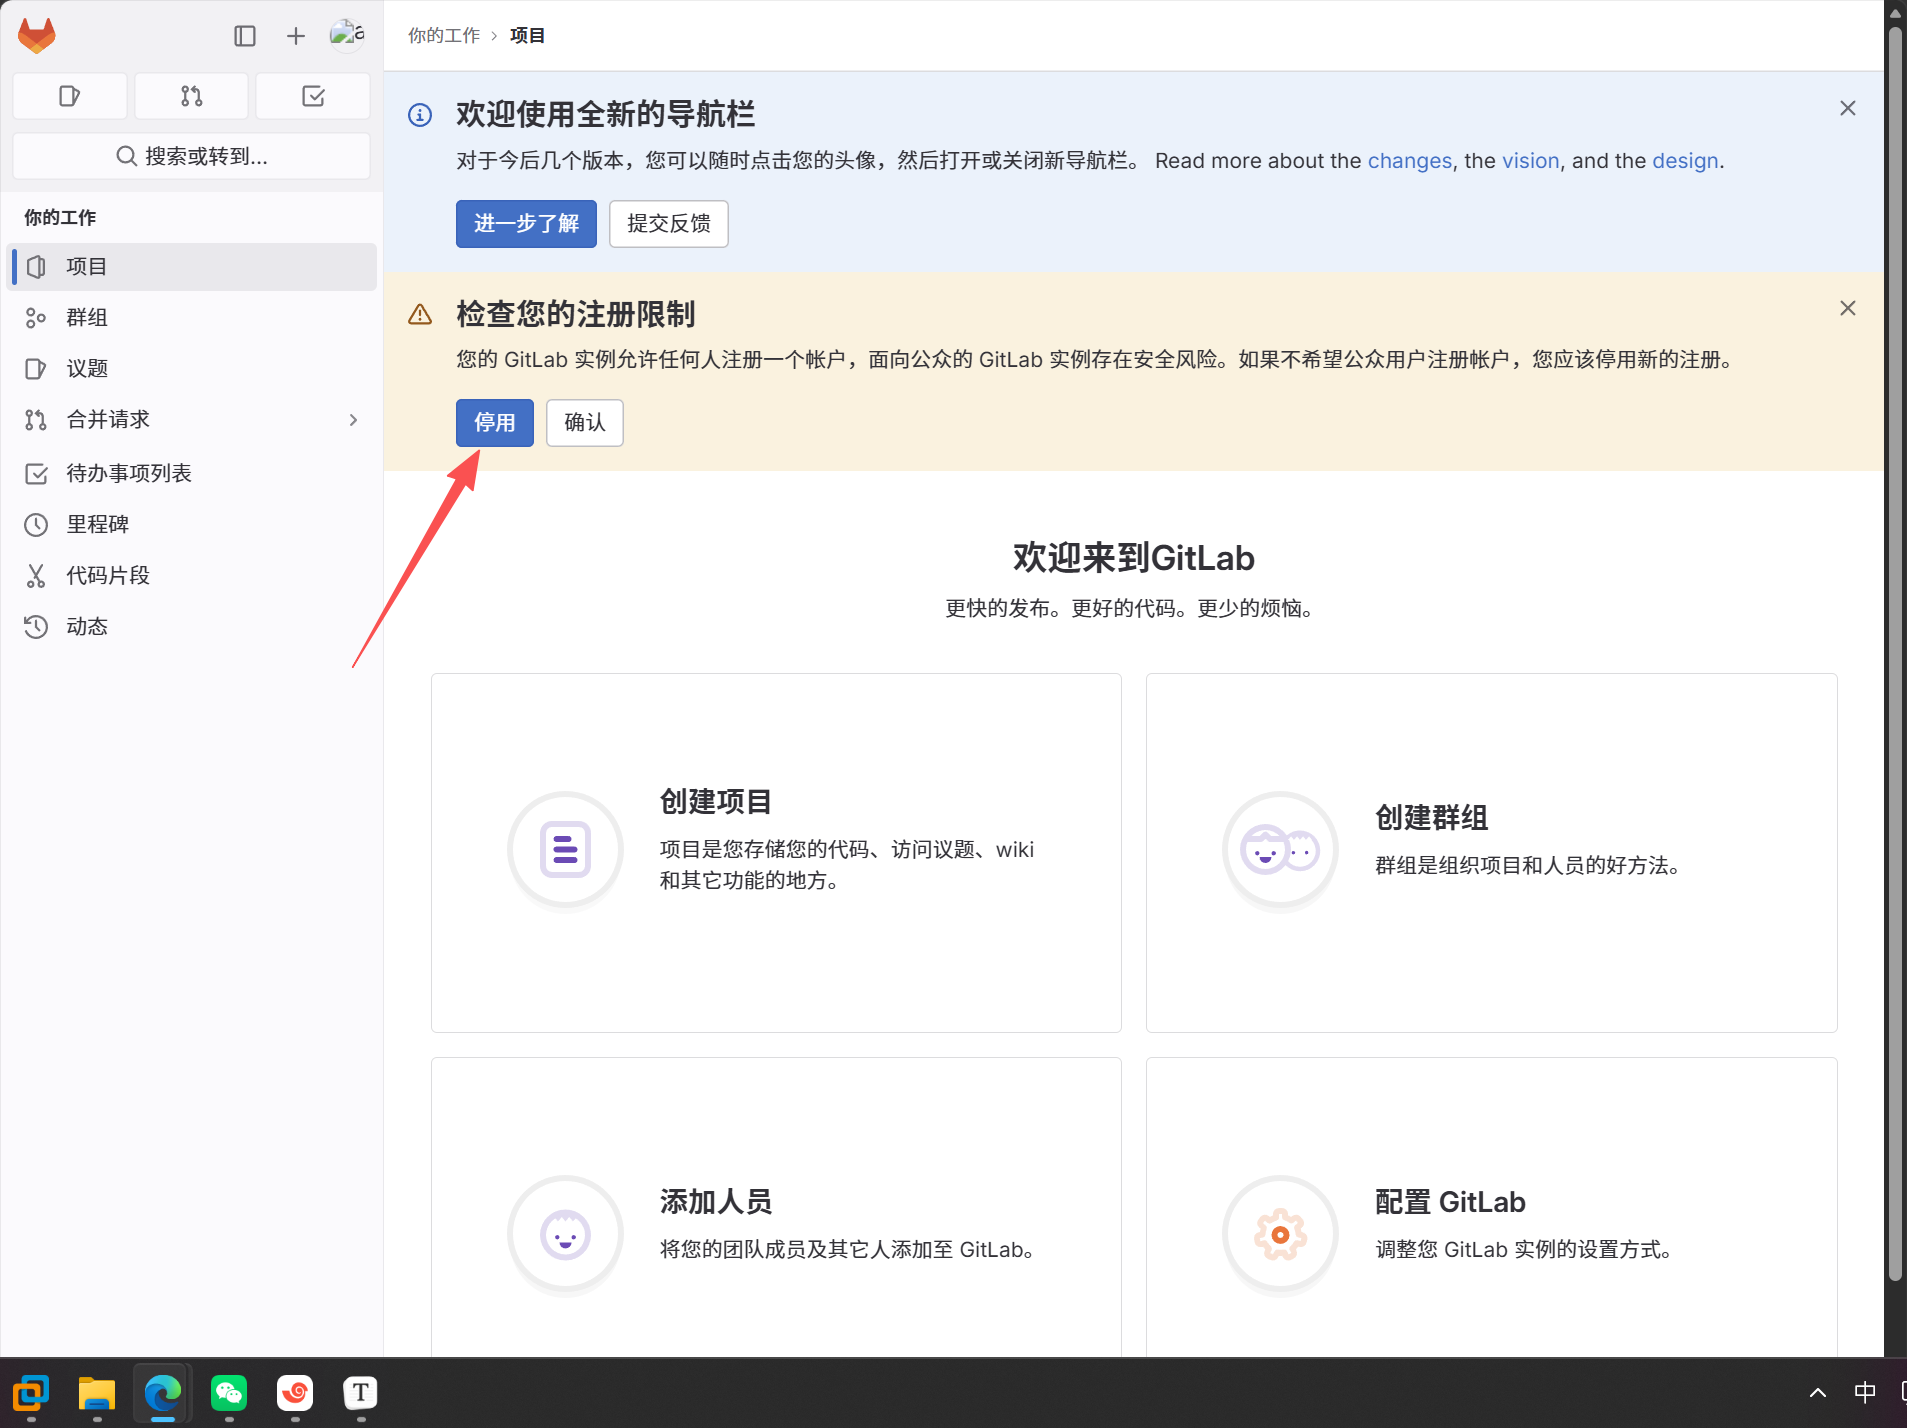
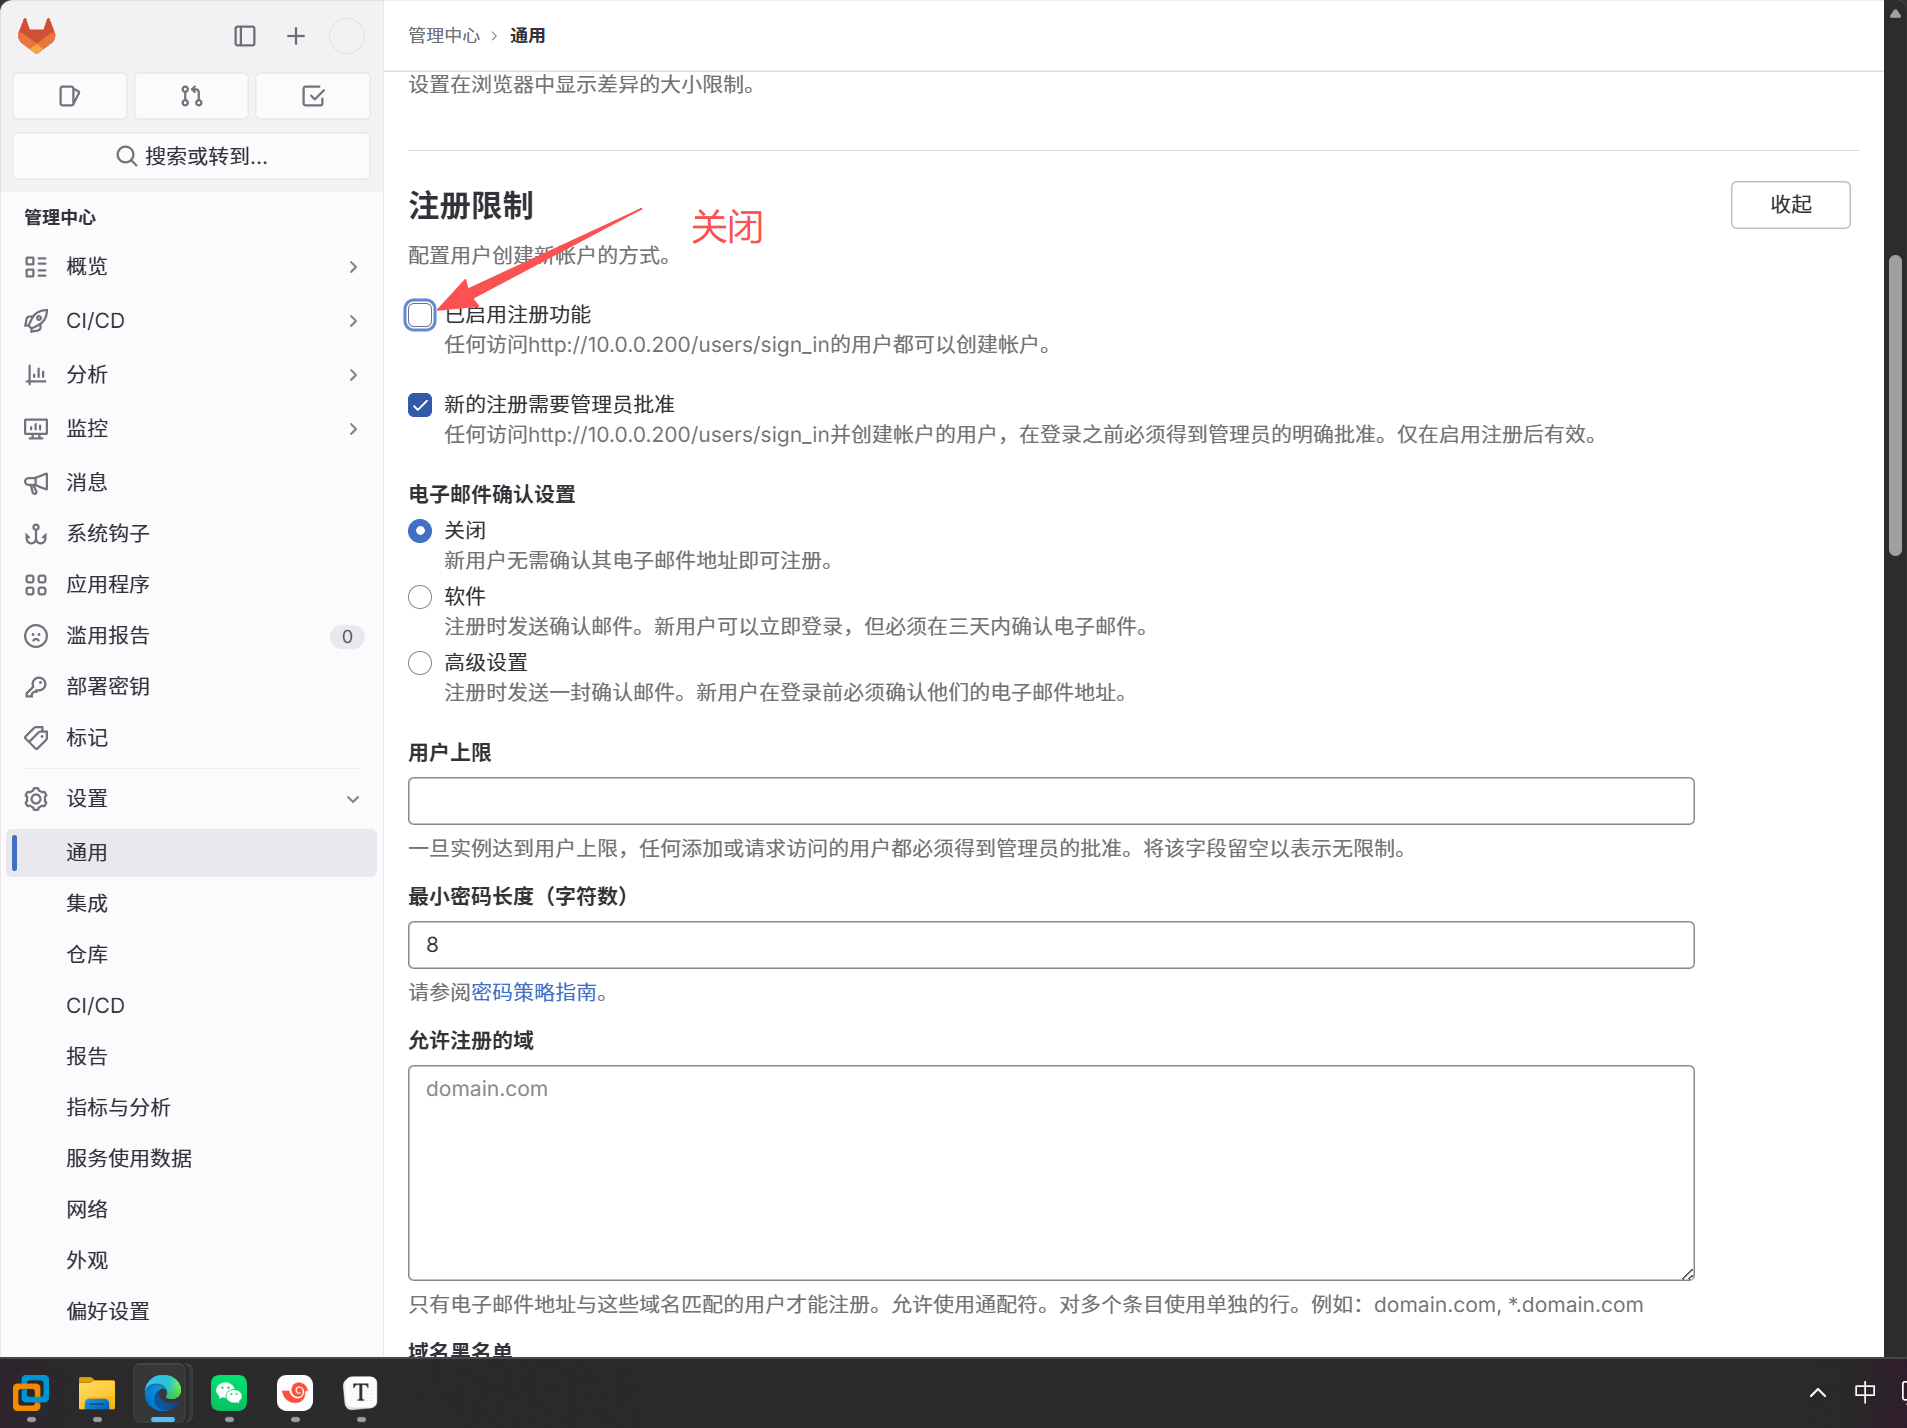
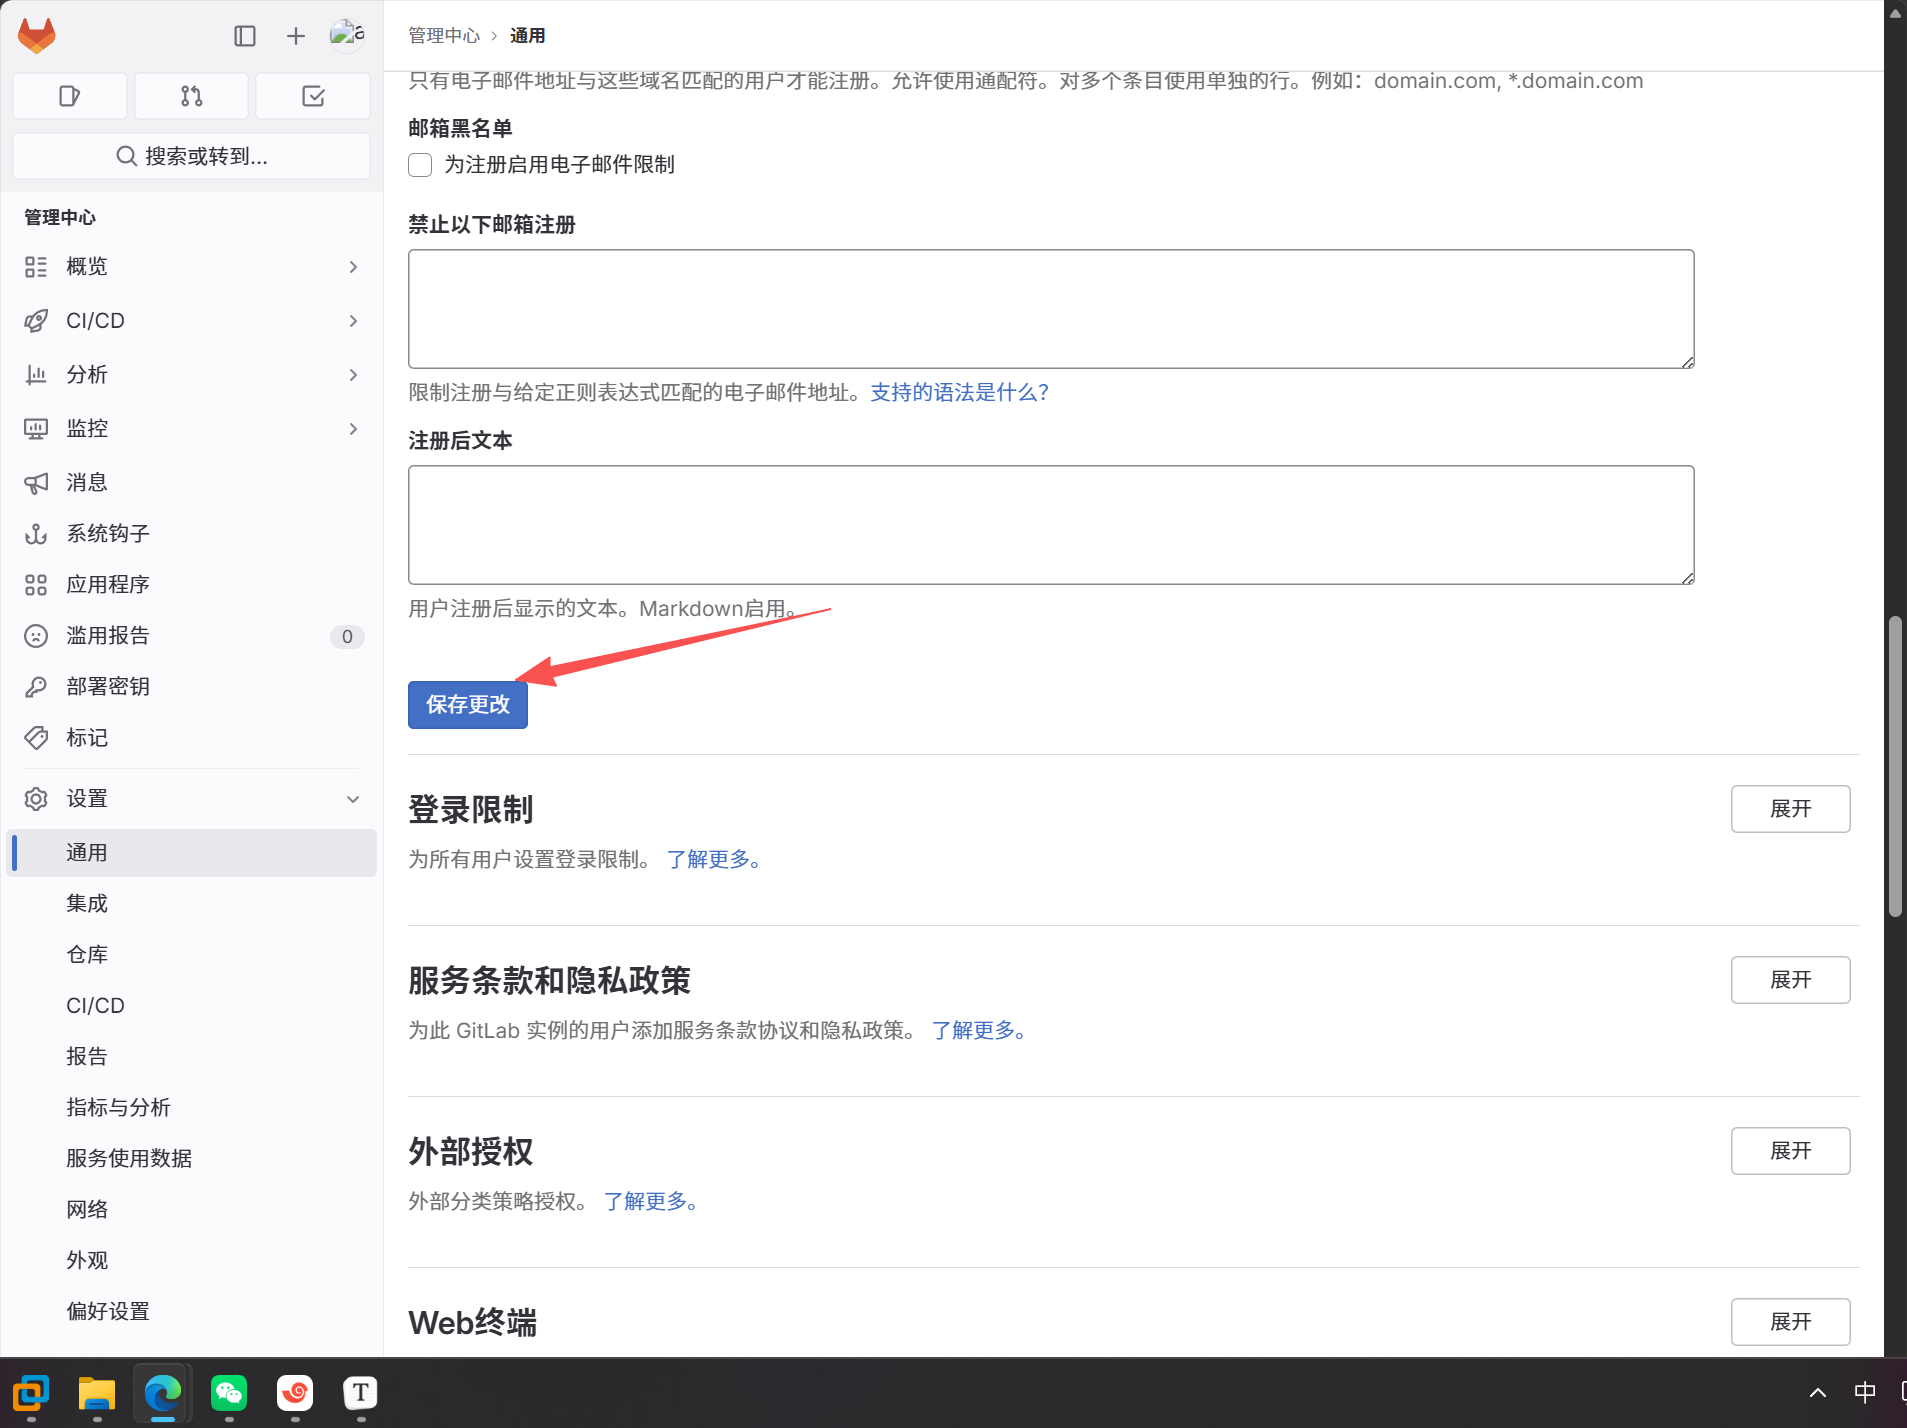
5.创建新的项目
第一种方式: 空的代码仓库,在gitlab创建代码仓库,然后拉取到本地服务器
第二种方式: 已经存在的代码仓库,需要配置远程仓库,然后将本地仓库中的代码推送到远程服务器
第一种方式:
空的代码仓库,在gitlab创建代码仓库,然后拉取到本地服务器
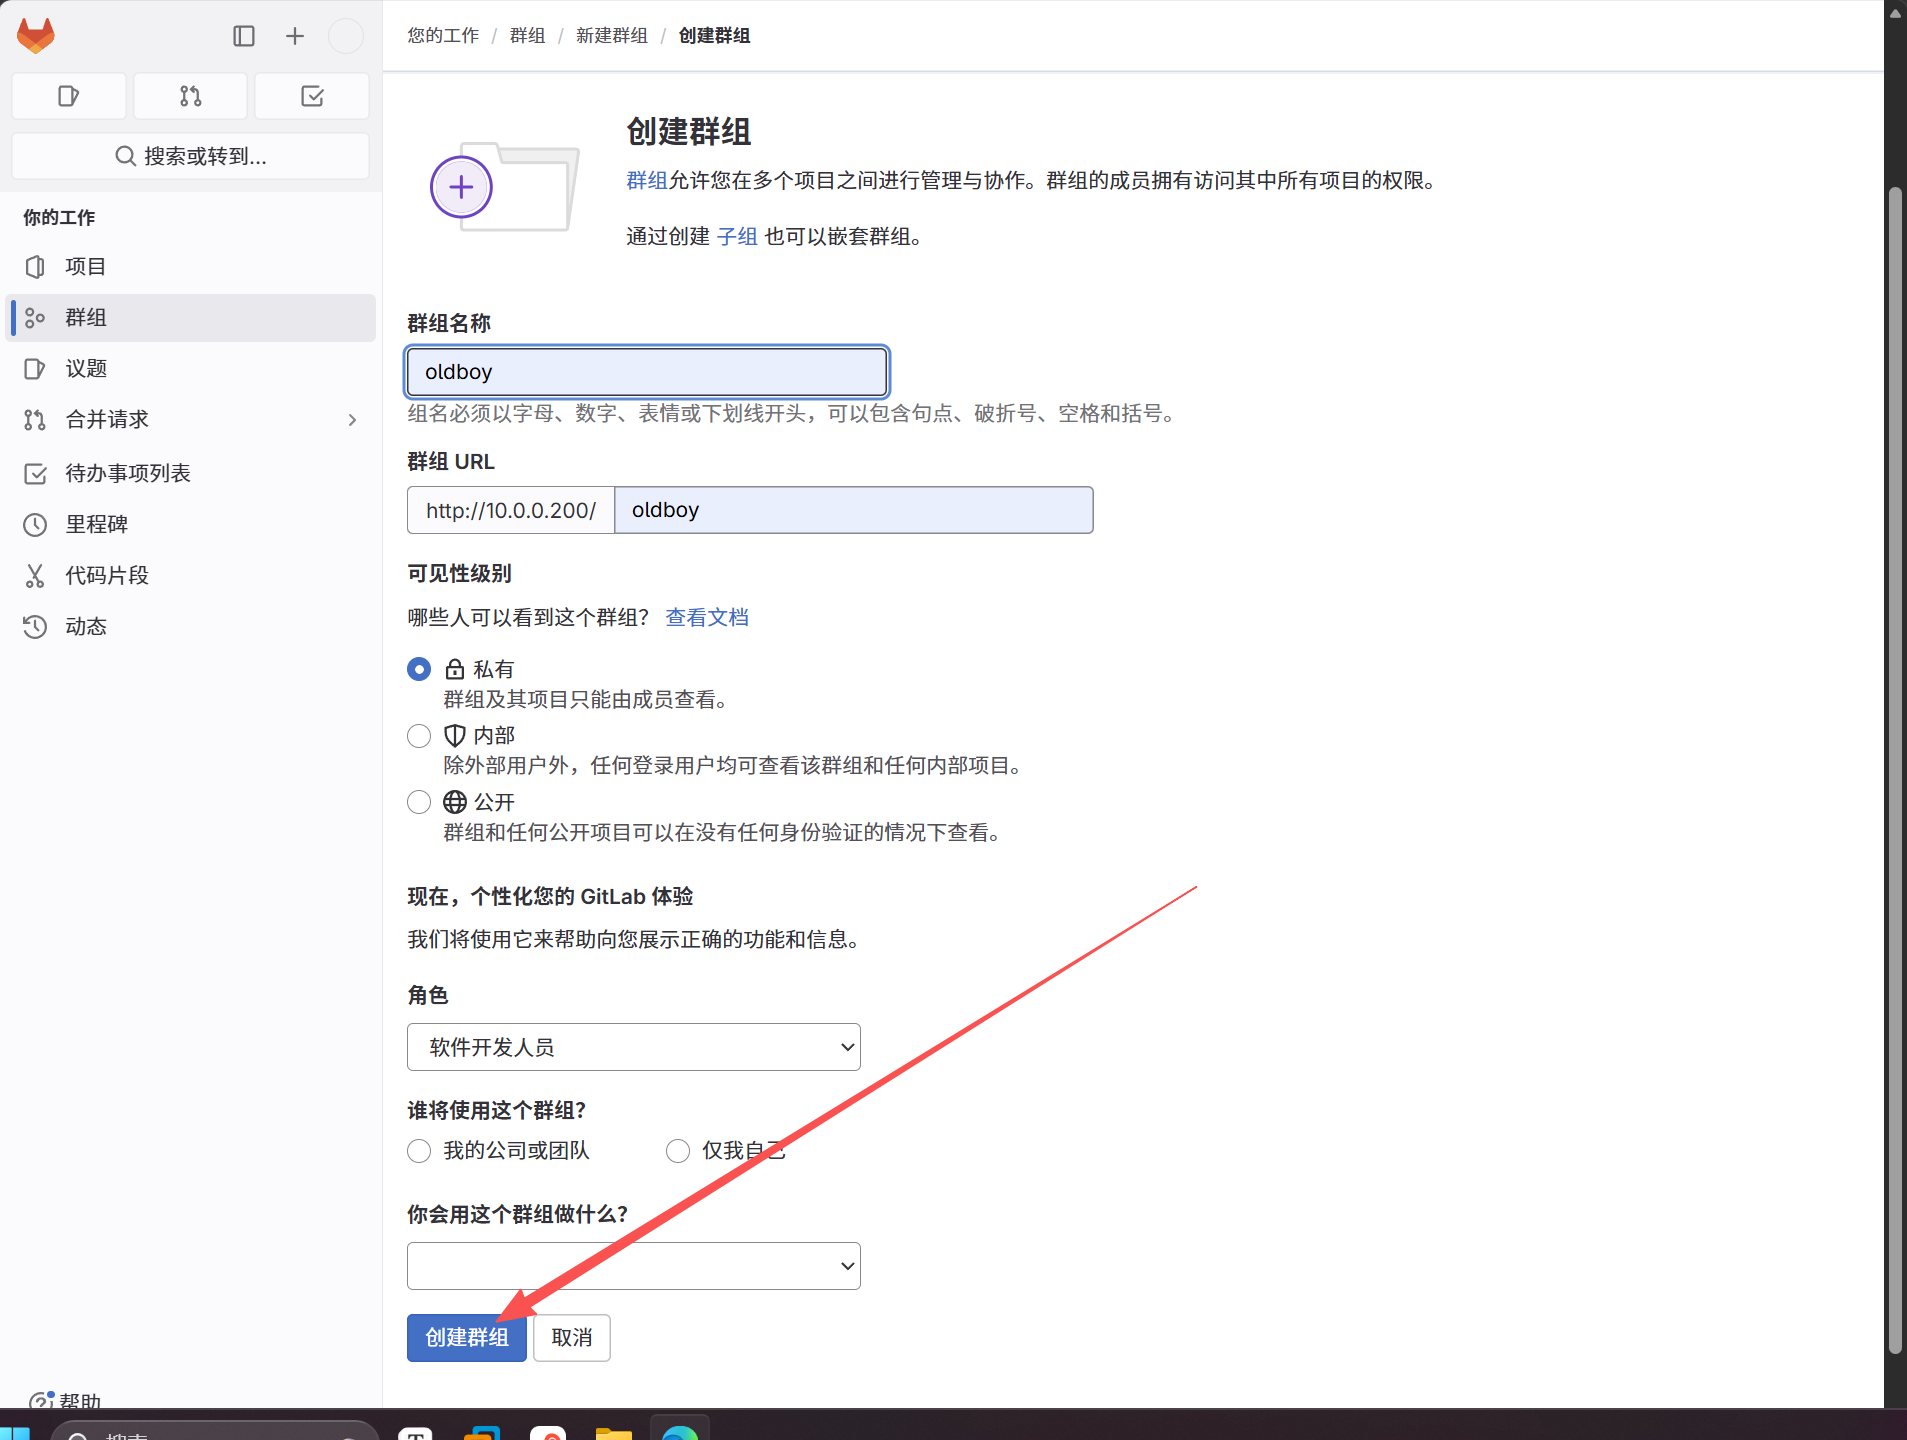
先创建群组
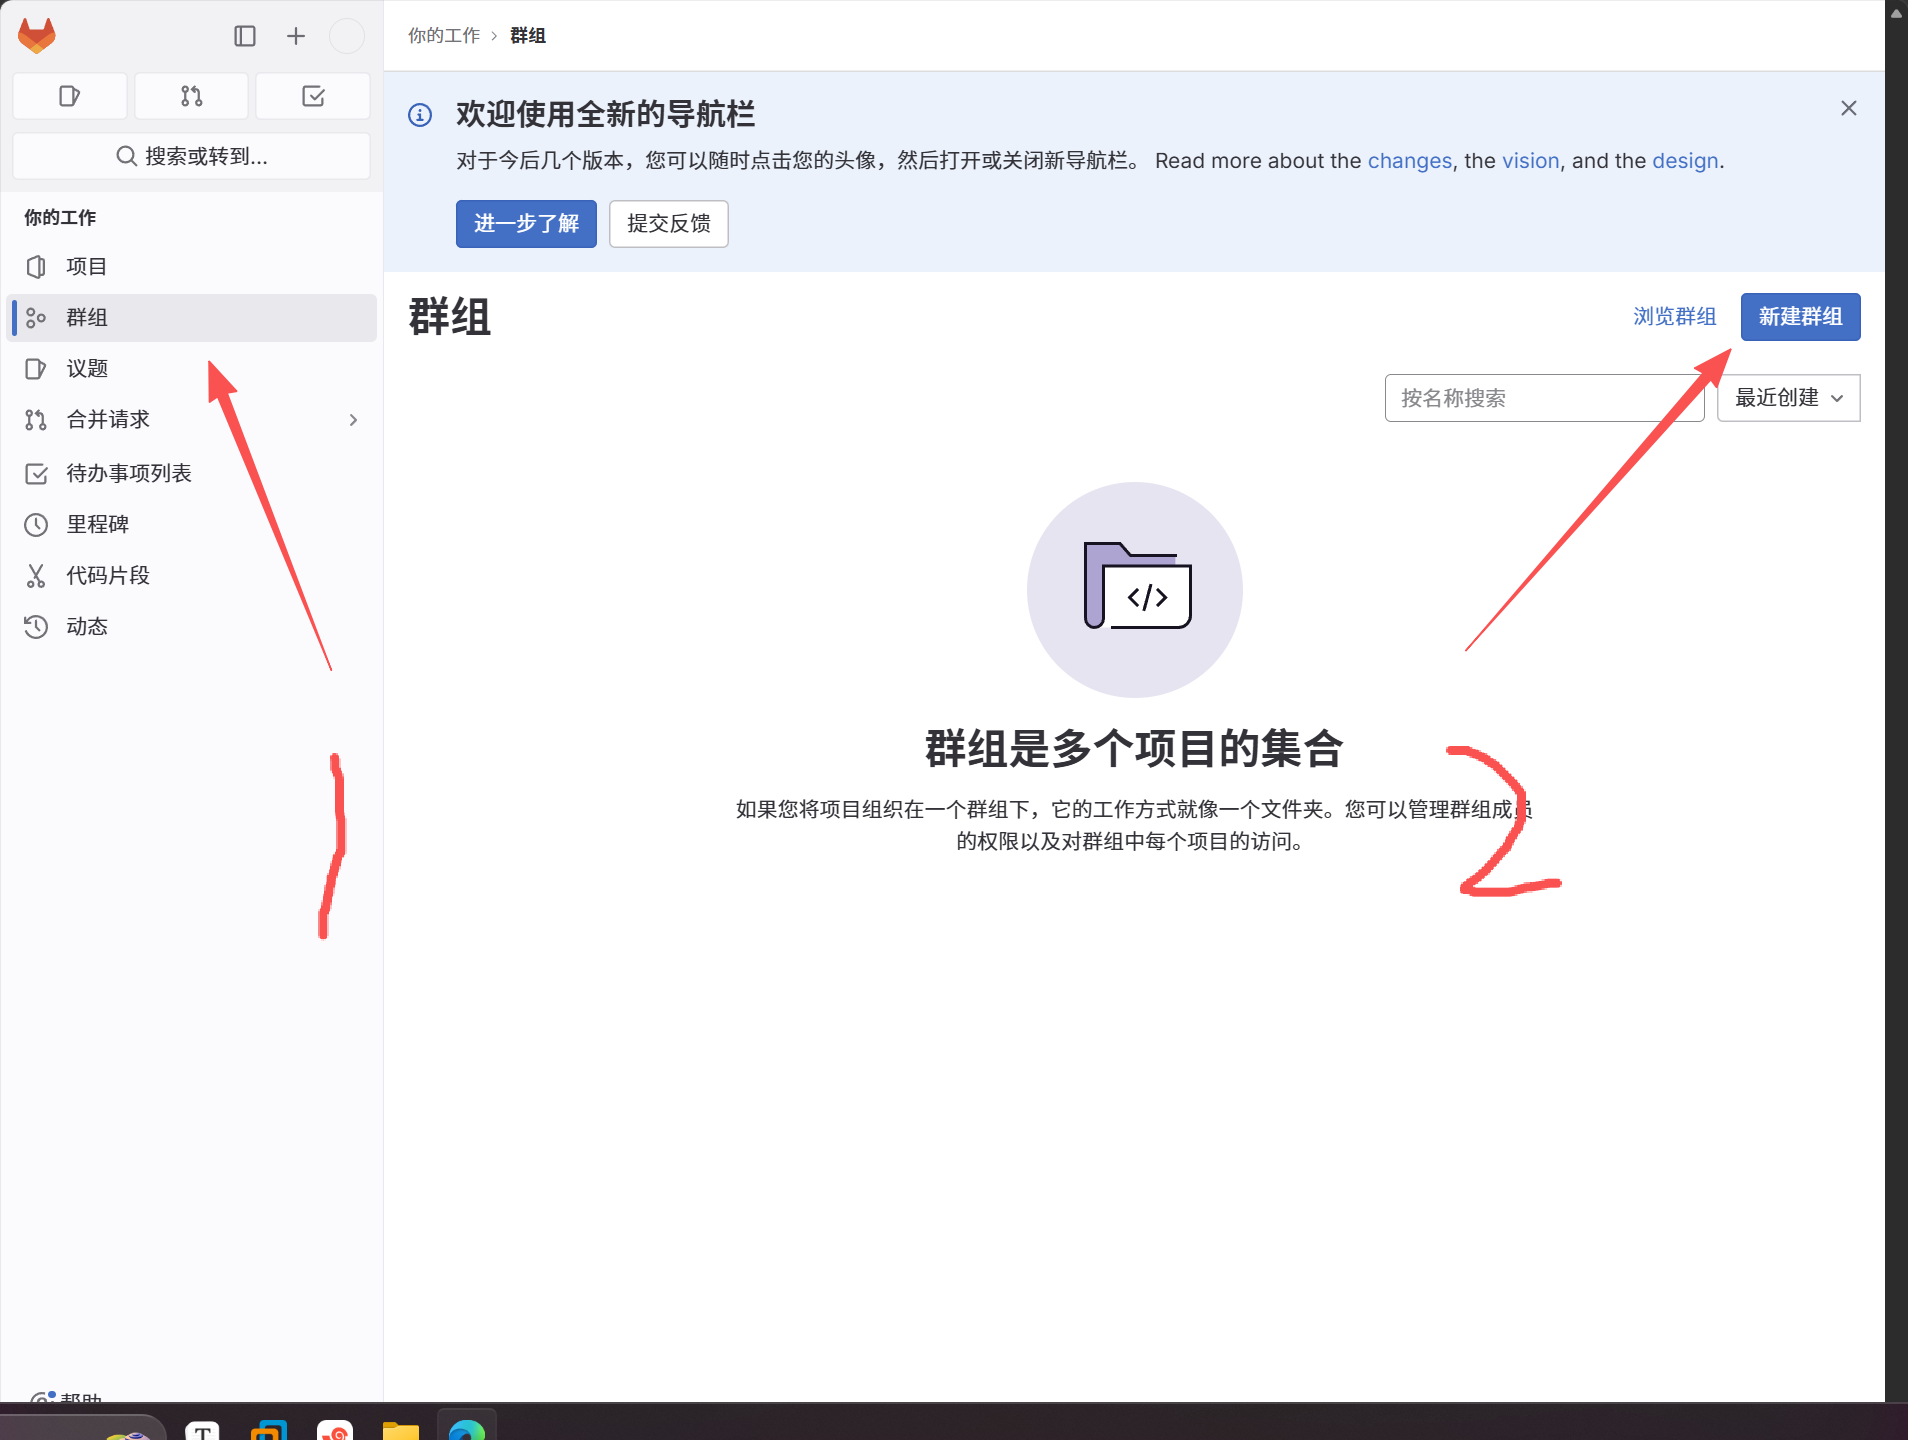
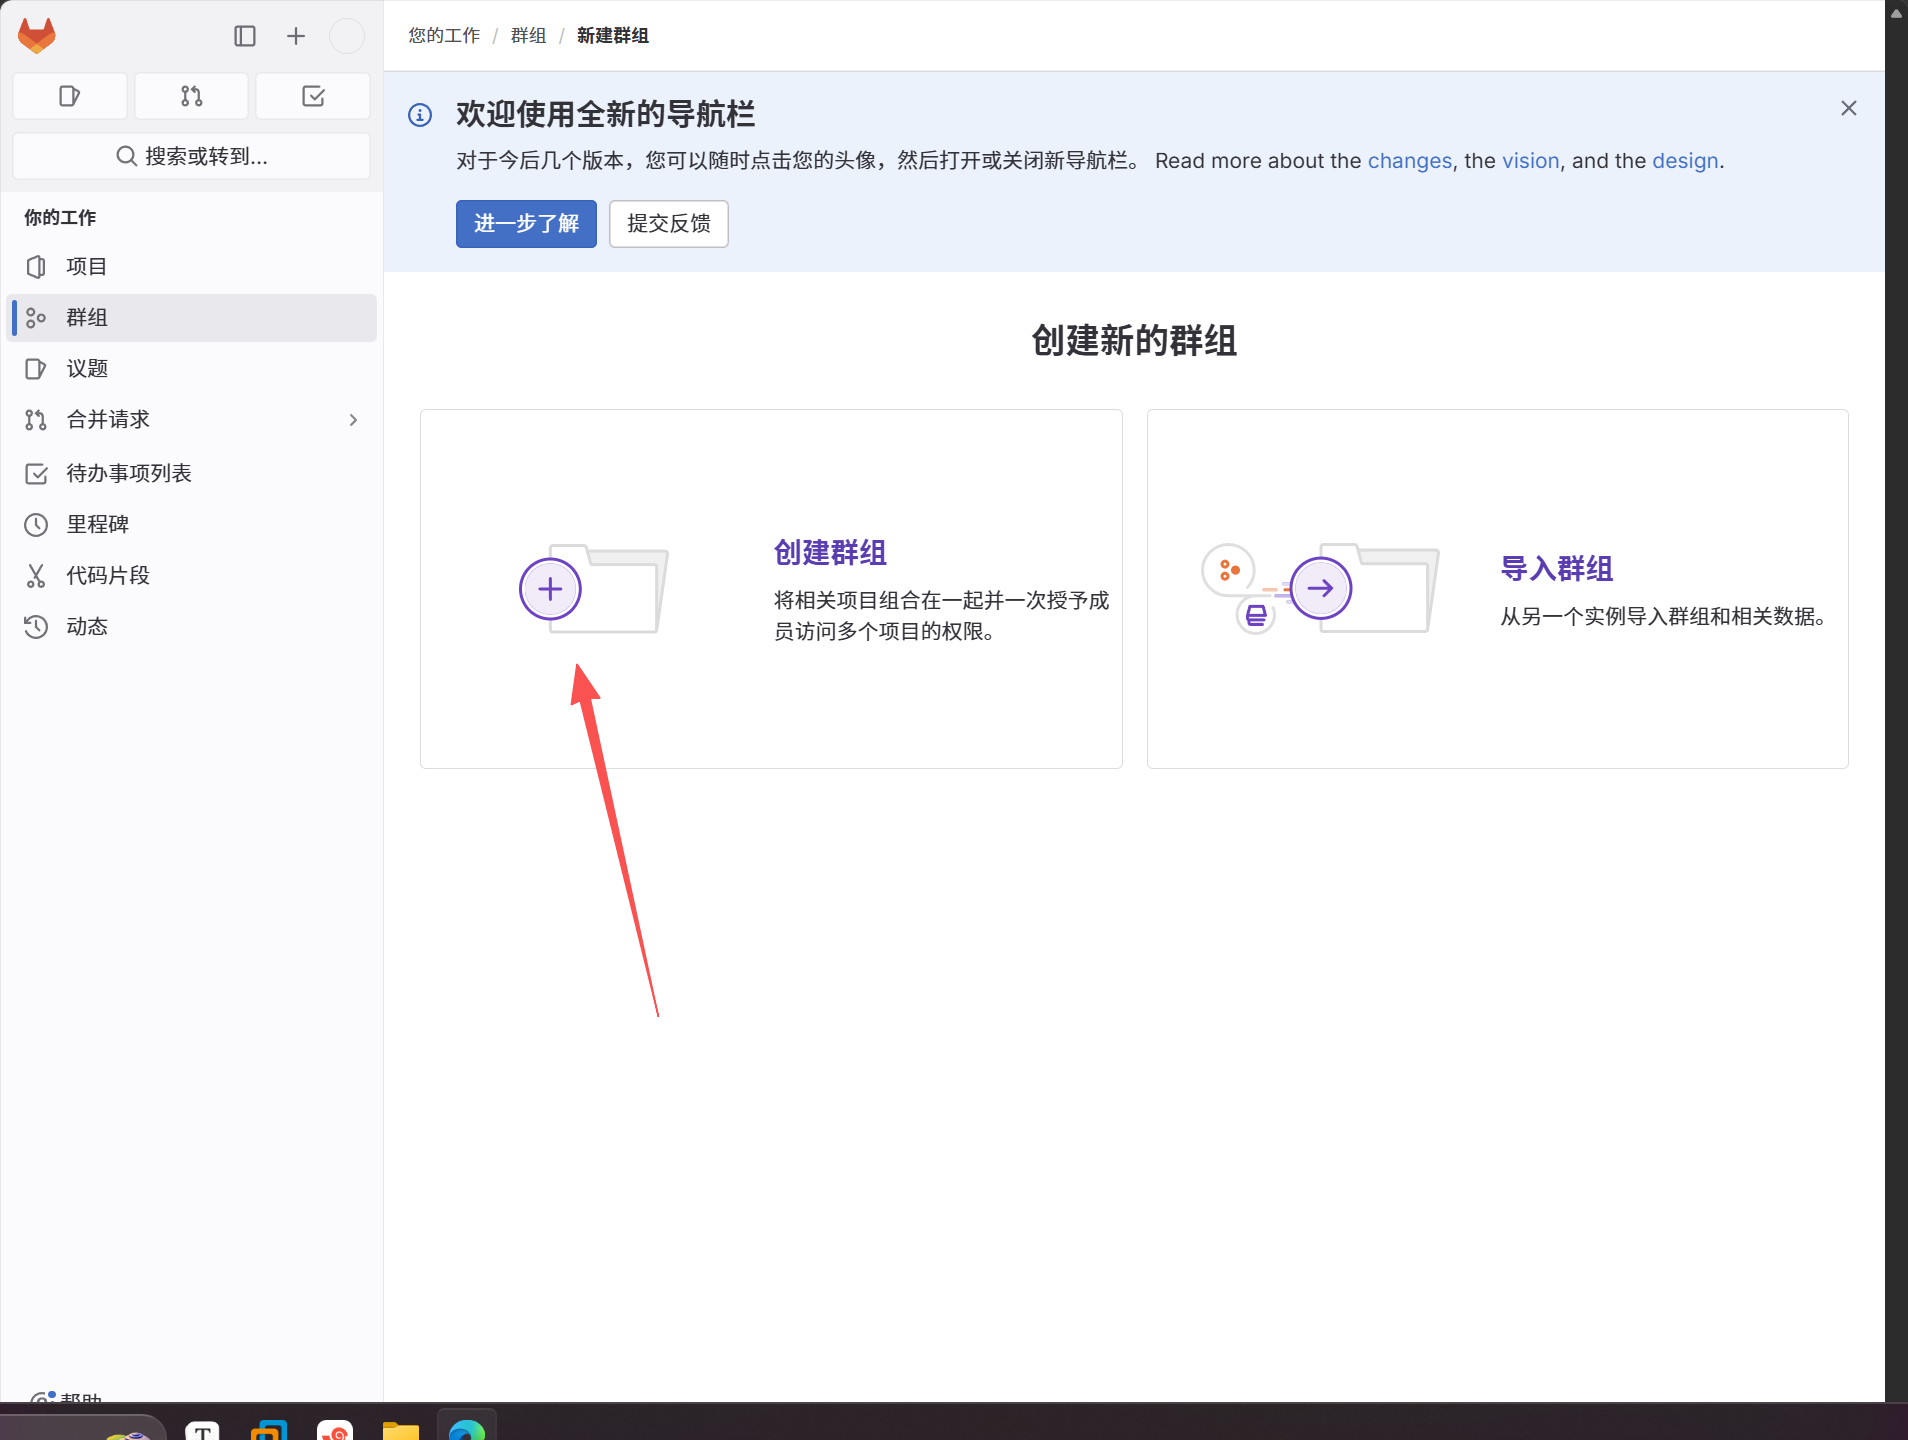
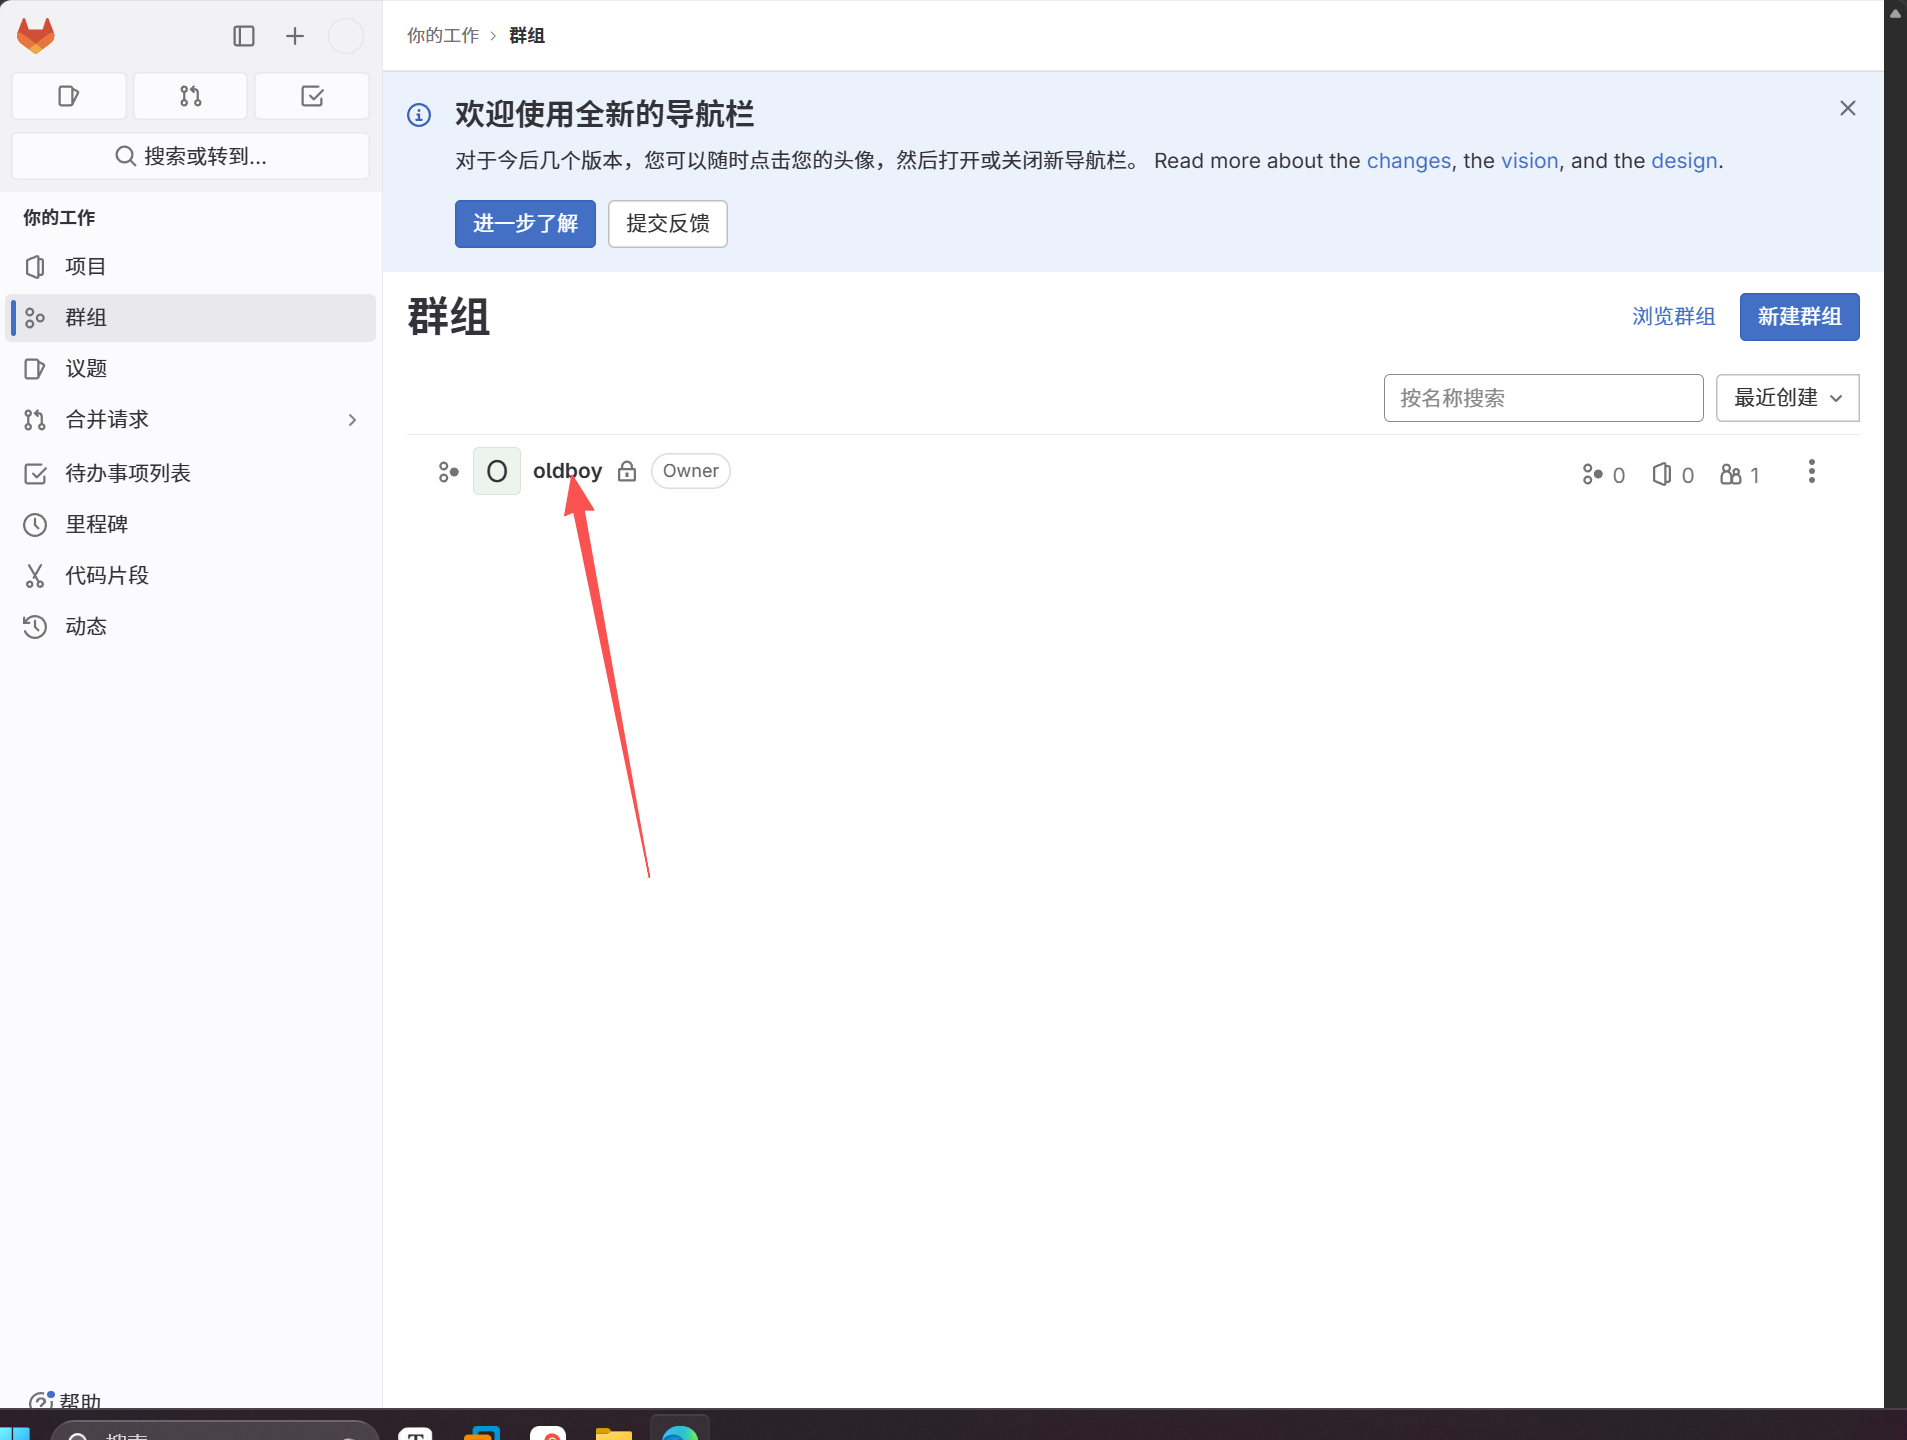
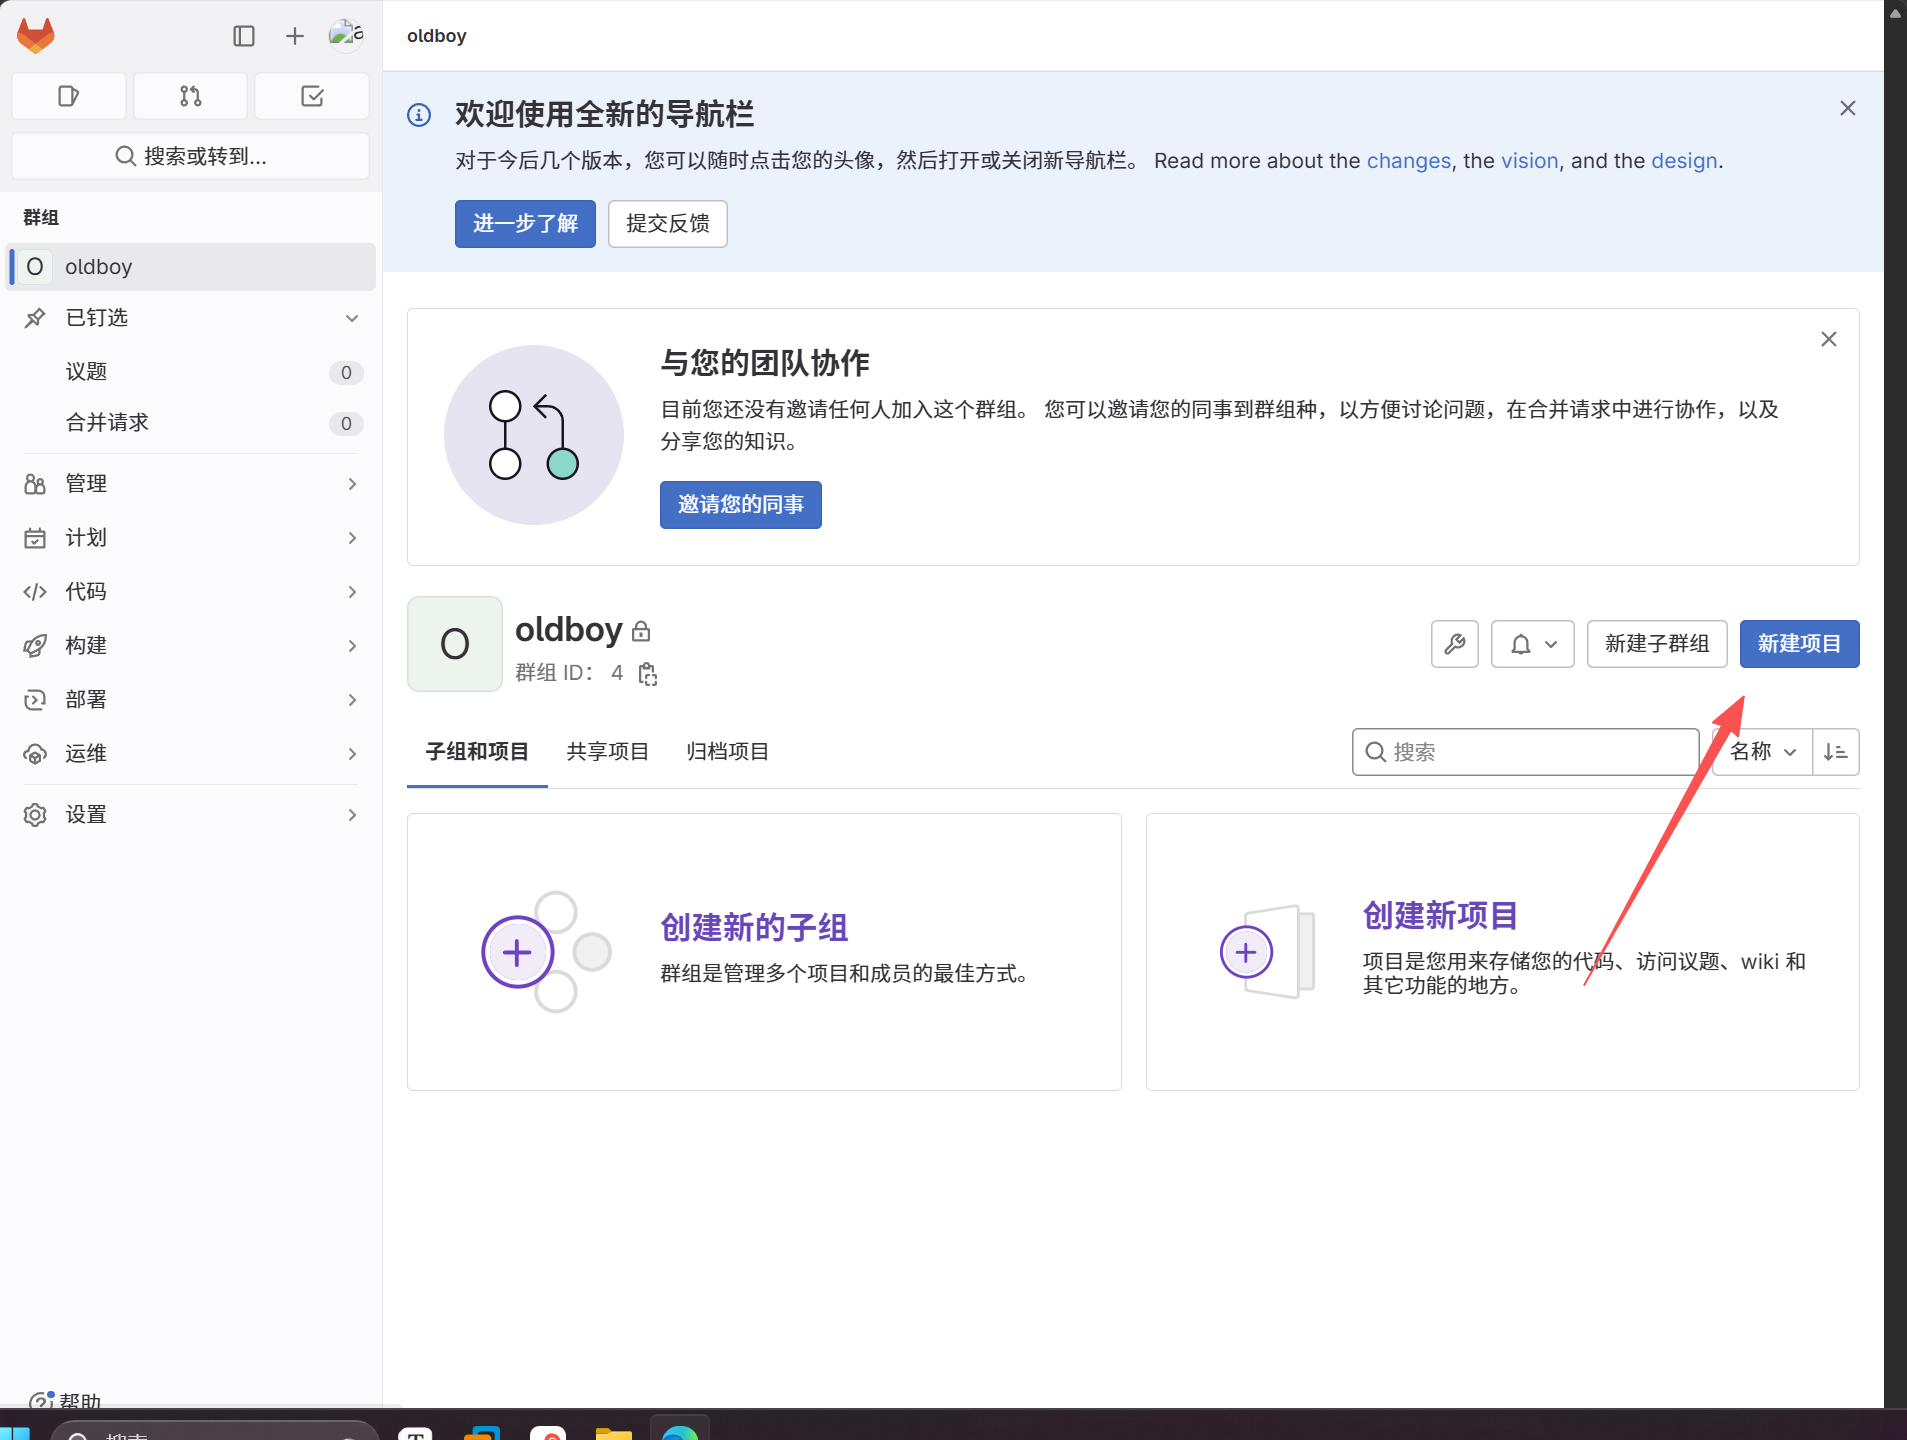
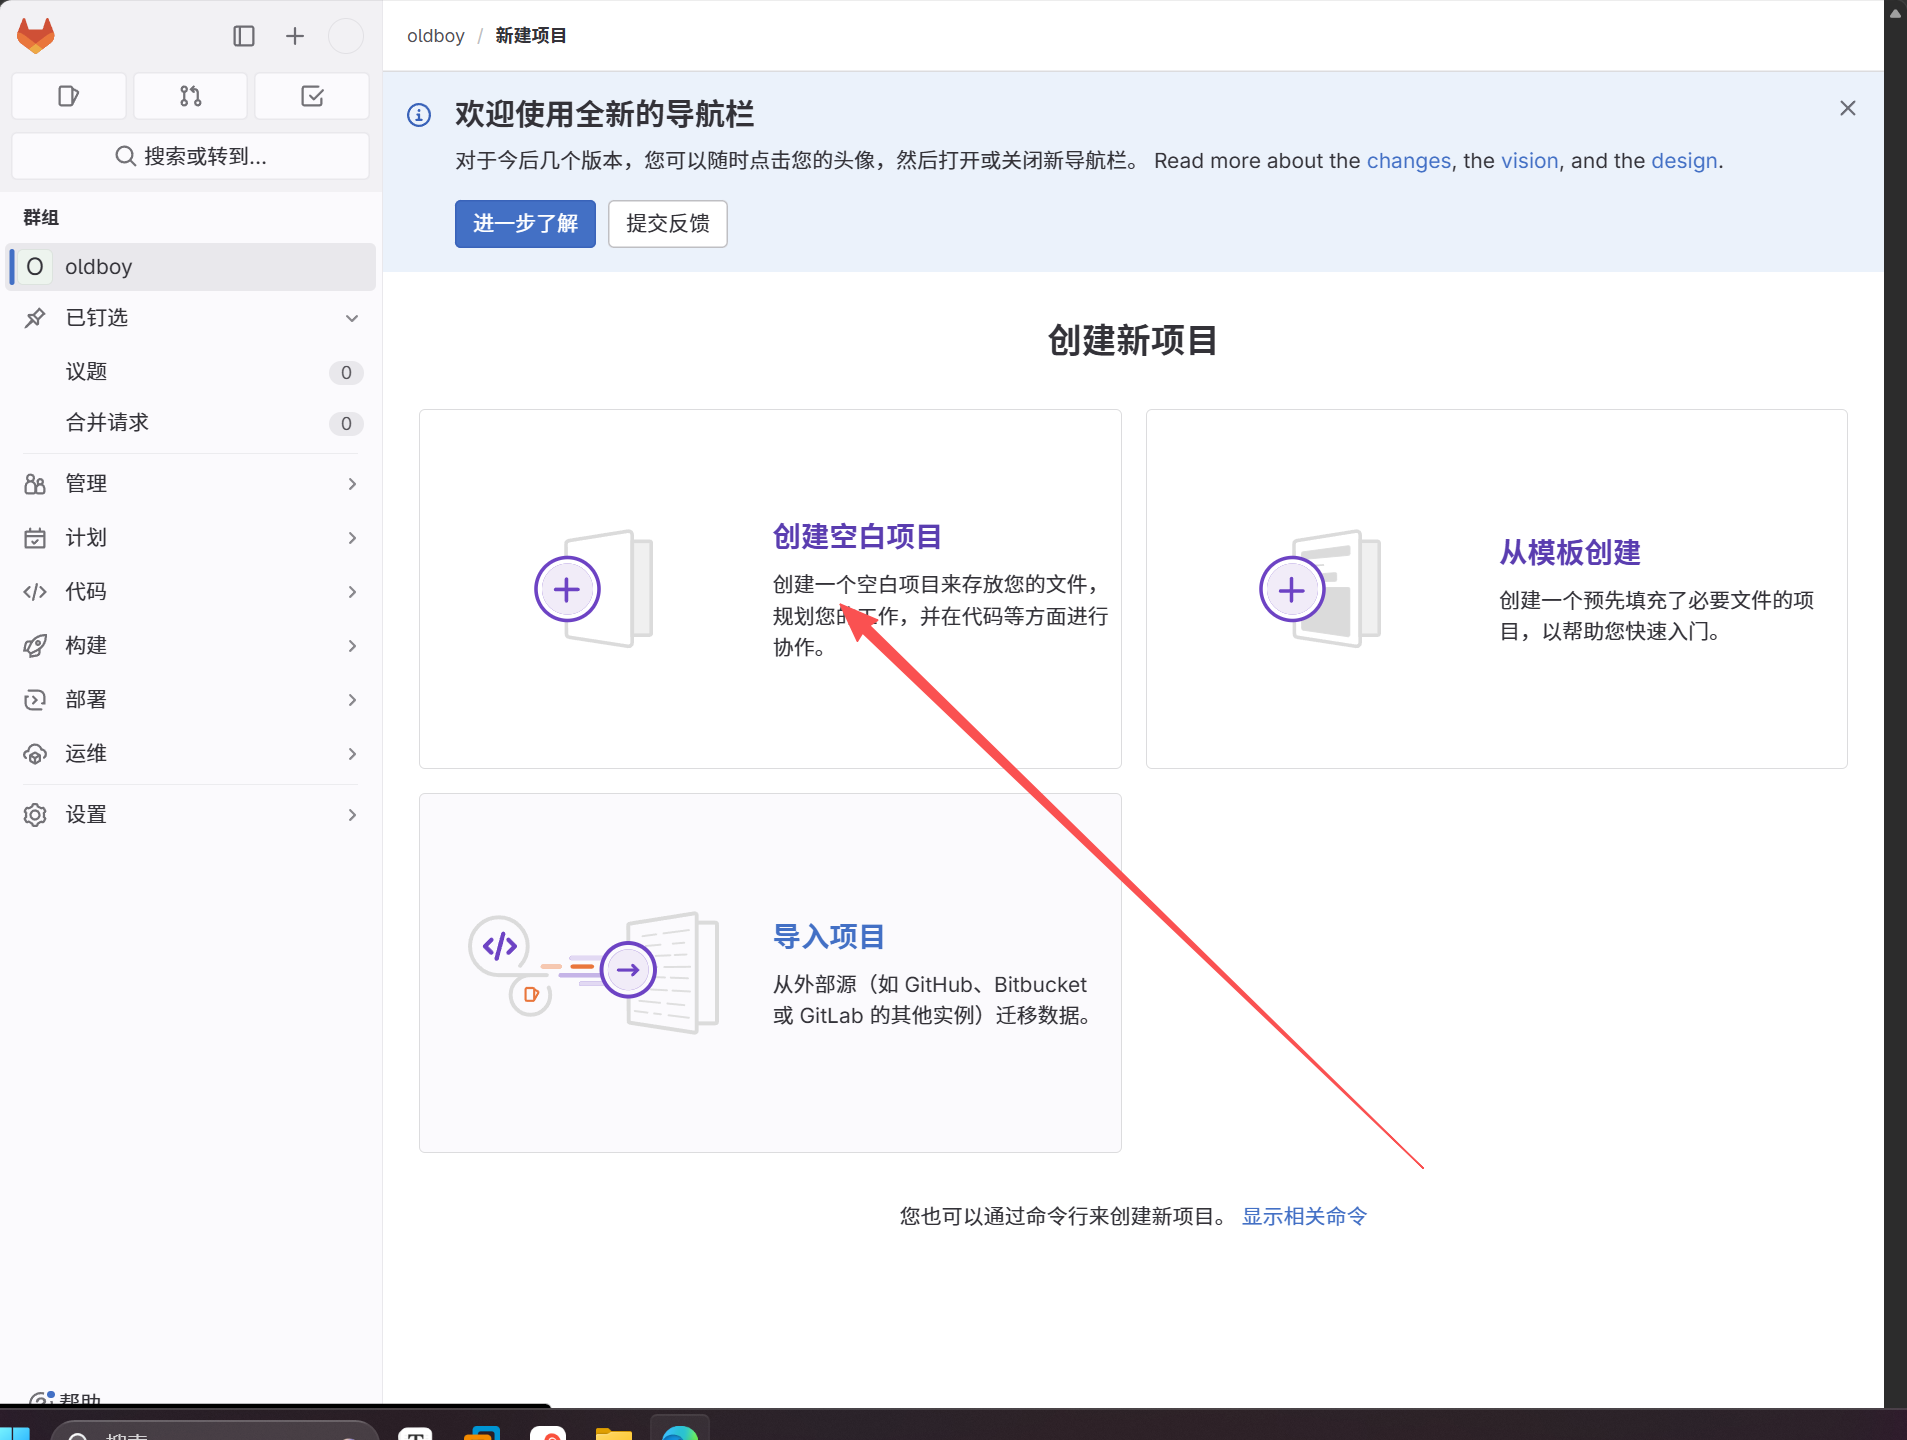
然后创建仓库
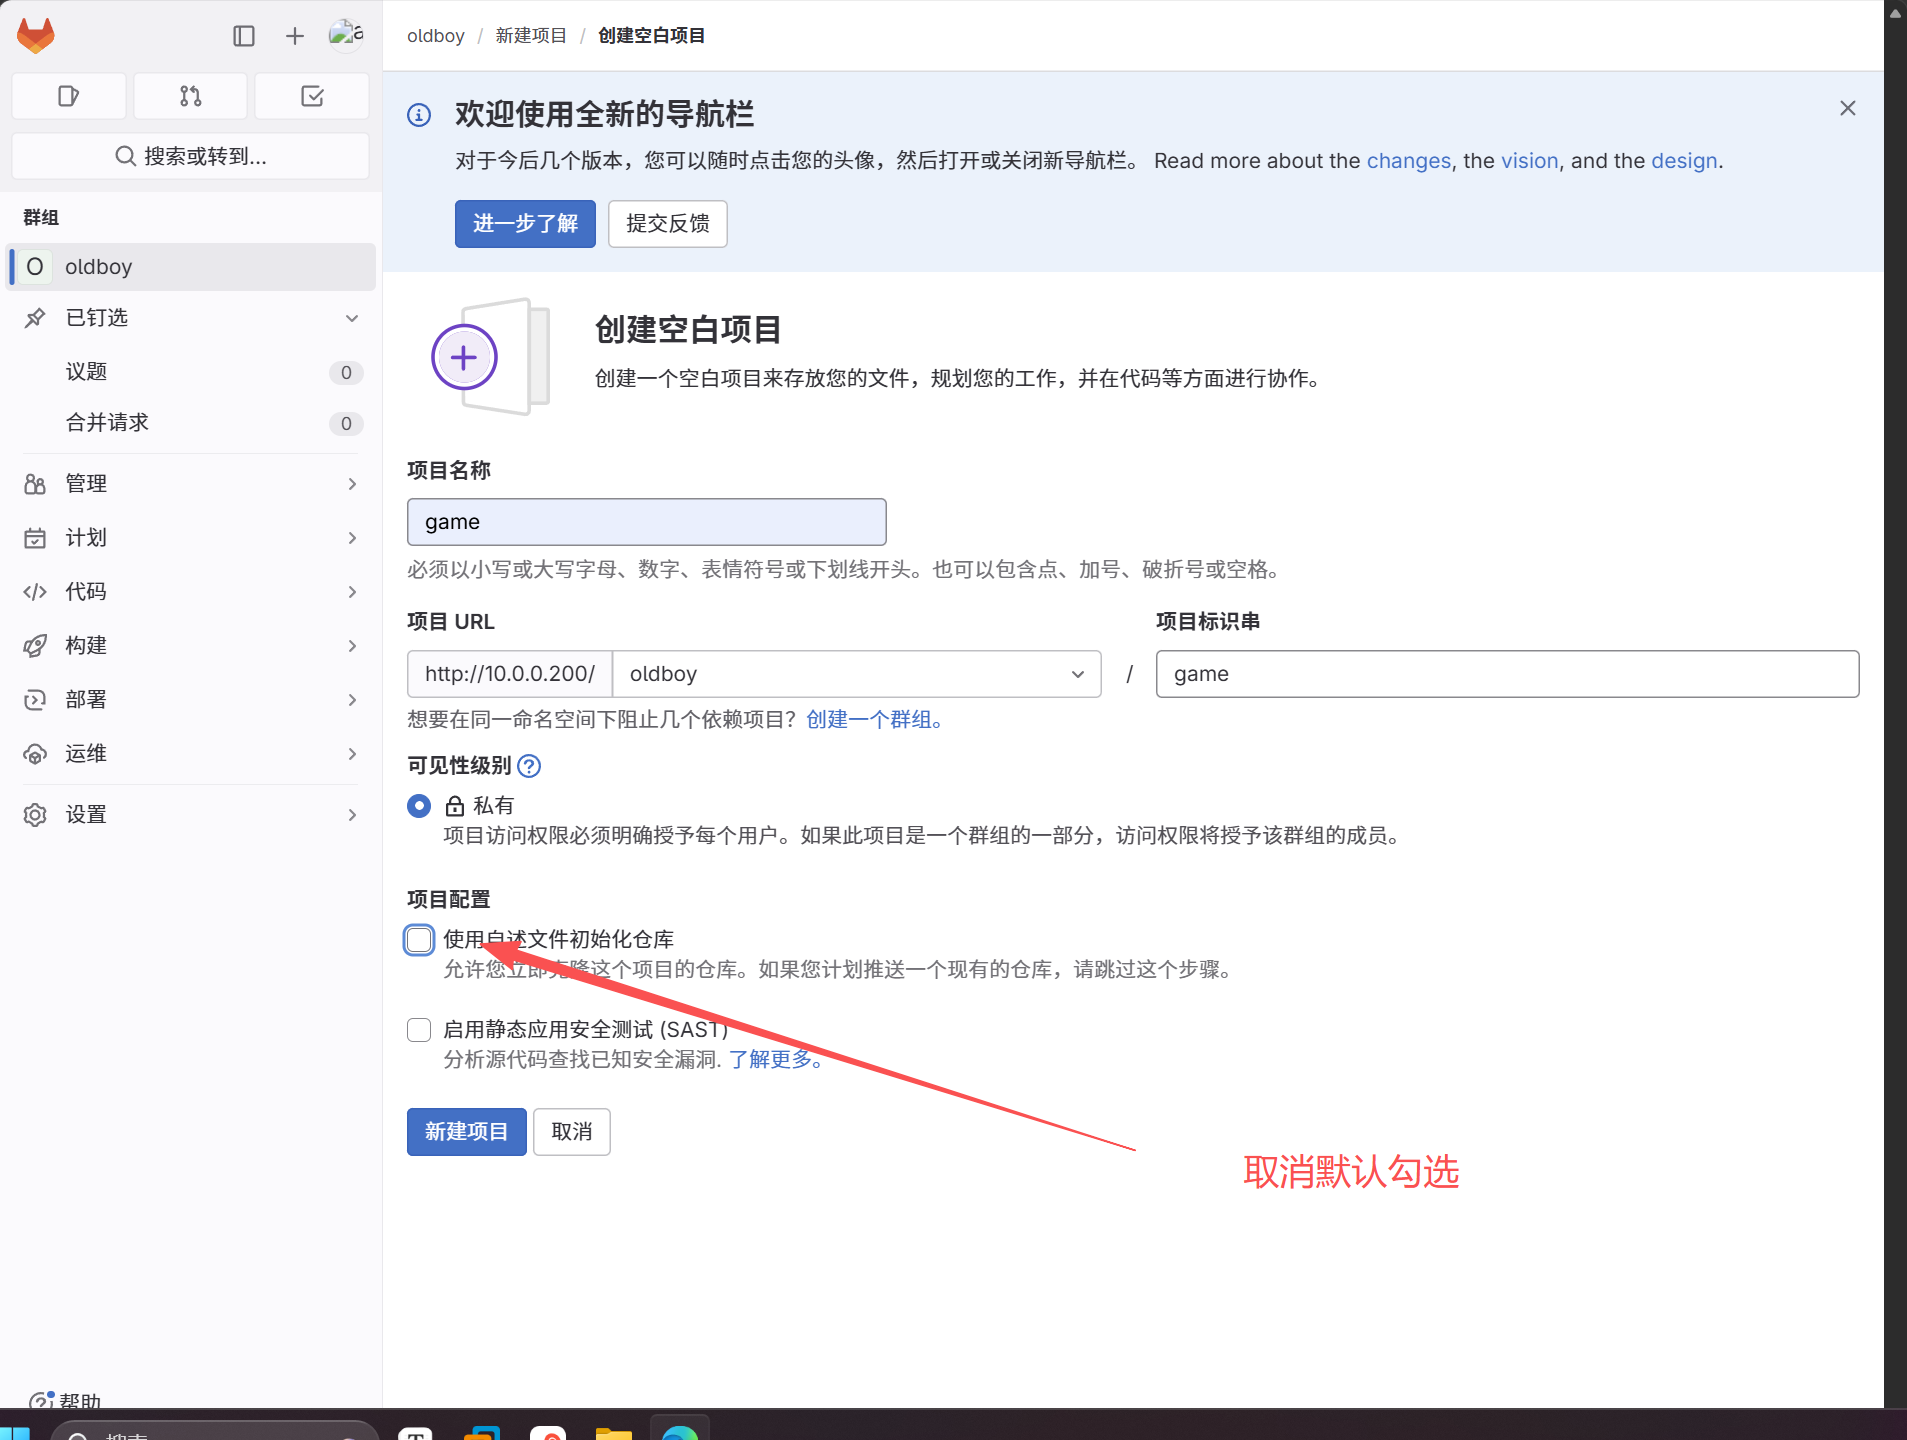
6.打通系统的gitlab root账户的ssh免密钥
1.ubt生成密钥
root@Gitlab:~# ssh-keygen

2.将公钥复制gitlab的root账户下
cat /root/.ssh/id_rsa.pub
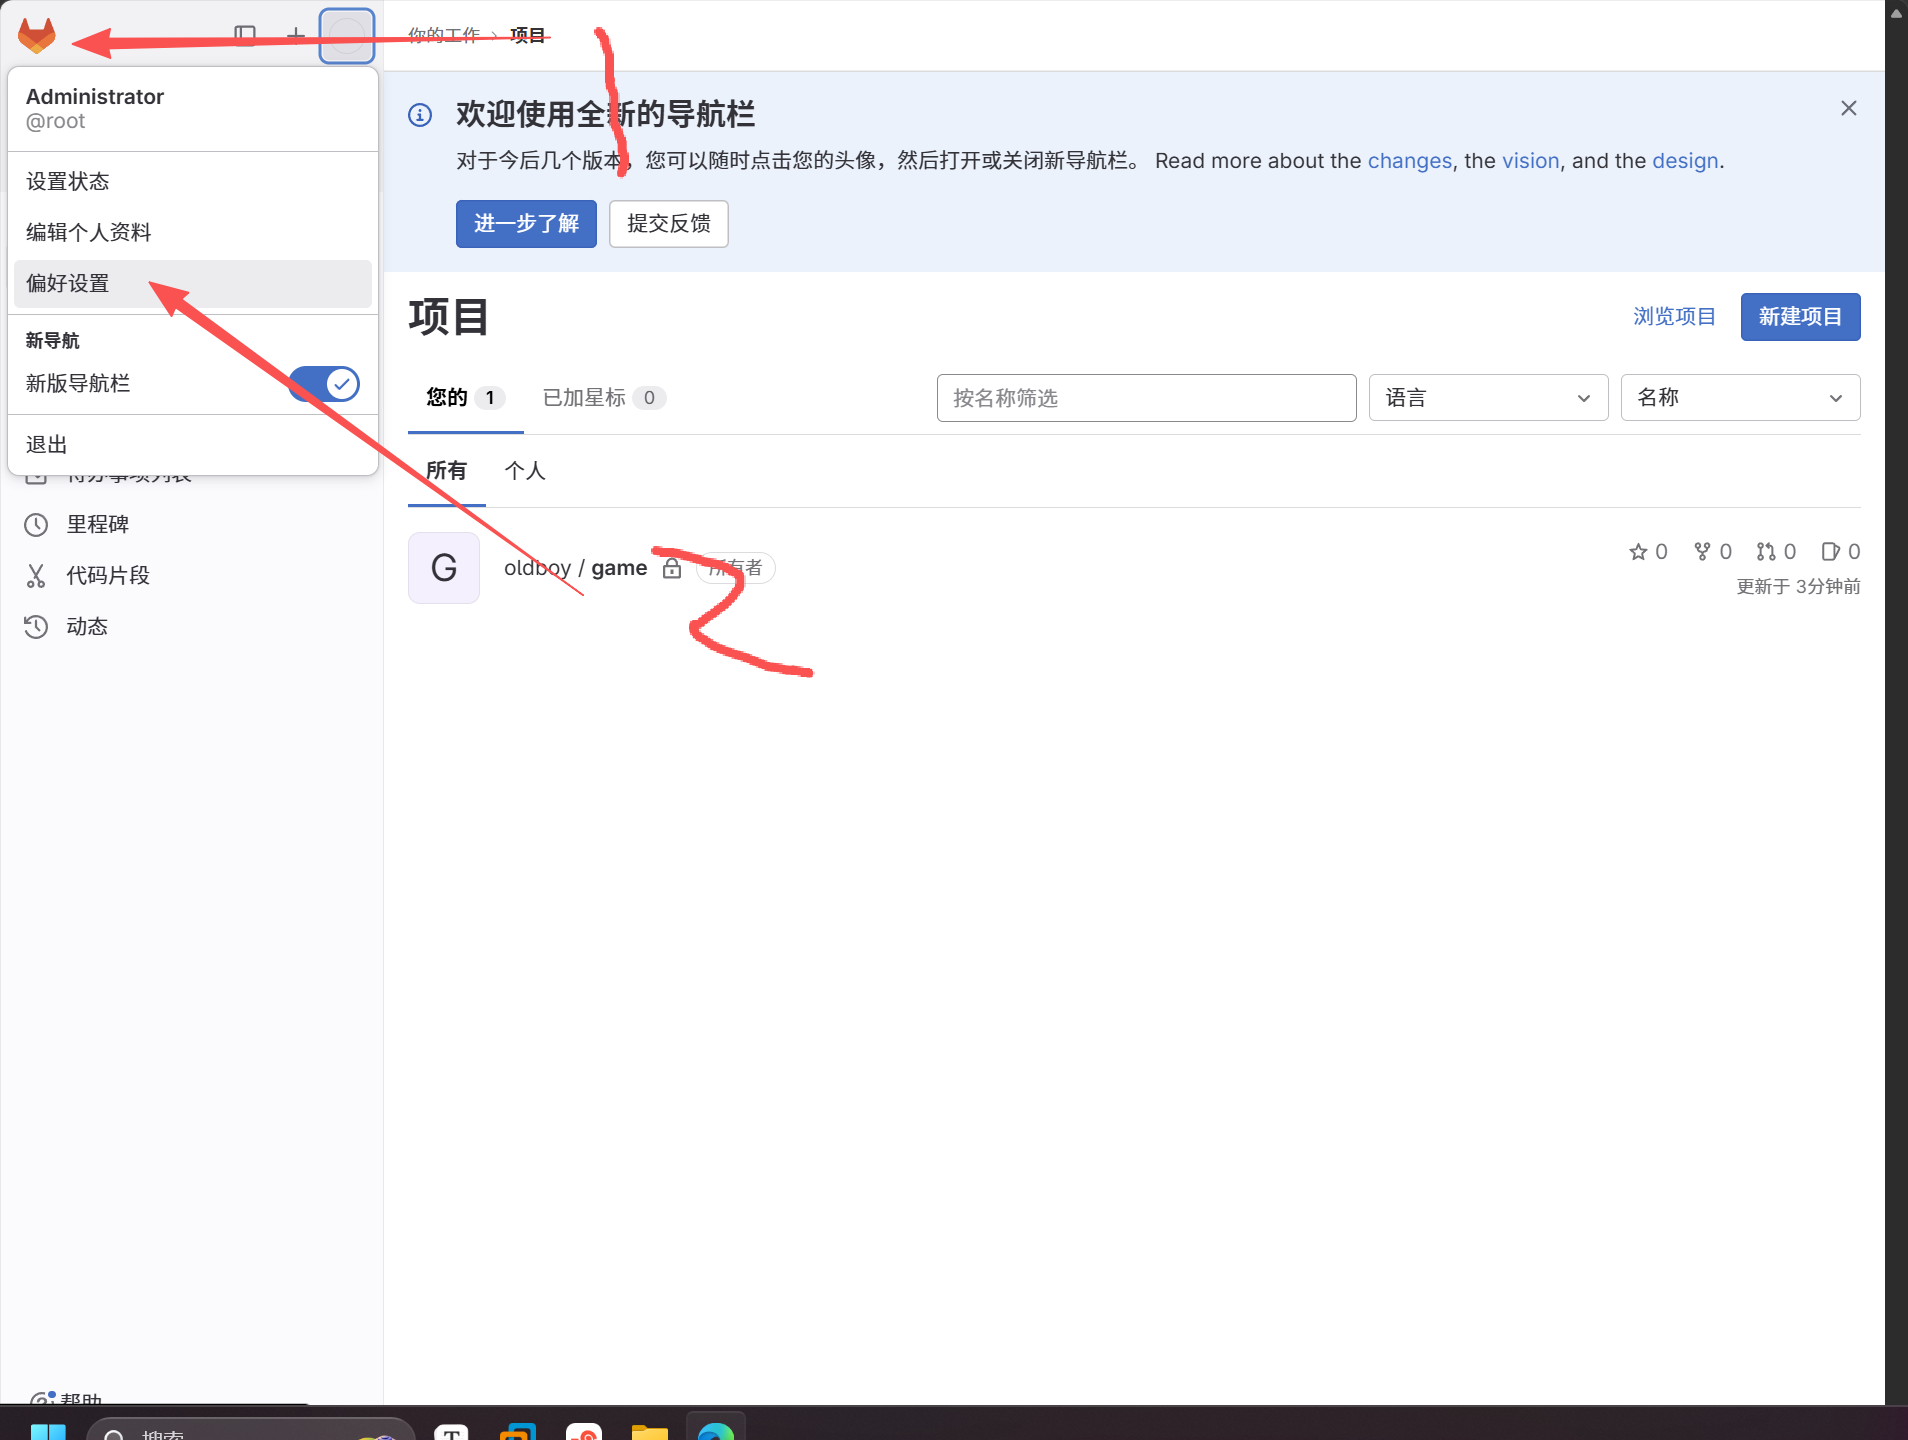
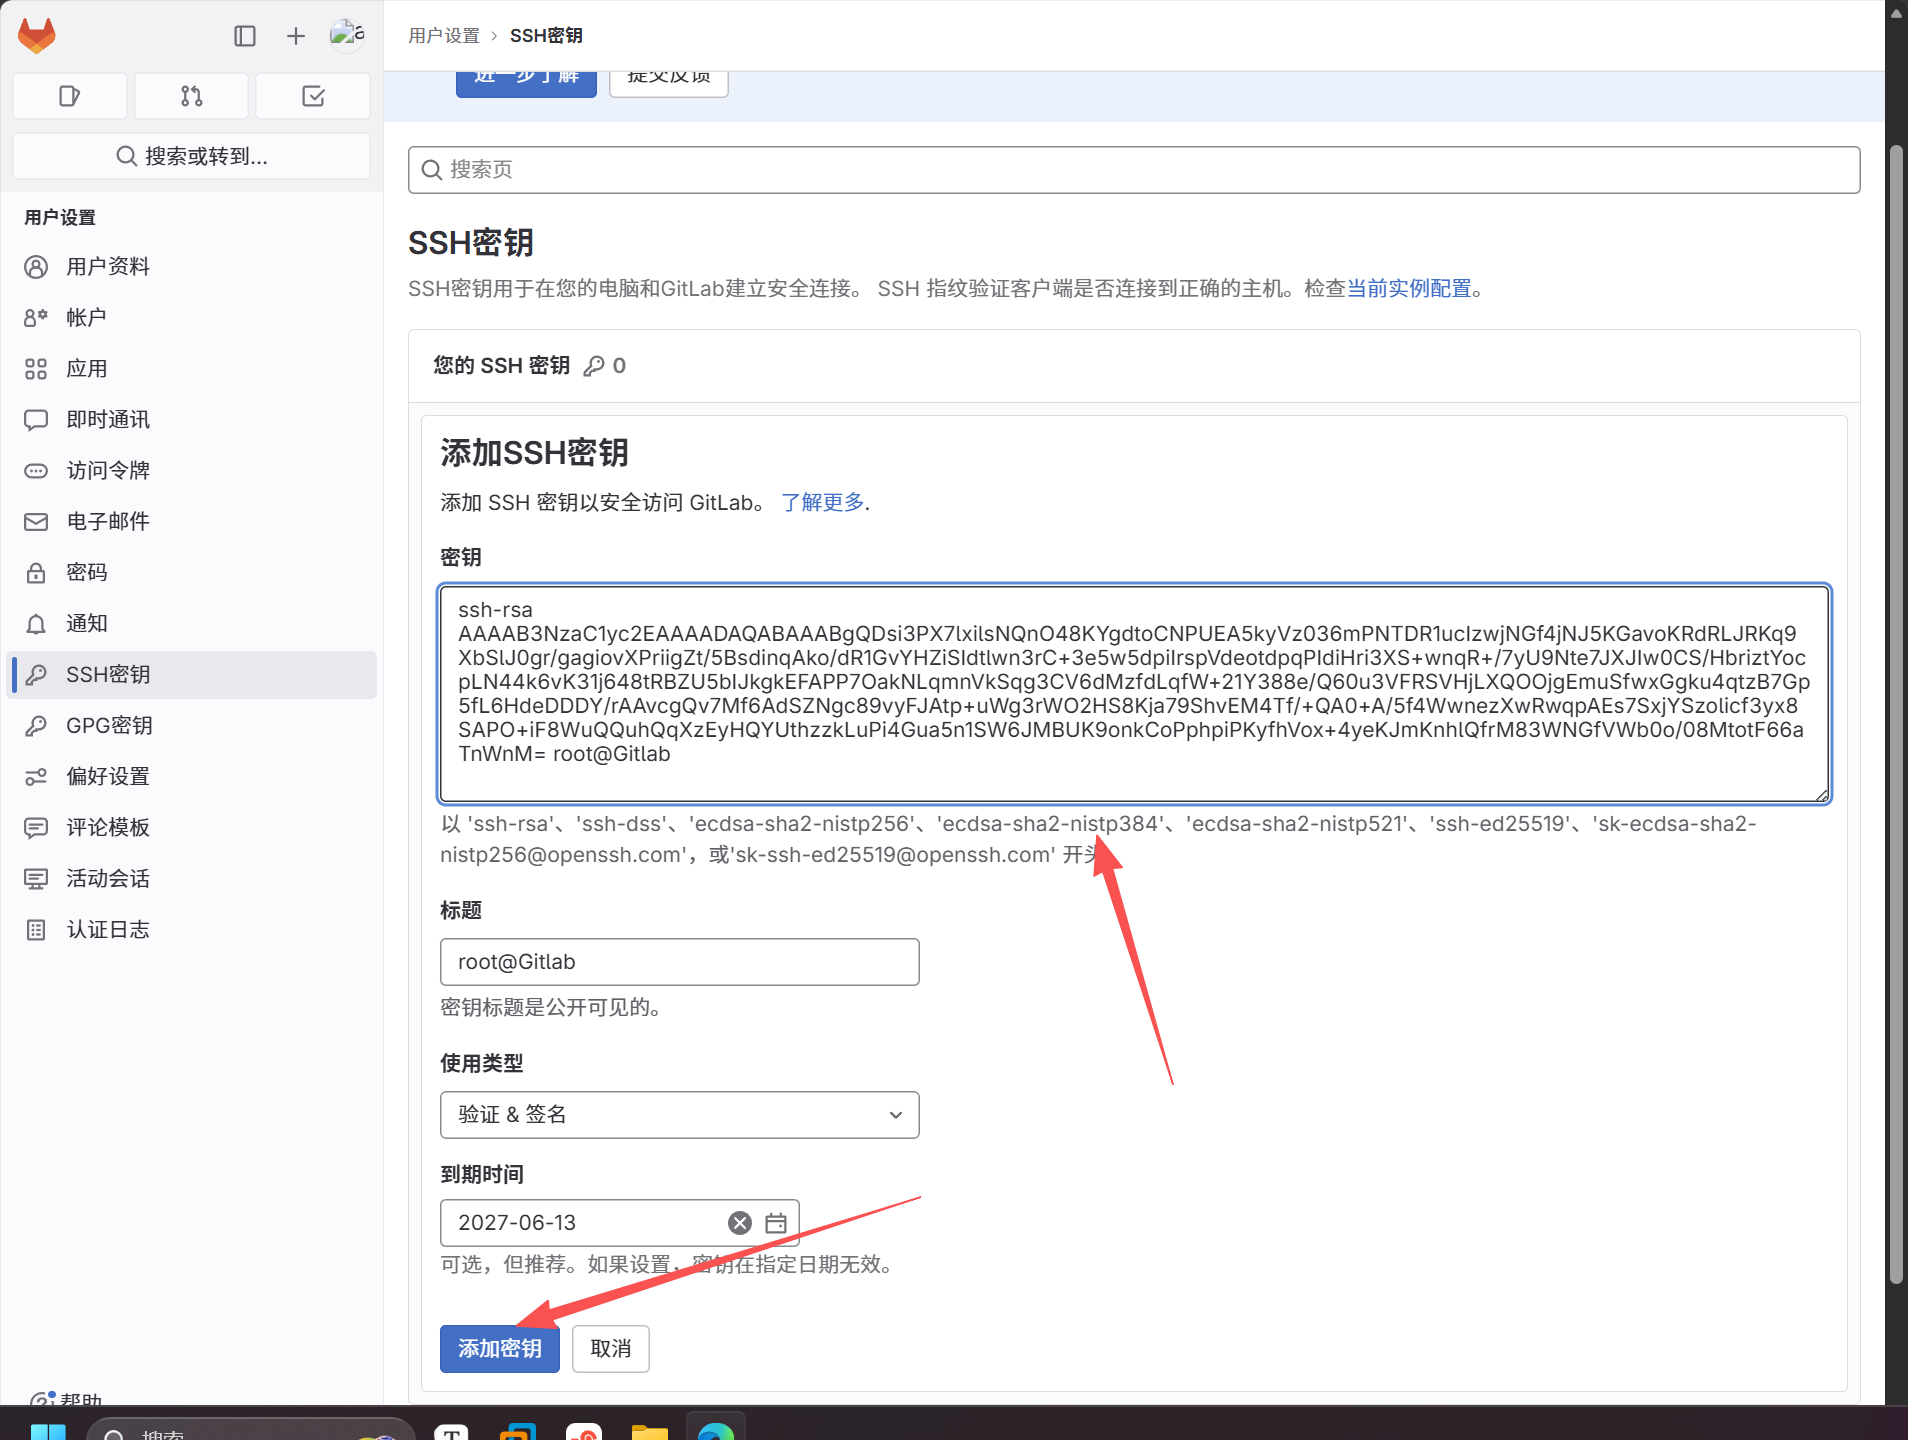
命令行将空的仓库下载到本地
root@Gitlab:~# git clone git@10.0.0.200:oldboy/game.git
Cloning into 'game'...
The authenticity of host '10.0.0.200 (10.0.0.200)' can't be established.
ED25519 key fingerprint is SHA256:WXUvTgbipToaP+L9JWoNyr+ZZzZVhLf5AydzmqUEGlI.
This key is not known by any other names
Are you sure you want to continue connecting (yes/no/[fingerprint])? yes
Warning: Permanently added '10.0.0.200' (ED25519) to the list of known hosts.
warning: You appear to have cloned an empty repository.
root@Gitlab:~# cd game/
root@Gitlab:~/game# ll
total 0
root@Gitlab:~/game# ll -a
total 12
drwxr-xr-x 3 root root 4096 Jun 12 23:50 ./
drwx------ 7 root root 4096 Jun 12 23:50 ../
drwxr-xr-x 7 root root 4096 Jun 12 23:50 .git/
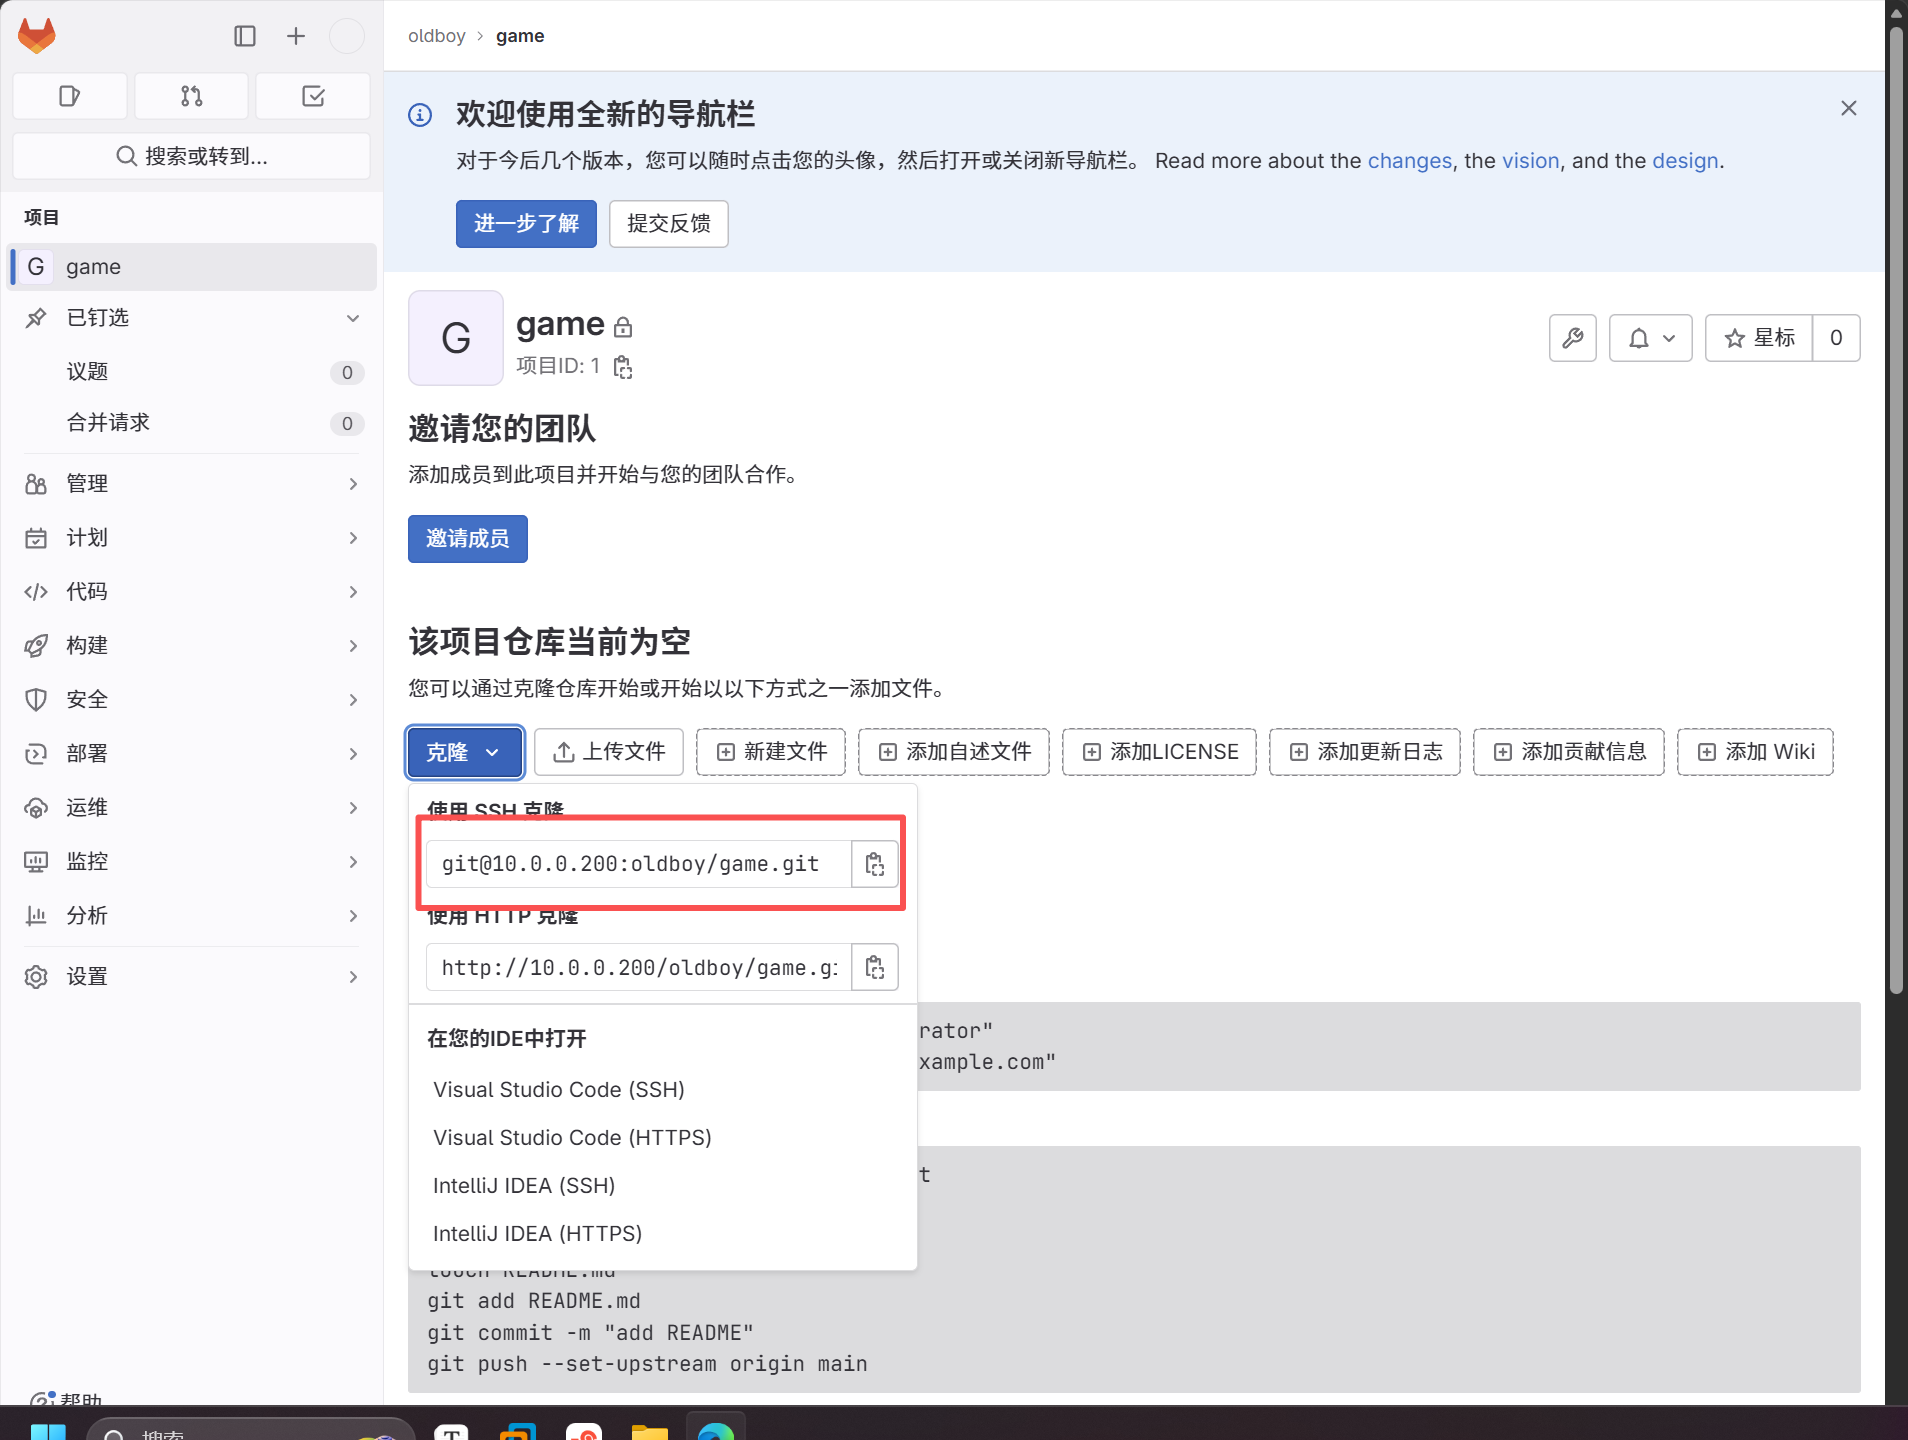
#配置使用人和邮箱
root@Gitlab:~/game# git config --global user.name "lzy"
root@Gitlab:~/game# git config --global user.email "zly@examople.con"

#创建新的文件提交到本地仓库
root@Gitlab:~/game# touch a.txt
root@Gitlab:~/game# git add .
root@Gitlab:~/game# git commit -m "创建文件a.txt"
[master (root-commit) 10ff55f] 创建文件a.txt
 1 file changed, 0 insertions(+), 0 deletions(-)
 create mode 100644 a.txt

#查看远程仓库名称
root@Gitlab:~/game# git remote
origin

#查看远程仓库的详细地址
root@Gitlab:~/game# git remote -v
origin	git@10.0.0.200:oldboy/game.git (fetch)
origin	git@10.0.0.200:oldboy/game.git (push)

#将本地仓库的代码提交到远程仓库
root@Gitlab:~/game# git push -u origin master
Enumerating objects: 3, done.
Counting objects: 100% (3/3), done.
Writing objects: 100% (3/3), 216 bytes | 108.00 KiB/s, done.
Total 3 (delta 0), reused 0 (delta 0), pack-reused 0
To 10.0.0.200:oldboy/game.git
 * [new branch]      master -> master
Branch 'master' set up to track remote branch 'master' from 'origin'.

#查看远程仓库是否上传成功
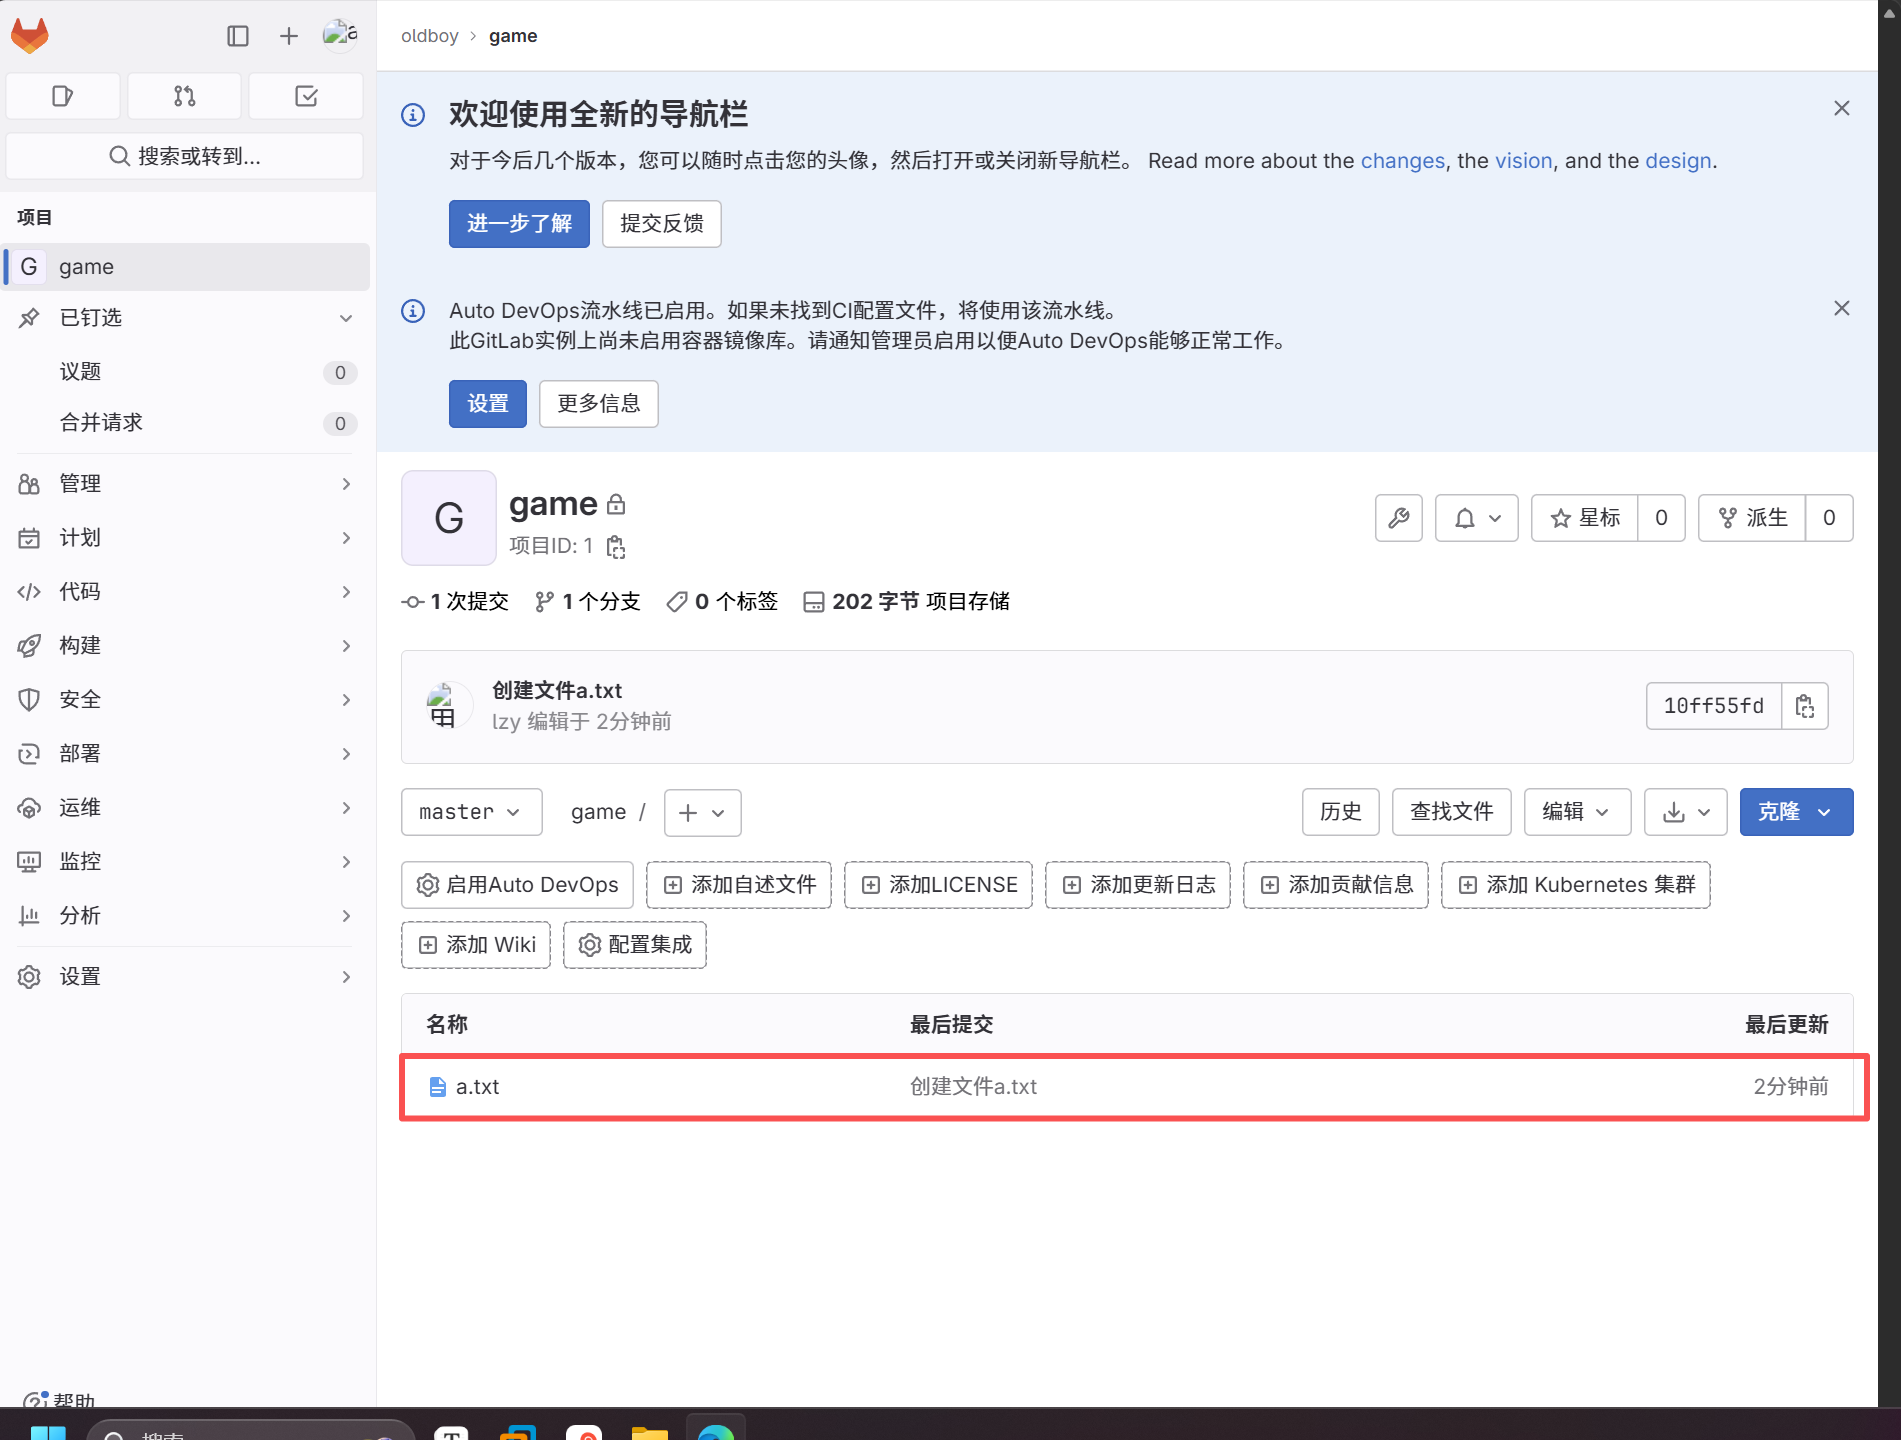
第二种方式
已经存在的代码仓库,需要配置远程仓库,然后将本地仓库中的代码推送到远程服务器
代码已经存在本地
1.本地仓库已经初始化
2.本地代码已经存在
root@Gitlab:~# mkdir test
root@Gitlab:~# cd test/
root@Gitlab:~/test# git init
hint: Using 'master' as the name for the initial branch. This default branch name
hint: is subject to change. To configure the initial branch name to use in all
hint: of your new repositories, which will suppress this warning, call:
hint:
hint: 	git config --global init.defaultBranch <name>
hint:
hint: Names commonly chosen instead of 'master' are 'main', 'trunk' and
hint: 'development'. The just-created branch can be renamed via this command:
hint:
hint: 	git branch -m <name>
Initialized empty Git repository in /root/test/.git/
root@Gitlab:~/test# touch {1..3}.txt
root@Gitlab:~/test# ll
total 0
-rw-r--r-- 1 root root 0 Jun 13 00:00 1.txt
-rw-r--r-- 1 root root 0 Jun 13 00:00 2.txt
-rw-r--r-- 1 root root 0 Jun 13 00:00 3.txt
root@Gitlab:~/test# git add .
root@Gitlab:~/test# git commit -m "创建文件 {1..3}.txt"
[master (root-commit) bcdf661] 创建文件 {1..3}.txt
 3 files changed, 0 insertions(+), 0 deletions(-)
 create mode 100644 1.txt
 create mode 100644 2.txt
 create mode 100644 3.txt

3.将本地仓库的代码提交到远程仓库
gitlab先创建仓库
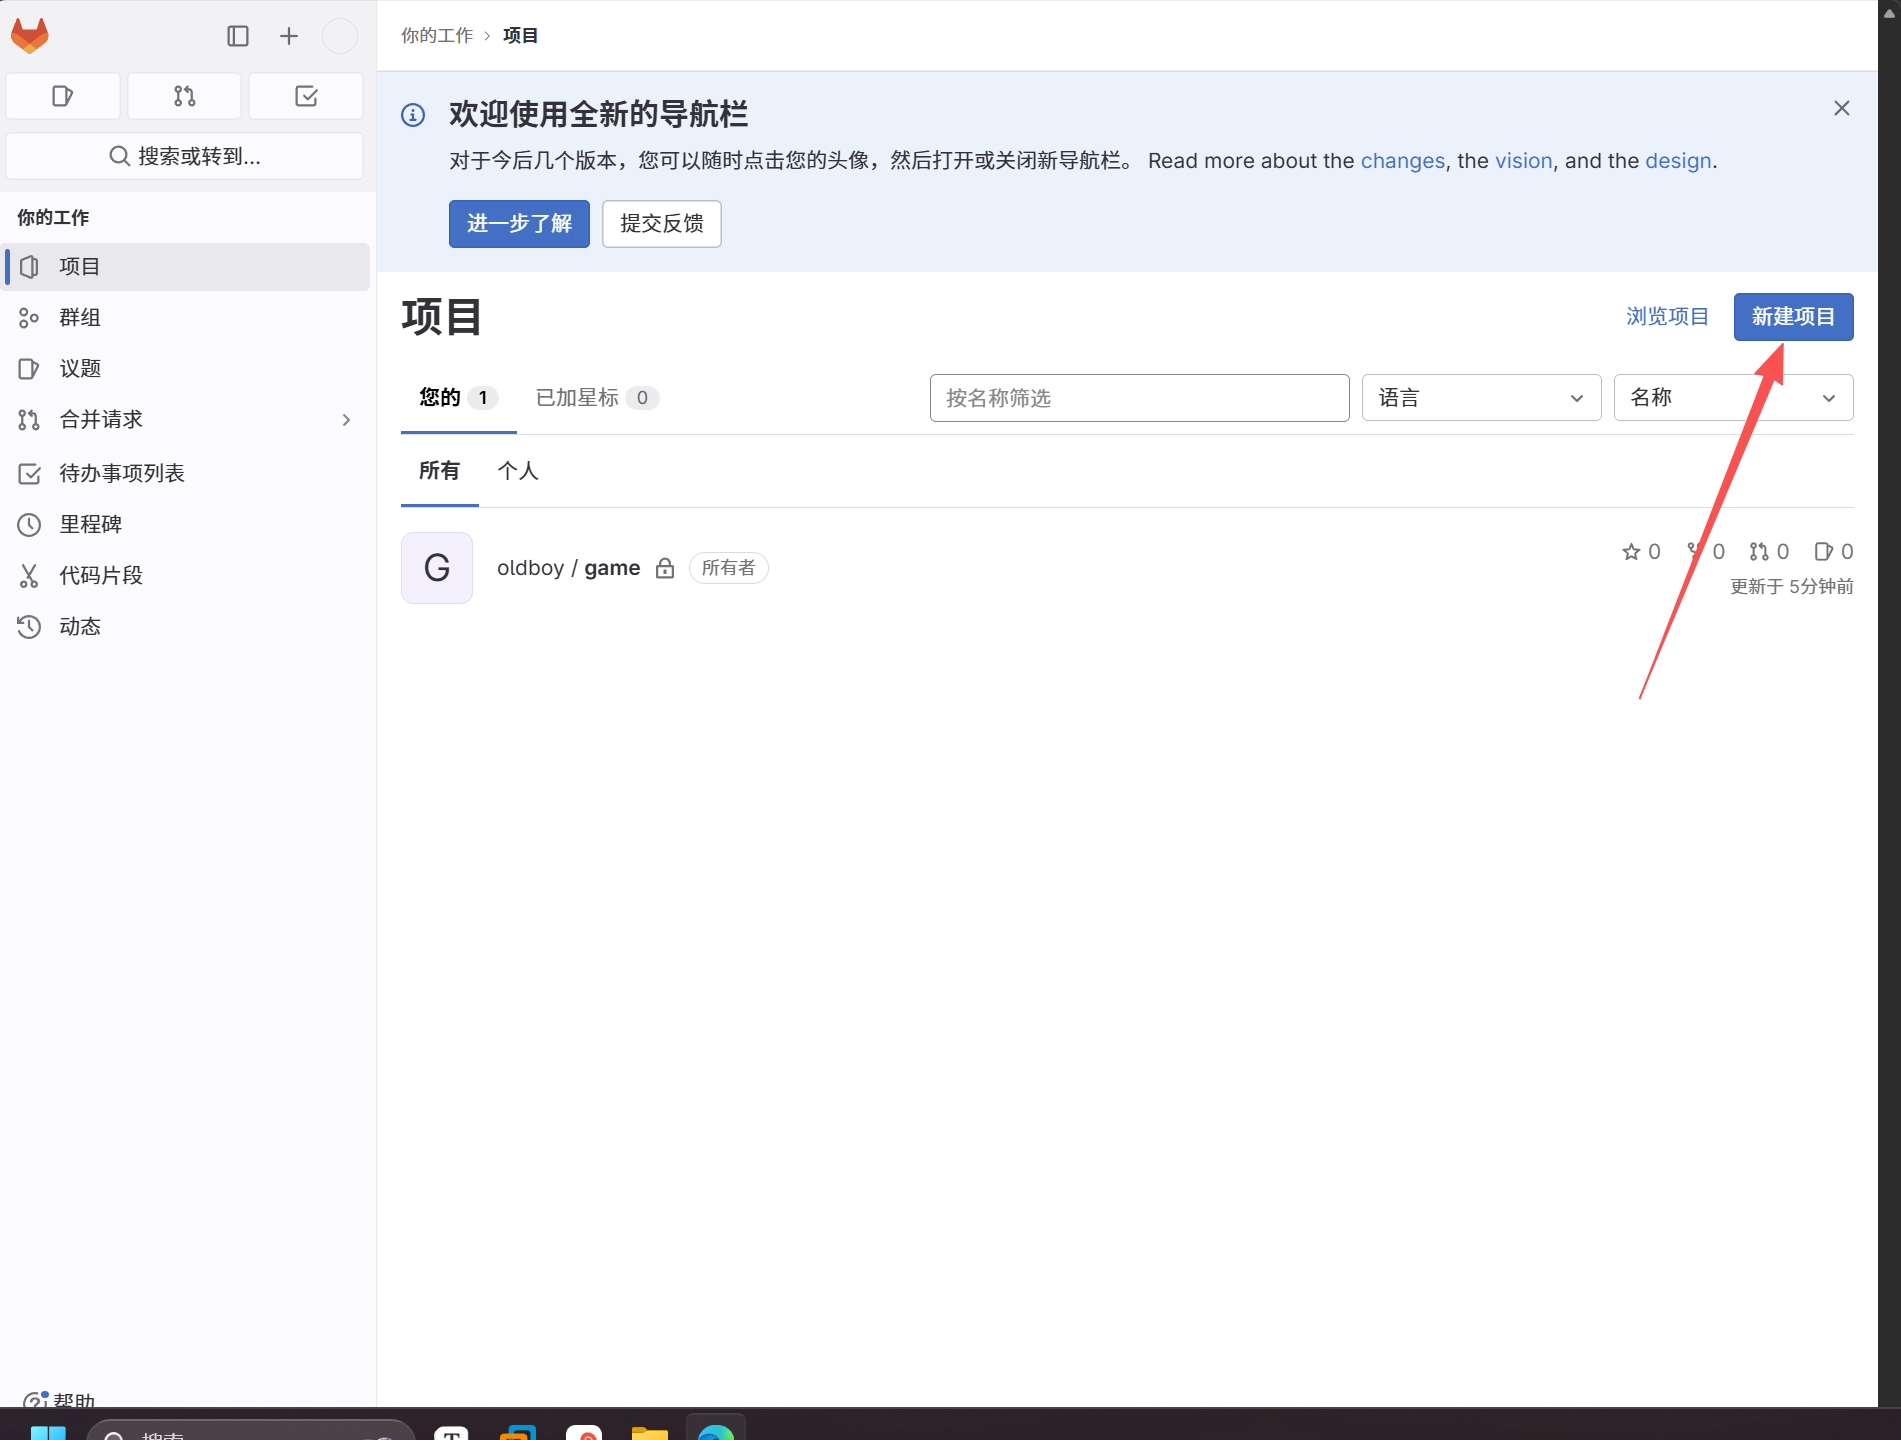
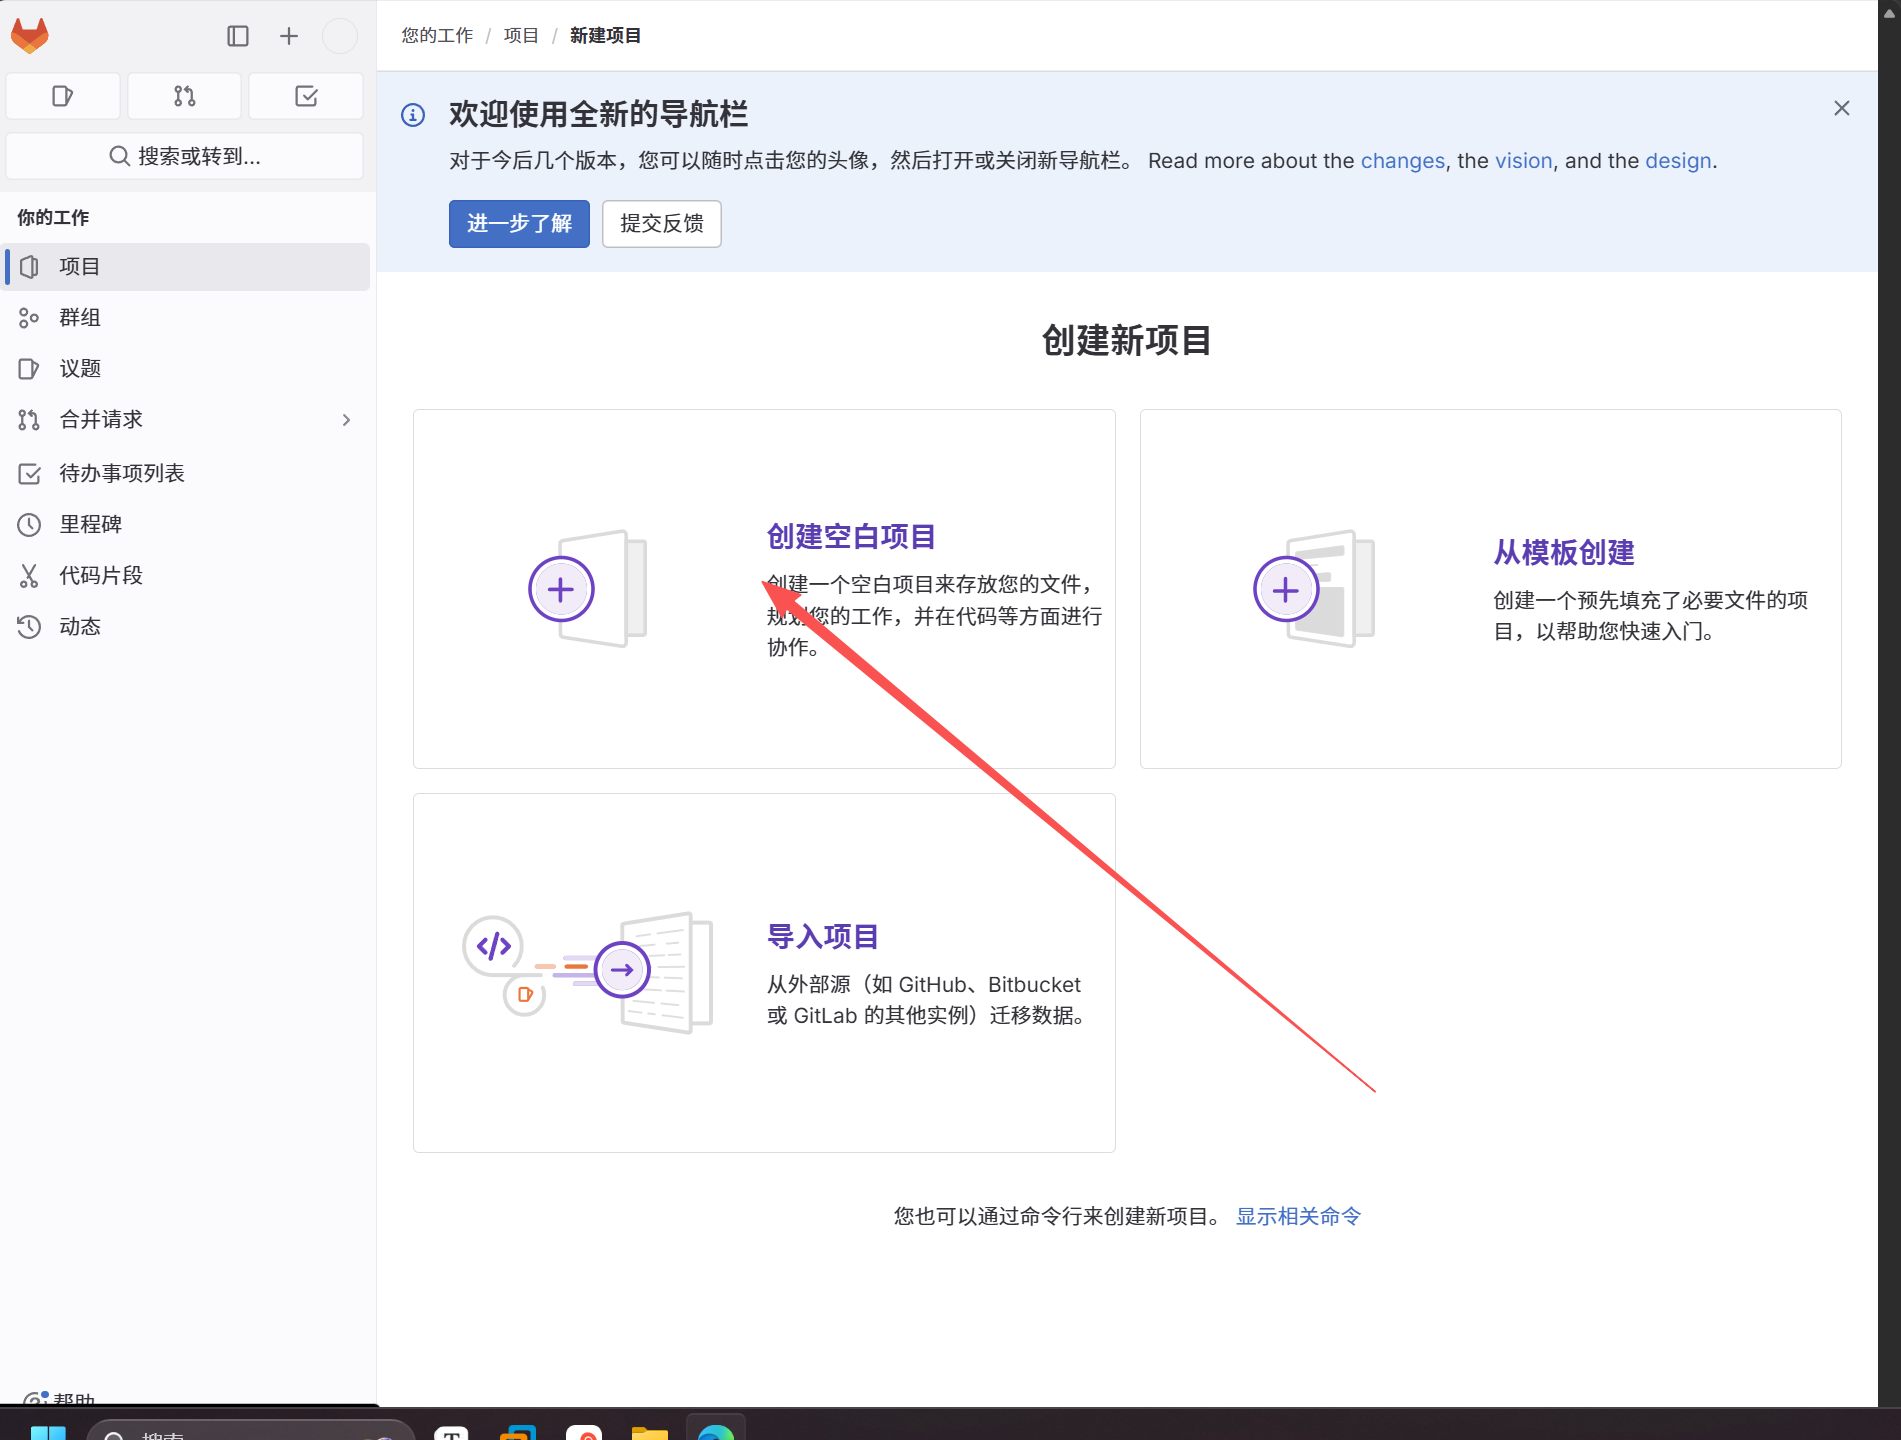
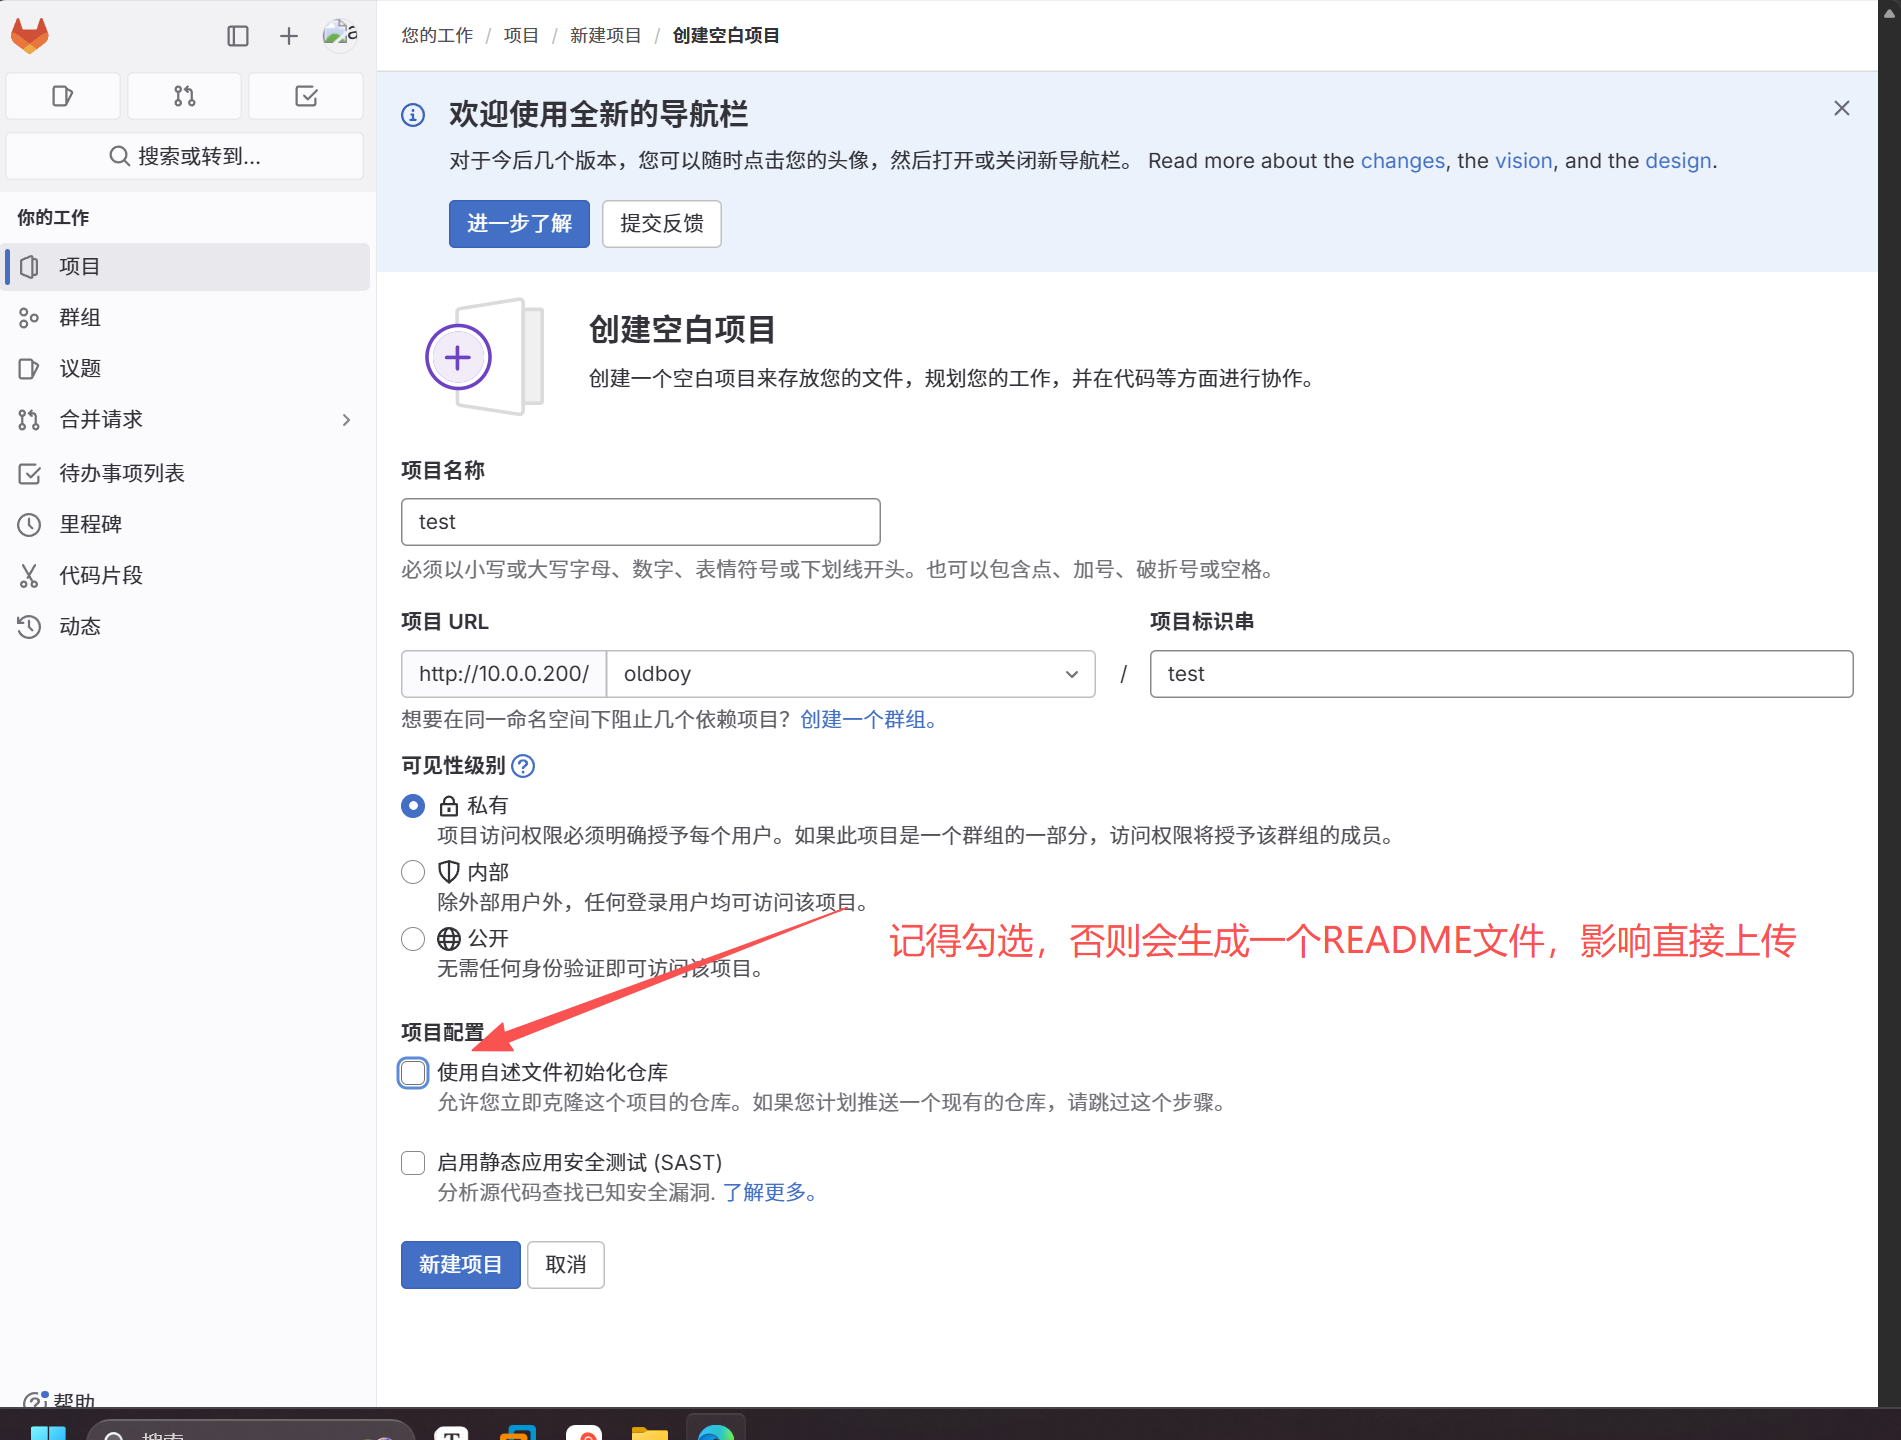
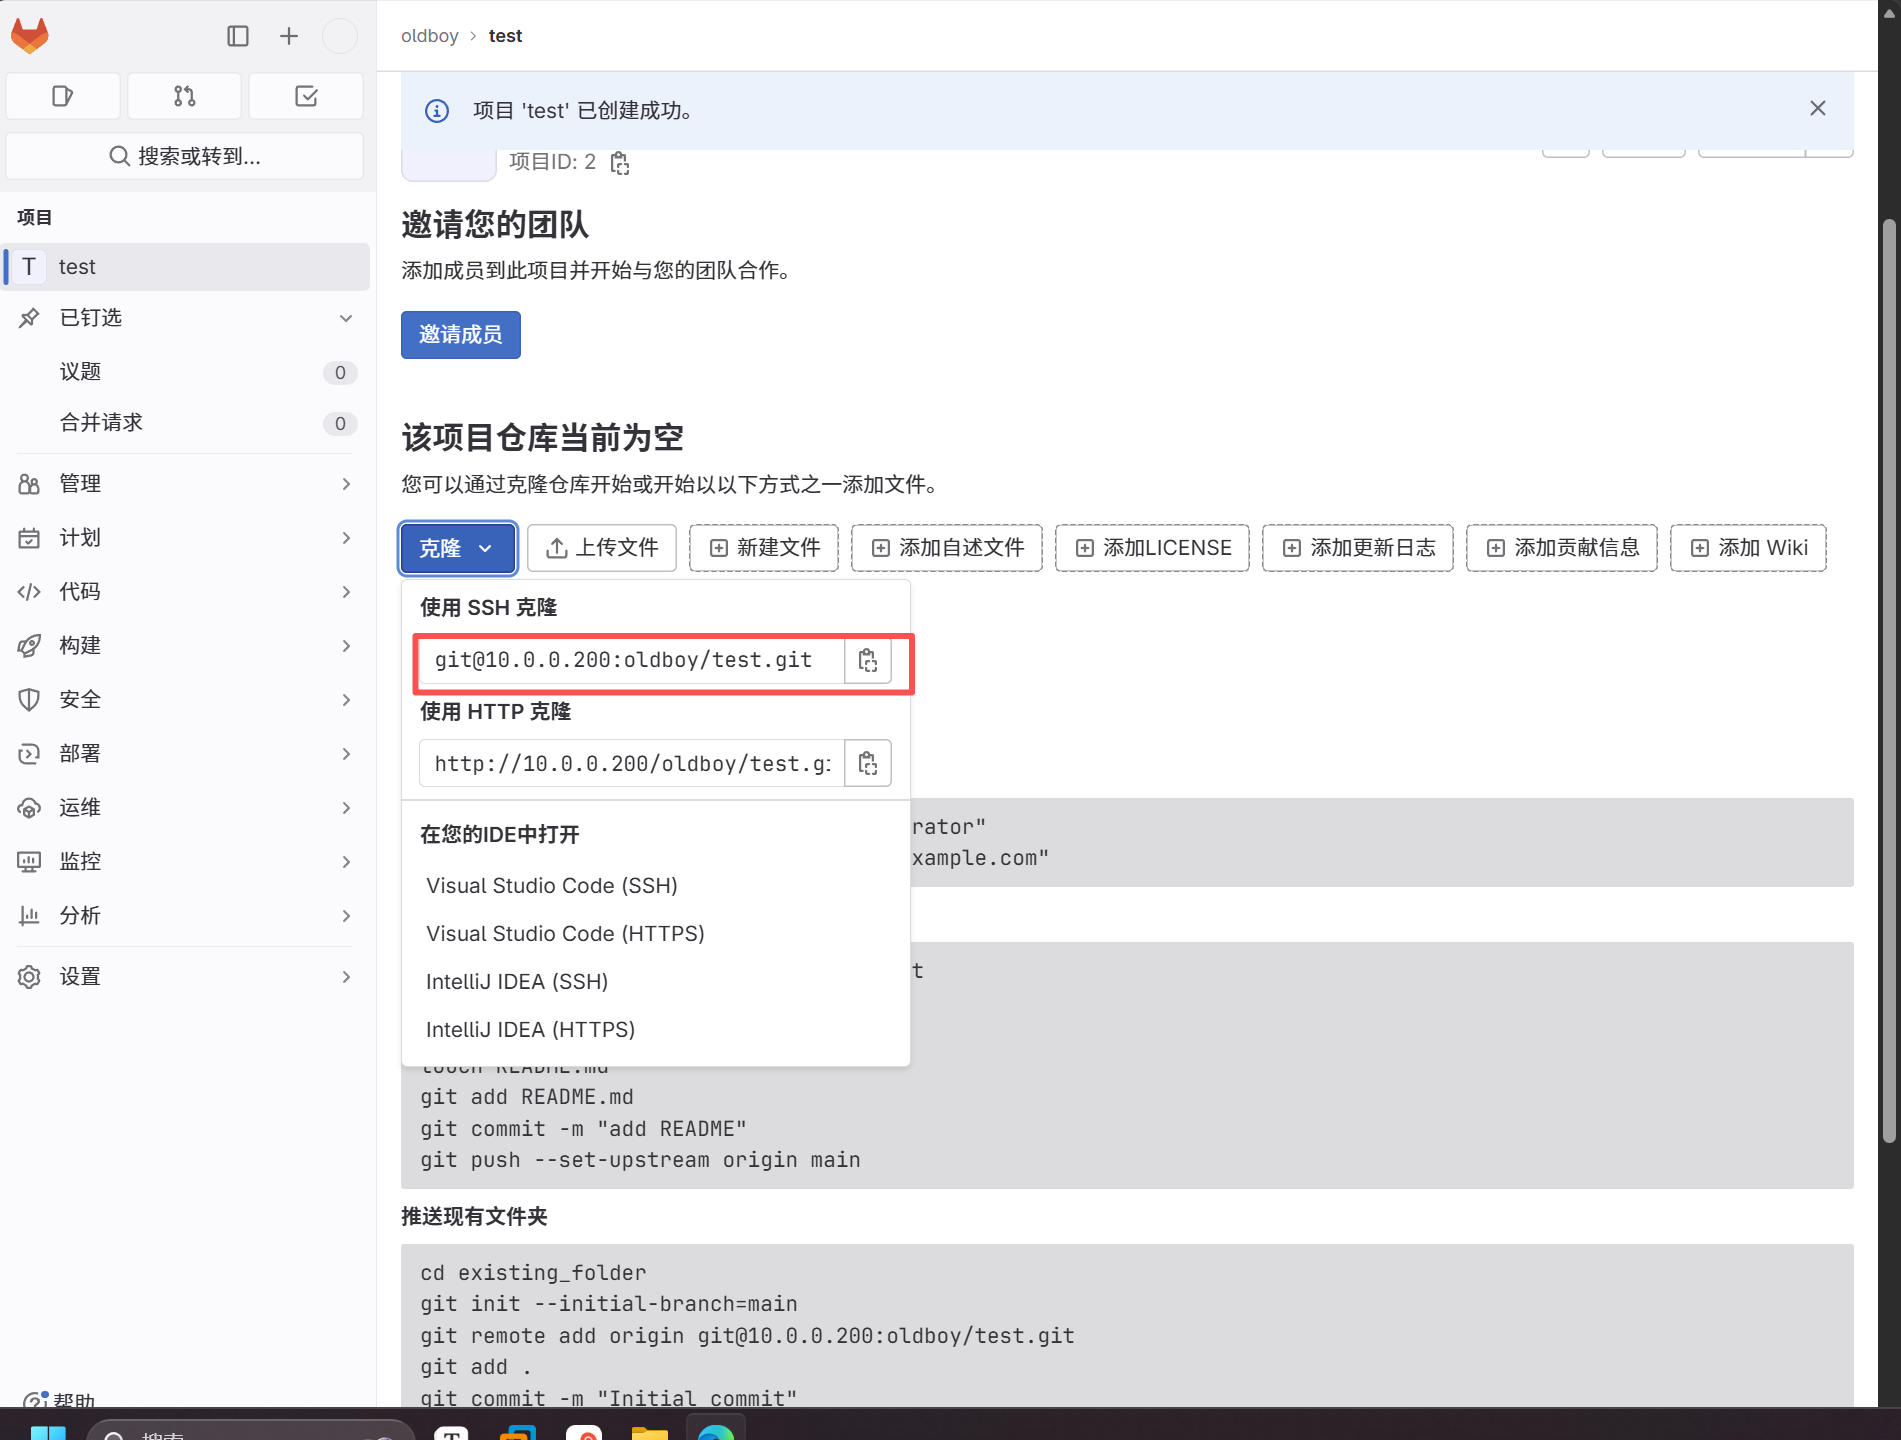
本地仓库配置远程仓库
#查看默认仓库
root@Gitlab:~/test# git remote
root@Gitlab:~/test# git remote -v

#配置远程仓库名称为origin
root@Gitlab:~/test# git remote add origin git@10.0.0.200:oldboy/test.git
root@Gitlab:~/test# git remote
origin
root@Gitlab:~/test# git remote -v
origin	git@10.0.0.200:oldboy/test.git (fetch)
origin	git@10.0.0.200:oldboy/test.git (push)
将本地仓库代码推送到远程仓库
root@Gitlab:~/test# git push -u origin master
Enumerating objects: 3, done.
Counting objects: 100% (3/3), done.
Delta compression using up to 2 threads
Compressing objects: 100% (2/2), done.
Writing objects: 100% (3/3), 232 bytes | 116.00 KiB/s, done.
Total 3 (delta 0), reused 0 (delta 0), pack-reused 0
To 10.0.0.200:oldboy/test.git
 * [new branch]      master -> master
Branch 'master' set up to track remote branch 'master' from 'origin'.
7.创建普通用户
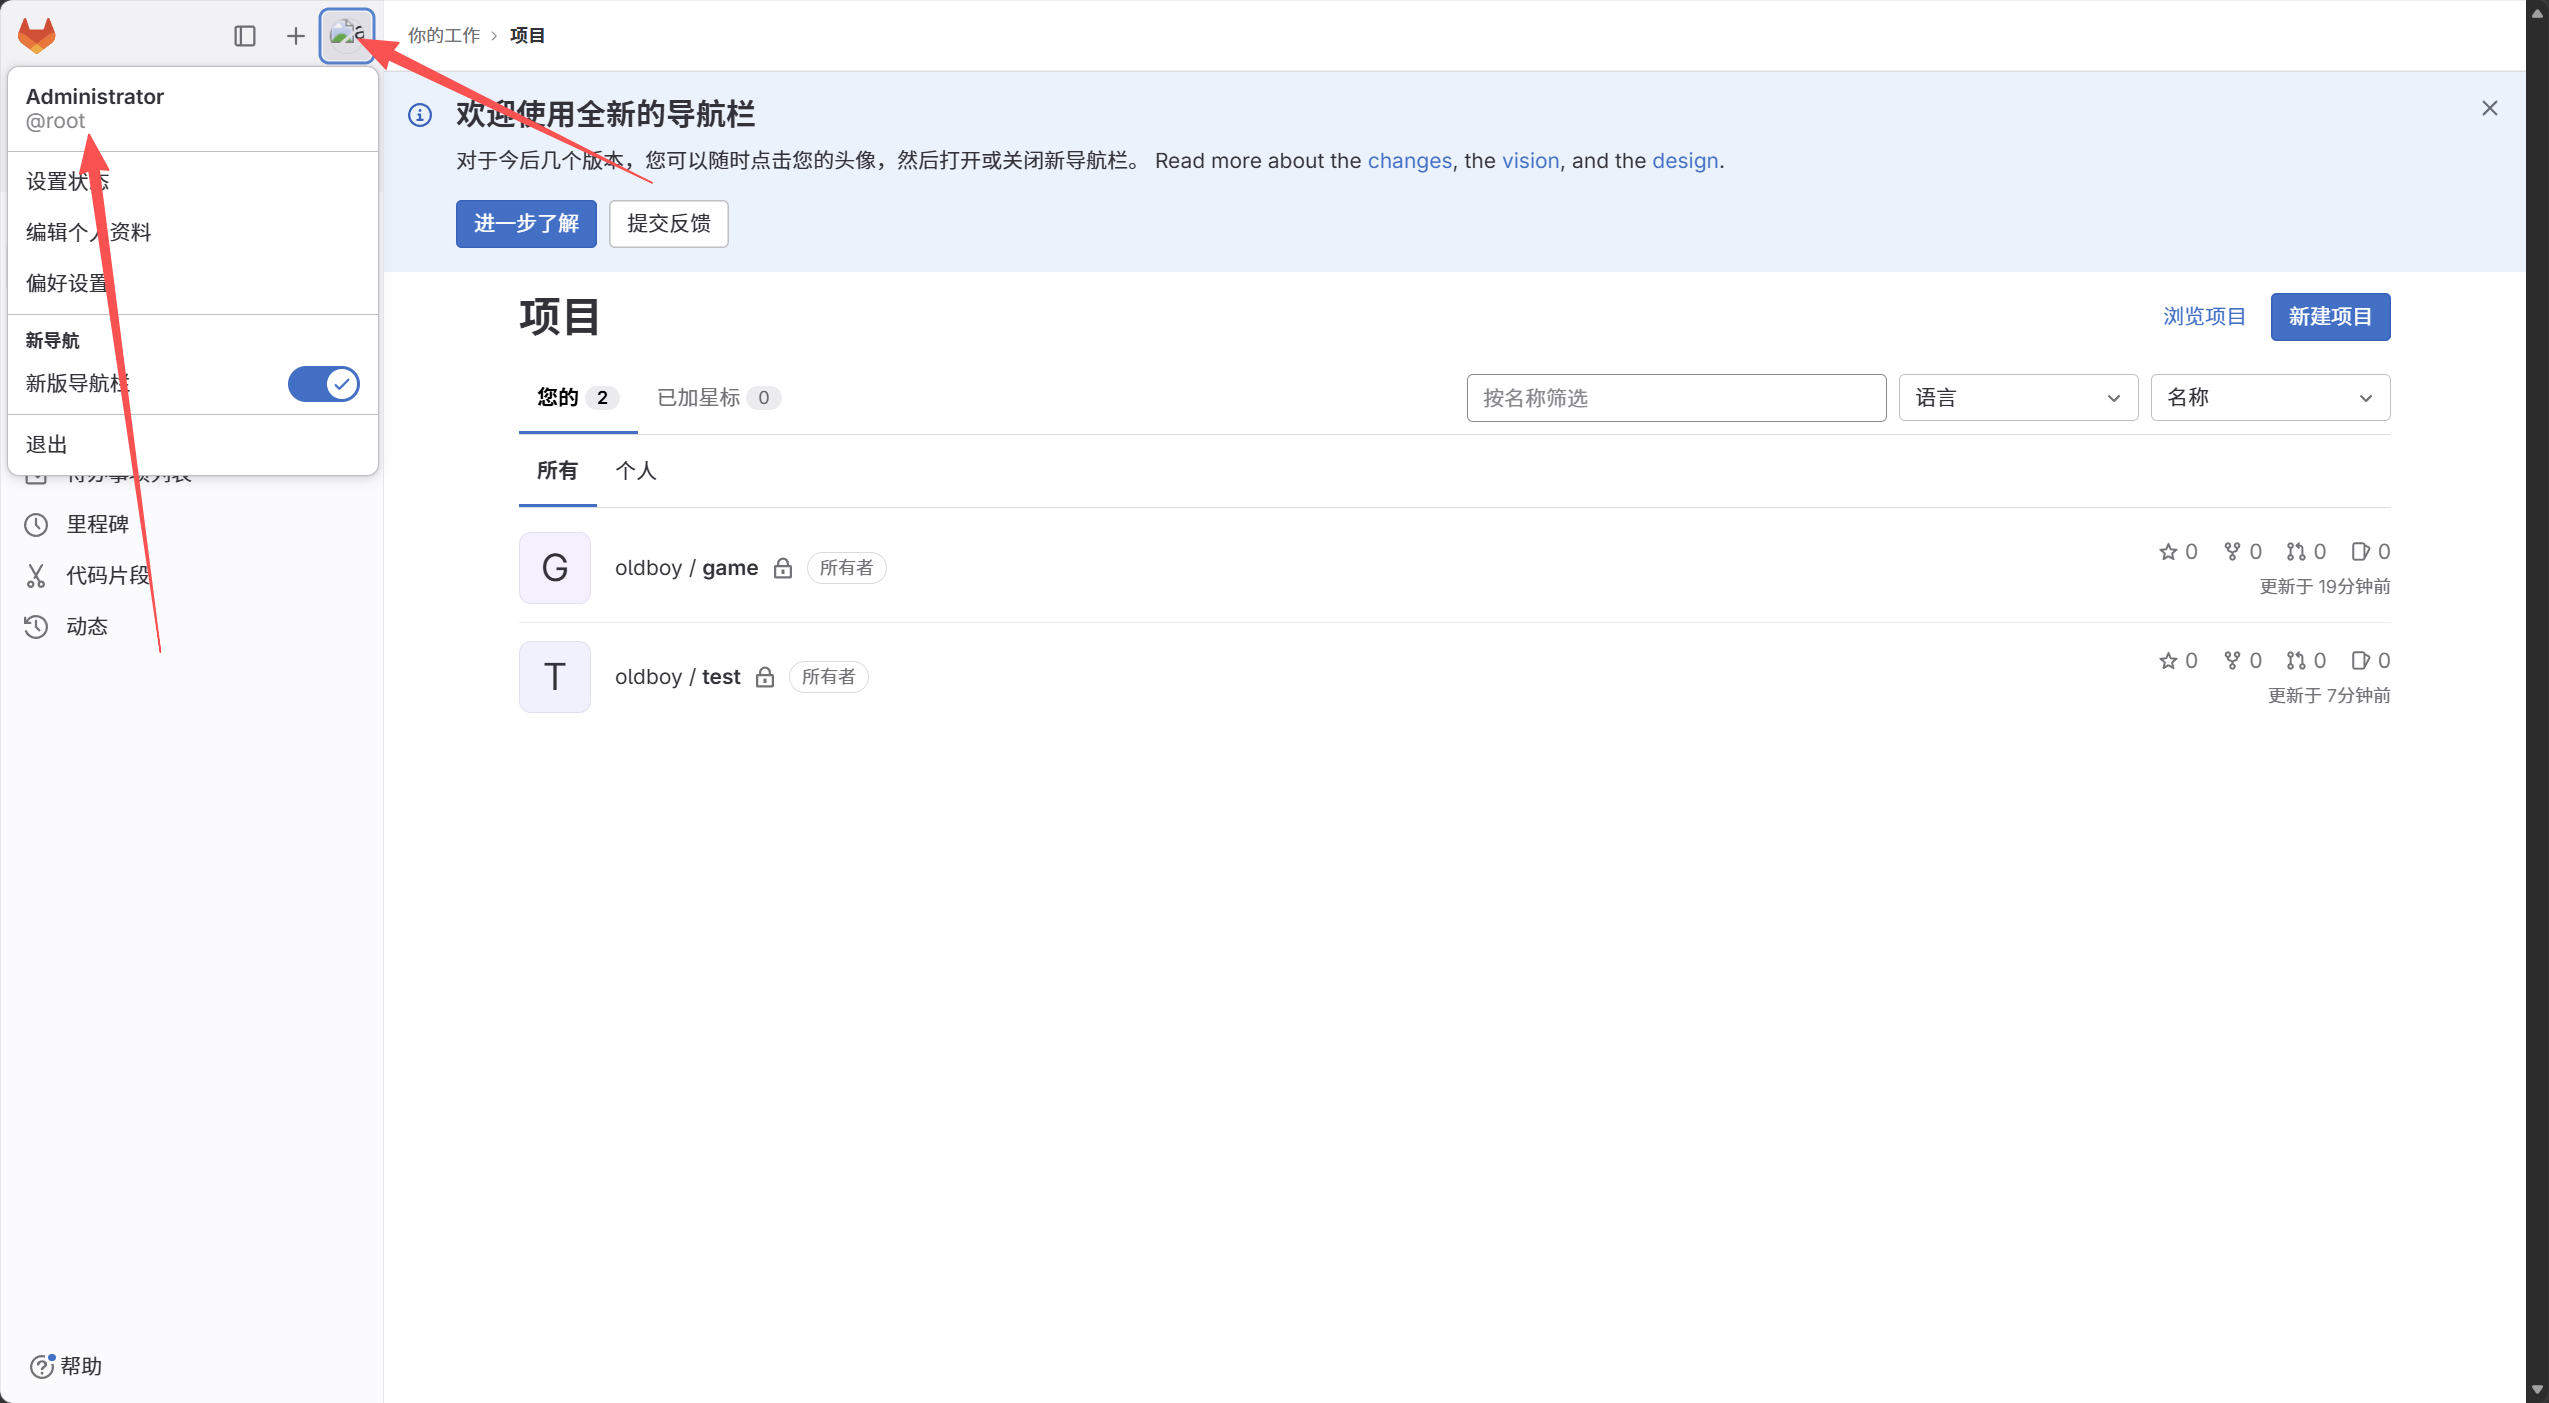
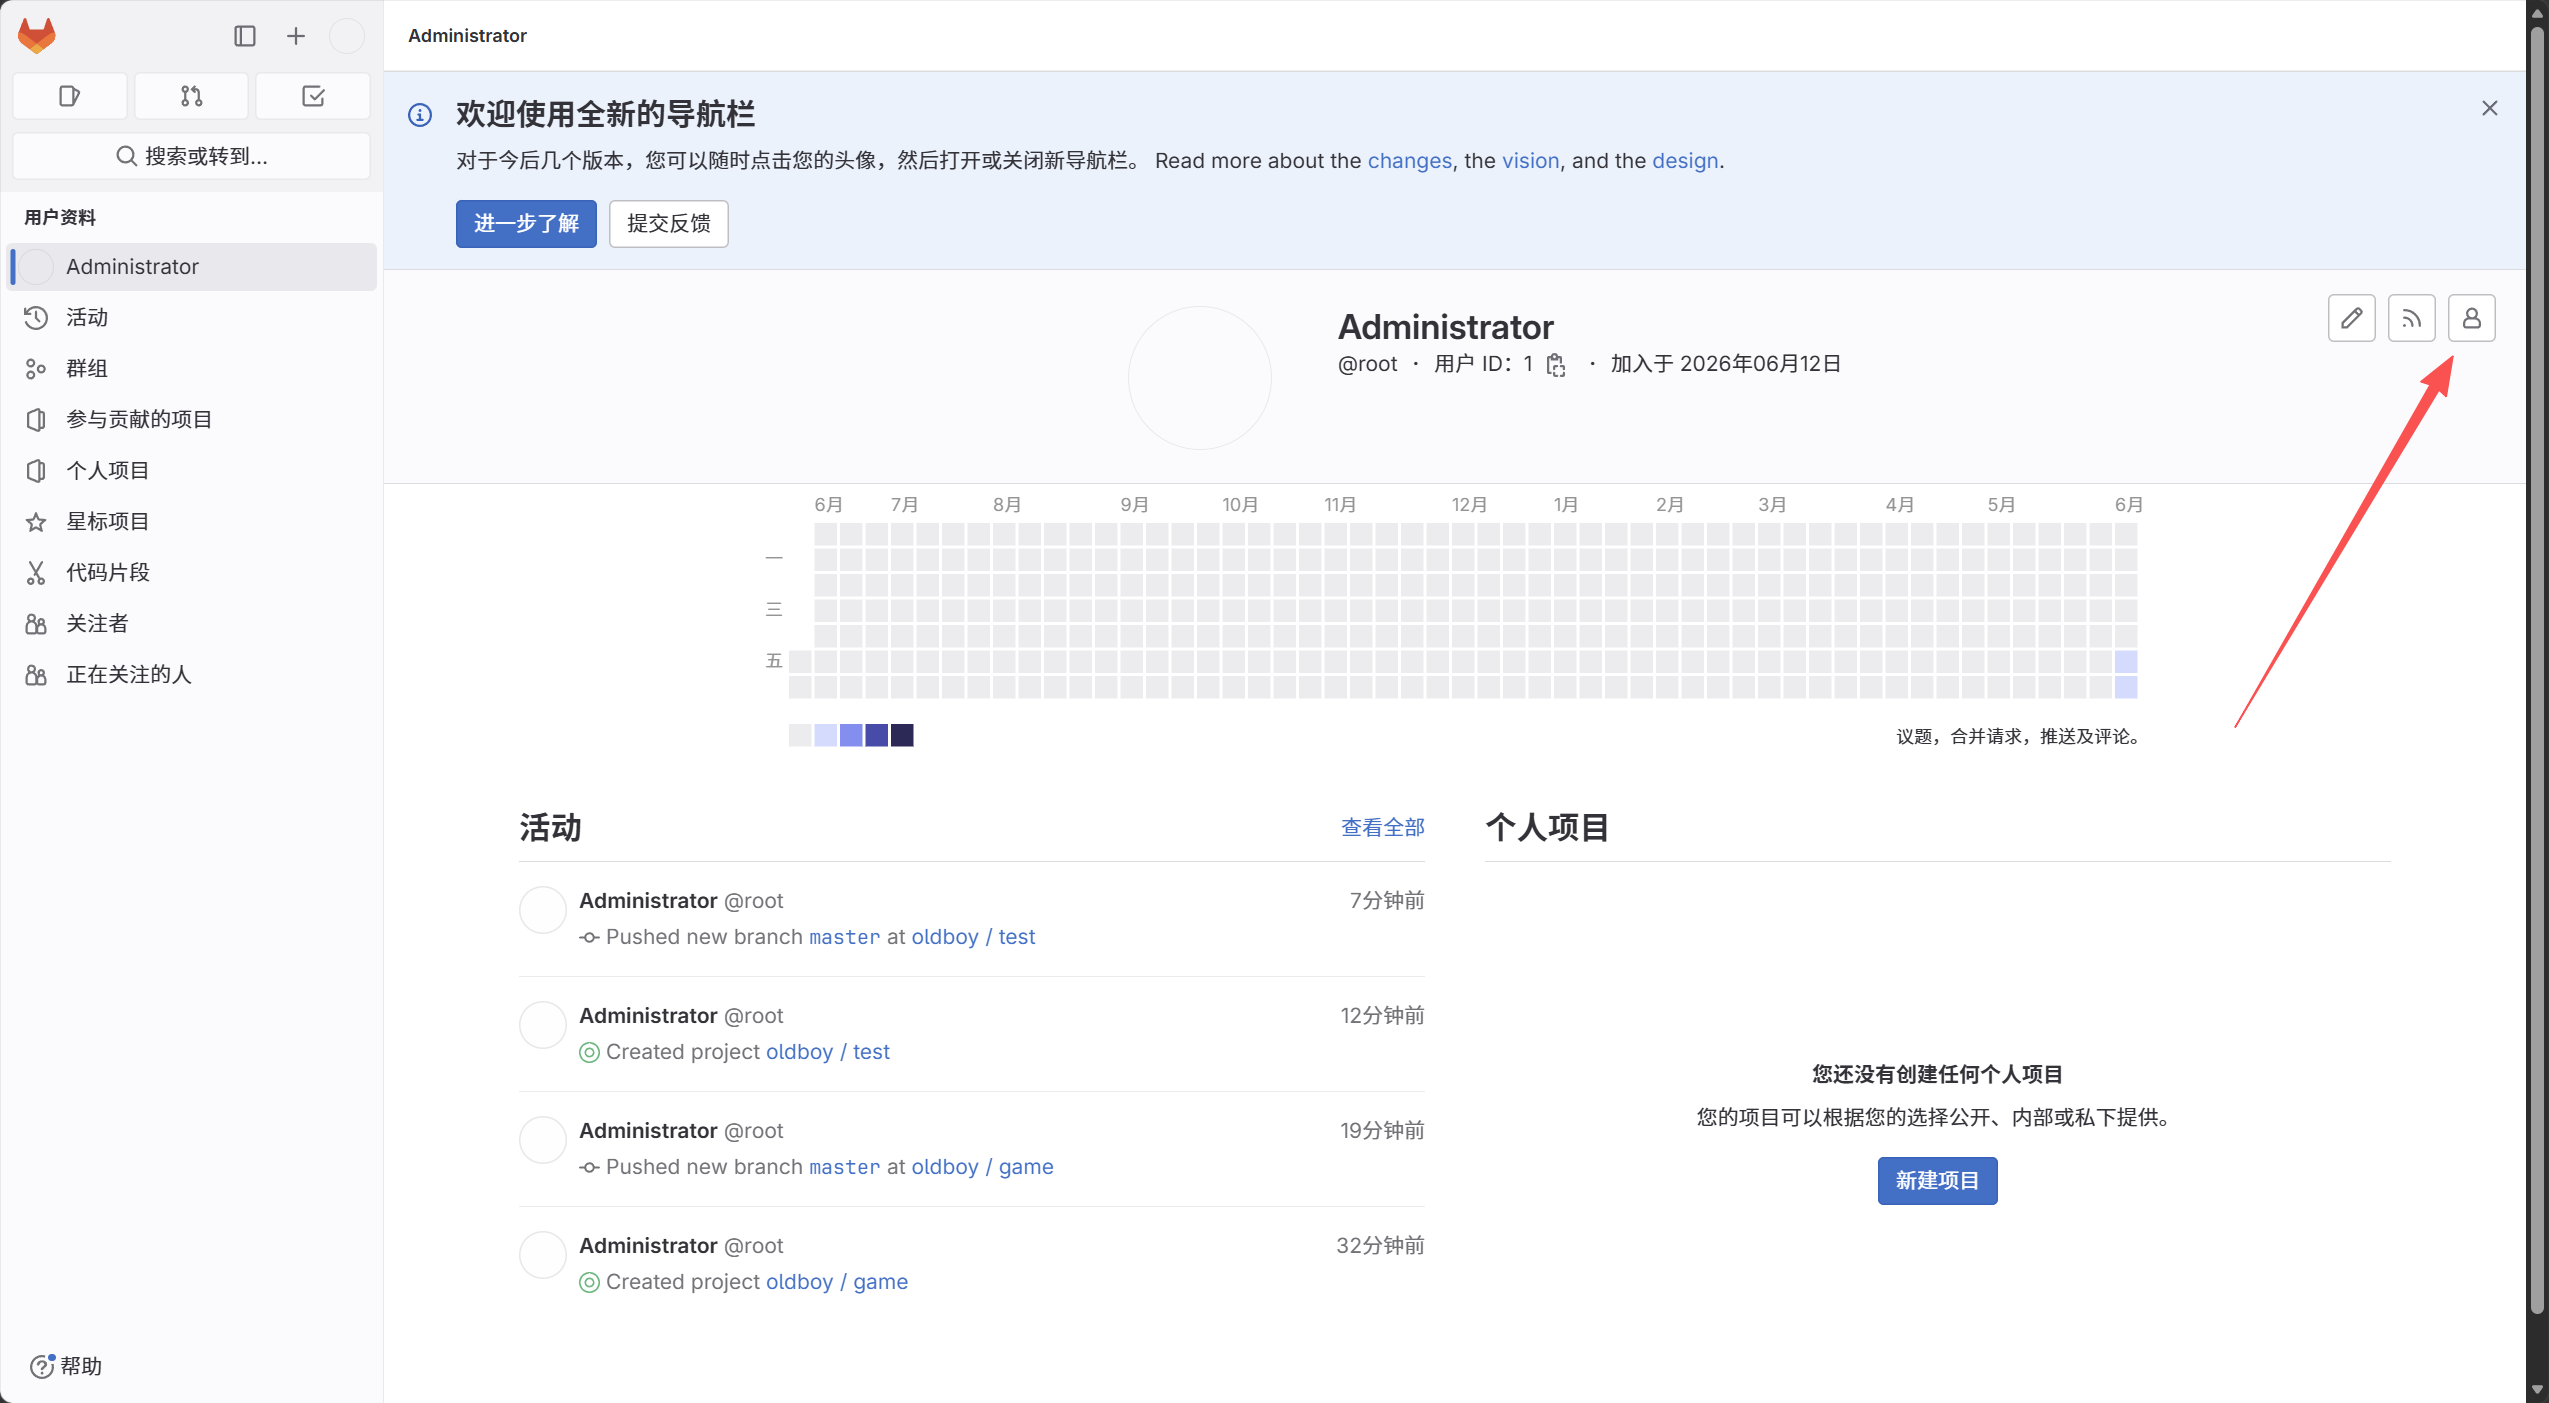
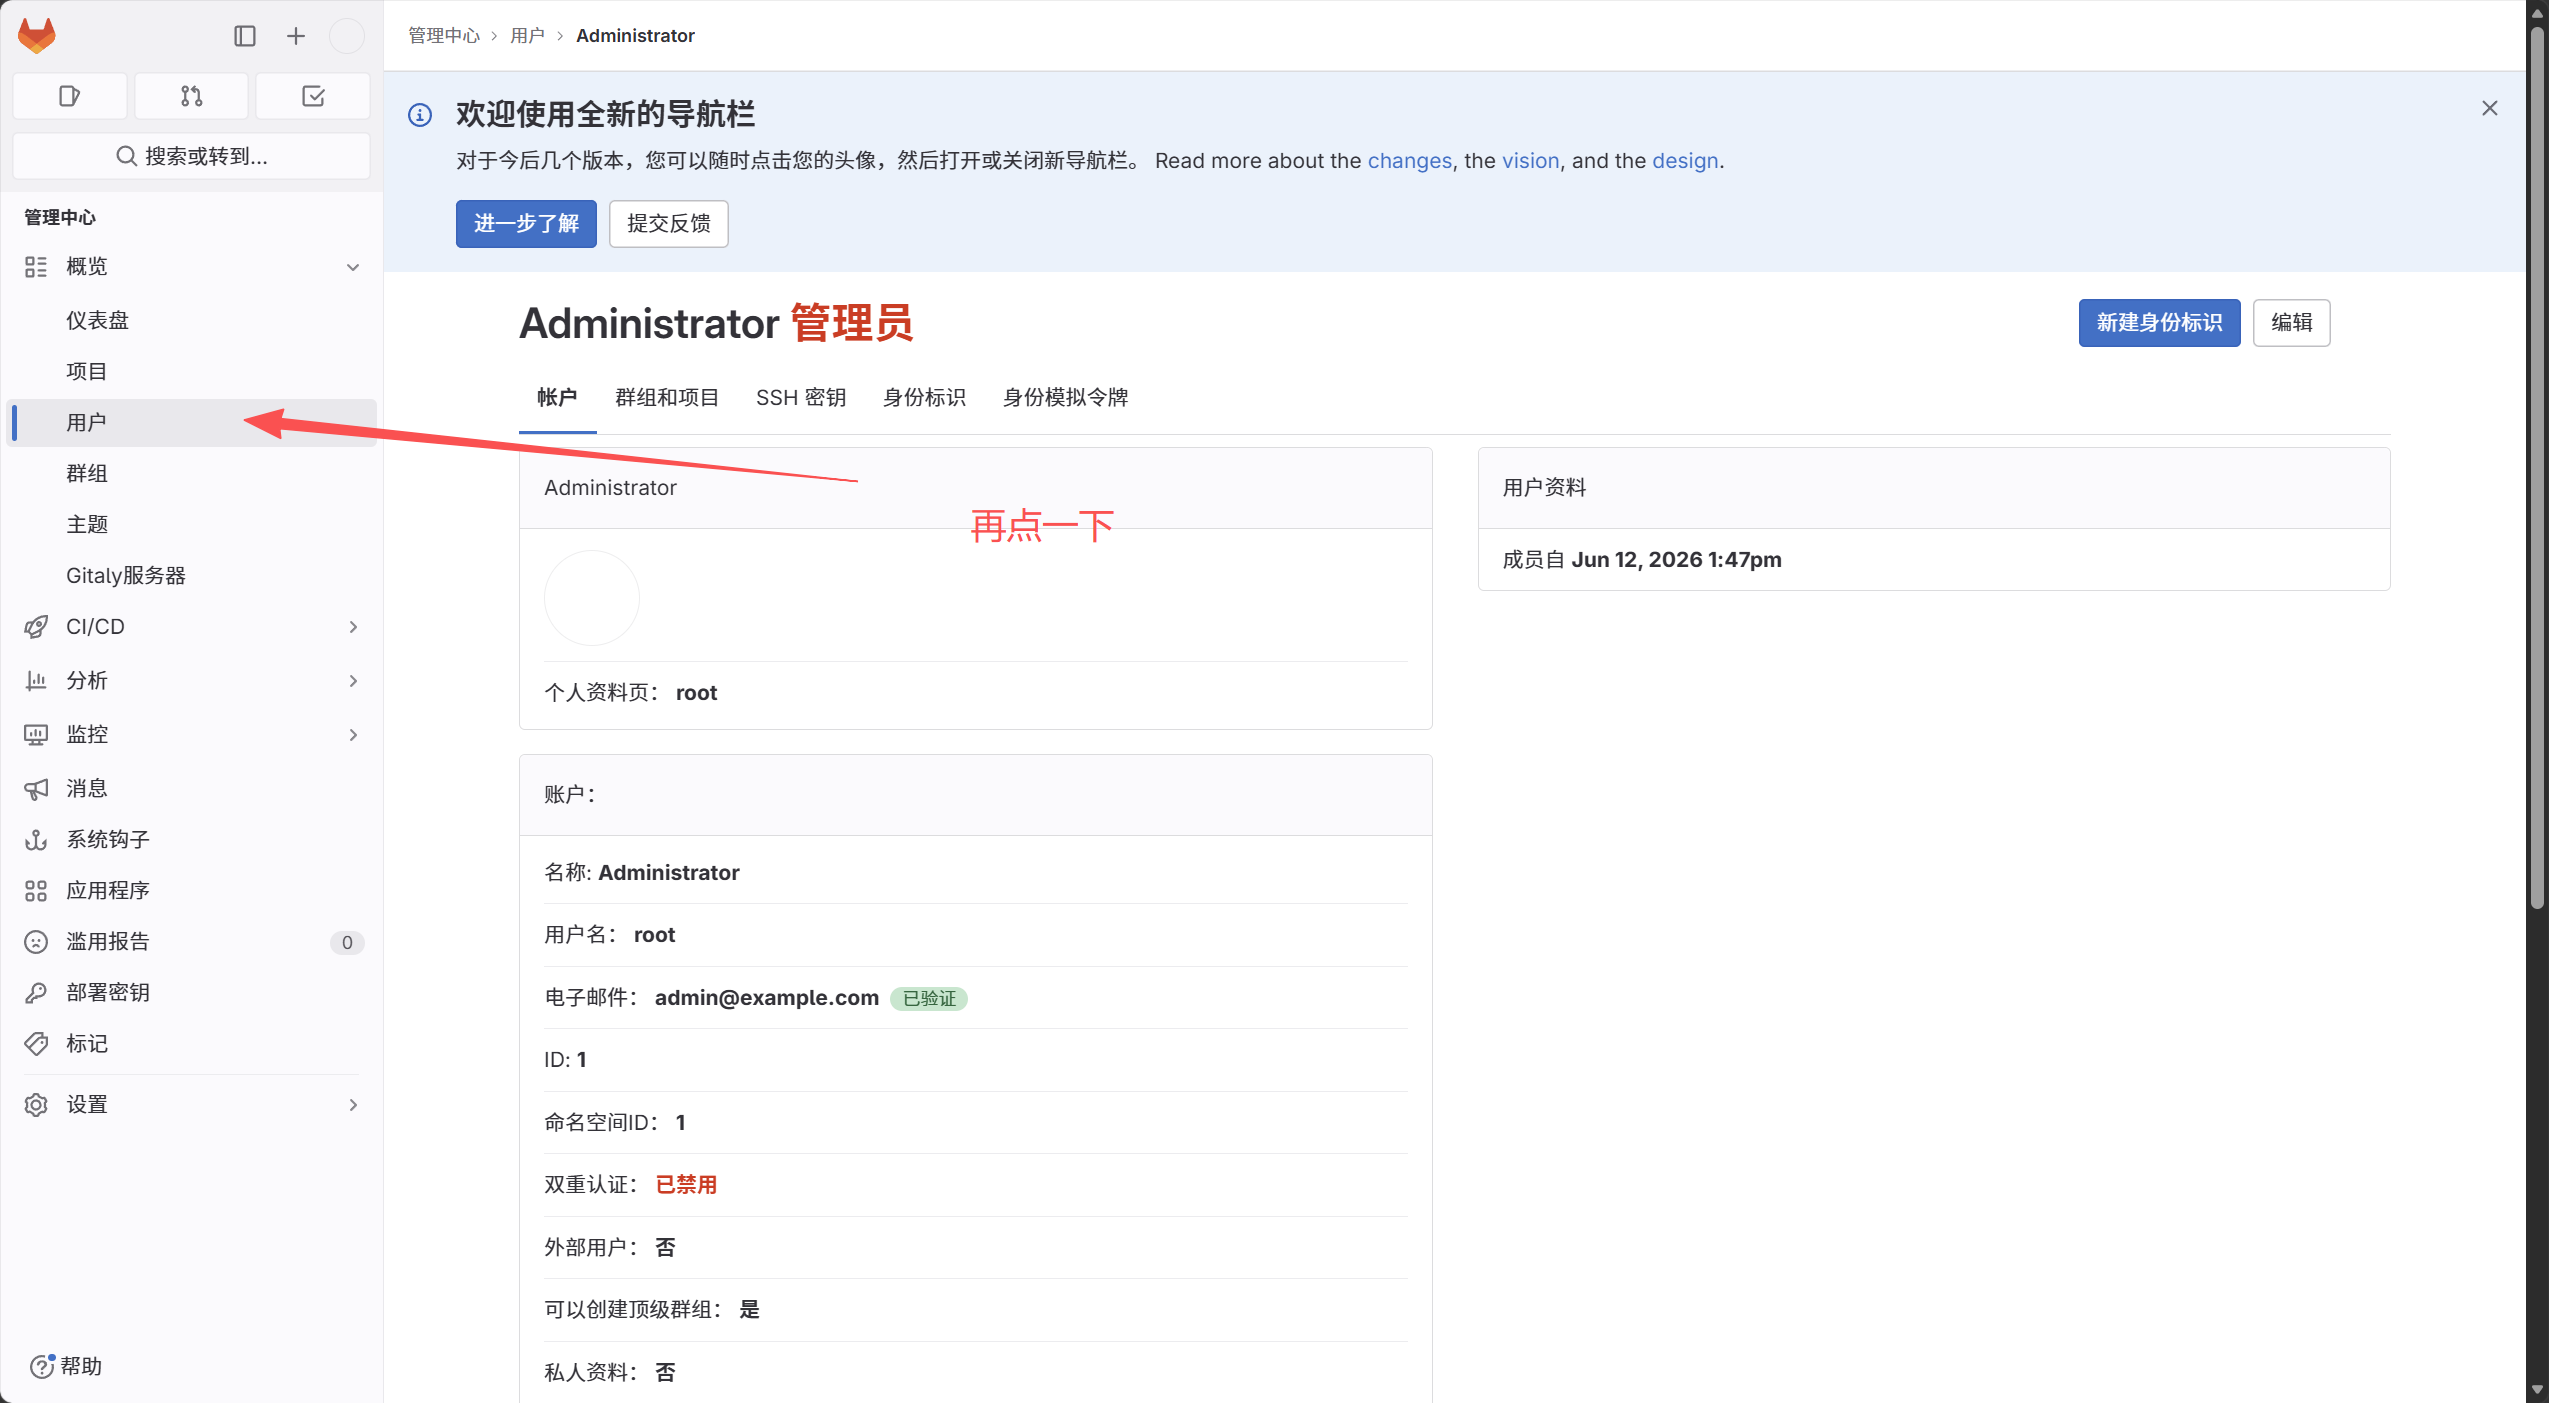
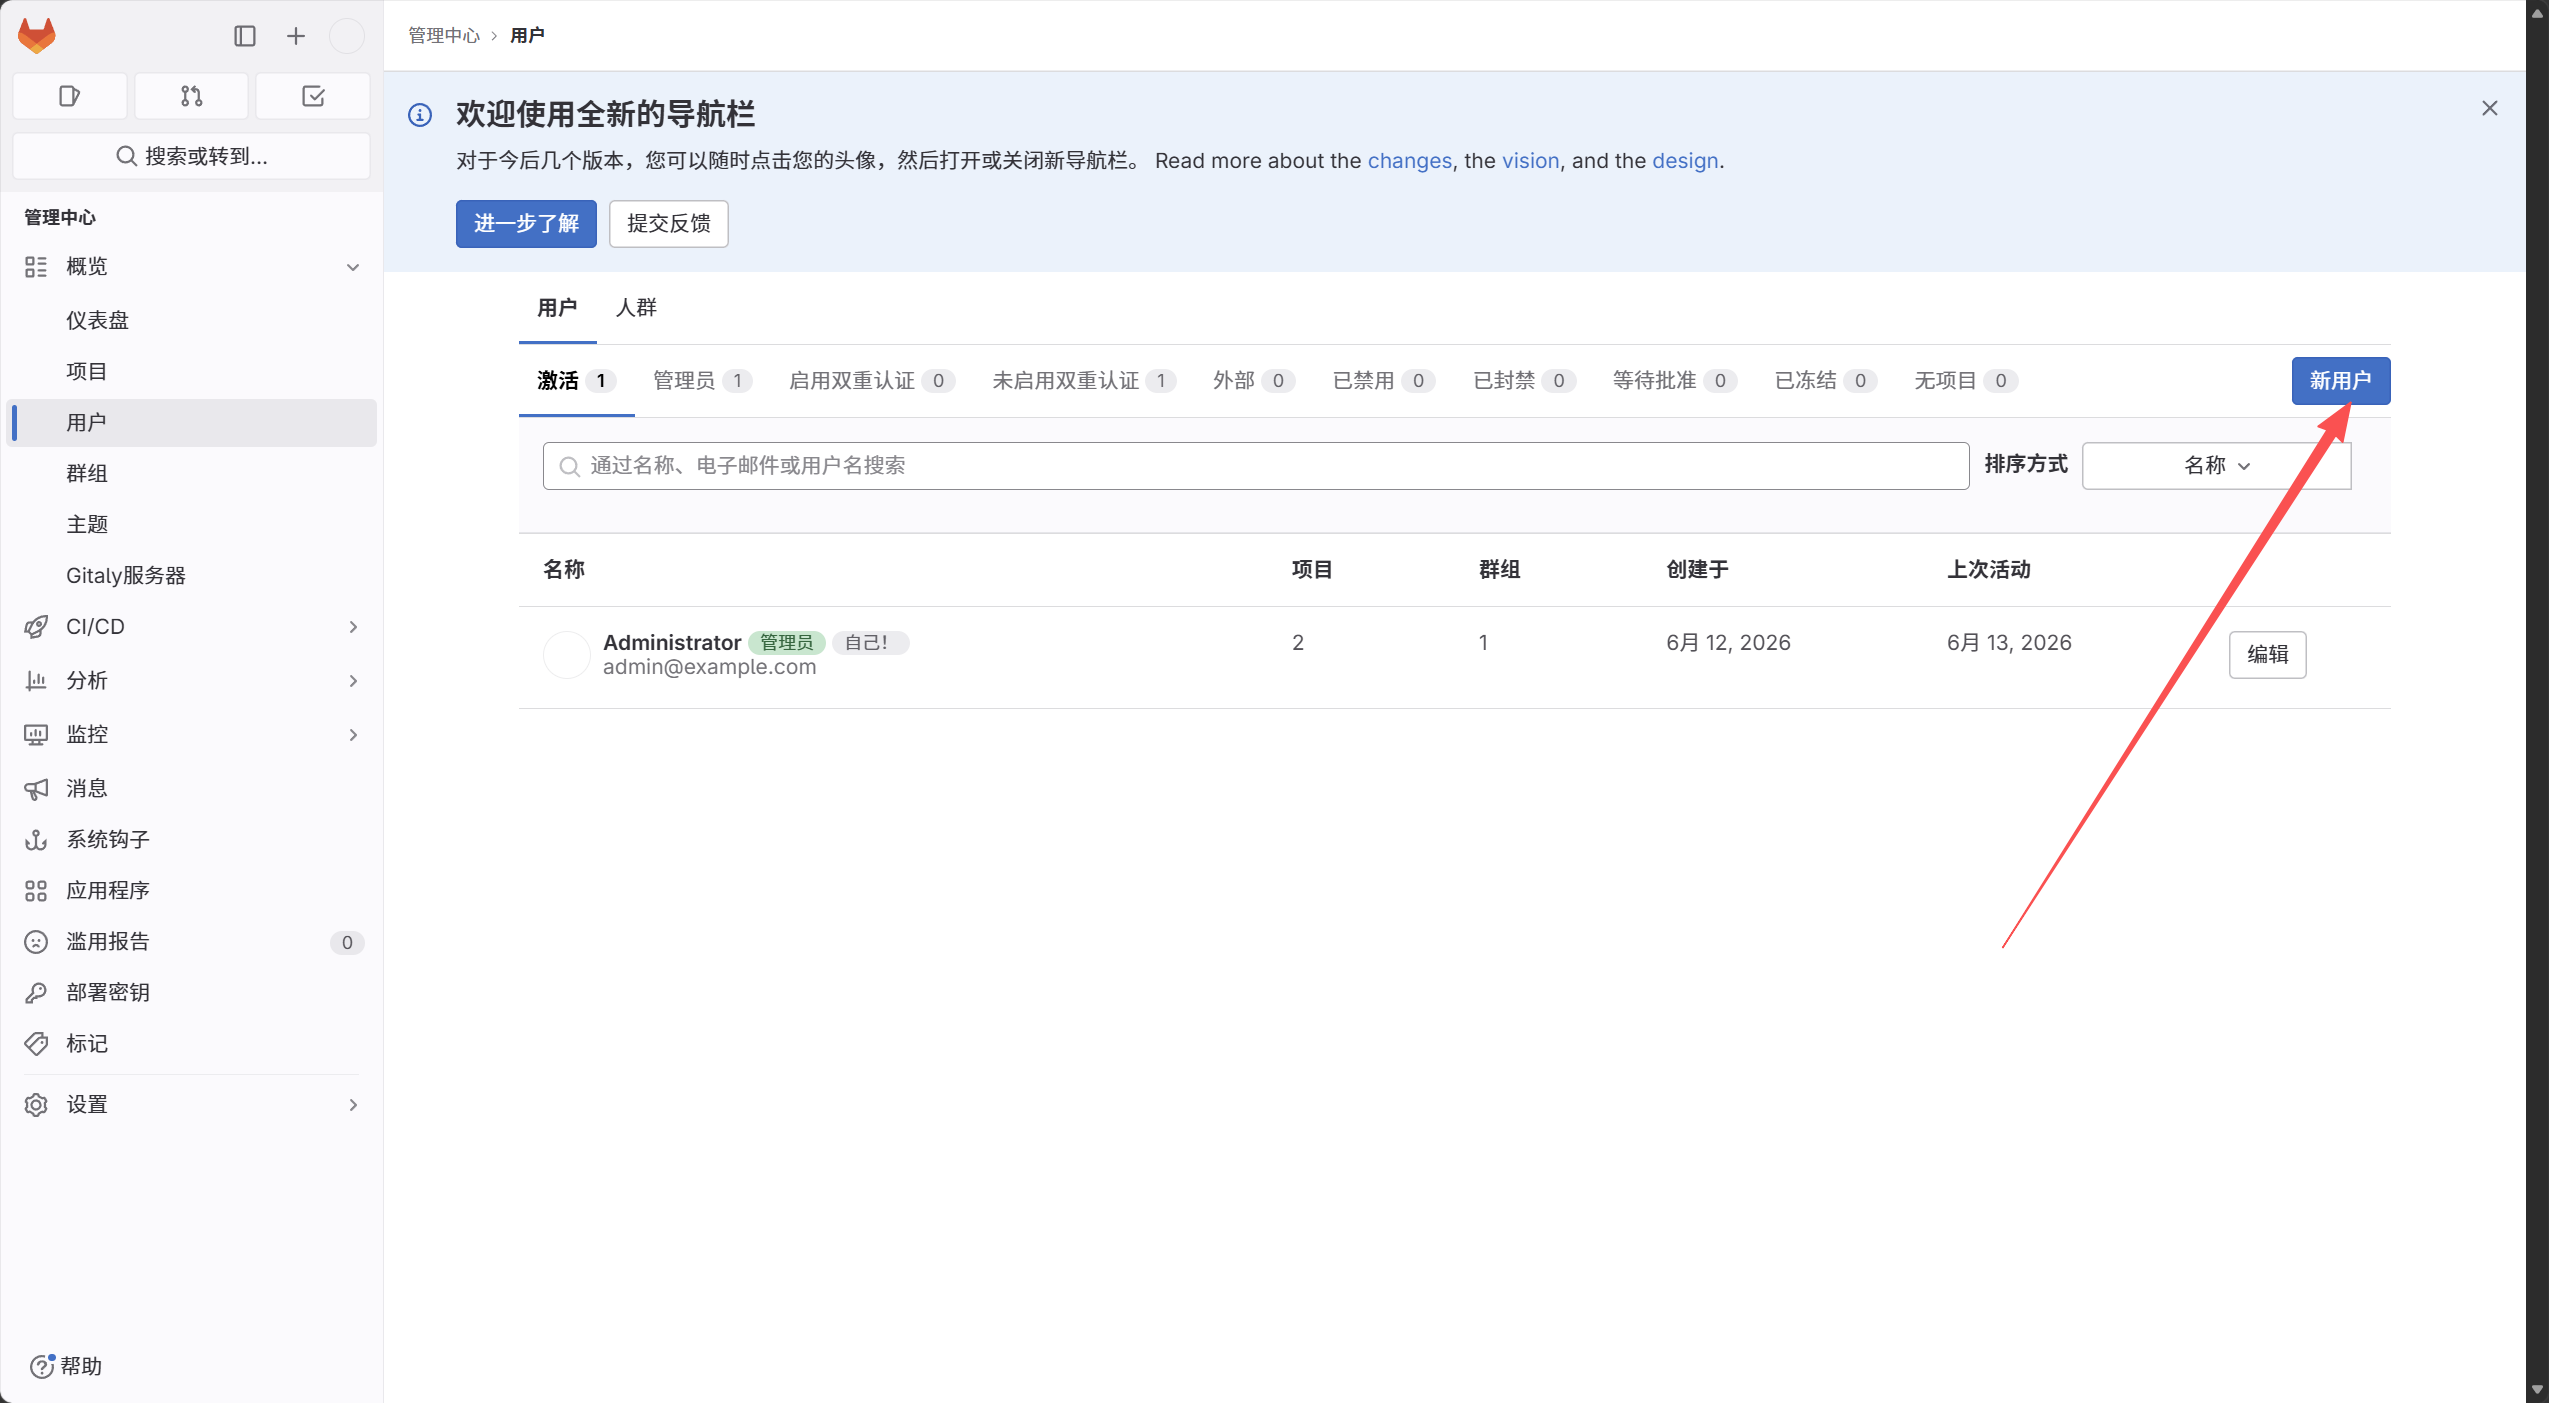
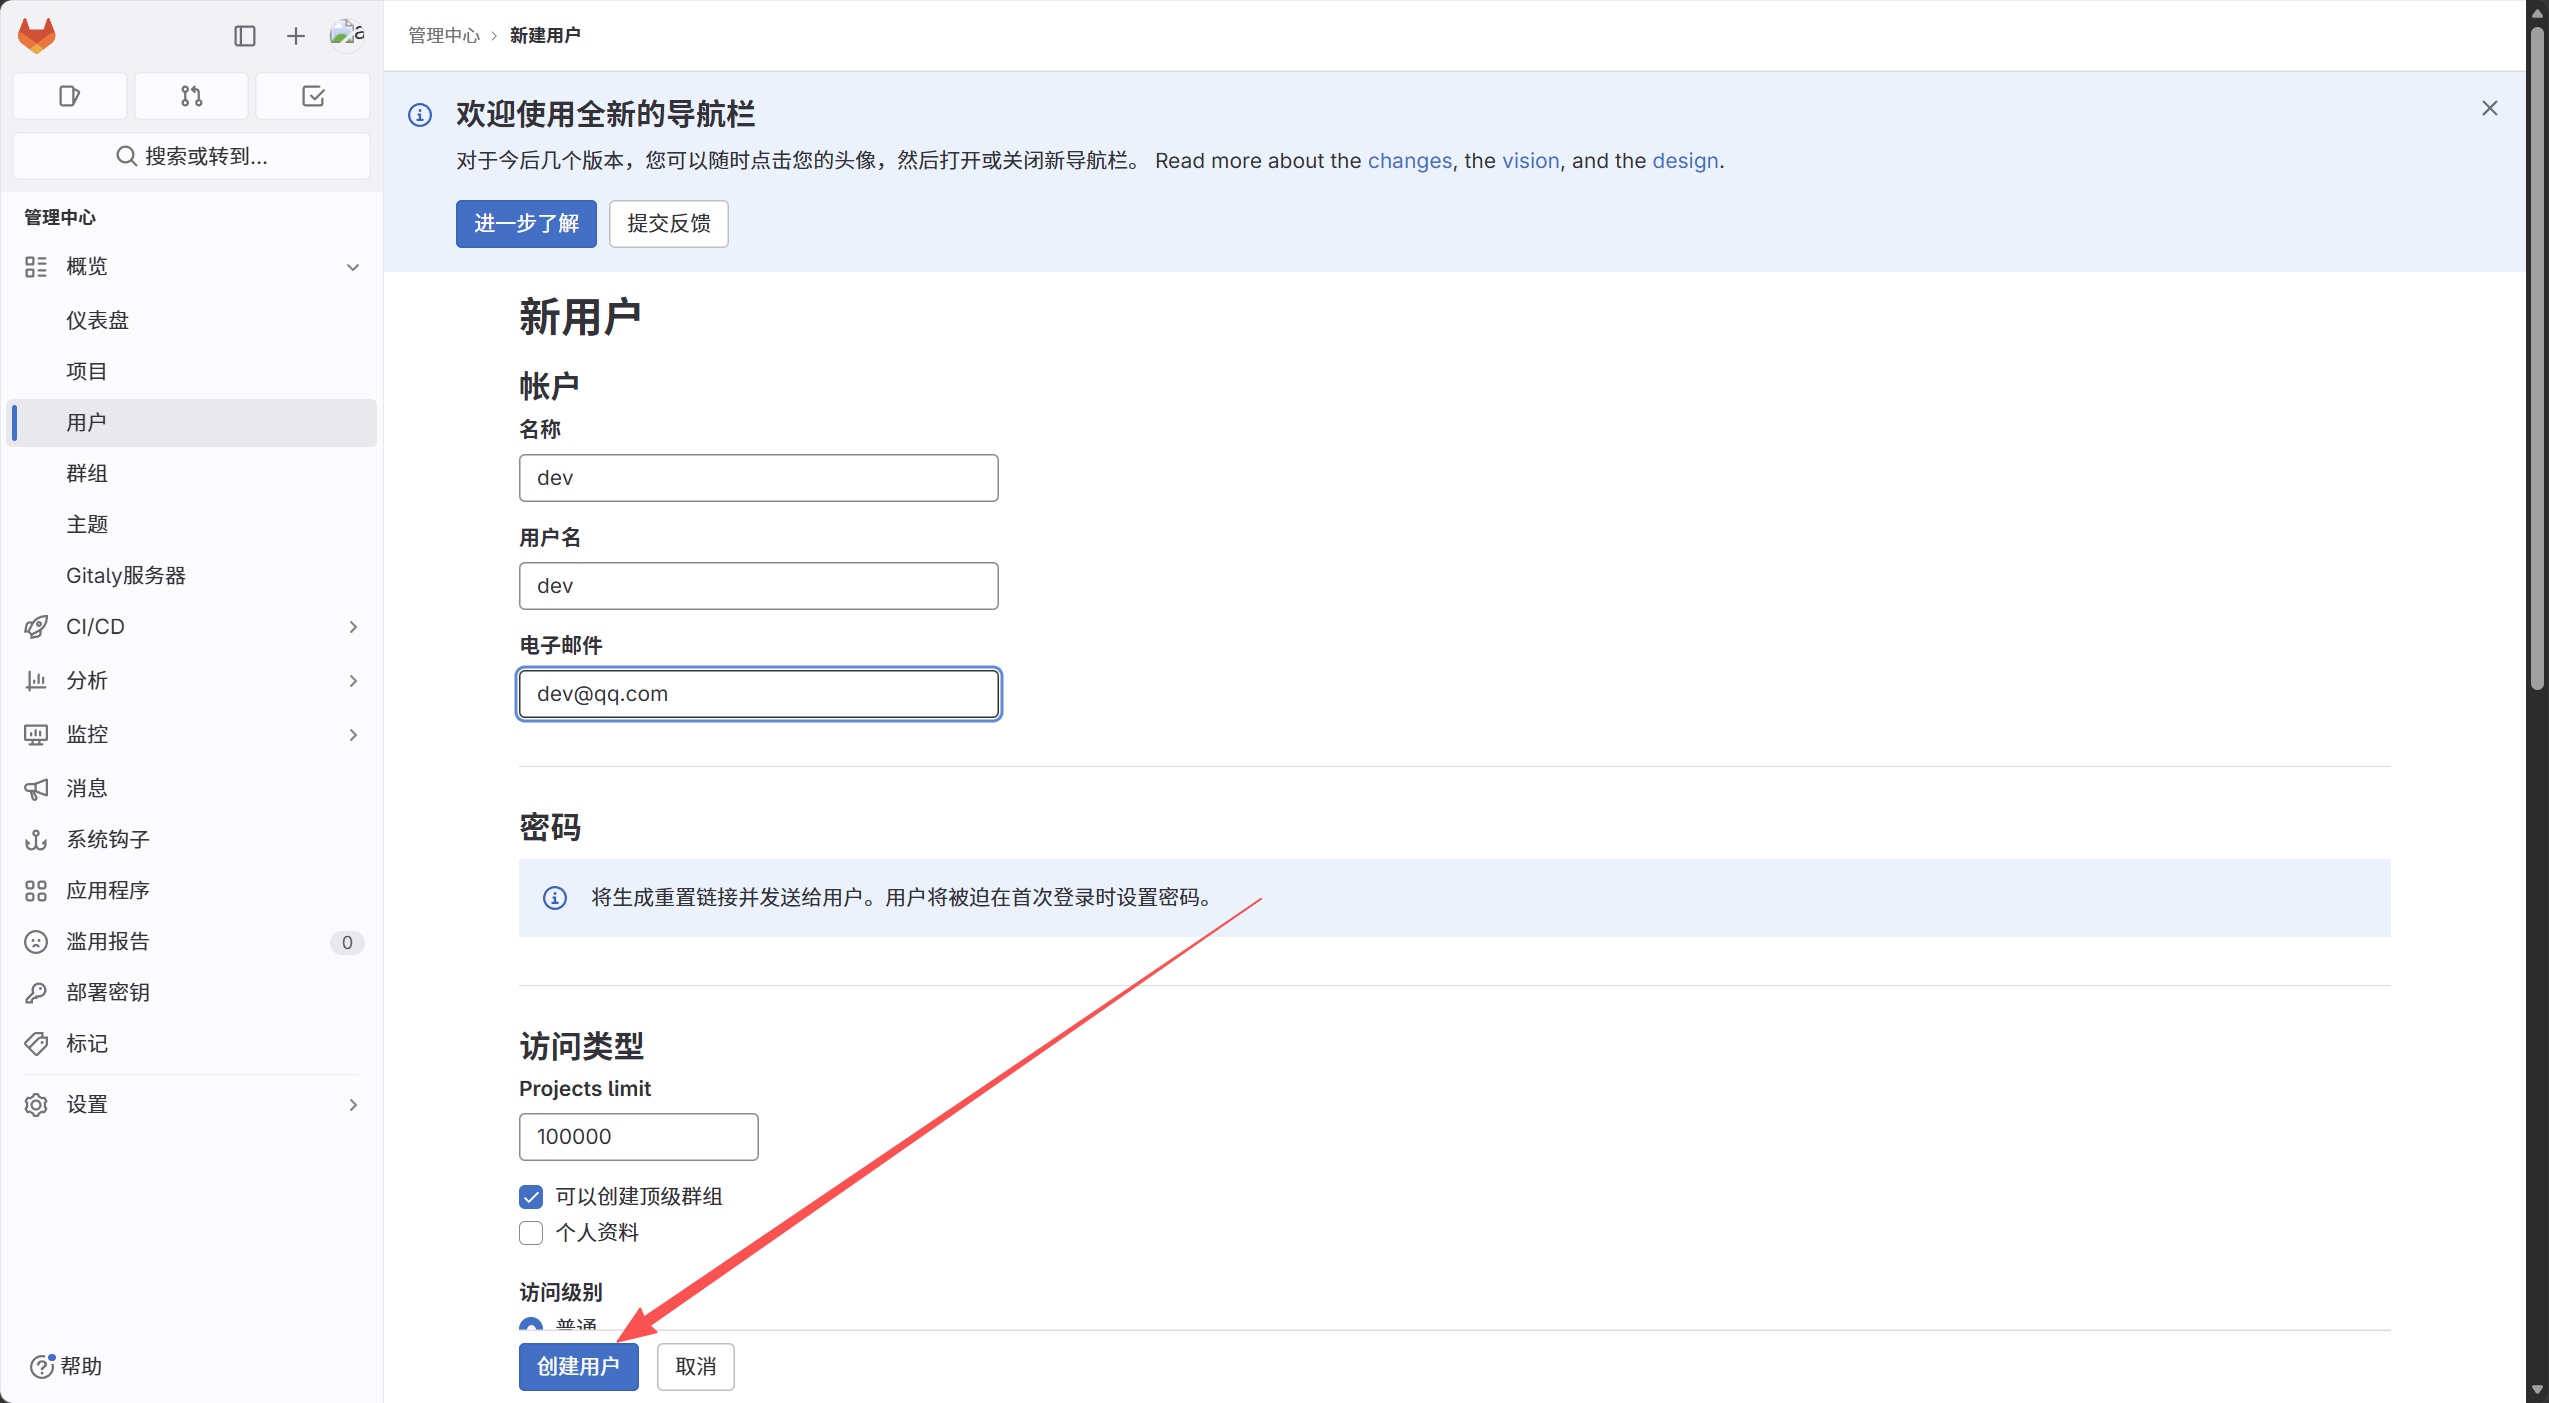
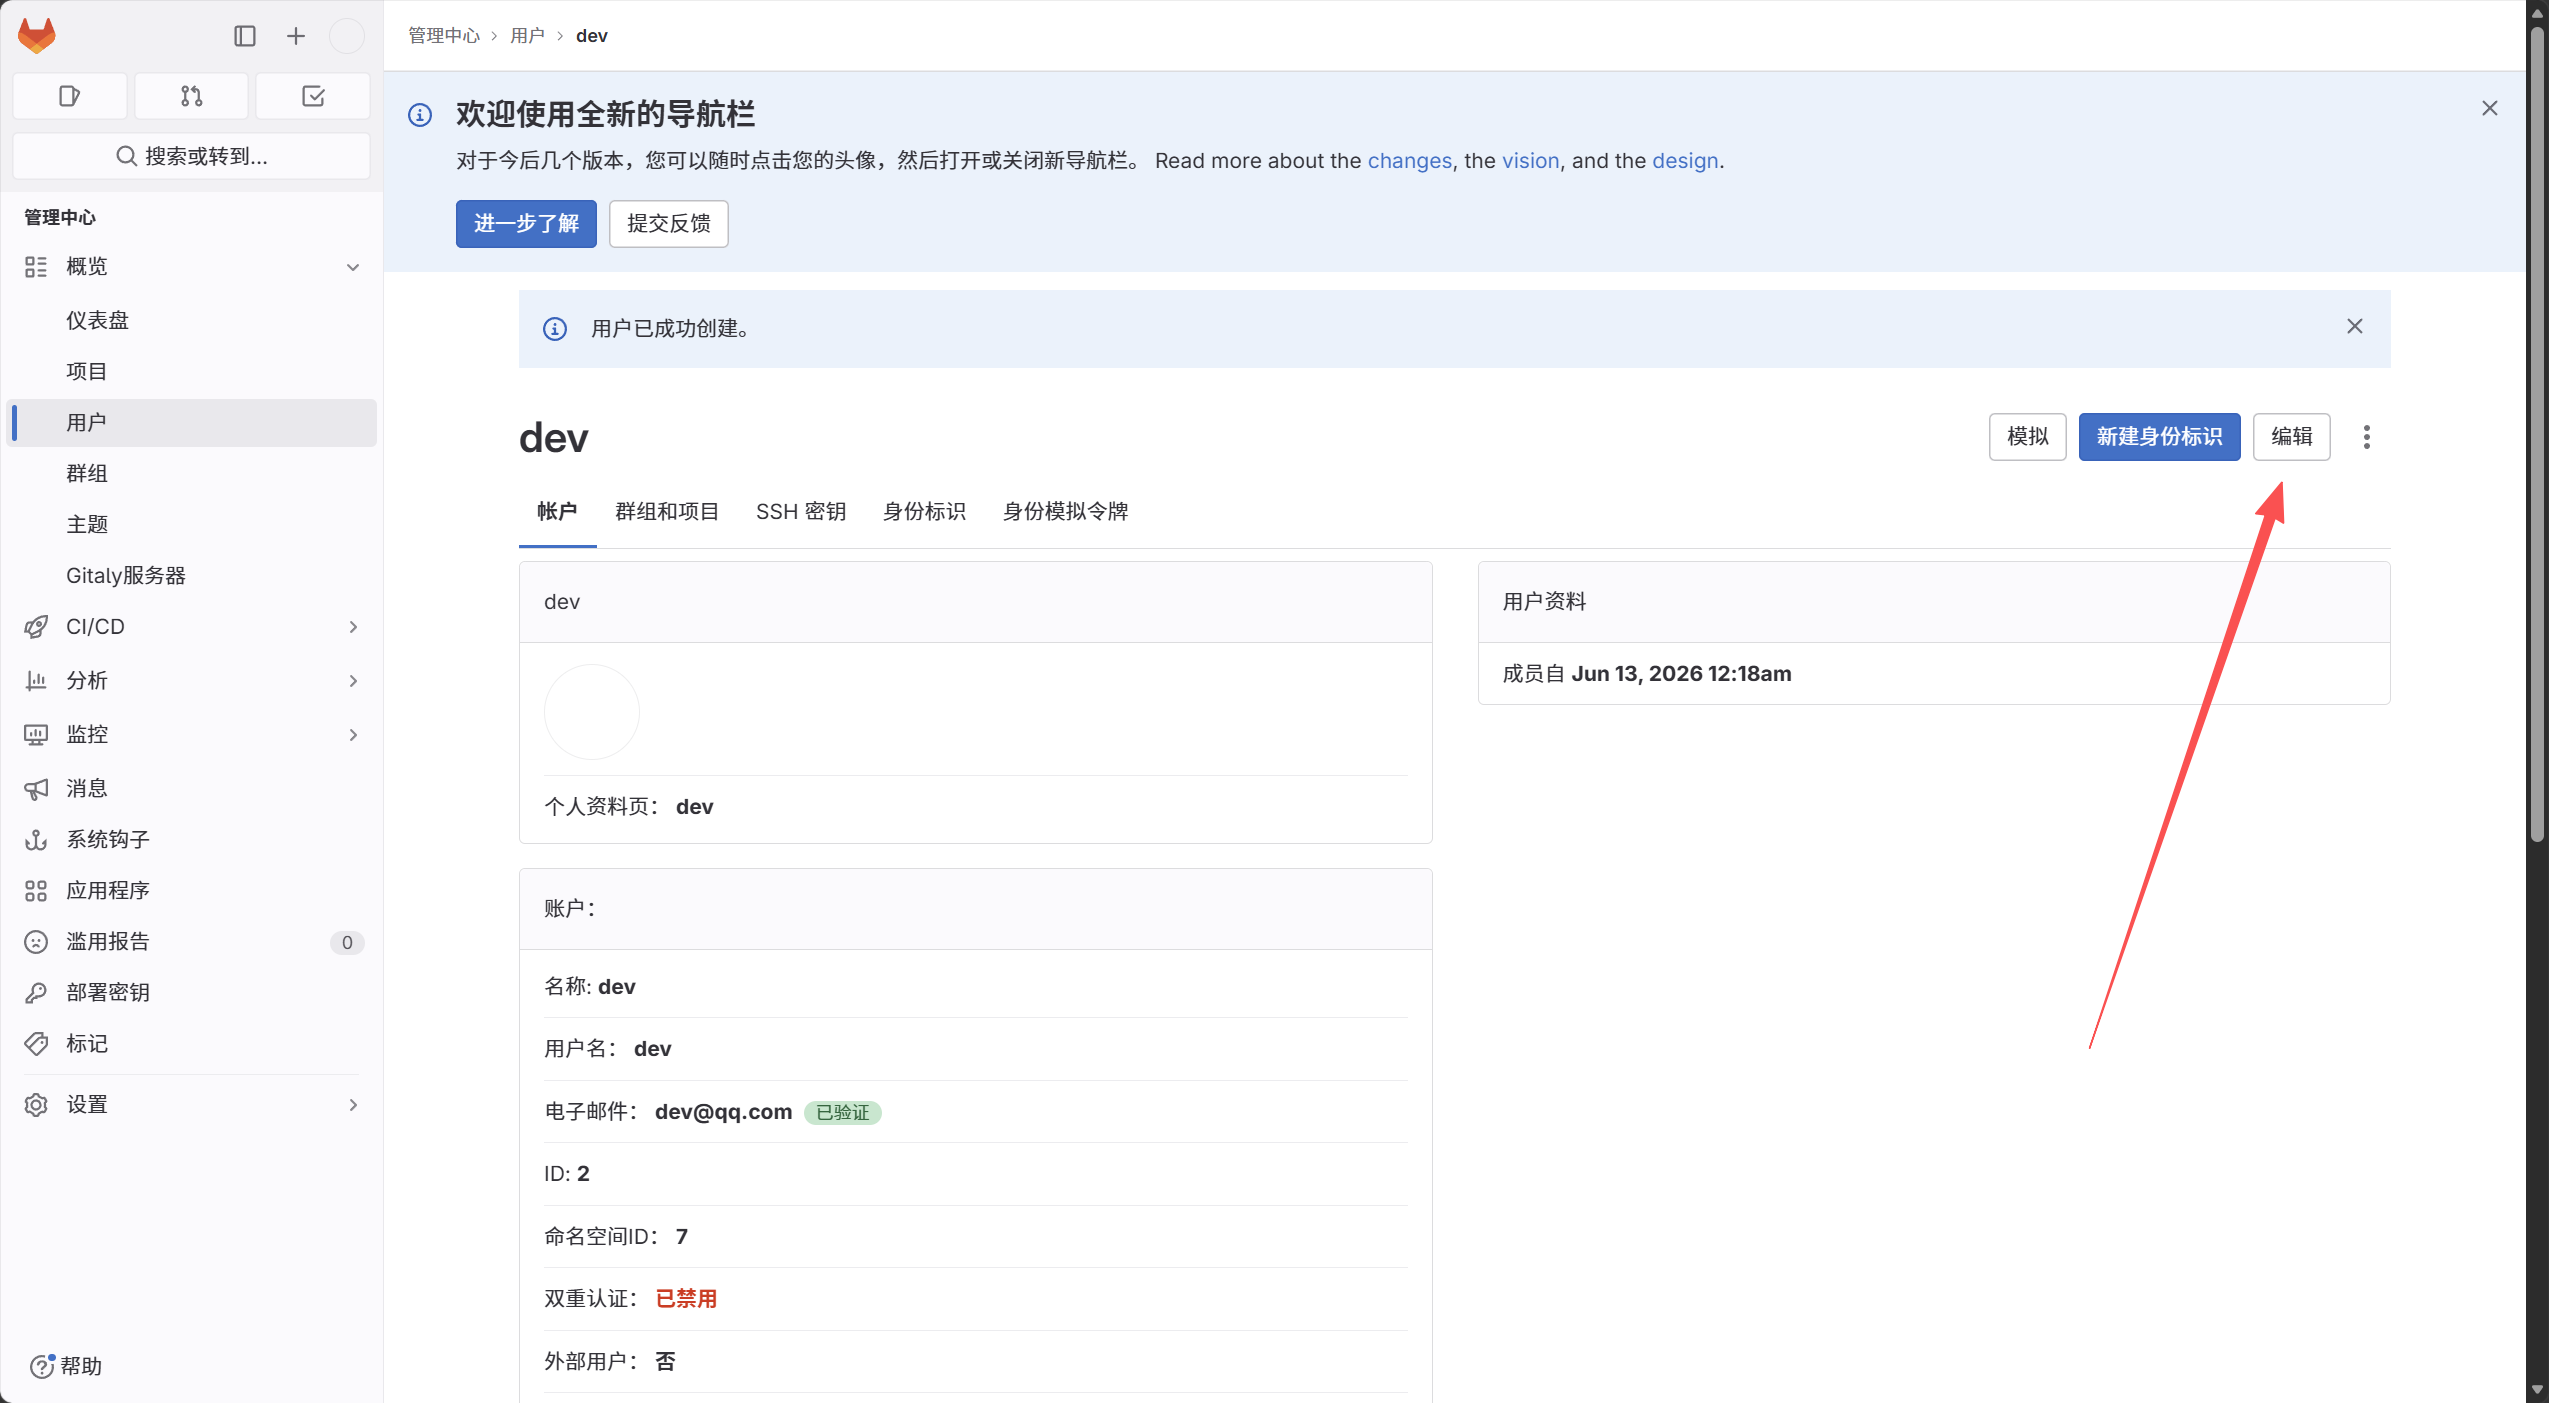
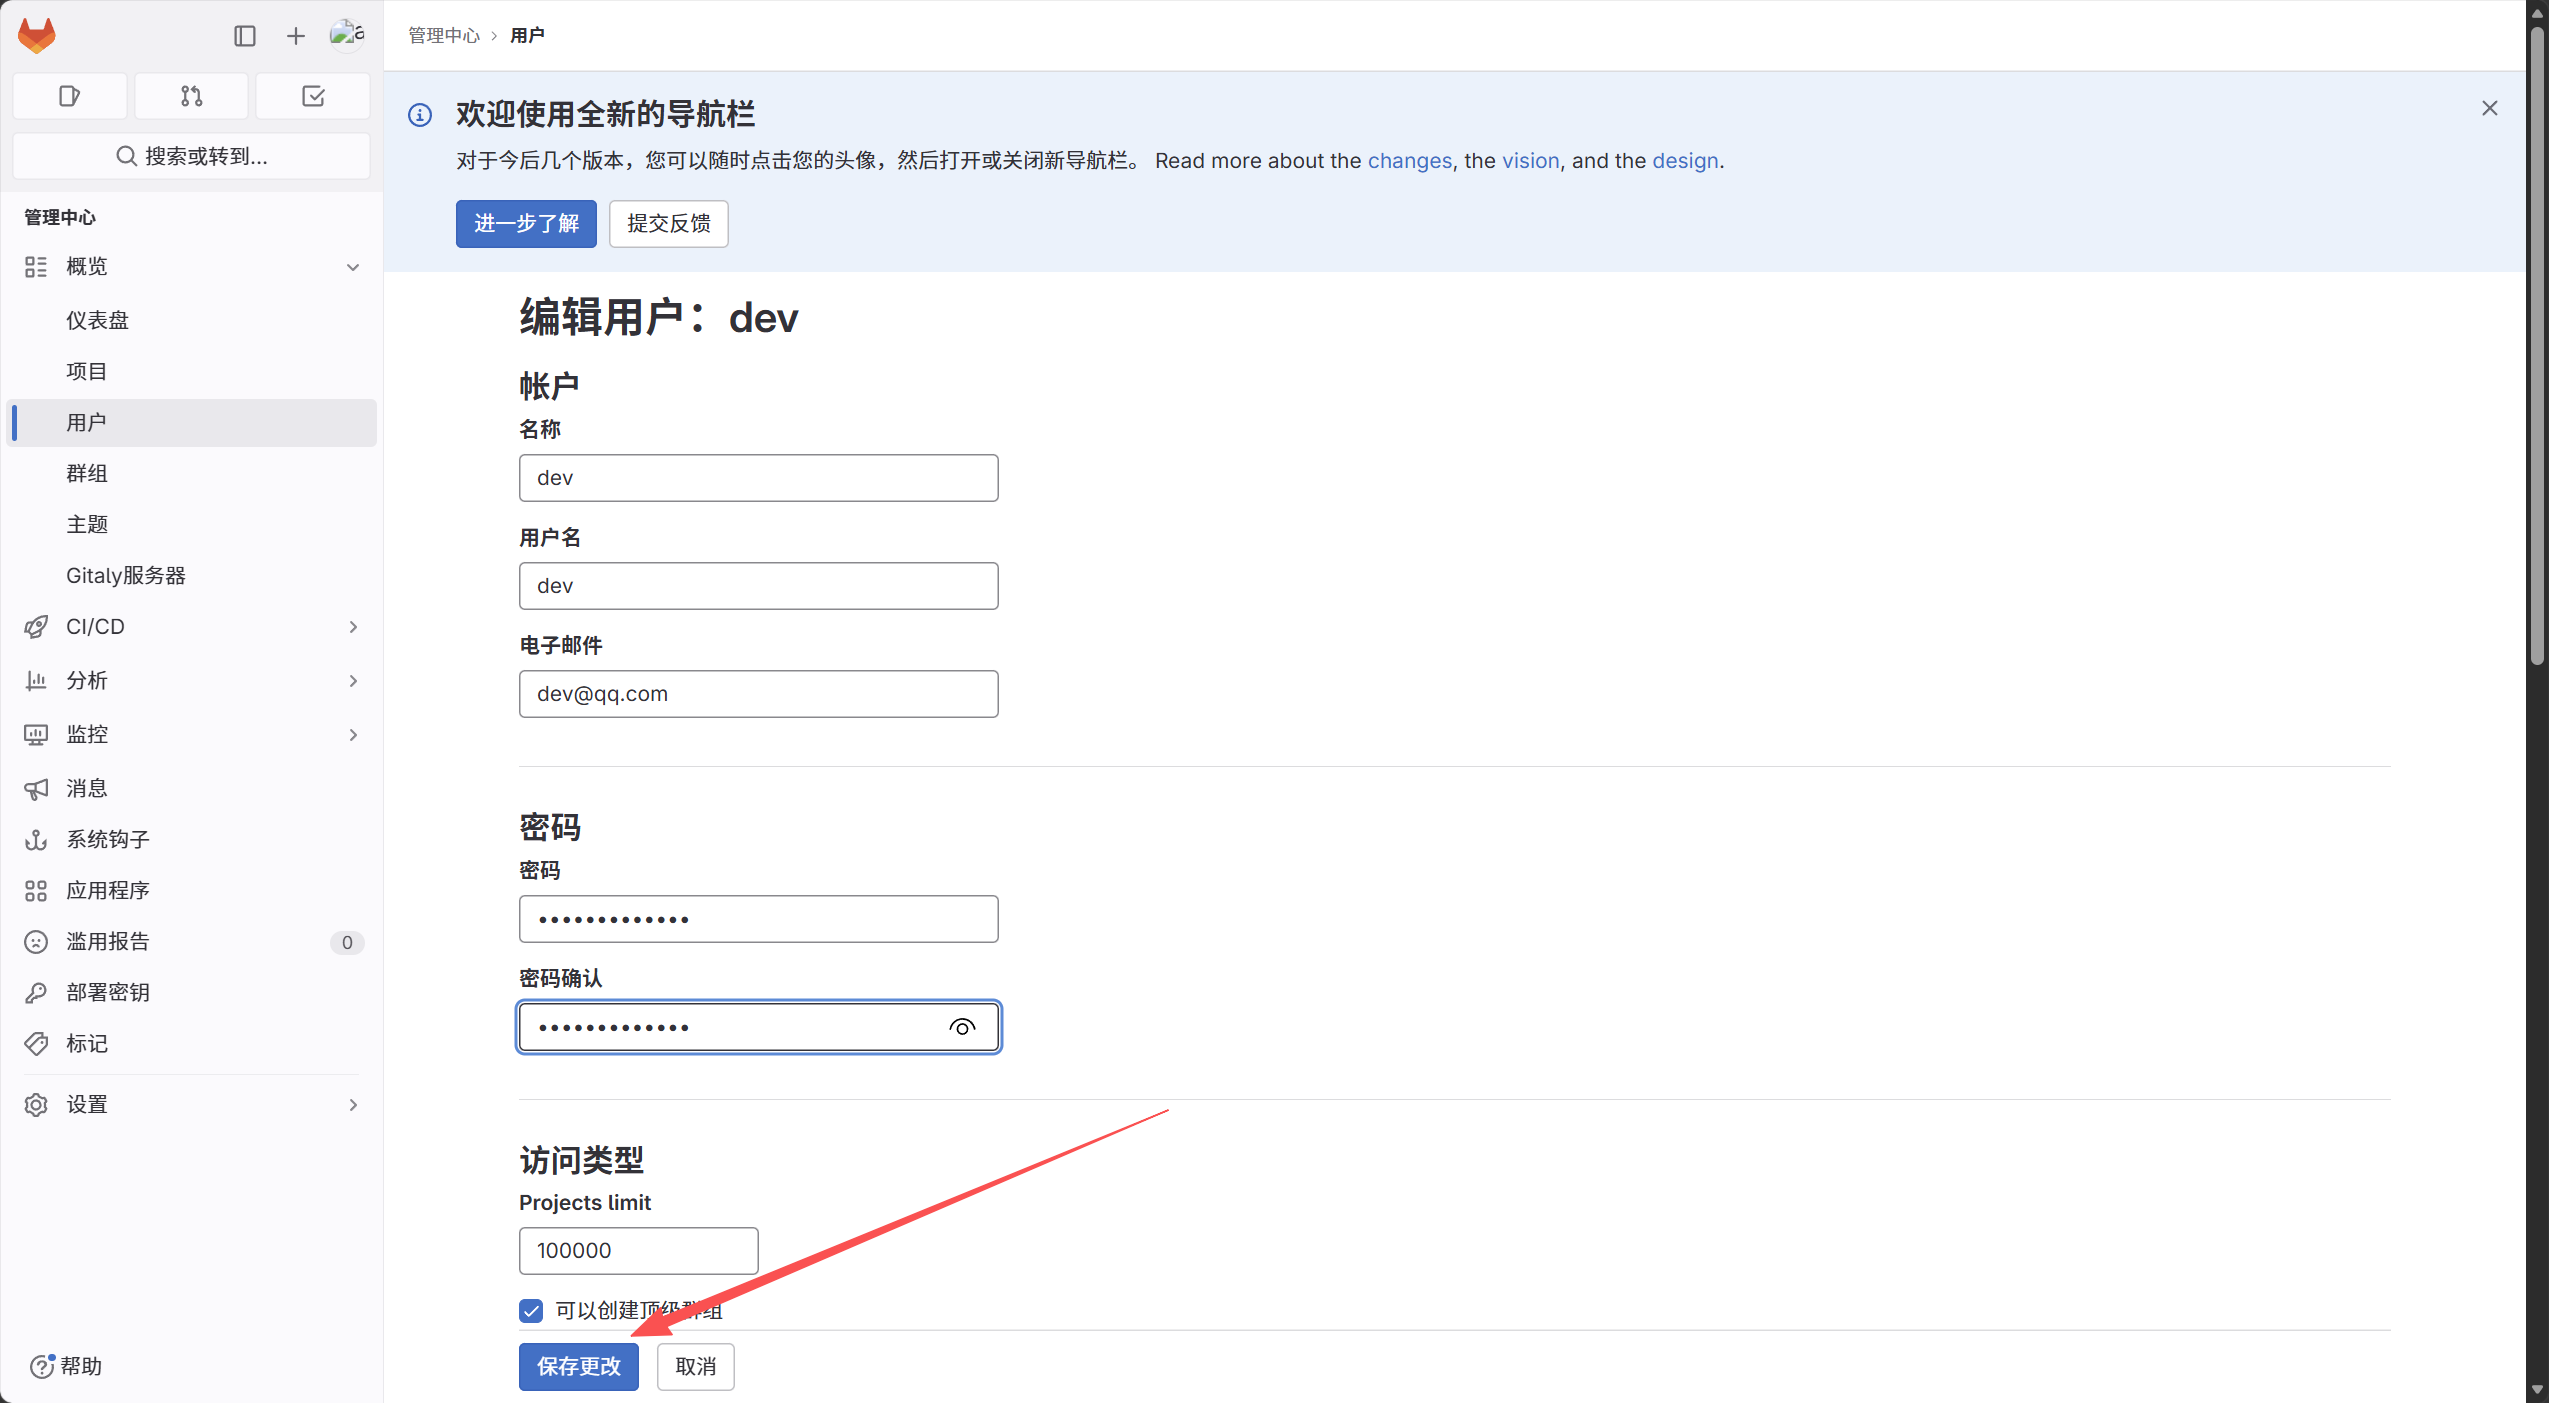
修改密码
将dev加入到oldboy的组中
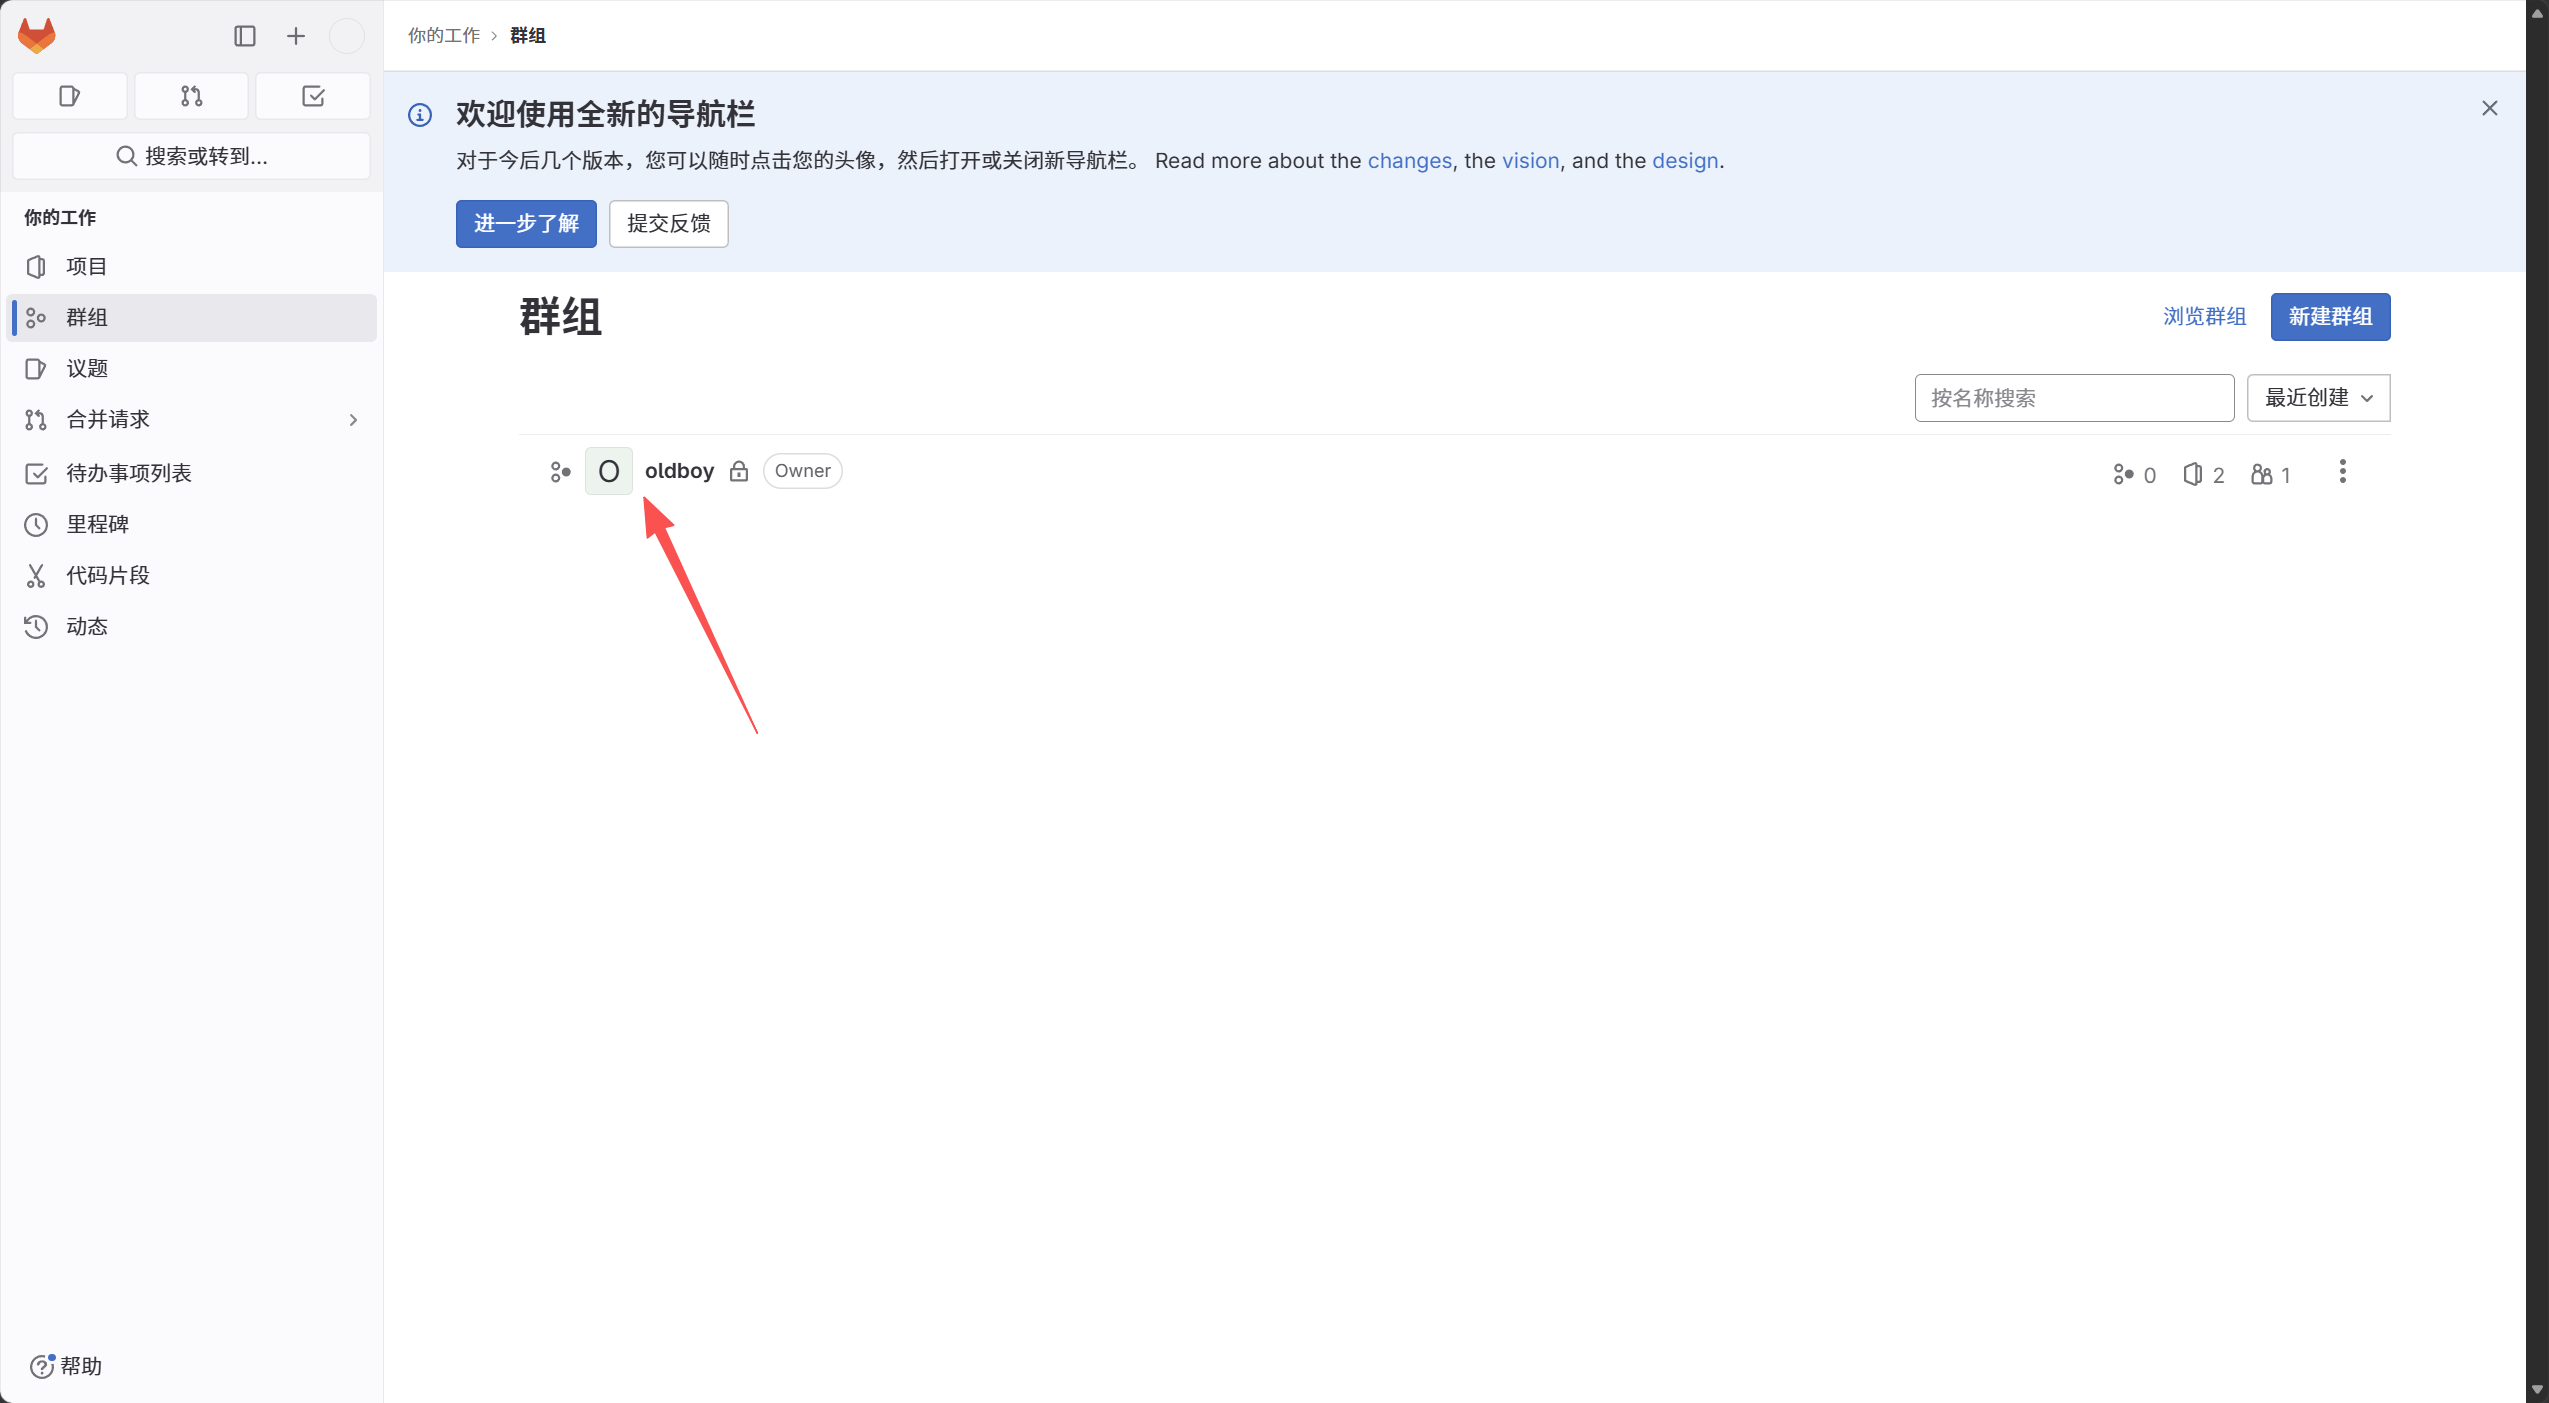
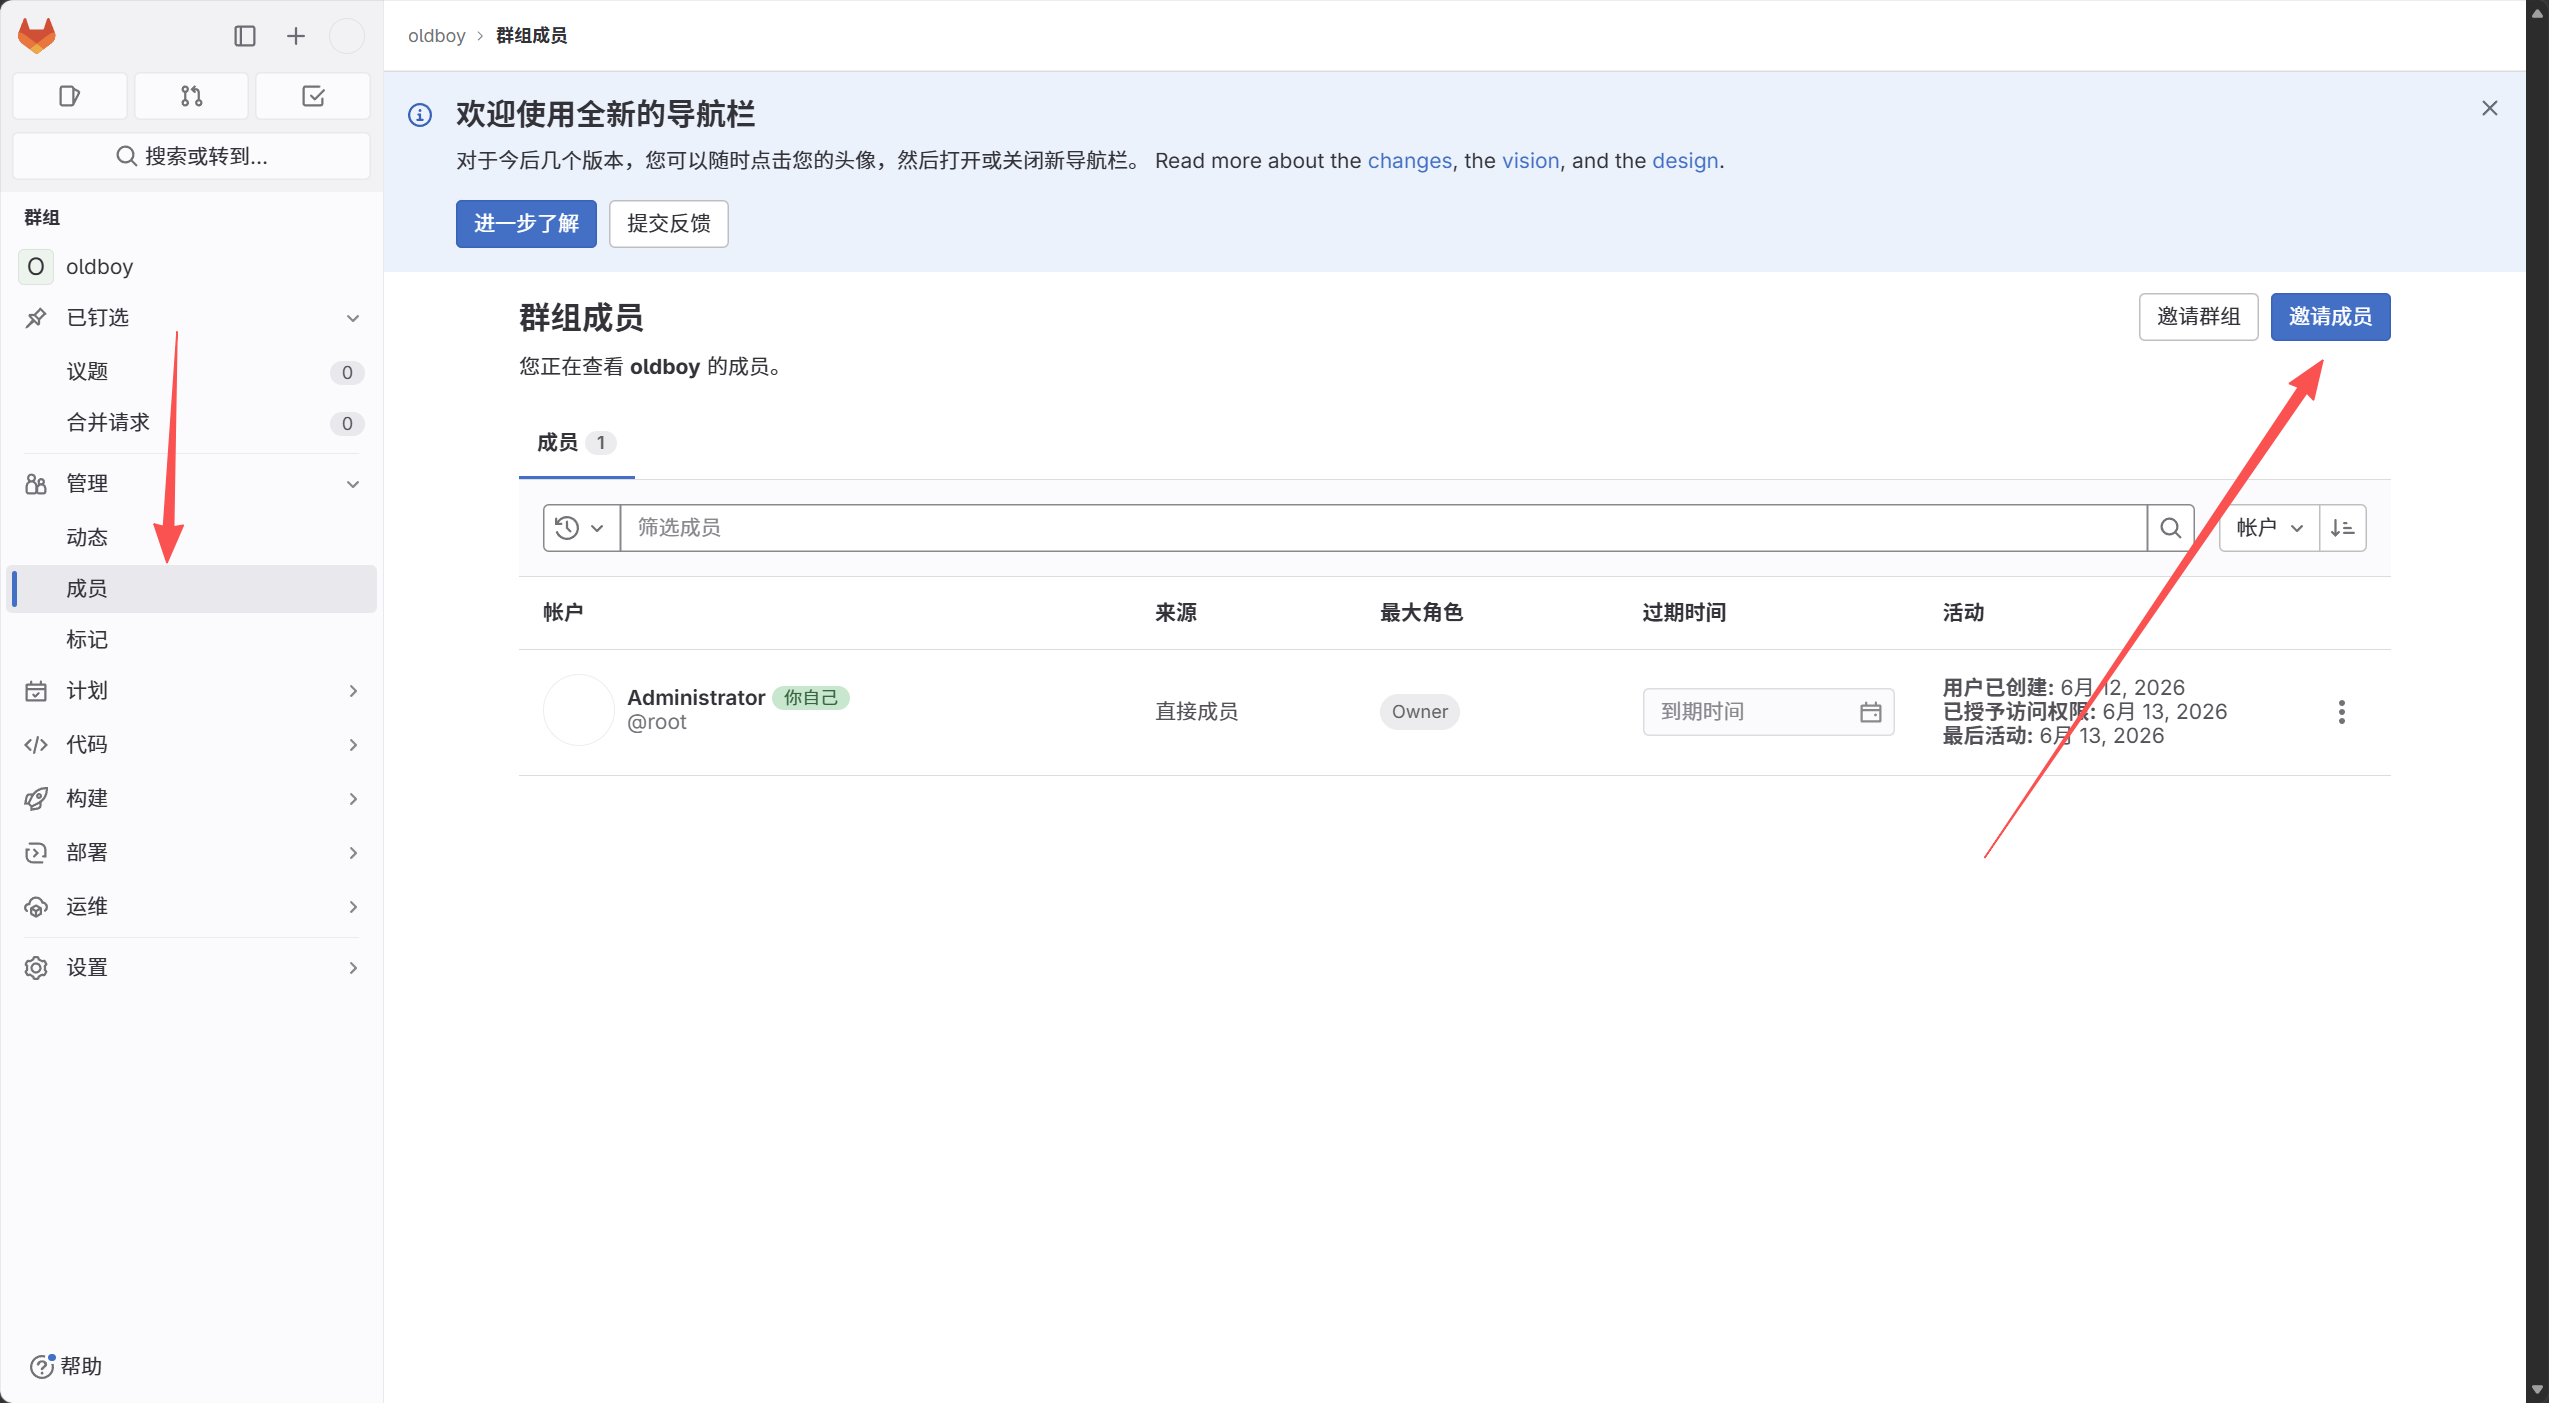
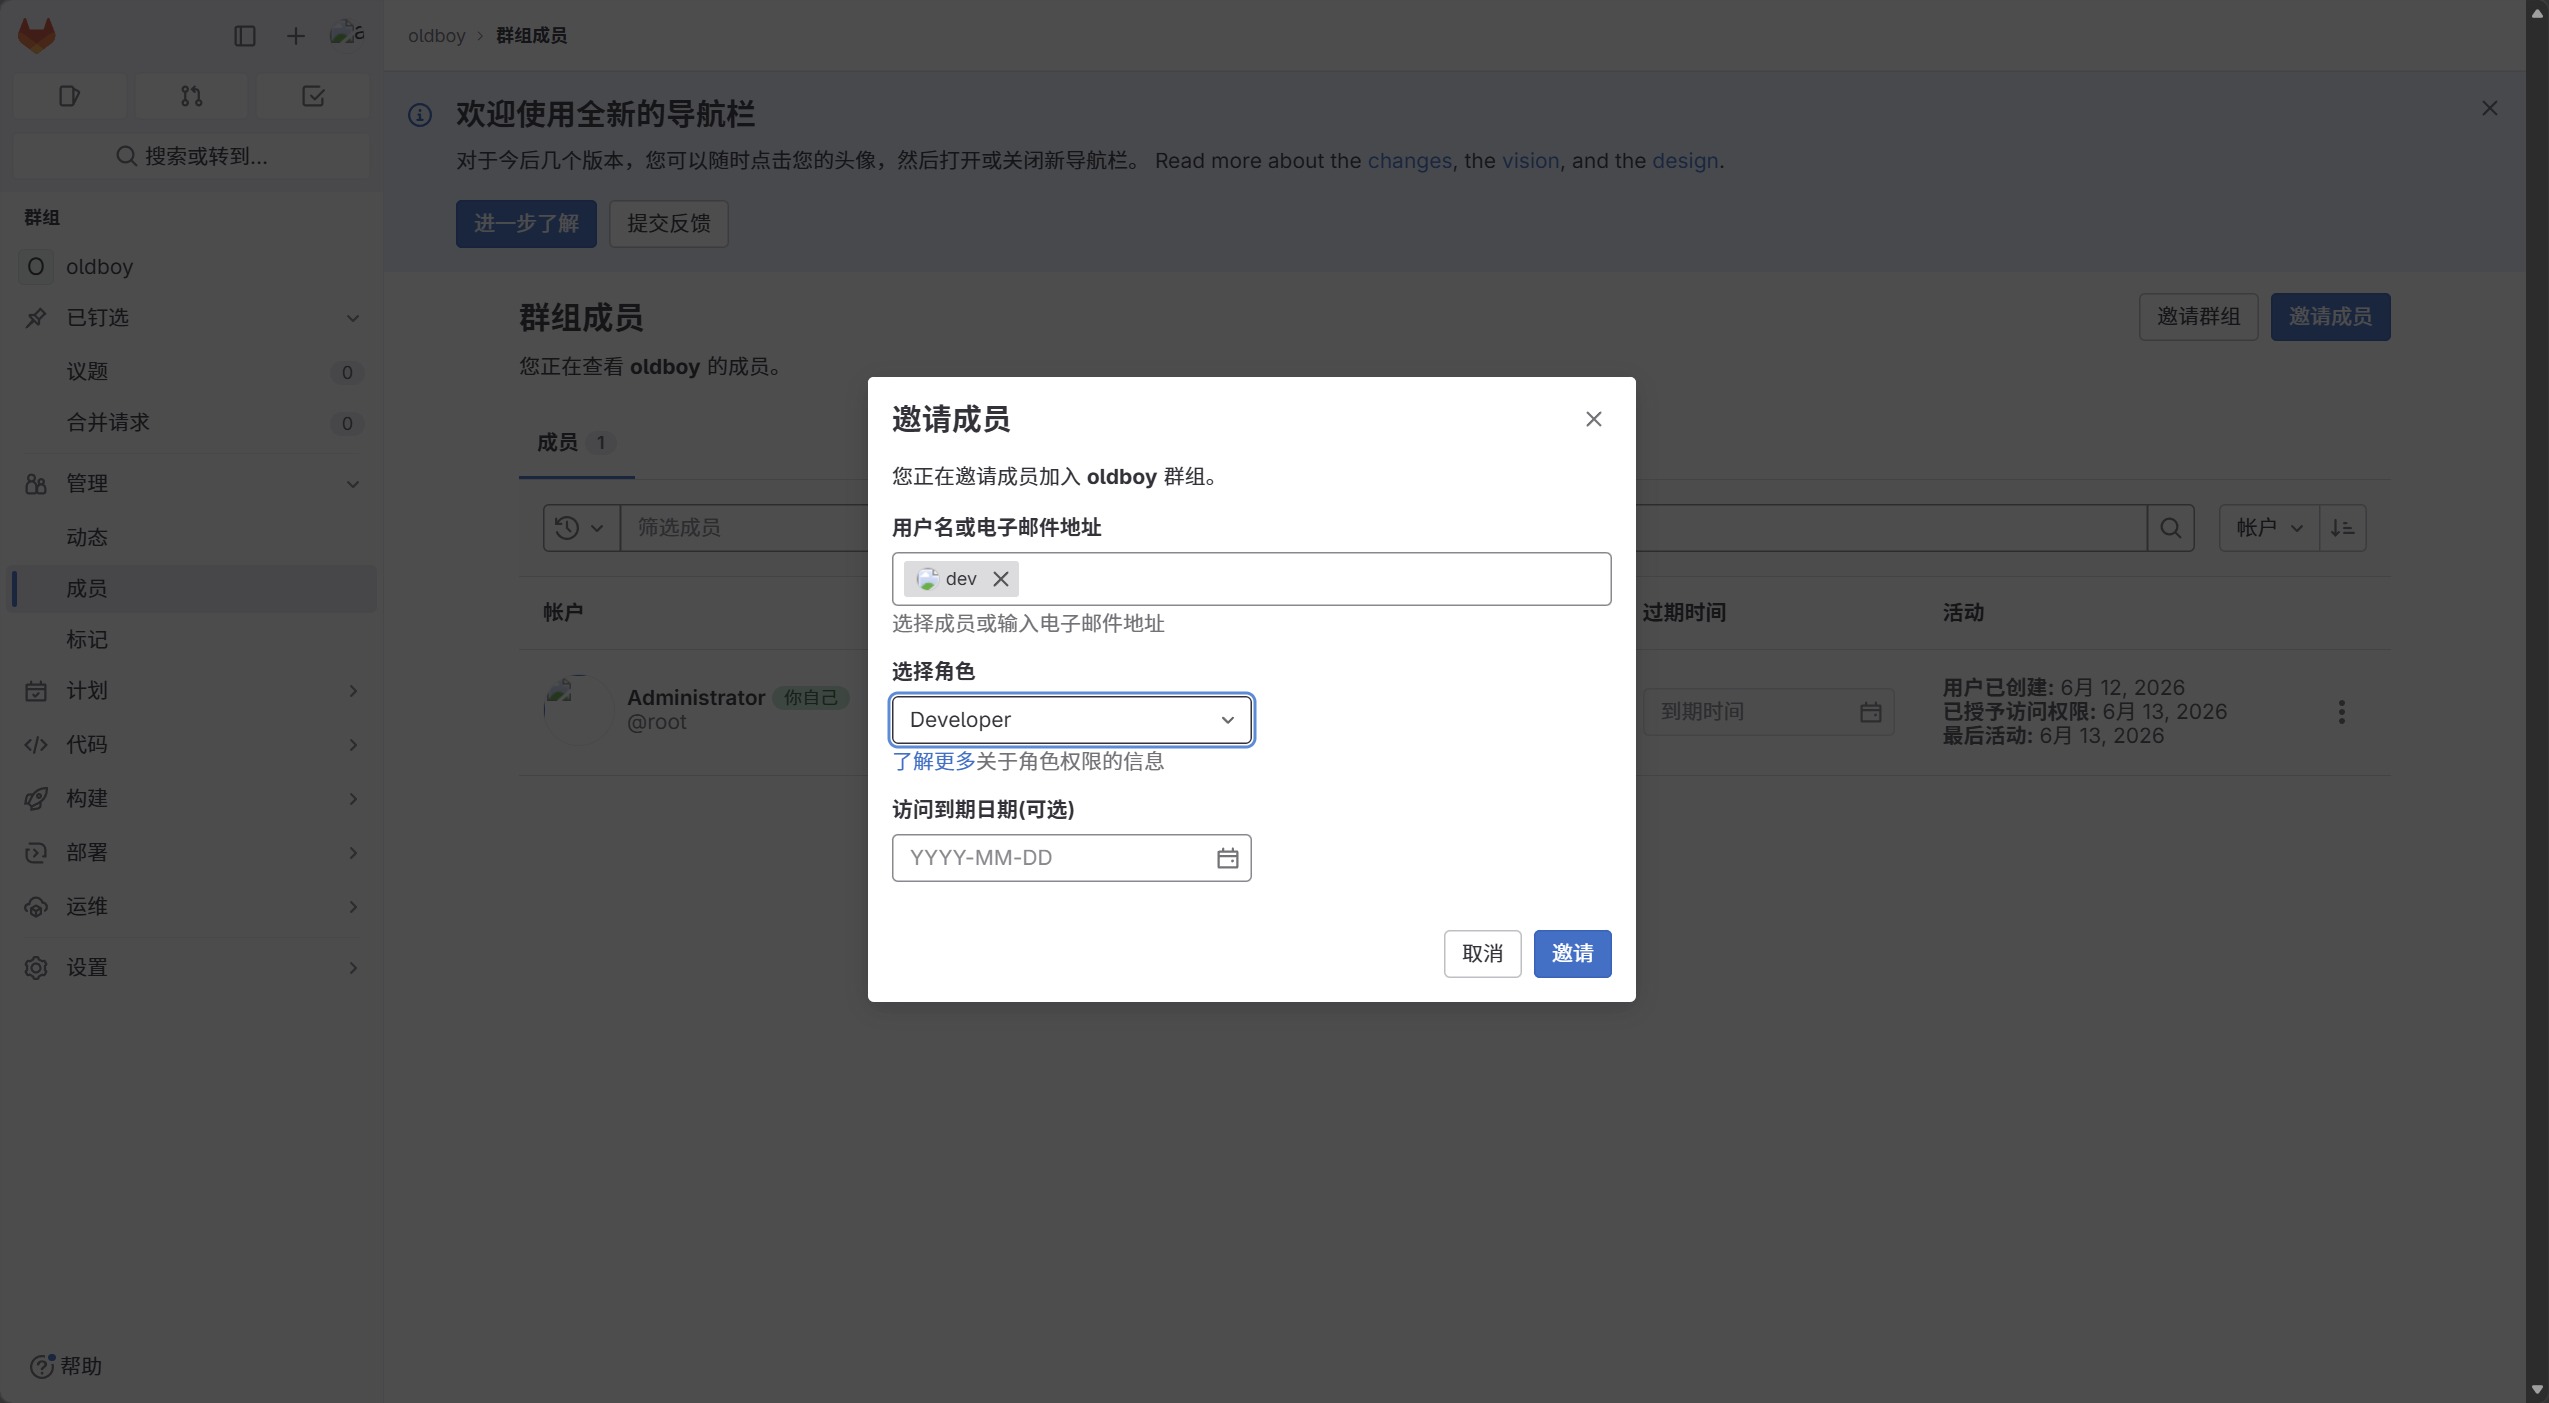
使用另外的浏览器或者是无痕模式登录dev
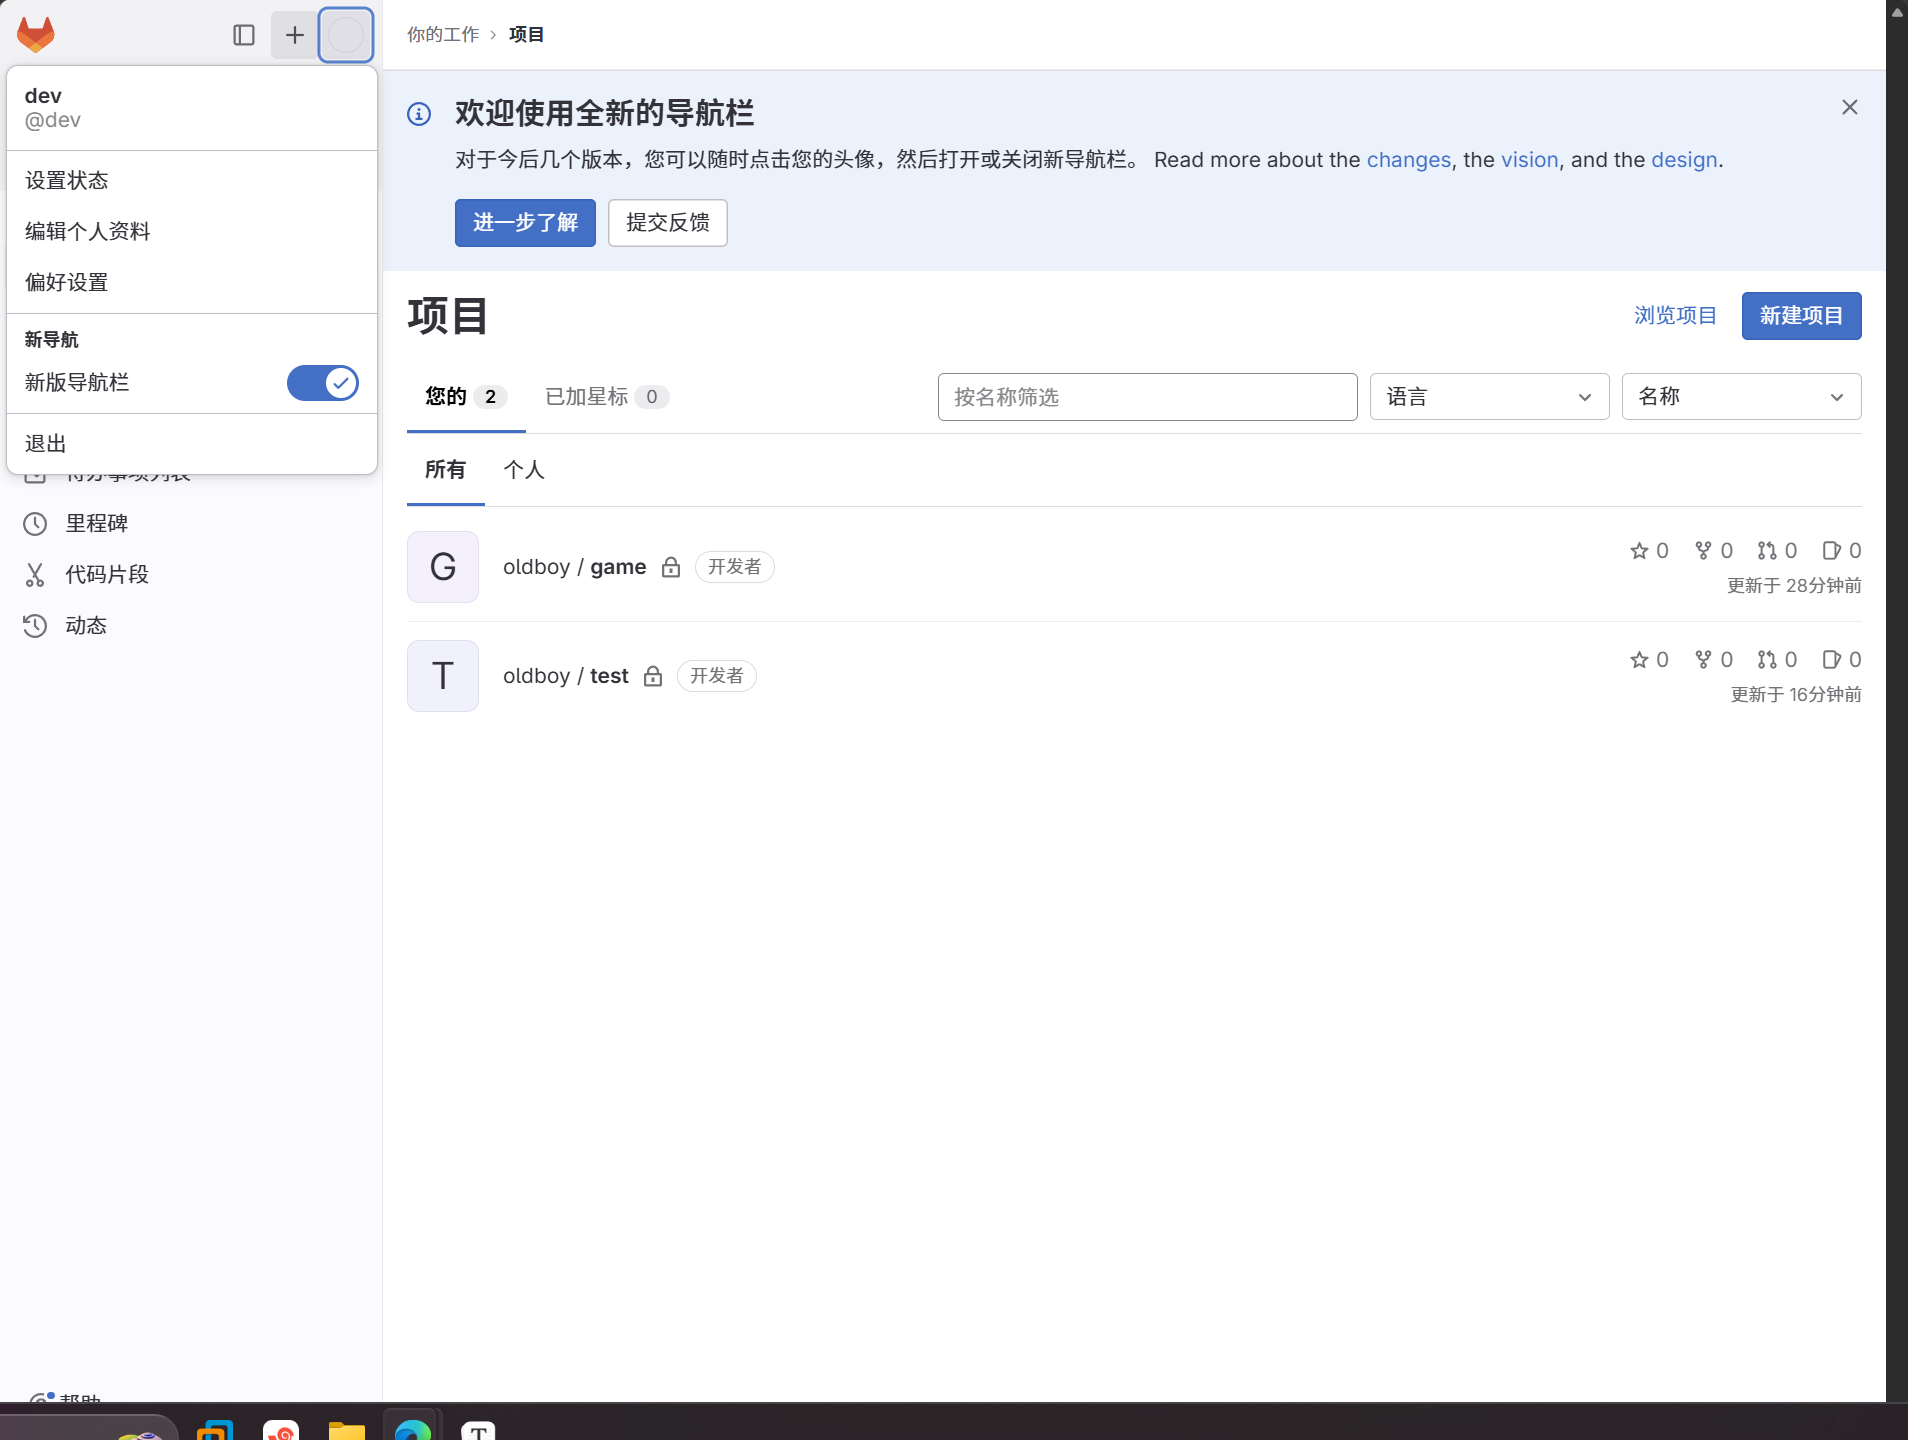
开发下载代码到本地的服务器
dev开发使用的服务器是10.0.0.5
1.开发需要将自己服务器的公钥放到dev账户中
root@lb01 ~]# ssh-keygen
2.复制到dev账户上
cat /root/.ssh/id_rsa.pub
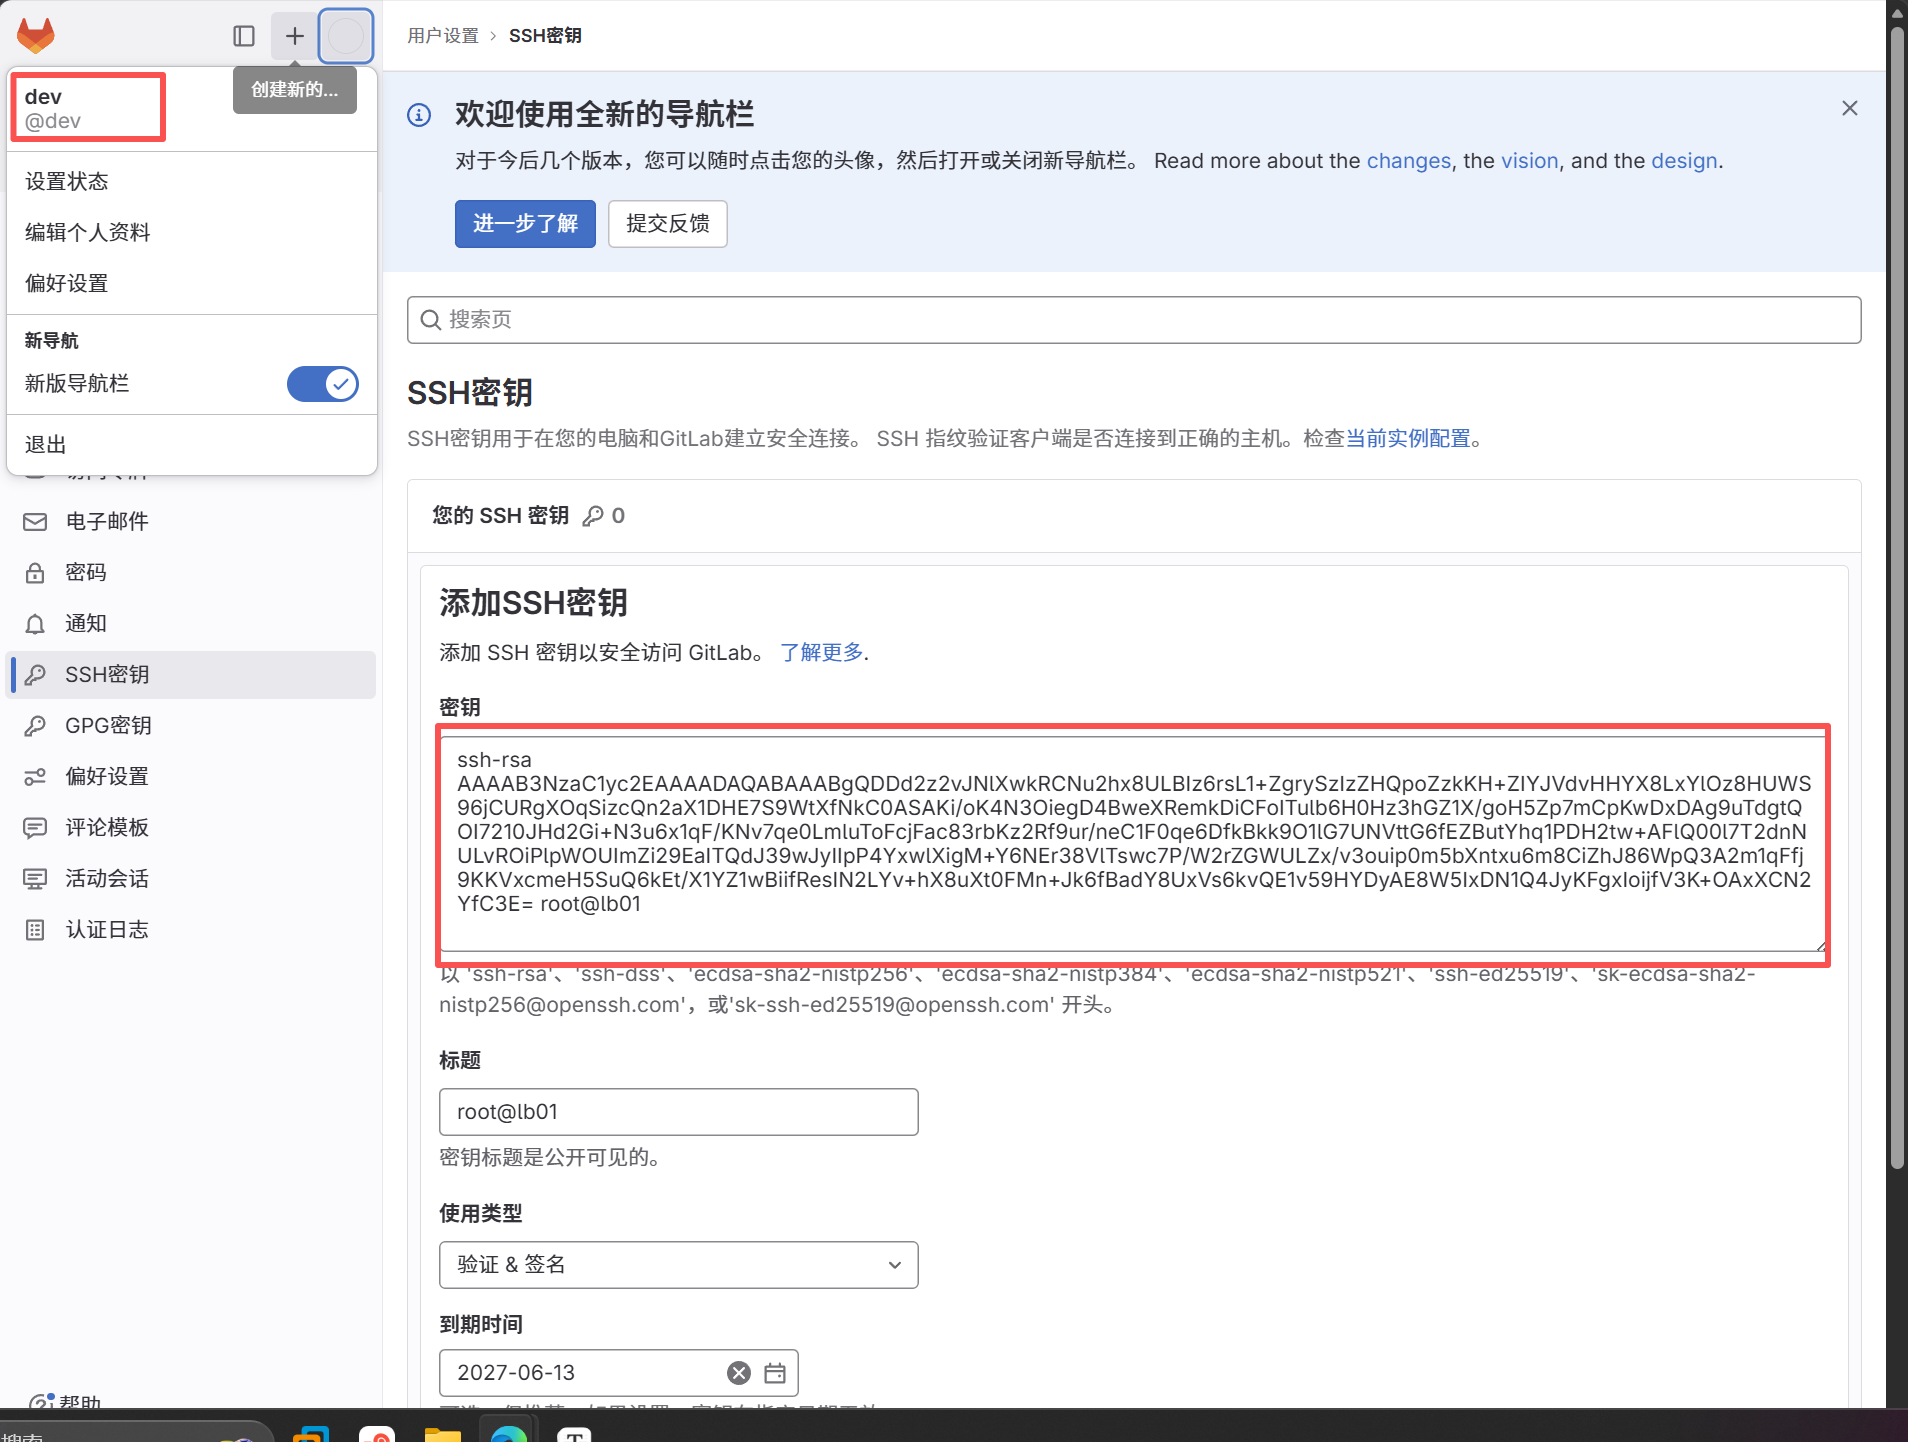
3.将oldboy群组中的test代码下载到本地
[root@lb01 ~]# git clone git@10.0.0.200:oldboy/test.git
正克隆到 'test'...
The authenticity of host '10.0.0.200 (10.0.0.200)' can't be established.
ECDSA key fingerprint is SHA256:MpkmNb46YEspkVIvN//cJ1xqE0xRfWdaMOfAQ70kEhM.
Are you sure you want to continue connecting (yes/no/[fingerprint])? yes
Warning: Permanently added '10.0.0.200' (ECDSA) to the list of known hosts.
remote: Enumerating objects: 3, done.
remote: Counting objects: 100% (3/3), done.
remote: Compressing objects: 100% (2/2), done.
接收对象中: 100% (3/3), 231 字节 | 231.00 KiB/s, 完成.
remote: Total 3 (delta 0), reused 0 (delta 0), pack-reused 0
[root@lb01 ~]# ll
总用量 8
-rw-r--r-- 1 root root    0  4月 15 09:25 1.txt
-rw------- 1 root root 2877  3月  7 08:29 anaconda-ks.cfg
-rw-r--r-- 1 root root 3284  3月  7 08:30 initial-setup-ks.cfg
drwxr-xr-x 3 root root   57  6月 13 08:30 test
[root@lb01 ~]# cd test/
[root@lb01 test]# ll
总用量 0
-rw-r--r-- 1 root root 0  6月 13 08:30 1.txt
-rw-r--r-- 1 root root 0  6月 13 08:30 2.txt
-rw-r--r-- 1 root root 0  6月 13 08:30 3.txt
8.开发上传代码的流程
先从管理源用户小霸王代码上传到master分支
root@Gitlab:~/game# ll
total 7780
-rw-r--r-- 1 root root   28032 May 24  2021 bgm.mp3
drwxr-xr-x 2 root root    4096 May 24  2021 css/
drwxr-xr-x 2 root root    4096 May 24  2021 images/
-rw-r--r-- 1 root root    8956 May 24  2021 index.html
drwxr-xr-x 2 root root    4096 May 24  2021 js/
drwxr-xr-x 2 root root    4096 May 24  2021 roms/
-rw-r--r-- 1 root root     811 May 24  2021 shuoming.html
-rw-r--r-- 1 root root 7902976 Sep 27  2024 xbw.zip
root@Gitlab:~/game# rm -f xbw.zip
root@Gitlab:~/game# git add .
root@Gitlab:~/game# git commit -m "小霸王代码"
[master c94b123] 小霸王代码
 1 file changed, 0 insertions(+), 0 deletions(-)
 delete mode 100644 xbw.zip
root@Gitlab:~/game# git push -u origin master
开发从10.0.0.5上操作
#先配置全局的用户和邮件
[root@lb01 ~]# git config --global user.name "dev"
[root@lb01 ~]# git config --global user.email "dev@example.com"

#从gitlab上拉取oldboy组中的game代码
git clone git@10.0.0.200:oldboy/game.git

#修改代码内容
vim index.html
...
['魂斗', 'roms/Contra1(U)30.nes'],
...

#提交到本地仓库
[root@lb01 game]# git add .
[root@lb01 game]# git commit -m "魂斗"
[master c682189] 魂斗
 1 file changed, 2 insertions(+), 2 deletions(-)

#提交到远程仓库

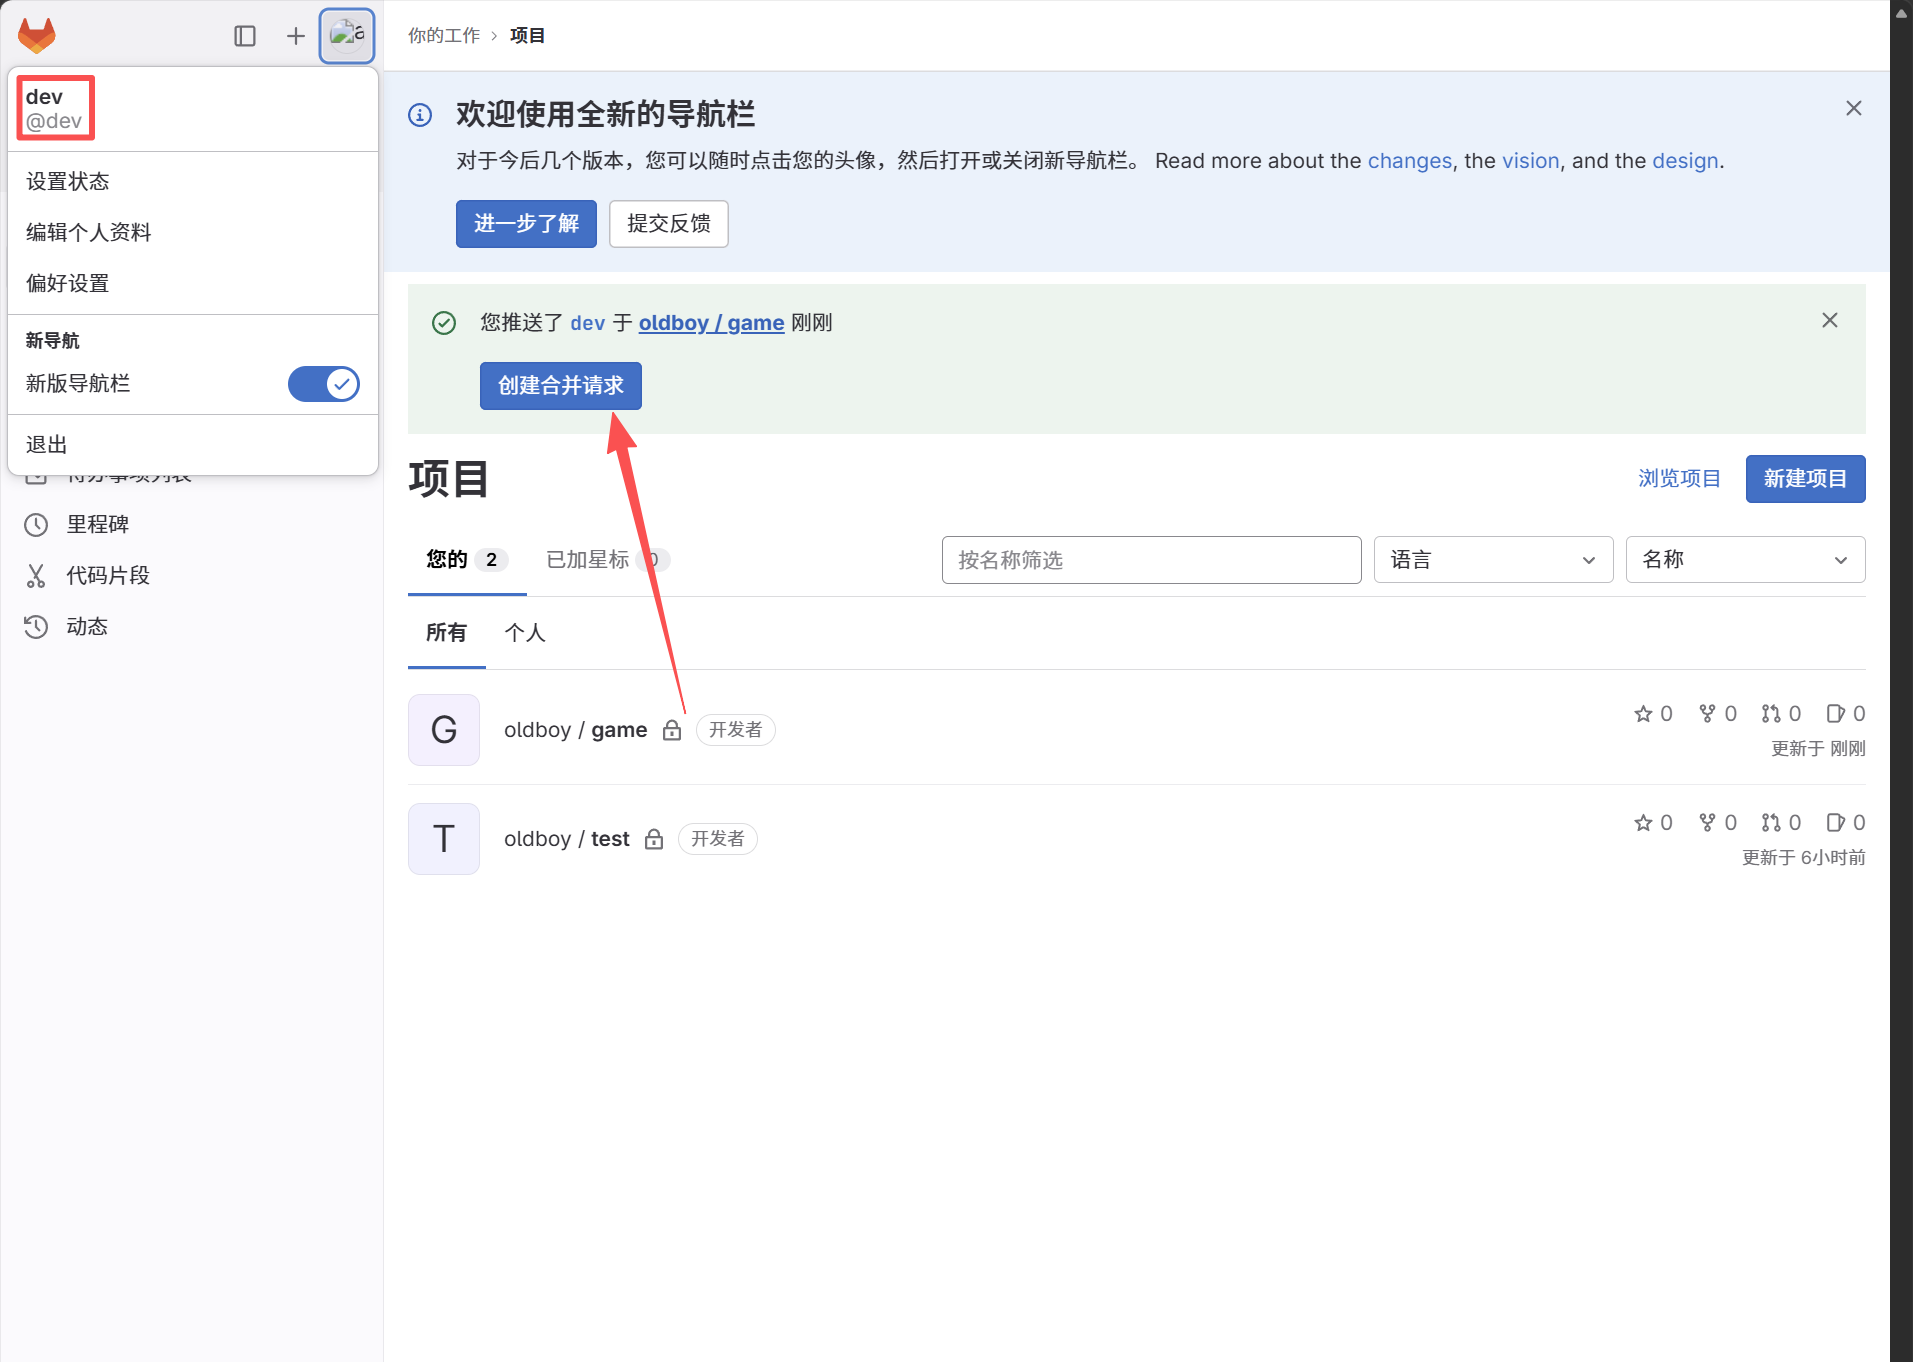
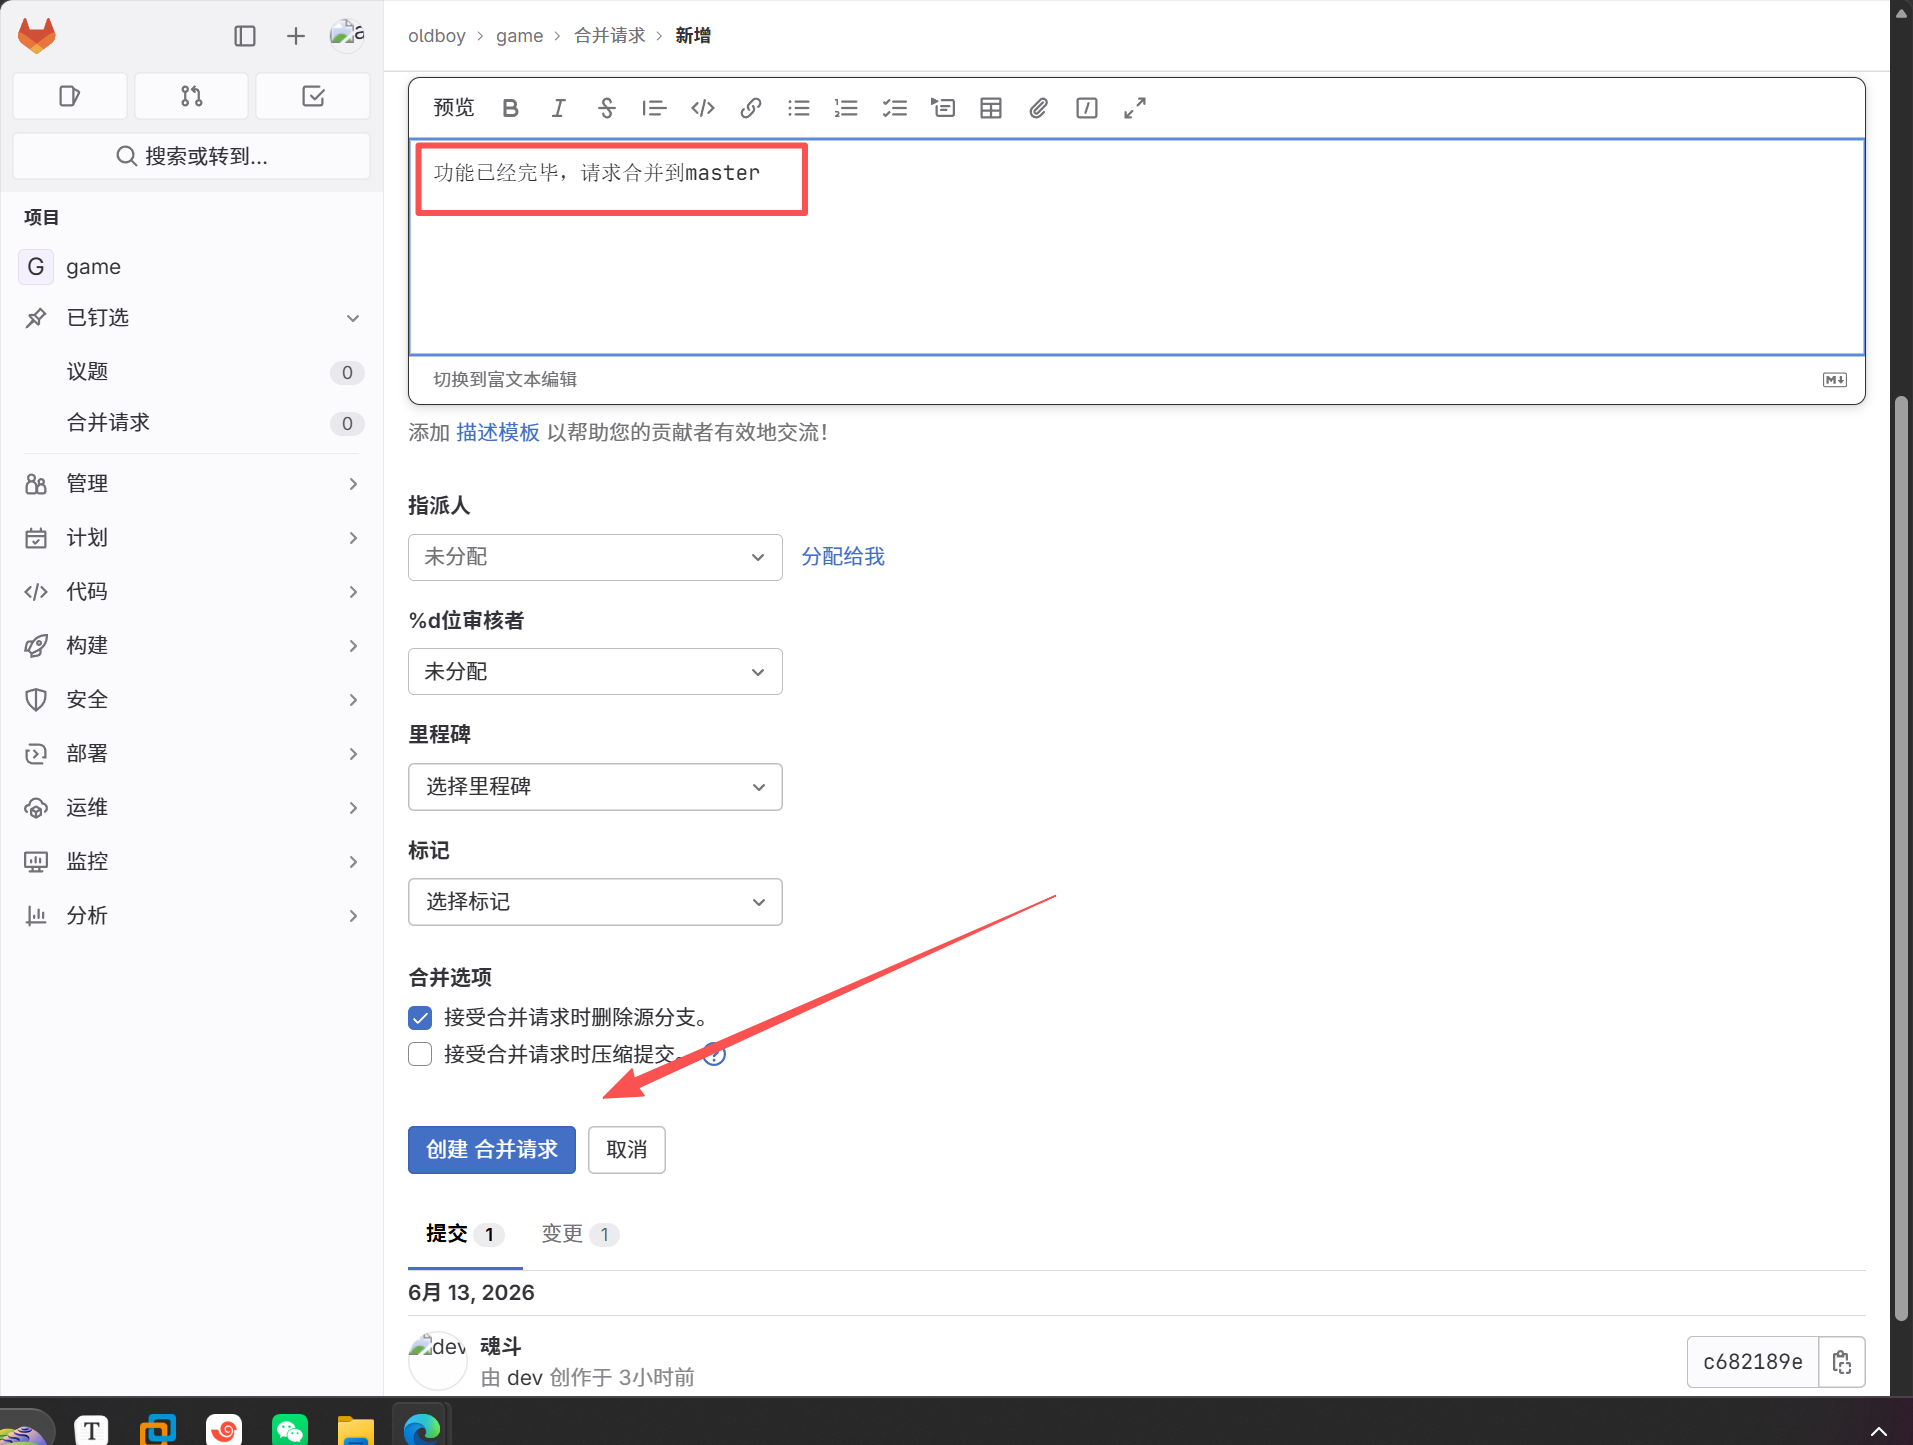
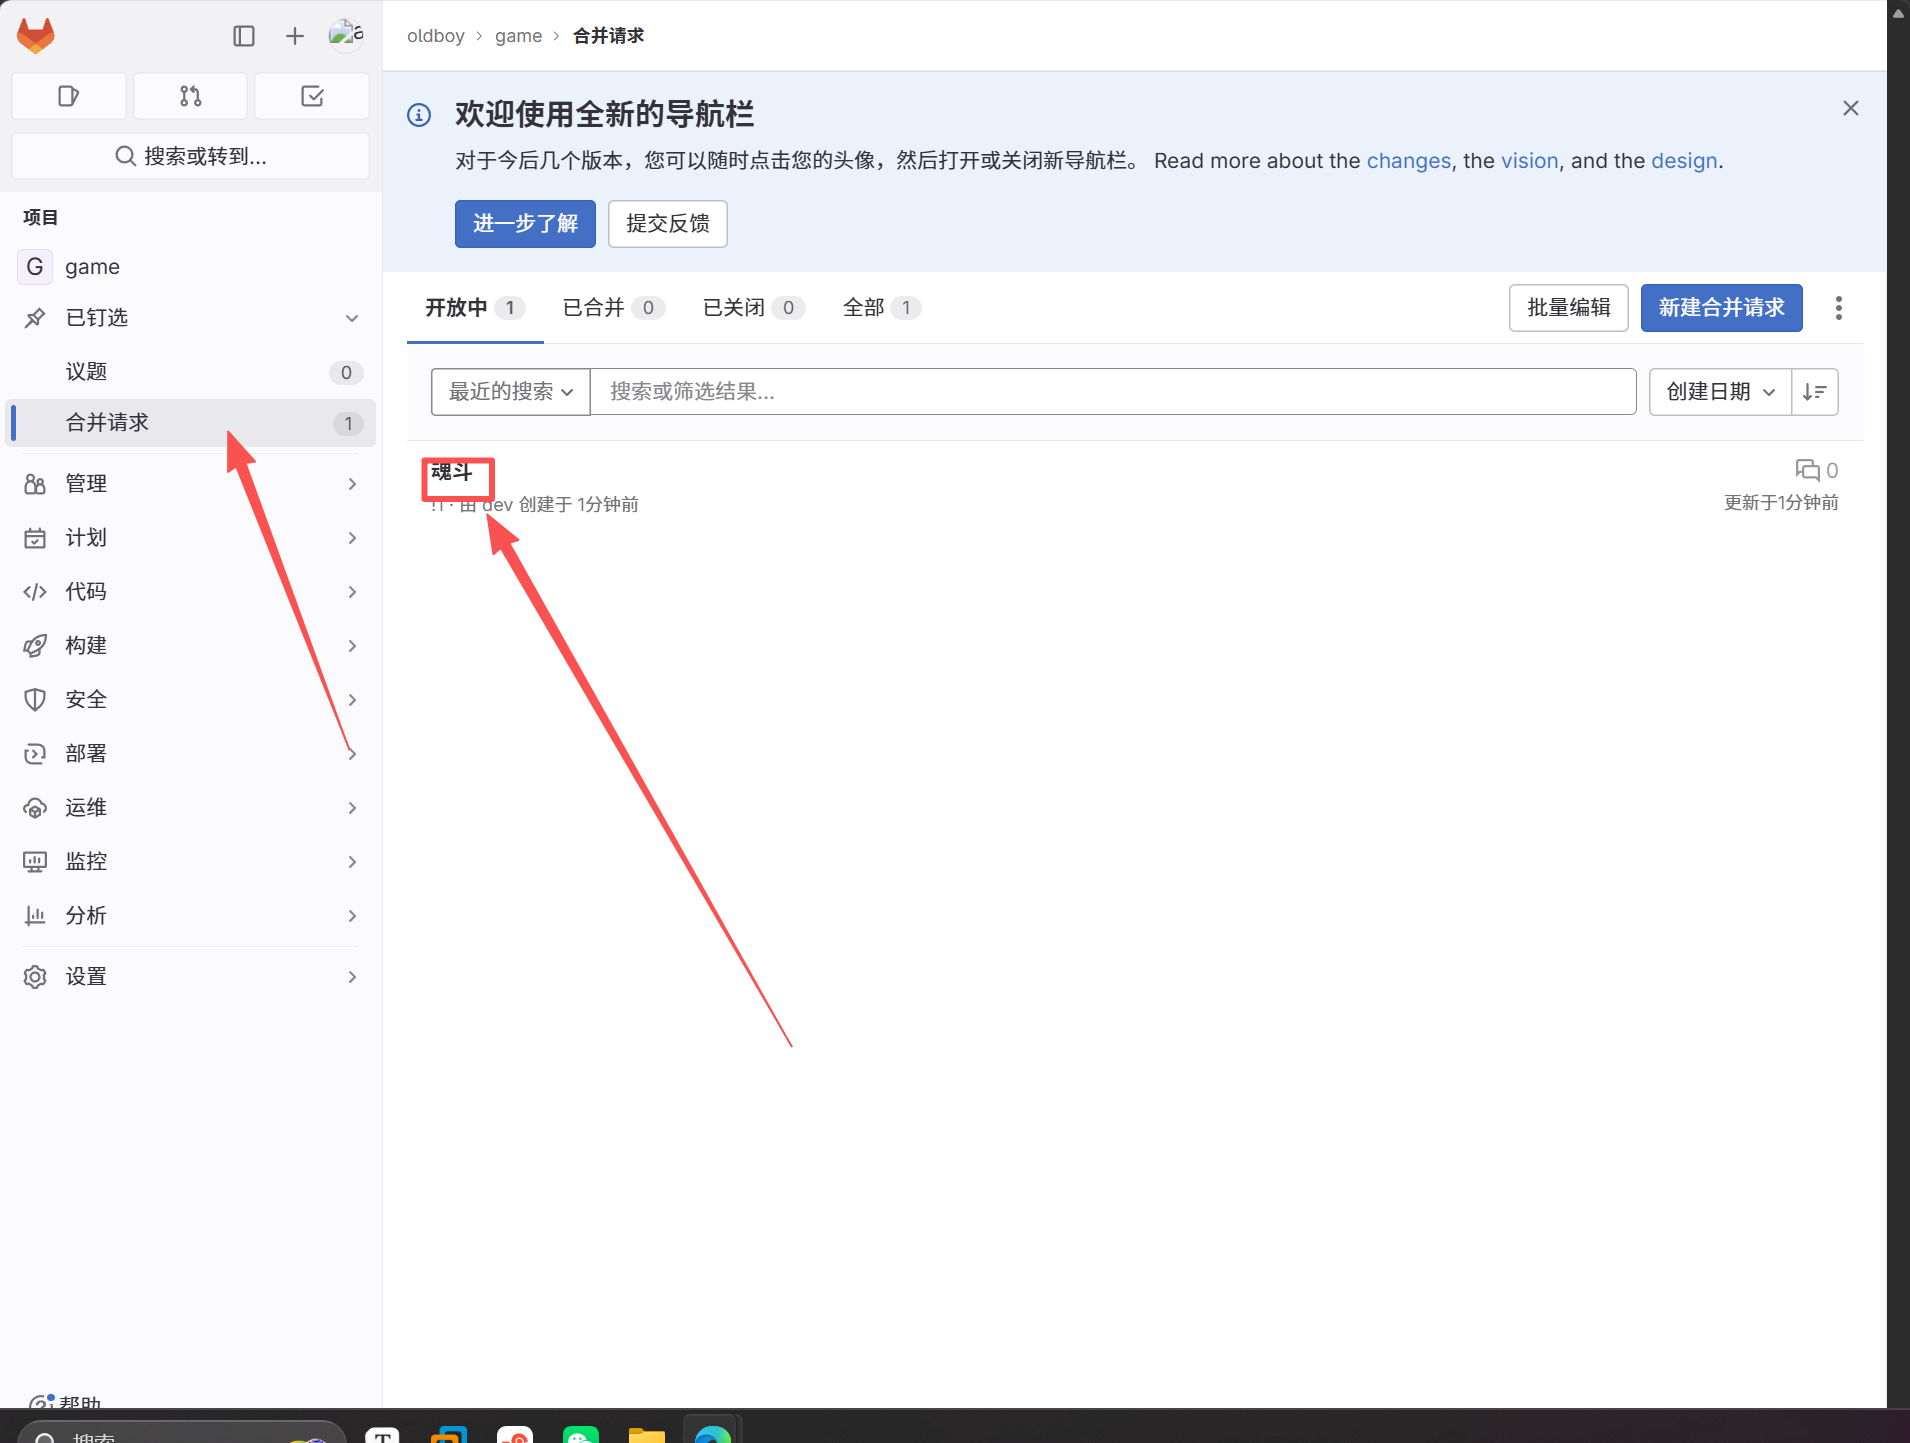
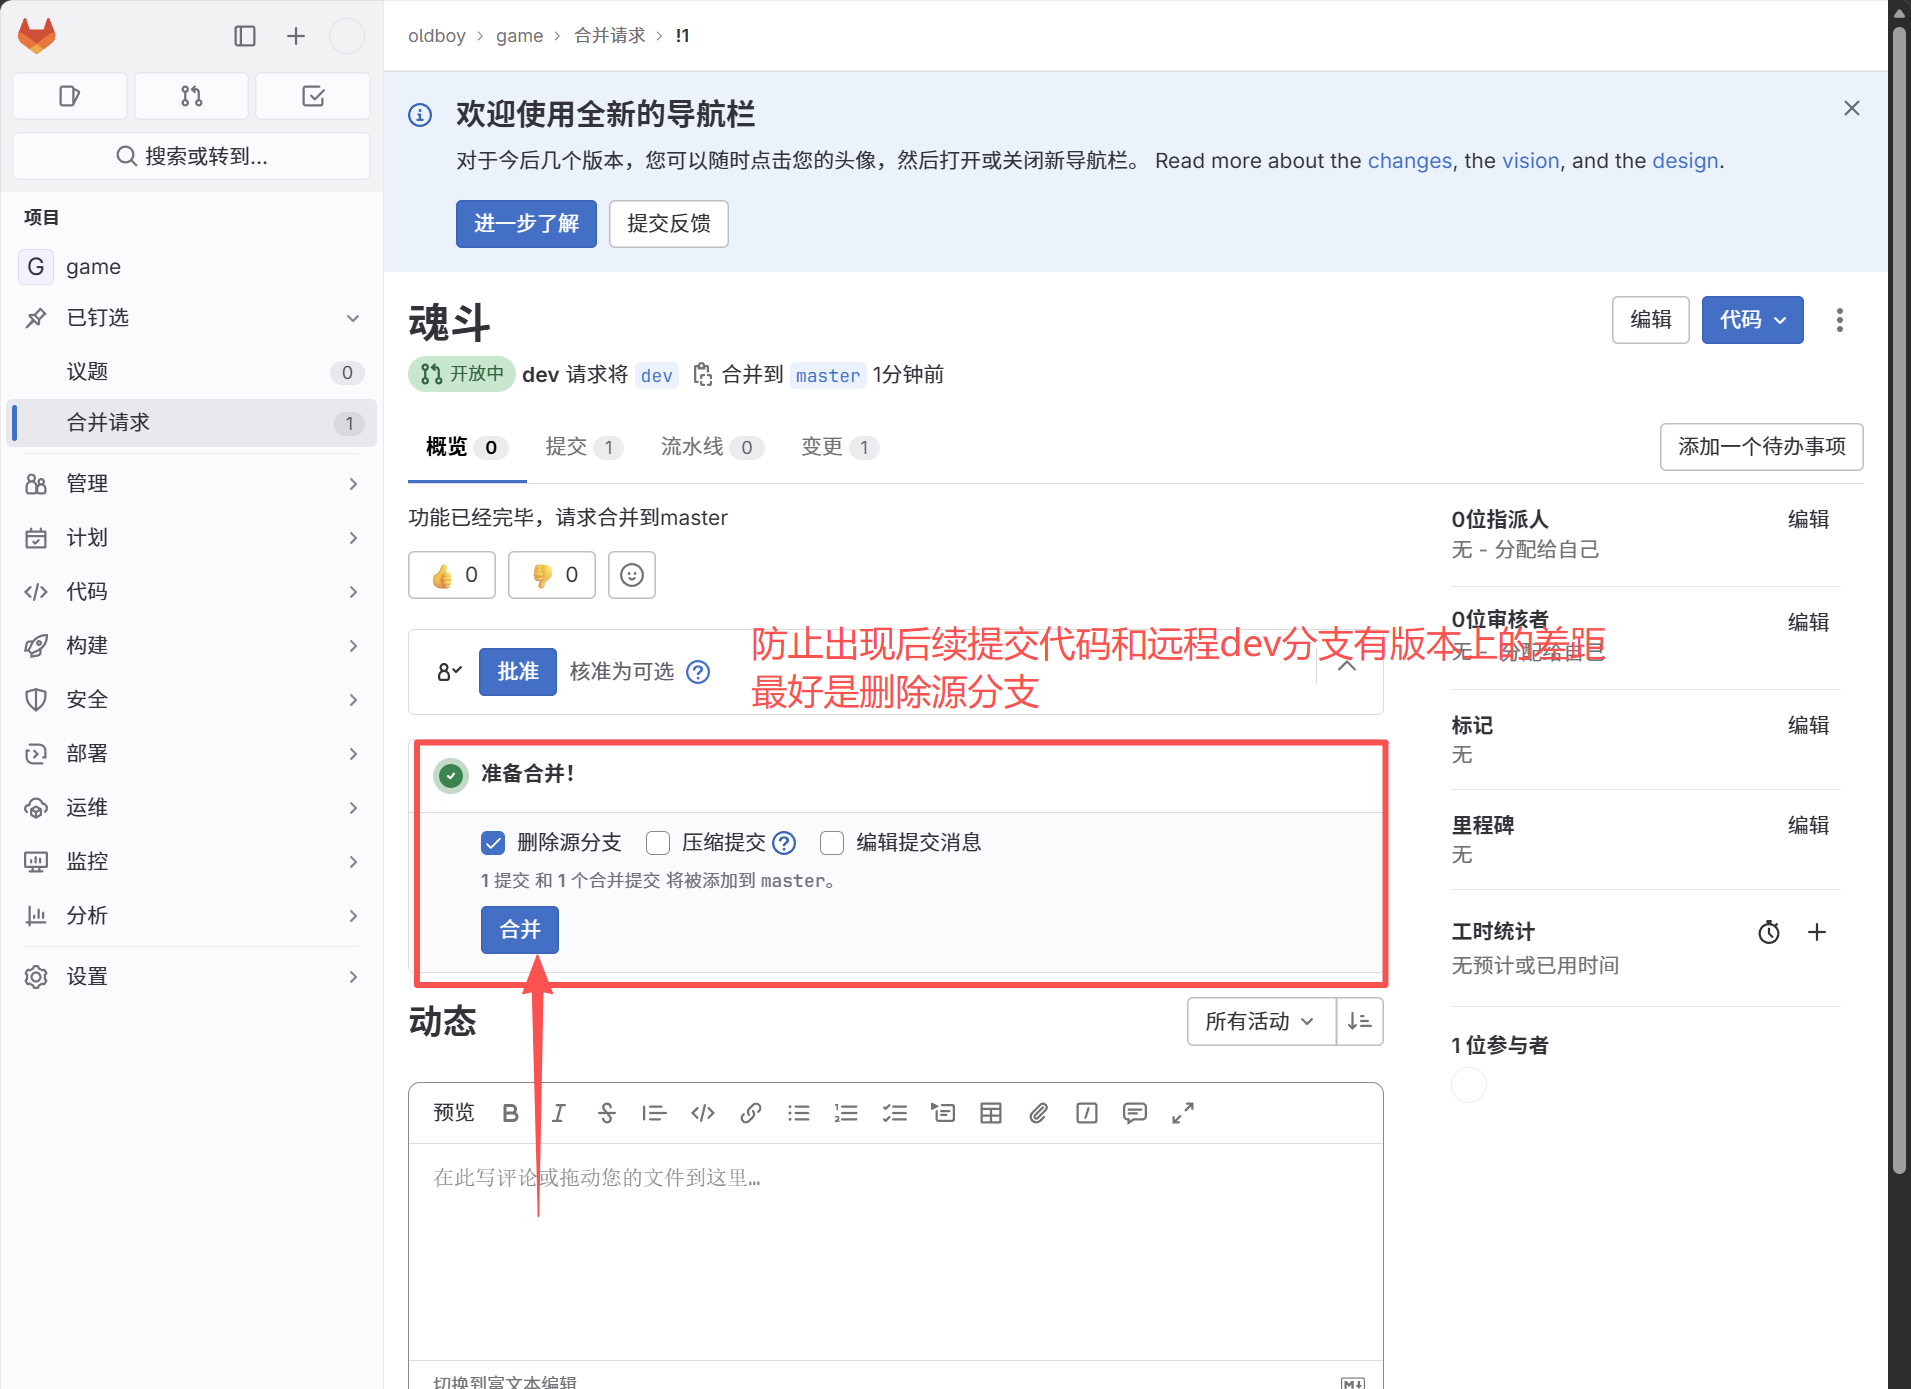
默认是不允许提交到master分支的,需要先创建子分支,然后提交子分支,再发起代码合并请求master
######################  示例  ###################################
[root@lb01 game]# git push -u origin master
枚举对象: 5, 完成.
对象计数中: 100% (5/5), 完成.
压缩对象中: 100% (3/3), 完成.
写入对象中: 100% (3/3), 285 字节 | 285.00 KiB/s, 完成.
总共 3(差异 2),复用 0(差异 0),包复用 0
remote: GitLab: You are not allowed to push code to protected branches on this project.
To 10.0.0.200:oldboy/game.git
 ! [remote rejected] master -> master (pre-receive hook declined)
error: 推送一些引用到 '10.0.0.200:oldboy/game.git' 失败
########################################################

#生成dev分支,将修改后的代码推送到dev分支上
[root@lb01 game]# git branch dev
[root@lb01 game]# git push -u origin dev
在dev账户上操作
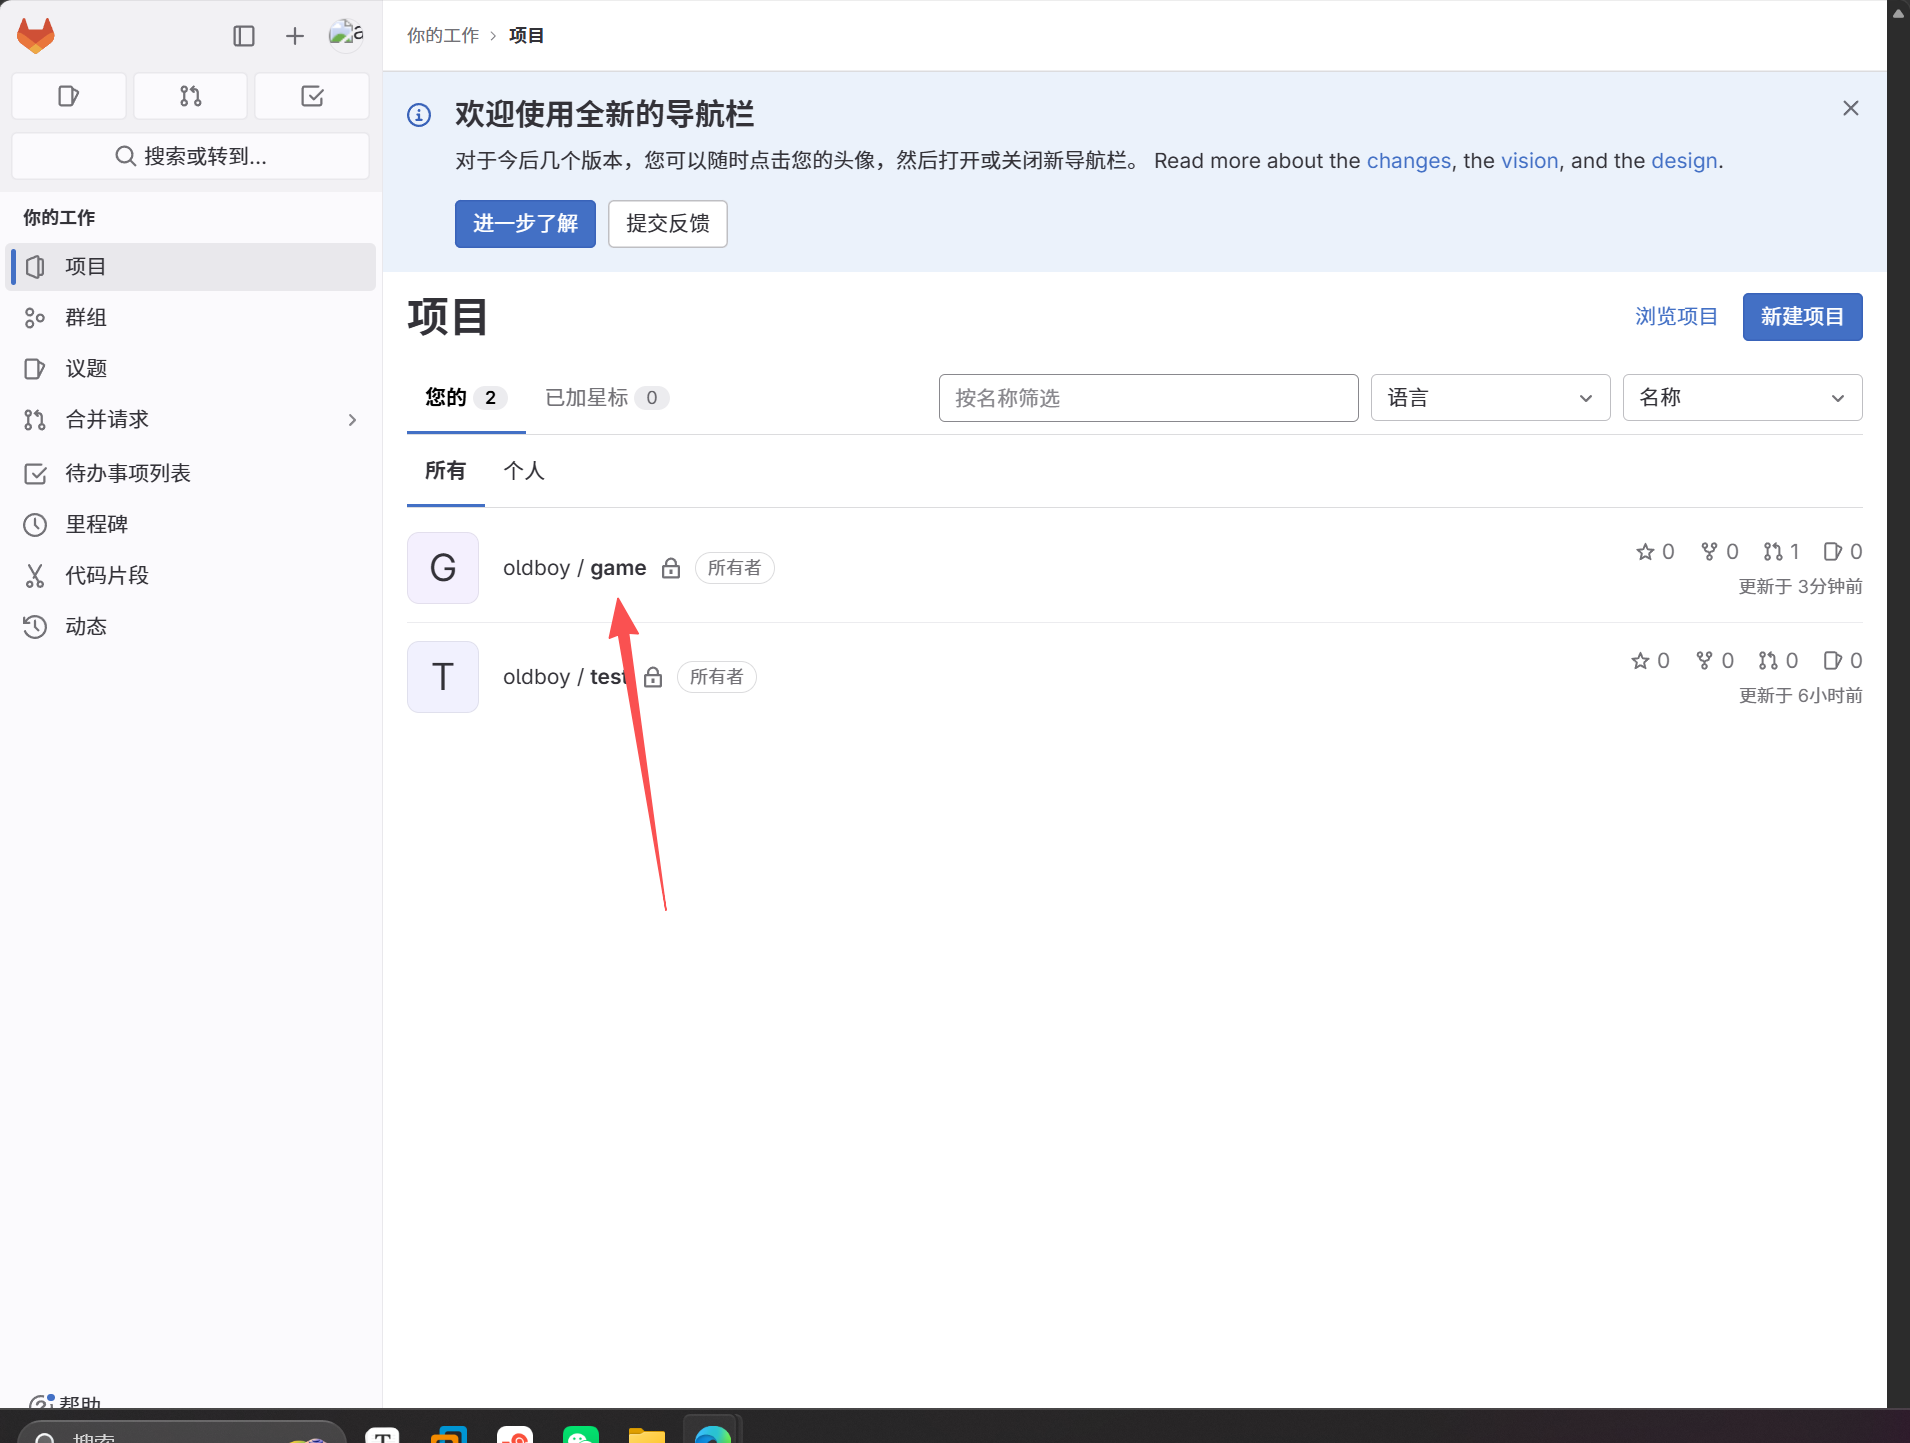
到root账户操作
五、jenkins
官网 jenkins.io
Jenkins是一个开源软件项目,是基于Java开发的一种持续集成工具,用于监控持续重复的工作,旨在提供一个开放易用的软件平台,使软件的持续集成变成可能。
1.安装jenkins
环境要求
1.kylin v10
2.IP 10.0.0.202
3.配置1核2G

#安装JDk运行环境(openJDk 11)
[root@jenkins ~]# yum -y install java

#使用rpm安装jenkins
[root@jenkins ~]# ll
-rw-r--r-- 1 root root 93405530  9月 27  2024 jenkins-2.405-1.1.noarch.rpm
[root@jenkins ~]# rpm -ivh jenkins-2.405-1.1.noarch.rp

#启动jenkins
[root@jenkins ~]# systemctl start jenkins

#修改启动用户为root(默认是以jenkins运行)
[root@jenkins ~]# grep root /usr/lib/systemd/system/jenkins.service
User=root
Group=root

#重新加载配置文件
[root@jenkins ~]# systemctl daemon-reload

#修改配置文件中的启动用户
[root@jenkins ~]# grep root /etc/sysconfig/jenkins
JENKINS_USER="root"

#配置jenkins的插件
将jenkins_plu.tar.gz压缩包上传到/var/lib/jenkins/plugins
[root@jenkins plugins]# pwd
/var/lib/jenkins/plugins
[root@jenkins plugins]# ll
总用量 306796
-rw-r--r-- 1 root root 314156543  9月 27  2024 jenkins_plu.tar.gz
[root@jenkins plugins]# tar xf jenkins_plu.tar.gz

#重启jenkins生效
[root@jenkins plugins]# systemctl restart jenkins

#查看8080端口是否开启
[root@jenkins plugins]# netstat -tunlp|grep 8080
tcp6       0      0 :::8080                 :::*                    LISTEN      2887/java
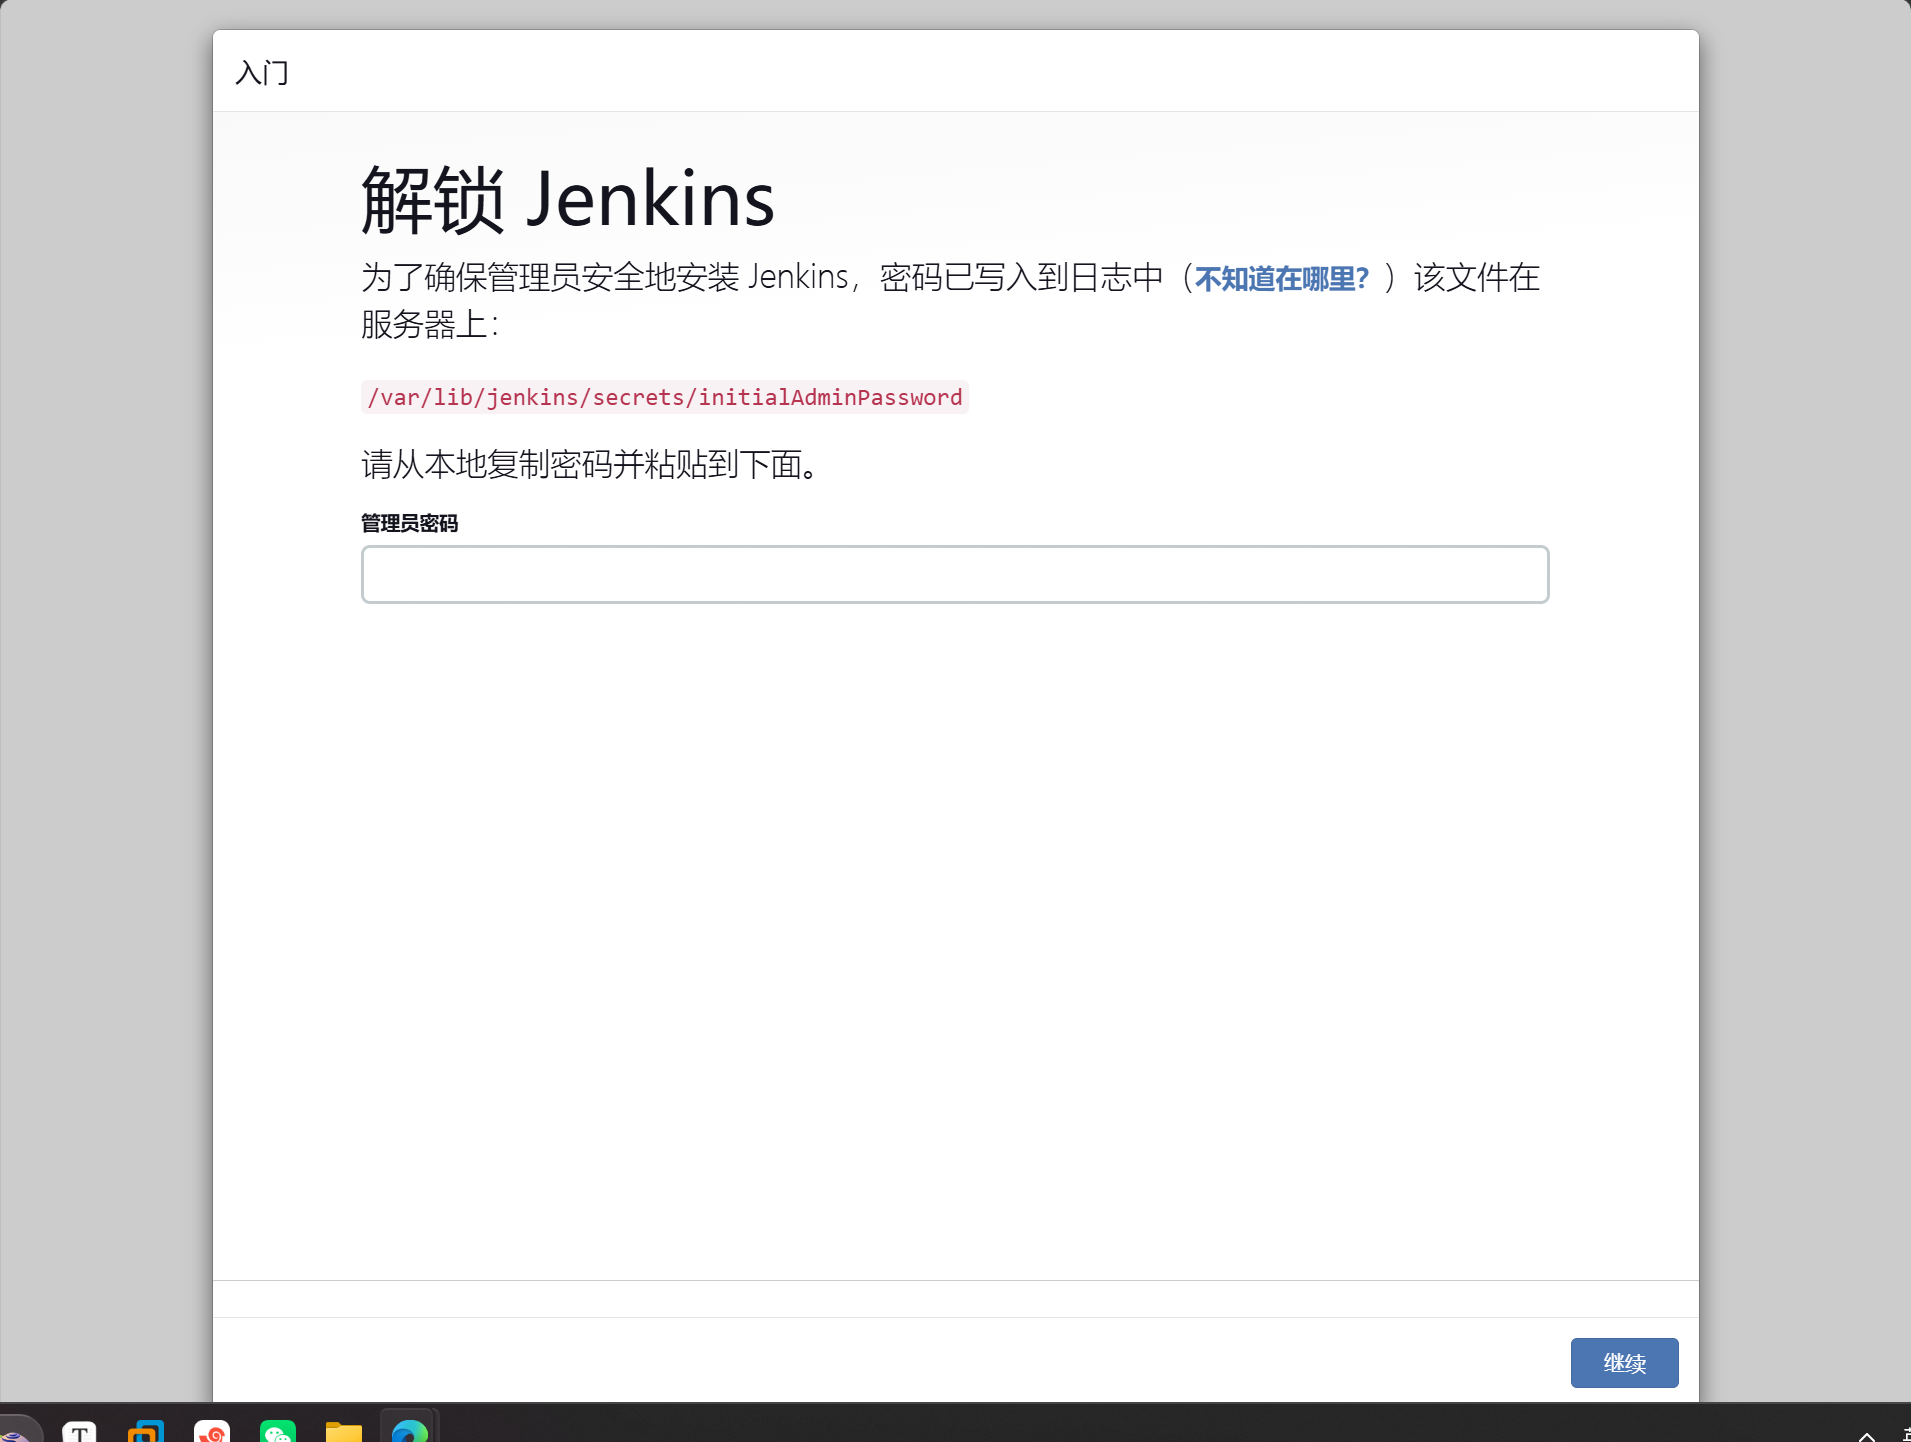
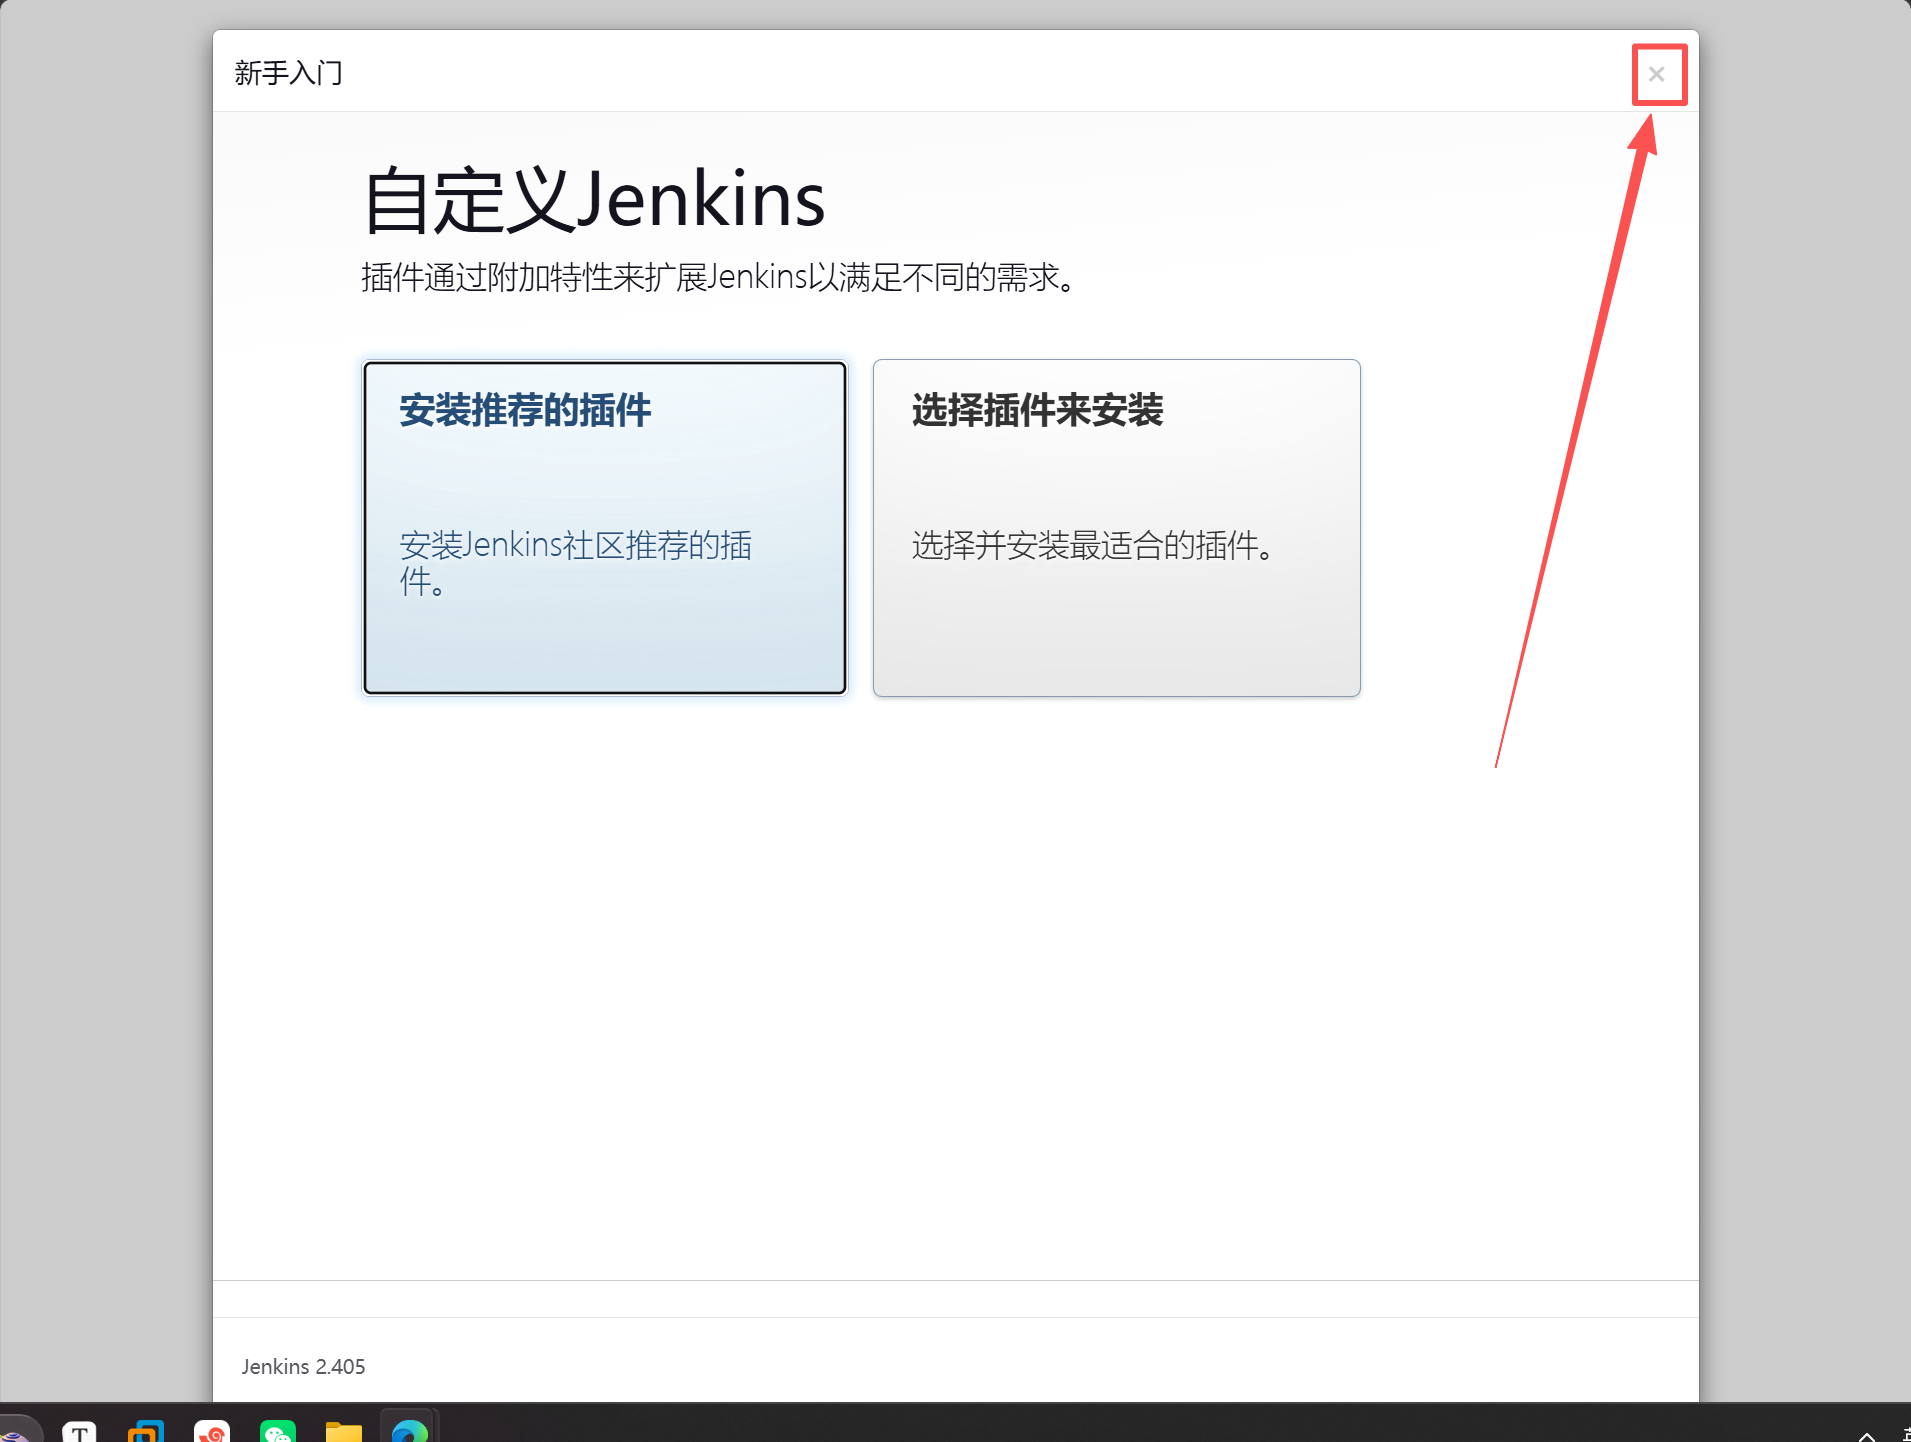
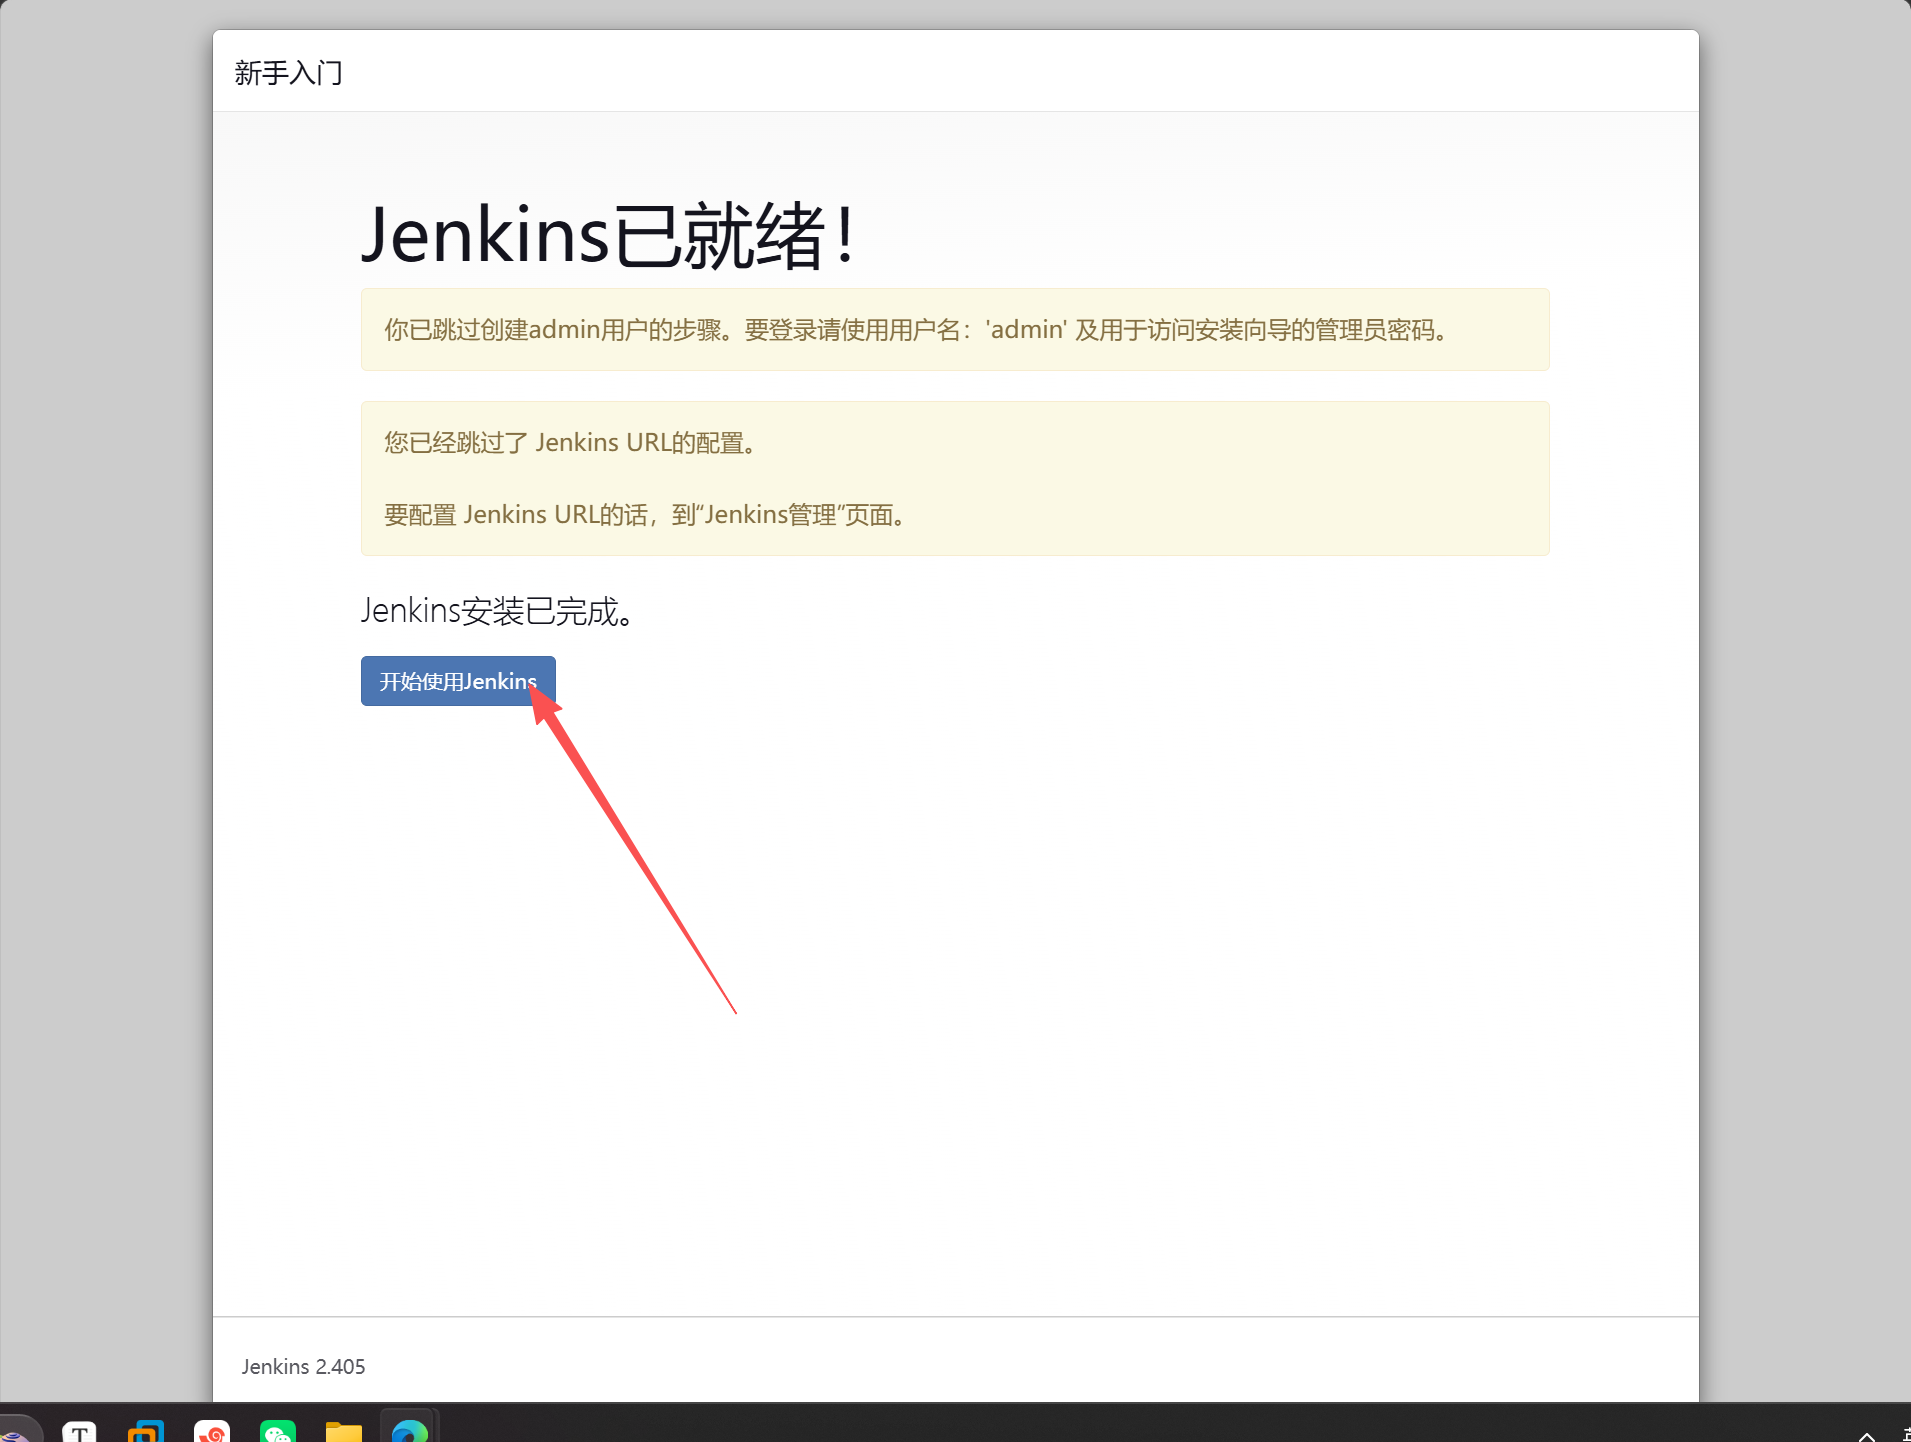
打开浏览器通过页面安装步骤
10.0.0.202:8080
修改jenkins密码
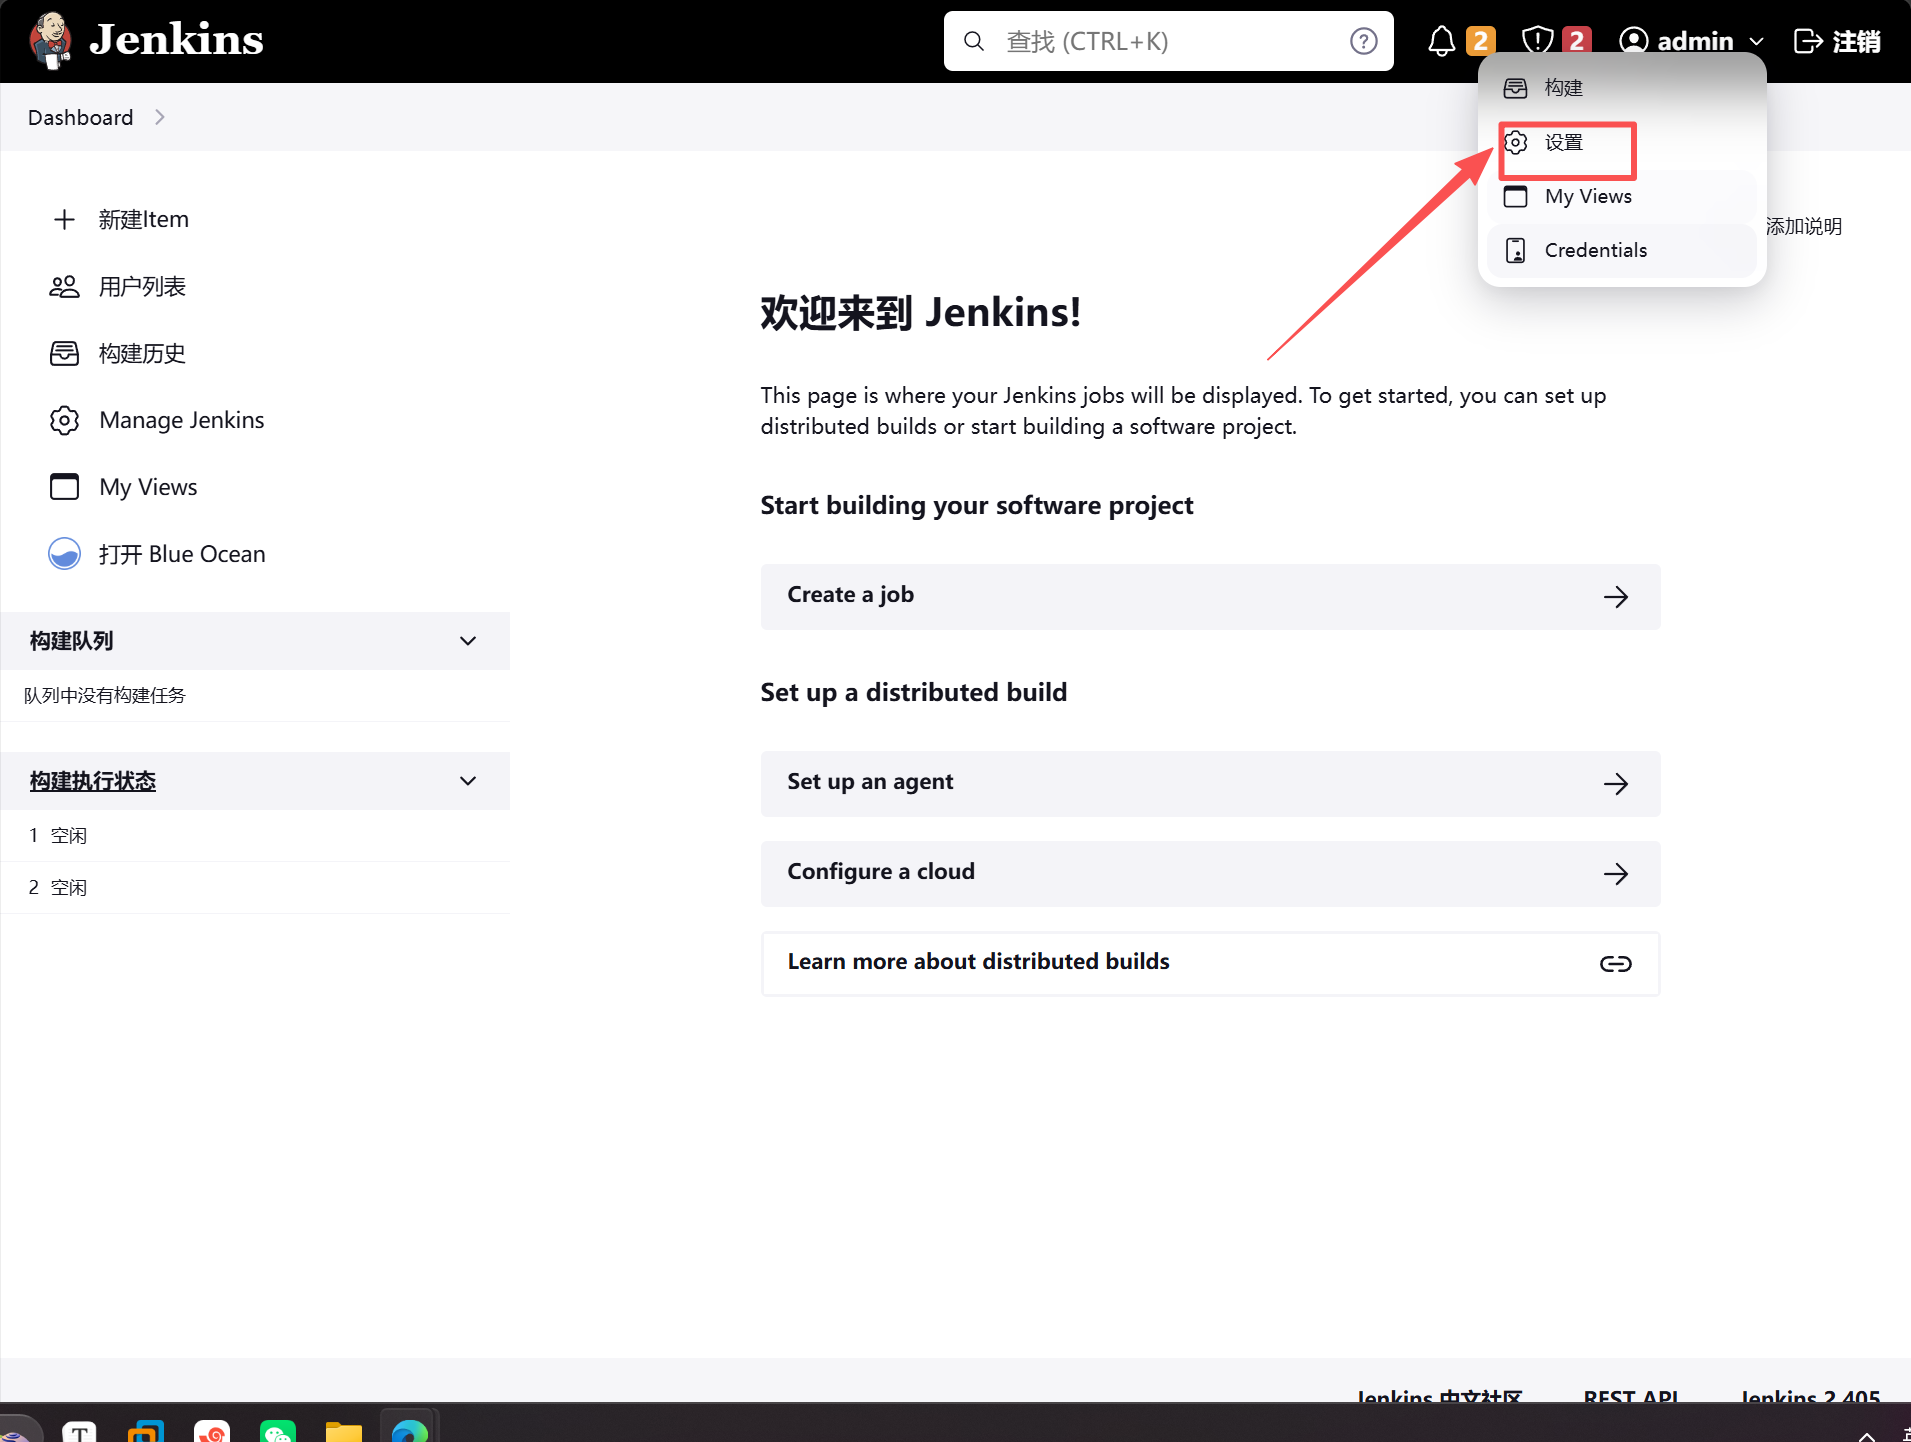
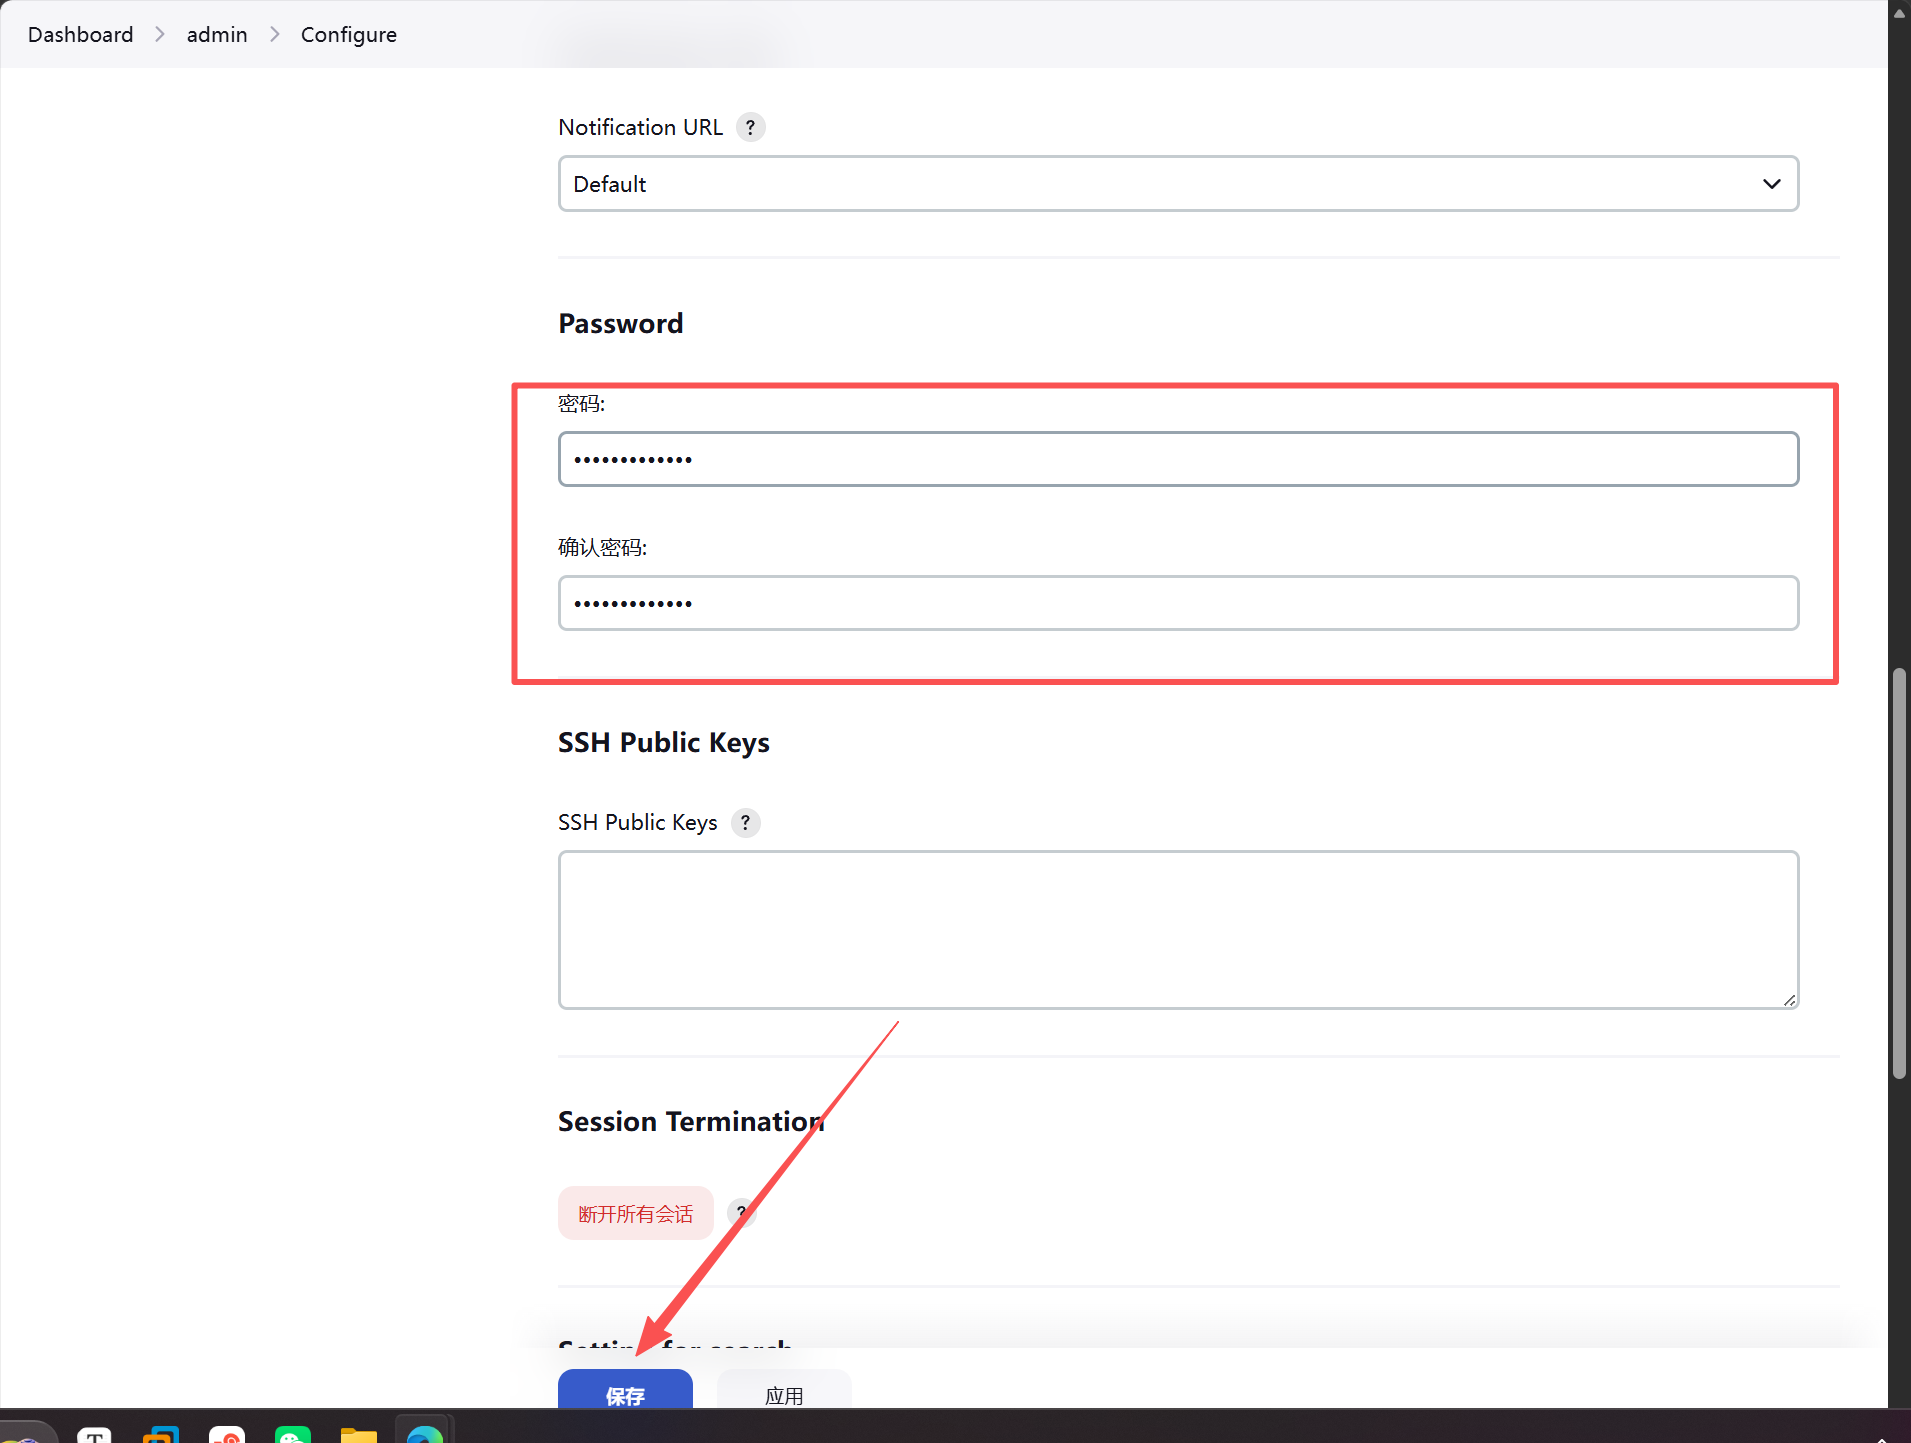
重新登录 用户admin
2.手动将gitlab中oldboy组的game项目的代码部署到web服务器上
准备测试服务器10.0.0.8
#配置nginx的conf
[root@web02 ~]# cat /etc/nginx/conf.d/game.conf
server {
    listen 80 default_server;
    server_name _;

    location / {
    root /code/game;
    index index.html;
    }
}
[root@web02 ~]# nginx -t
nginx: the configuration file /etc/nginx/nginx.conf syntax is ok
nginx: configuration file /etc/nginx/nginx.conf test is successful
[root@web02 ~]# systemctl restart nginx

#生成密钥对,将公钥放到jitlab的root账户上
[root@web02 code]# ssh-keygen
[root@web02 code]# cat /root/.ssh/id_rsa.pub
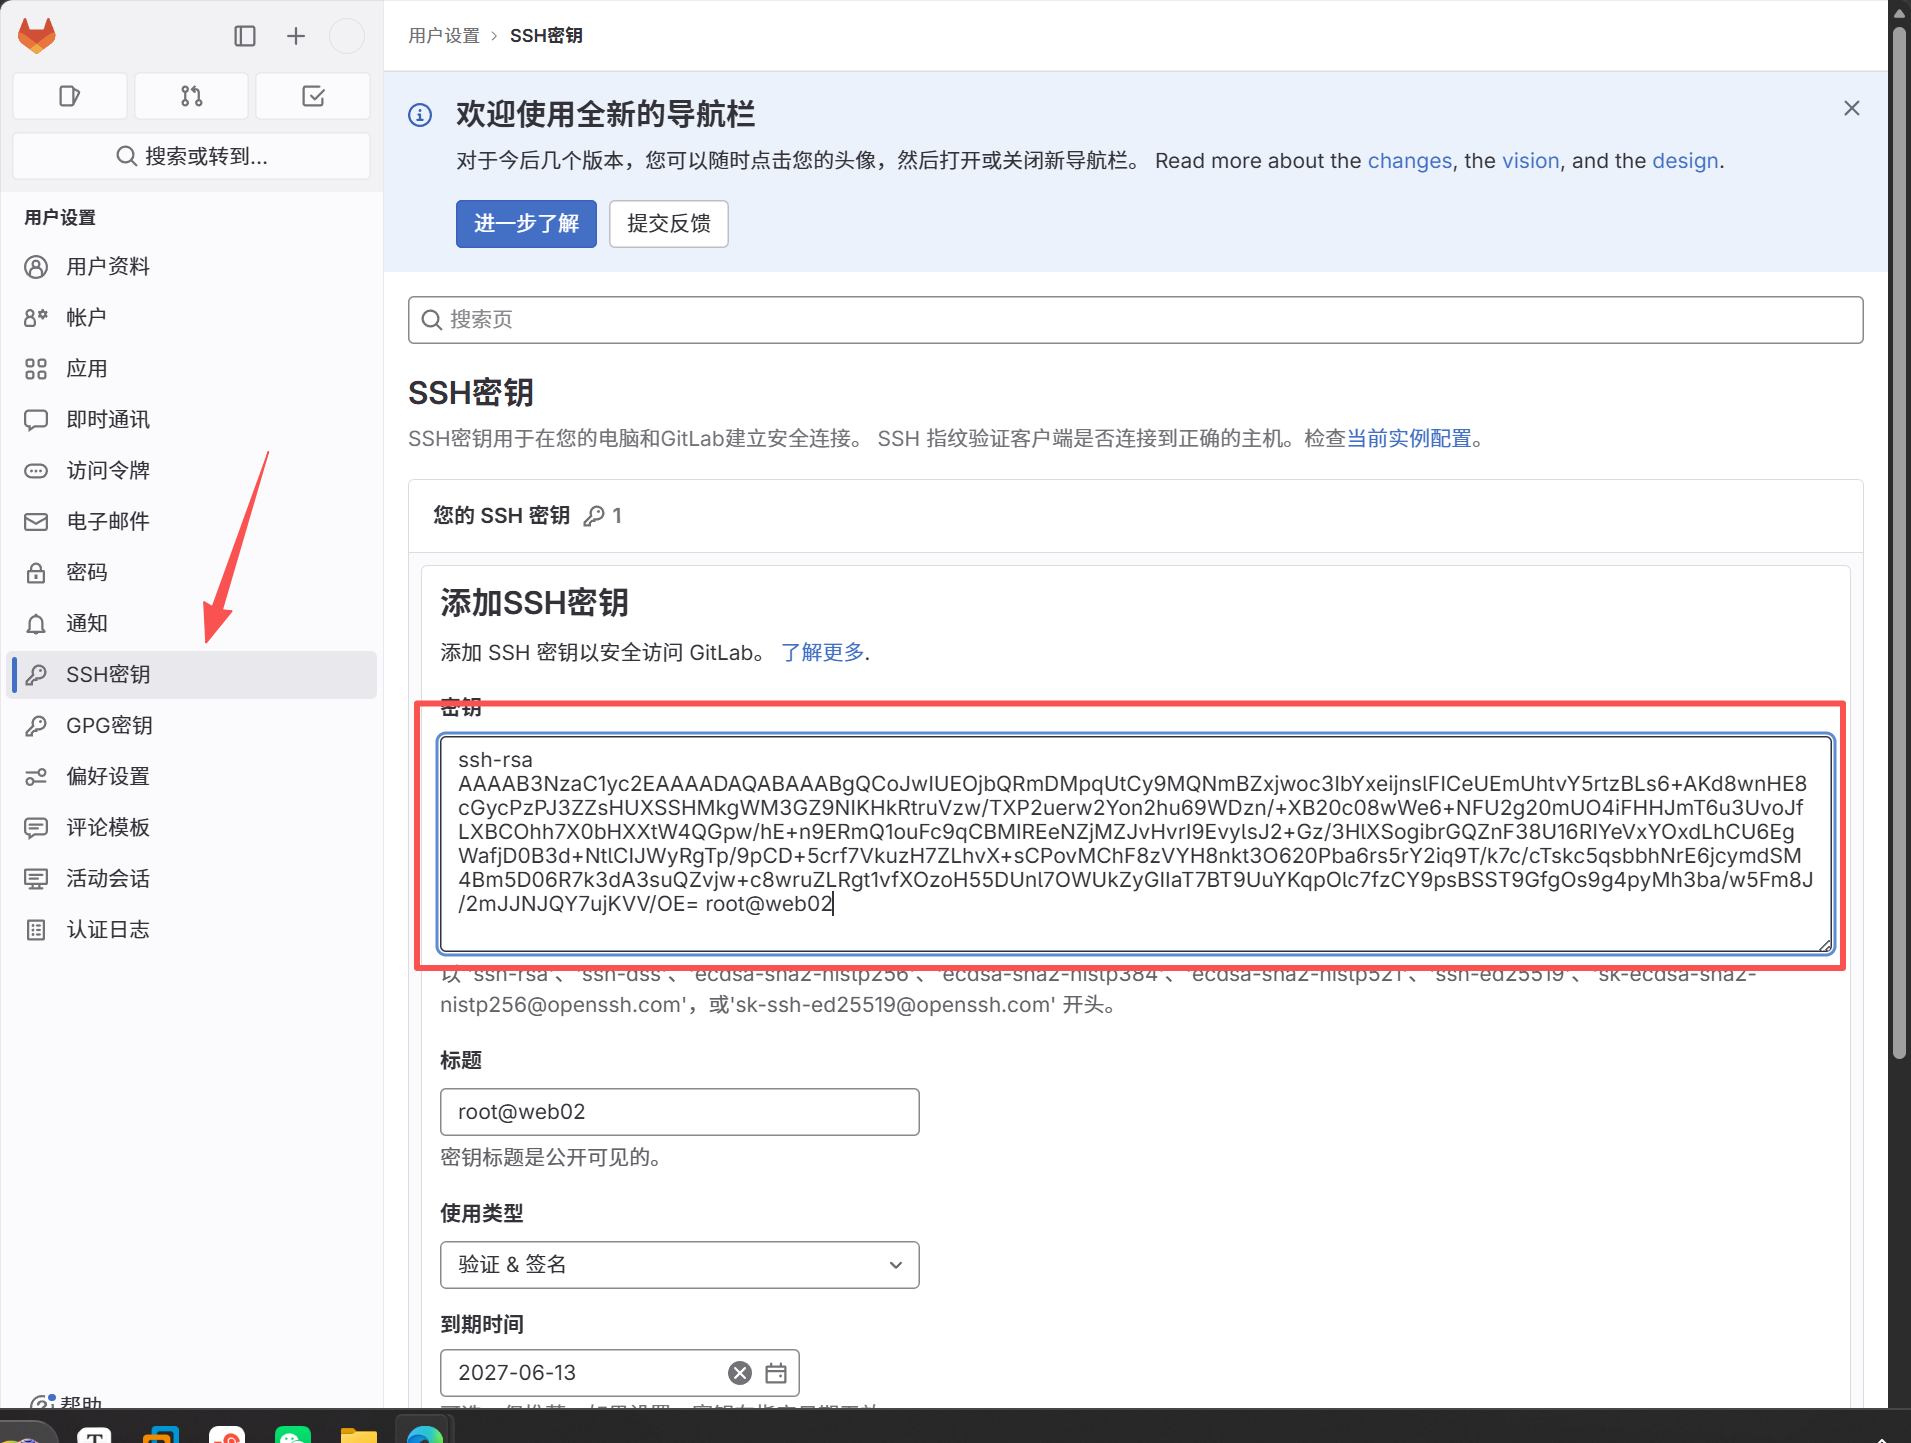
#将gitlab中oldboy组的game拉取到/code目录
[root@web02 code]# git clone git@10.0.0.200:oldboy/game.git
正克隆到 'game'...
remote: Enumerating objects: 108, done.
remote: Counting objects: 100% (108/108), done.
remote: Compressing objects: 100% (100/100), done.
remote: Total 108 (delta 6), reused 101 (delta 4), pack-reused 0
接收对象中: 100% (108/108), 14.87 MiB | 14.19 MiB/s, 完成.
处理 delta 中: 100% (6/6), 完成.
[root@web02 code]# ll
总用量 12
drwxr-xr-x  7 root root  119  5月 23 02:56 game
[root@web02 code]# cd game/
[root@web02 game]# ll
总用量 48
-rw-r--r-- 1 root root 28032  5月 23 02:56 bgm.mp3
drwxr-xr-x 2 root root    23  5月 23 02:56 css
drwxr-xr-x 2 root root    23  5月 23 02:56 images
-rw-r--r-- 1 root root  8954  5月 23 02:56 index.html
drwxr-xr-x 2 root root   213  5月 23 02:56 js
drwxr-xr-x 2 root root  4096  5月 23 02:56 roms
-rw-r--r-- 1 root root   811  5月 23 02:56 shuoming.html

#测试访问
10.0.0.8
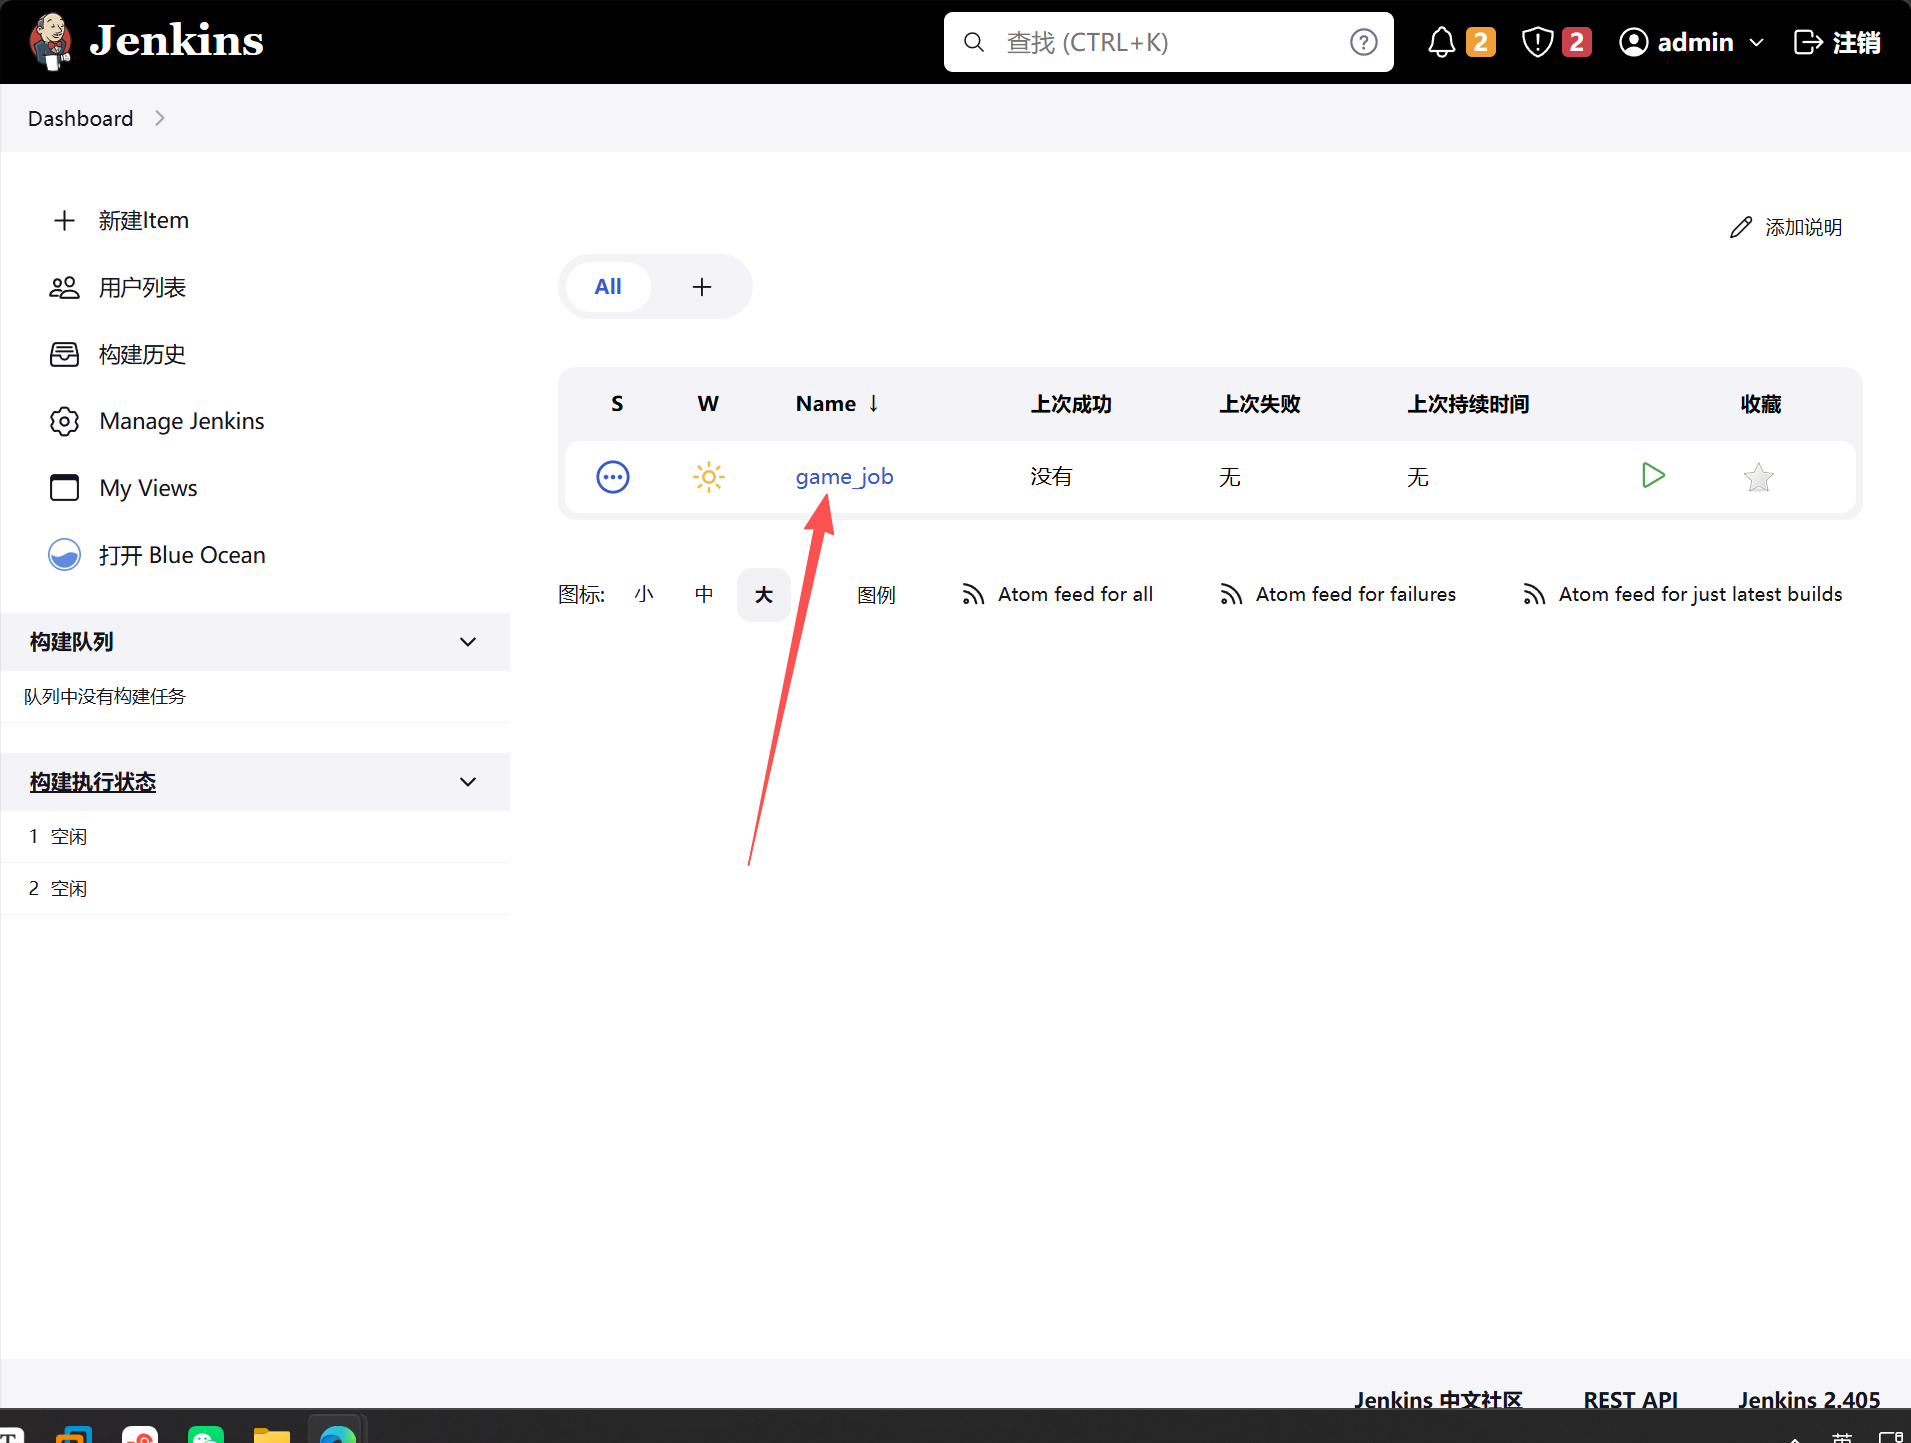
3.jenkins默认执行的shell路径
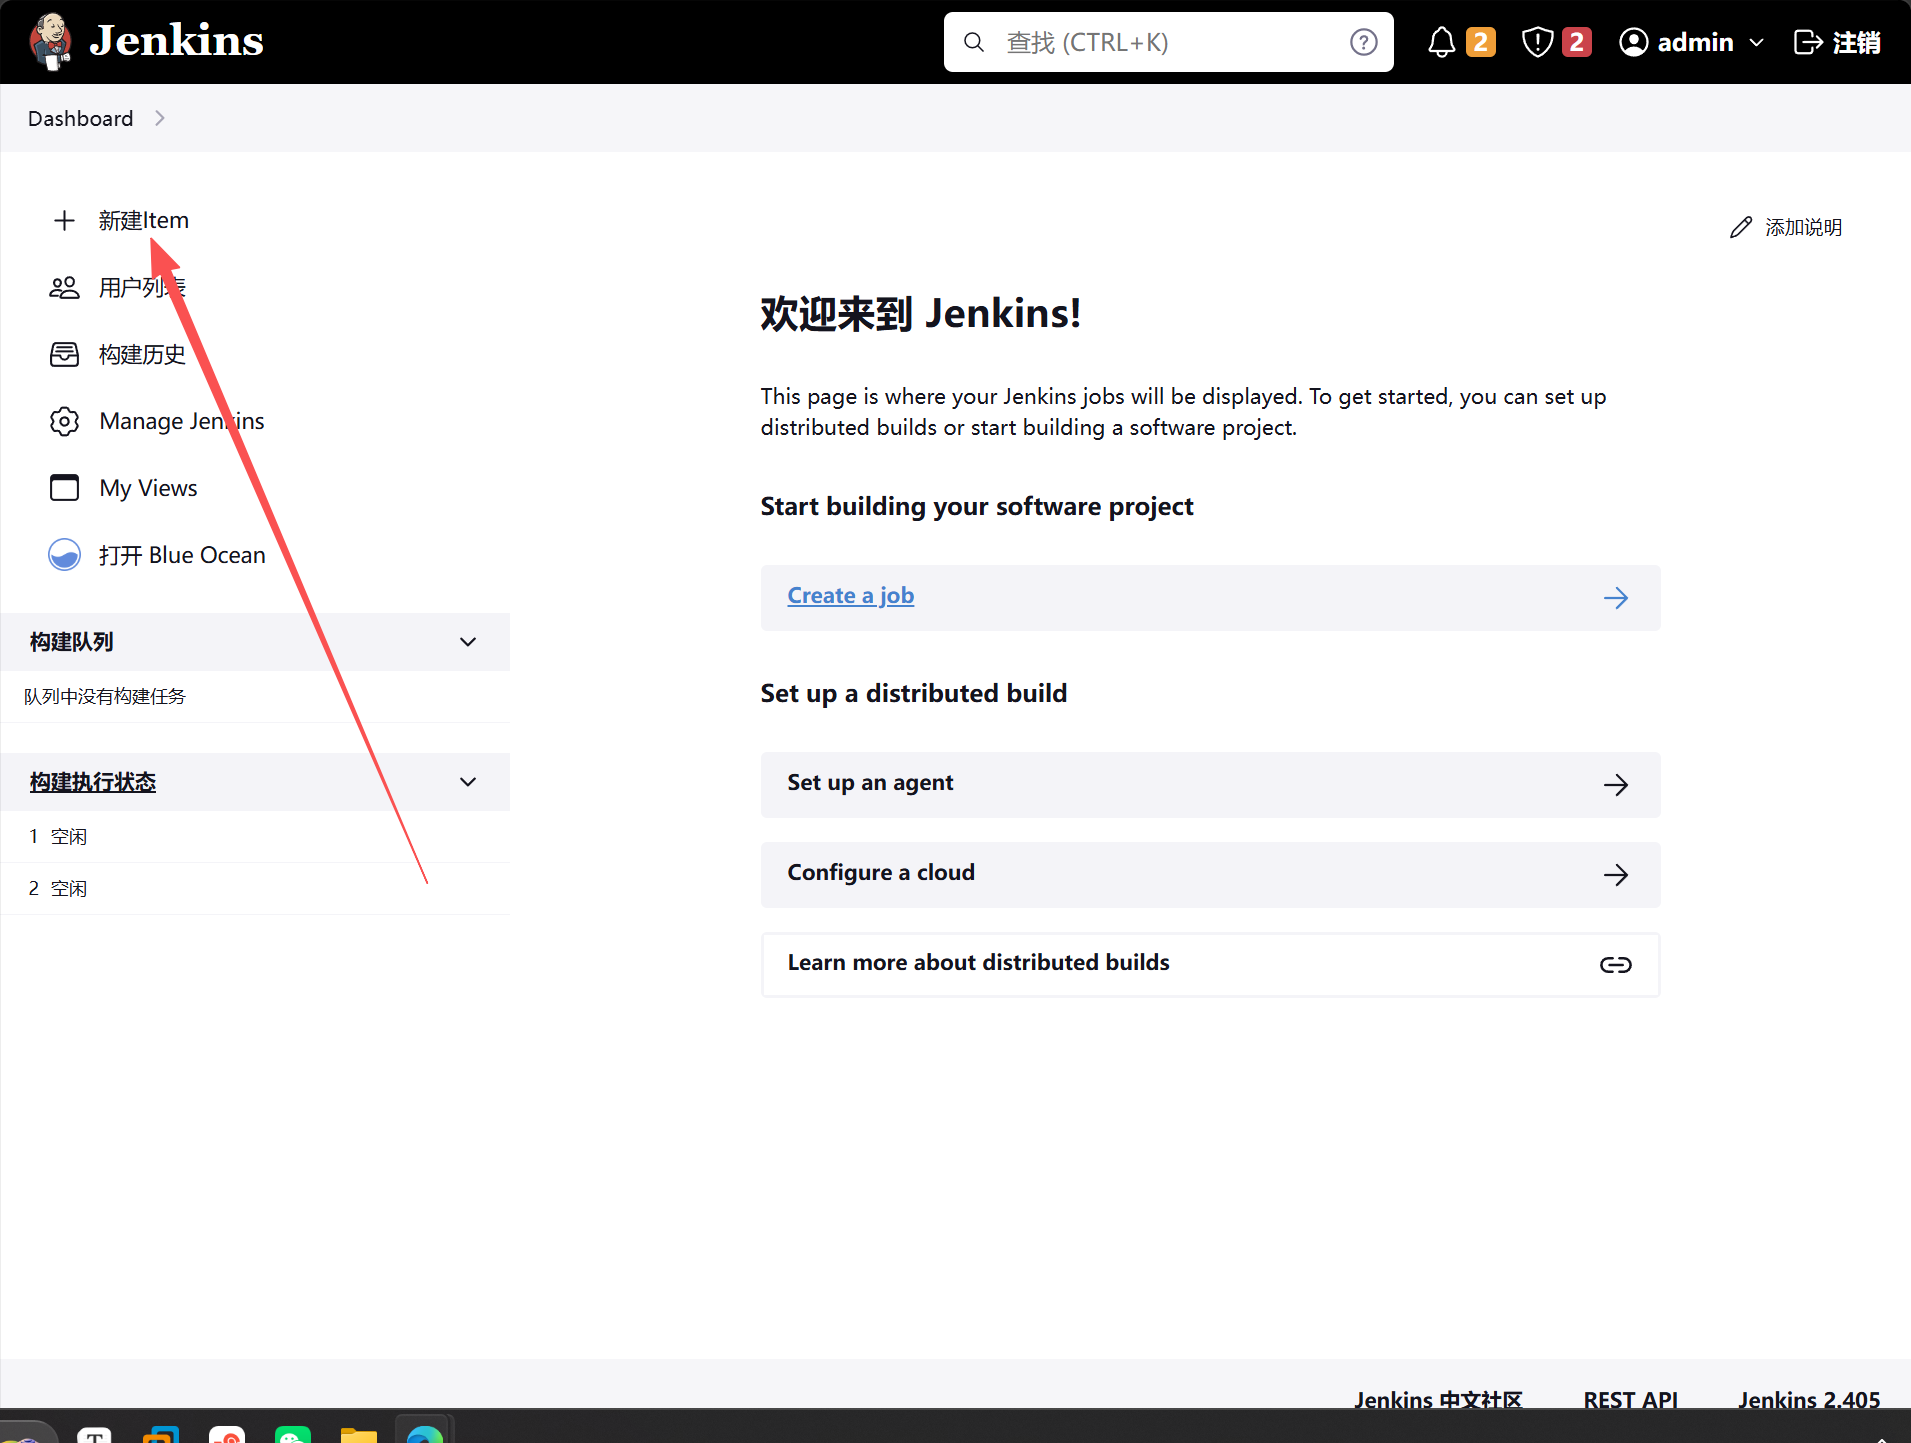
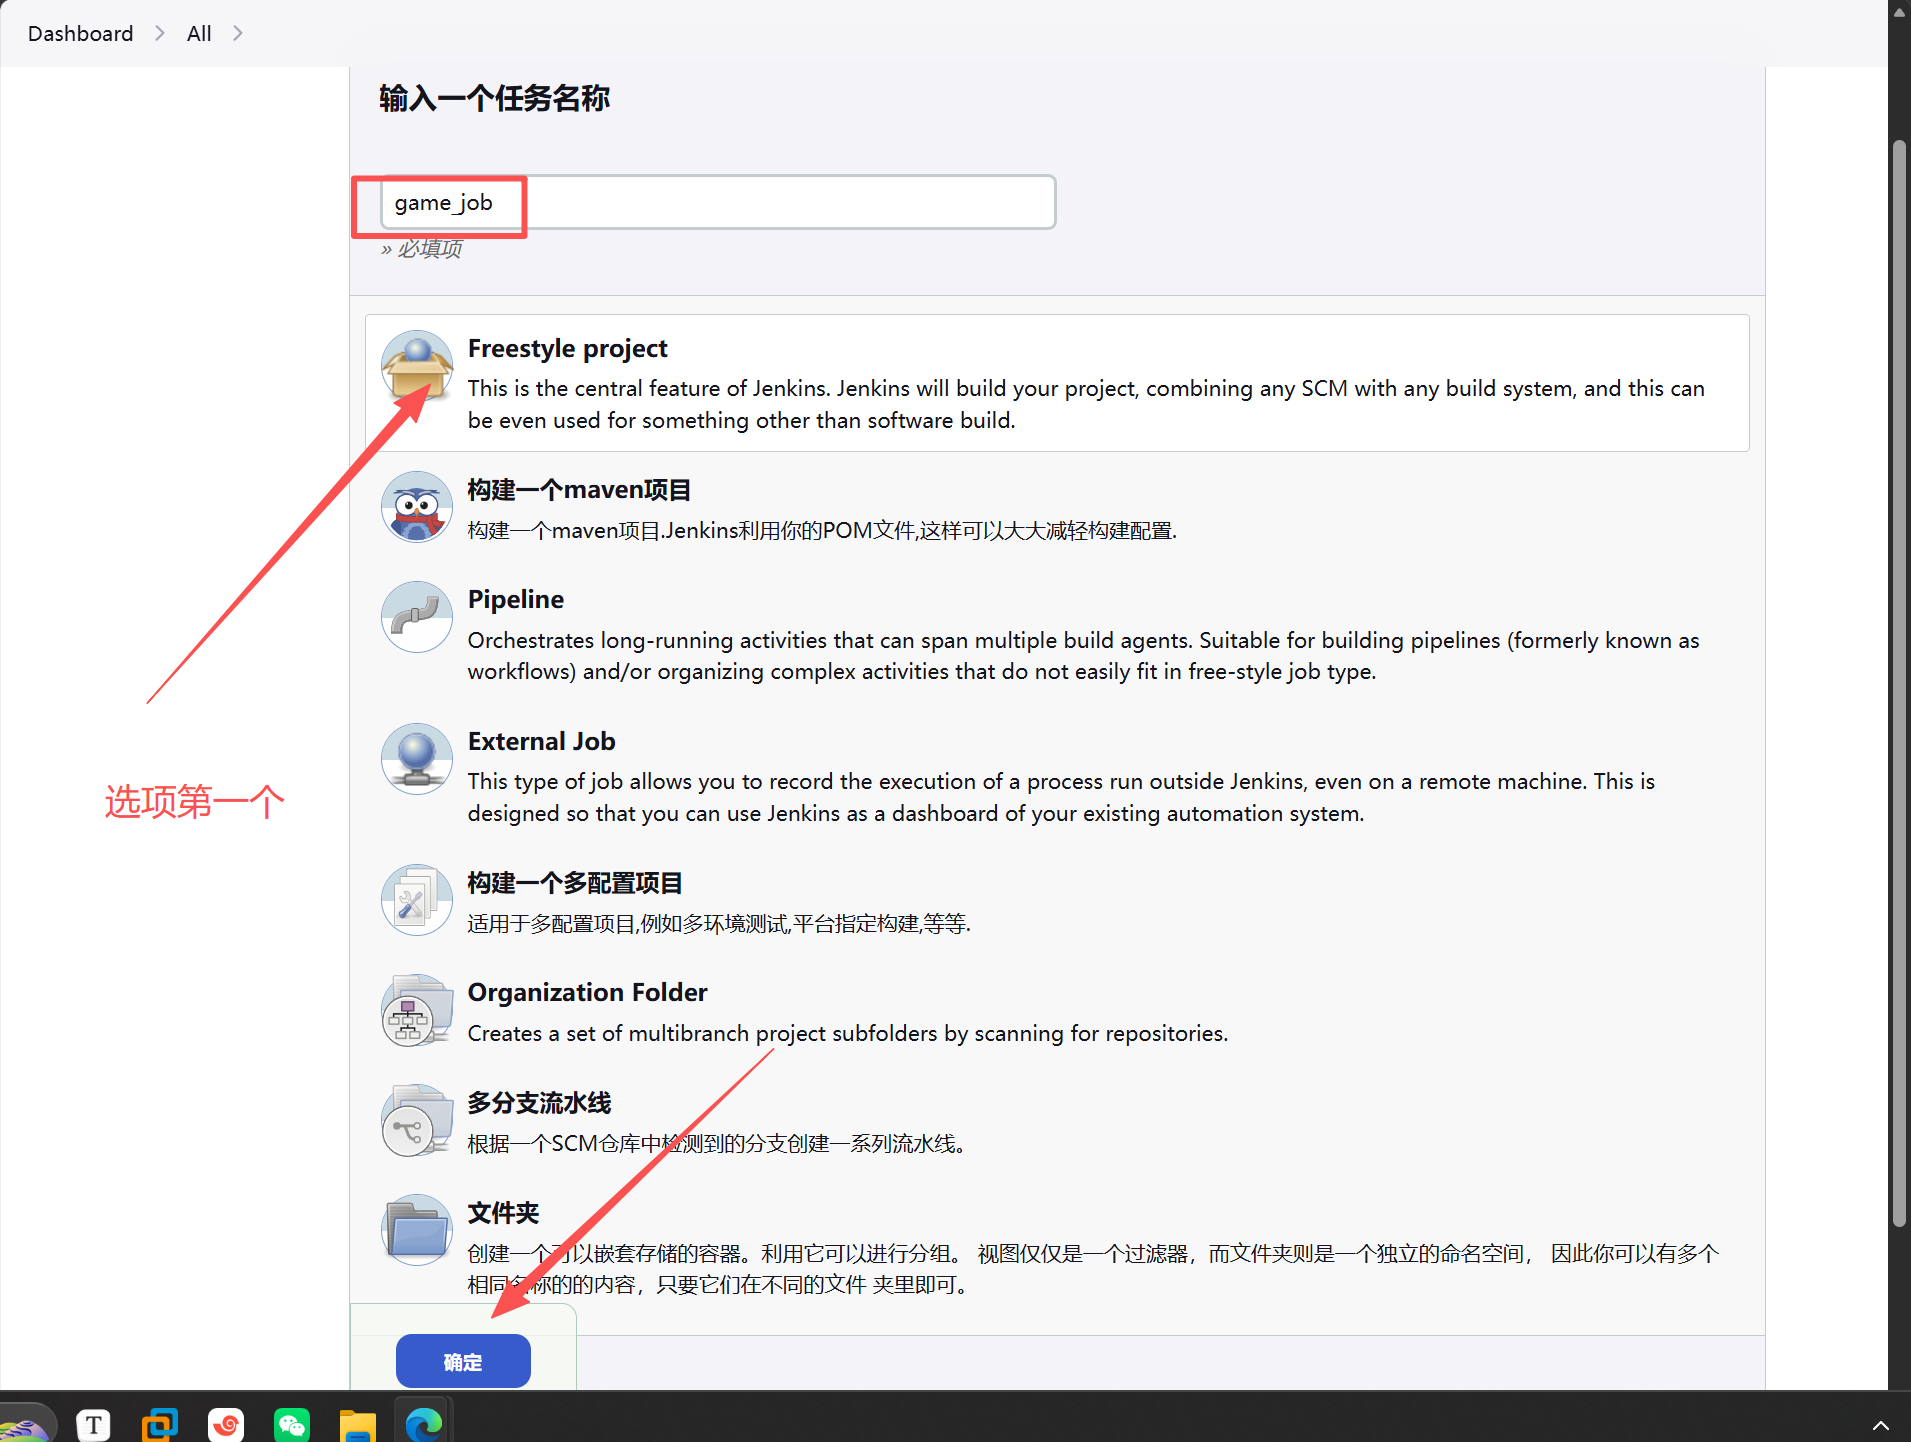
测试执行pwd命令
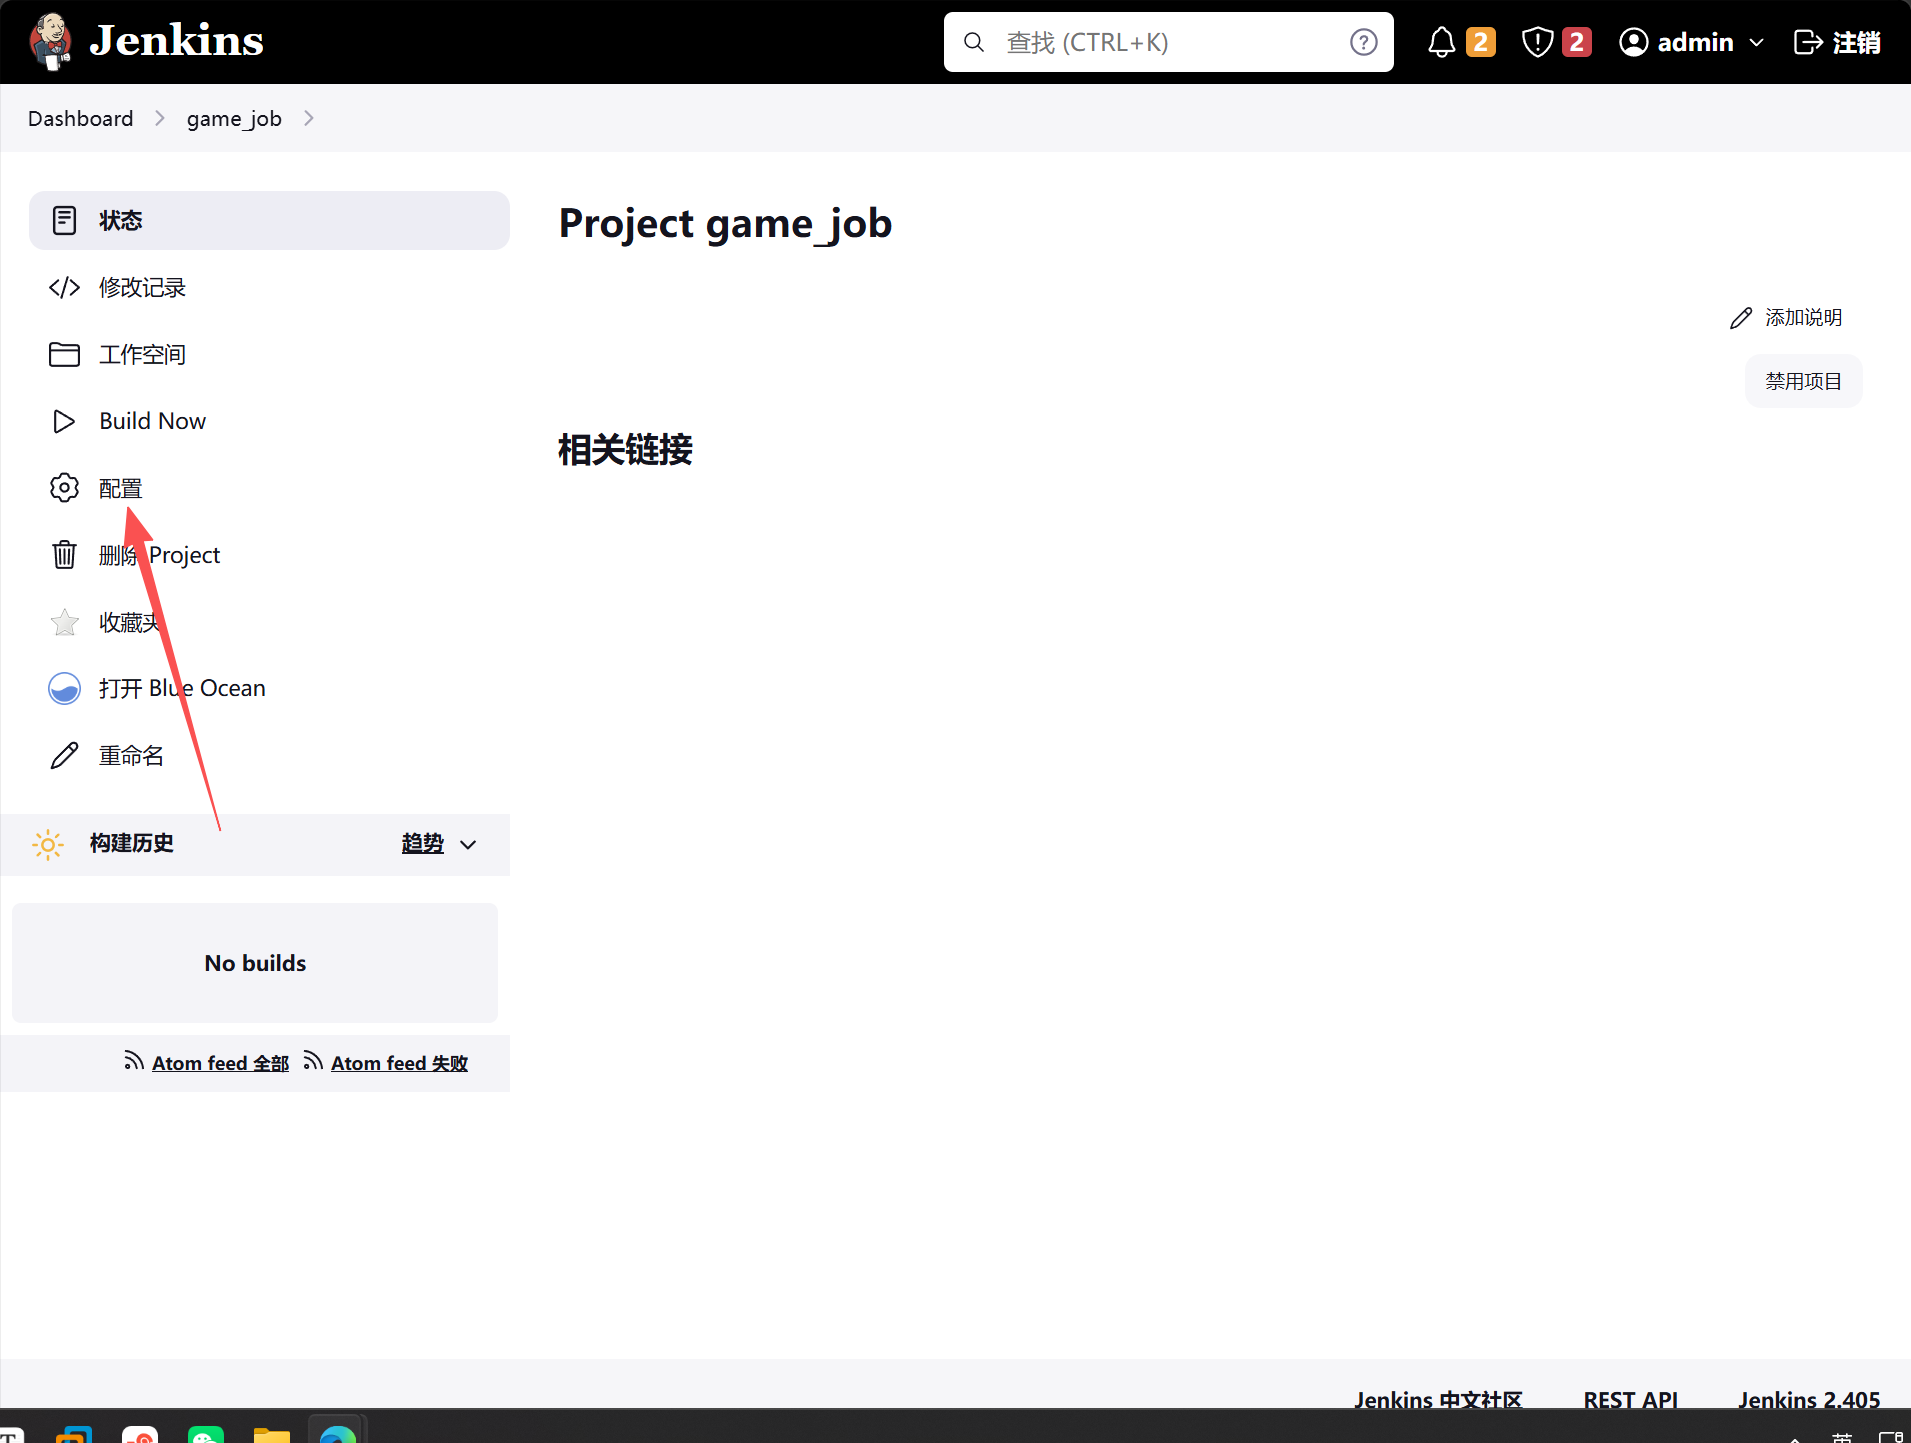
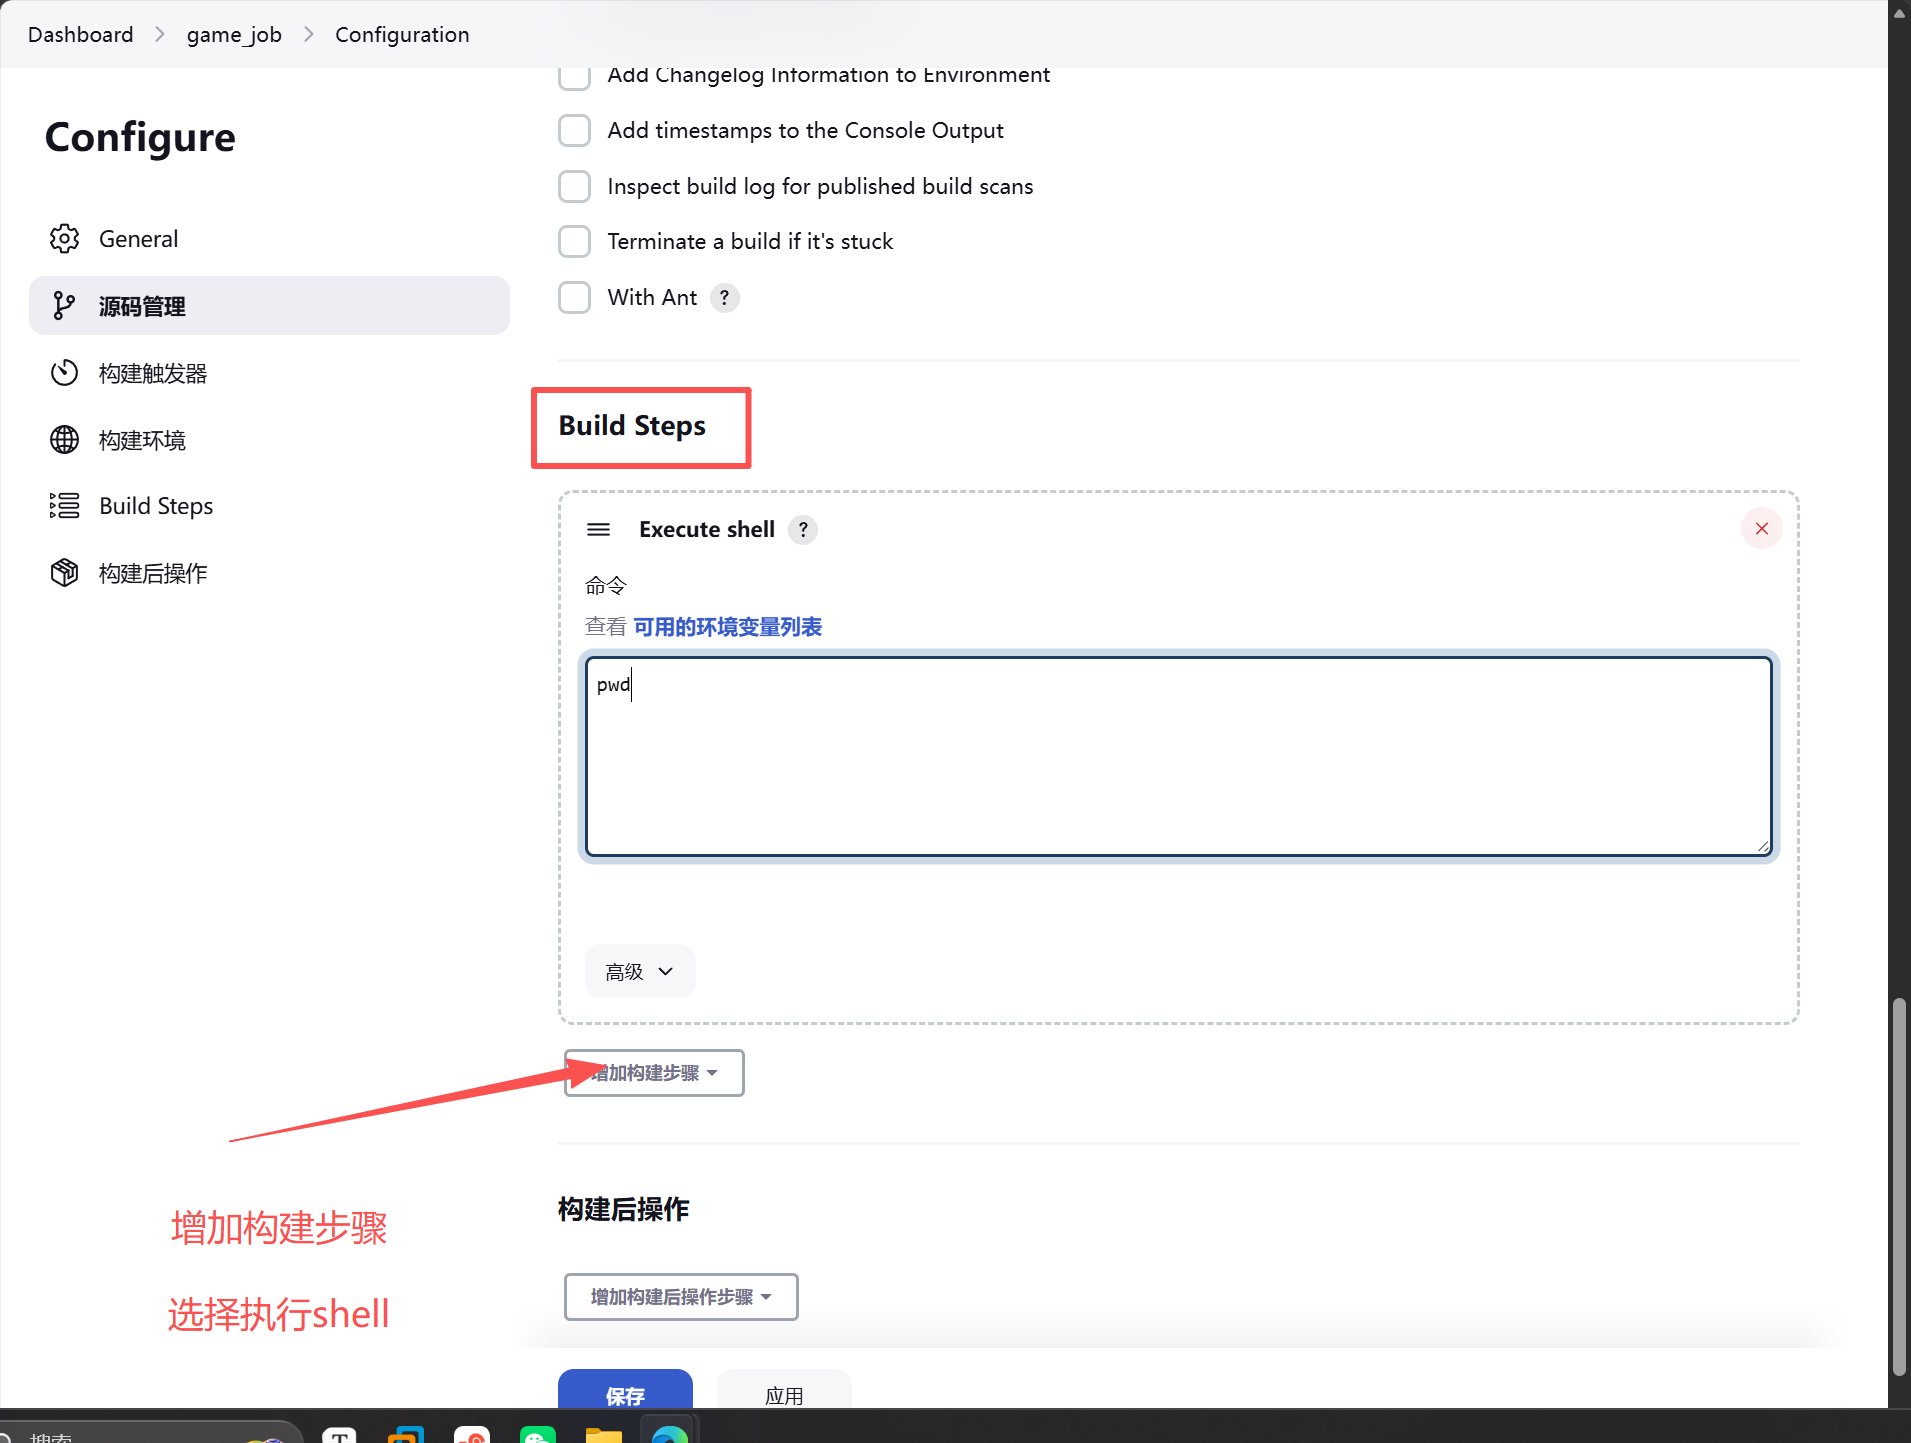
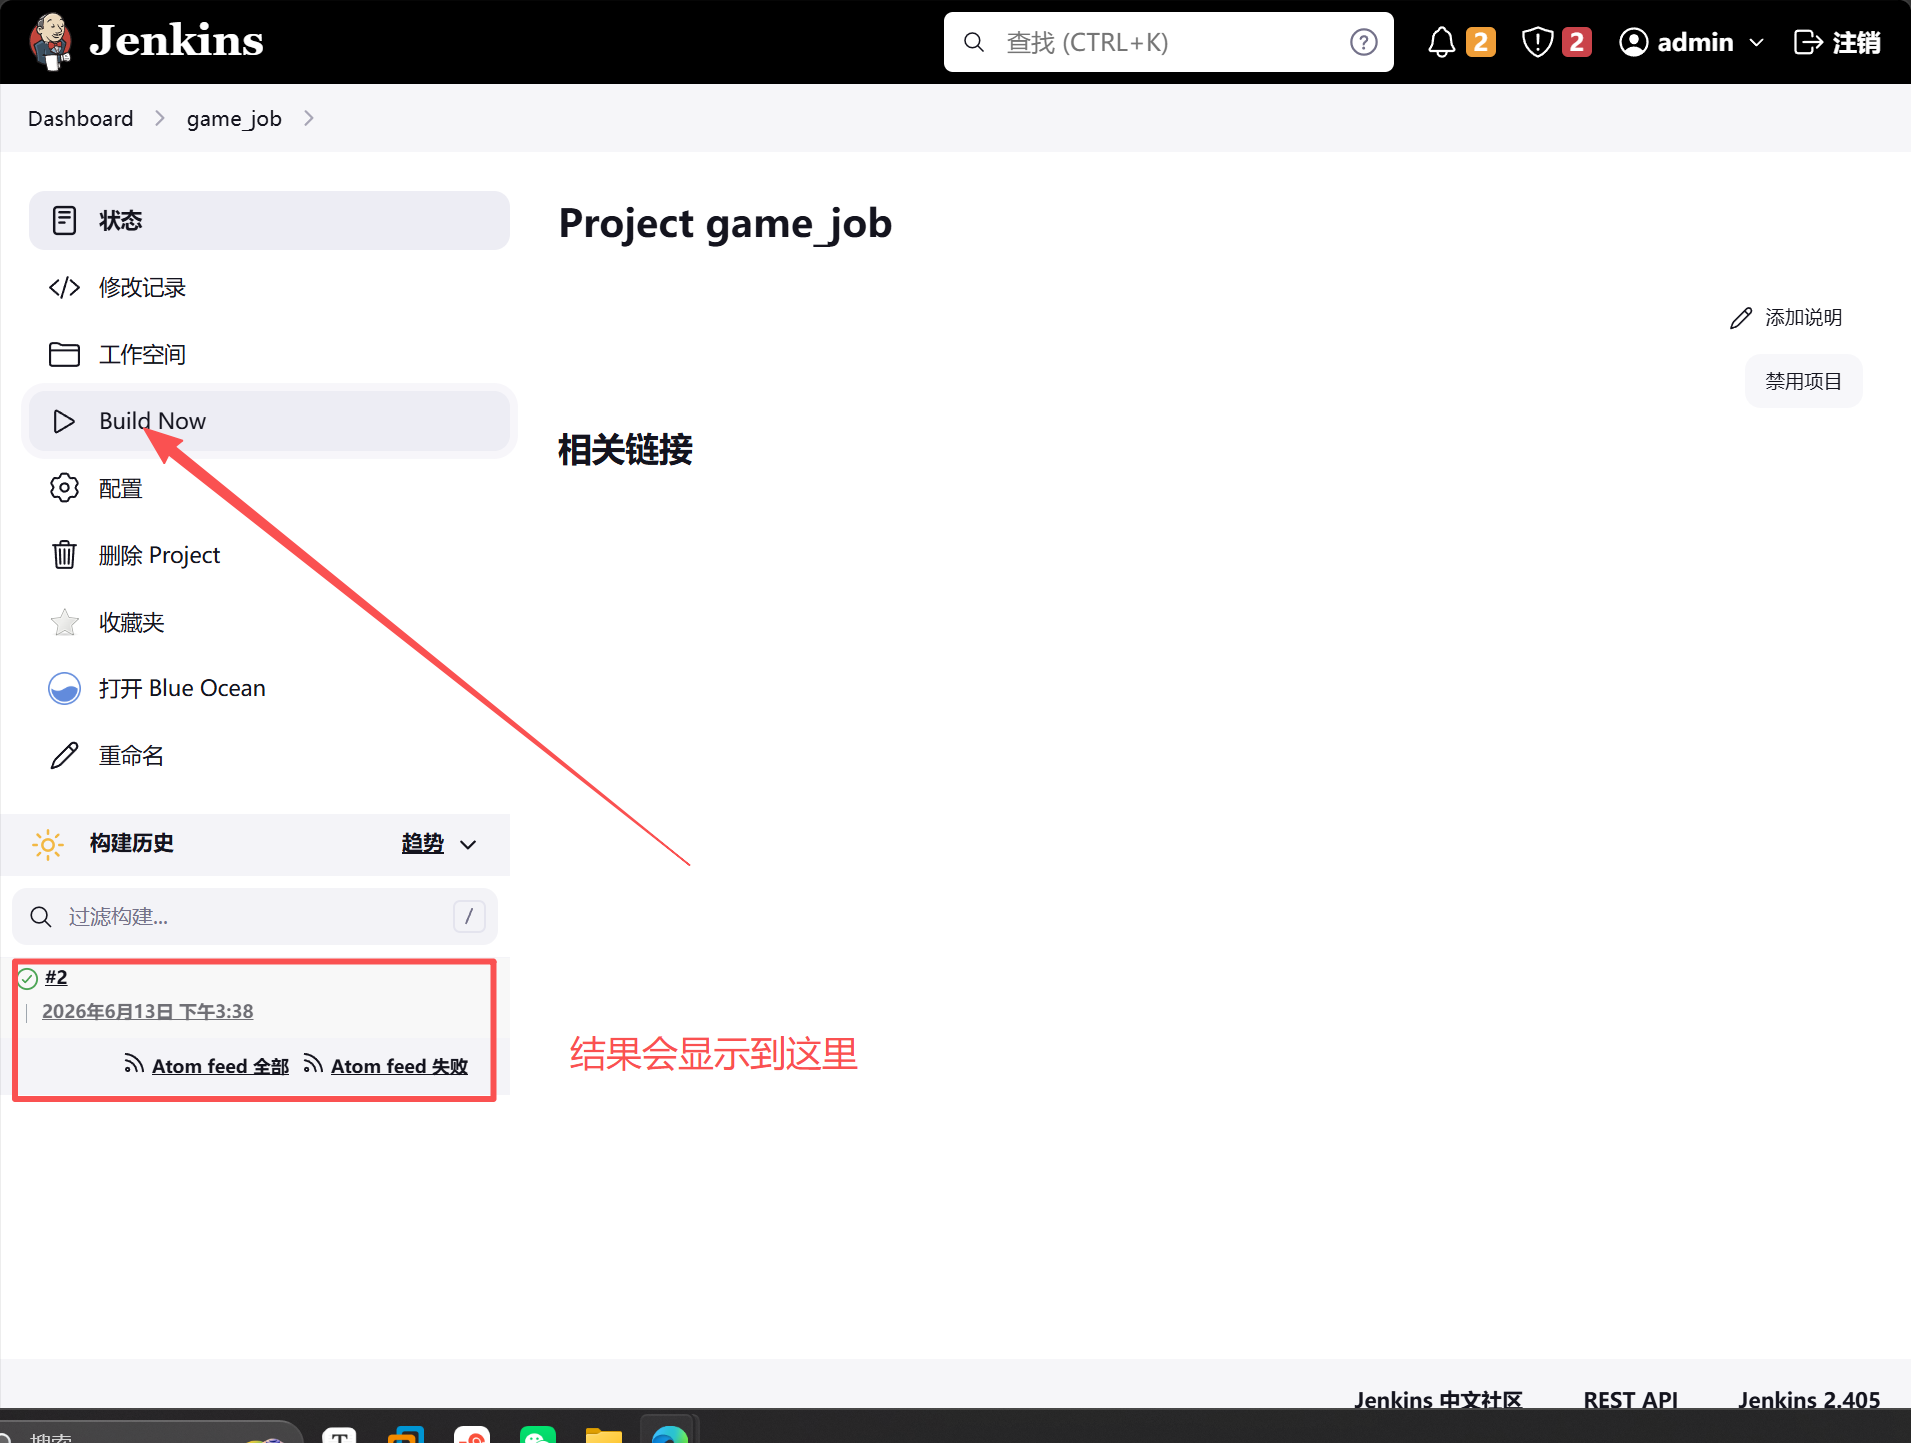
保存后点击构建
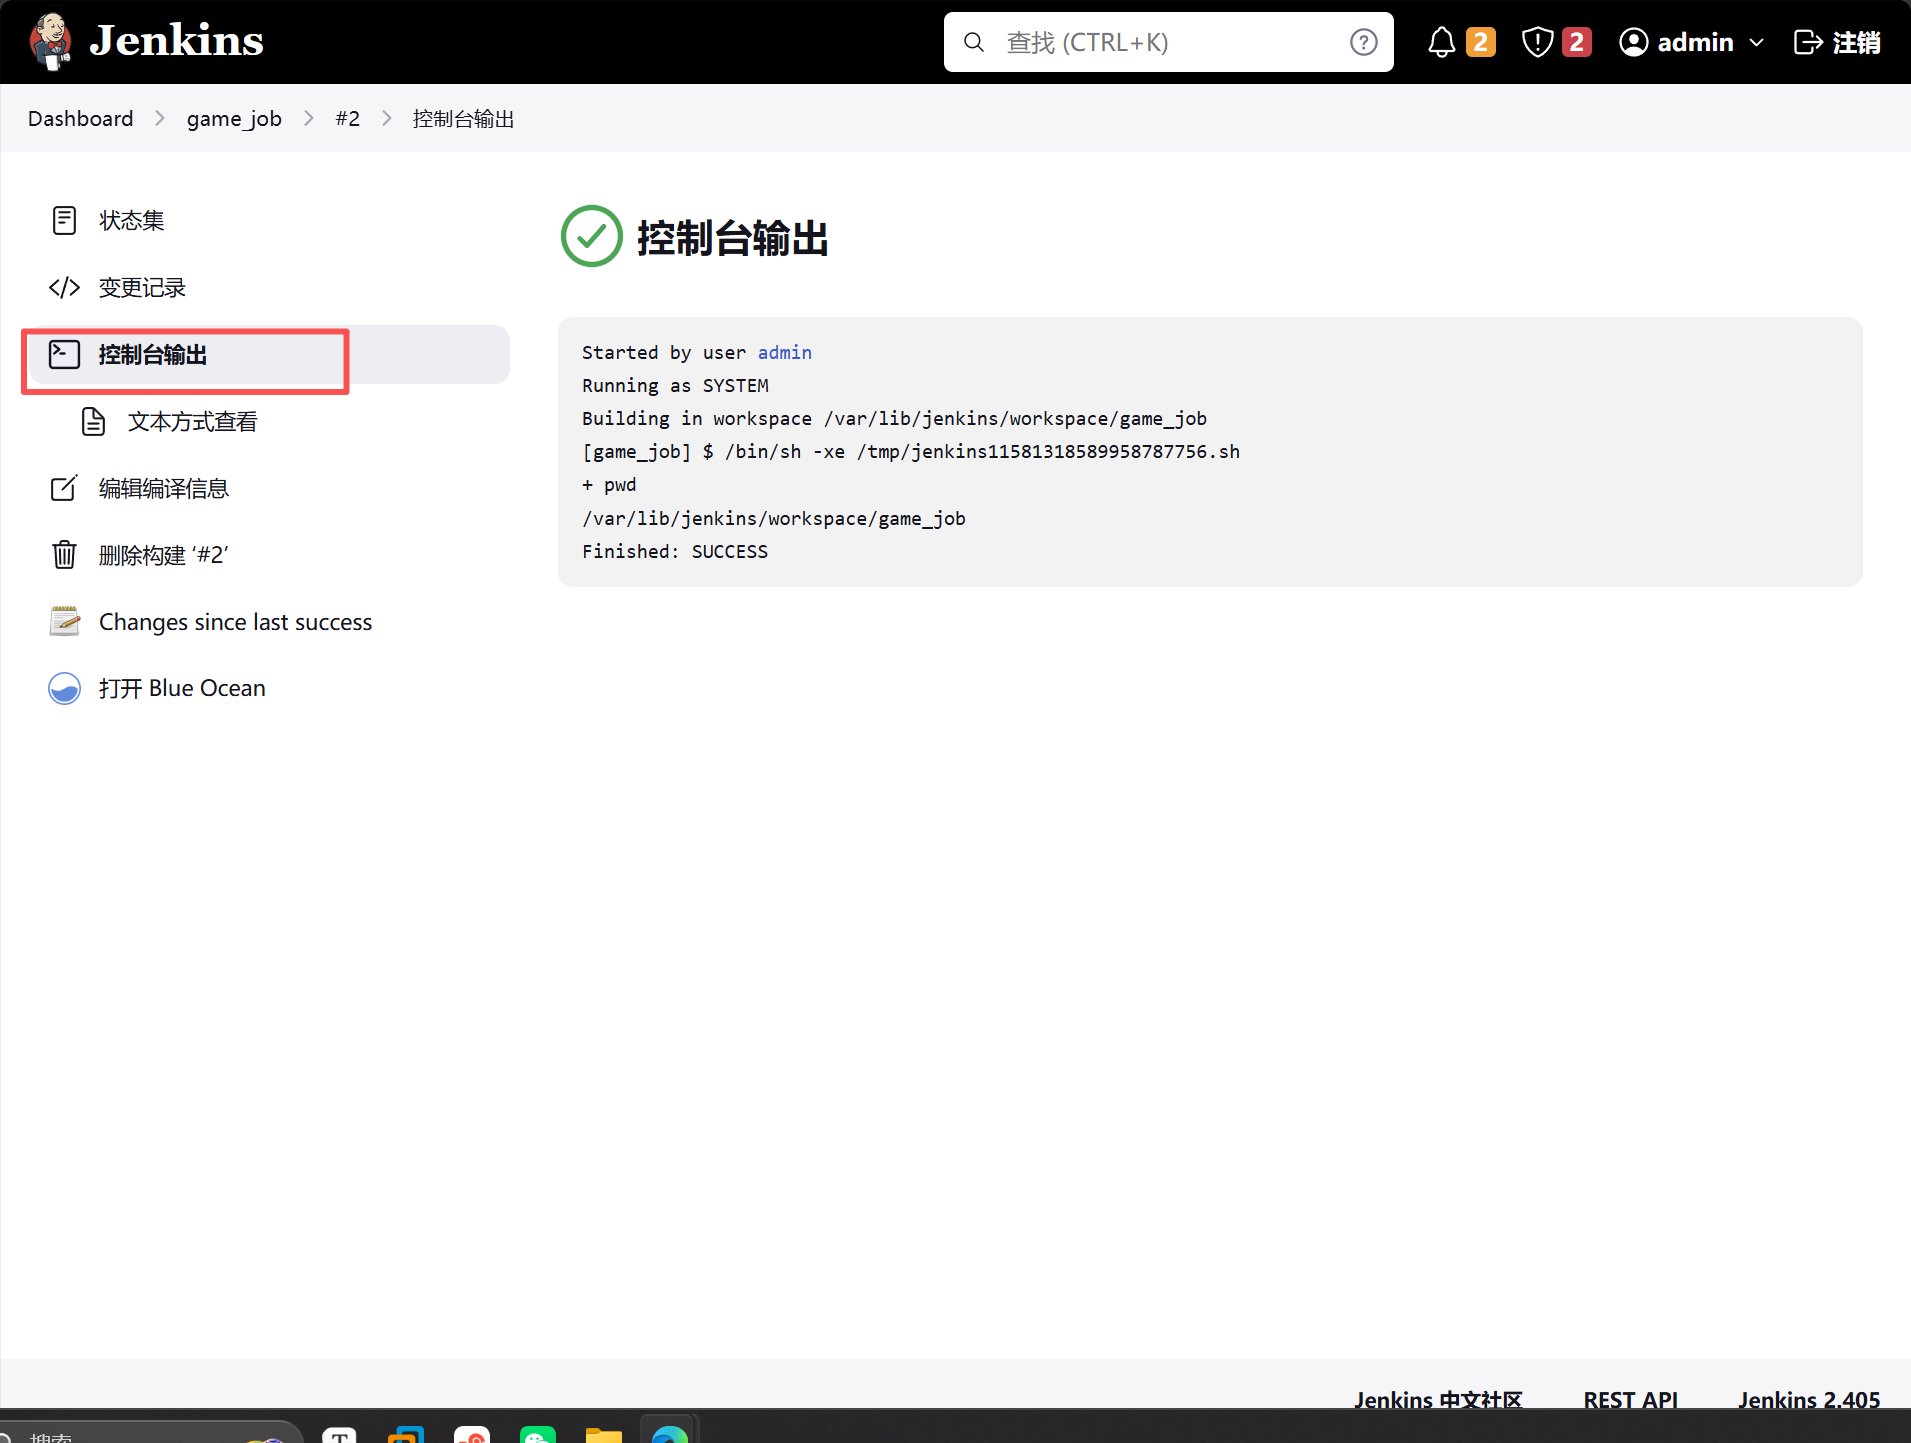
查看执行的详细结构
4.jenkins拉取gitlab的代码
#jenkins生成密钥对,将密钥对放到gitlab的root账户上
[root@jenkins plugins]# ssh-keygen
[root@jenkins plugins]# cat /root/.ssh/id_rsa.pub
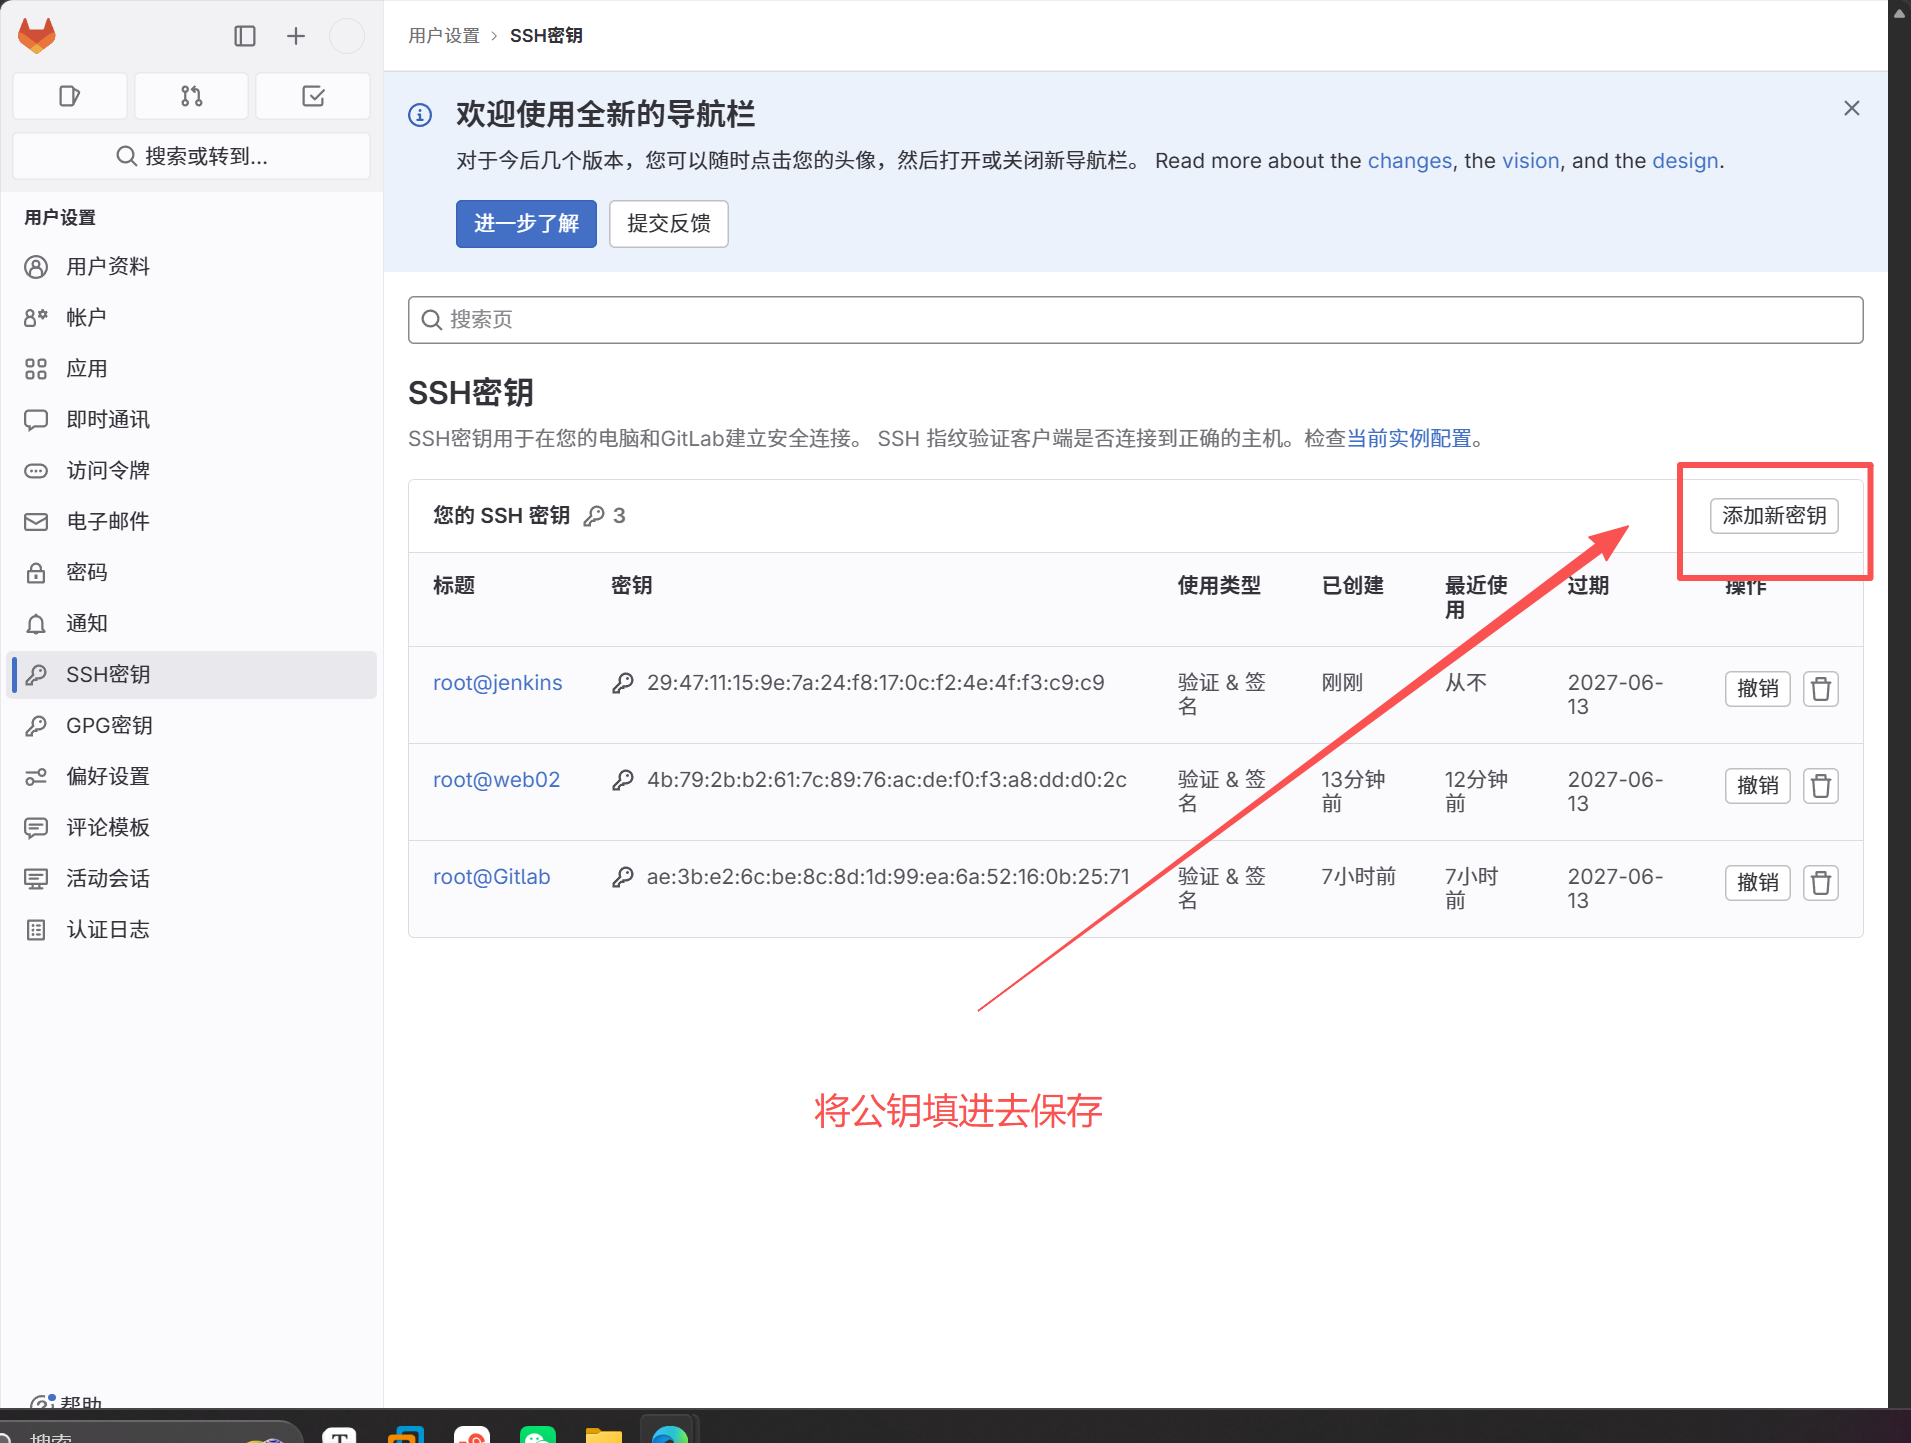
配置jenkins拉取jitlab的game项目
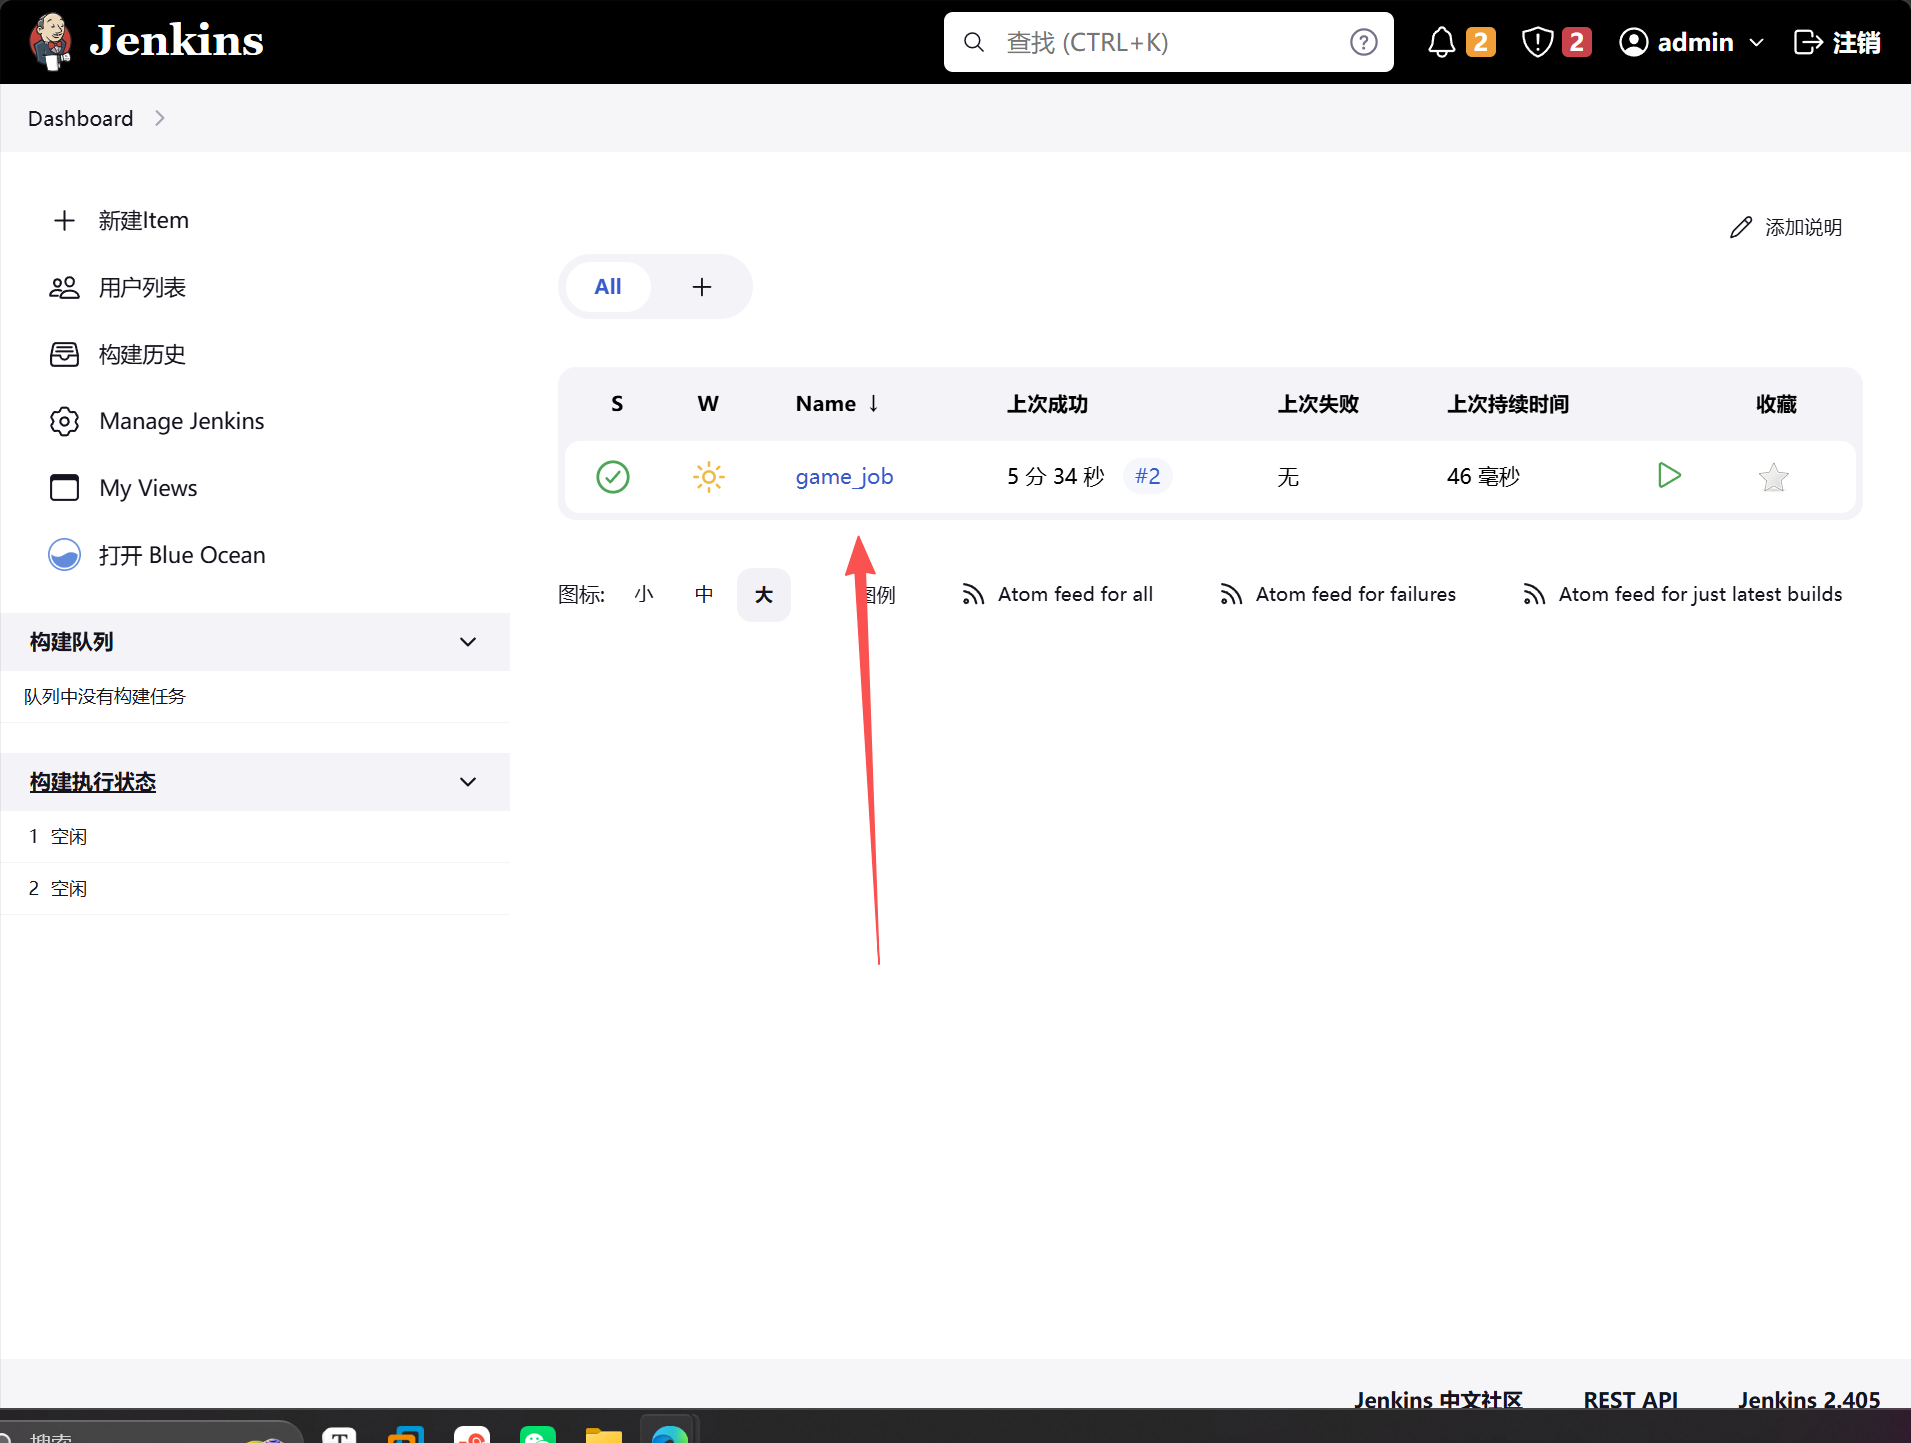
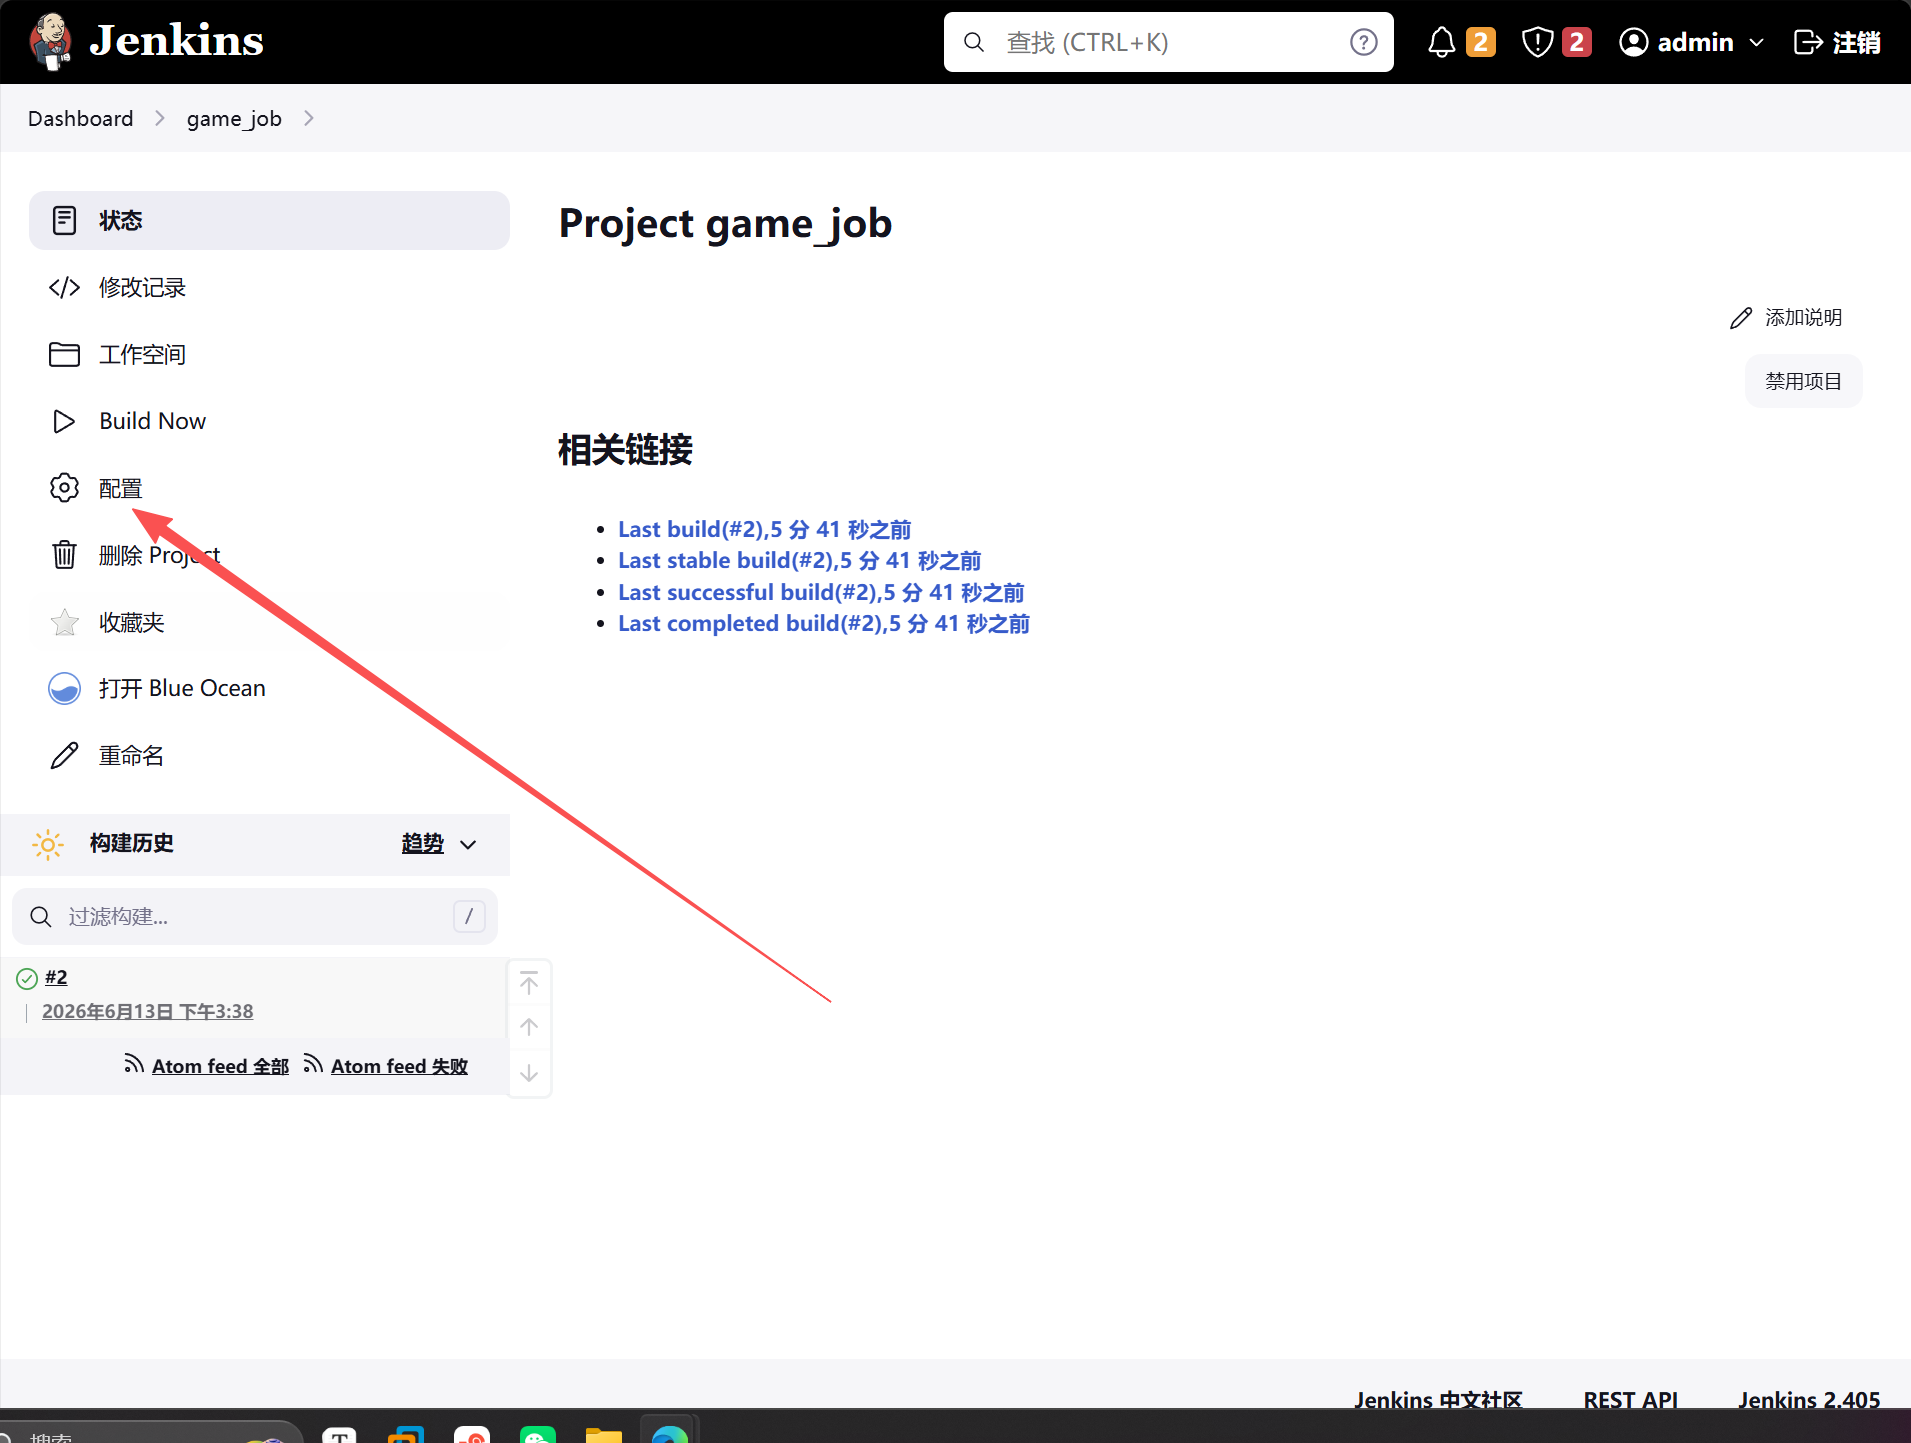
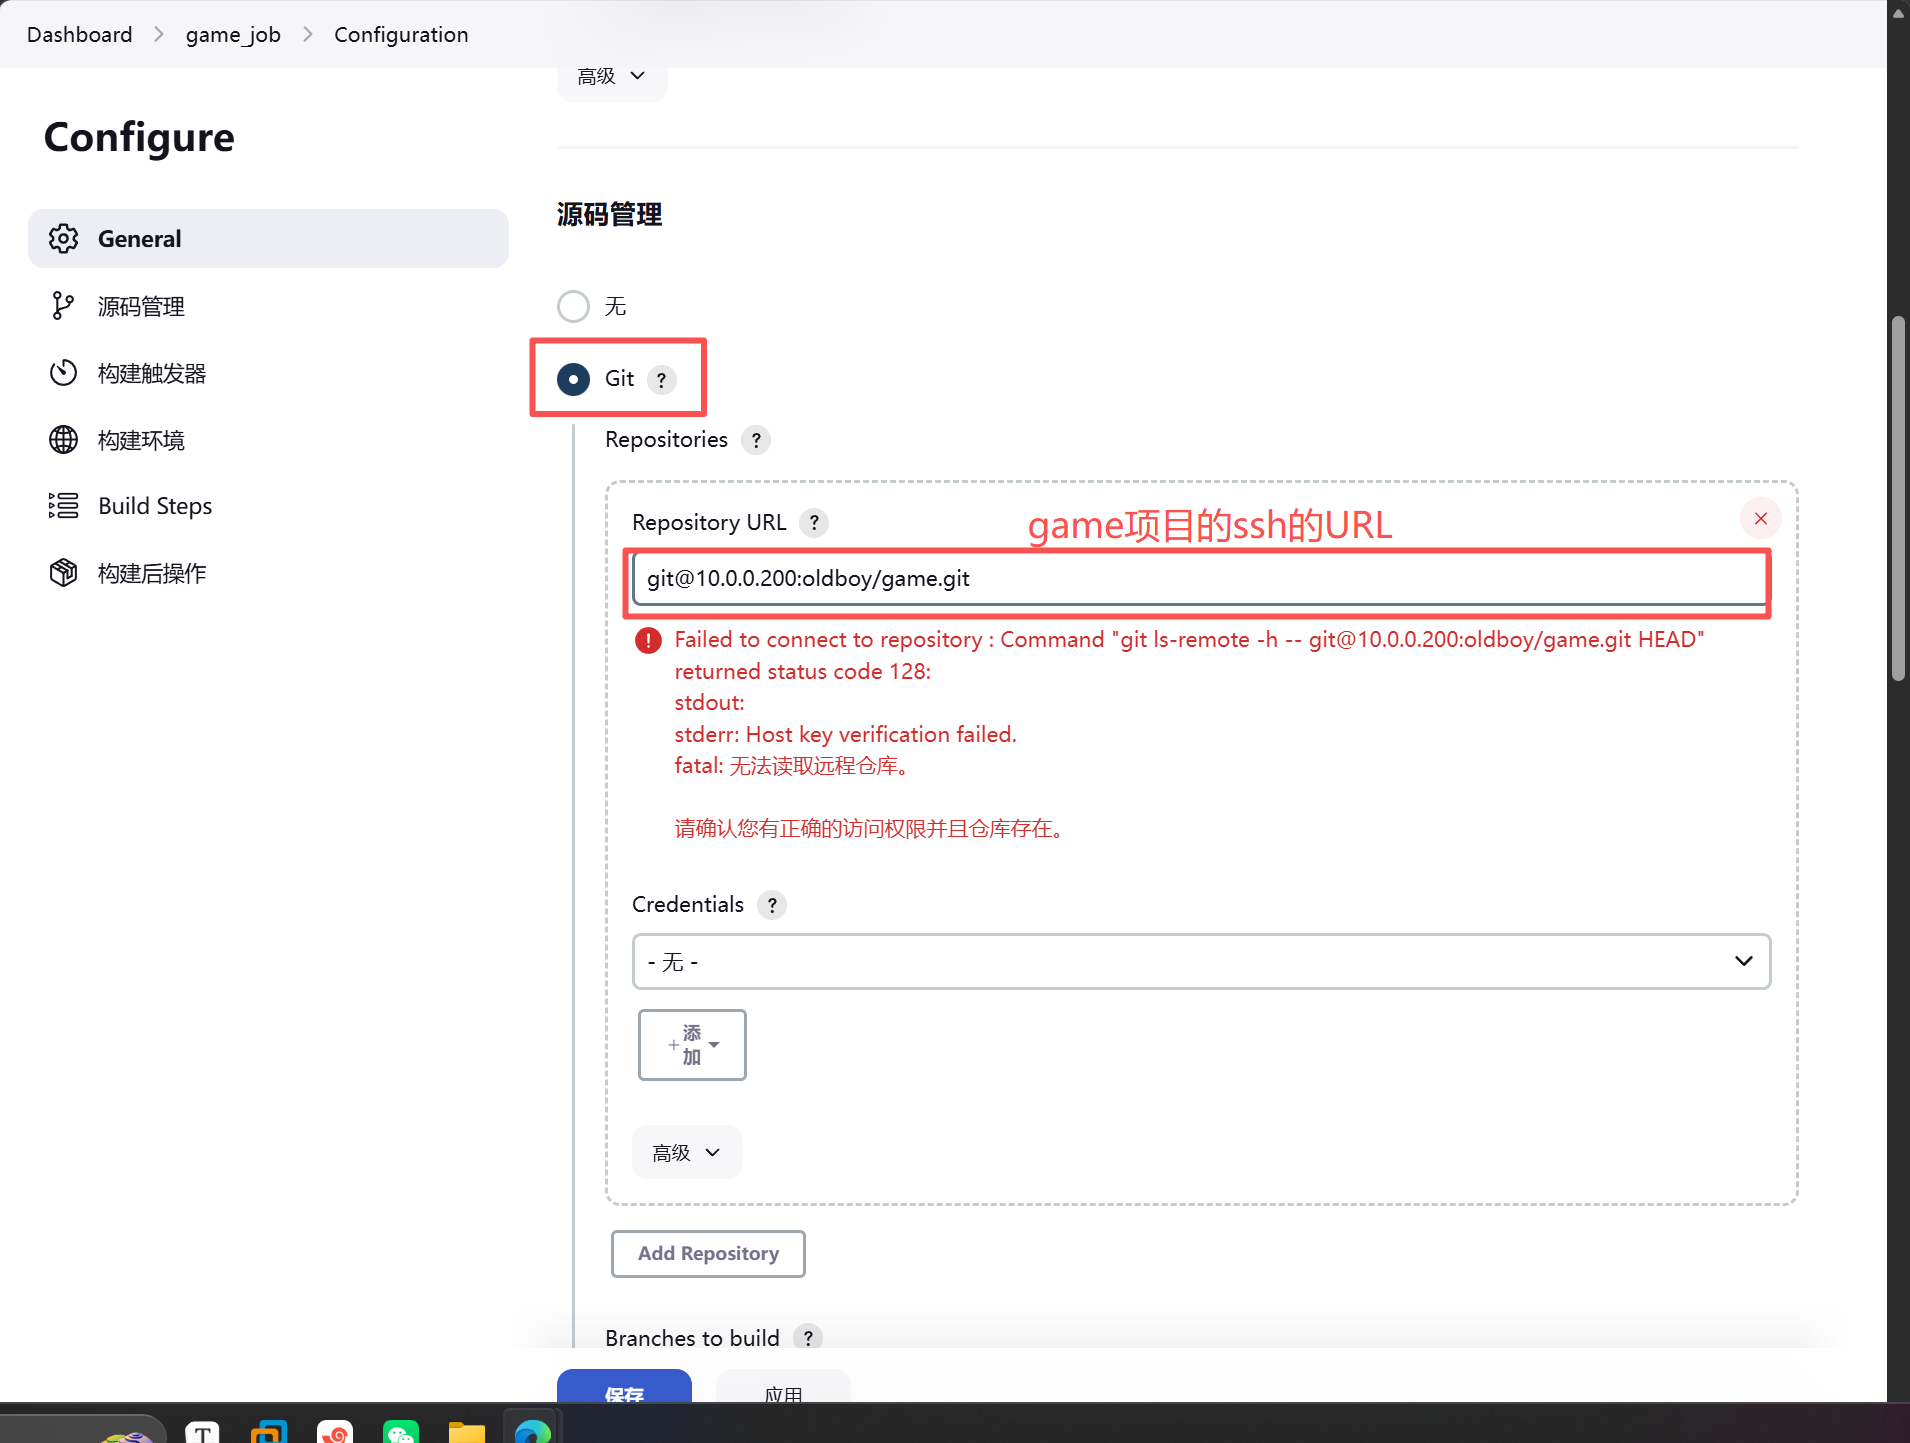
出现这样的情况就是jenkins没有和gitlab进行过ssh连接,需要先输入一下yes
在jenkins服务器上随便一个目录,拉取一下gitlab的game项目
[root@jenkins ~]# git clone git@10.0.0.200:oldboy/game.git
正克隆到 'game'...
The authenticity of host '10.0.0.200 (10.0.0.200)' can't be established.
ECDSA key fingerprint is SHA256:MpkmNb46YEspkVIvN//cJ1xqE0xRfWdaMOfAQ70kEhM.
Are you sure you want to continue connecting (yes/no/[fingerprint])? yes
Warning: Permanently added '10.0.0.200' (ECDSA) to the list of known hosts.
remote: Enumerating objects: 108, done.
remote: Counting objects: 100% (108/108), done.
remote: Compressing objects: 100% (100/100), done.
接收对象中: 100% (108/108), 14.87 MiB | 13.87 MiB/s, 完成.
处理 delta 中: 100% (6/6), 完成.
remote: Total 108 (delta 6), reused 101 (delta 4), pack-reused 0
重新填写一下
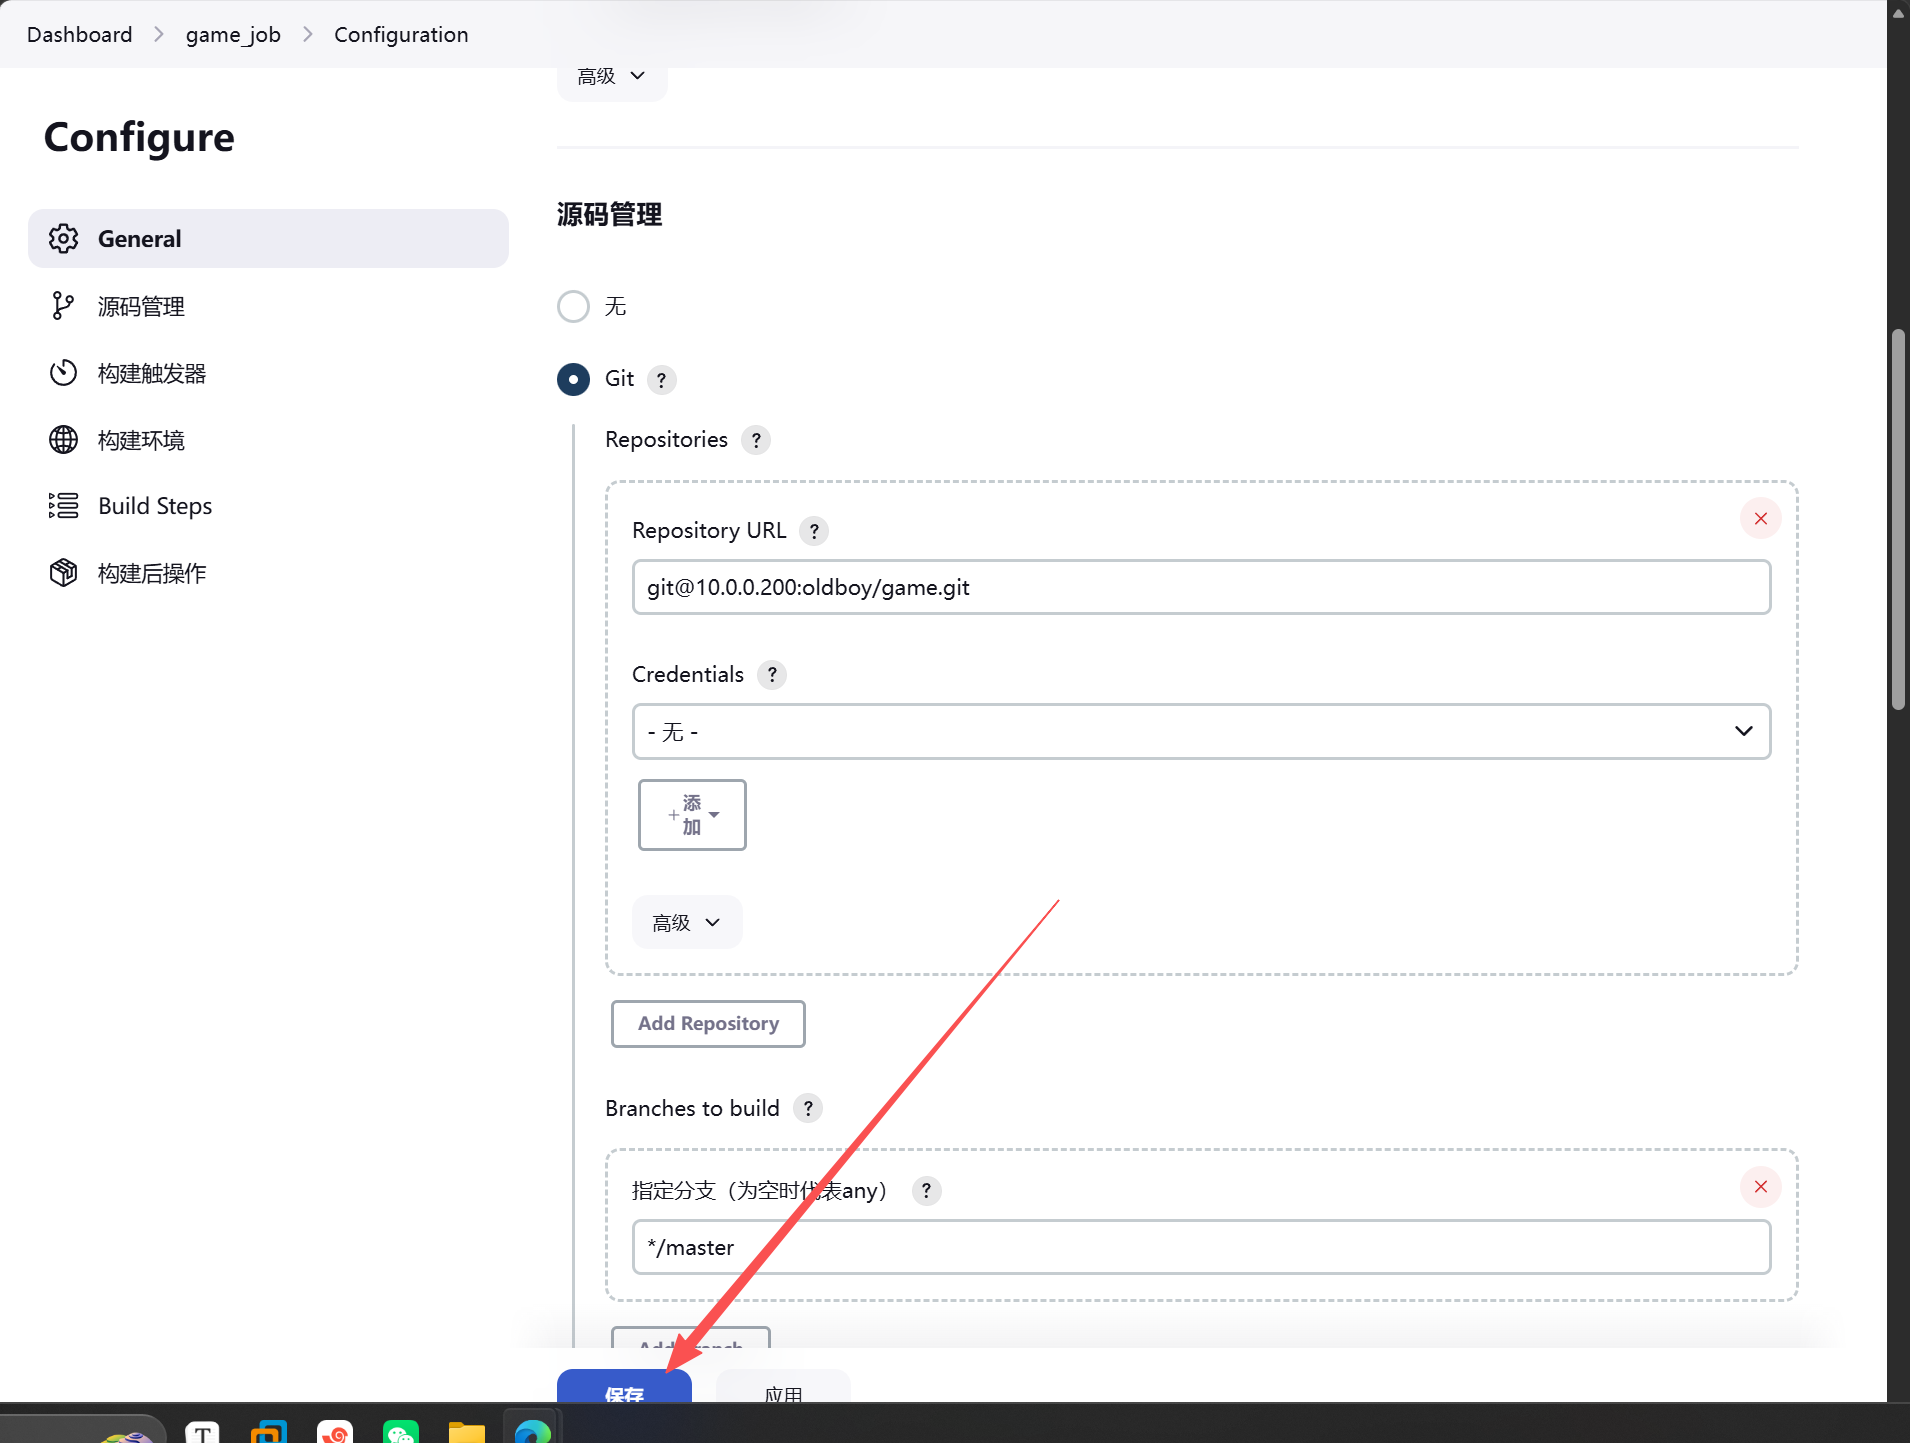
完成后执行构建
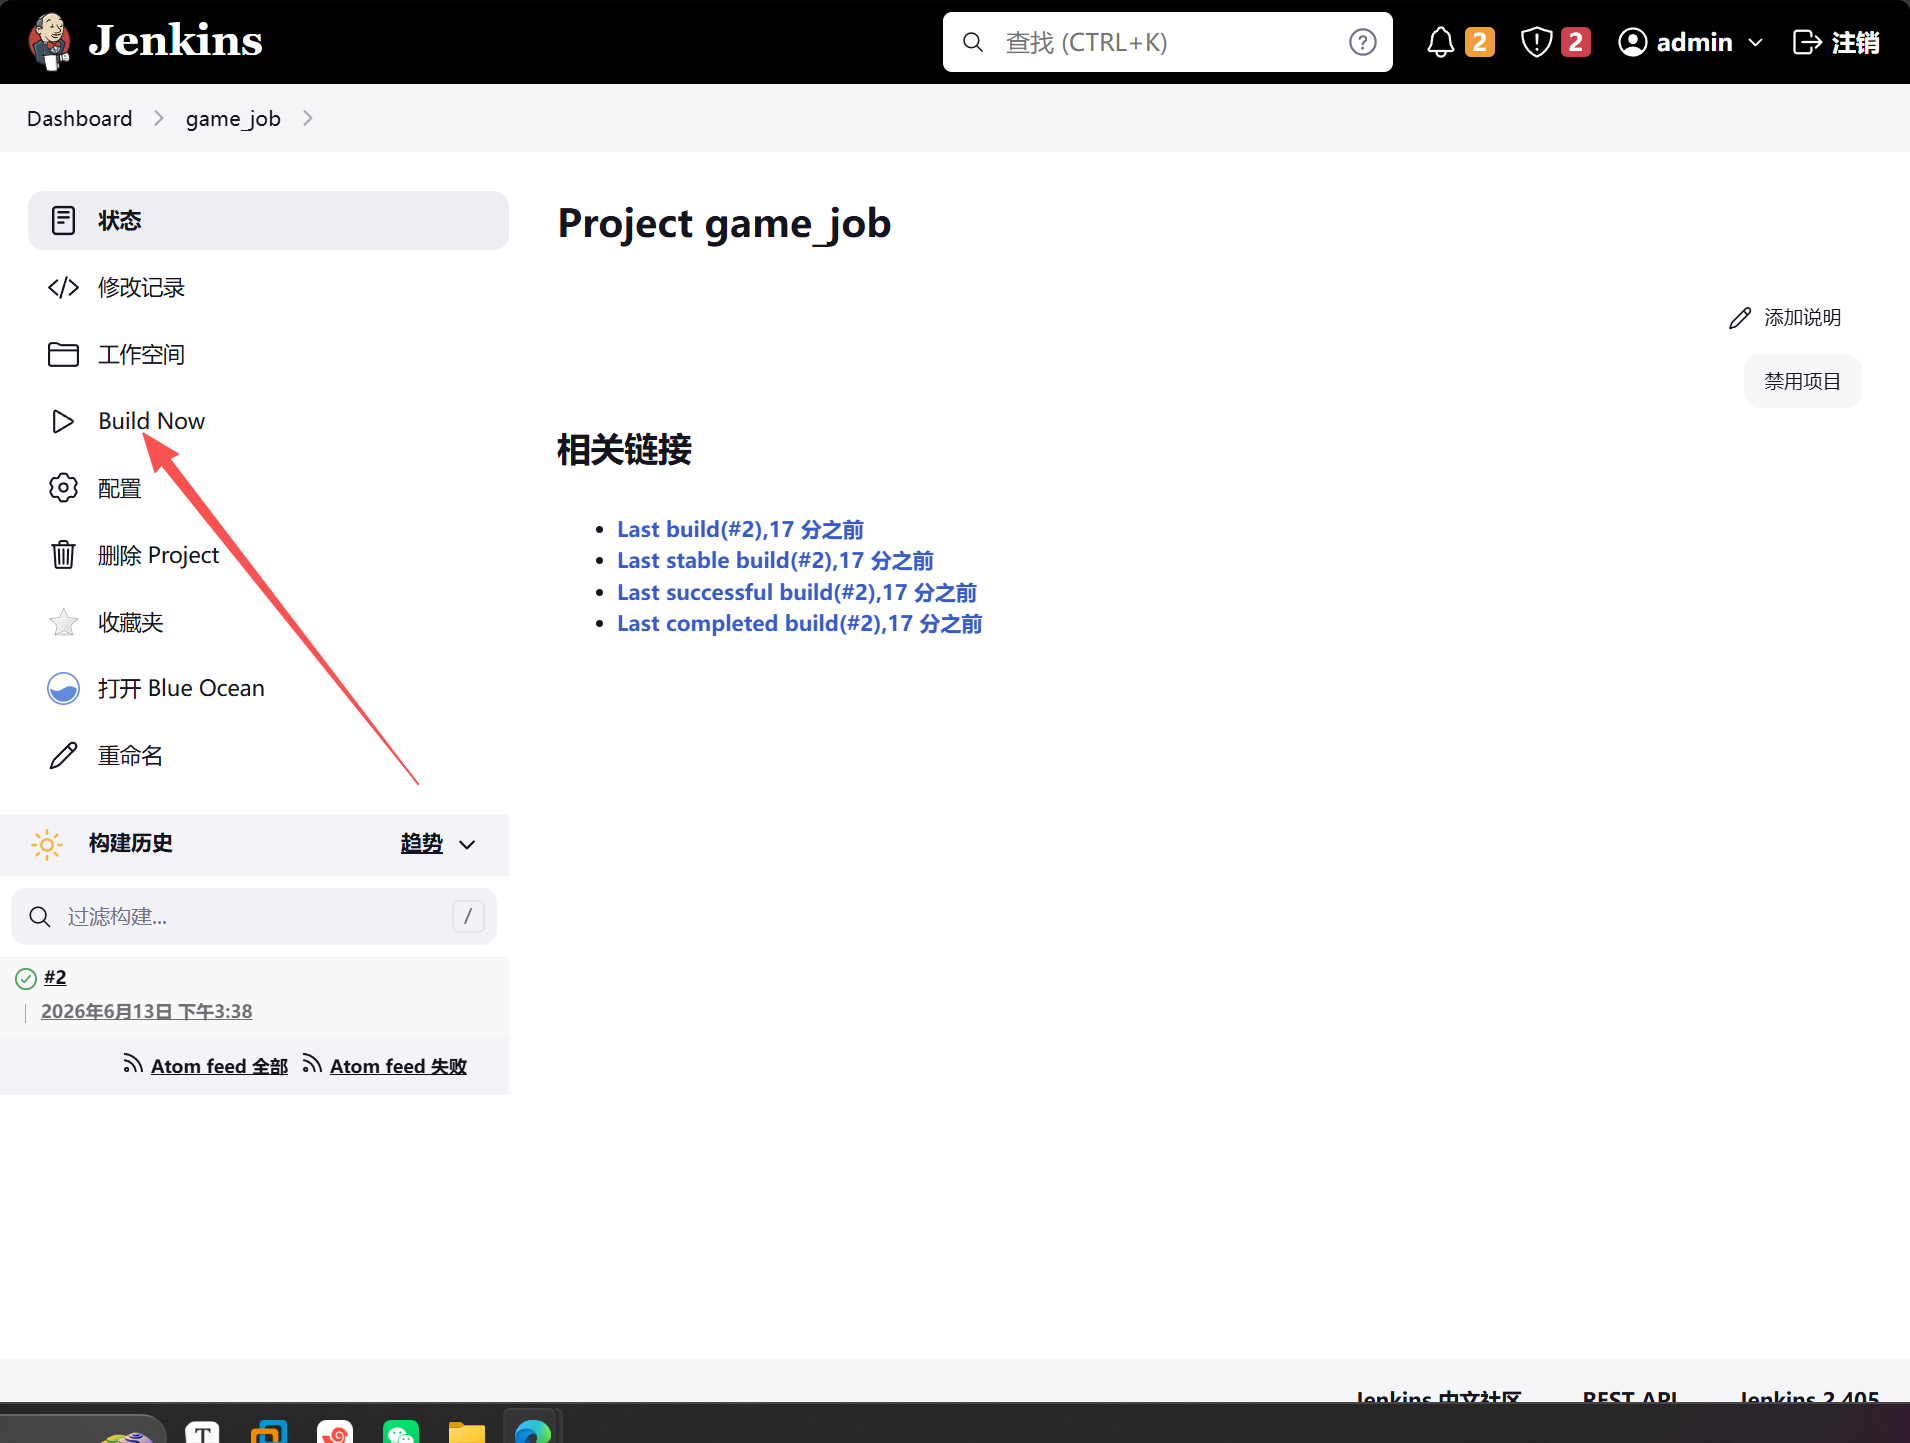
完成后在jinkens服务器上查看拉取的代码
[root@jenkins ~]# cd /var/lib/jenkins/workspace/    #jenkins的项目仓库
[root@jenkins workspace]# ll
总用量 0
drwxr-xr-x 7 root root 119  6月 13 15:56 game_job
[root@jenkins workspace]# cd game_job/
[root@jenkins game_job]# ll
总用量 48
-rw-r--r-- 1 root root 28032  6月 13 15:56 bgm.mp3
drwxr-xr-x 2 root root    23  6月 13 15:56 css
drwxr-xr-x 2 root root    23  6月 13 15:56 images
-rw-r--r-- 1 root root  8954  6月 13 15:56 index.html
drwxr-xr-x 2 root root   213  6月 13 15:56 js
drwxr-xr-x 2 root root  4096  6月 13 15:56 roms
-rw-r--r-- 1 root root   811  6月 13 15:56 shuoming.html
将代码推送到web服务器
#先将jenkins的公钥推送到web服务器
[root@jenkins game_job]# ssh-copy-id 10.0.0.8
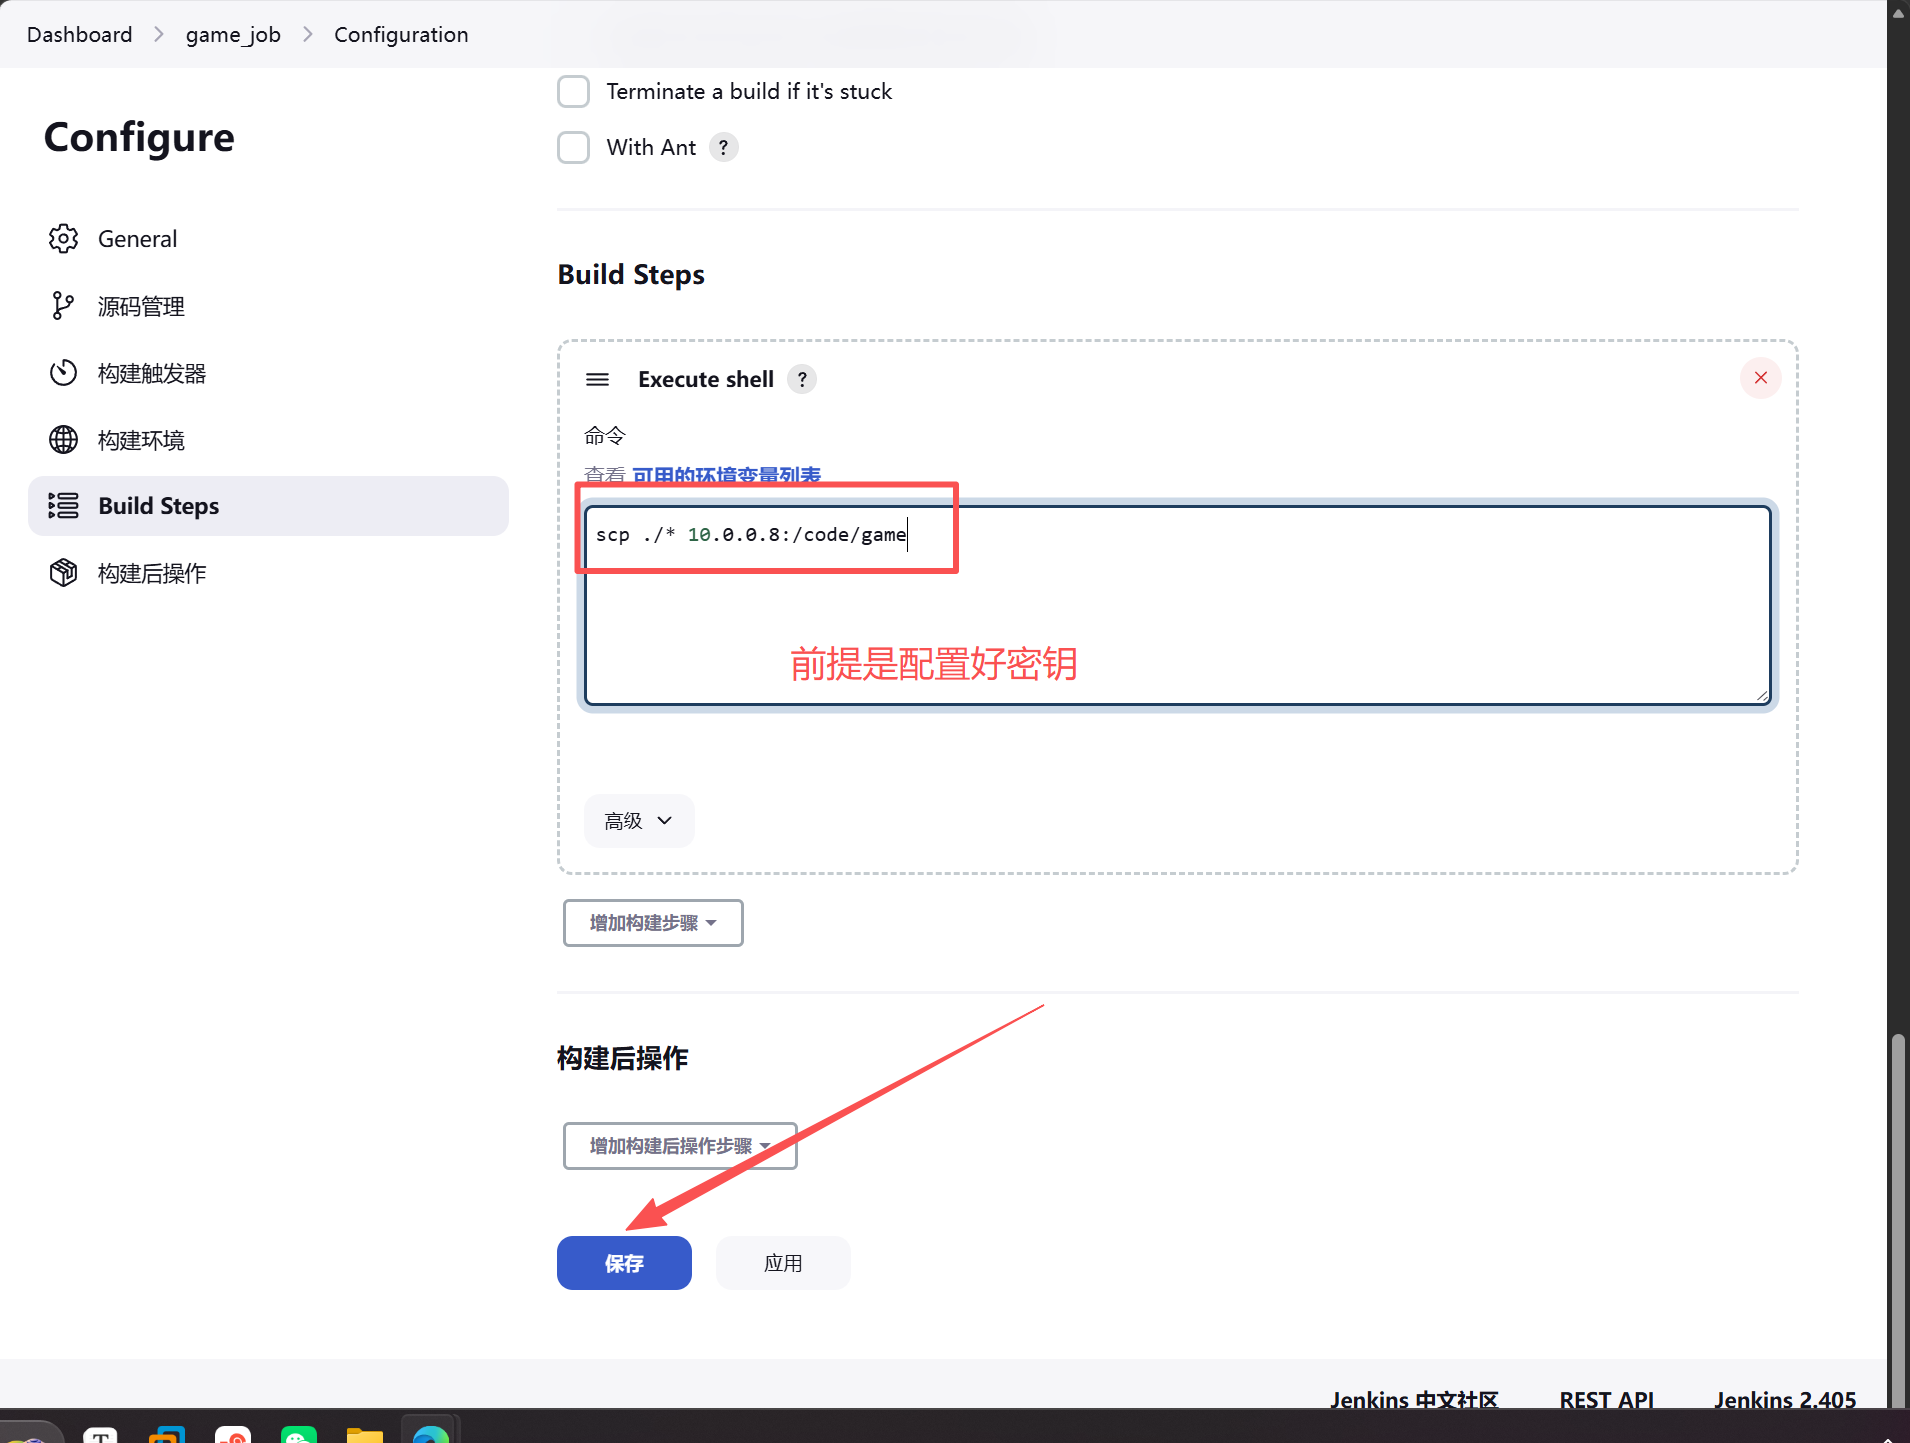
5.配置自动触发的webhook勾子
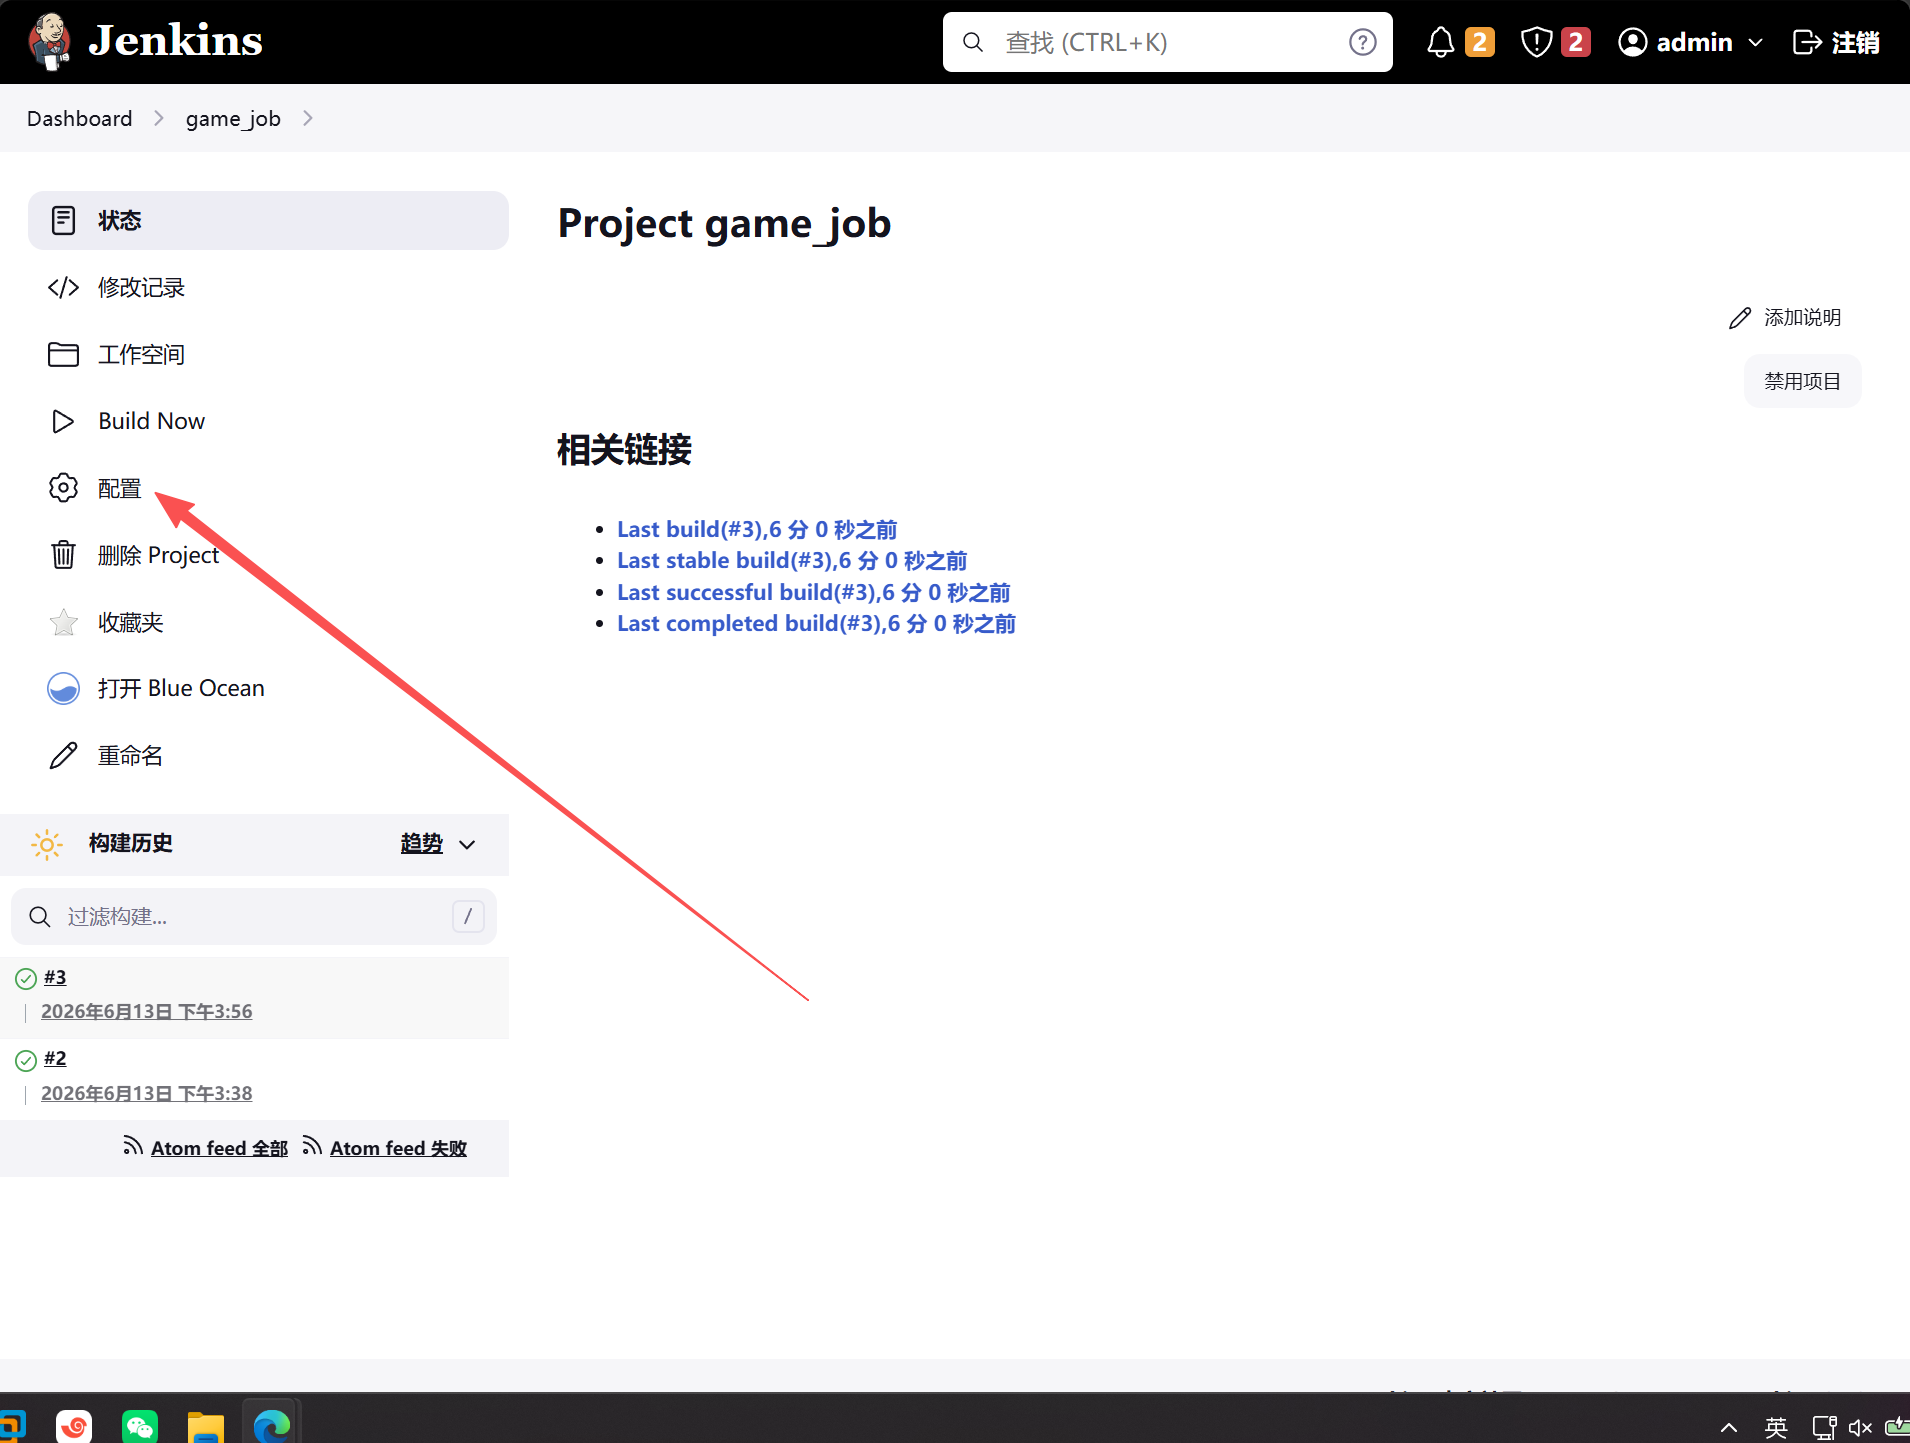
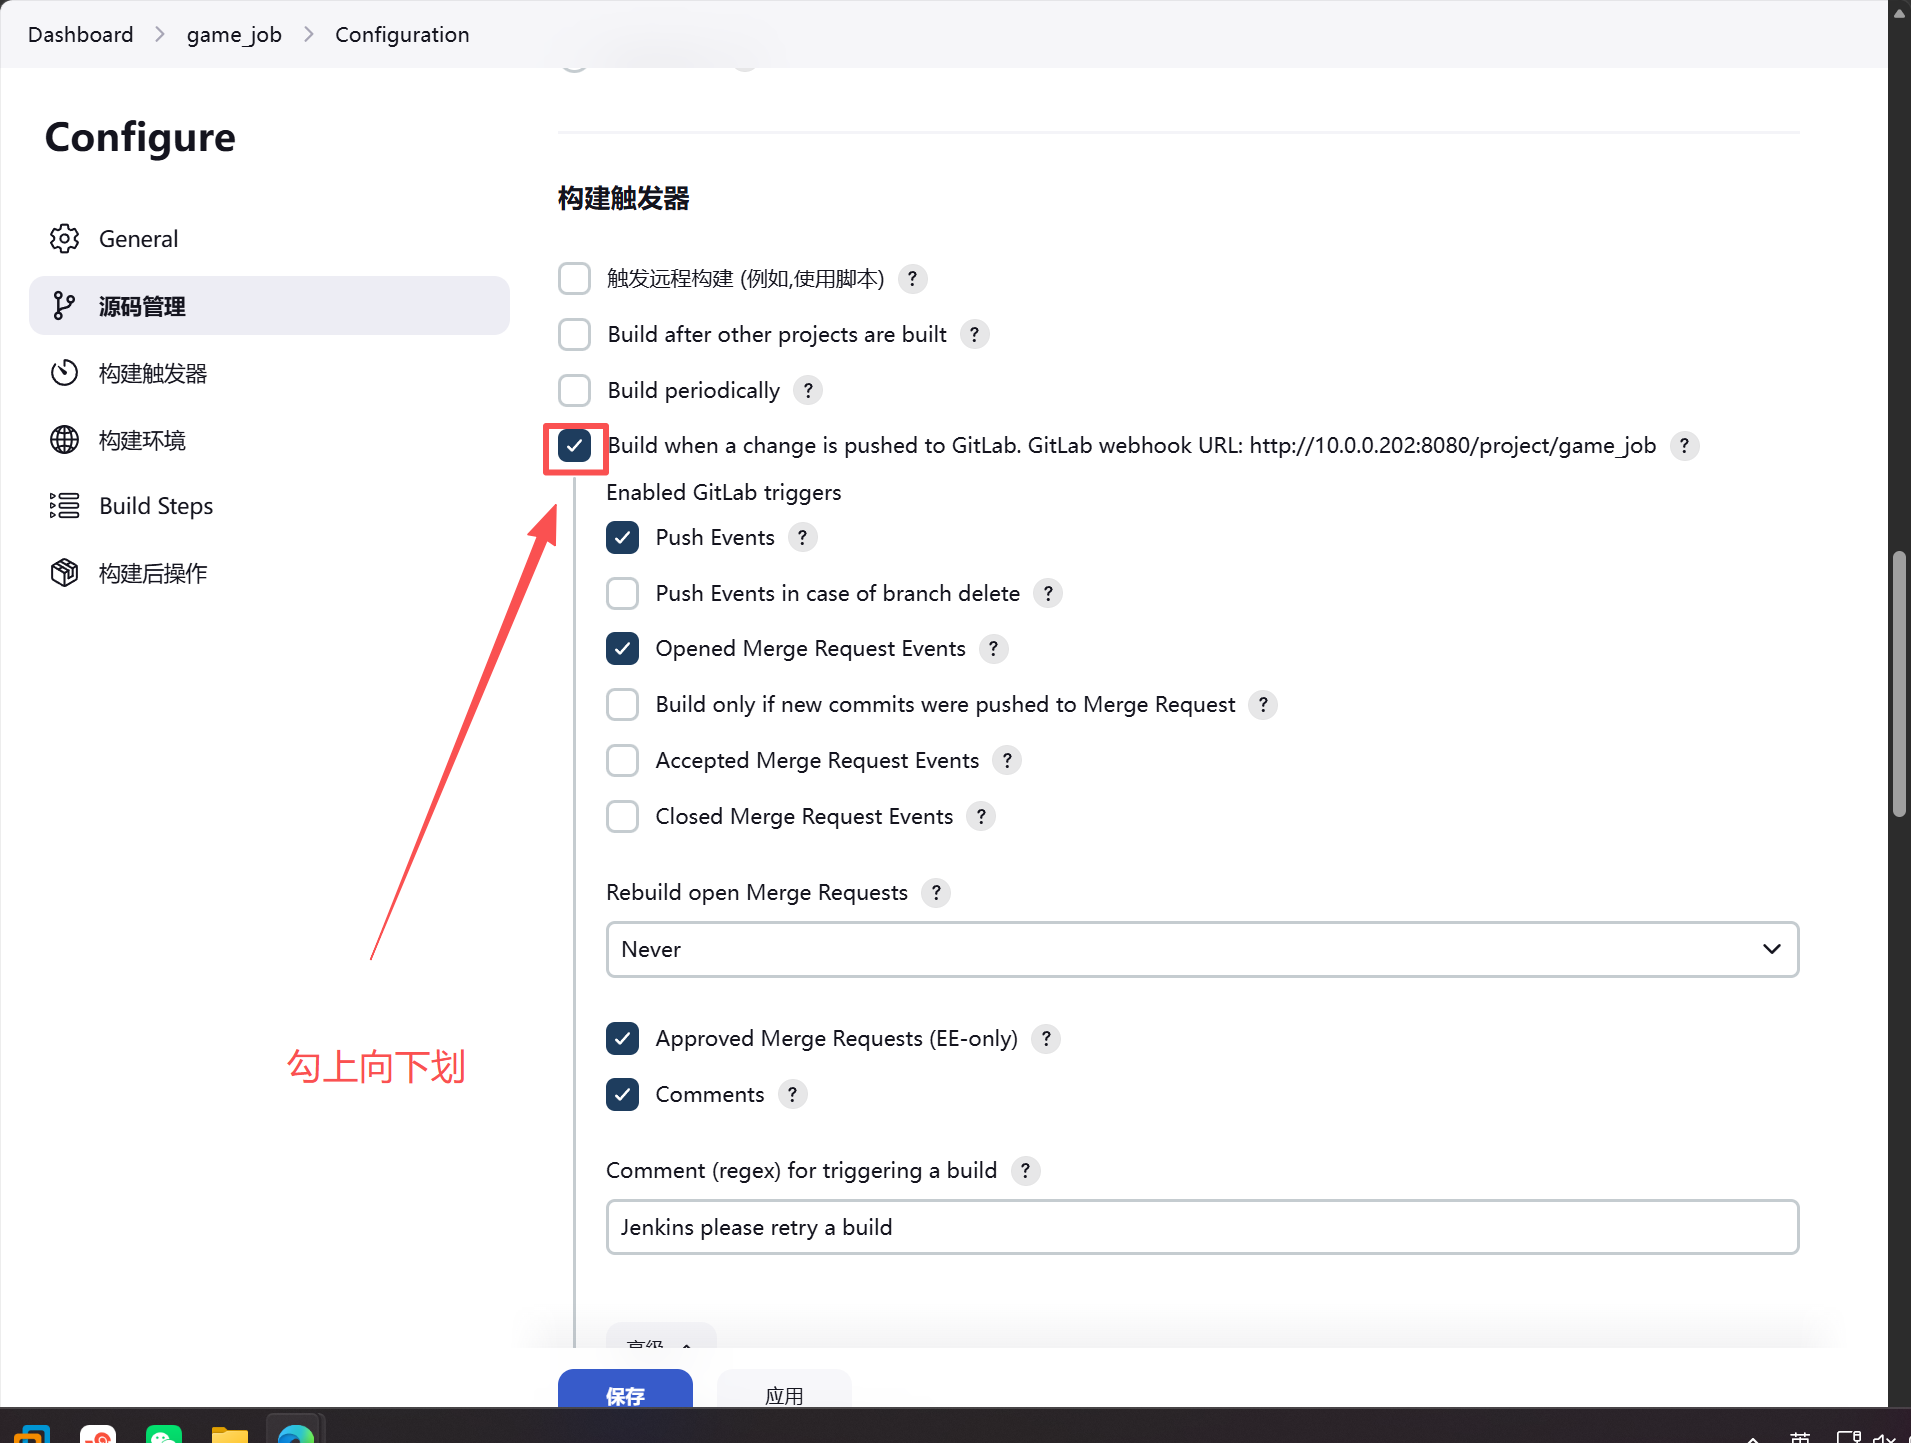
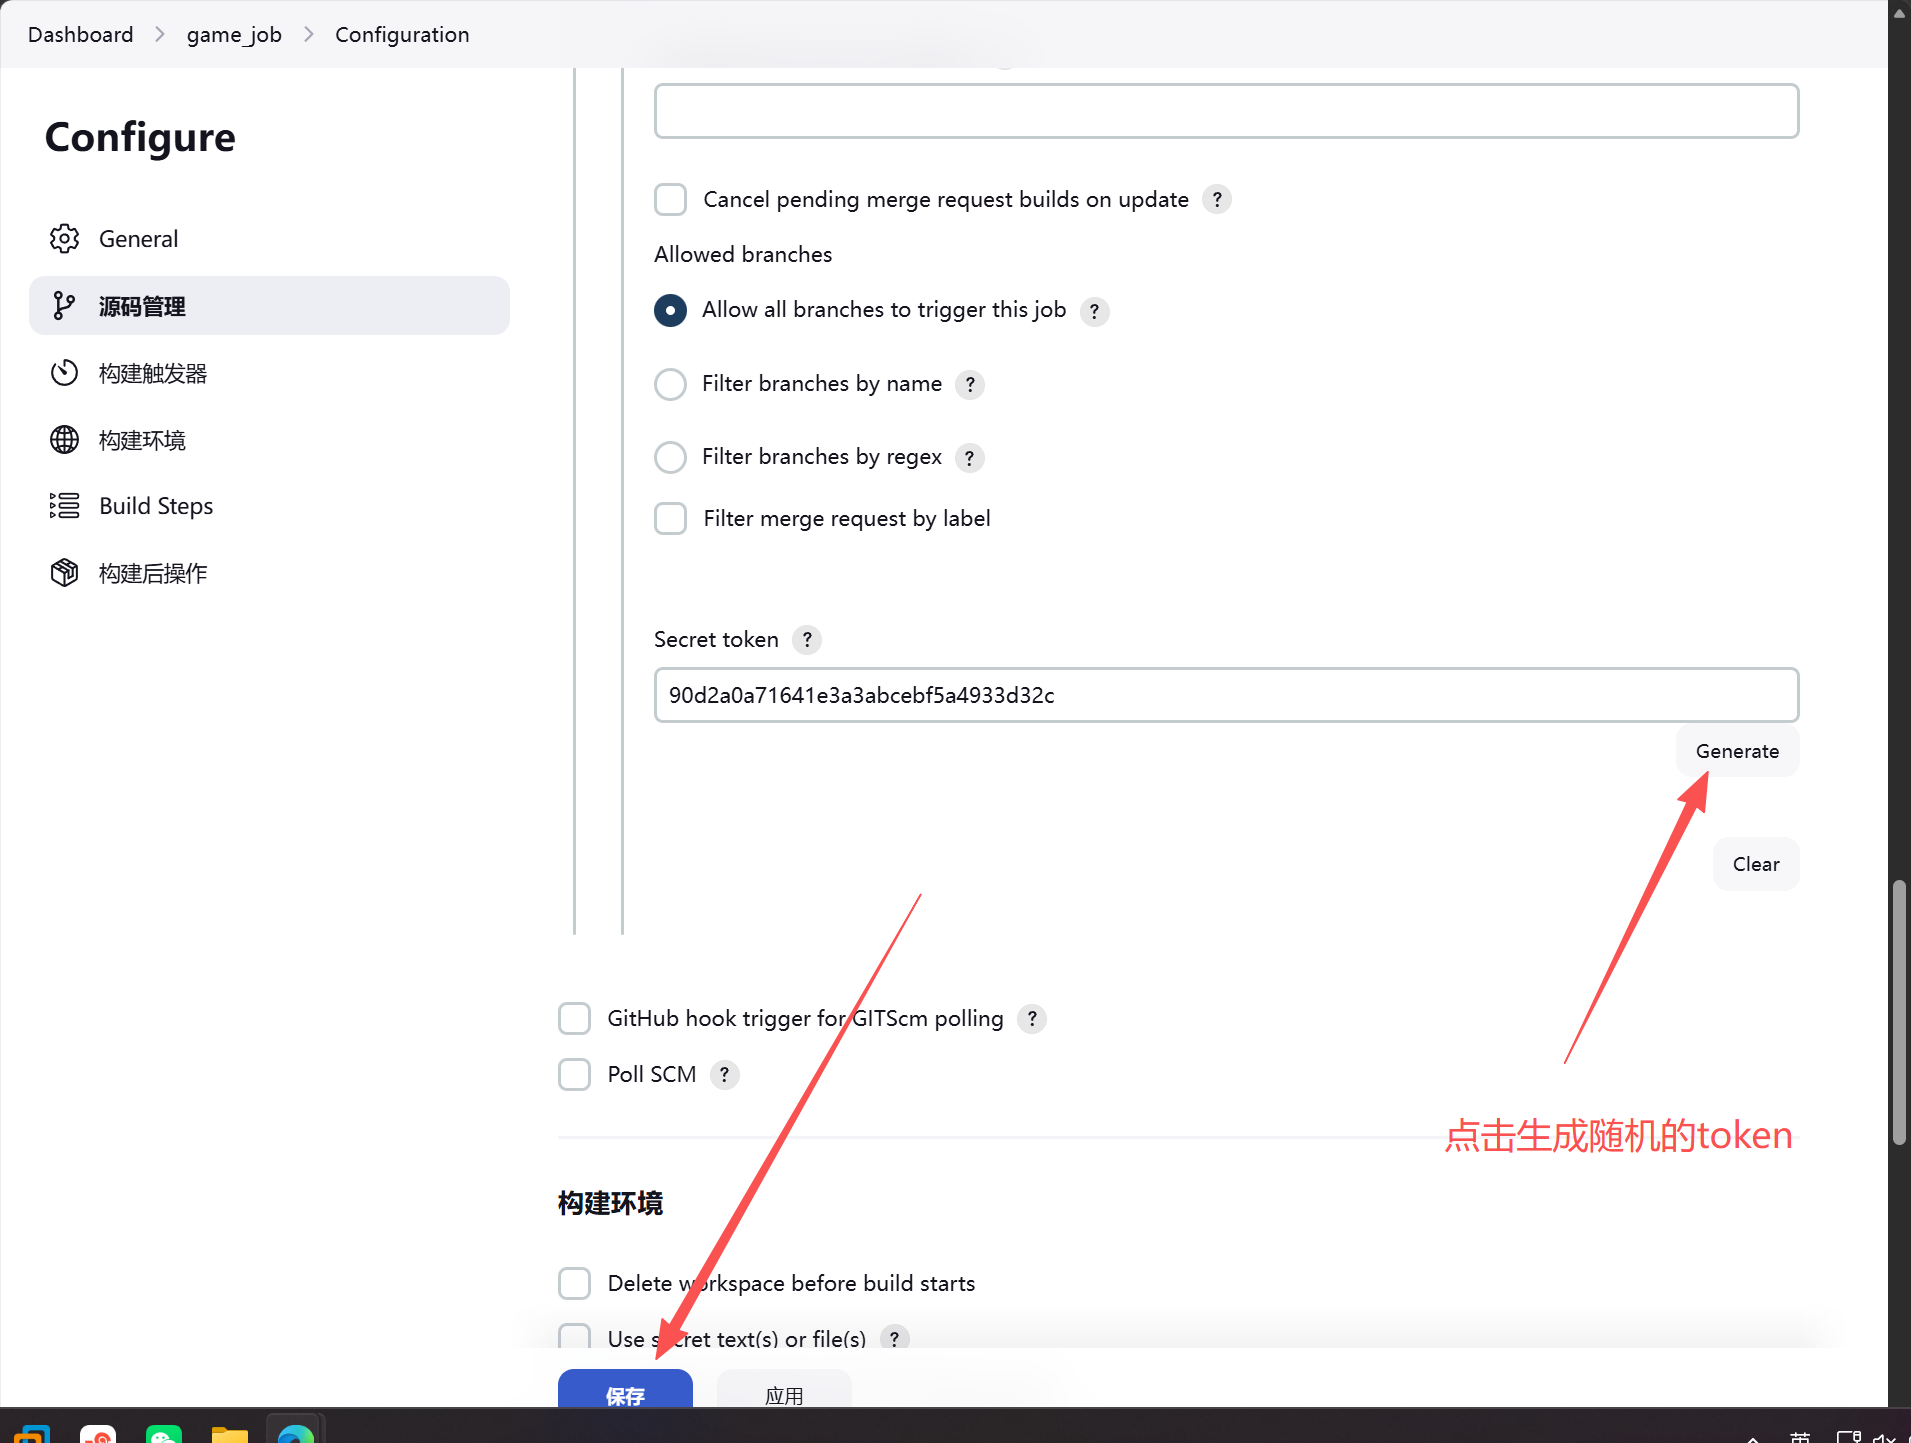
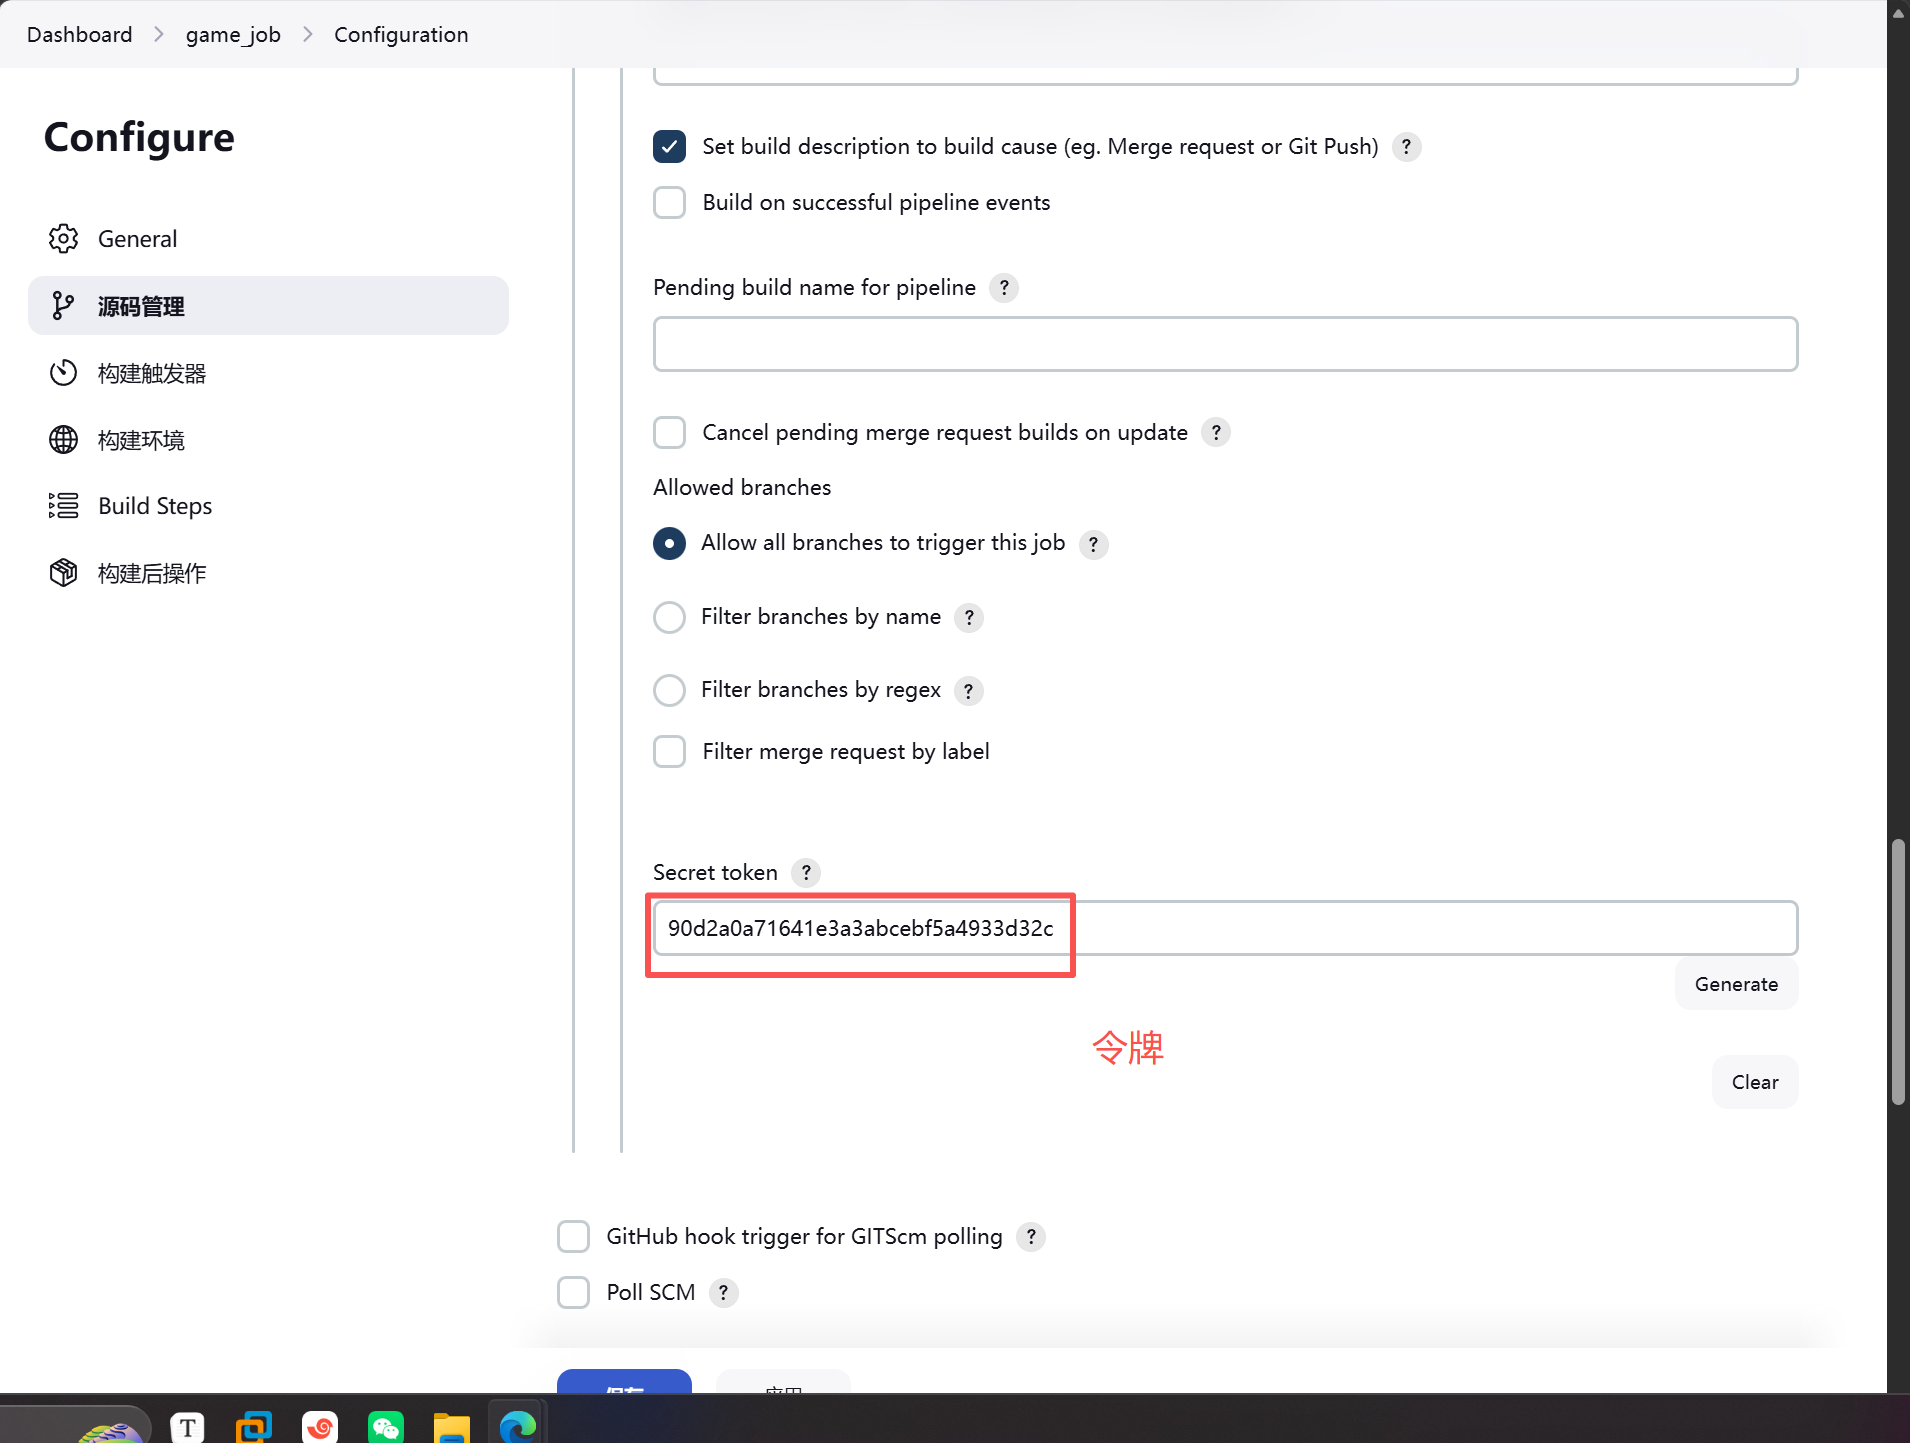
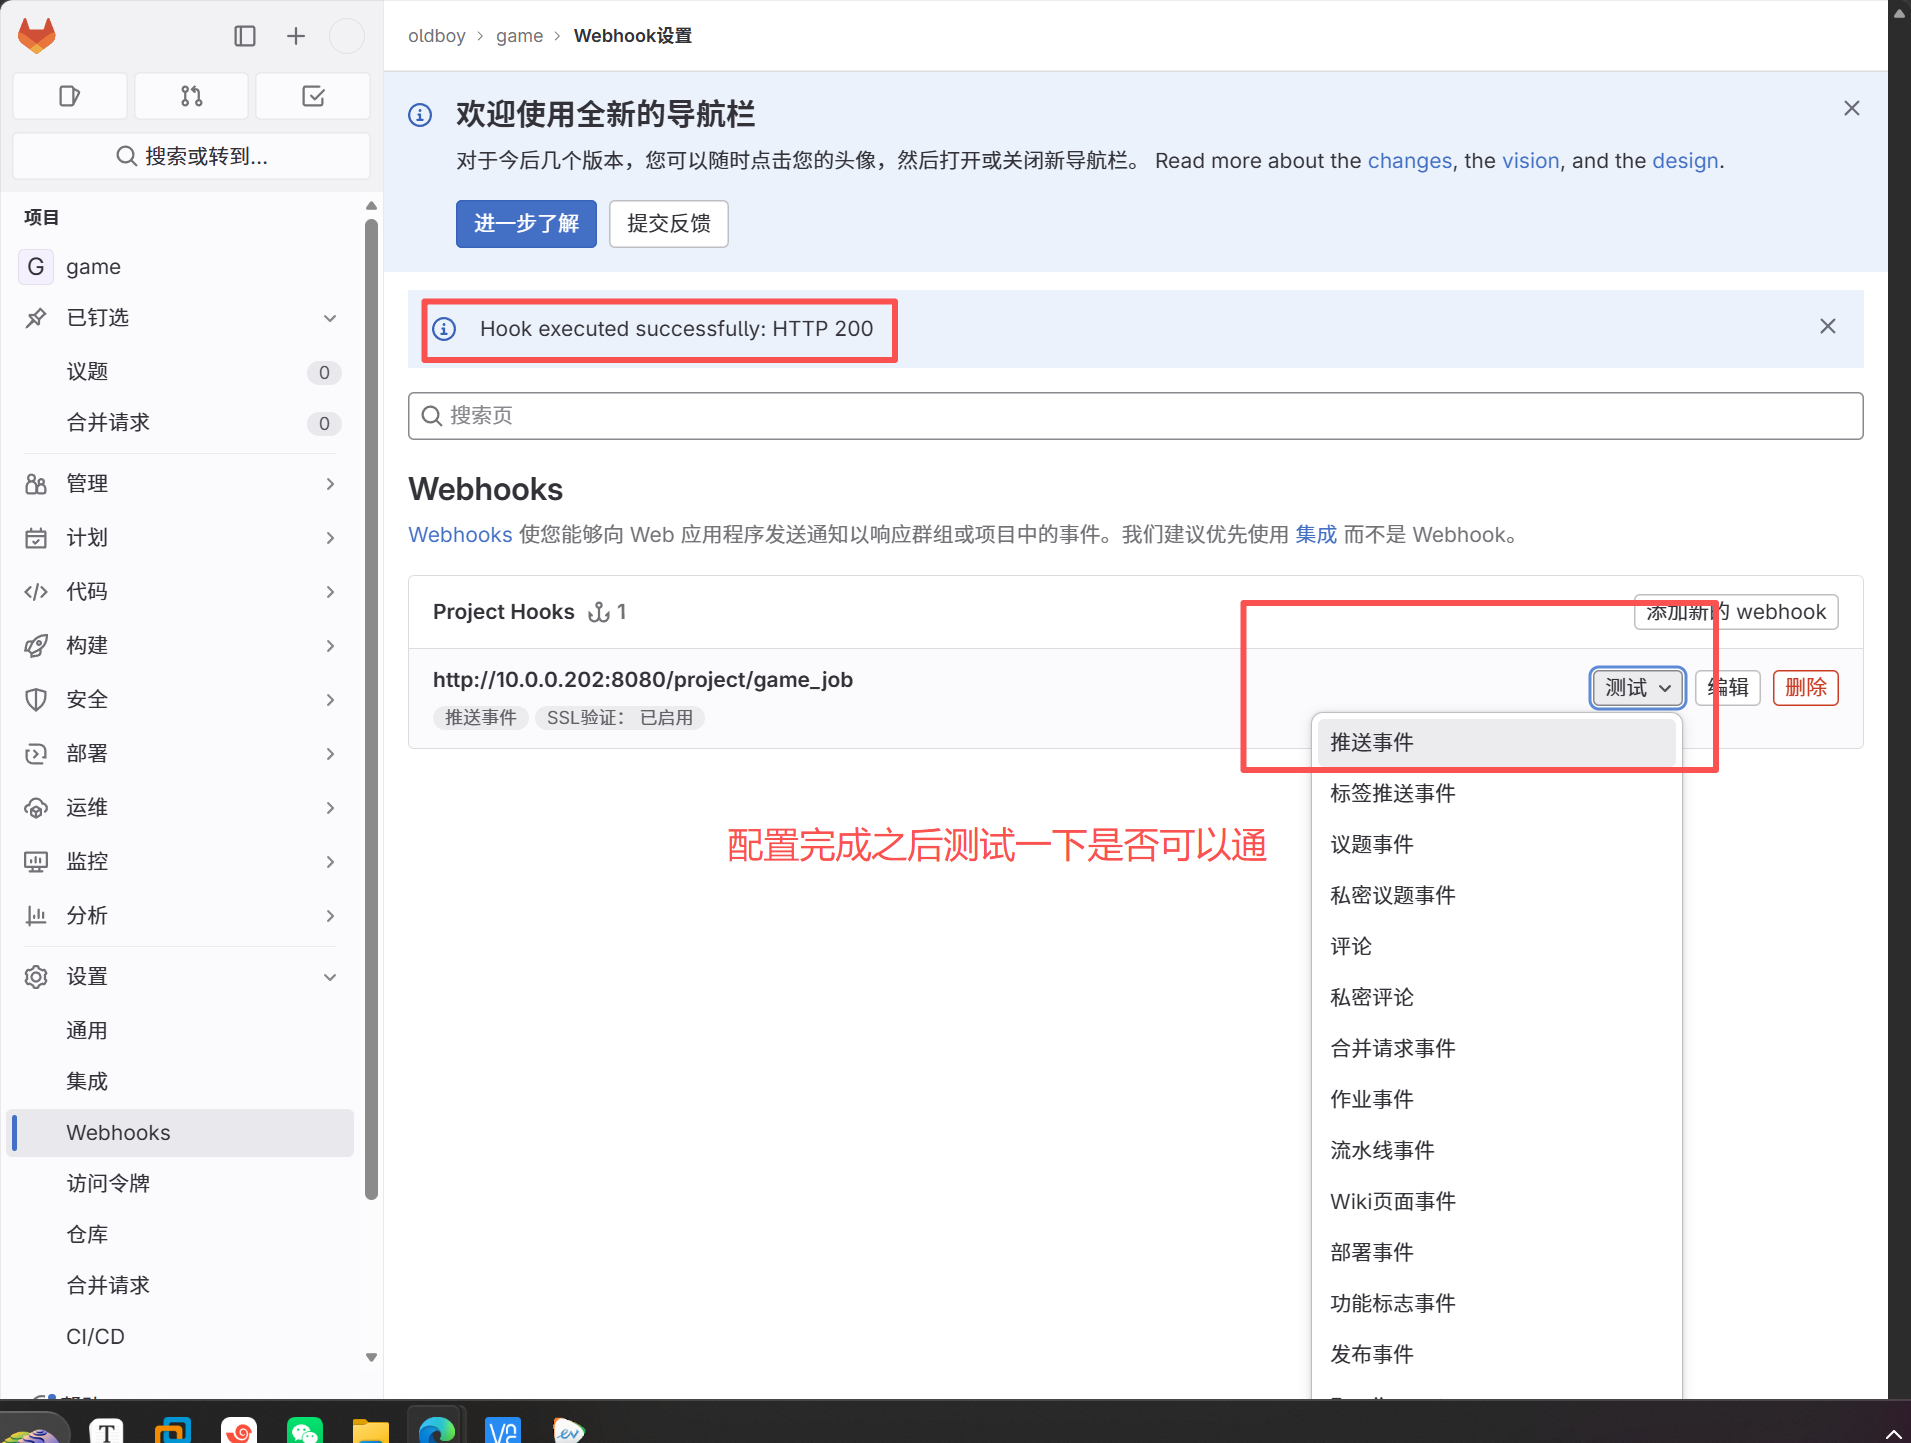
gitlab页面配置勾子
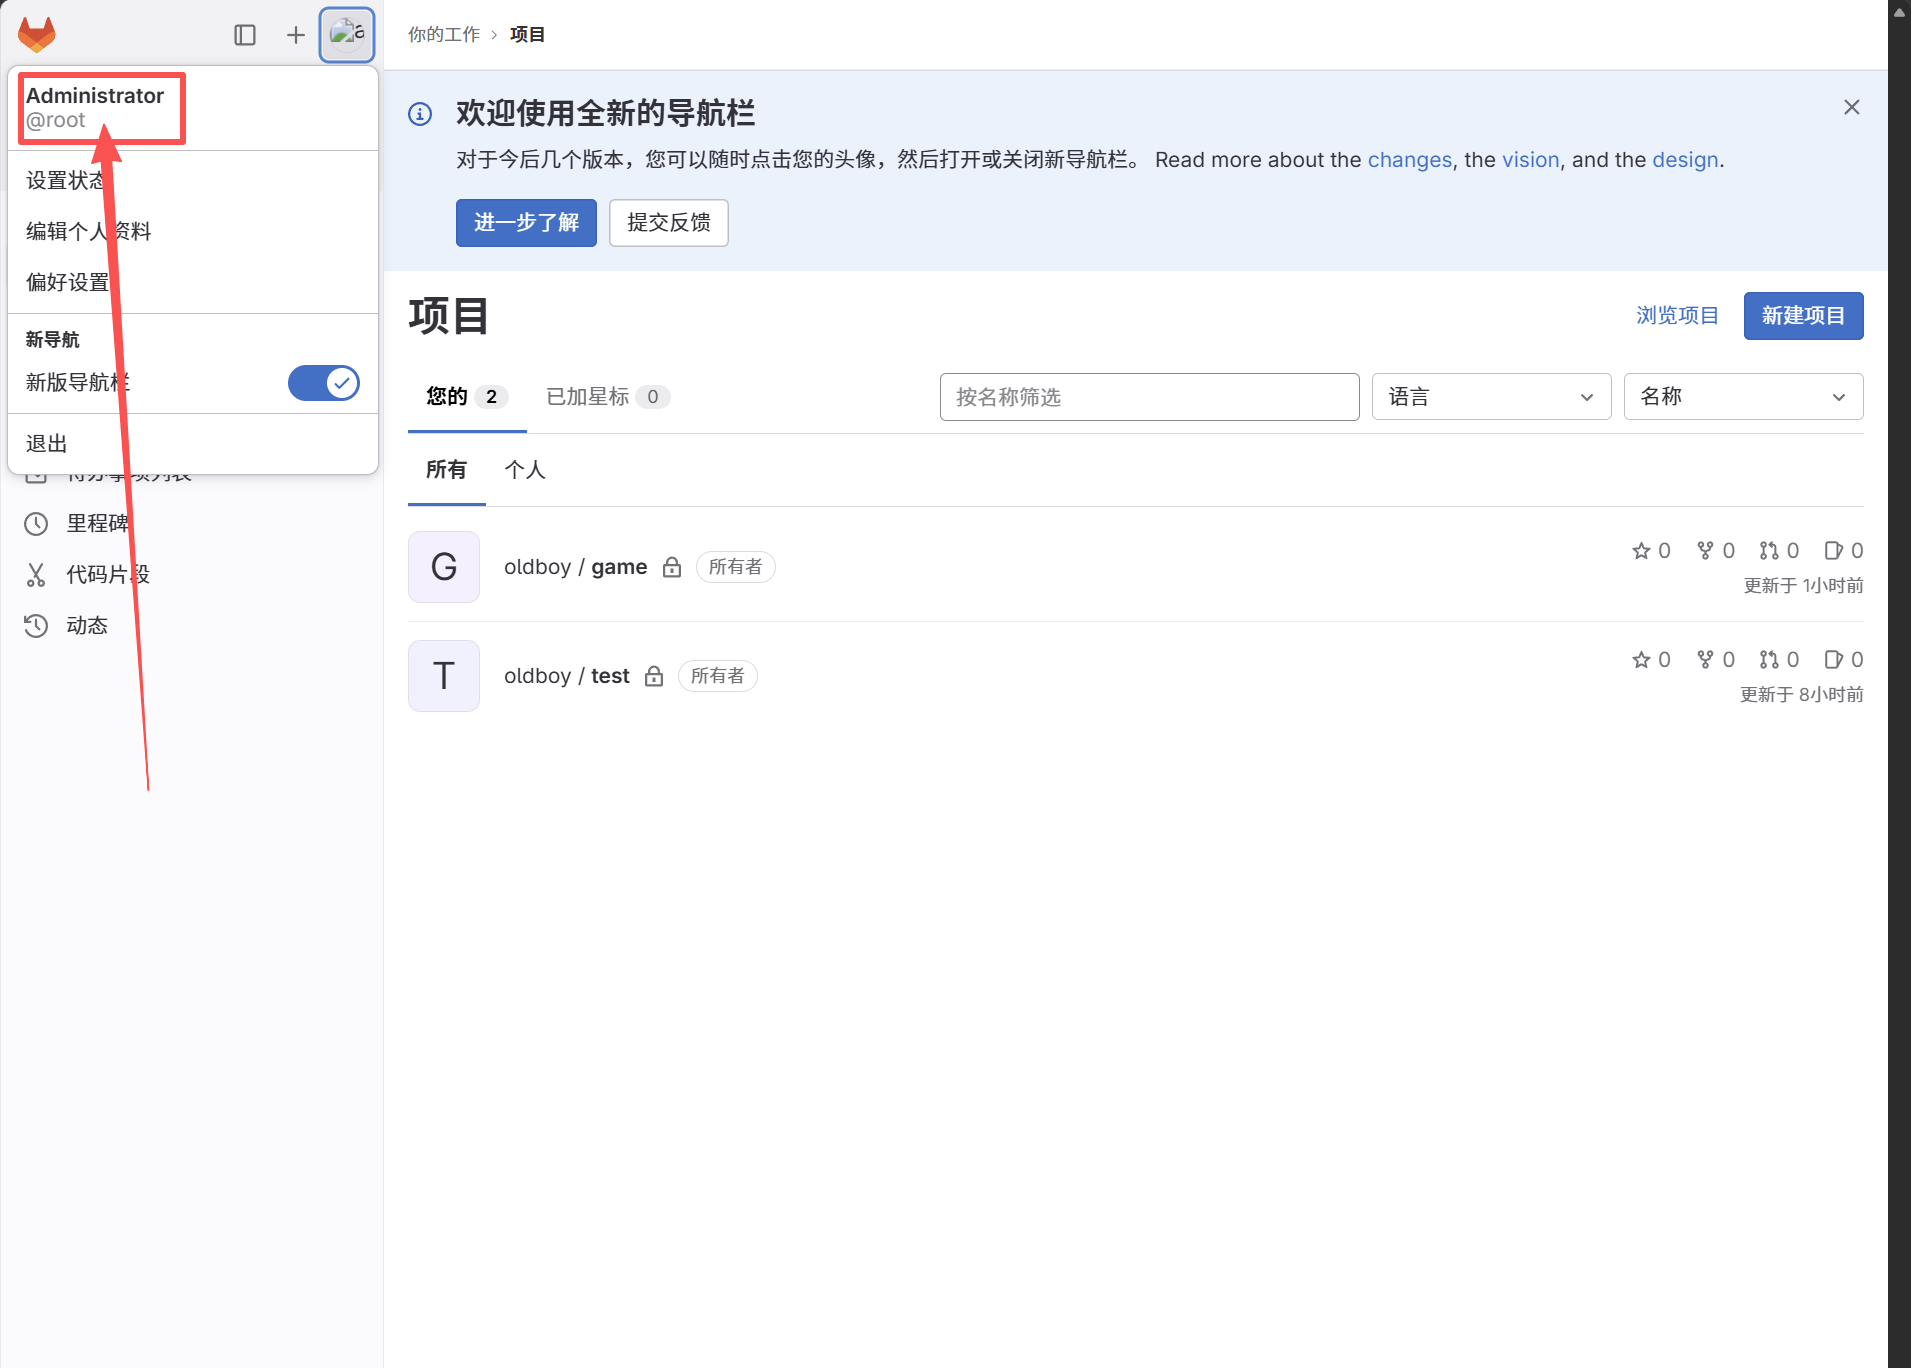
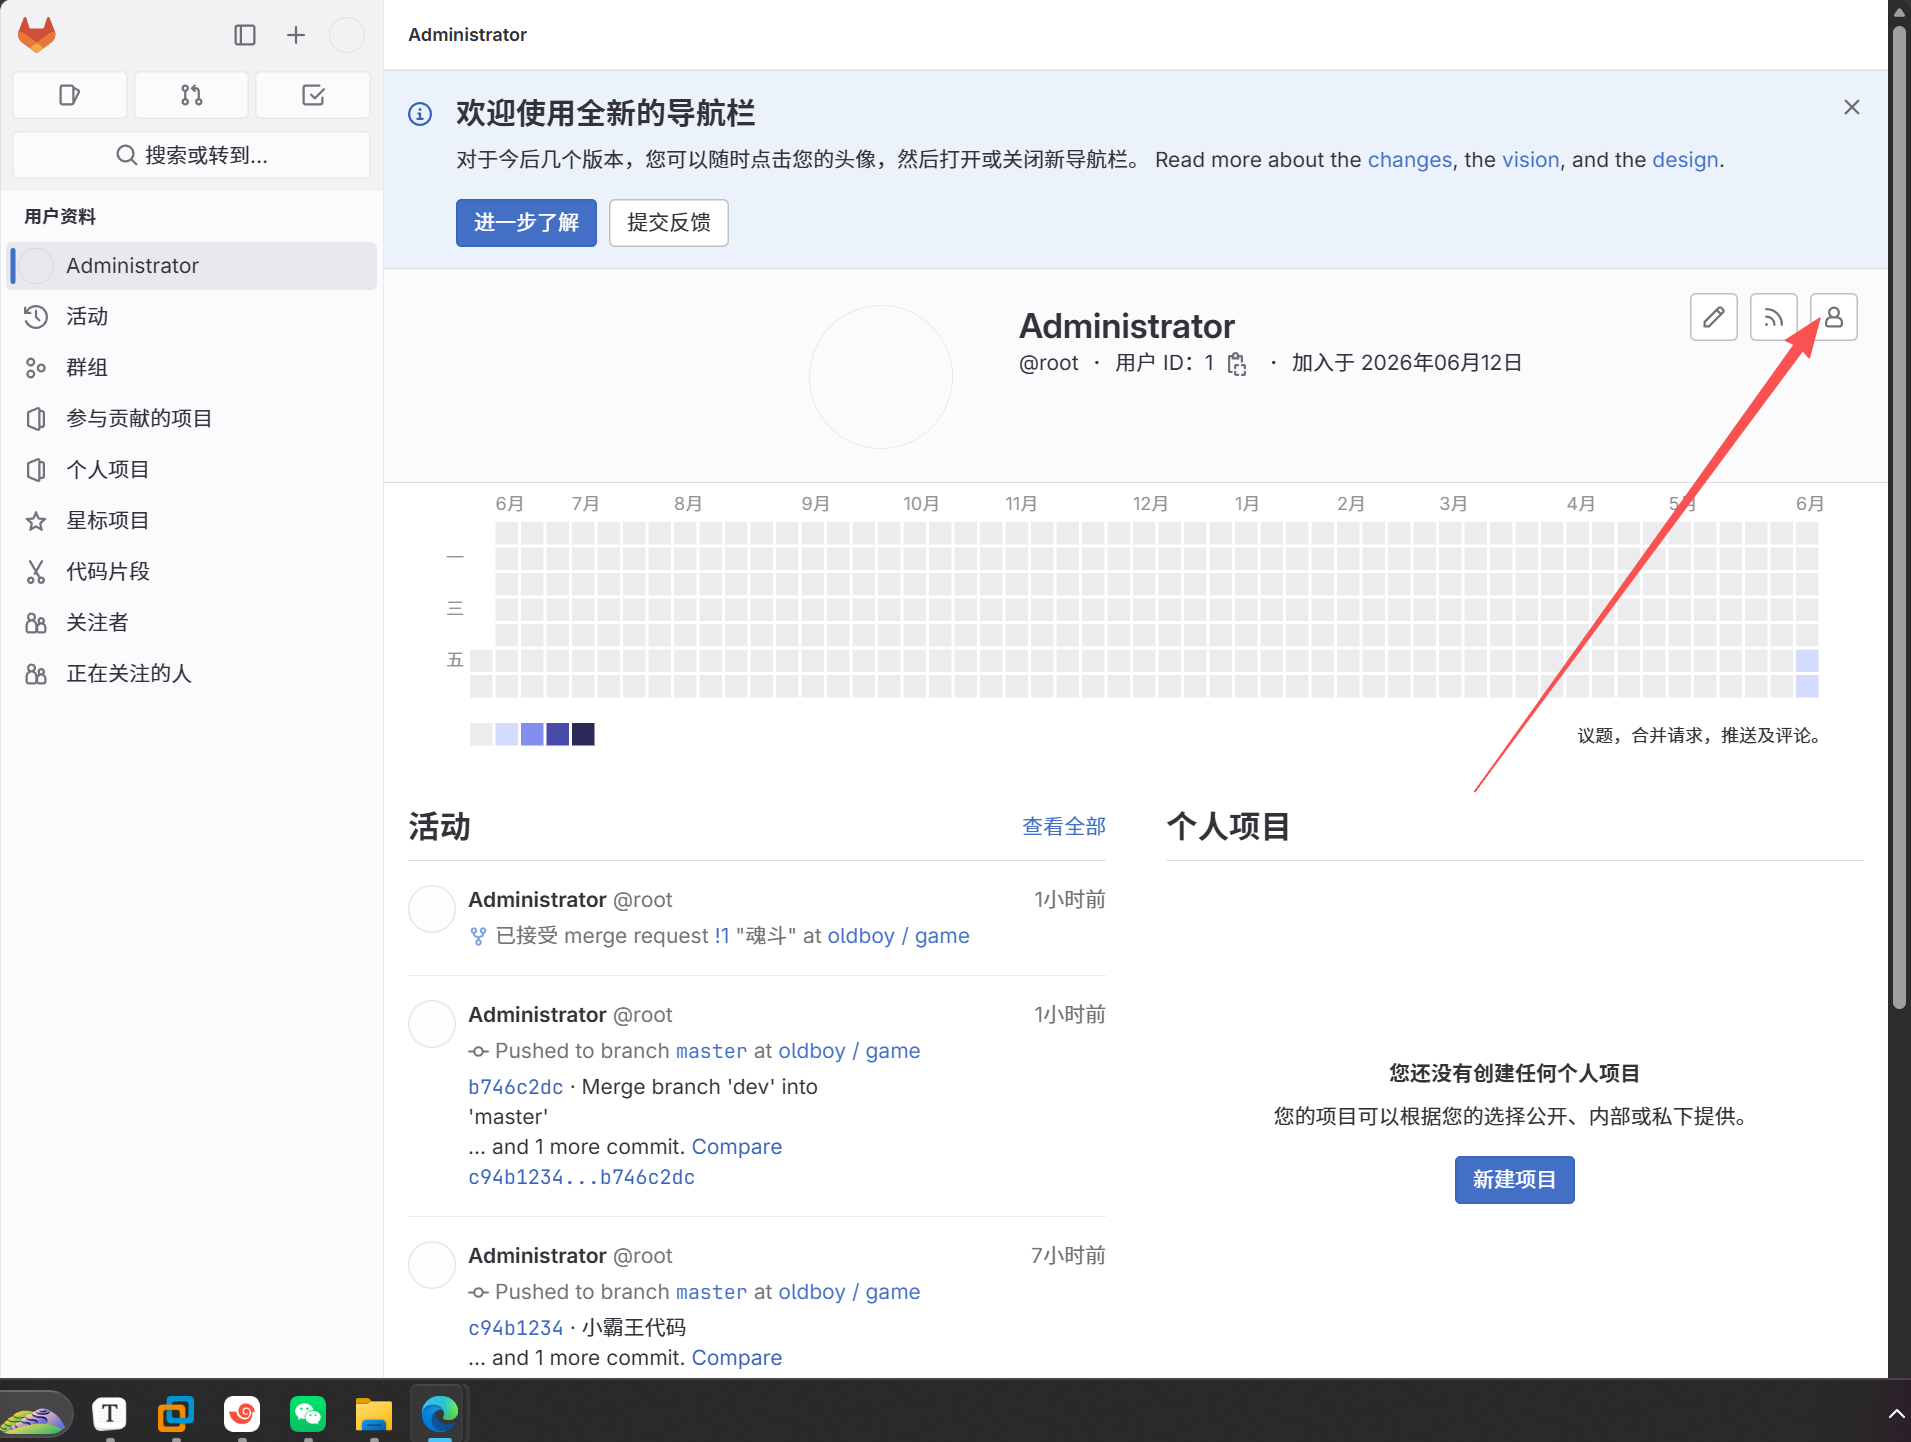
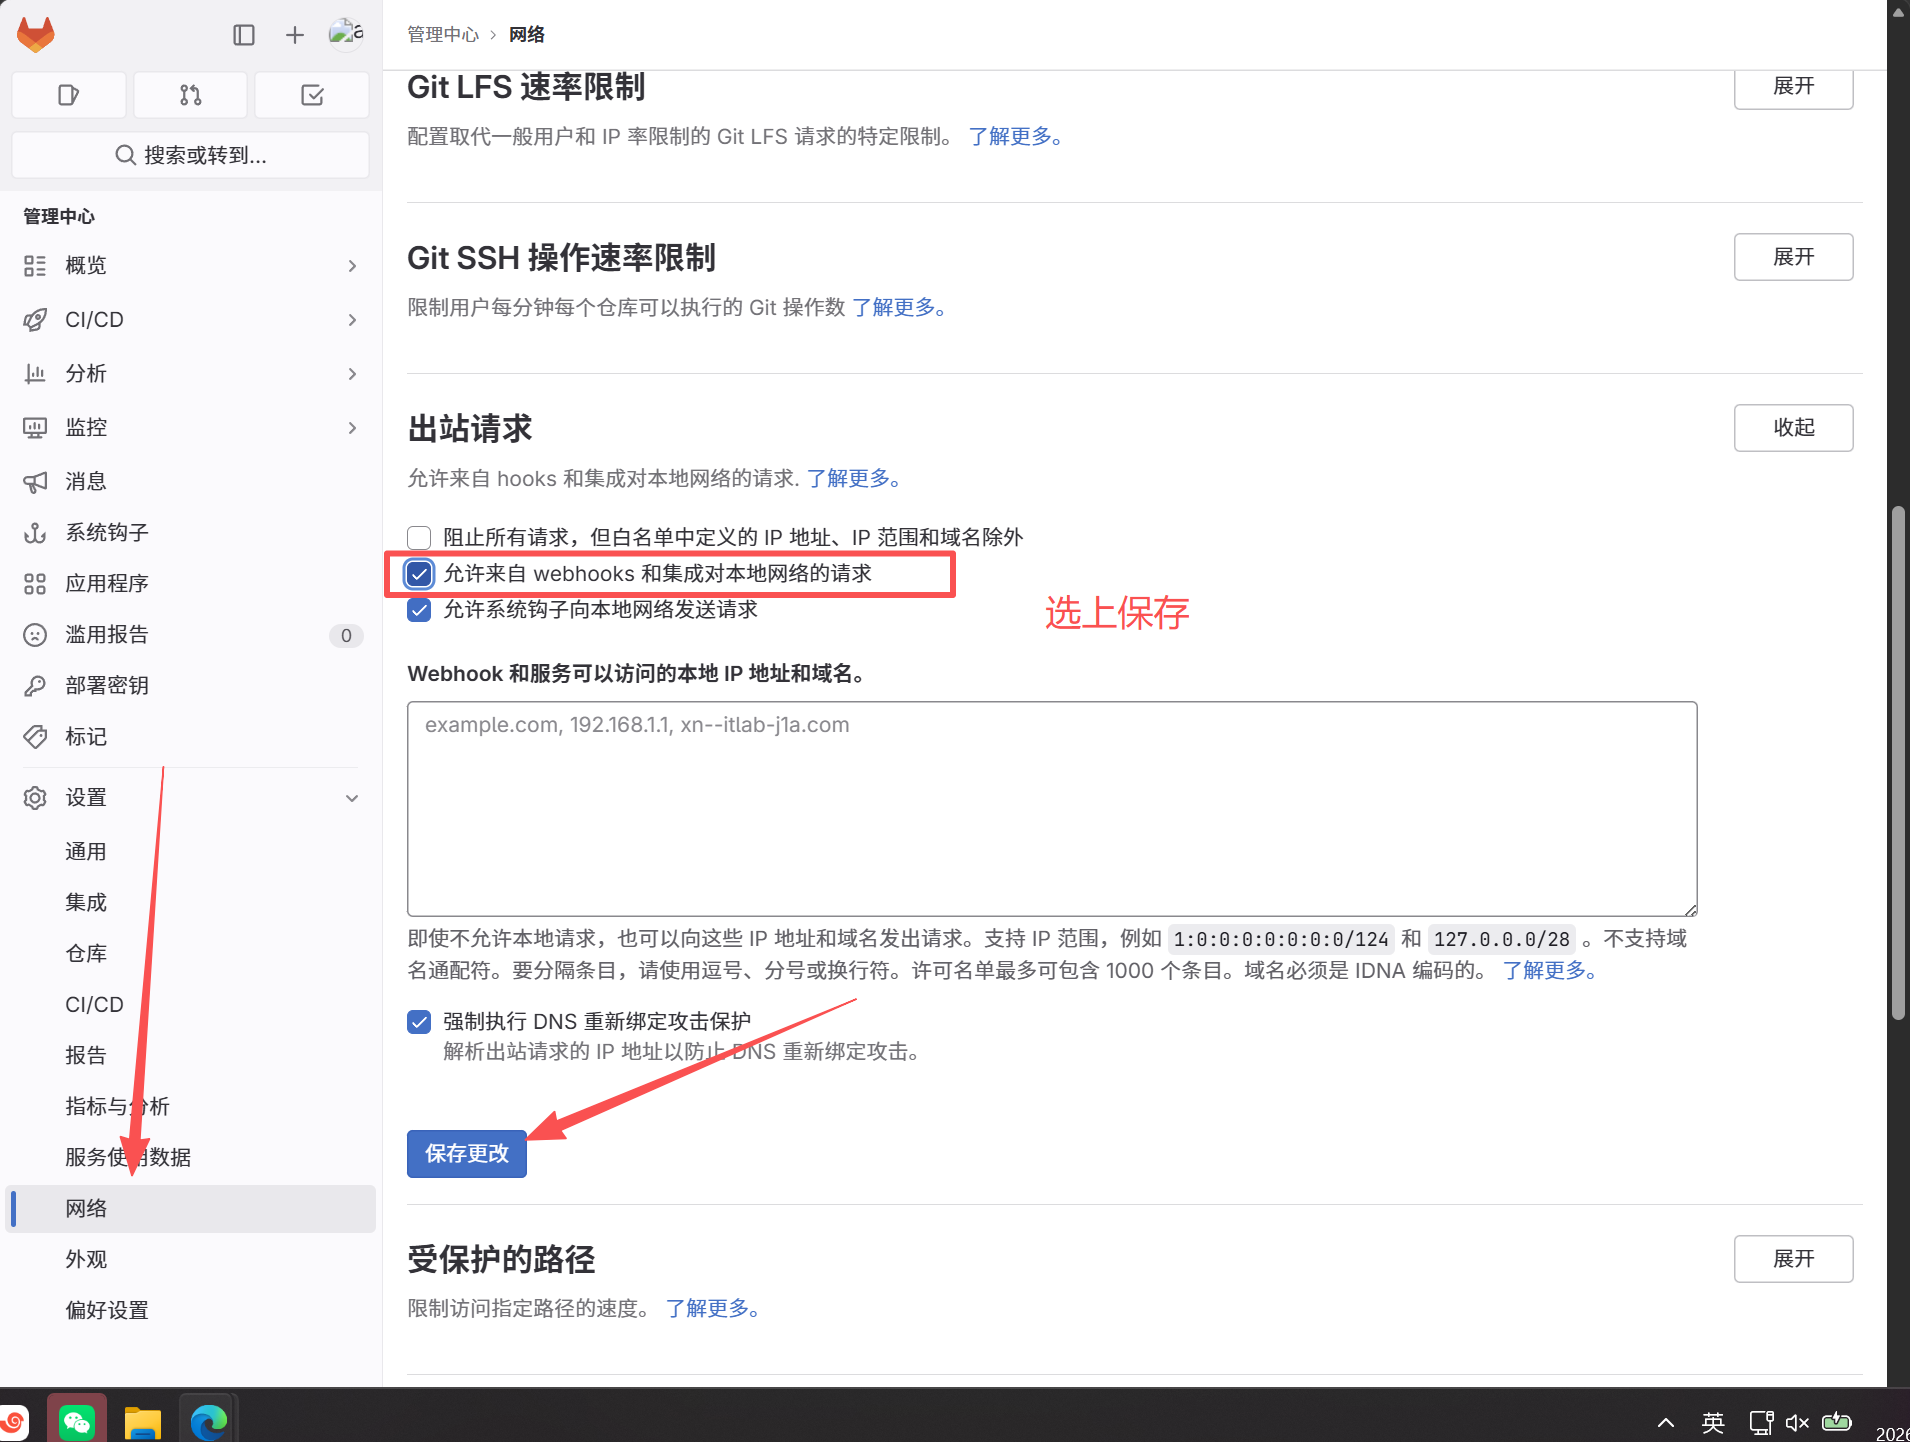
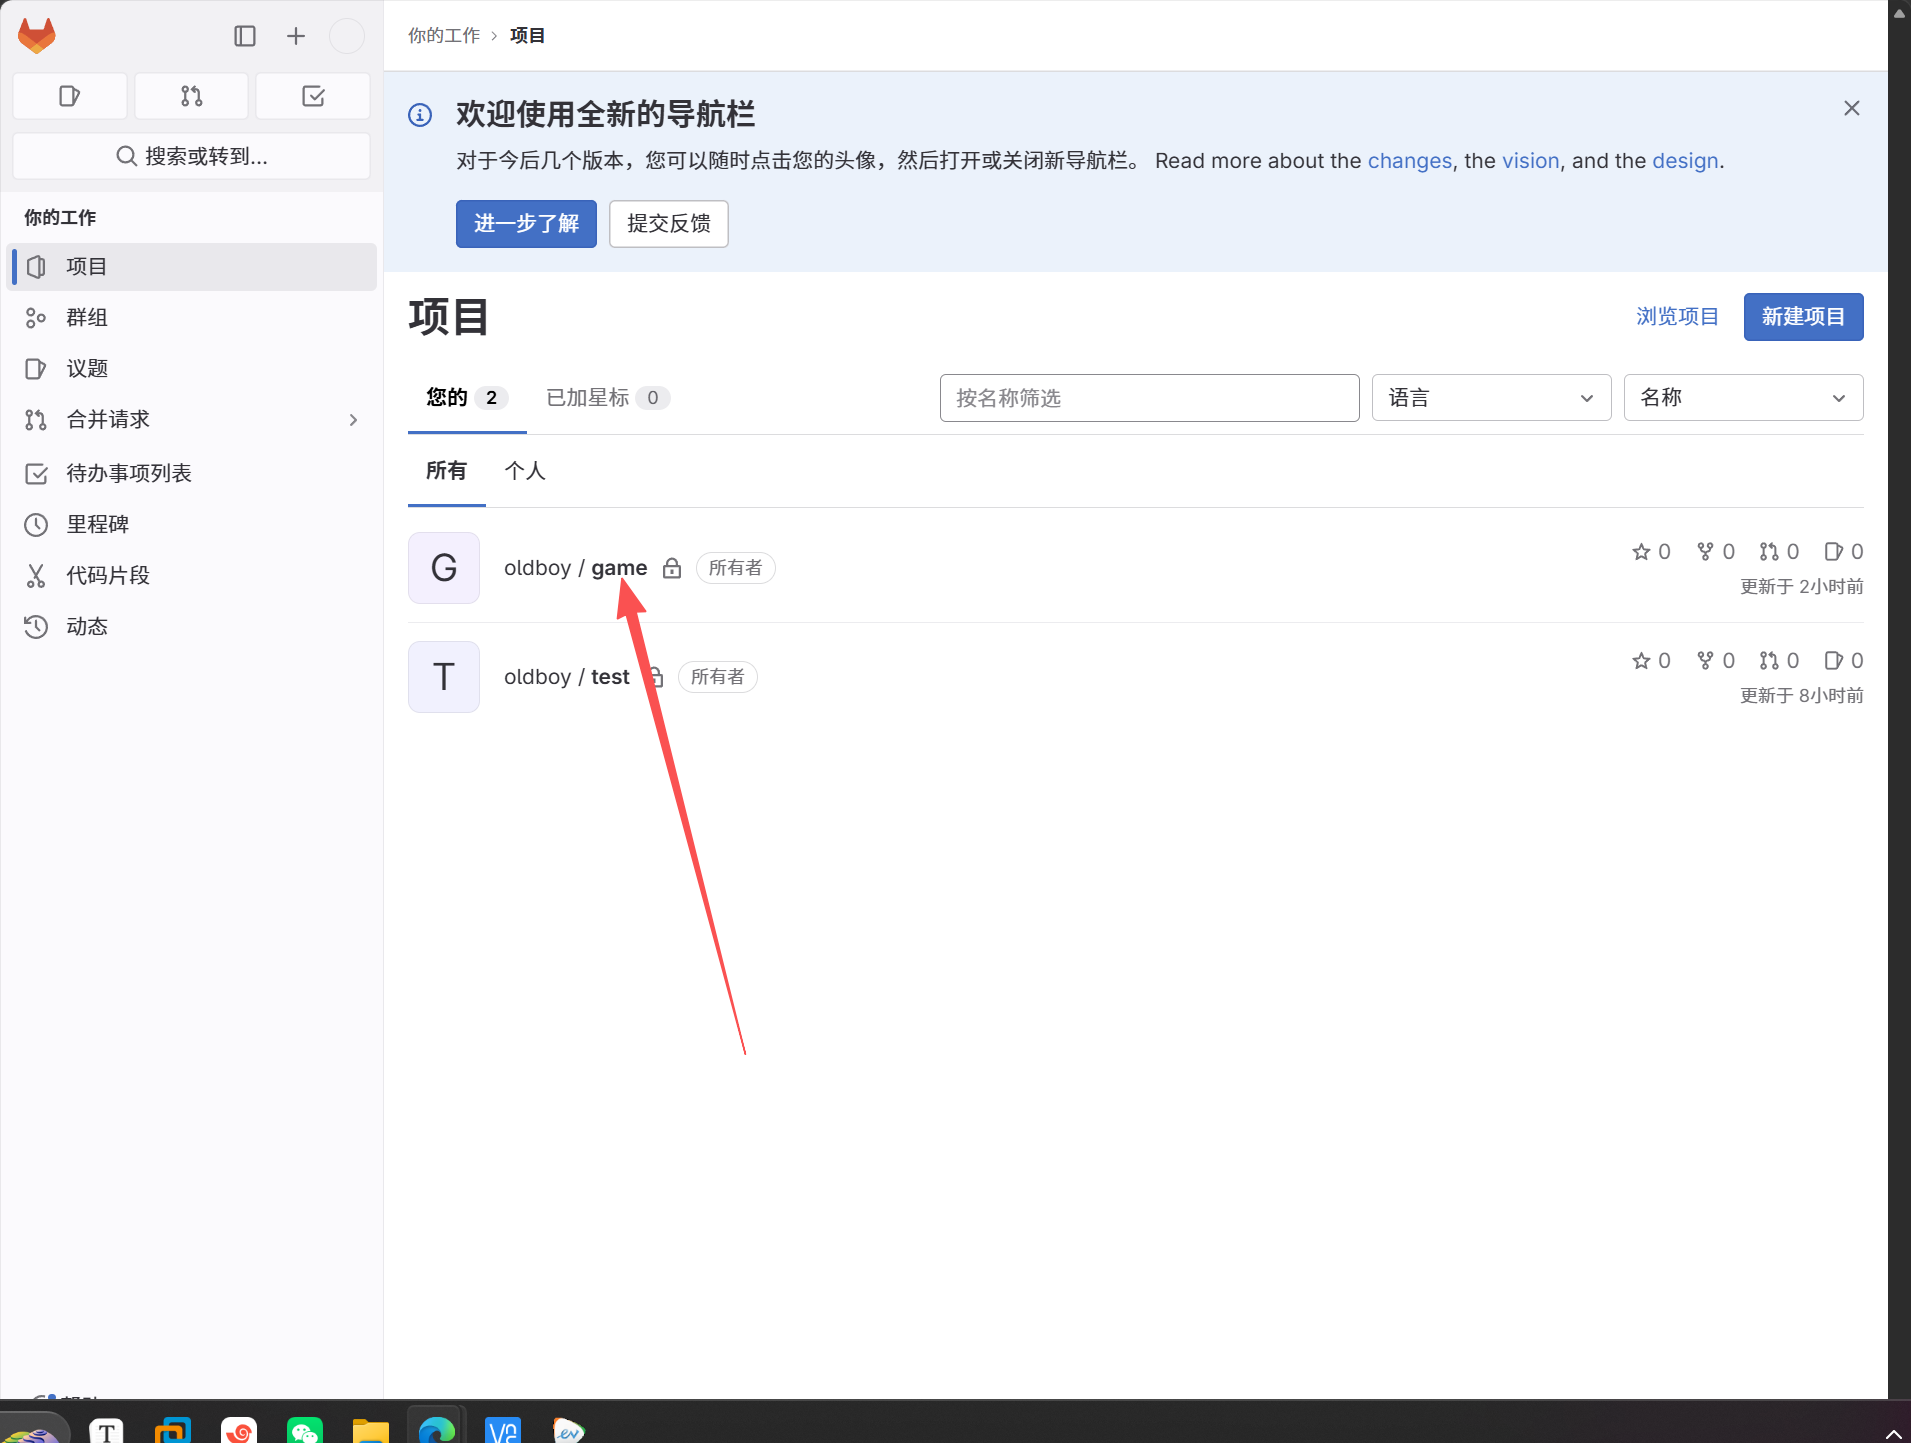
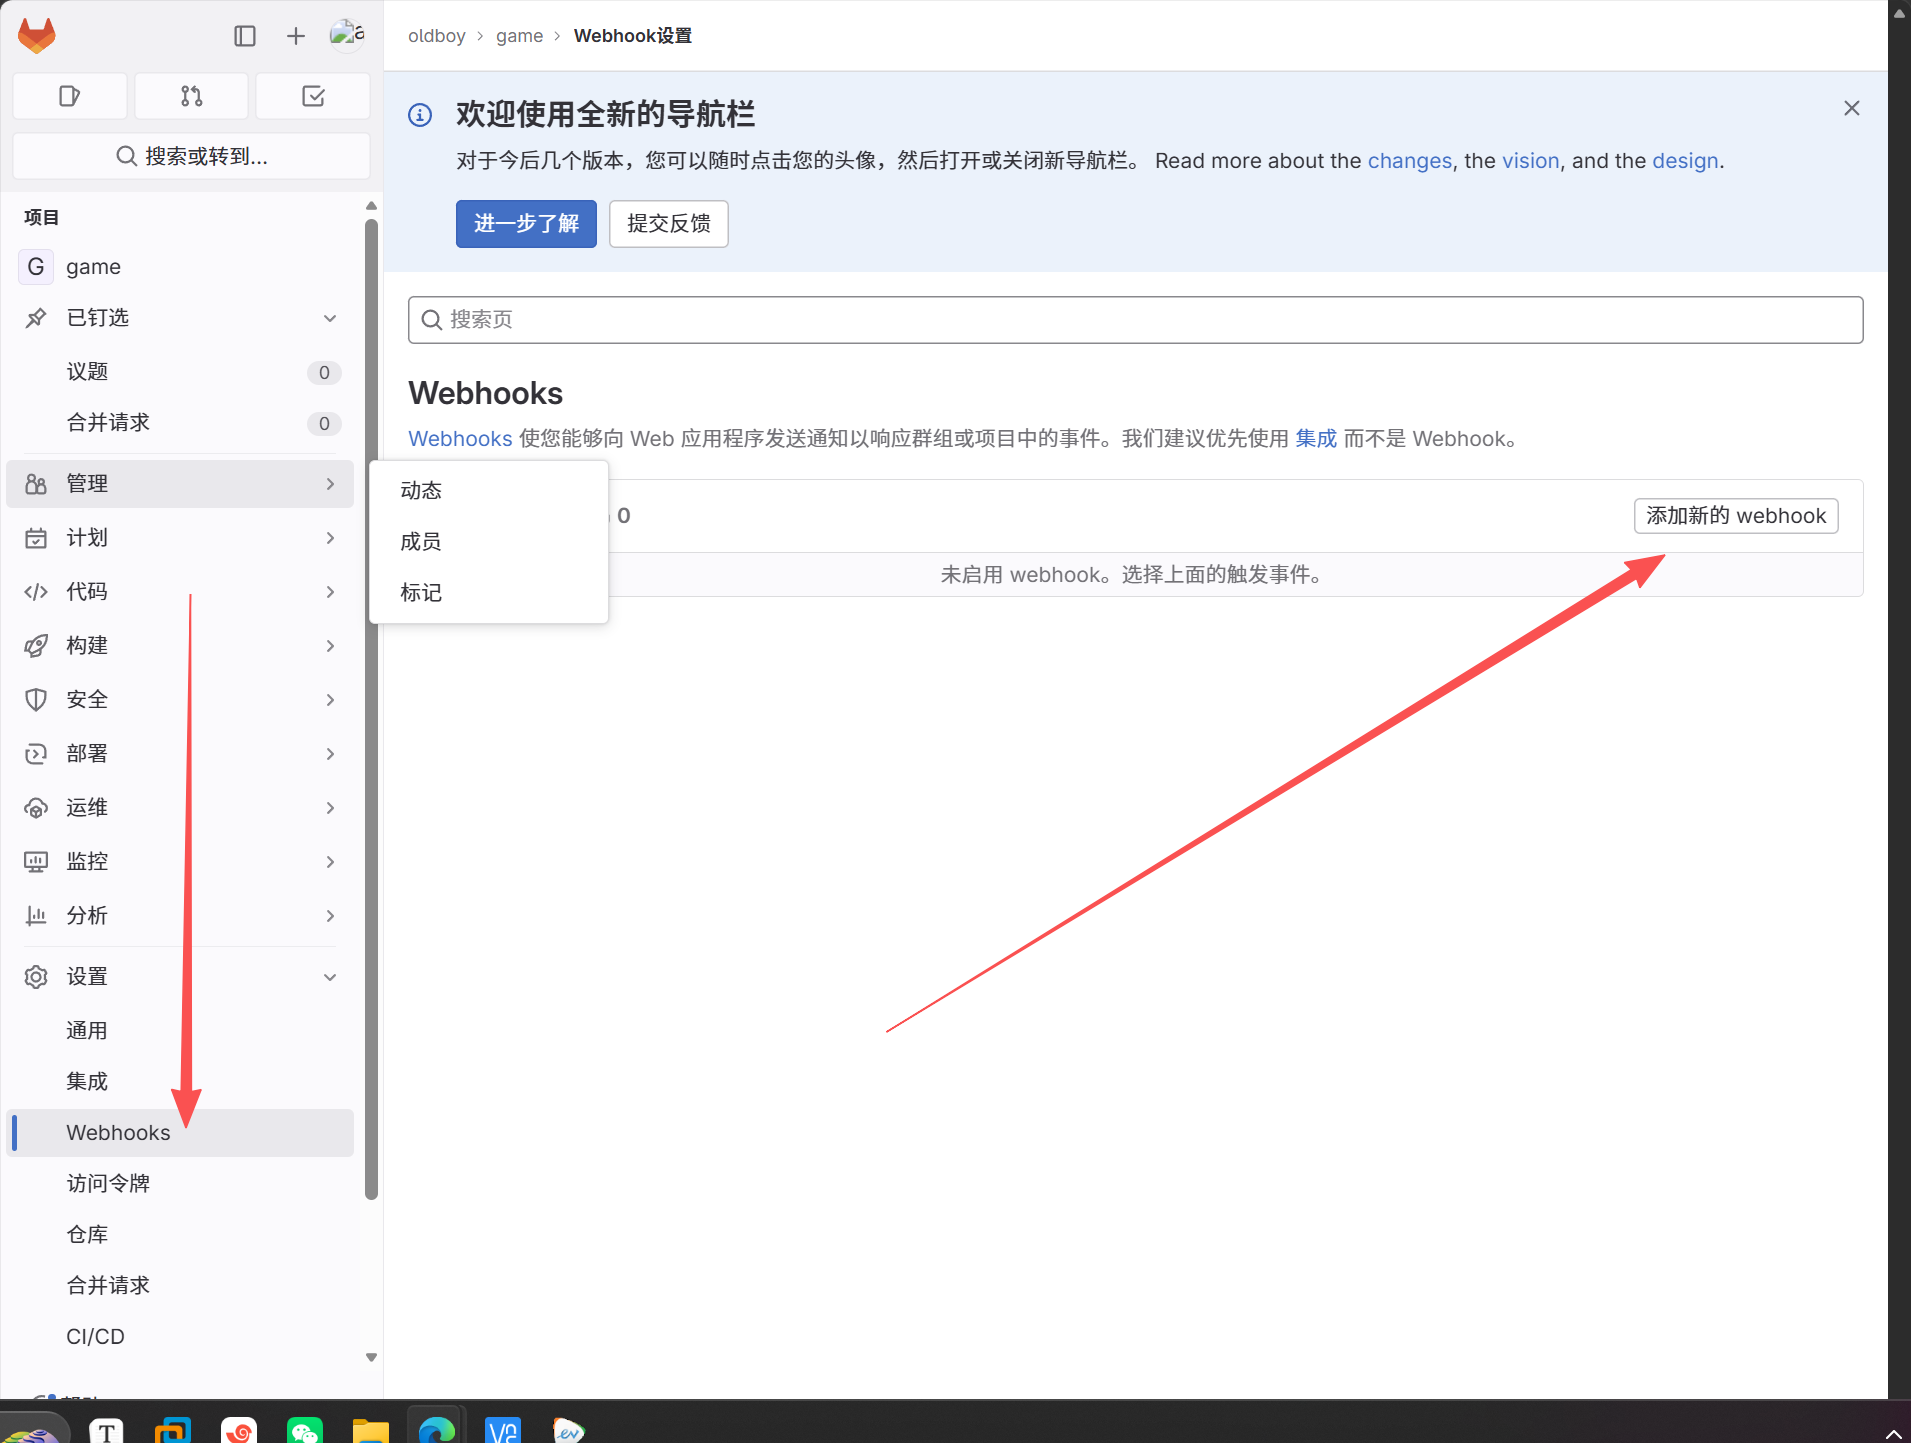
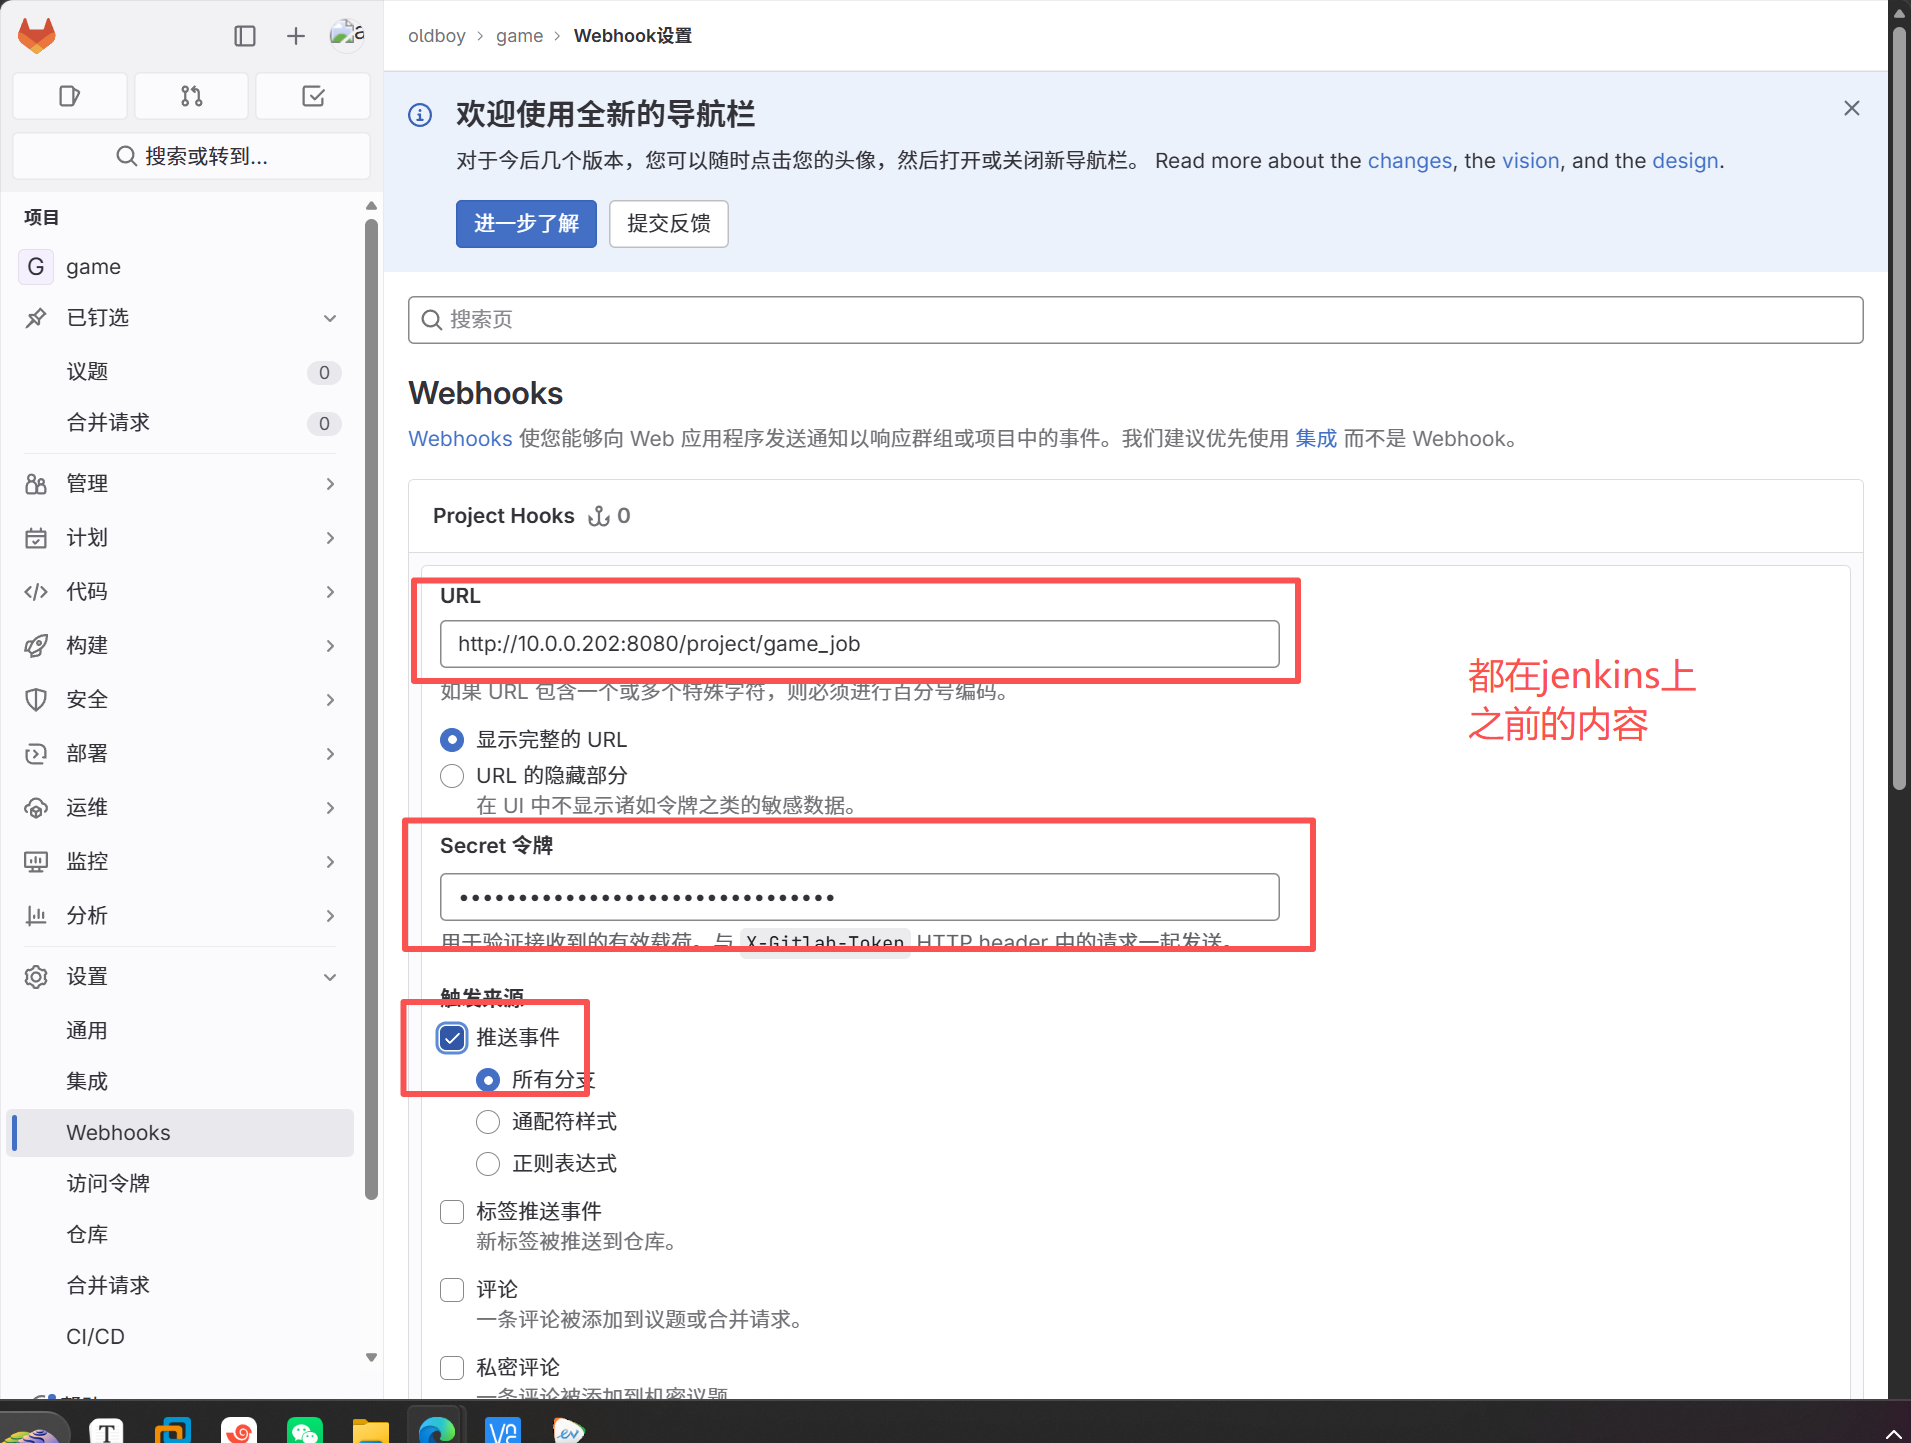
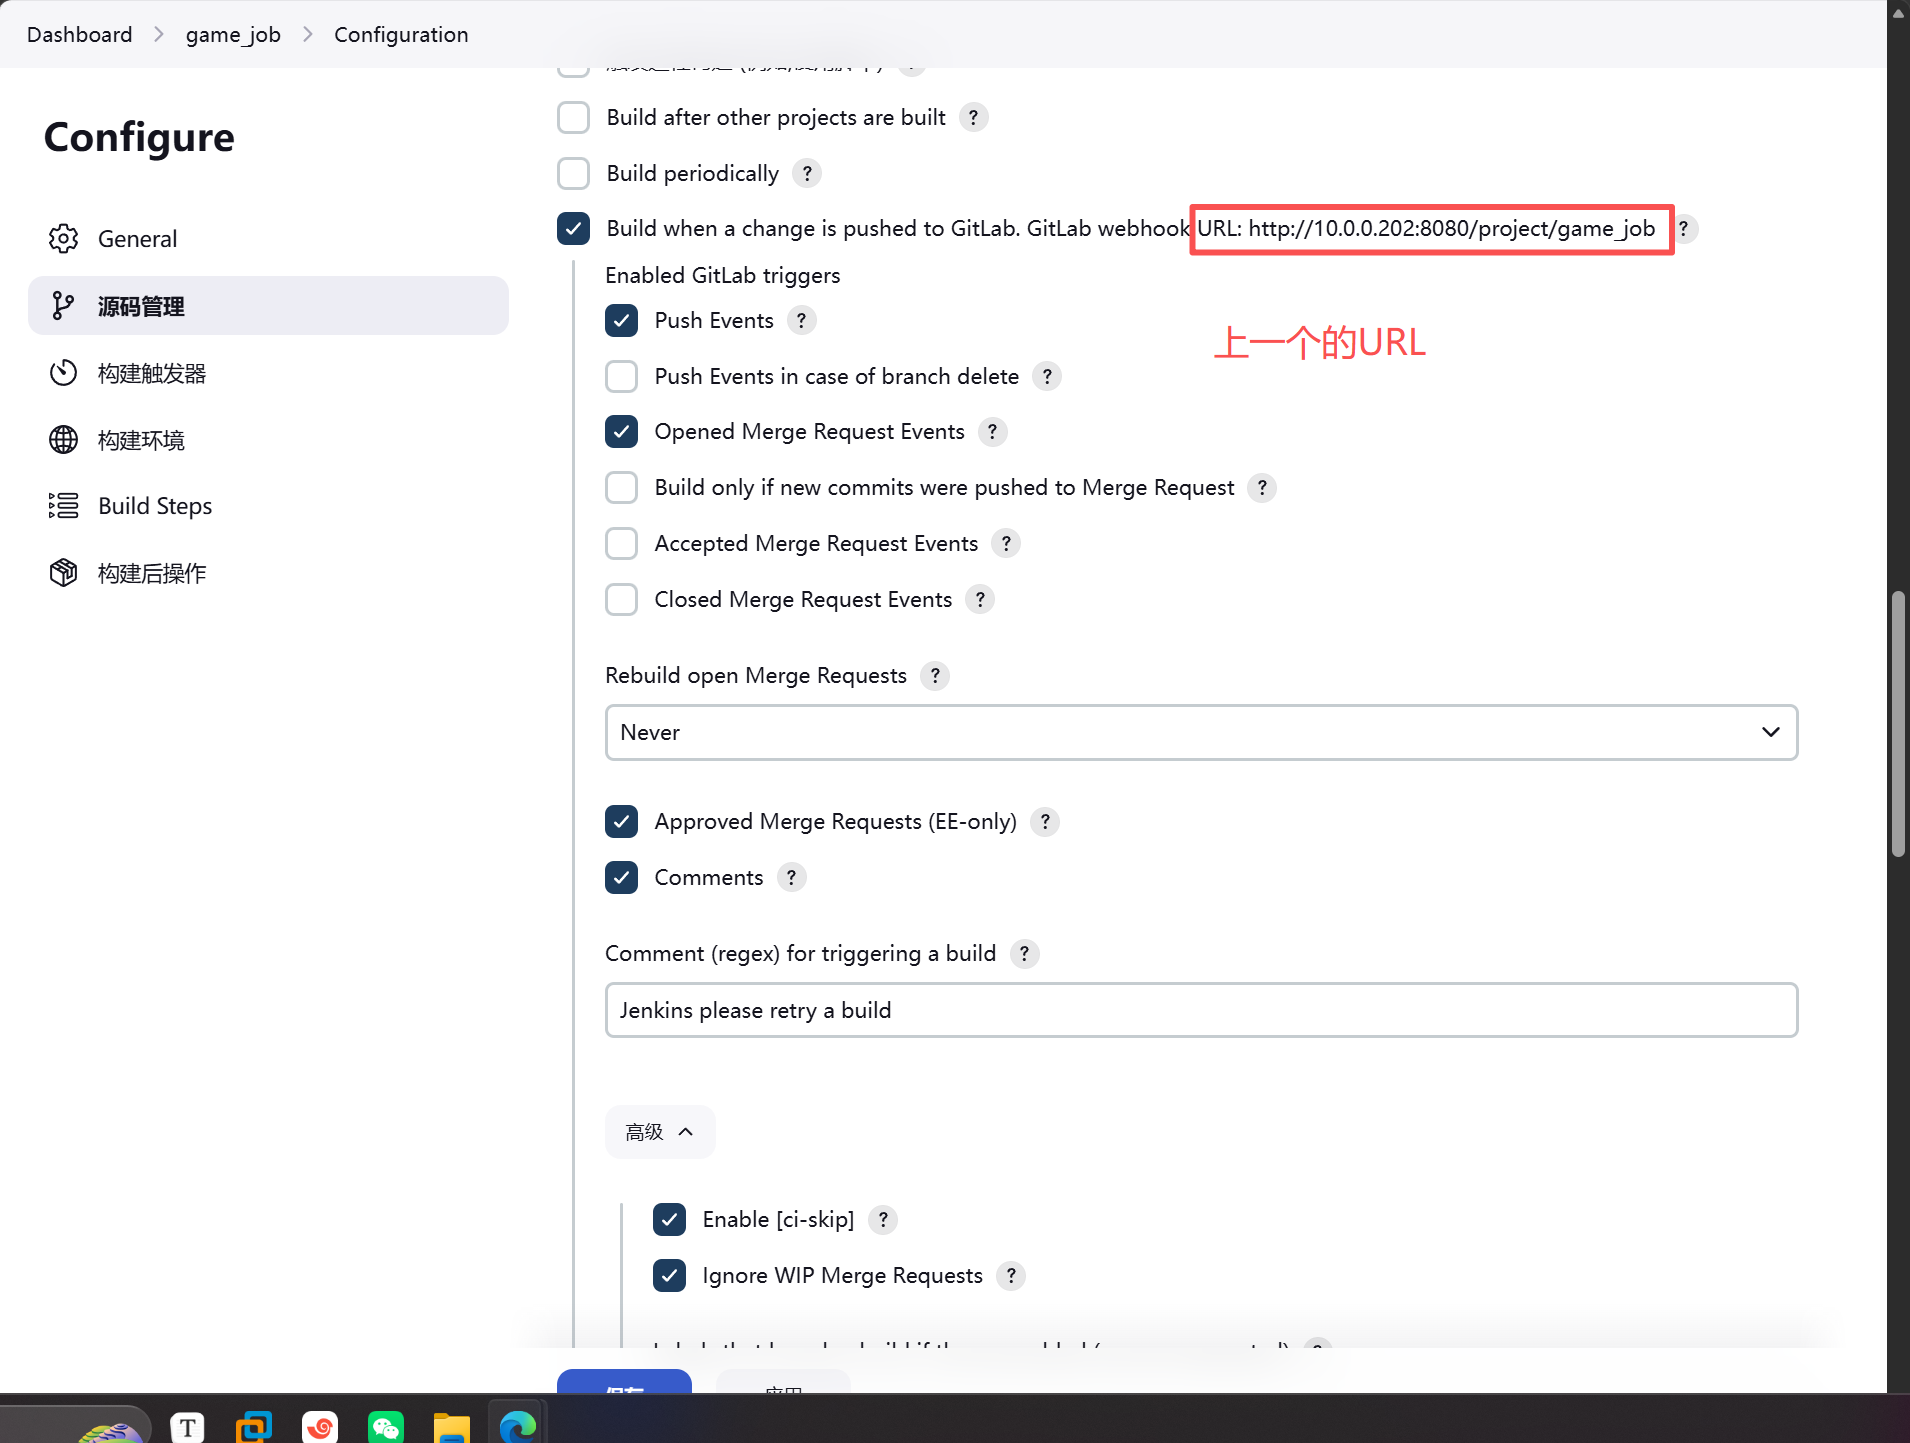
gitlab上需要的的URL和令牌在jenkins之前的配置上
最后测试一下
6.使用软连接回滚功能
为了方便版本回滚,将每次传输的新代码使用变量标记,然后使用创建软连接实现访问

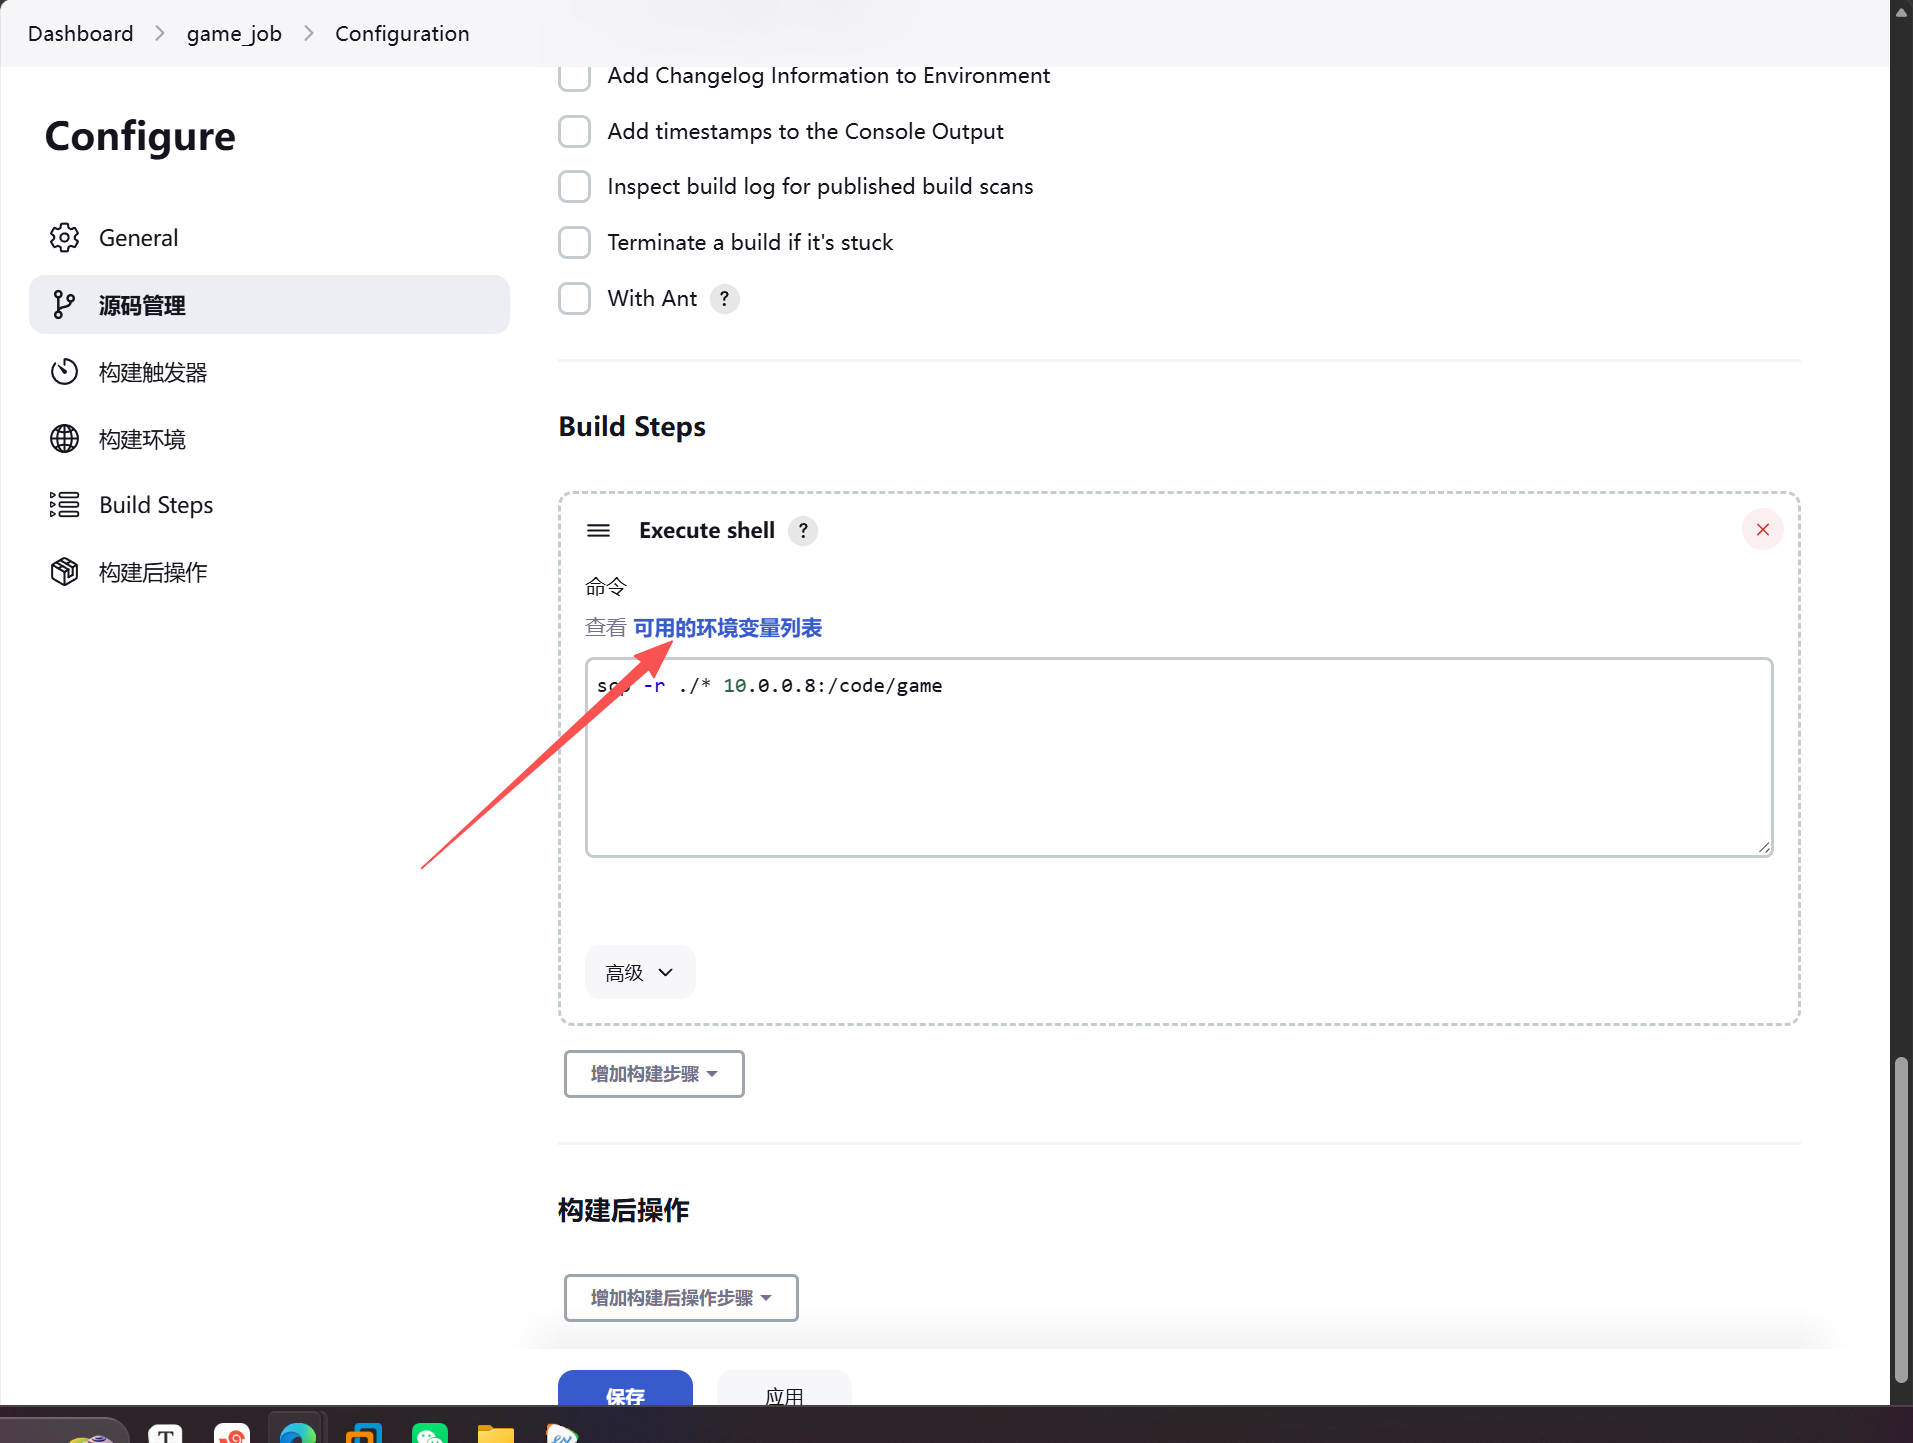
#在jenkins上执行shell命令
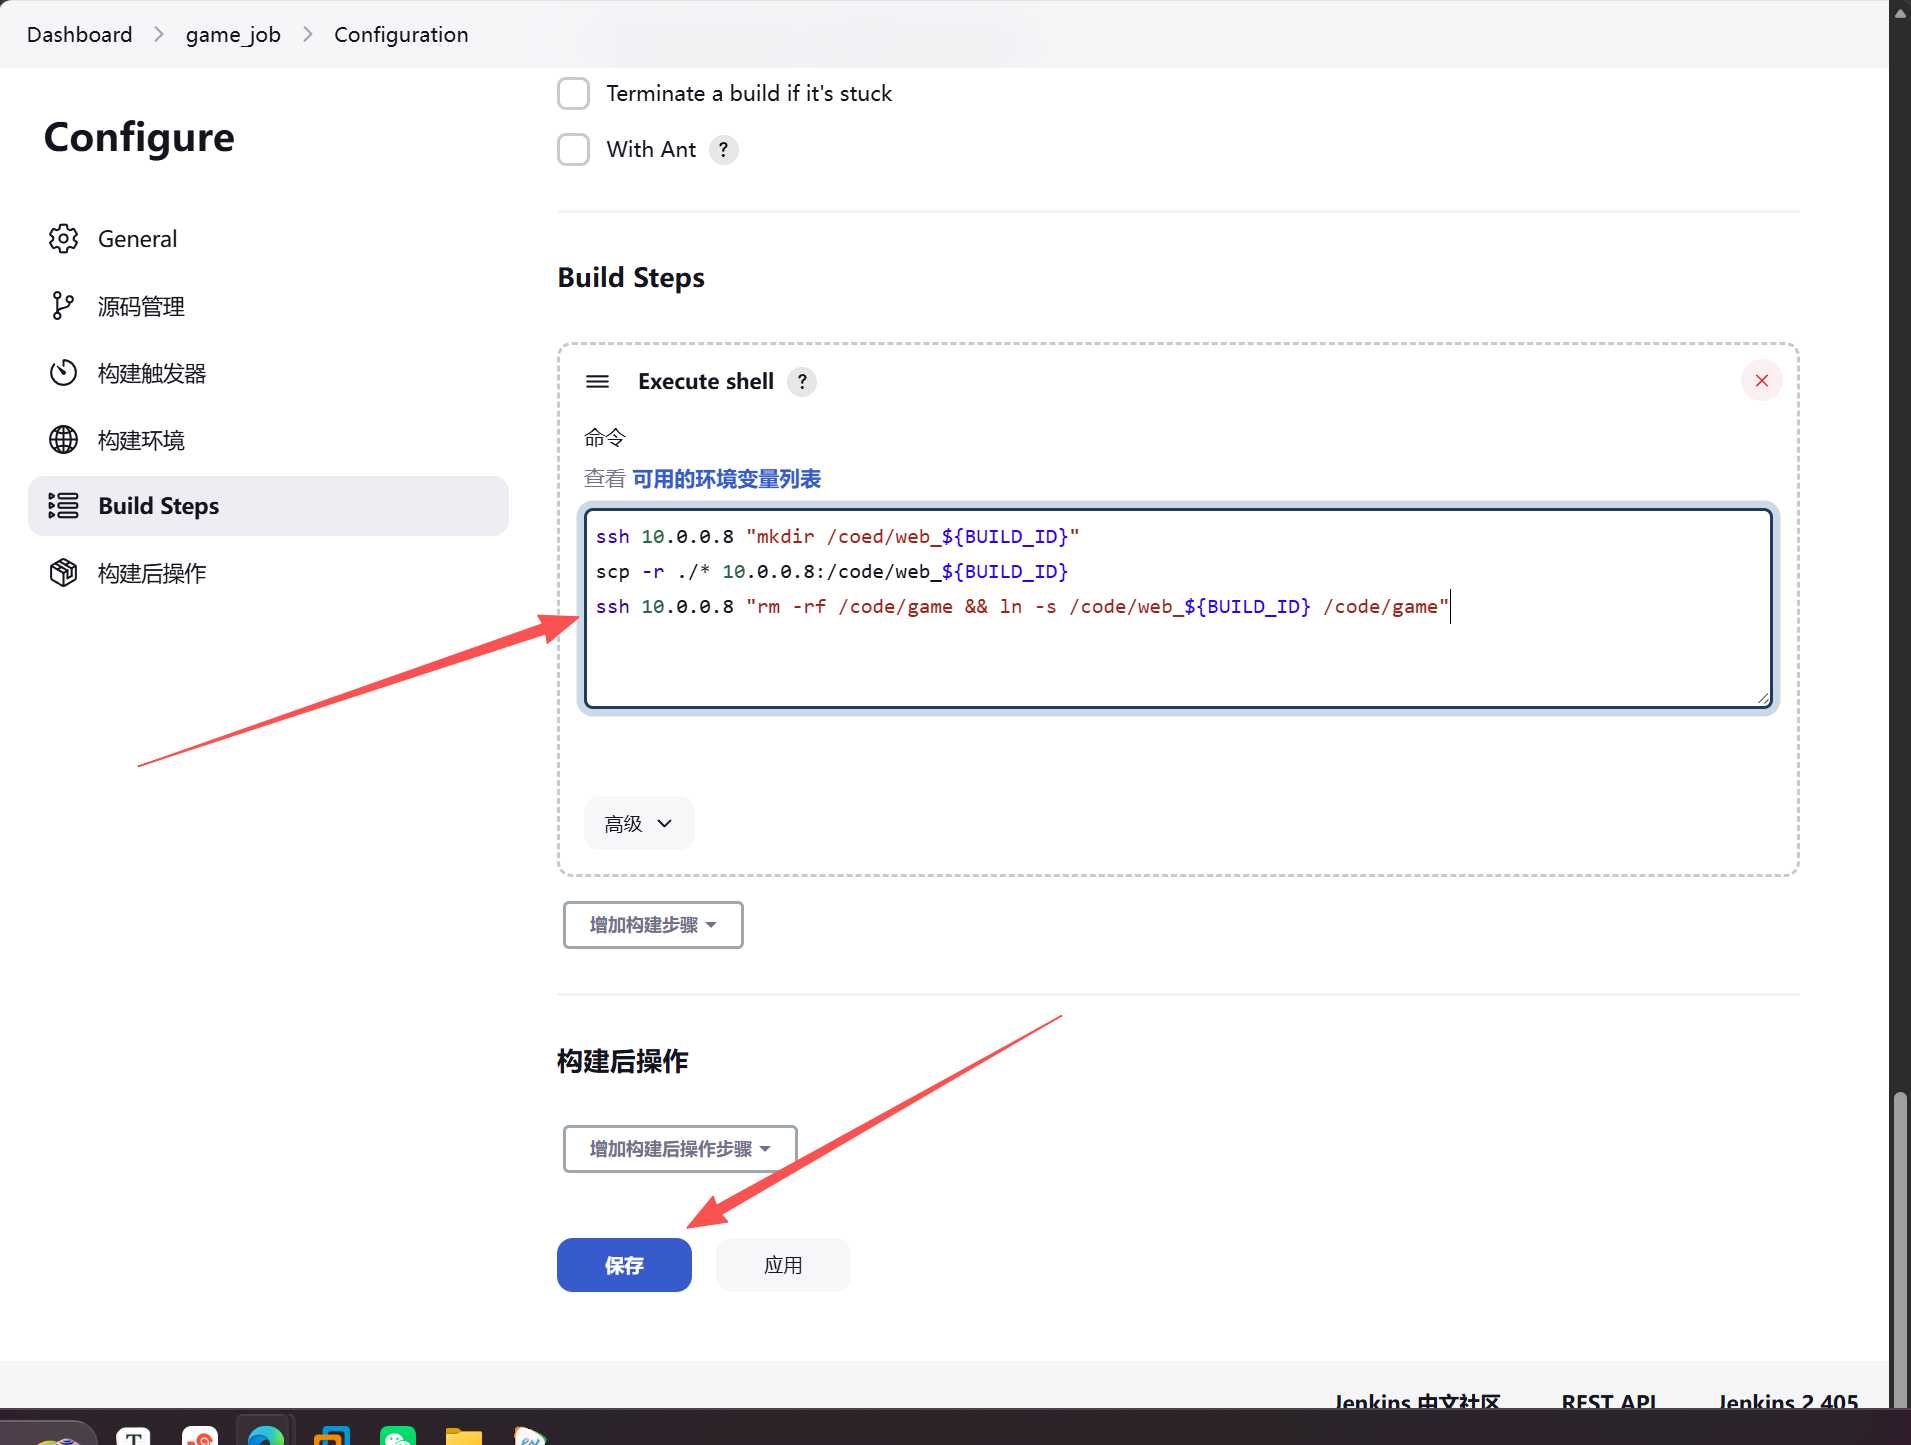
使用内置变量${BUILD_ID} 可以将每次构建的序号写入文件路径
ssh 10.0.0.8 "mkdir /code/web_${BUILD_ID}"
scp -r ./* 10.0.0.8:/code/web_${BUILD_ID}
ssh 10.0.0.8 "rm -rf /code/game && ln -s /code/web_${BUILD_ID} /code/game"
 ****
****
保存完之后点击构建
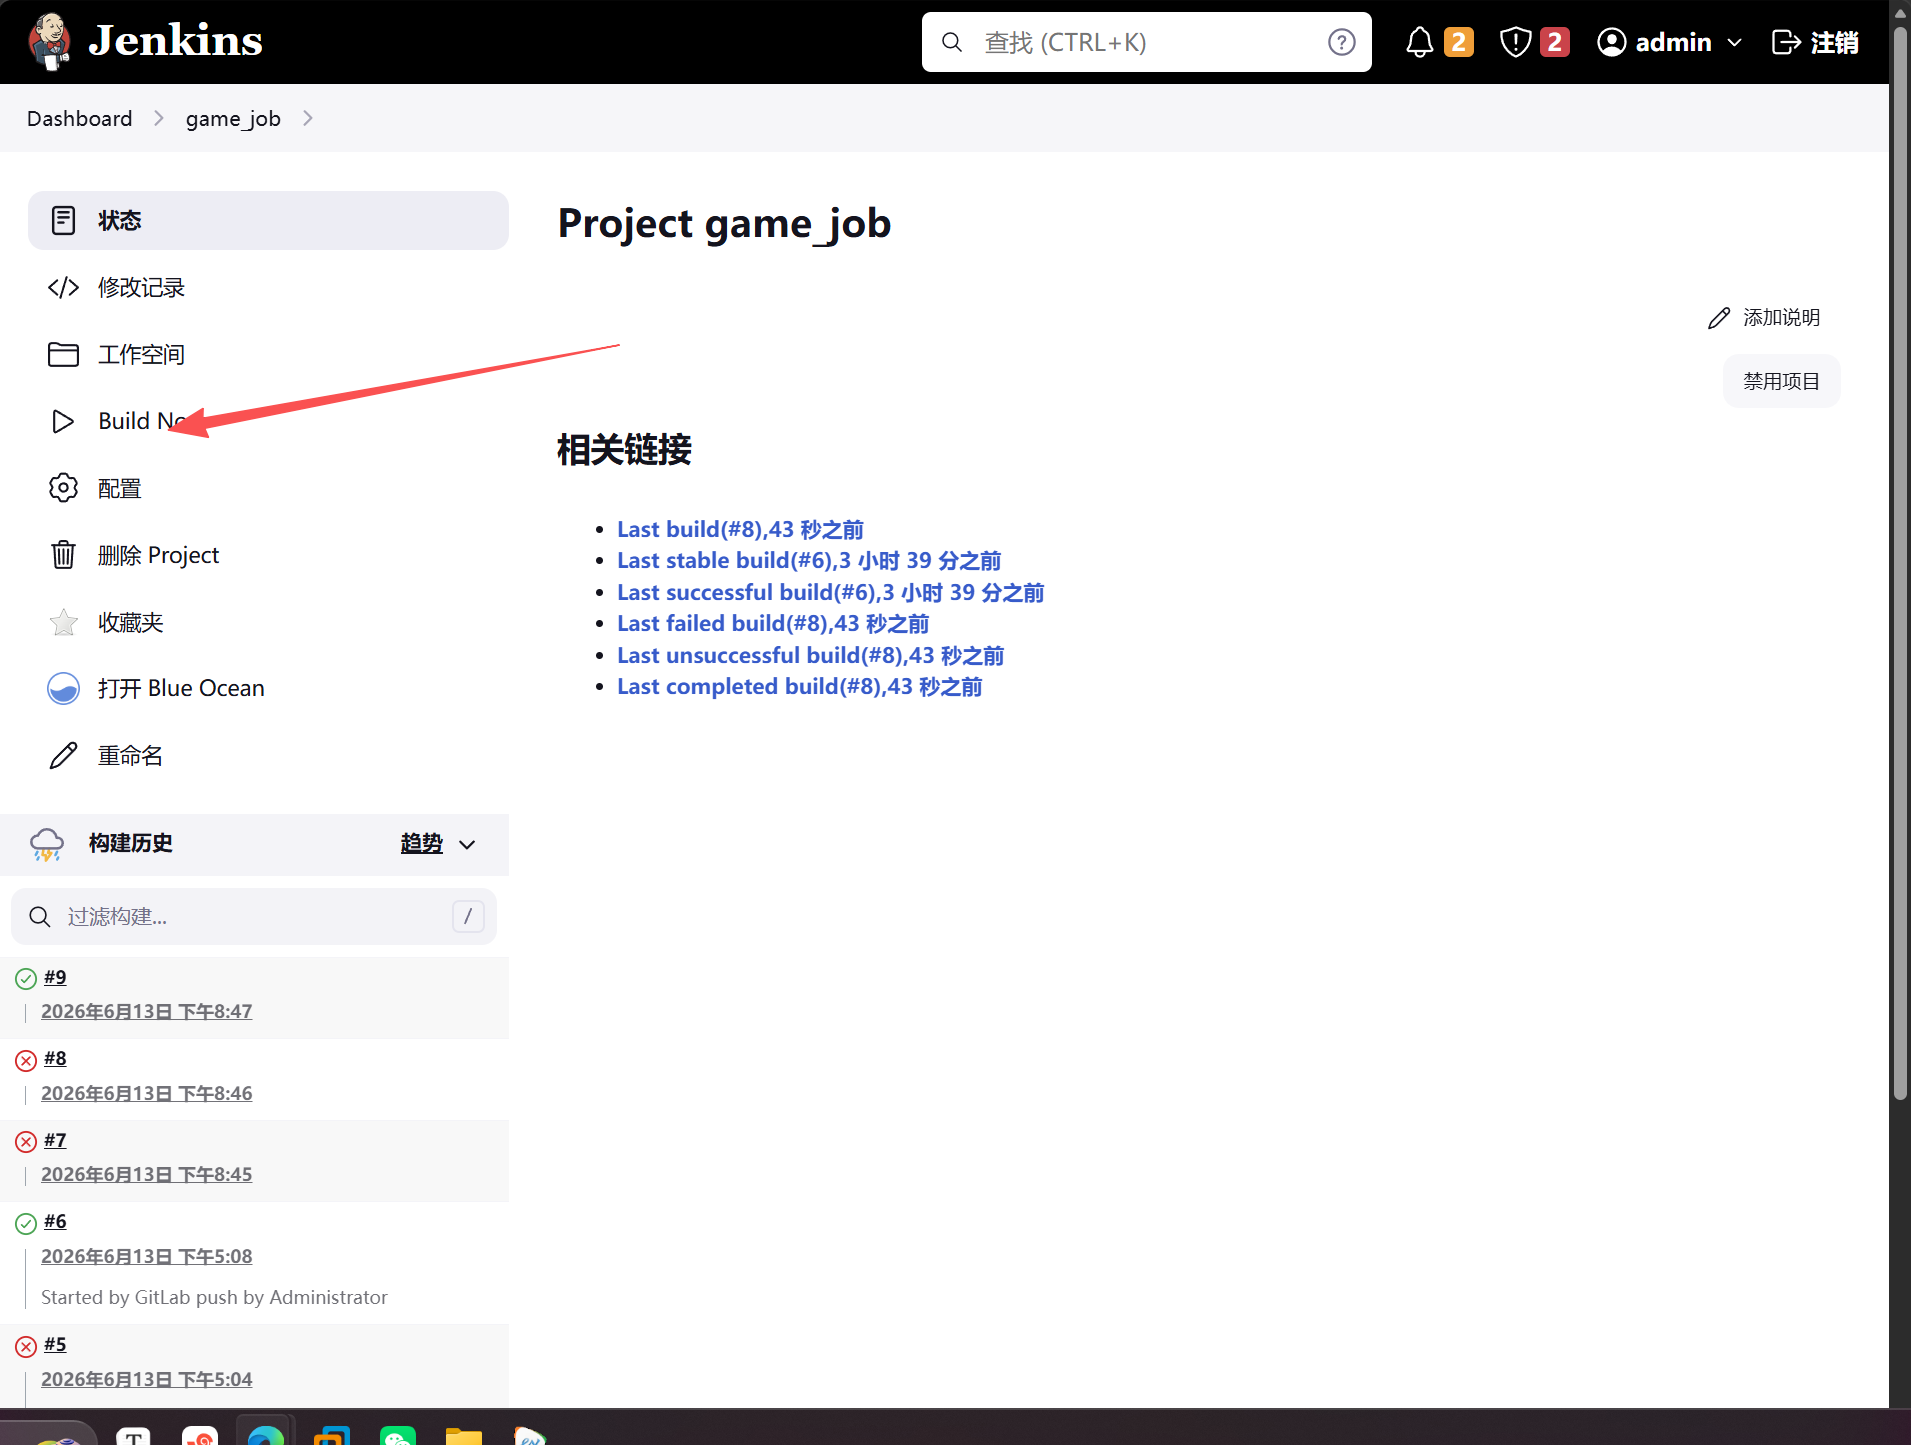
查看10.0.0.8的代码
[root@web02 code]# ll
lrwxrwxrwx  1 root root   12  6月 13 20:48 game -> /code/web_10
drwxr-xr-x  6 root root  107  6月 13 20:48 web_10
drwxr-xr-x  6 root root  107  6月 13 20:47 web_9

回滚代码只需要将原来的软连接删除,重新连接到原来的目录上即可
六、SonarQube代码扫描
1.安装sunarqube
安装环境
1.keylin v10
2.ip 10.0.0.203
3.1核心2G


Jenkins将代码拉取到jenkins本地,先将代码推送到sonar服务器上代码扫描检测,检测漏洞 逻辑 坏味道。

#安装java
[root@sonar ~]# yum -y install java

#配置mysql仓库
[root@sonar ~]# wget dev.mysql.com/get/mysql-community-release-el6-5.noarch.rpm
[root@sonar ~]# rpm -ivh mysql-community-release-el6-5.noarch.rpm

#禁止gpgcheck
[root@sonar ~]# vim /etc/yum.repos.d/mysql-community.repo
...
# Enable to use MySQL 5.6
[mysql56-community]
name=MySQL 5.6 Community Server
baseurl=http://repo.mysql.com/yum/mysql-5.6-community/el/6/$basearch/
enabled=1
gpgcheck=0
gpgkey=file:/etc/pki/rpm-gpg/RPM-GPG-KEY-mysql
...

#下载mysql
[root@sonar ~]# yum -y install mysql-server
[root@sonar ~]# service mysqld start
Starting mysqld (via systemctl):
[  OK  ]
[root@sonar ~]# mysqladmin -uroot password lizhenya123
Warning: Using a password on the command line interface can be insecure.
[root@sonar ~]# mysql -uroot -plizhenya123 -e "CREATE DATABASE sonar DEFAULT CHARACTER SET utf8;"
Warning: Using a password on the command line interface can be insecure.
[root@sonar ~]# mysql -uroot -plizhenya123 -e "show databases;"
Warning: Using a password on the command line interface can be insecure.
+--------------------+
| Database           |
+--------------------+
| information_schema |
| mysql              |
| performance_schema |
| sonar              |
+--------------------+
#安装sonarqube
[root@sonar ~]# ll
-rw-r--r-- 1 root root 155709573  9月 27  2024 sonarqube-7.0.zip
[root@sonar ~]# unzip sonarqube-7.0.zip -d /usr/local/
[root@sonar ~]# ln -s /usr/local/sonarqube-7.0/ /usr/local/sonarqube

#修改连接数据库信息
[root@sonar ~]# cd /usr/local/sonarqube/conf/
[root@sonar conf]# vim sonar.properties

修改配置文件的16 17和26行
...
 14 # Permissions to create tables, indices and triggers must be granted to JDBC user.
 15 # The schema must be created first.
 16 sonar.jdbc.username=root
 17 sonar.jdbc.password=lizhenya123
 18
 19 #----- Embedded Database (default)
 20 # H2 embedded database server listening port, defaults to 9092
 21 #sonar.embeddedDatabase.port=9092
 22
 23 #----- MySQL 5.6 or greater
 24 # Only InnoDB storage engine is supported (not myISAM).
 25 # Only the bundled driver is supported. It can not be changed.
 26 sonar.jdbc.url=jdbc:mysql://localhost:3306/sonar?useUnicode=true&characterEncoding=utf    8&rewriteBatchedStatements=true&useConfigs=maxPerformance&useSSL=false
 27
 28
 ...

 #创建普通用户sonar
[root@sonar conf]# useradd sonar
[root@sonar conf]# chown -R sonar.sonar /usr/local/sonarqube-7.0/

#使用sonar用户运行服务
[root@sonar conf]# su - sonar -c "/usr/local/sonarqube/bin/linux-x86-64/sonar.sh start"

#查看端口
[root@sonar conf]# netstat -tunlp|grep 9000
tcp6       0      0 :::9000                 :::*                    LISTEN      3668/java

测试访问10.0.0.203:9000
#安装插件
[root@sonar plugins]# cd /usr/local/sonarqube/extensions/plugins
[root@sonar plugins]# ll
总用量 36048
-rw-r--r-- 1 sonar sonar      92  2月  2  2018 README.txt
-rw-r--r-- 1 sonar sonar 1460815  1月 29  2018 sonar-csharp-plugin-6.7.1.4347.jar
-rw-r--r-- 1 sonar sonar 1618672  1月 29  2018 sonar-flex-plugin-2.3.jar
-rw-r--r-- 1 sonar sonar 6813805  2月  2  2018 sonar-java-plugin-5.1.0.13090.jar
-rw-r--r-- 1 sonar sonar 3373769  1月 29  2018 sonar-javascript-plugin-4.0.0.5862.jar
-rw-r--r-- 1 sonar sonar 2774137  2月  2  2018 sonar-php-plugin-2.12.1.3018.jar
-rw-r--r-- 1 sonar sonar 1509434  2月  2  2018 sonar-python-plugin-1.9.0.2010.jar
-rw-r--r-- 1 sonar sonar 3625962  1月 29  2018 sonar-scm-git-plugin-1.3.0.869.jar
-rw-r--r-- 1 sonar sonar 6680471  1月 29  2018 sonar-scm-svn-plugin-1.6.0.860.jar
-rw-r--r-- 1 sonar sonar 1663416  2月  2  2018 sonar-typescript-plugin-1.5.0.2122.jar
-rw-r--r-- 1 sonar sonar 7368250  1月 29  2018 sonar-xml-plugin-1.4.3.1027.jar
[root@sonar plugins]# rm -rf *

上传插件
[root@sonar plugins]# ll
总用量 44052
-rw-r--r-- 1 root root 45106788  9月 27  2024 sonar_plugins.tar.gz
[root@sonar plugins]# tar xf sonar_plugins.tar.gz
[root@sonar plugins]# rm -f sonar_plugins.tar.gz
[root@sonar plugins]# ll
总用量 4
drwxr-xr-x 2 sonar sonar 4096 10月 24  2019 plugins
[root@sonar plugins]# mv plugins/* .

#重启sonarqube服务
[root@sonar plugins]# su - sonar -c "/usr/local/sonarqube/bin/linux-x86-64/sonar.sh restart"
Stopping SonarQube...
Waiting for SonarQube to exit...
Stopped SonarQube.
Starting SonarQube...
Started SonarQube.

访问10.0.0.203:9000
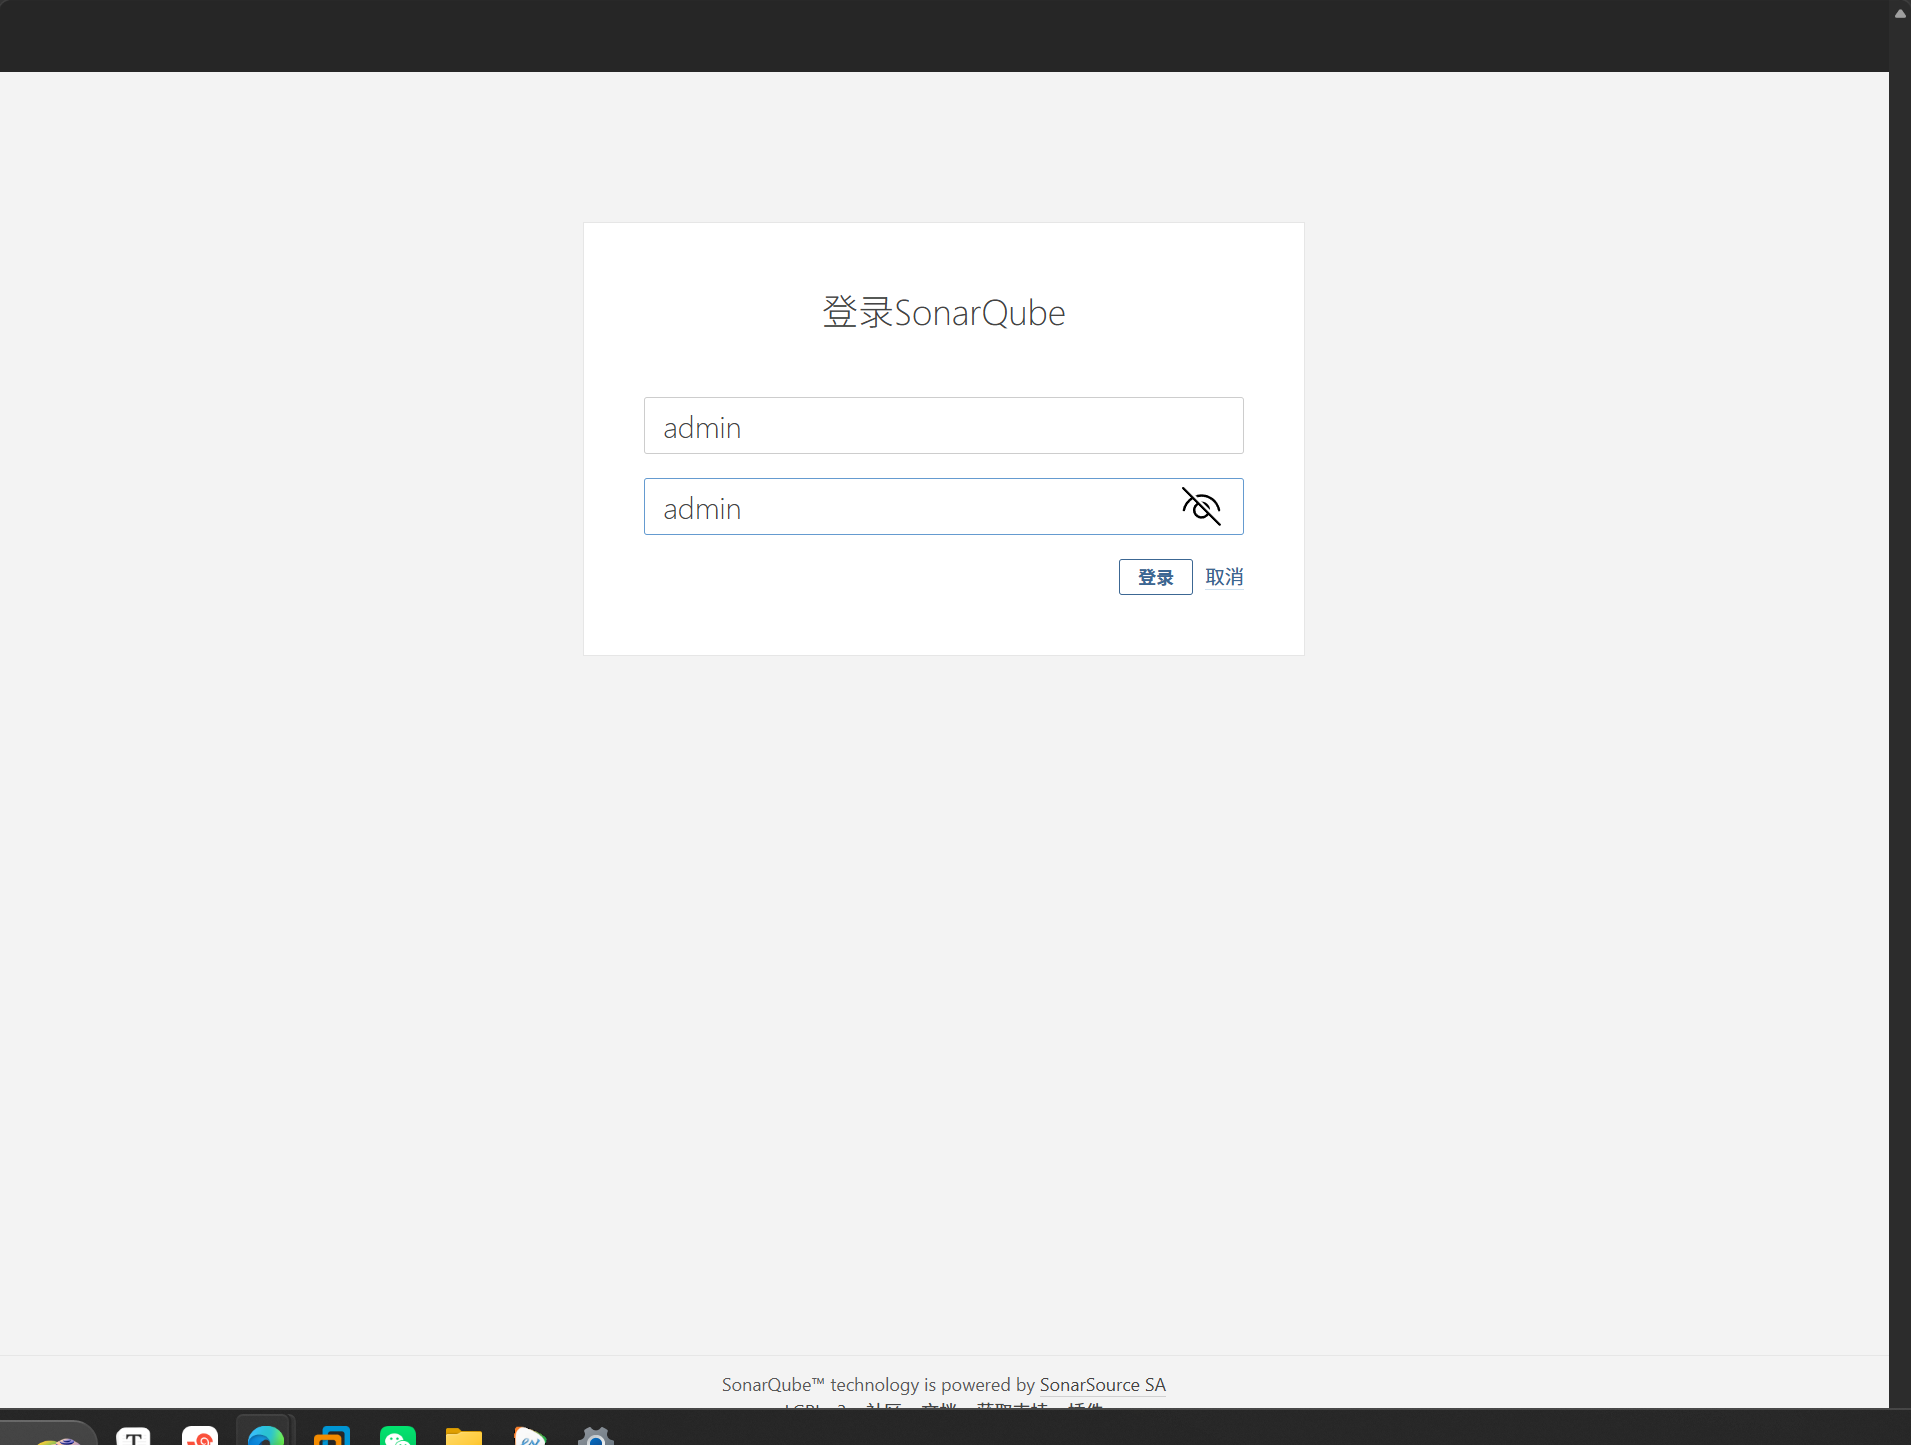
2.sonar创建项目
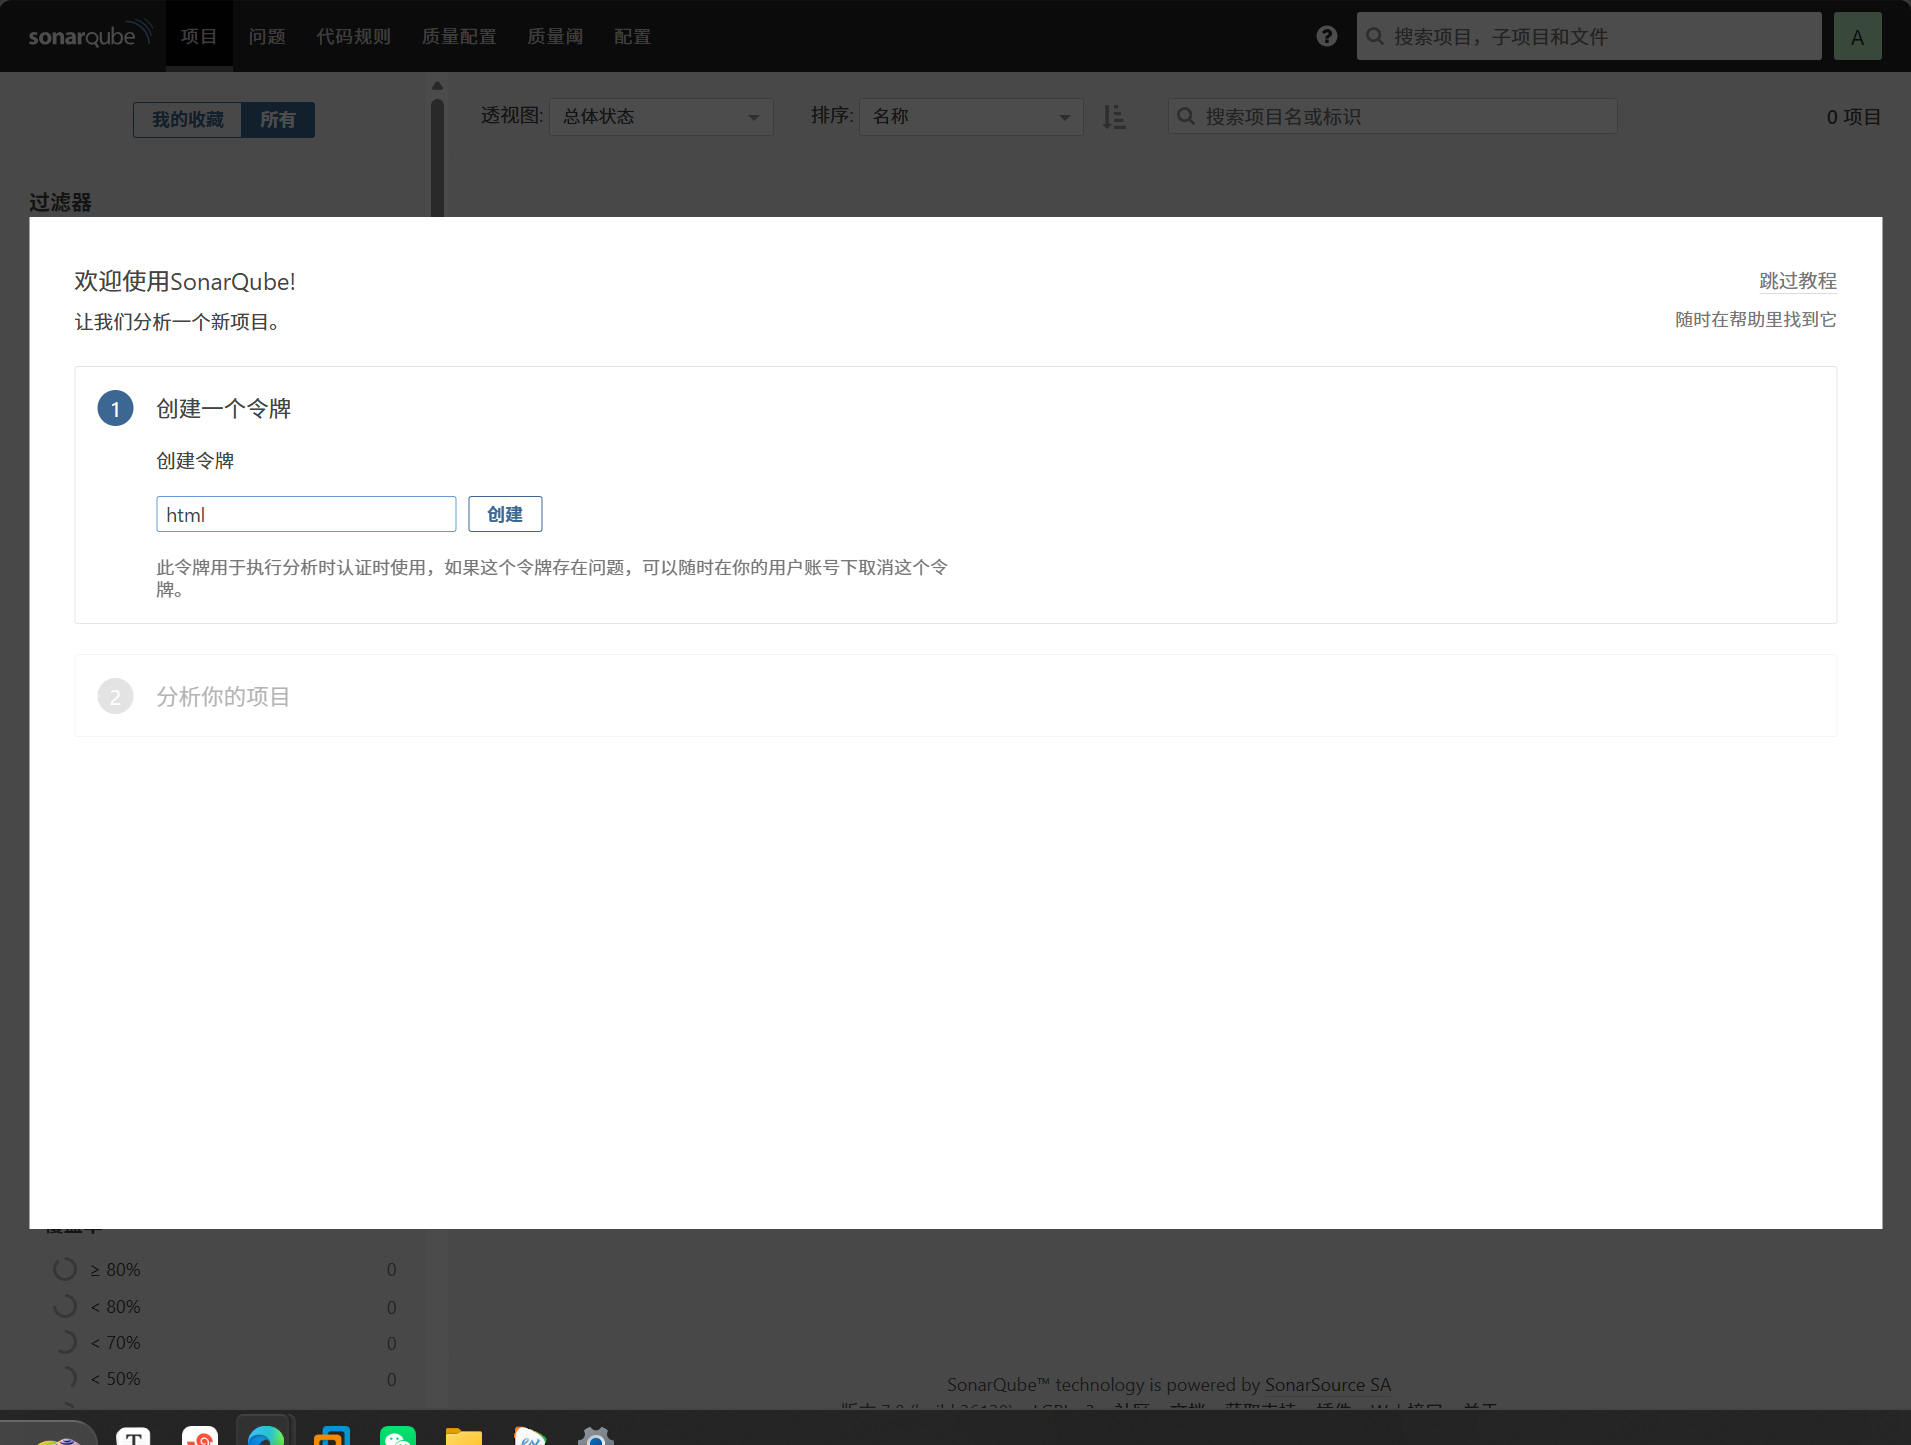
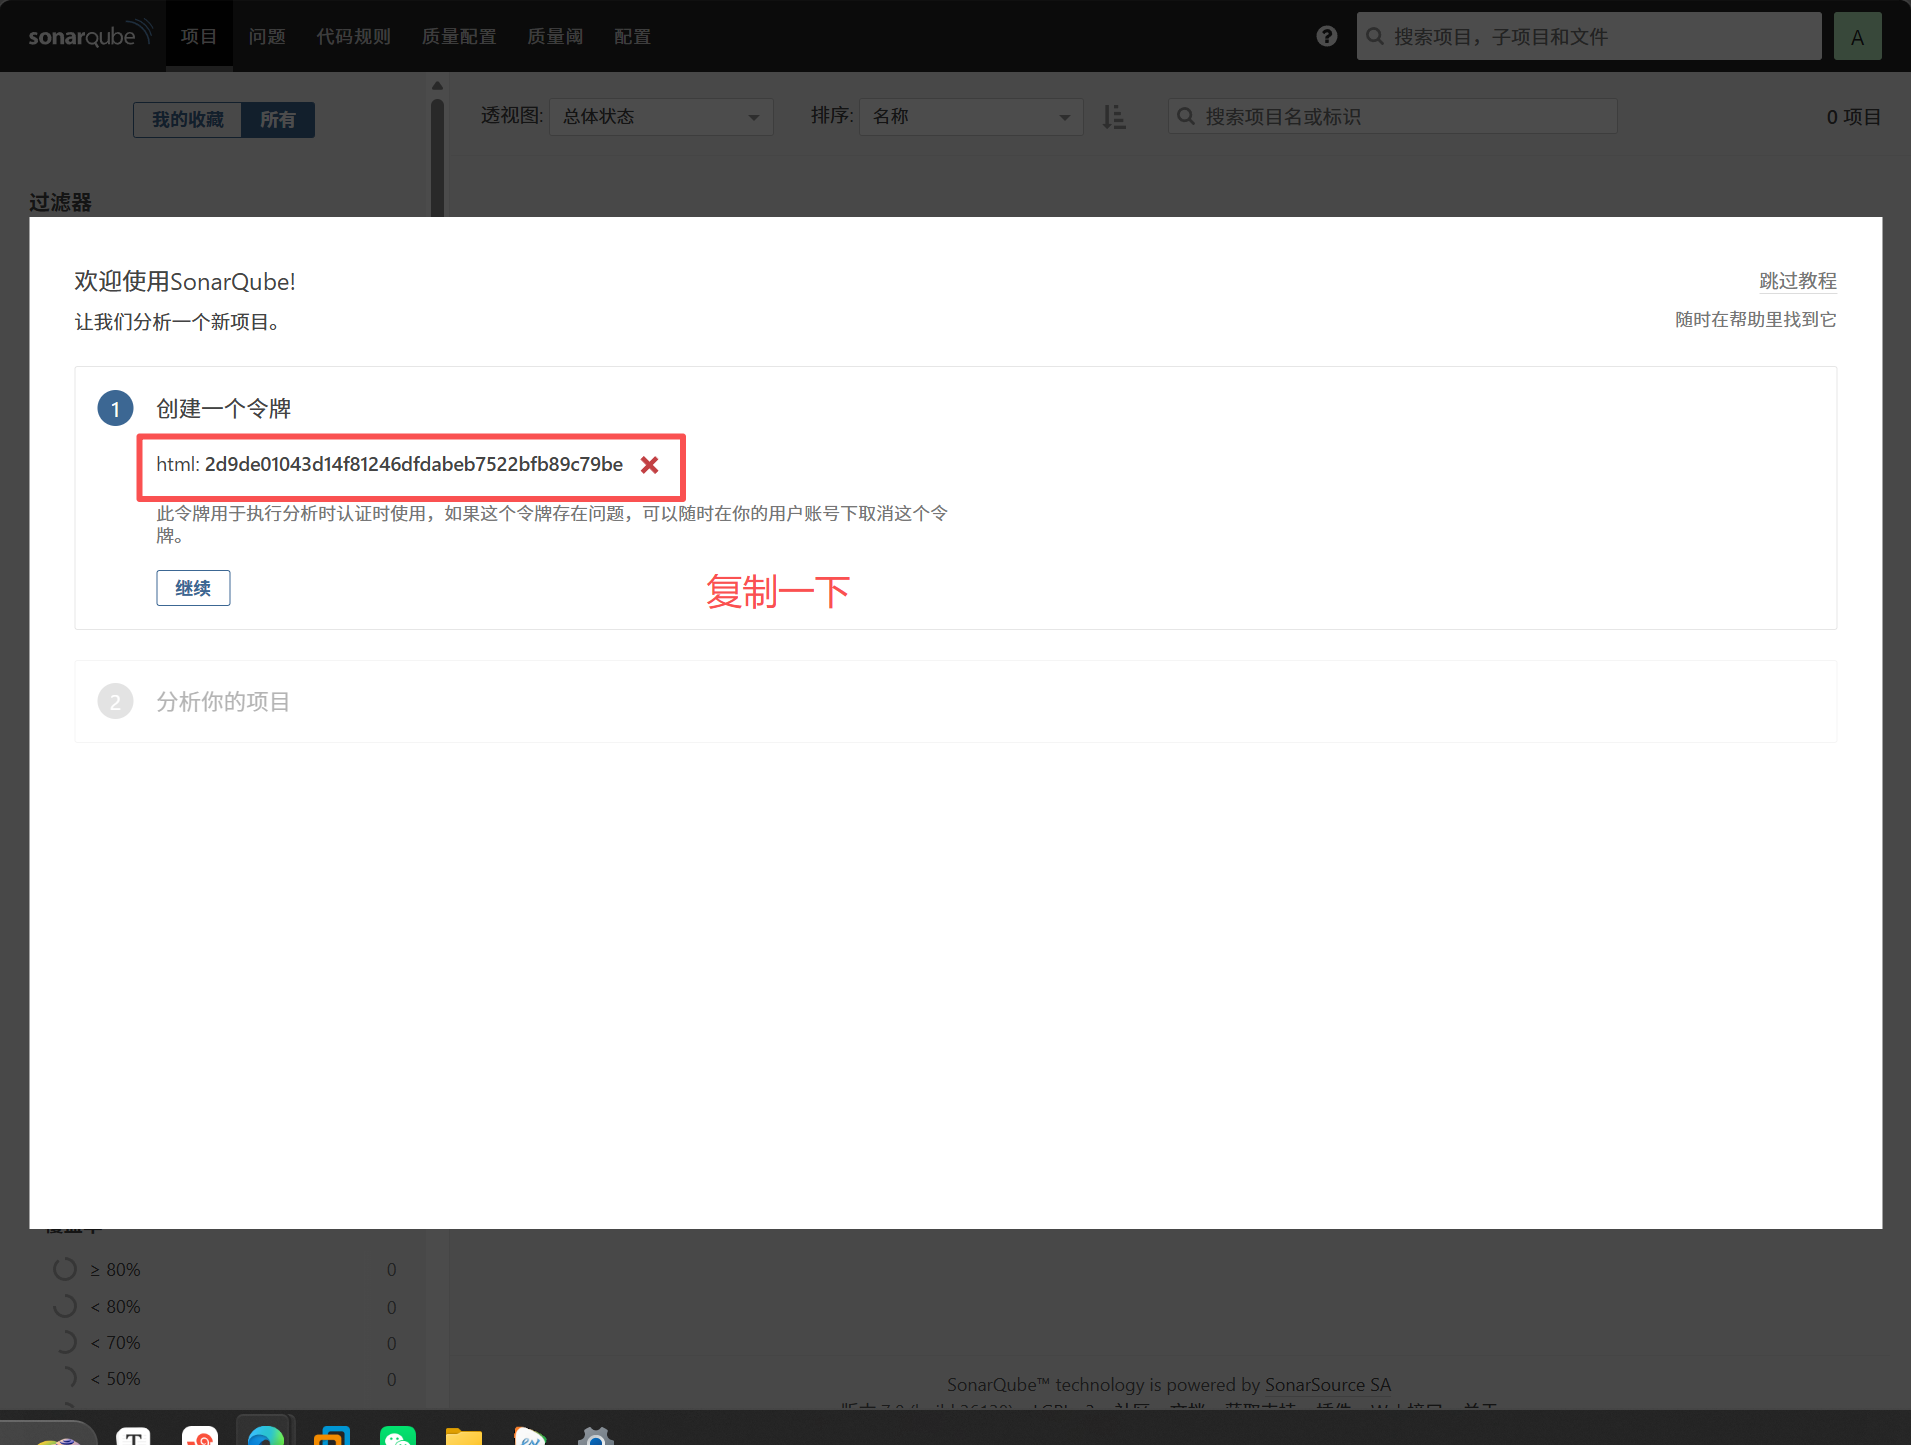
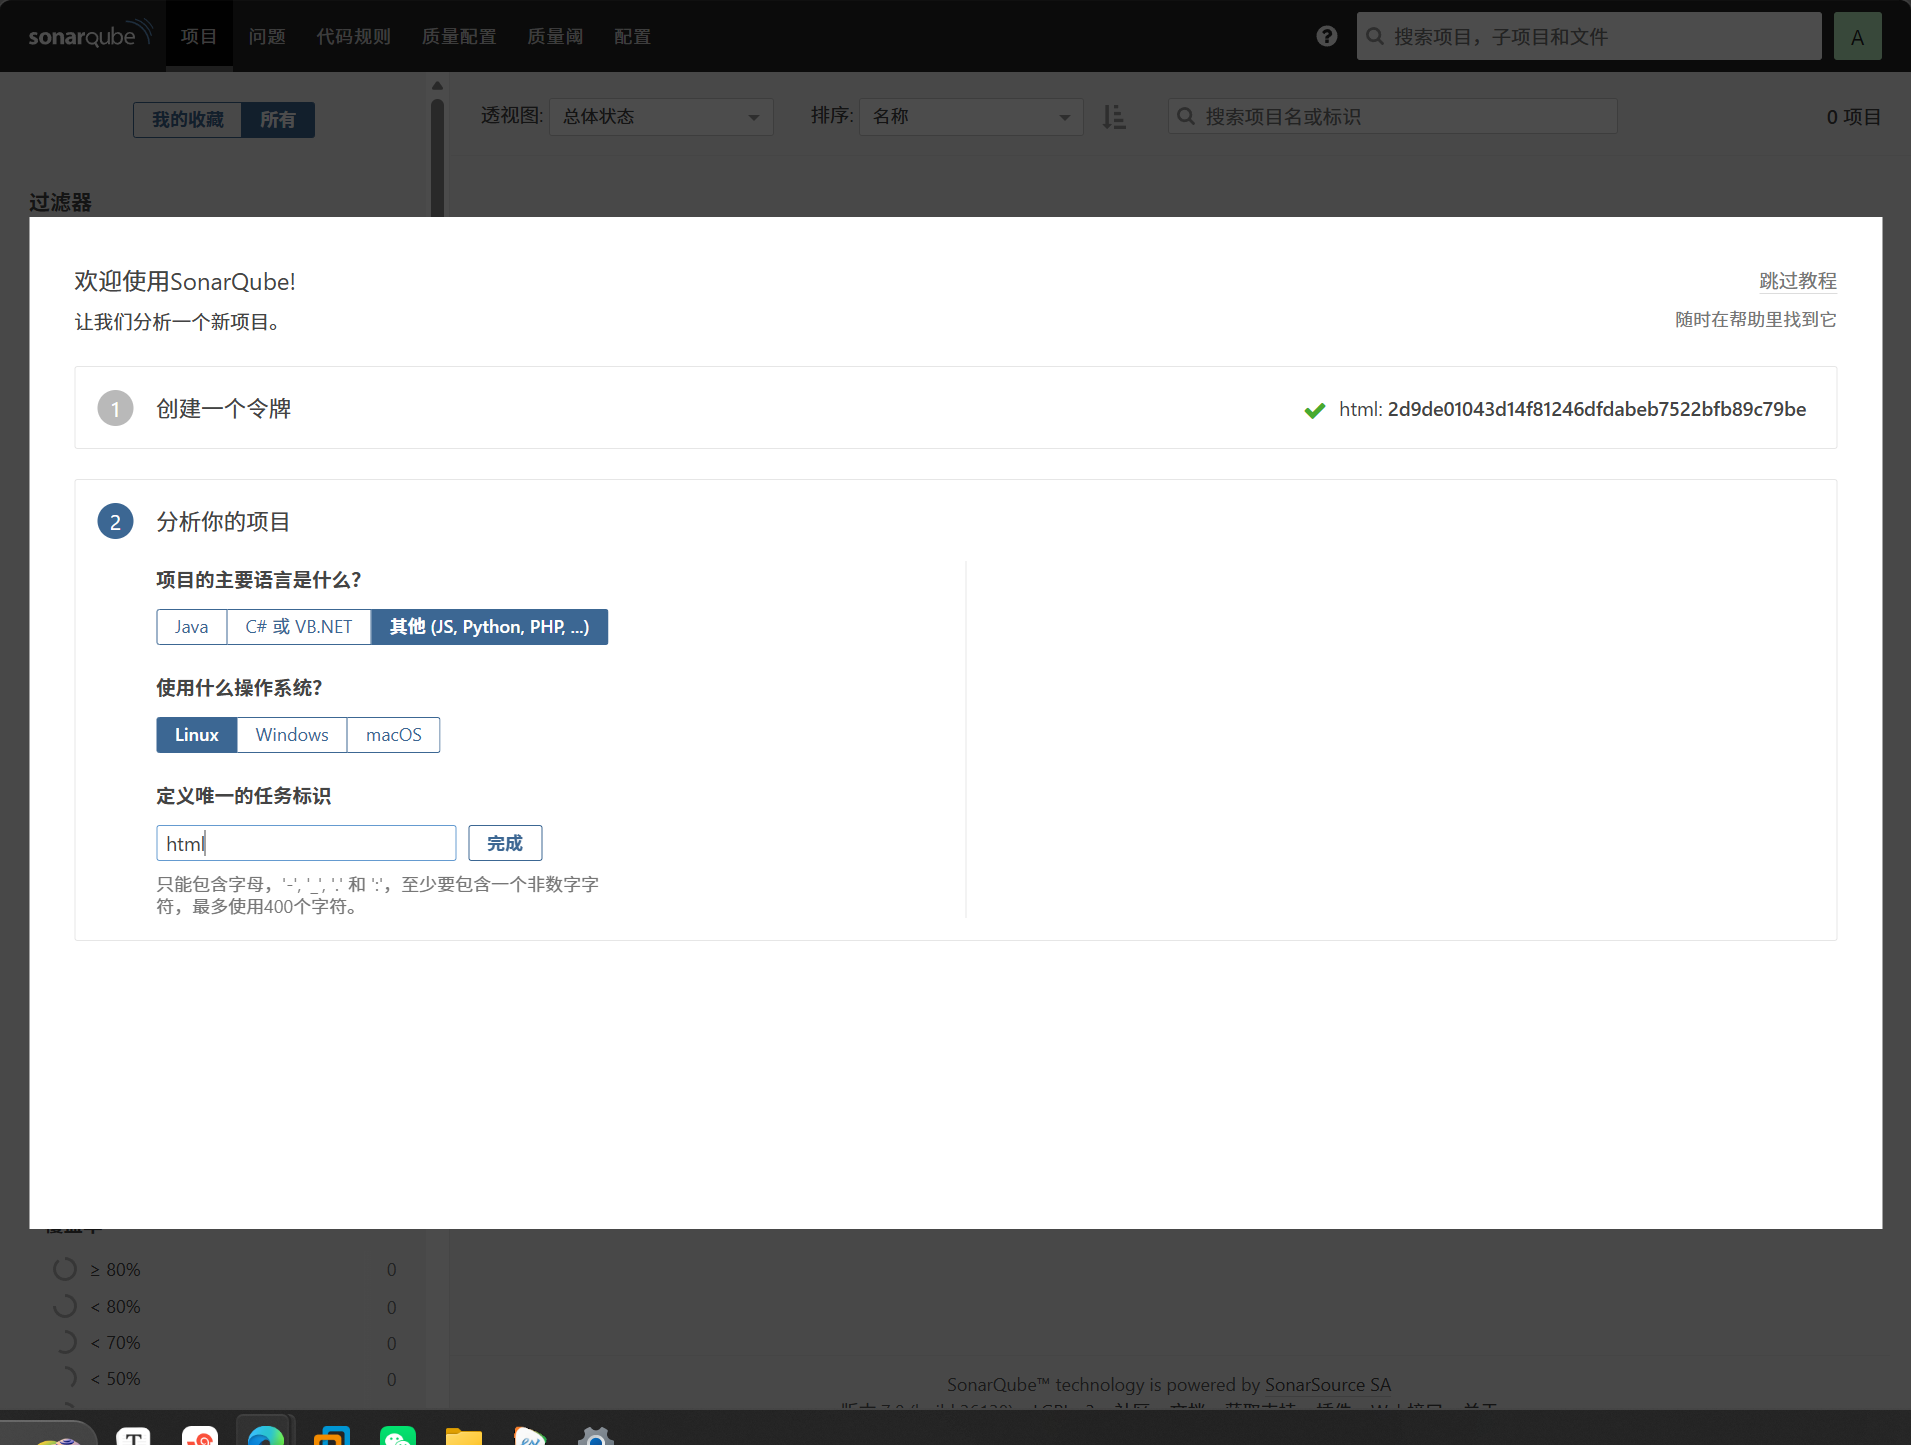
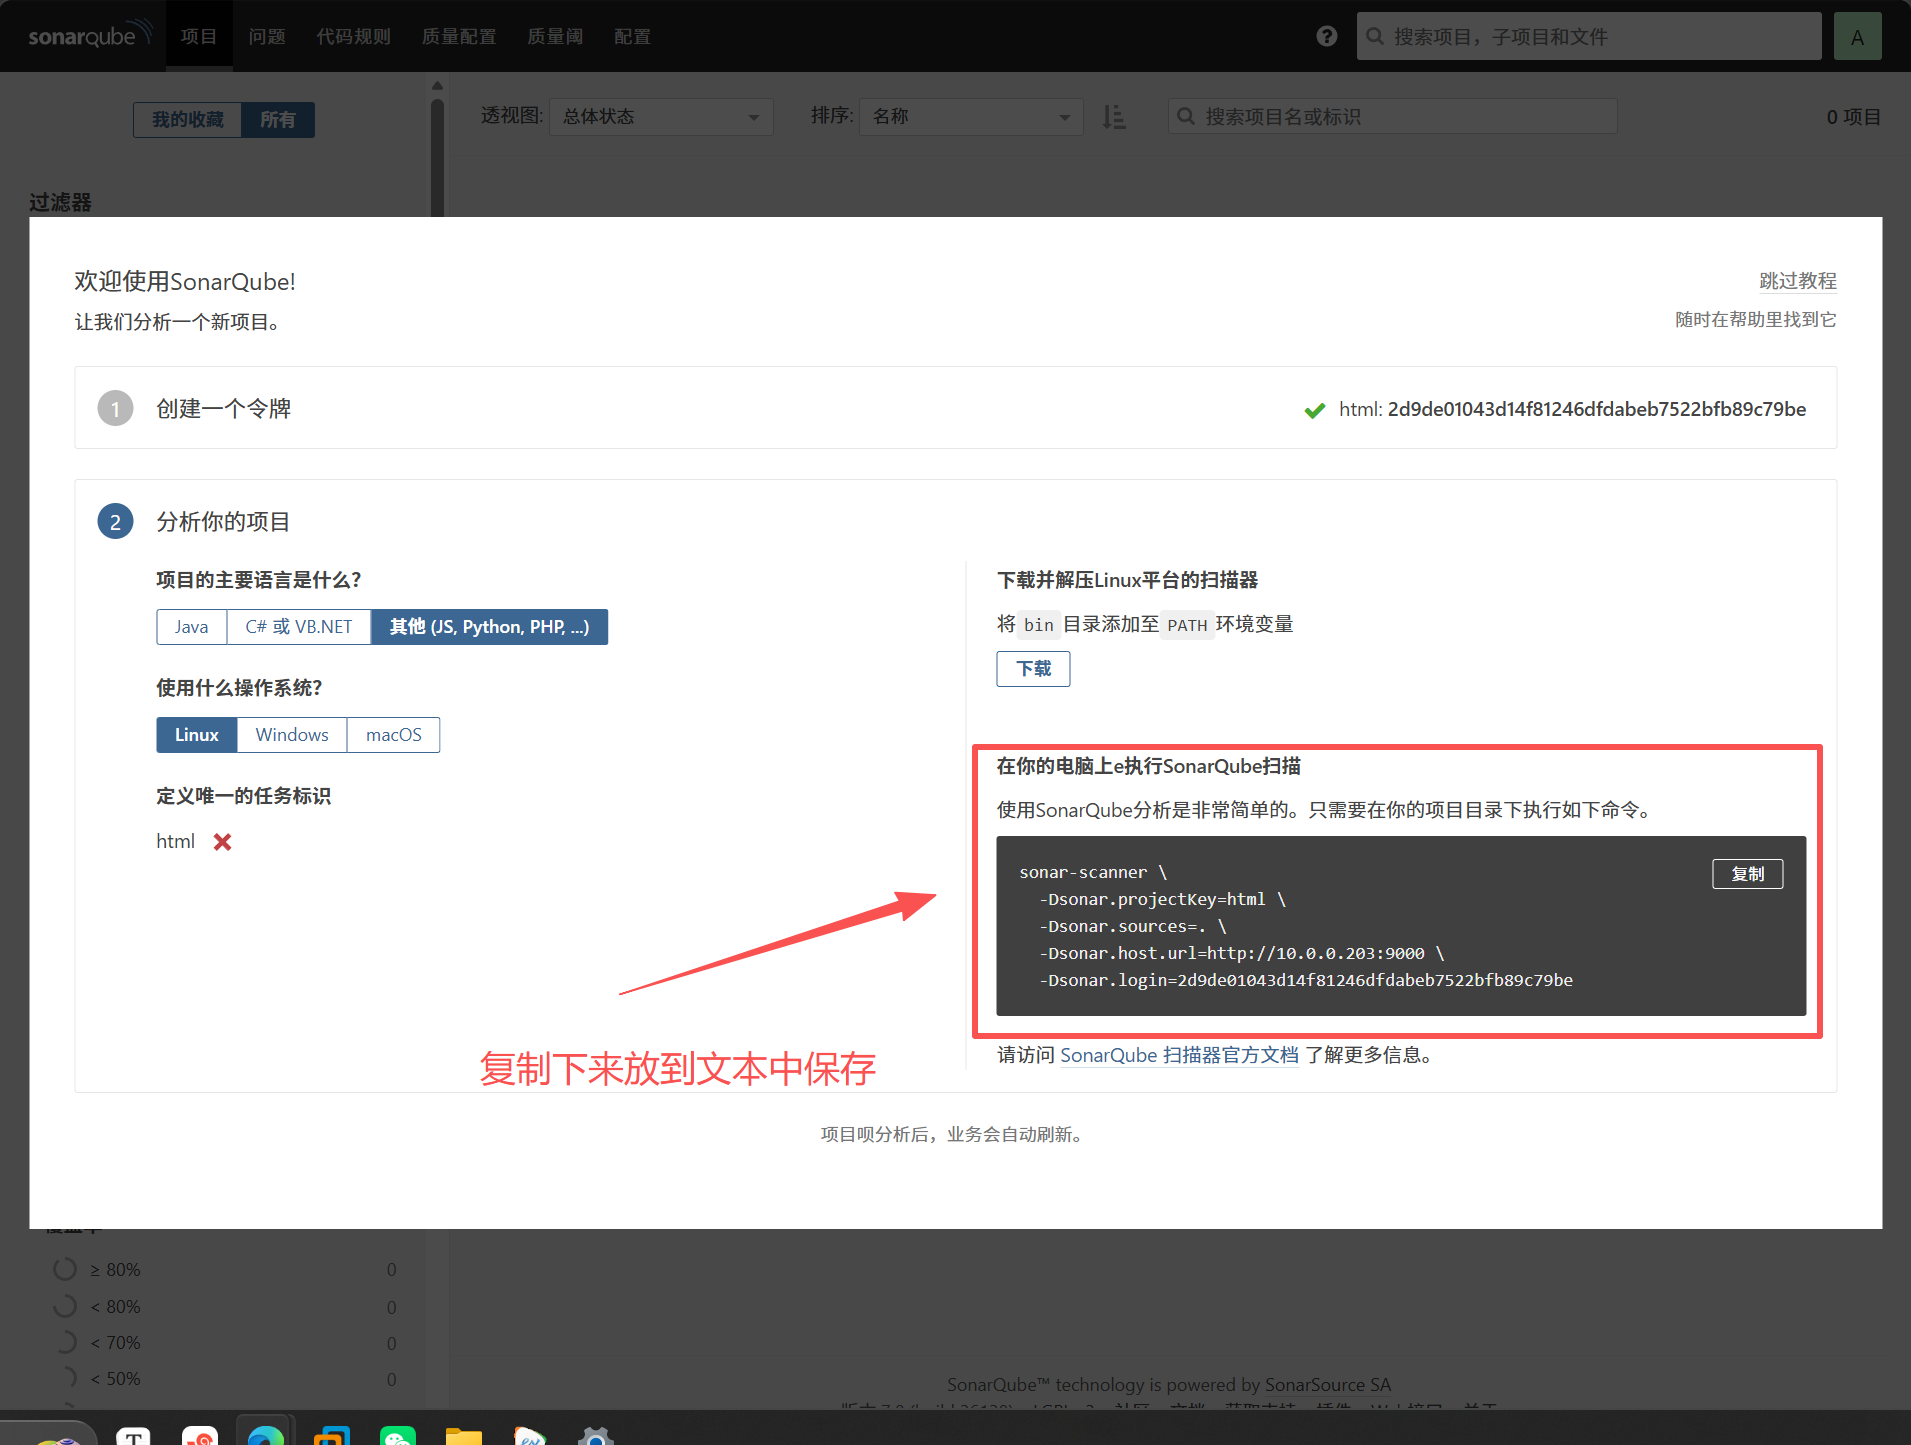
3.客户端执行代码扫描并上传到sonar服务器
在jenkins服务器上执行
#安装客户端
[root@jenkins ~]# ll sonar-scanner-cli-4.2.0.1873-linux.zip
-rw-r--r-- 1 root root 42397119  9月 27  2024 sonar-scanner-cli-4.2.0.1873-linux.zip
[root@jen[root@jenkins ~]# mv /usr/local/sonar-scanner-4.2.0.1873-linux/ /usr/local/sonar-scannerkins ~]# unzip sonar-scanner-cli-4.2.0.1873-linux.zip -d /usr/local/
[root@jenkins ~]# mv /usr/local/sonar-scanner-4.2.0.1873-linux/ /usr/local/sonar-scanner

#将客户端写入PATH变量
[root@jenkins bin]# tail -n1 /etc/profile
export PATH="$PATH:/usr/local/sonar-scanner/bin"
[root@jenkins bin]# source /etc/profile

#执行代码扫描  (刚才复制的那一堆)
sonar-scanner \
  -Dsonar.projectKey=html \
  -Dsonar.sources=. \
  -Dsonar.host.url=http://10.0.0.203:9000 \
  -Dsonar.login=2d9de01043d14f81246dfdabeb7522bfb89c79be

。。。
INFO: Task total time: 4.246 s
INFO: ------------------------------------------------------------------------
INFO: EXECUTION SUCCESS
INFO: ------------------------------------------------------------------------
INFO: Total time: 6.761s
INFO: Final Memory: 7M/115M
INFO: ------------------------------------------------------------------------
。。。
4.配置jenkins集成sonarqube
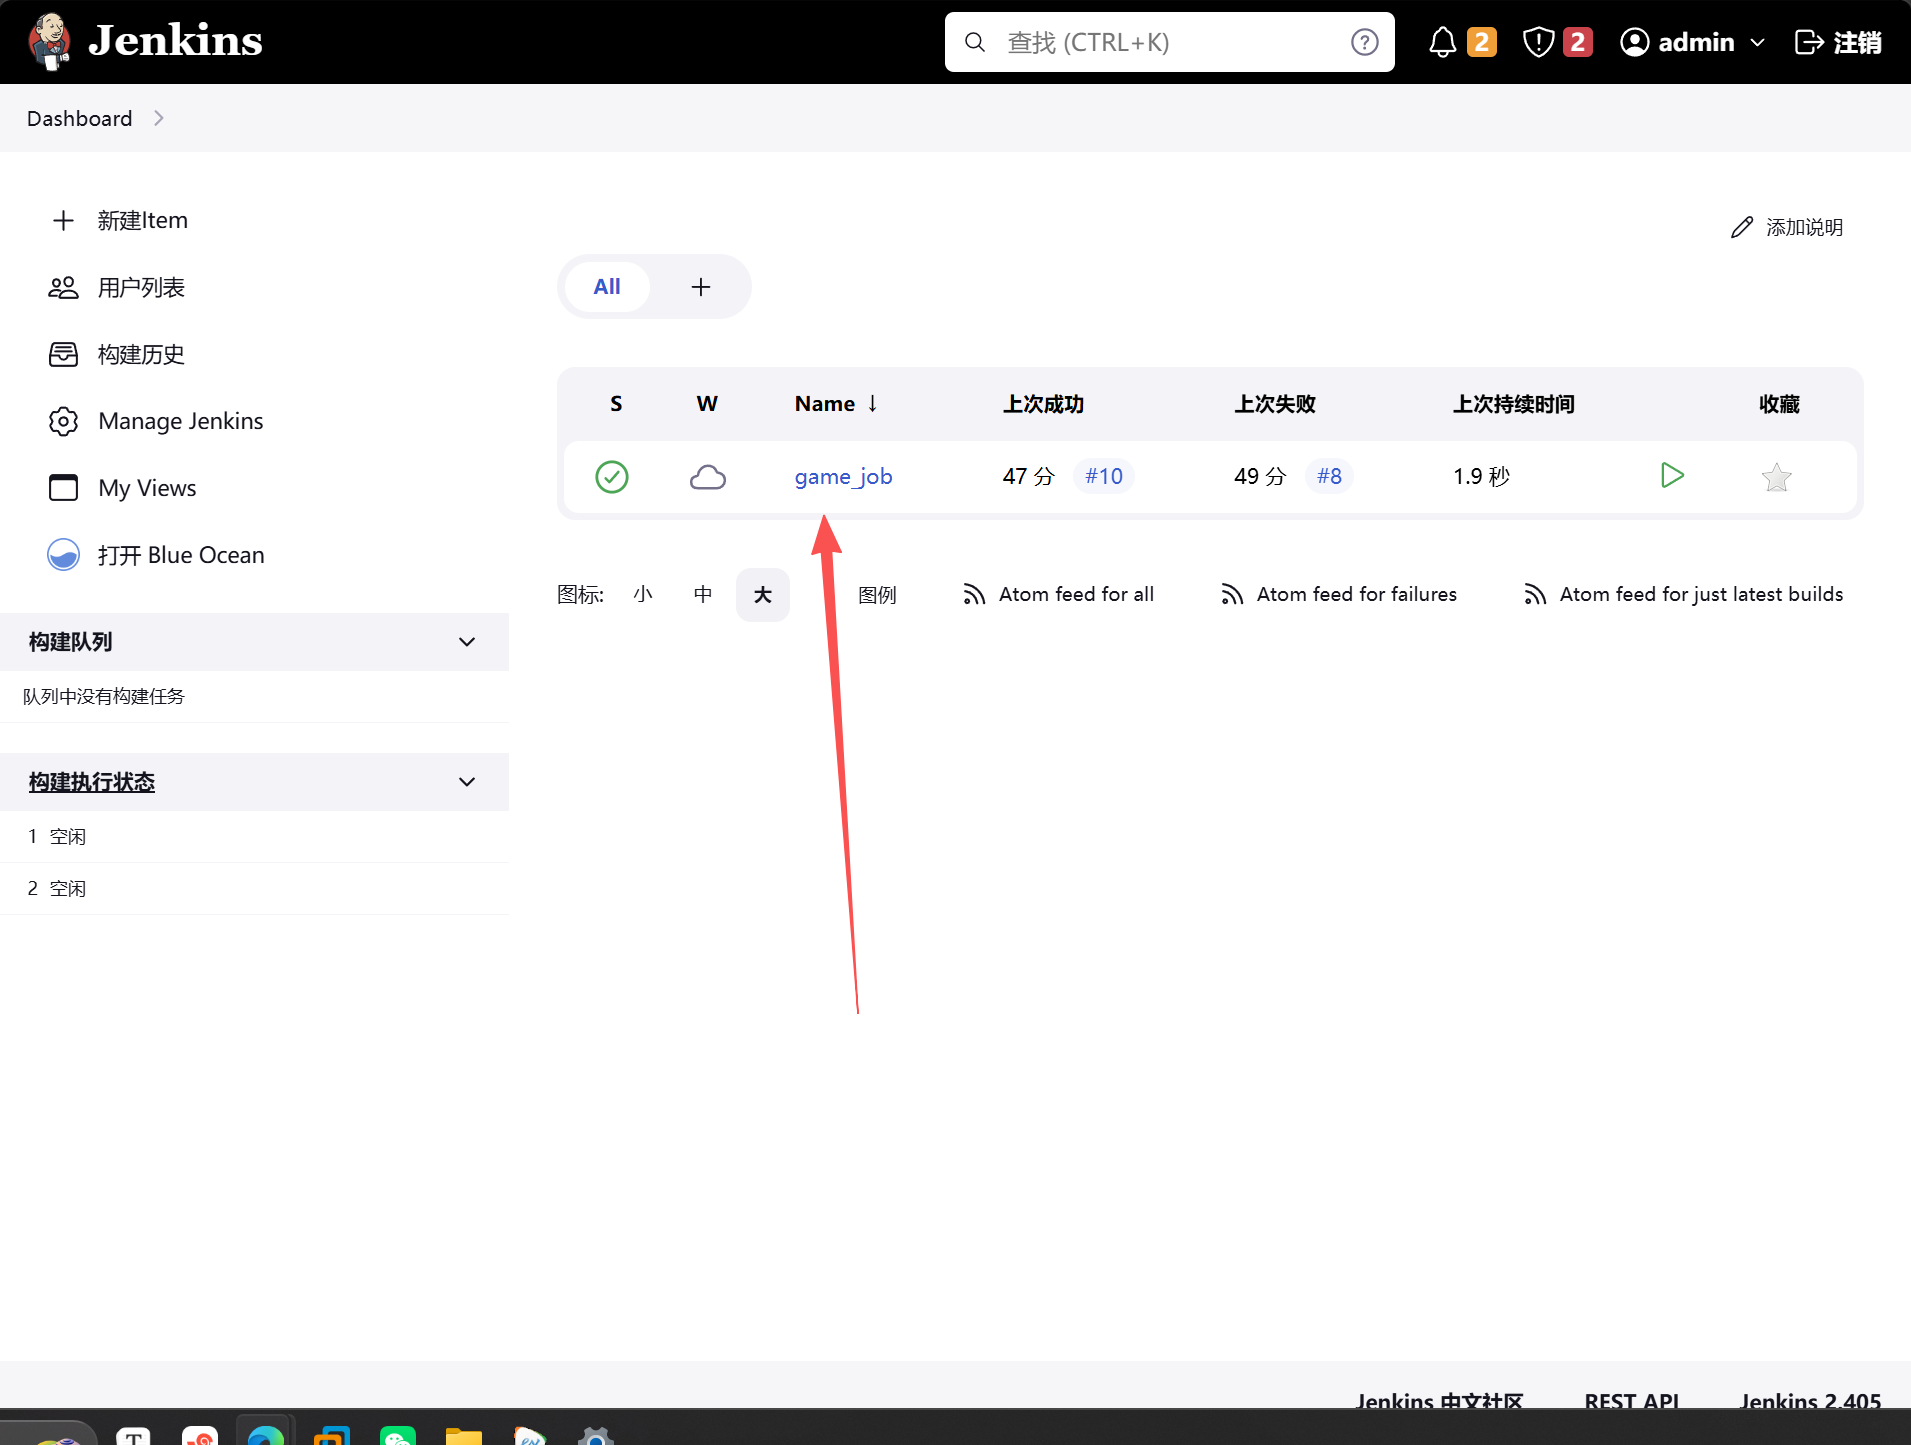
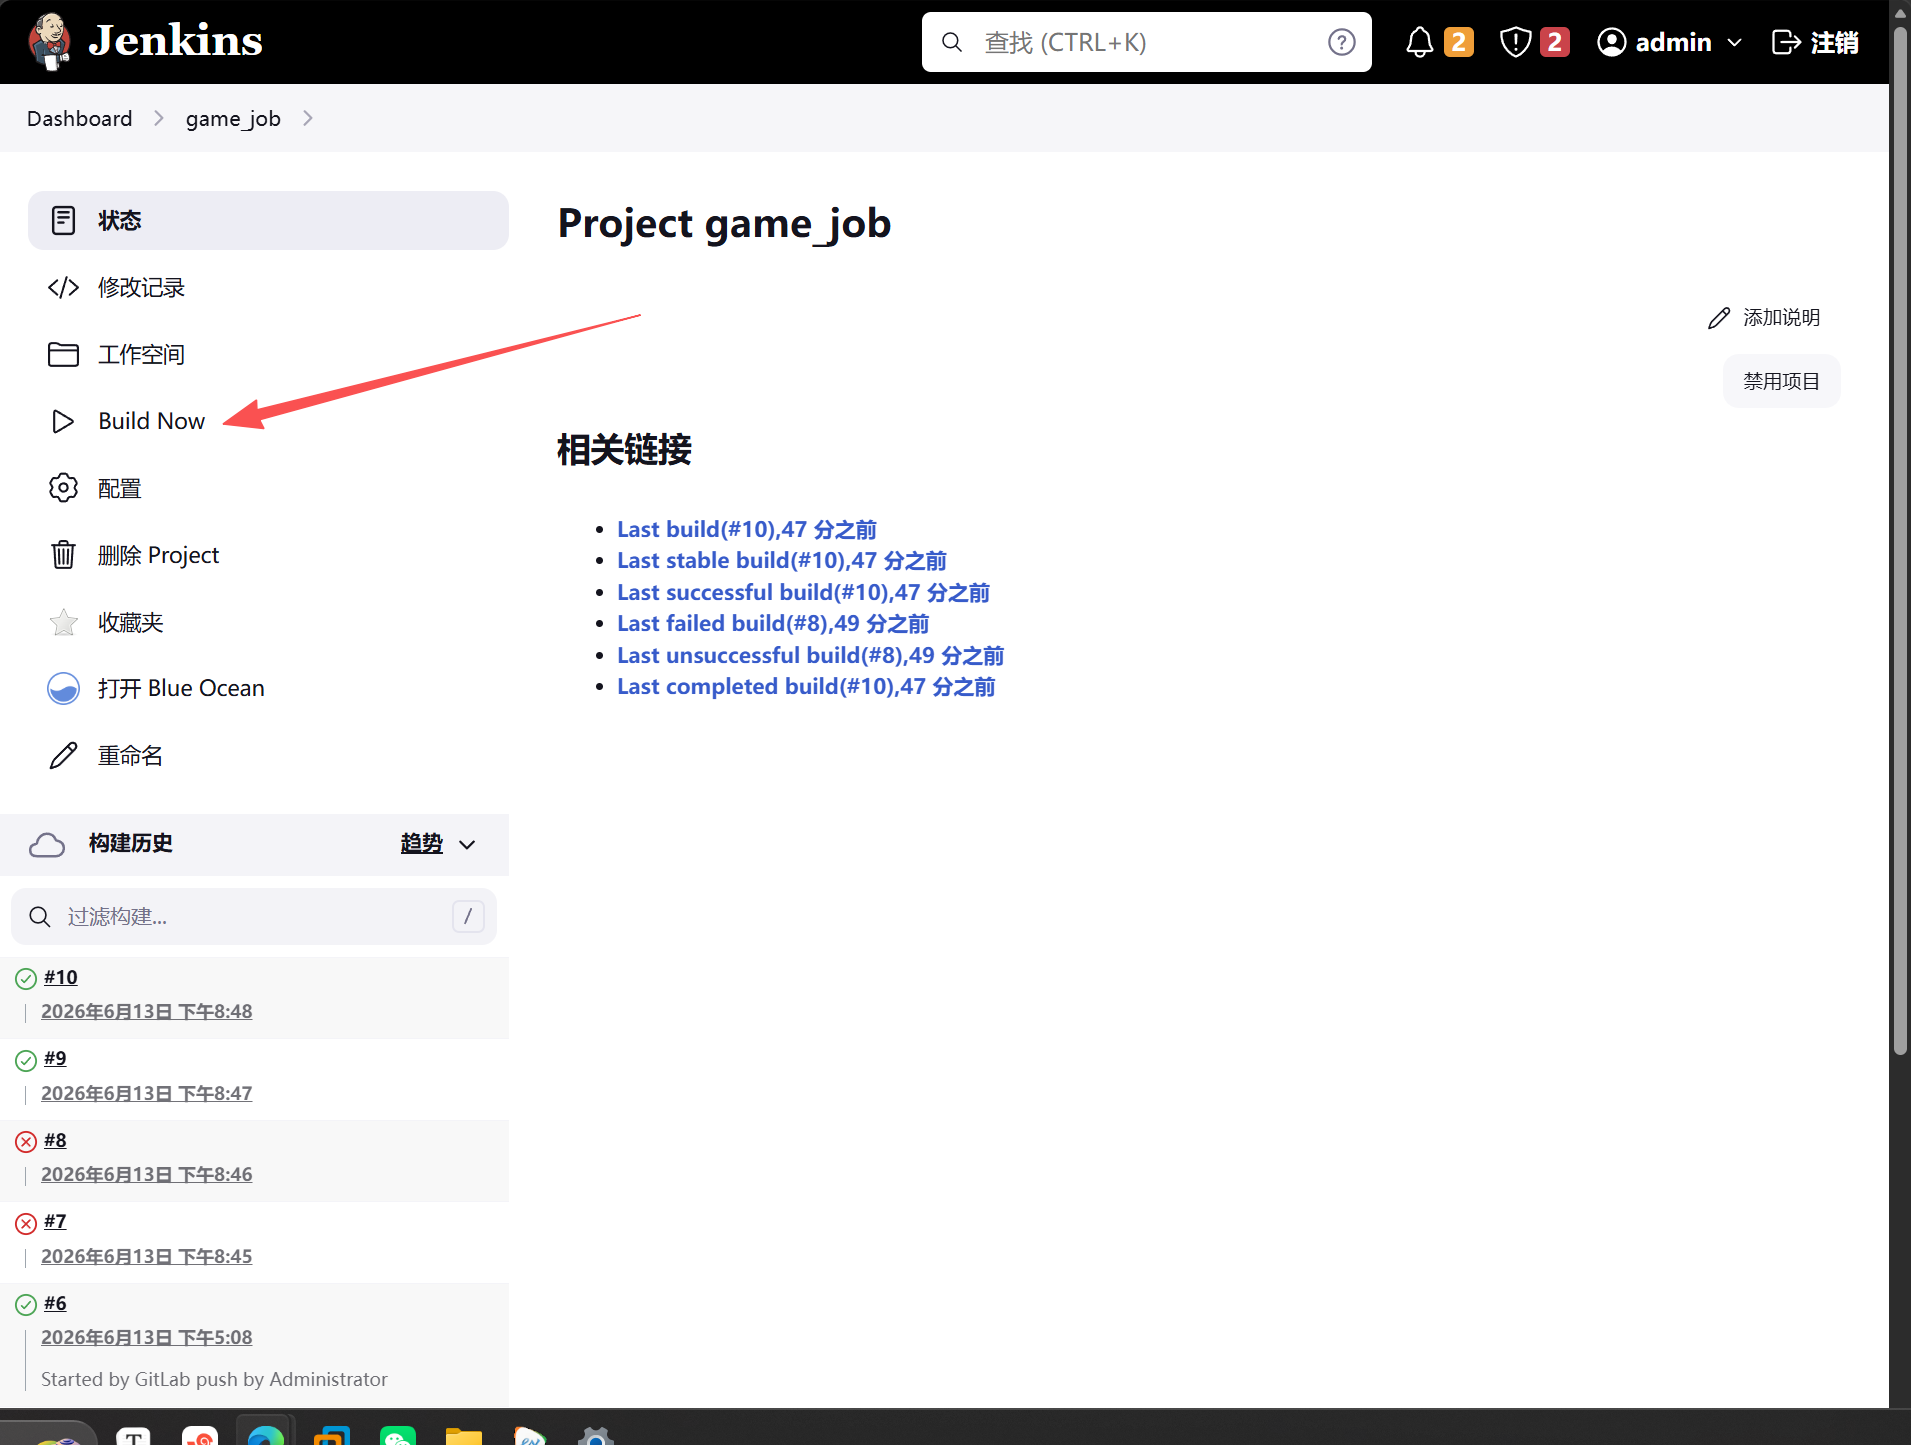
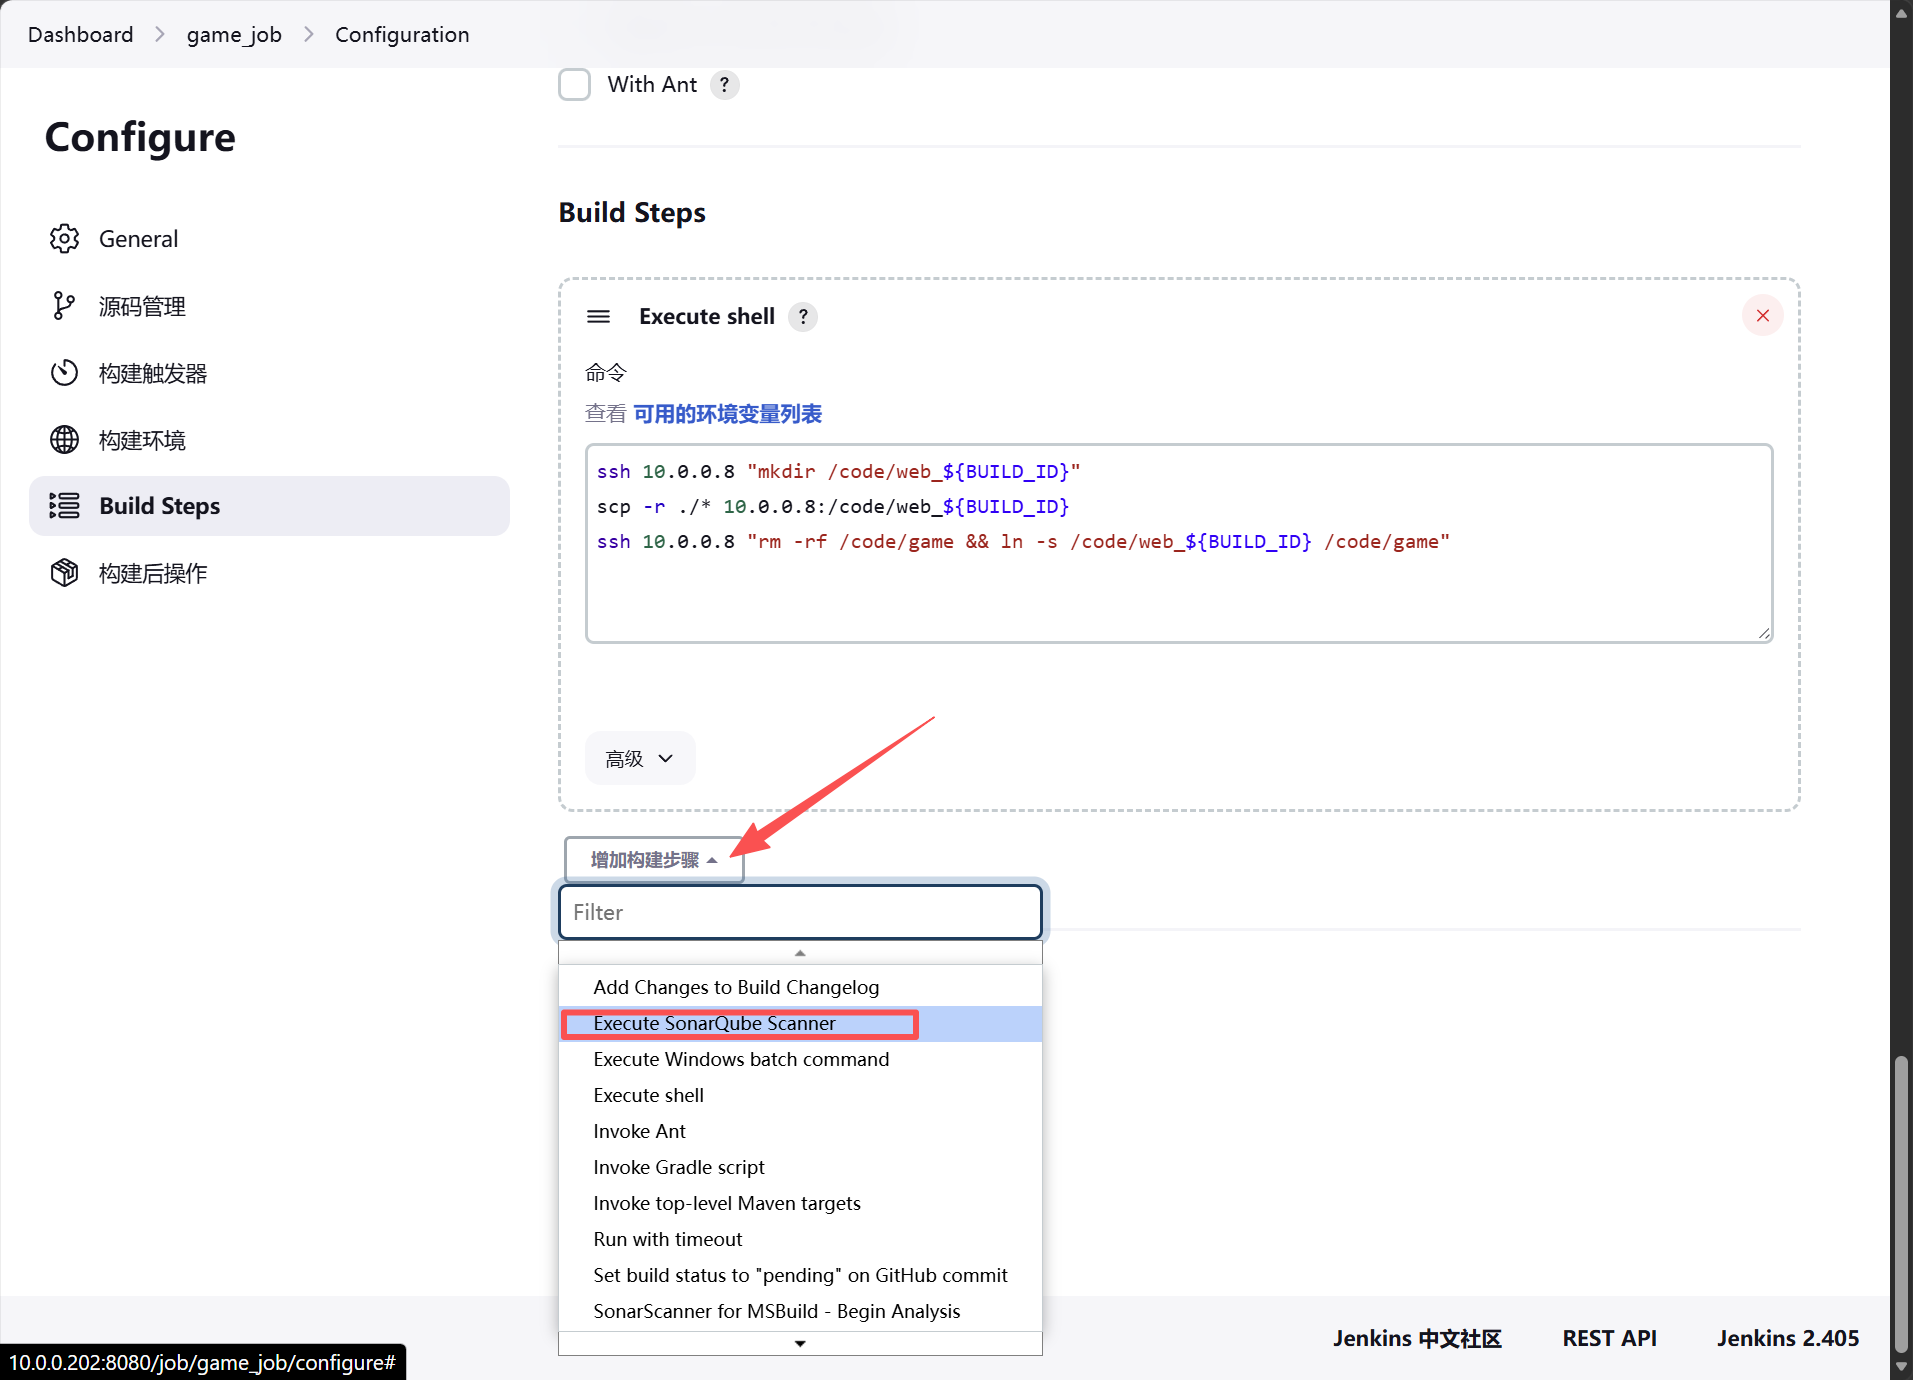
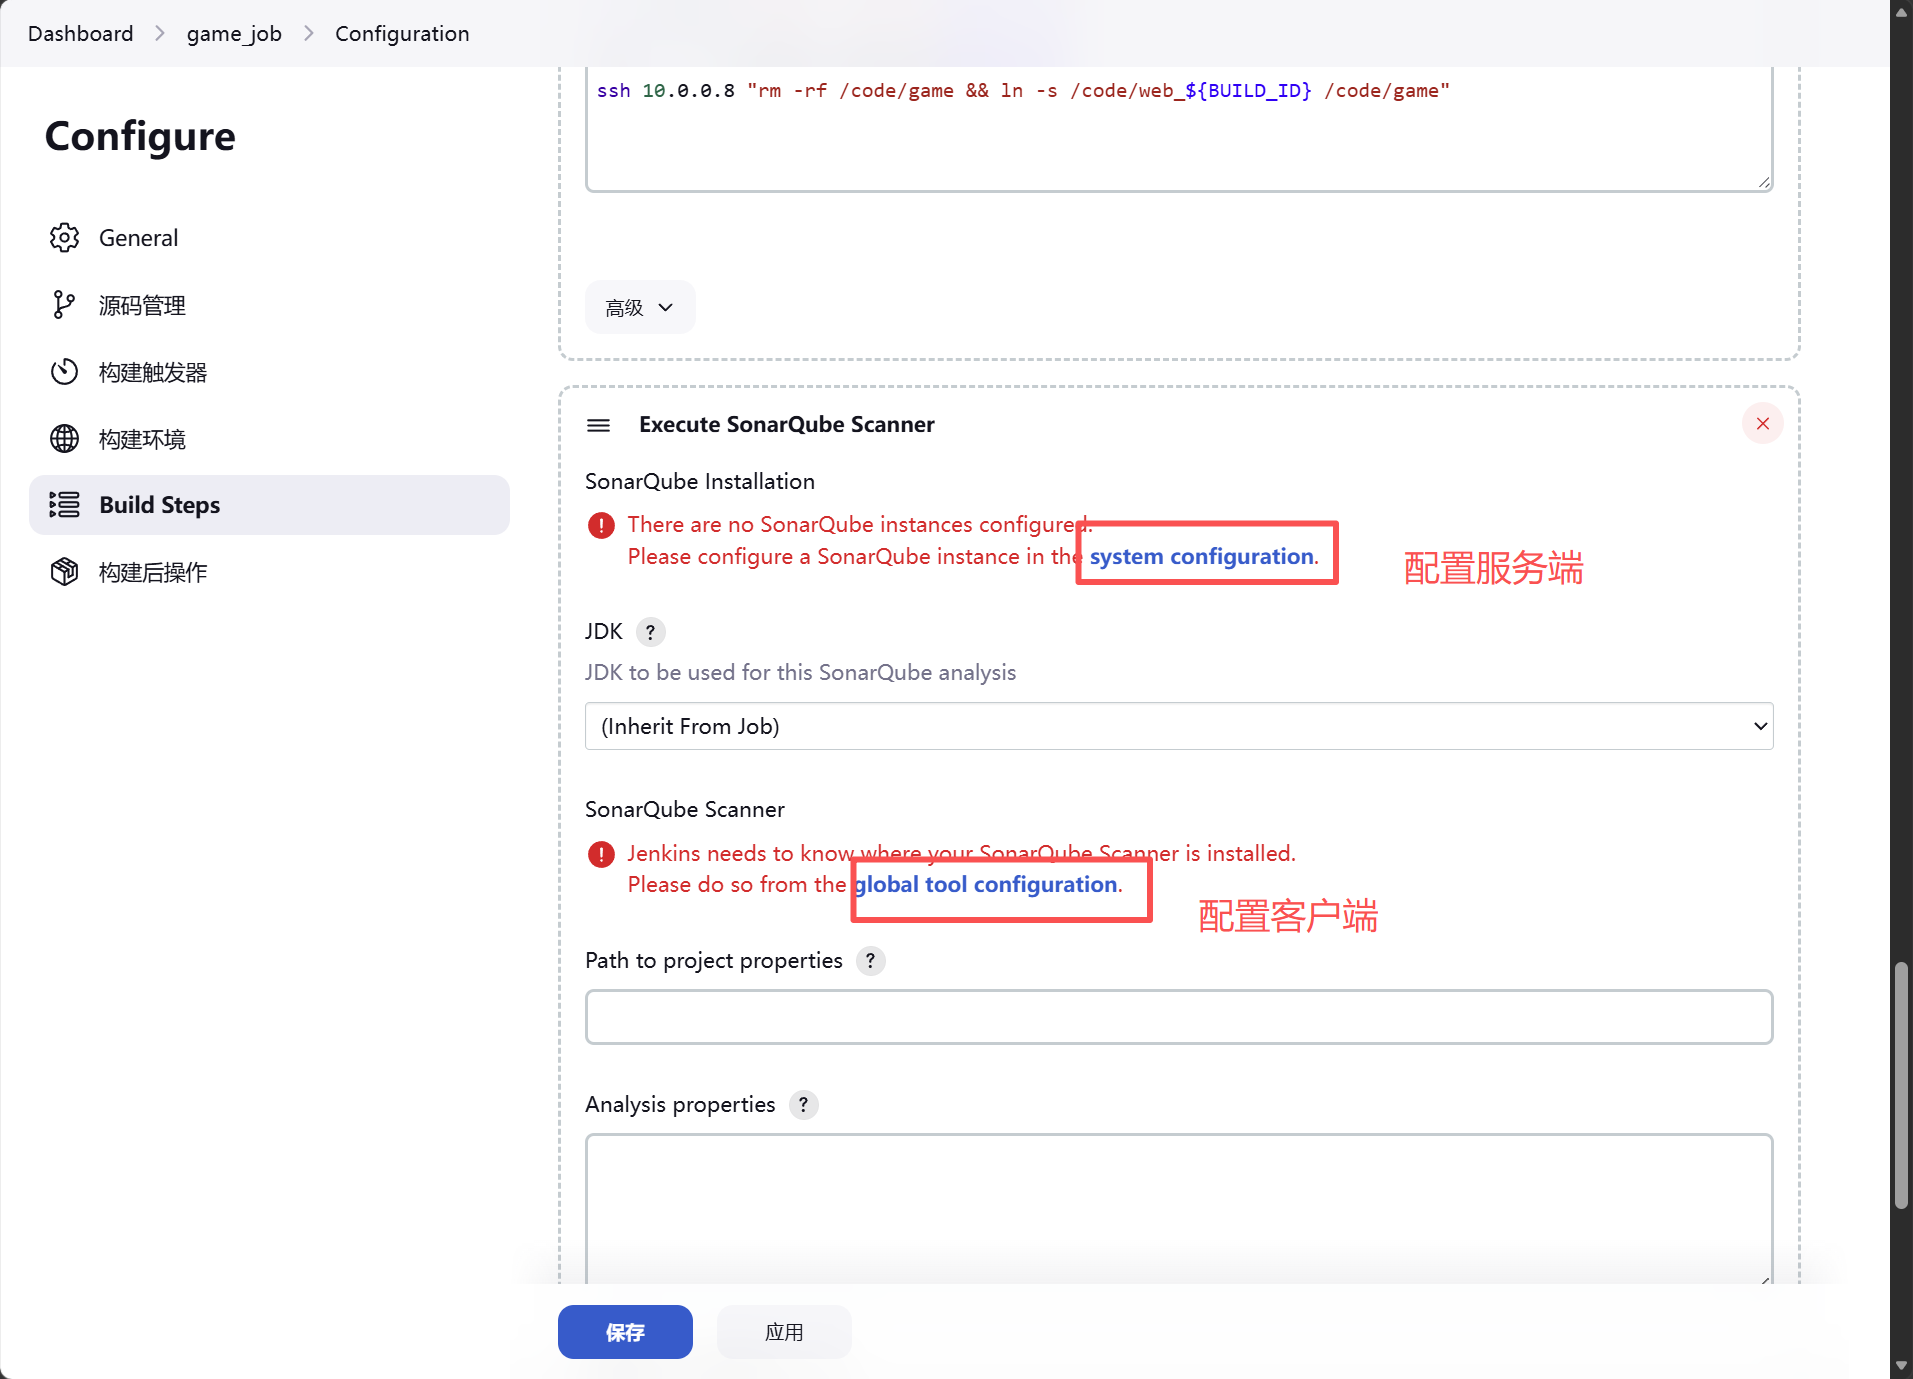
需要依次点击配置服务端和客户端的信息
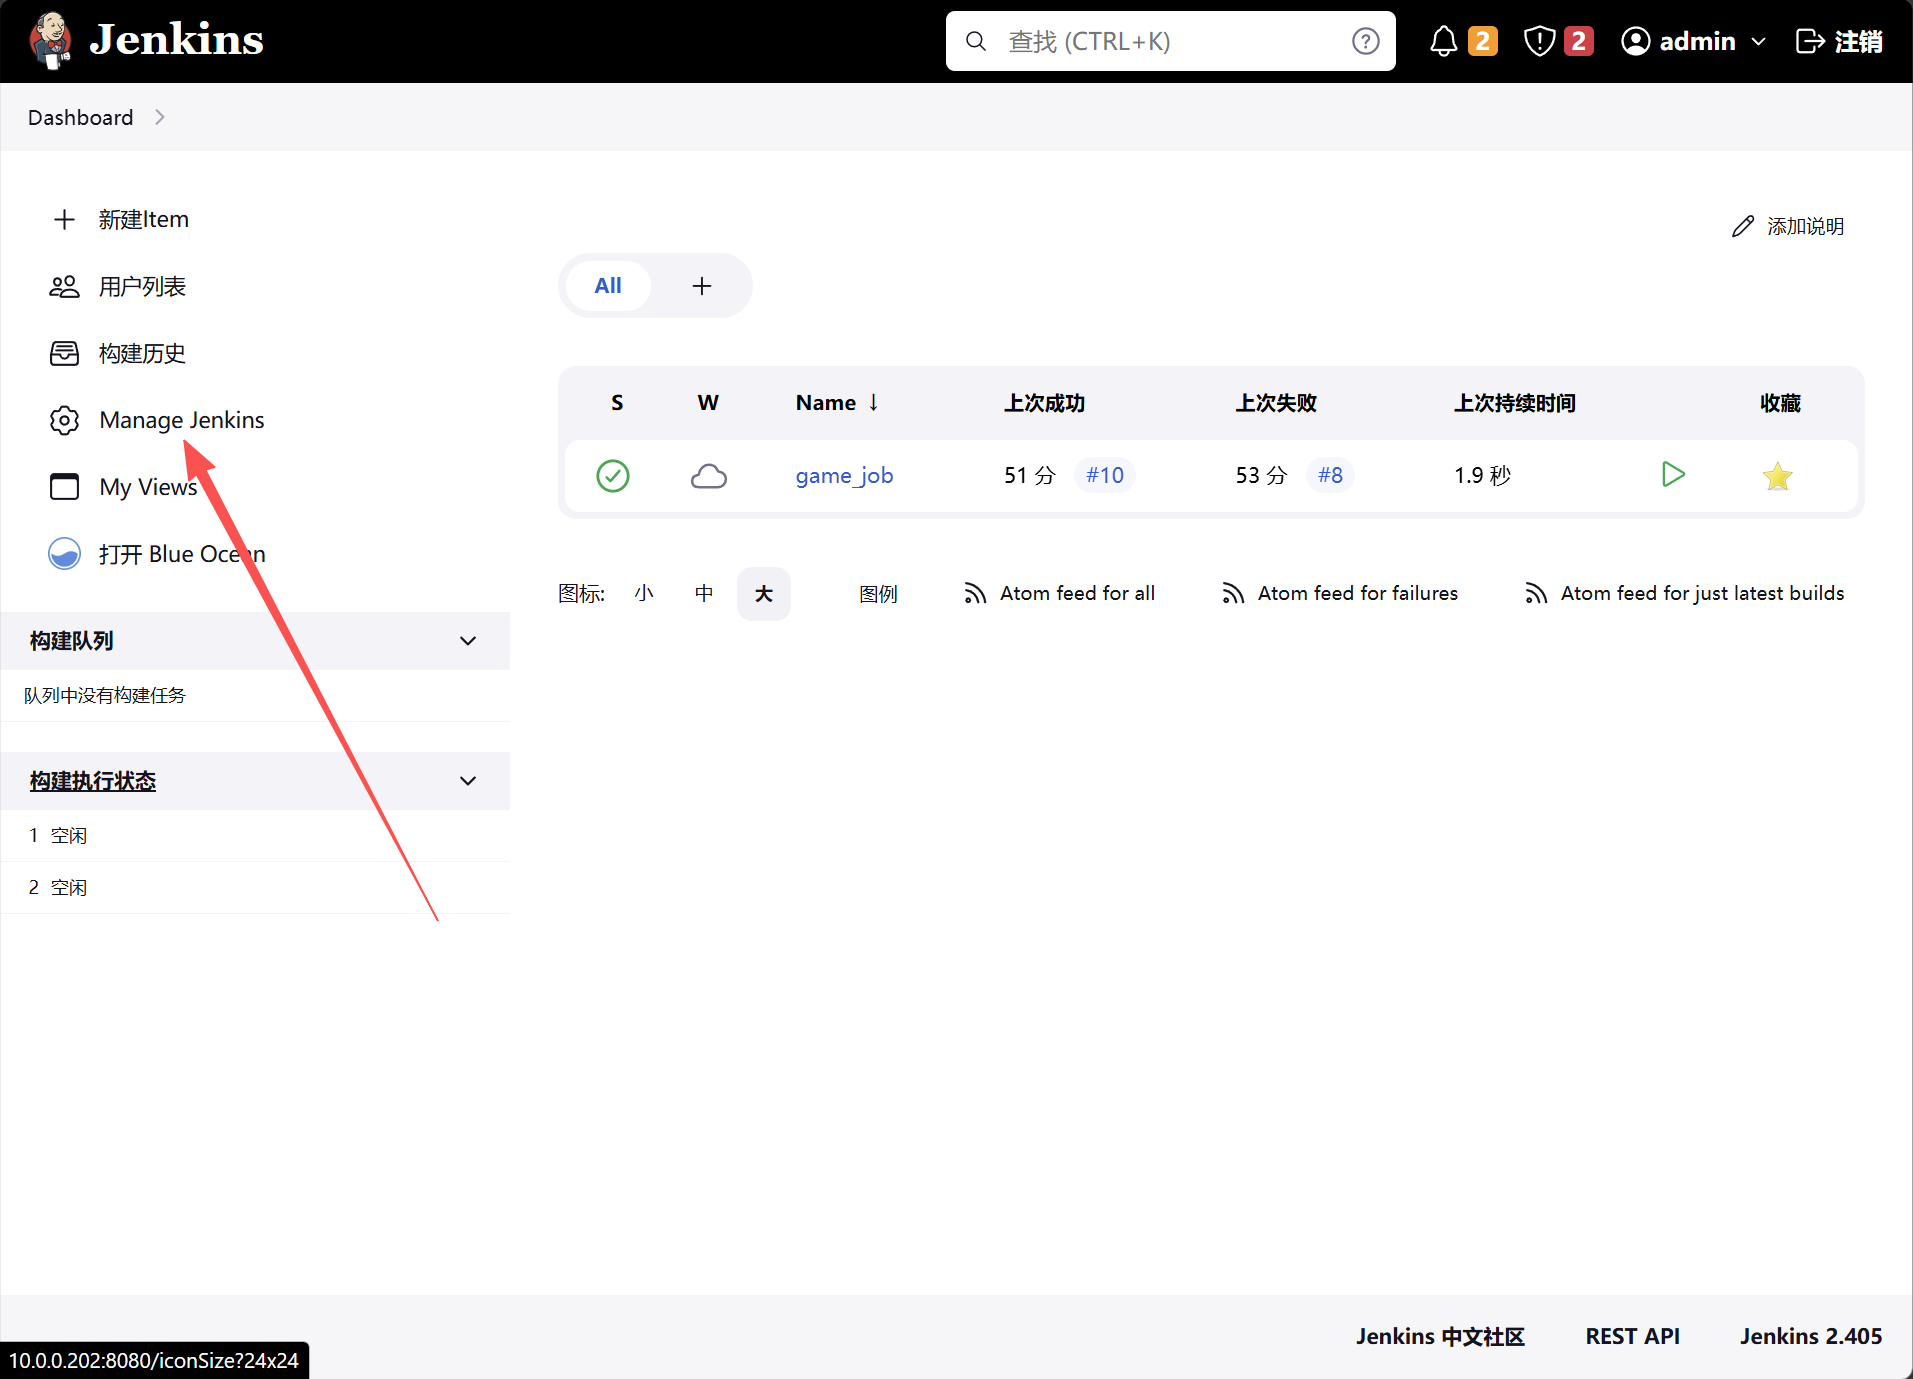
如果回退到jenkins页面是找不到服务端和客户端的,可以通过以下的路径找到
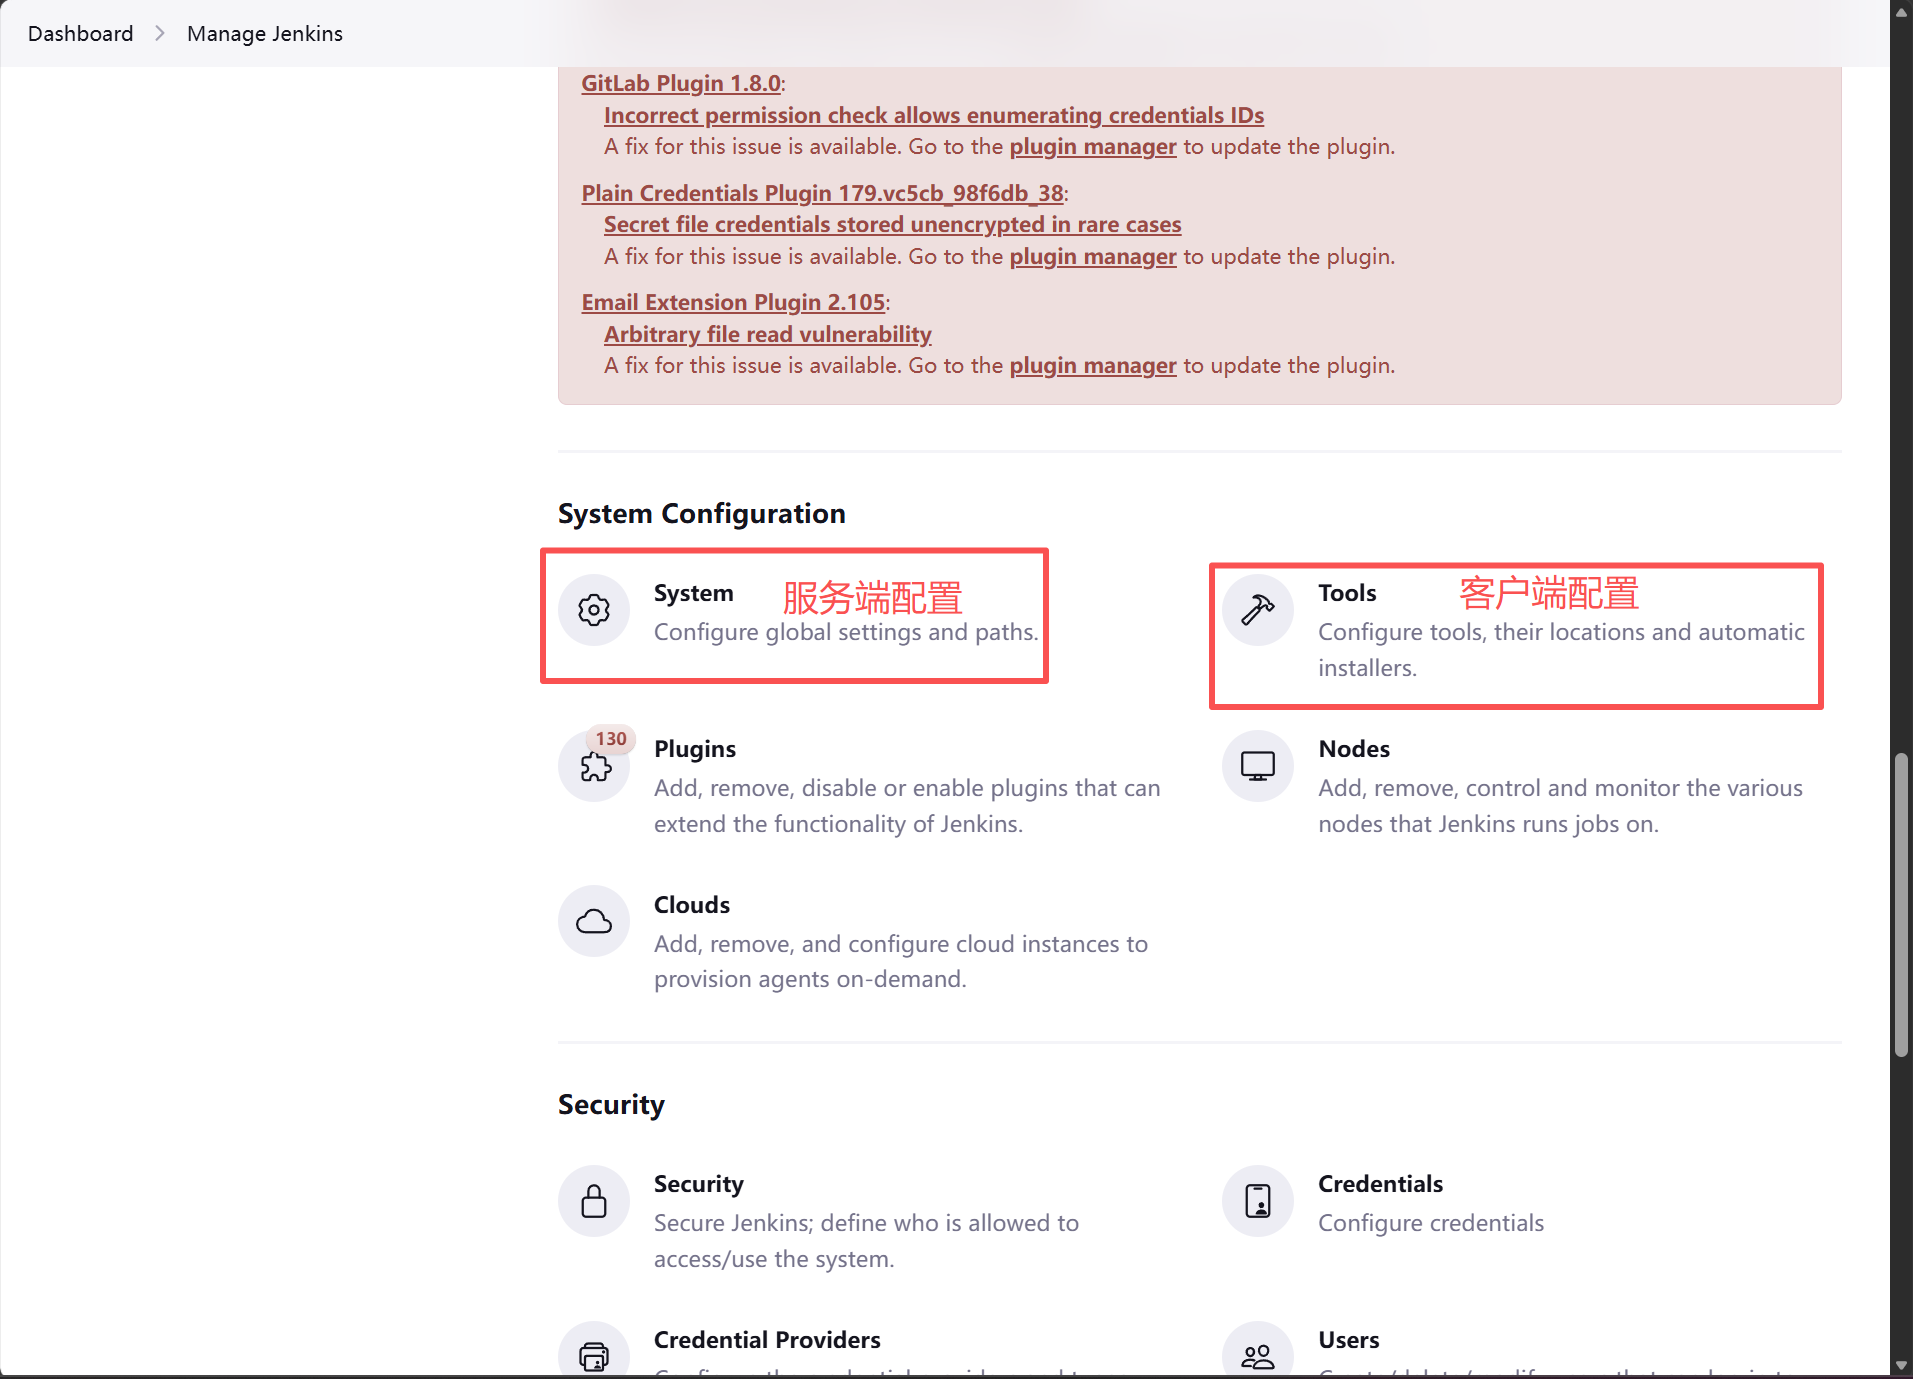
先配置服务端的信息
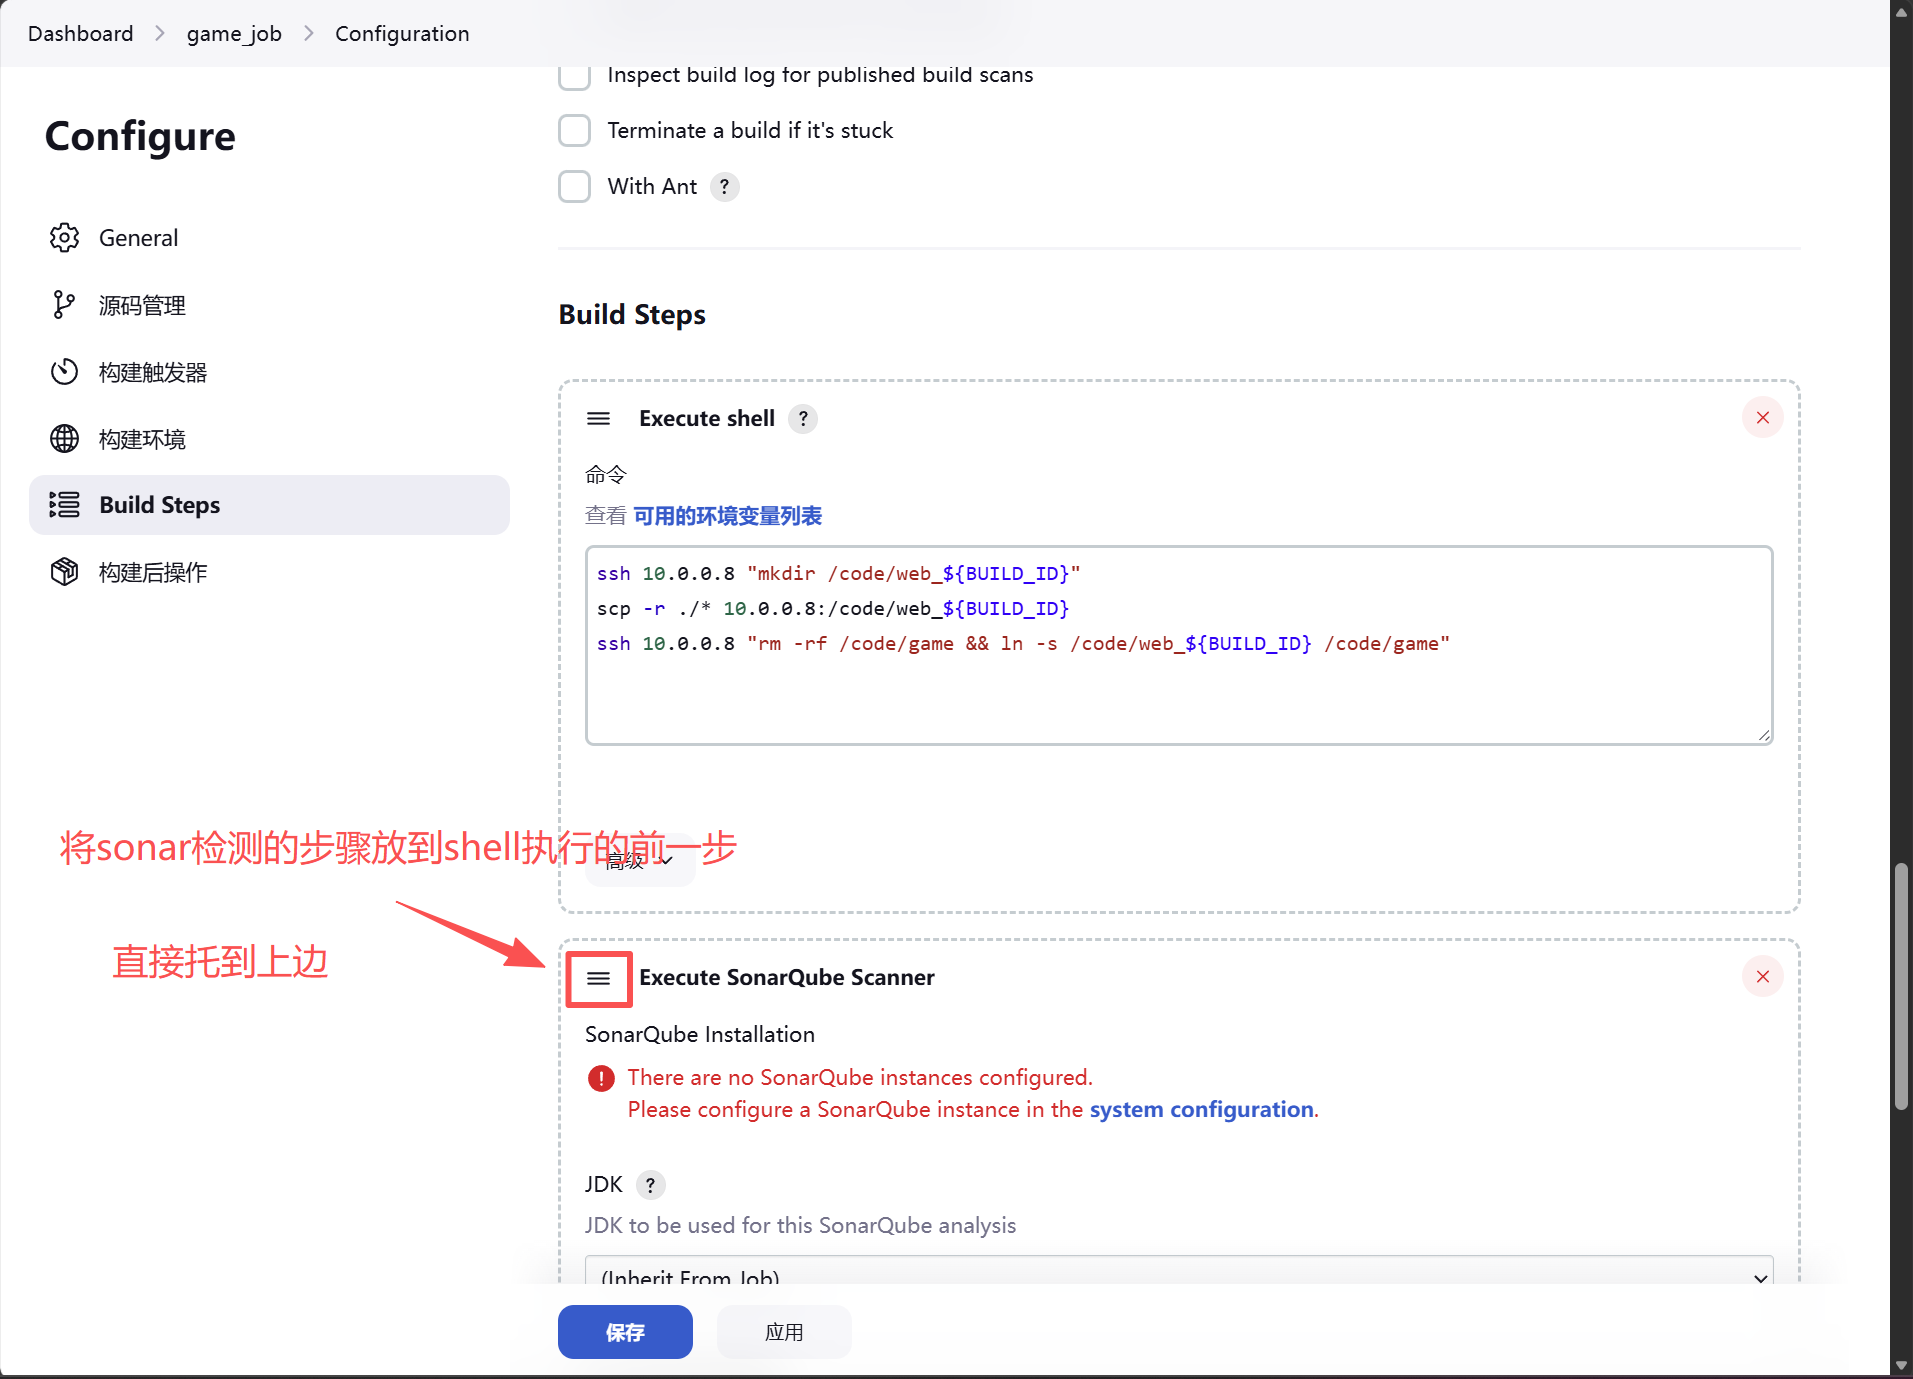
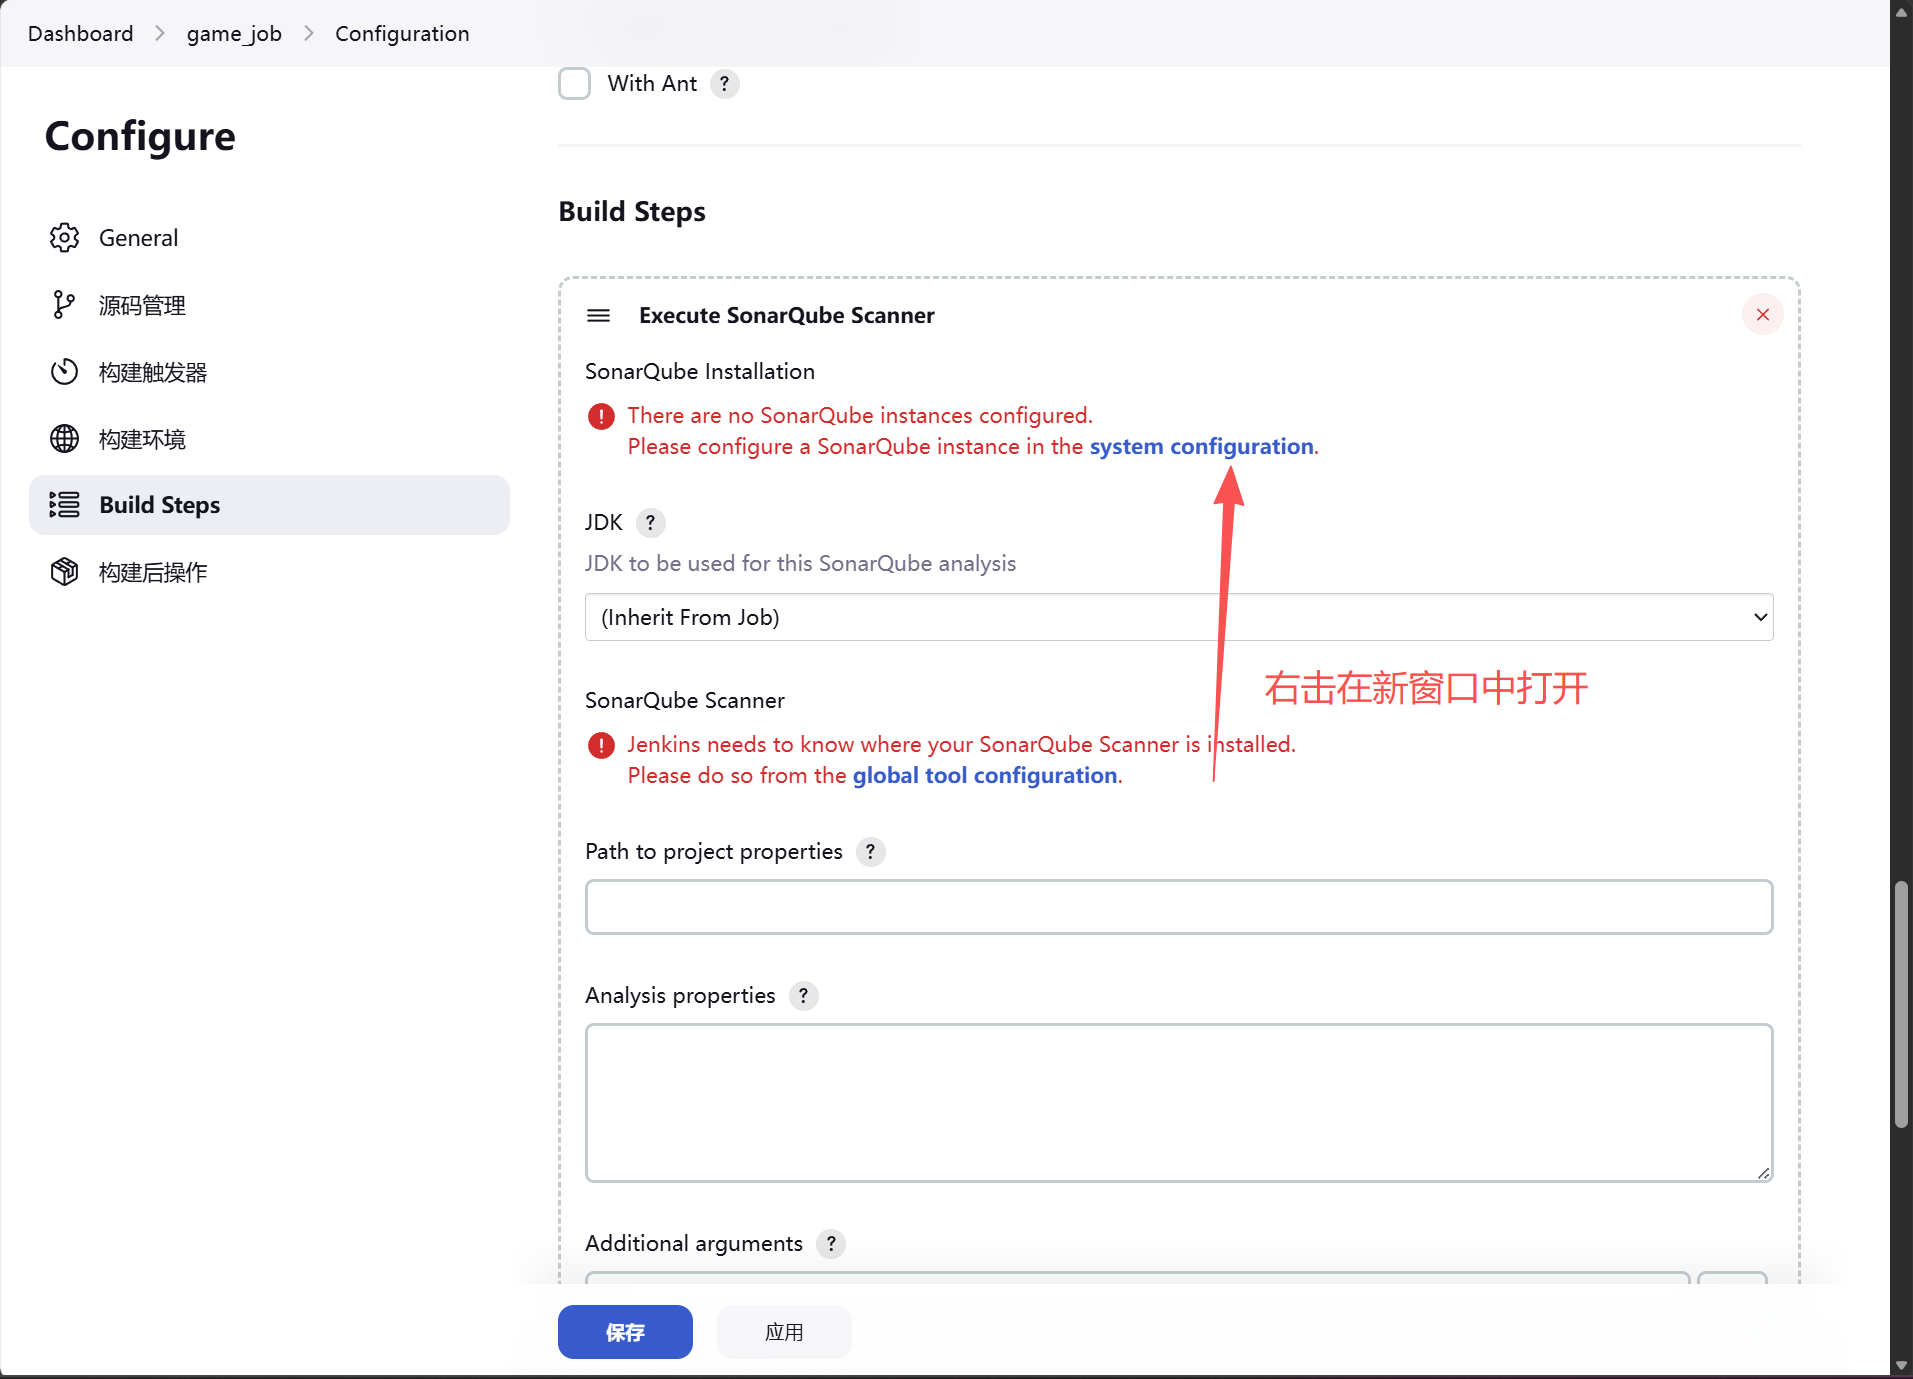
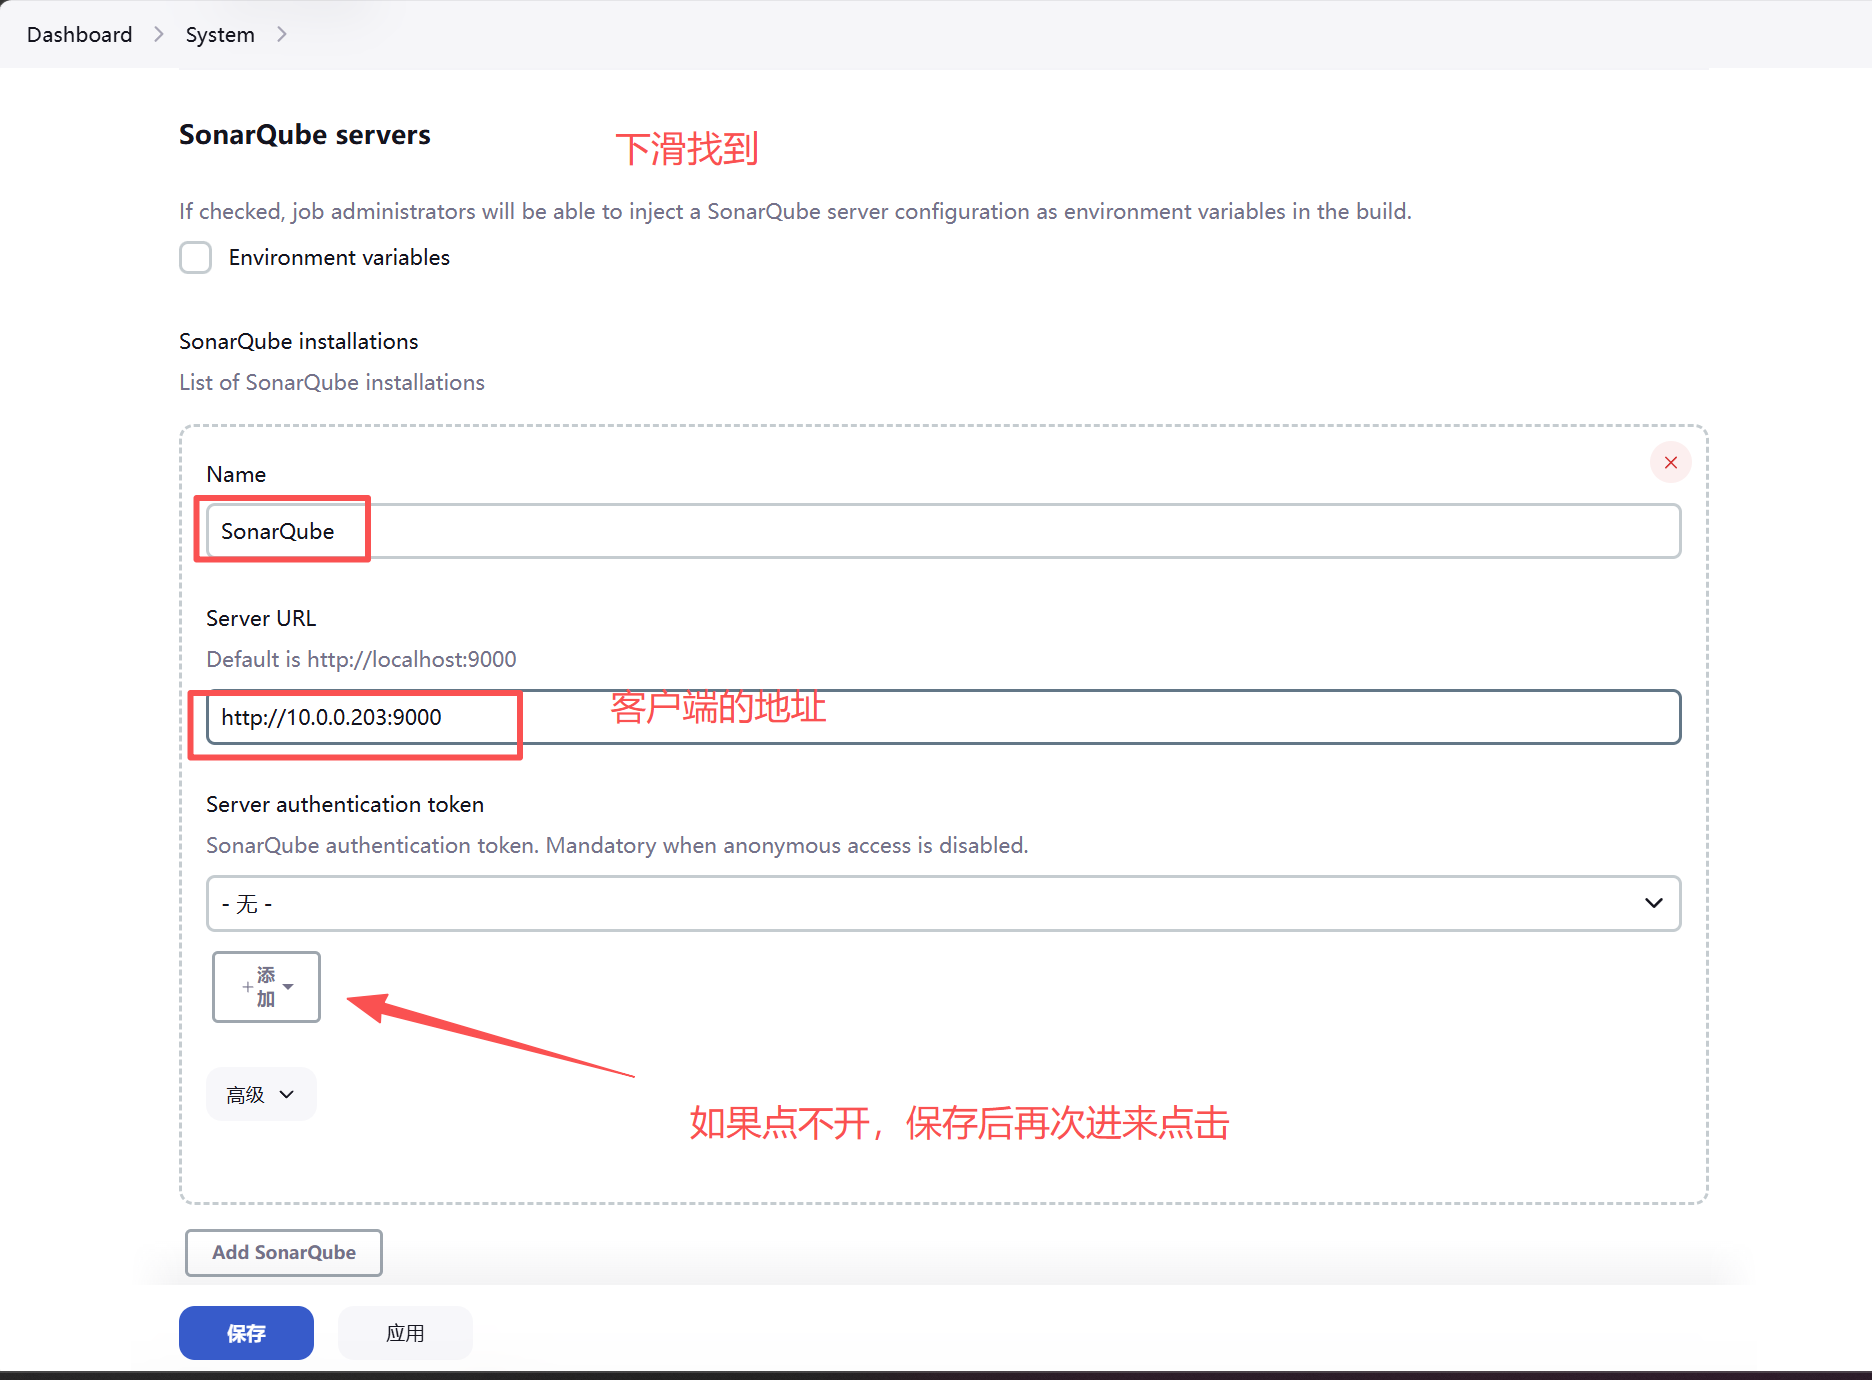
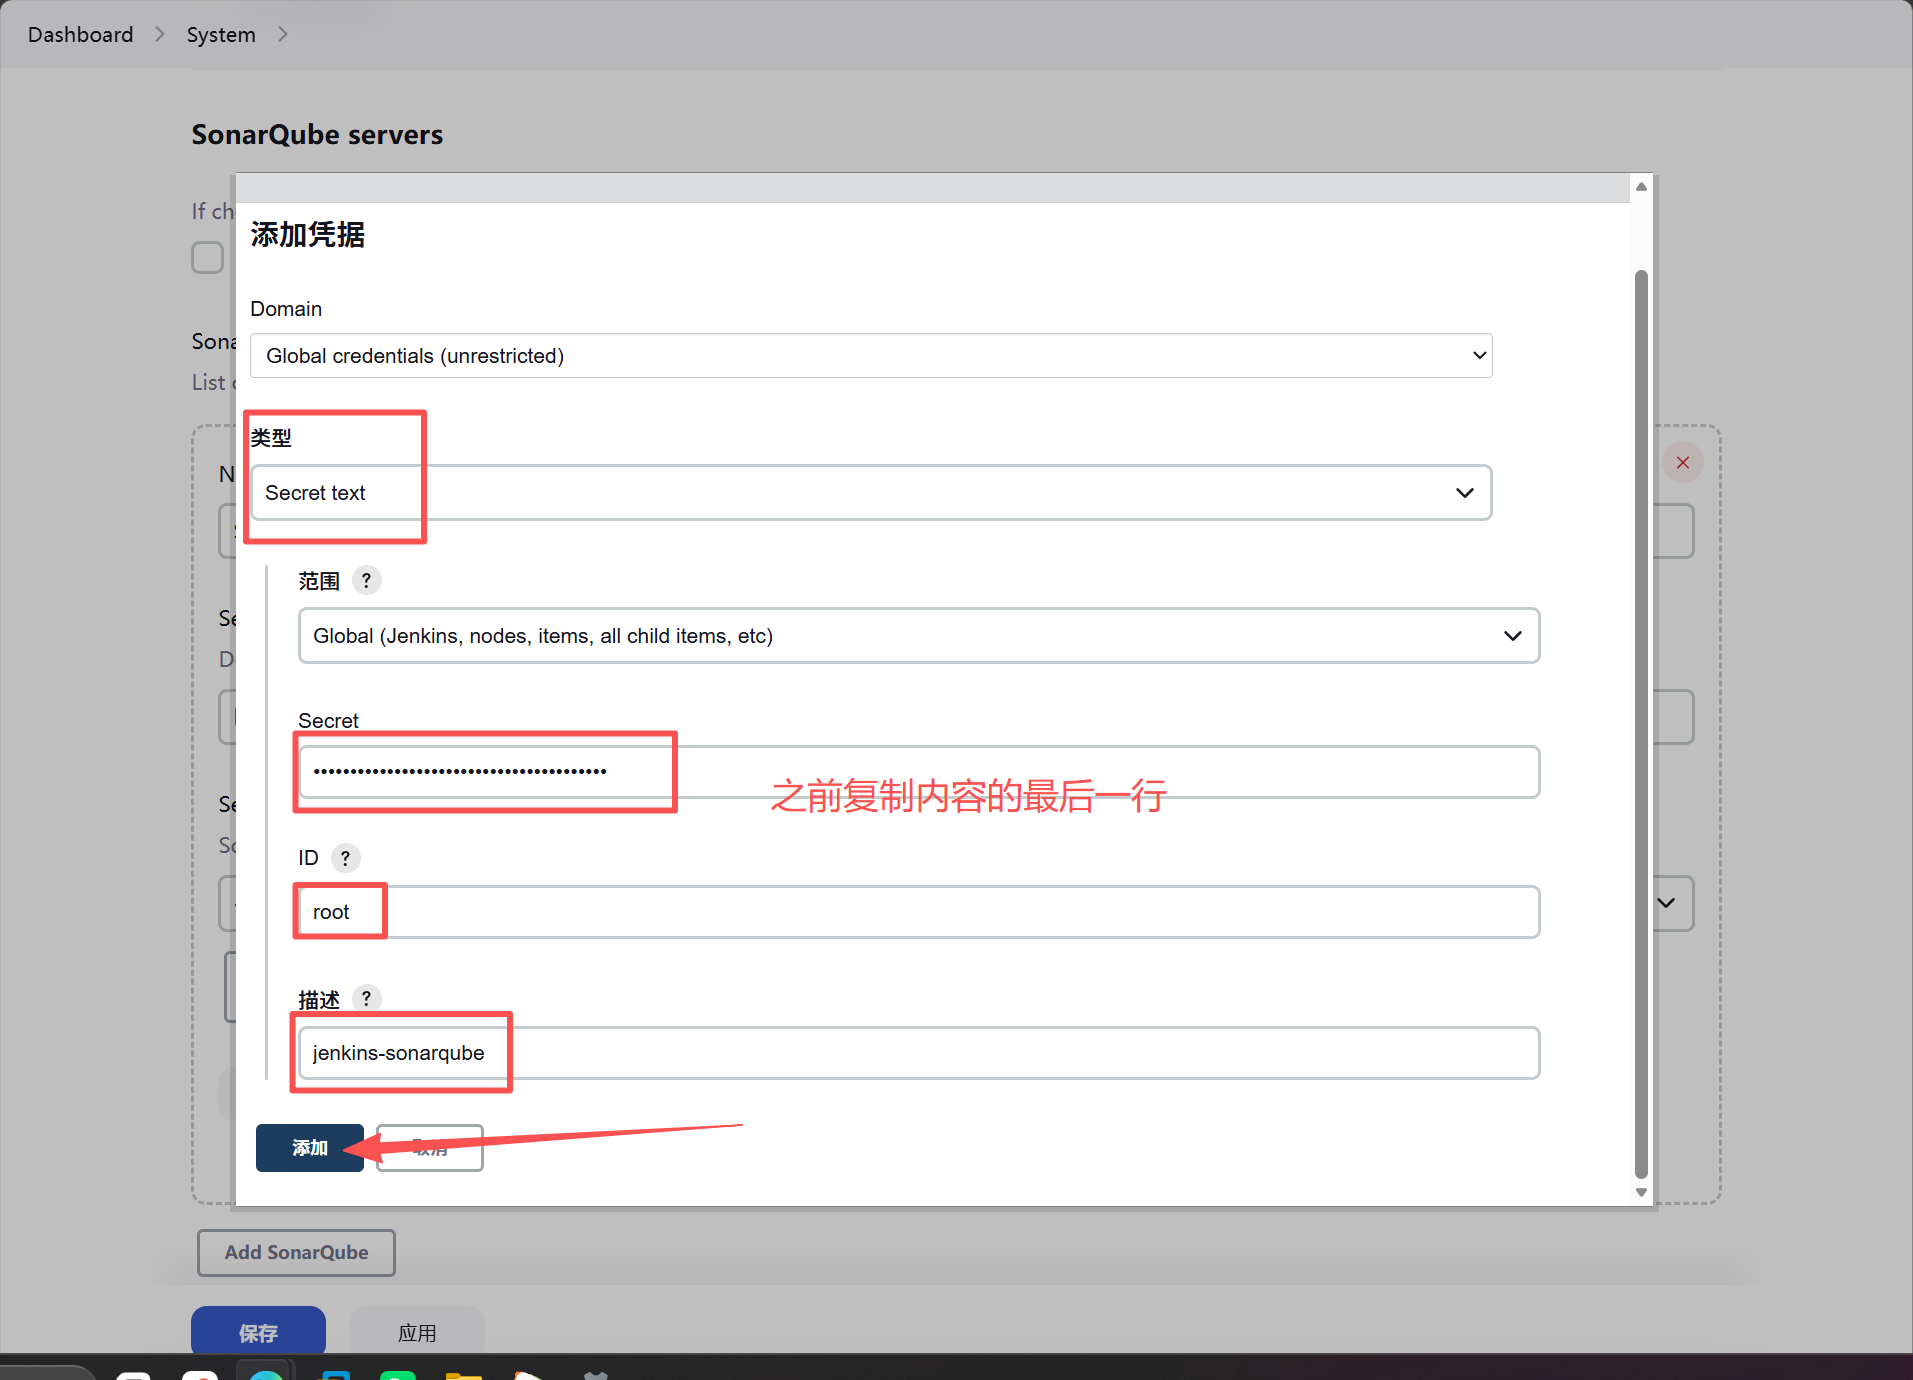
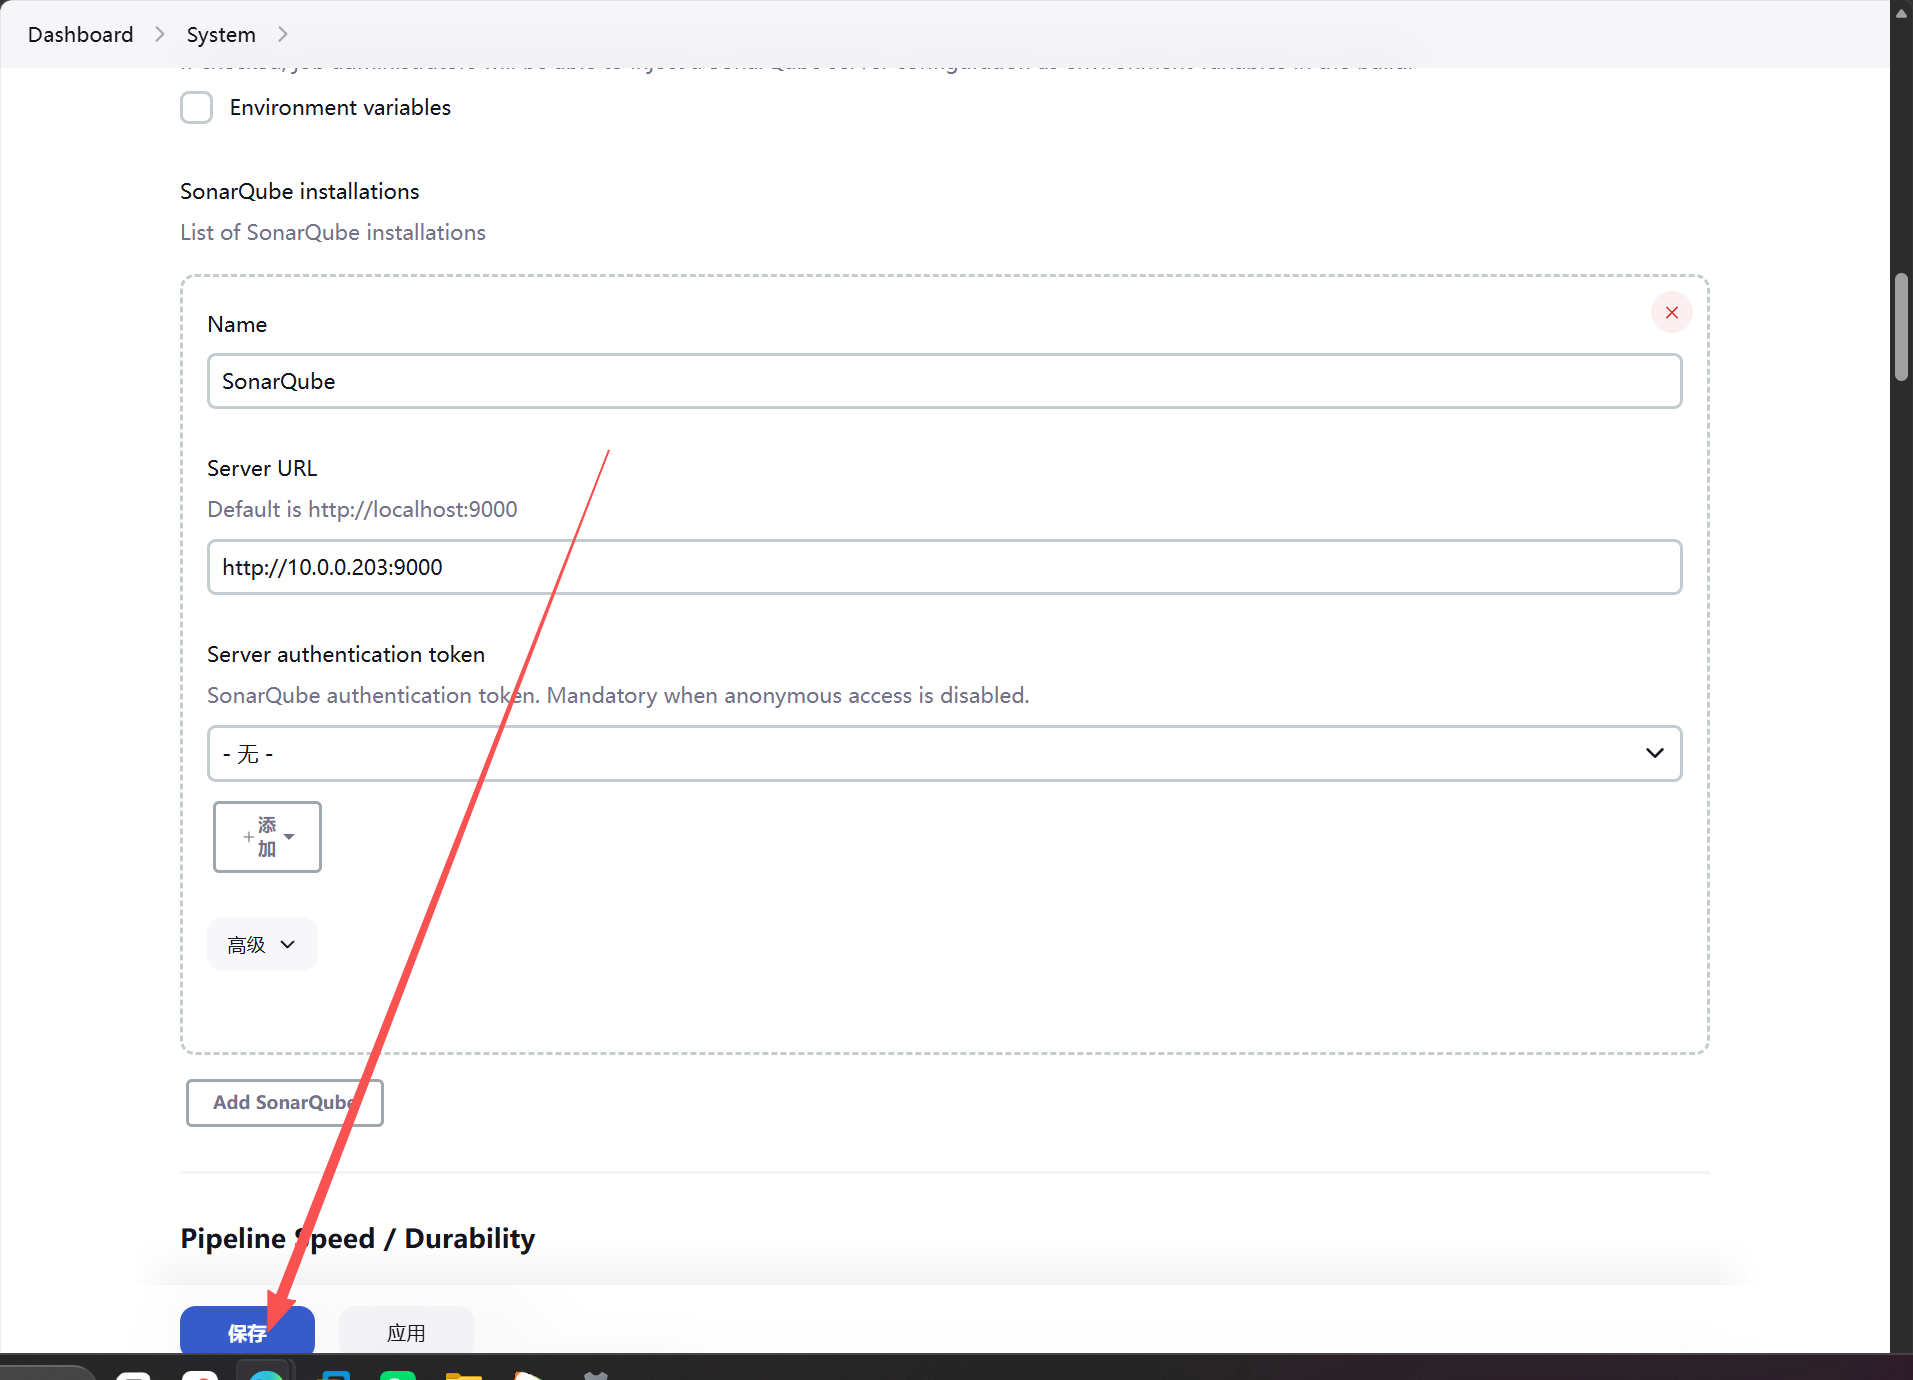
配置客户端信息
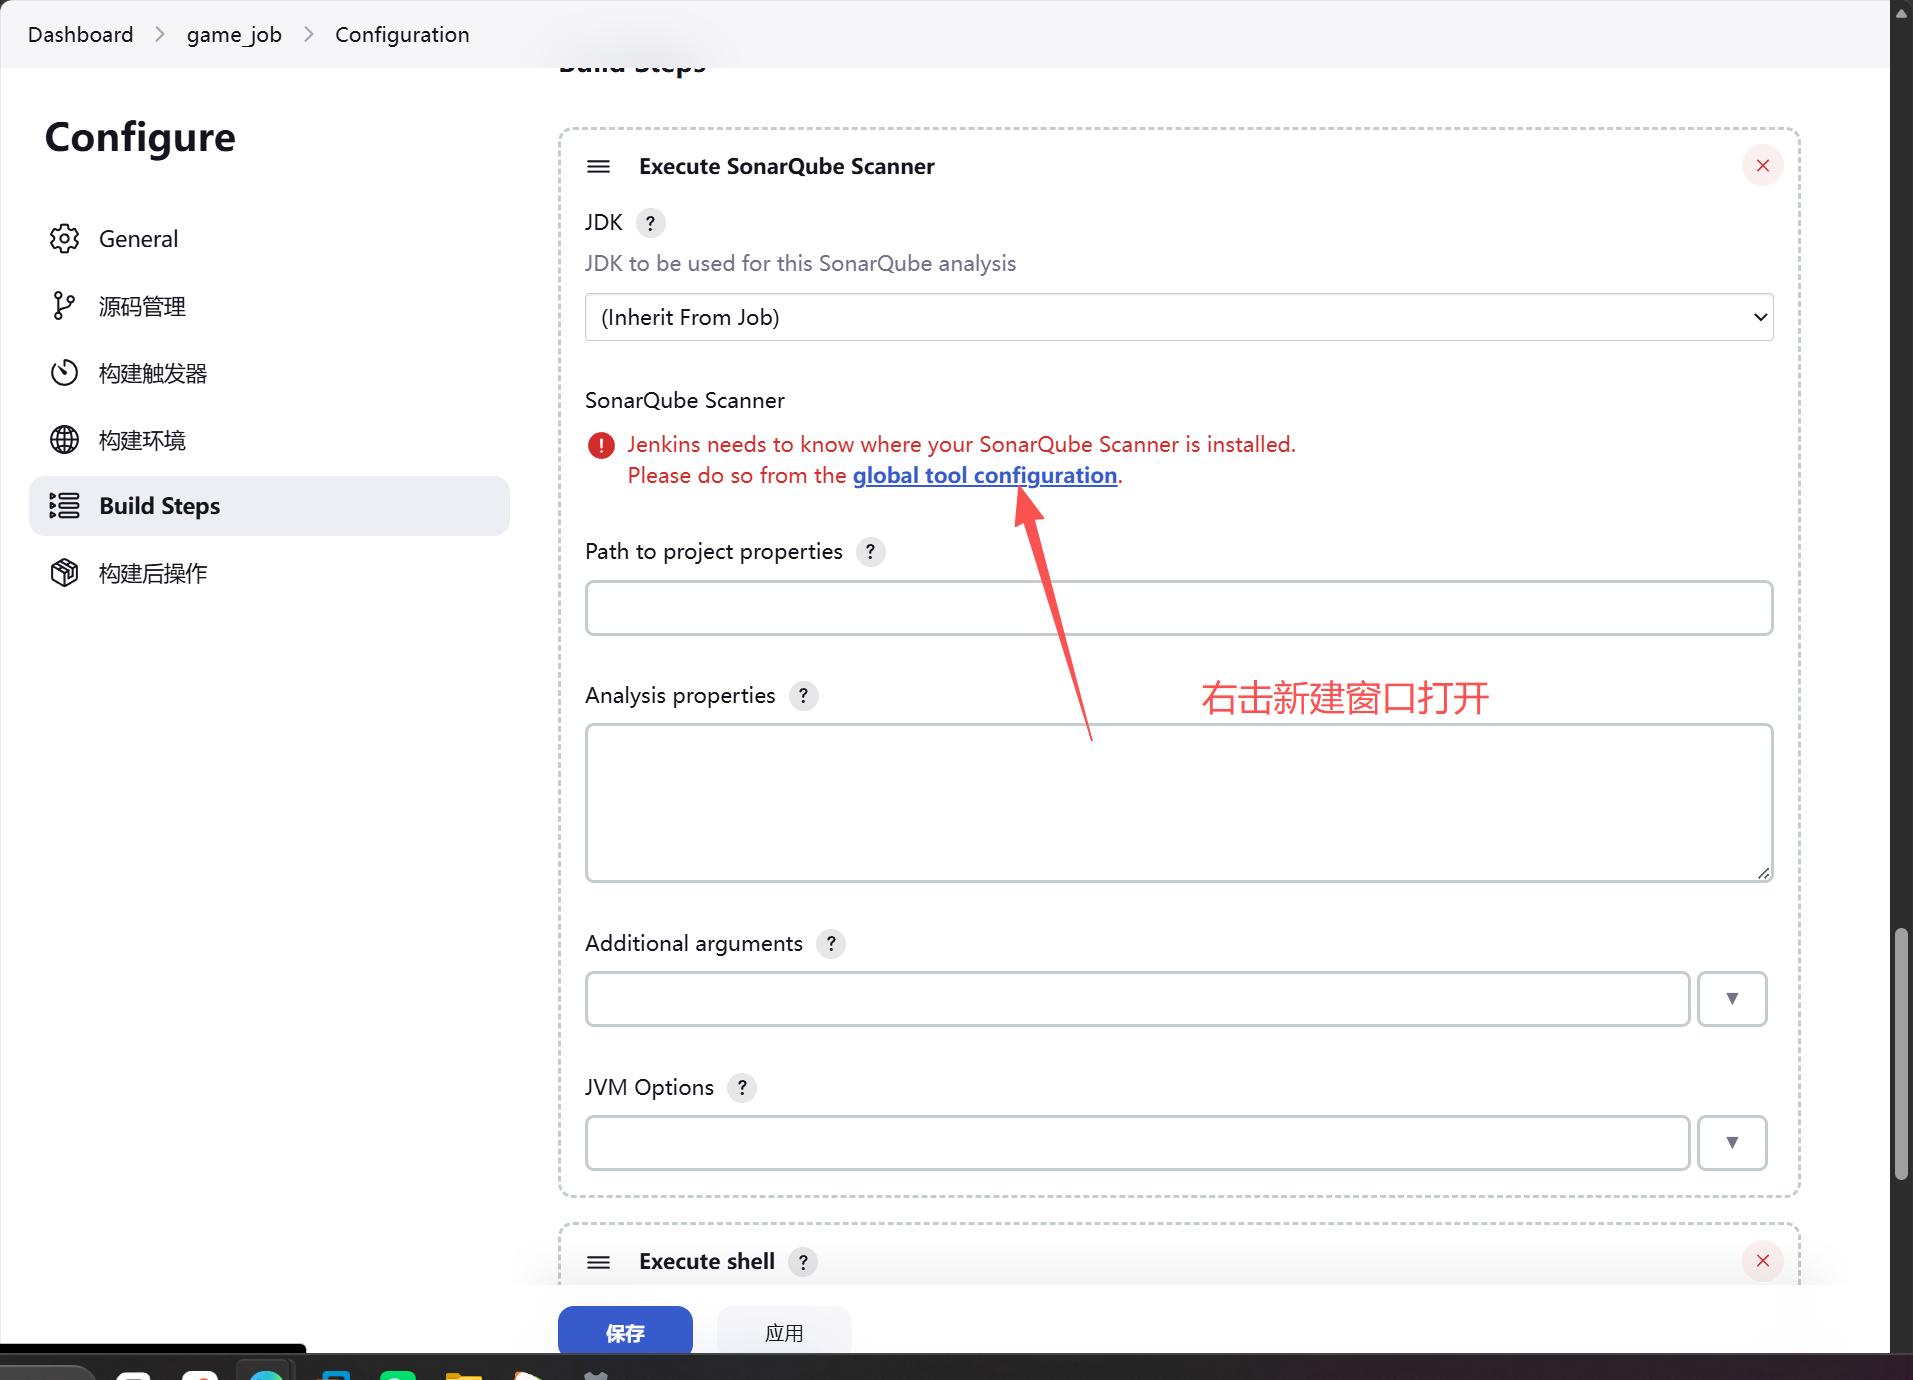
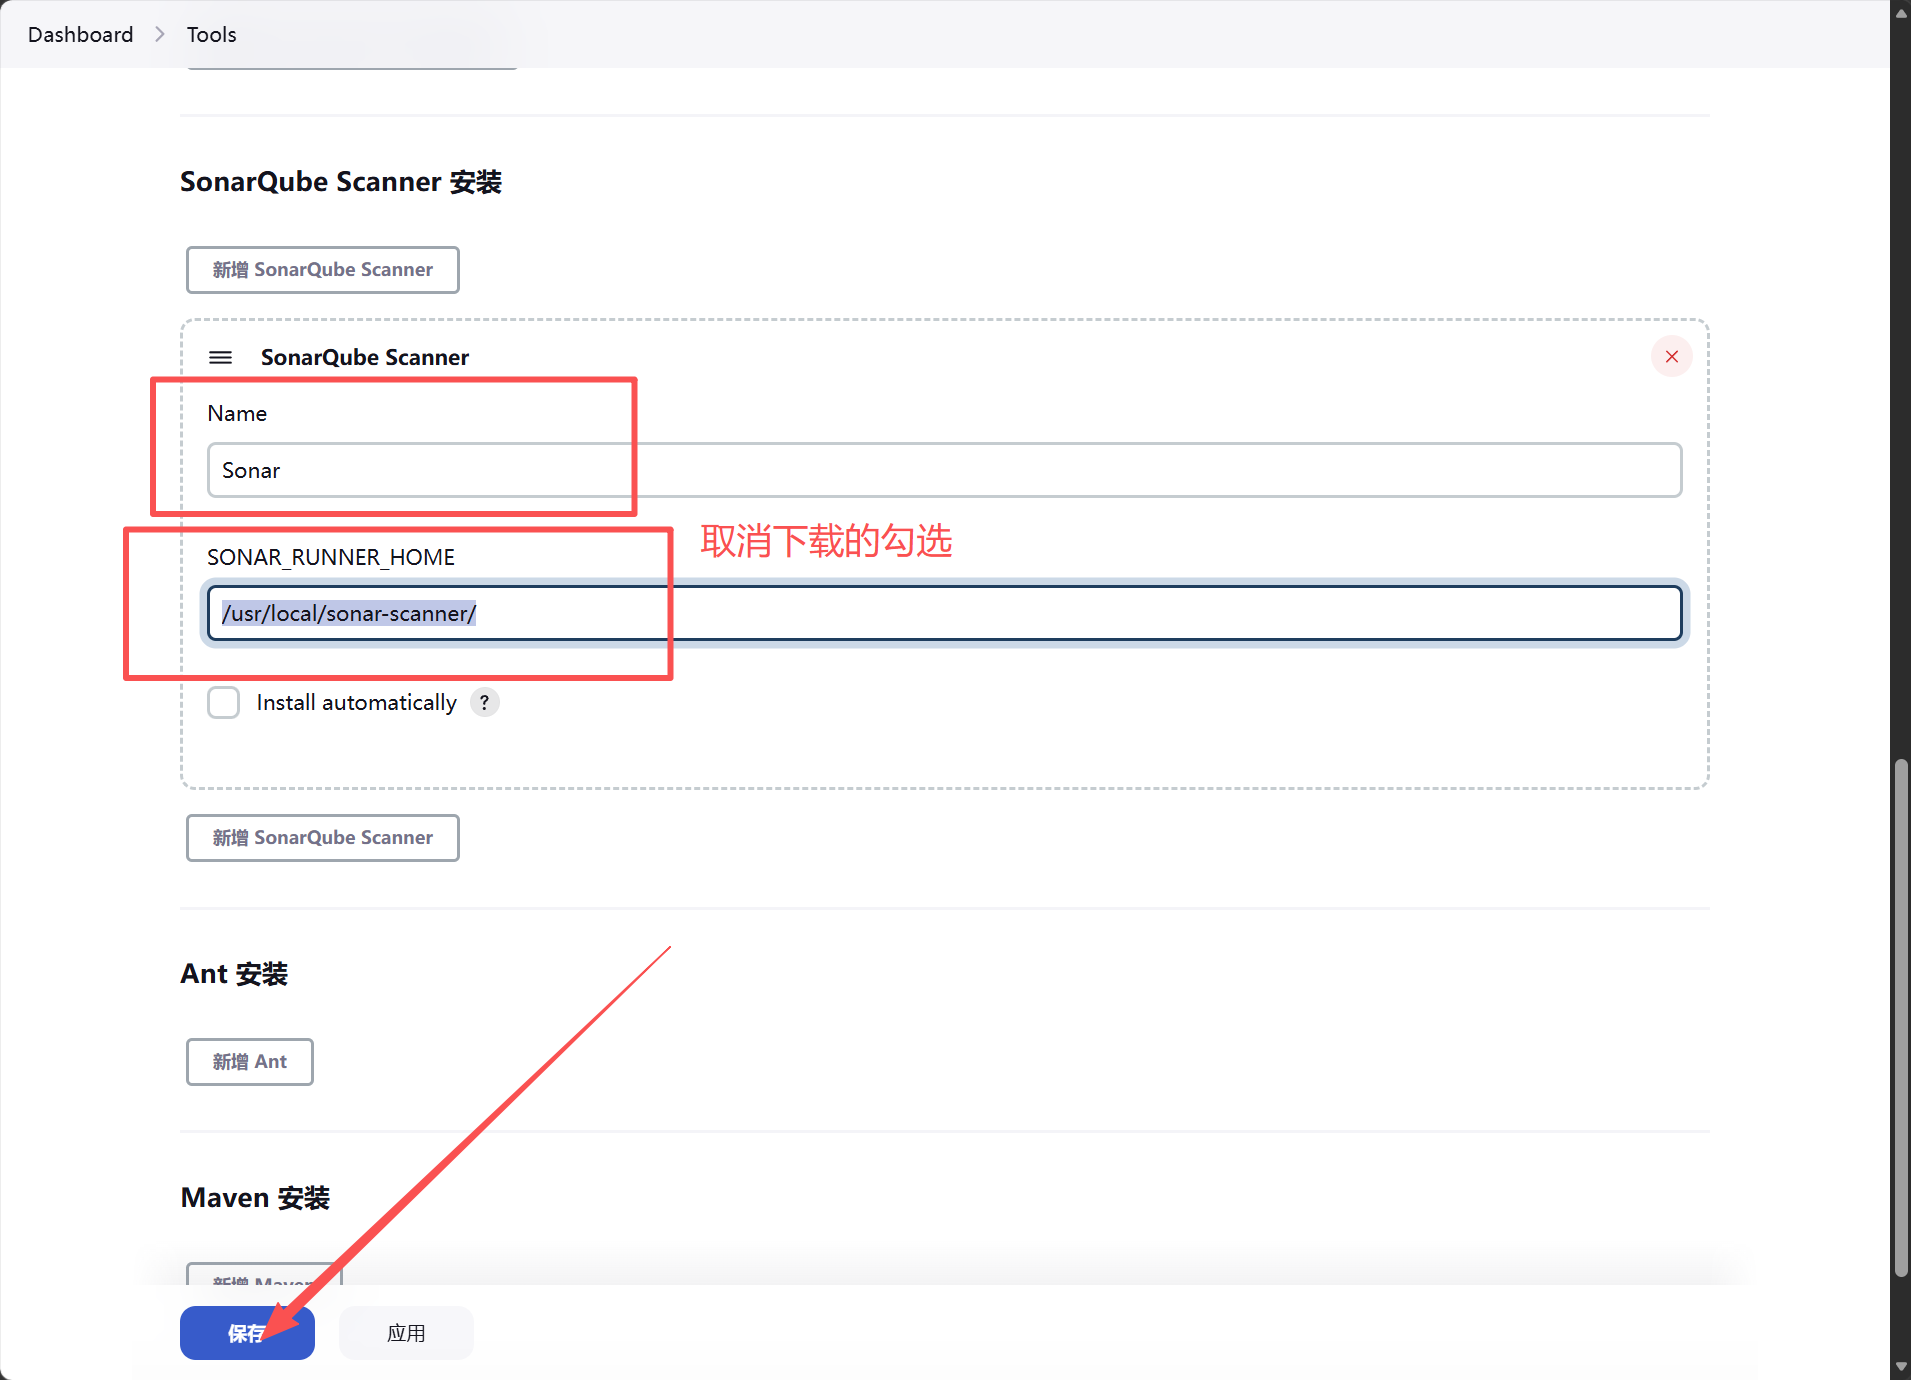
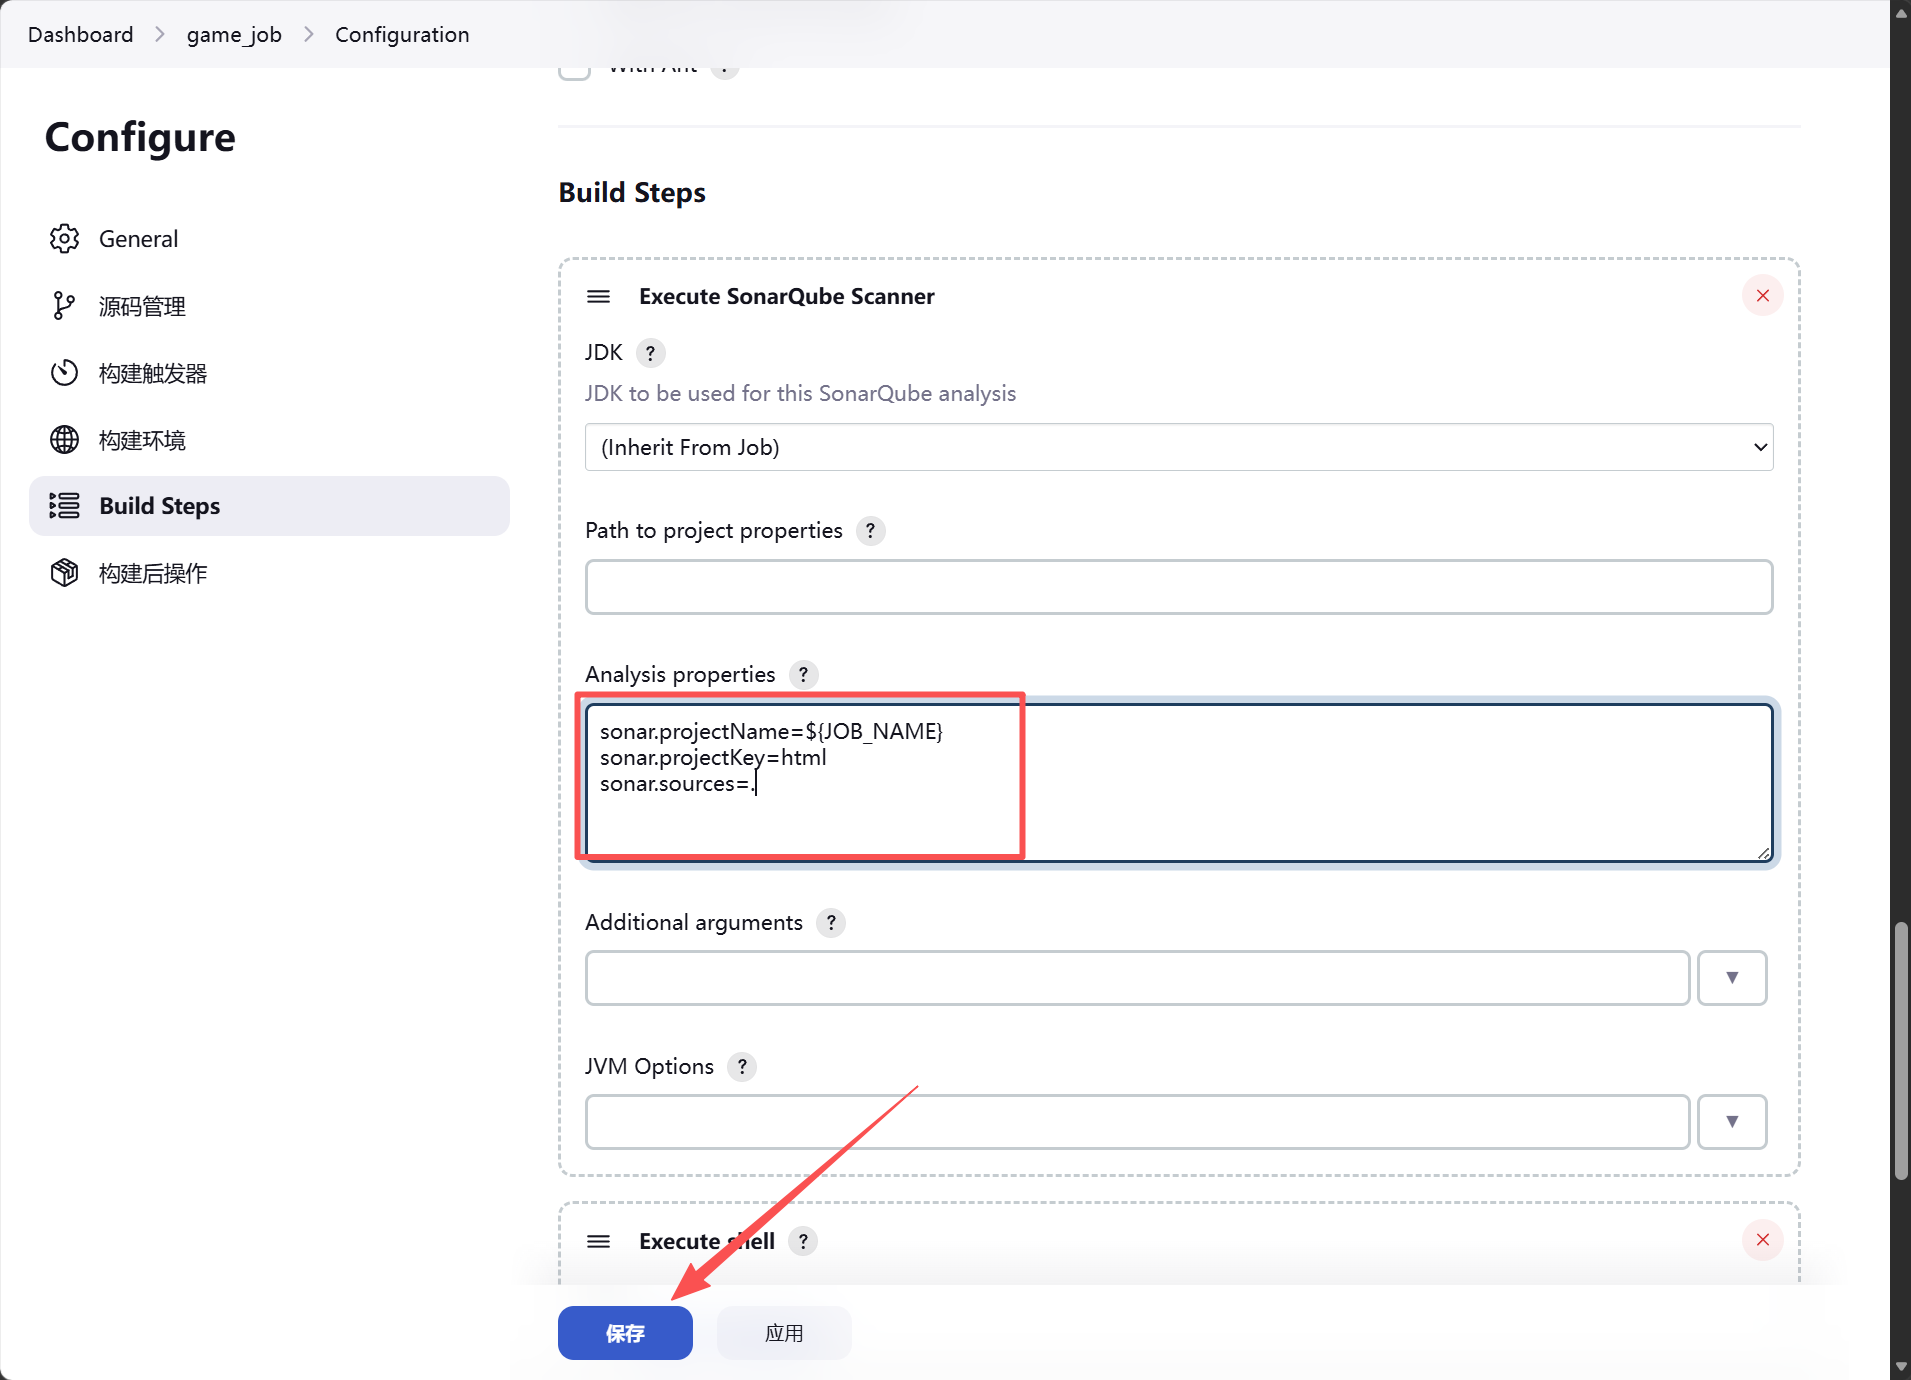
最后配置参数
sonar.projectName=${JOB_NAME} # 项目在sonarqube上的显示名称
sonar.projectKey=html # 项目的唯一表示,不能重复
sonar.sources=. # 扫描那个项目的源码
修改sonar客户端指向10.0.0.203
[root@jenkins conf]# cd /usr/local/sonar-scanner/conf
[root@jenkins conf]# vim sonar-scanner.properties
[root@jenkins conf]# cat sonar-scanner.properties
#Configure here general information about the environment, such as SonarQube server connection details for example
#No information about specific project should appear here

#----- Default SonarQube server
sonar.host.url=http://10.0.0.203:9000
snoar.login=2d9de01043d14f81246dfdabeb7522bfb89c79be

#----- Default source code encoding
sonar.sourceEncoding=UTF-8
5.测试
#手动修改game代码,将代码上传到master分支,测试sonar代码检测和测试服务器的显示
root@Gitlab:~# cd game/
root@Gitlab:~/game# ll
total 60
-rw-r--r-- 1 root root 28032 Jun 13 09:03 bgm.mp3
drwxr-xr-x 2 root root  4096 Jun 13 09:03 css/
drwxr-xr-x 2 root root  4096 Jun 13 09:03 images/
-rw-r--r-- 1 root root  8960 Jun 13 09:07 index.html
drwxr-xr-x 2 root root  4096 Jun 13 09:03 js/
drwxr-xr-x 2 root root  4096 Jun 13 09:03 roms/
-rw-r--r-- 1 root root   811 Jun 13 09:03 shuoming.html
root@Gitlab:~/game# vim index.html
root@Gitlab:~/game# cat index.html |grep 测试
                    ['魂斗罗 测试', 'roms/Contra1(U)30.nes'],
root@Gitlab:~/game# git commit -am "测试"
[master a2bfe1f] 测试
 1 file changed, 1 insertion(+), 1 deletion(-)
root@Gitlab:~/game# git remote -v
origin	git@10.0.0.200:oldboy/game.git (fetch)
origin	git@10.0.0.200:oldboy/game.git (push)
root@Gitlab:~/game# git push -u origin master
Enumerating objects: 5, done.
Counting objects: 100% (5/5), done.
Delta compression using up to 2 threads
Compressing objects: 100% (3/3), done.
Writing objects: 100% (3/3), 301 bytes | 301.00 KiB/s, done.
Total 3 (delta 2), reused 0 (delta 0), pack-reused 0
To 10.0.0.200:oldboy/game.git
   70c791b..a2bfe1f  master -> master
Branch 'master' set up to track remote branch 'master' from 'origin'.
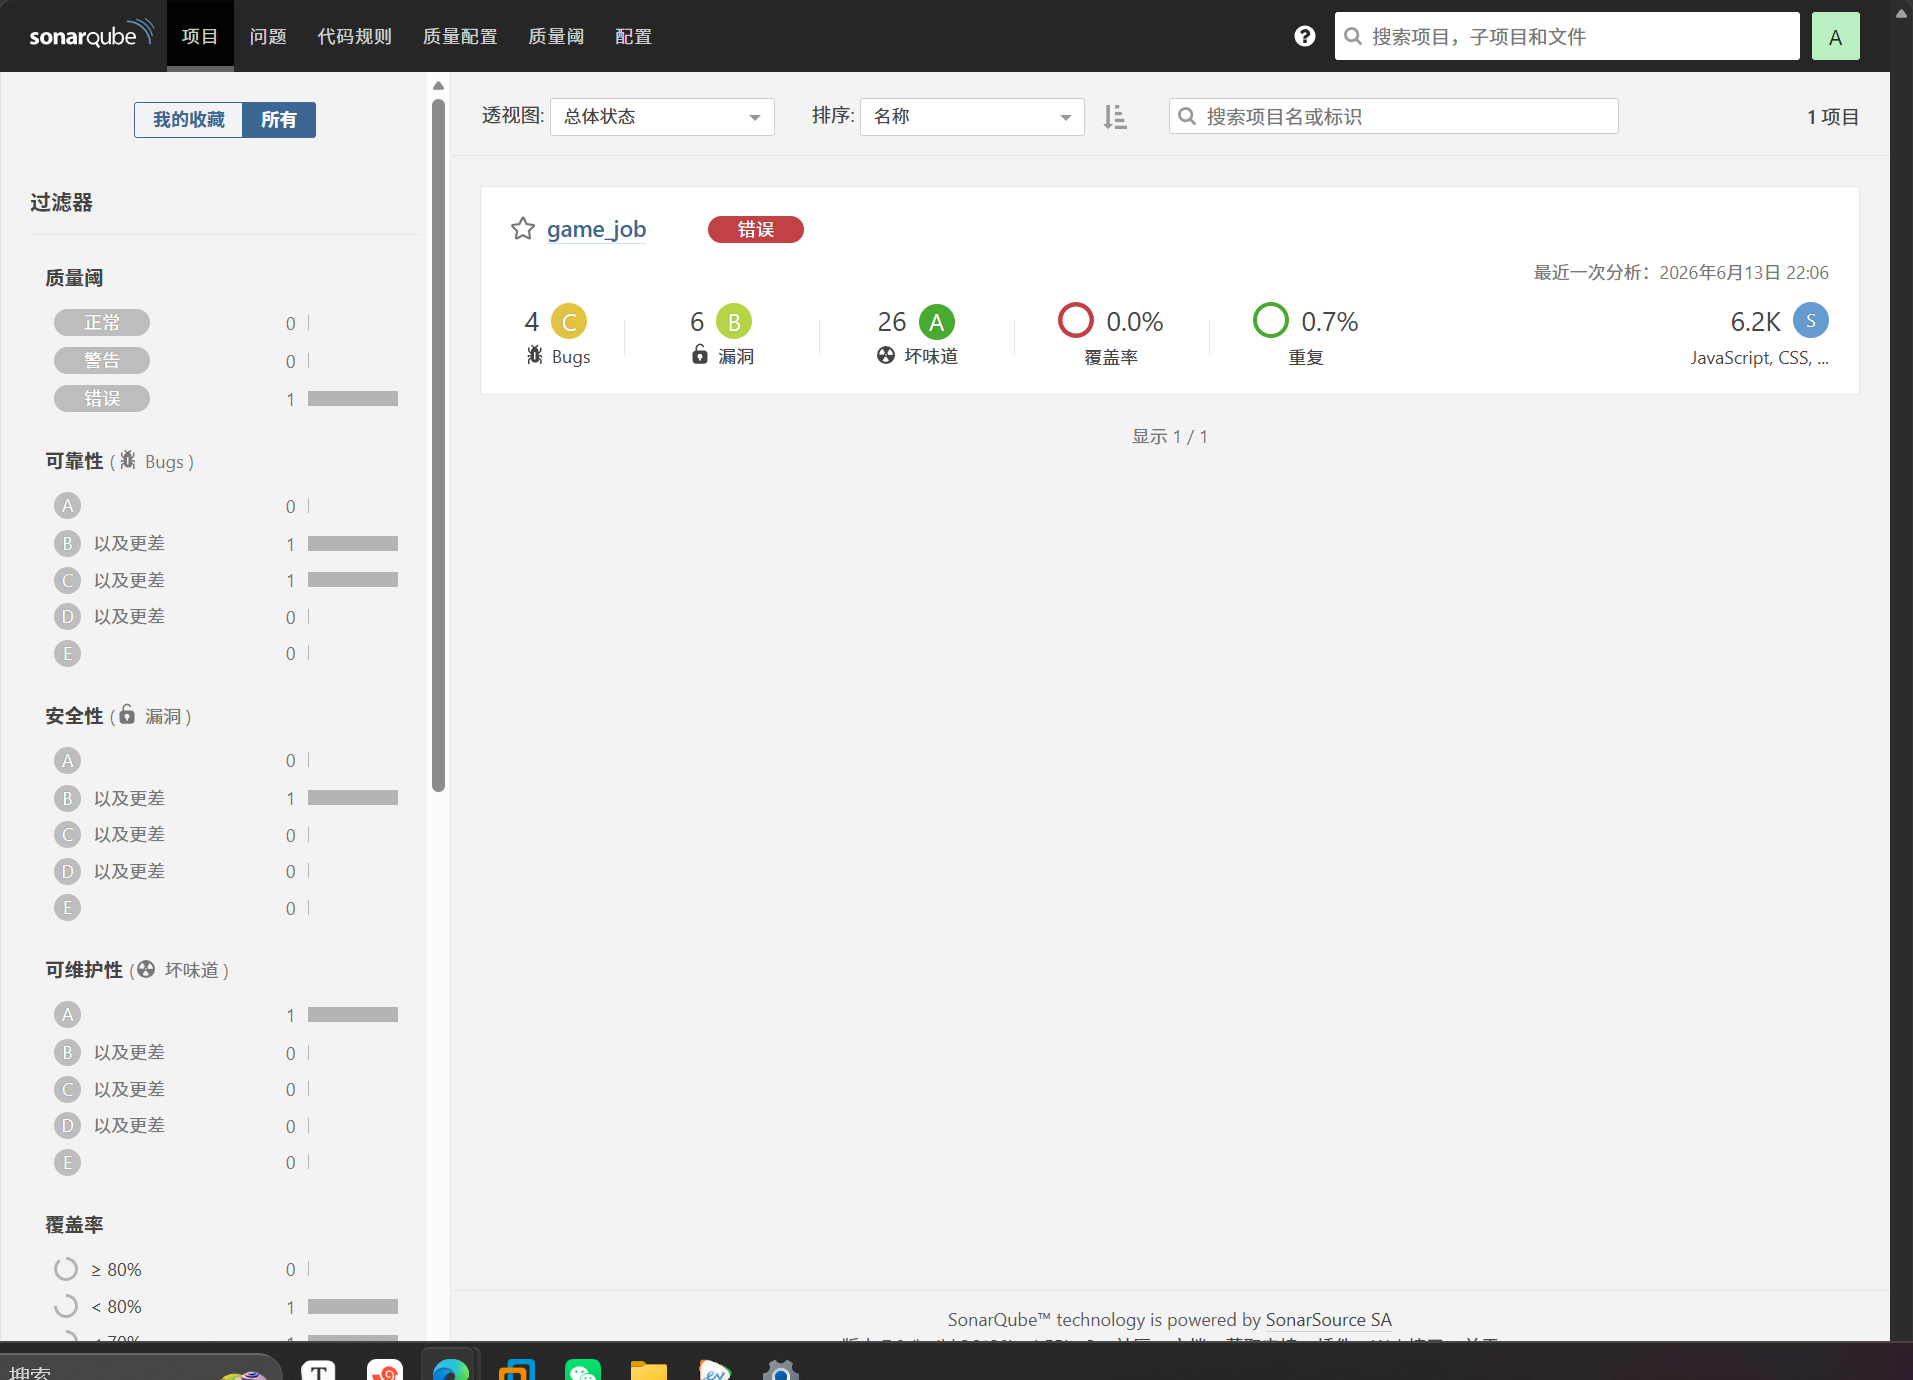
检查sonar是否检测
访问10.0.0.203:9000
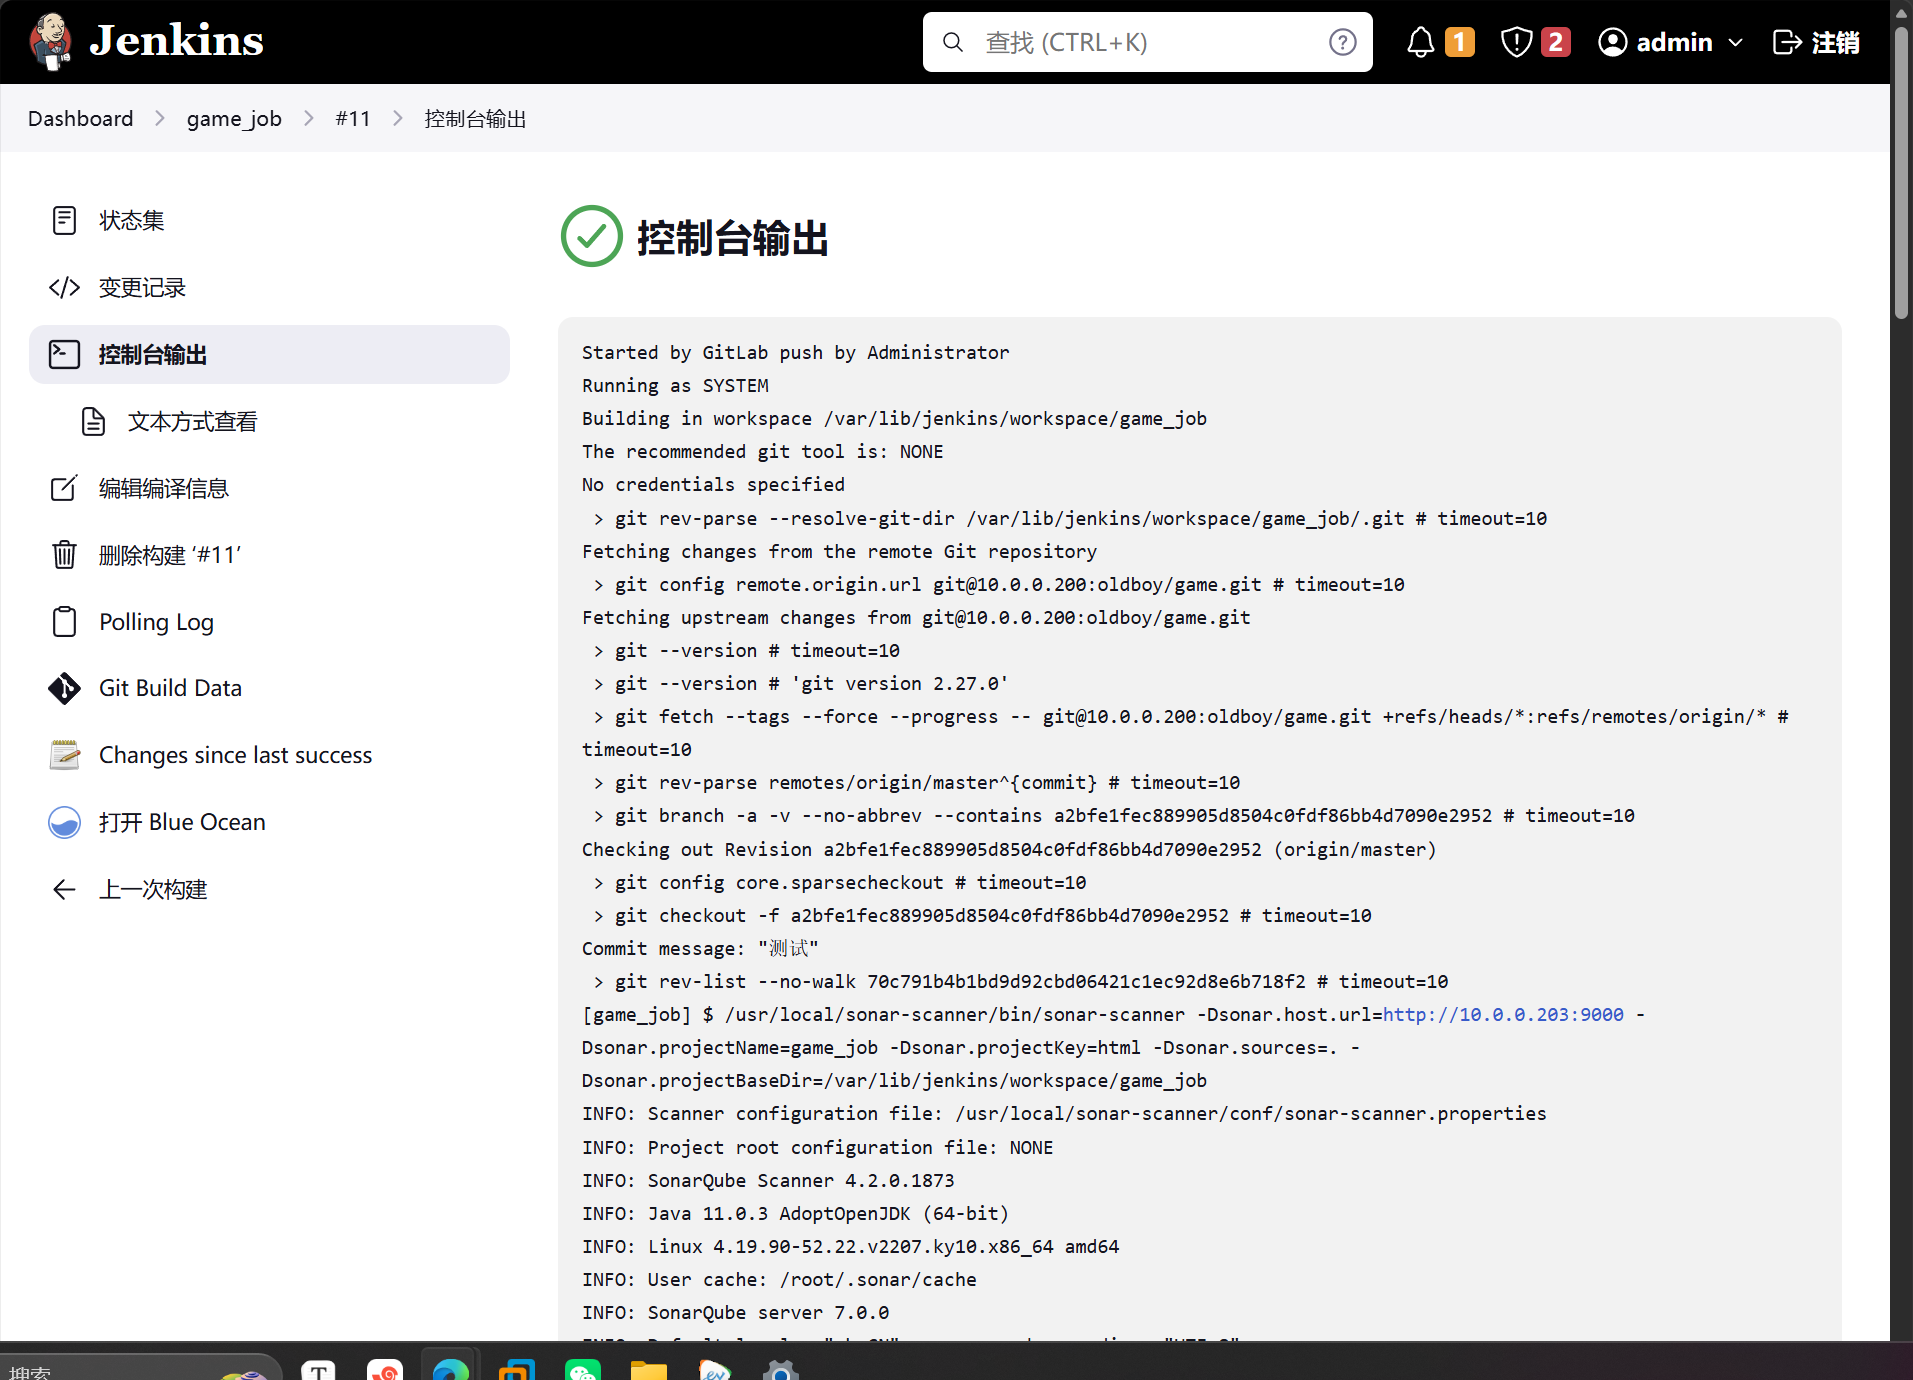
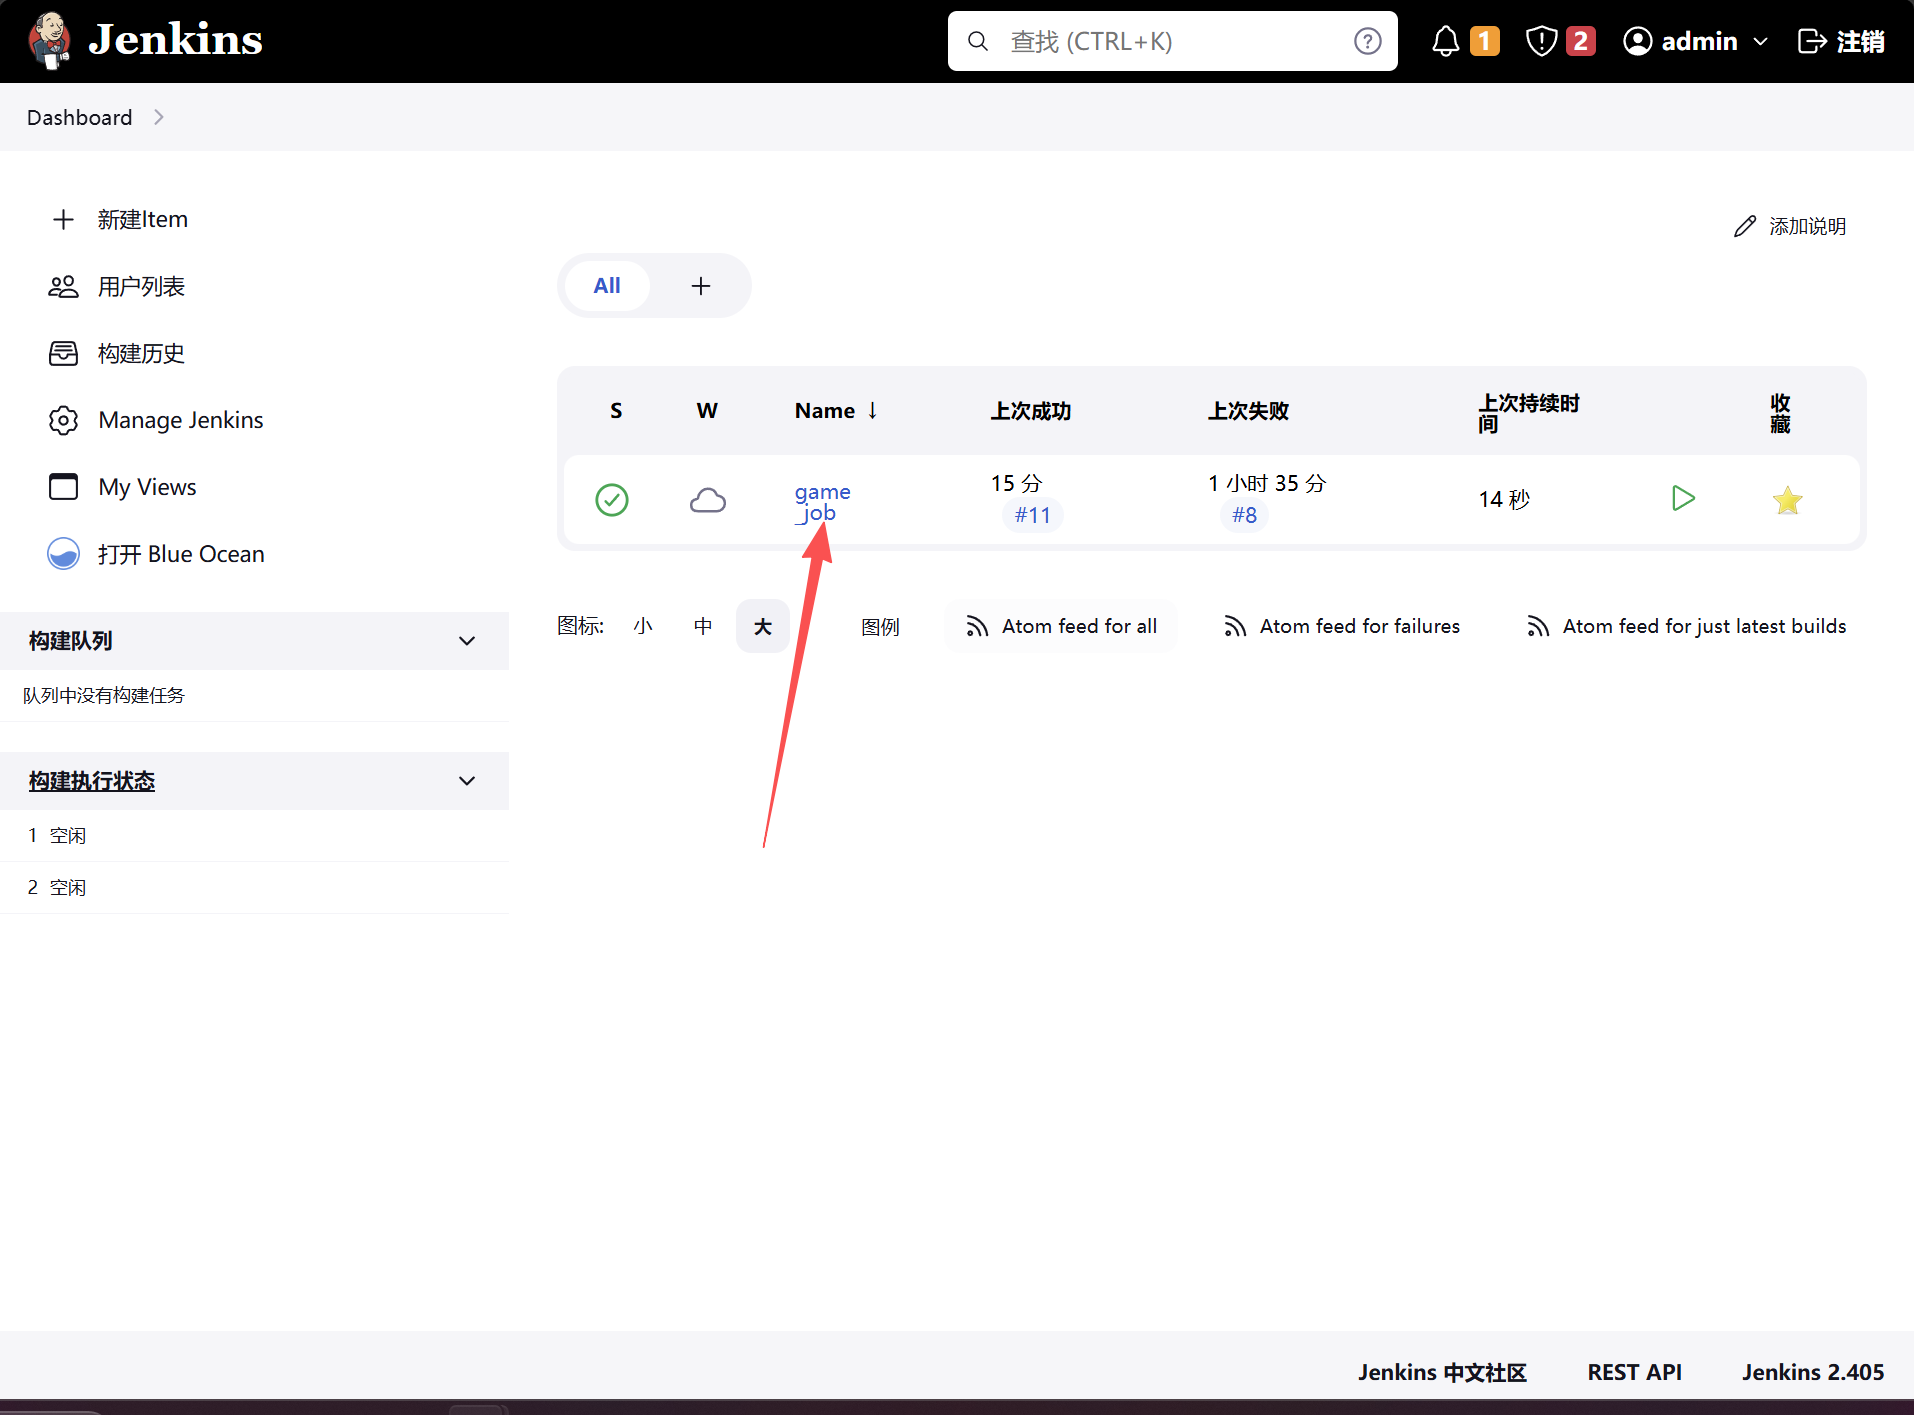
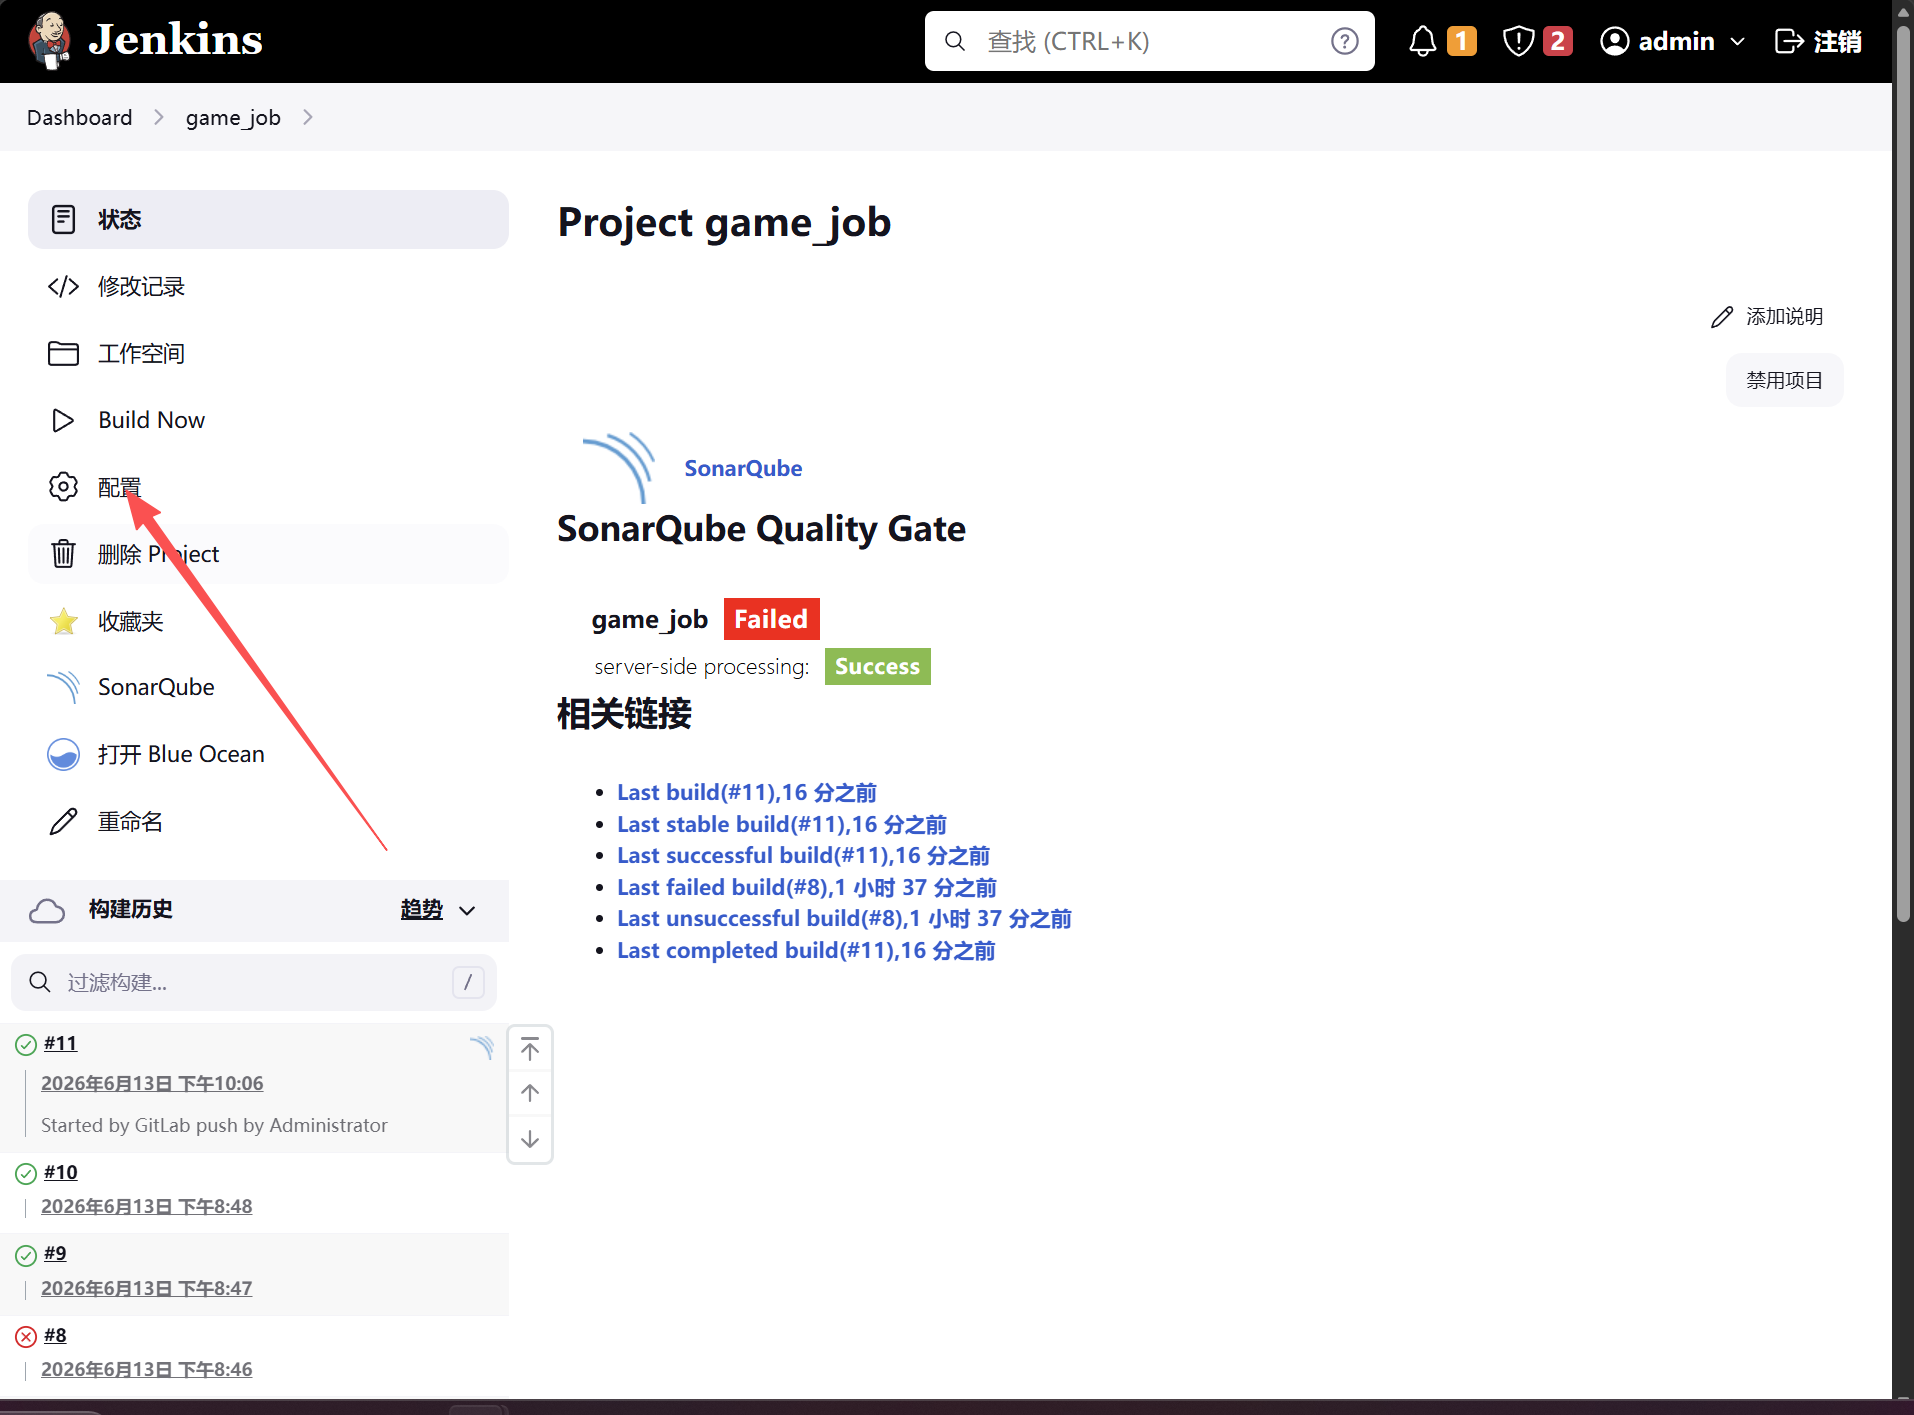
查看jenkins的构建流程
访问10.0.0.202:8080
七、配置企业微信
1.由于jenkins没有官网的插件来完成此功能,所以我们只能用网络上一些开源的插件(线下班不需要以下步骤,已集合
在plugins)
github下载代码
https://github.com/daniel-beck/changelogenvironment-plugin
解压到某个目录-》进入目录执行以下操作
cd 到 changelog-environment-plugin-master 下,执行
mvn verify
时间较长,会在changelog-environment-pluginmaster/target/下有个changelogenvironment.hpi文件,上传到jenkins即可使用
2.配置jenkins
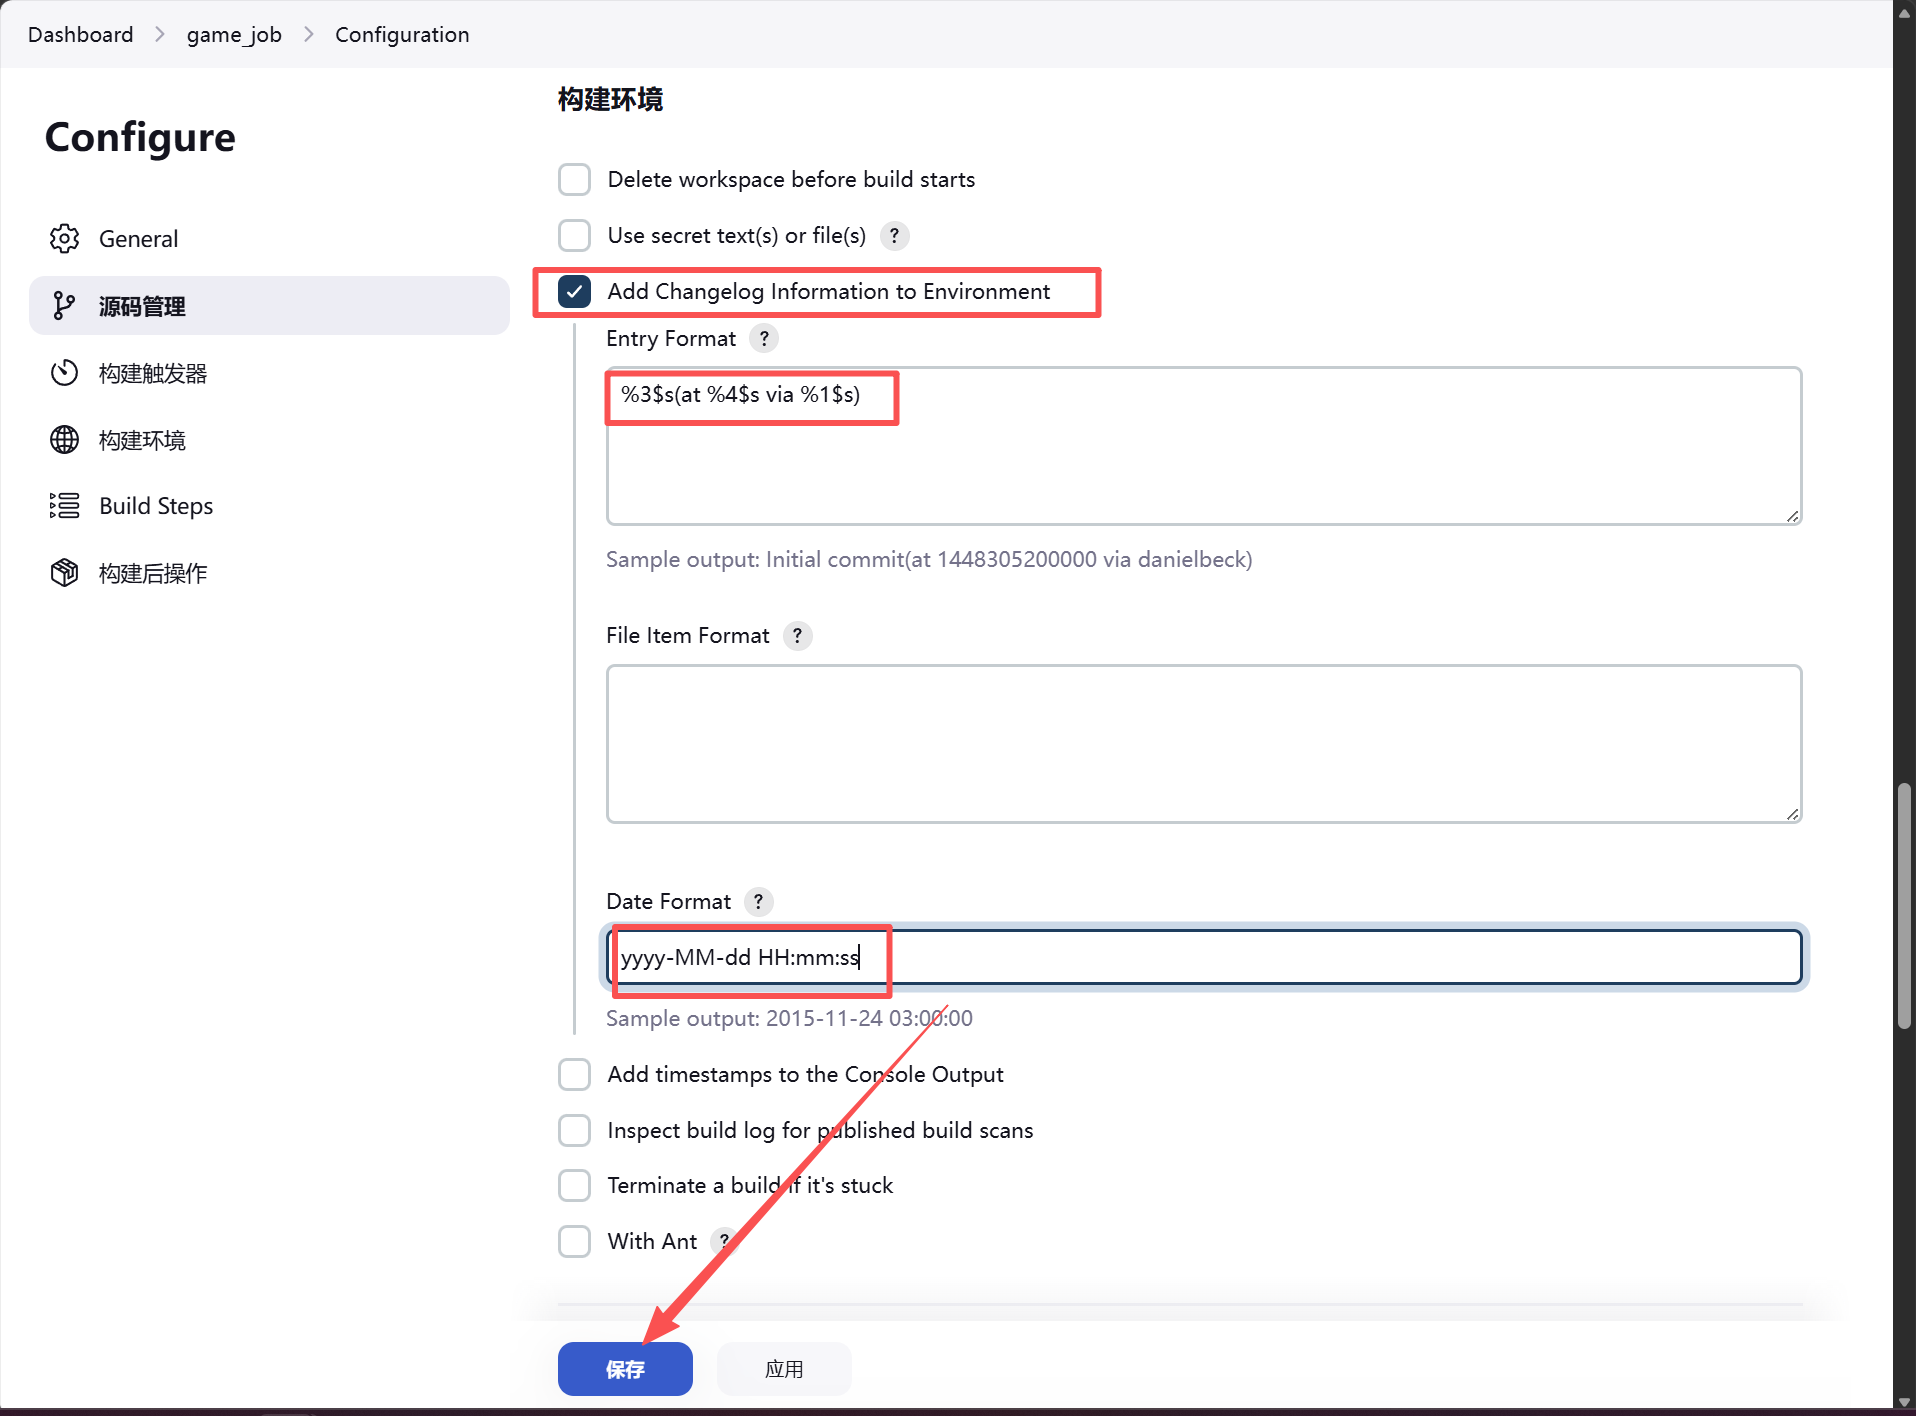
jenkins进入到项目中->构建环境多了Add Changelog Information to Environment->点击选择
Entry Format中添加 %3$s(at %4$s via %1$s),参数分别为ChangeLog内容,时间,提交人。
Date Format中添加 yyyy-MM-dd HH:mm:ss 就是时间格式
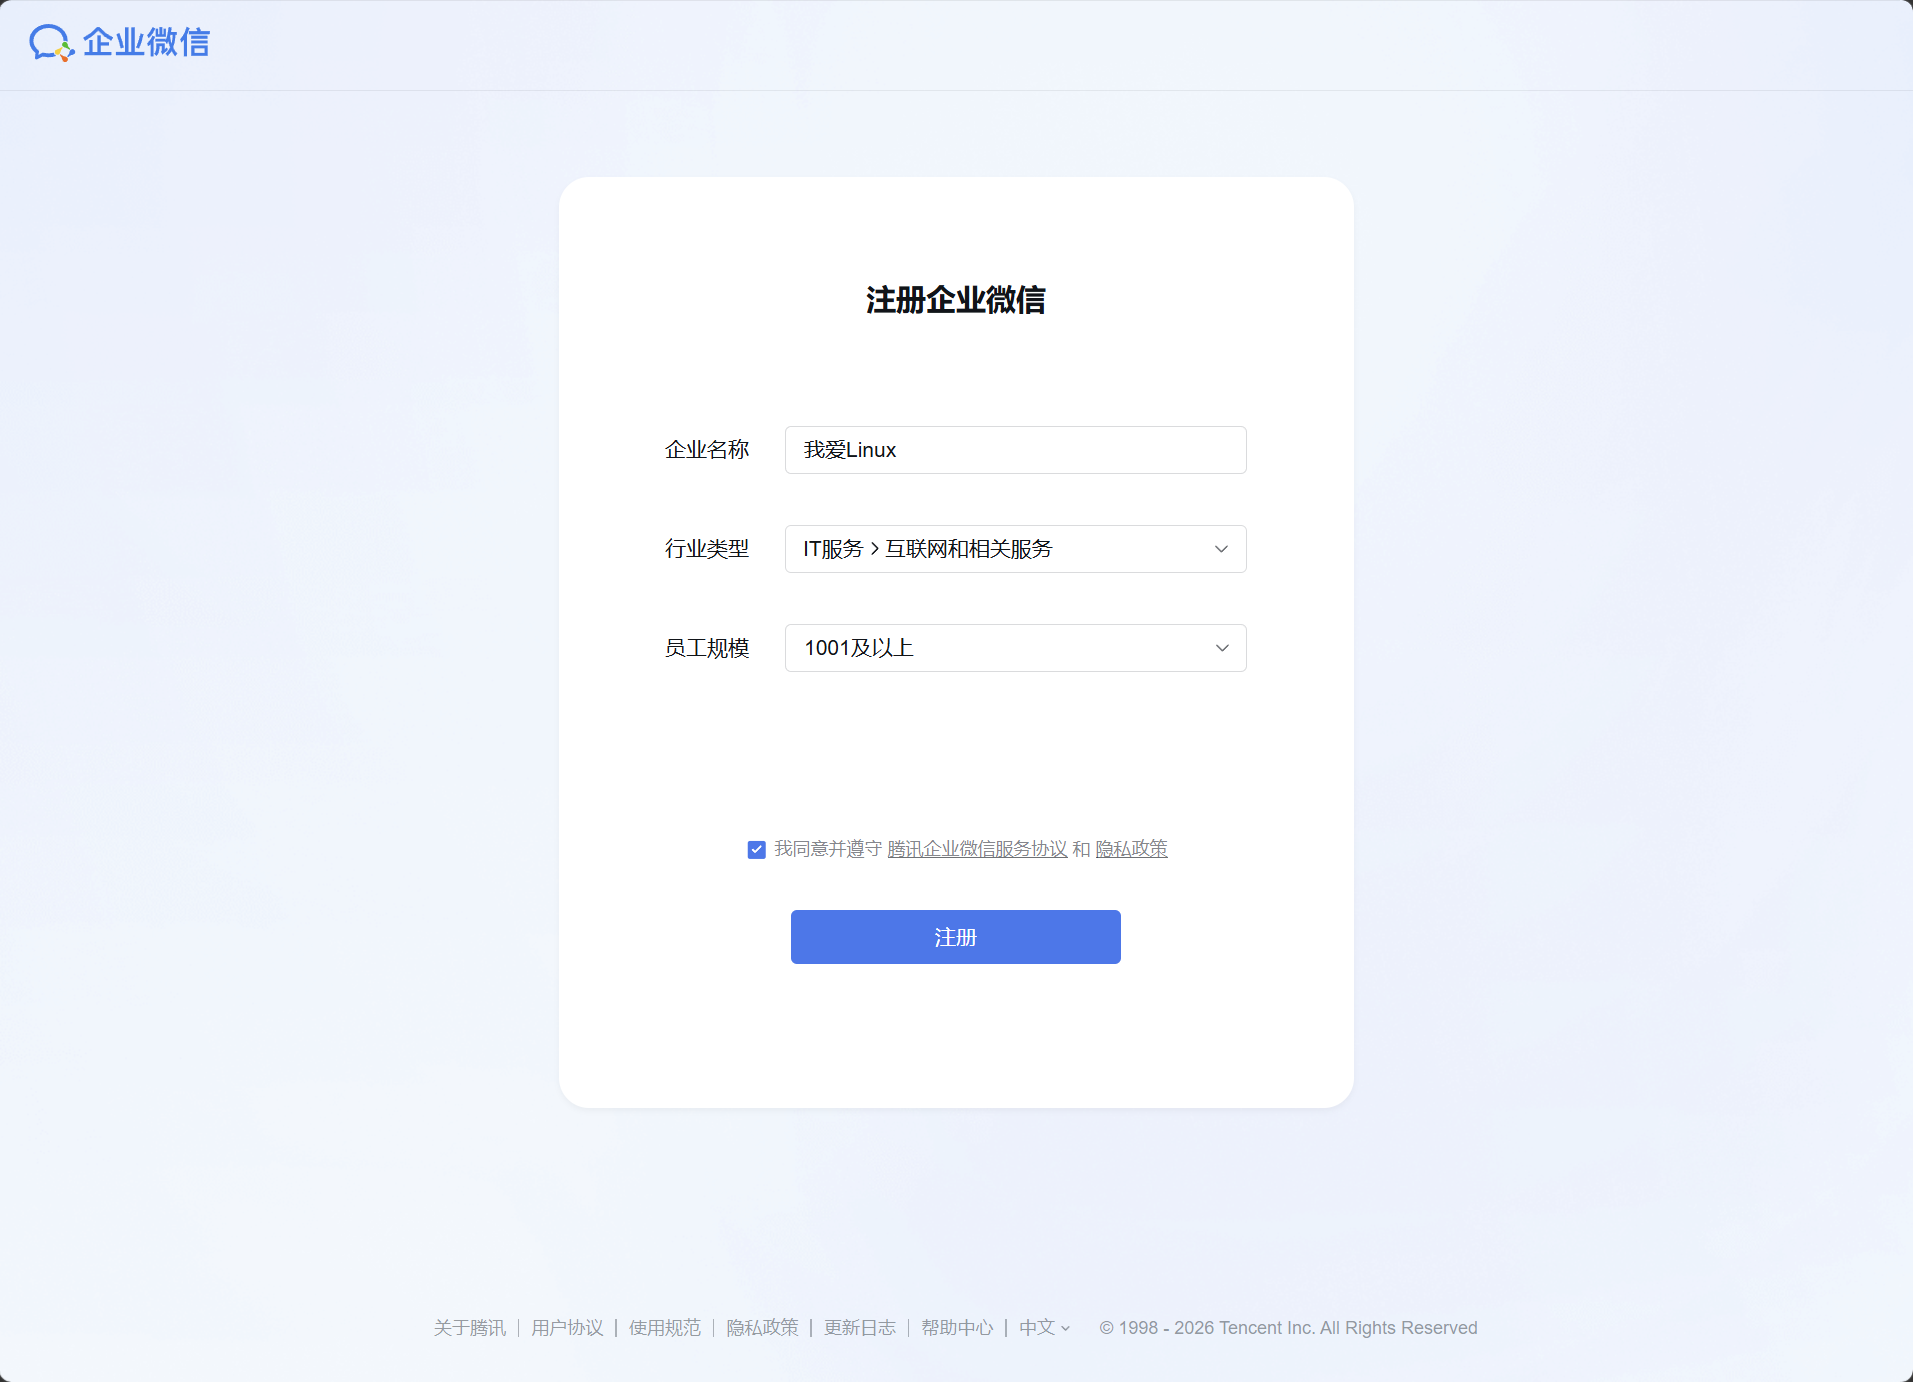
1.注册企业微信

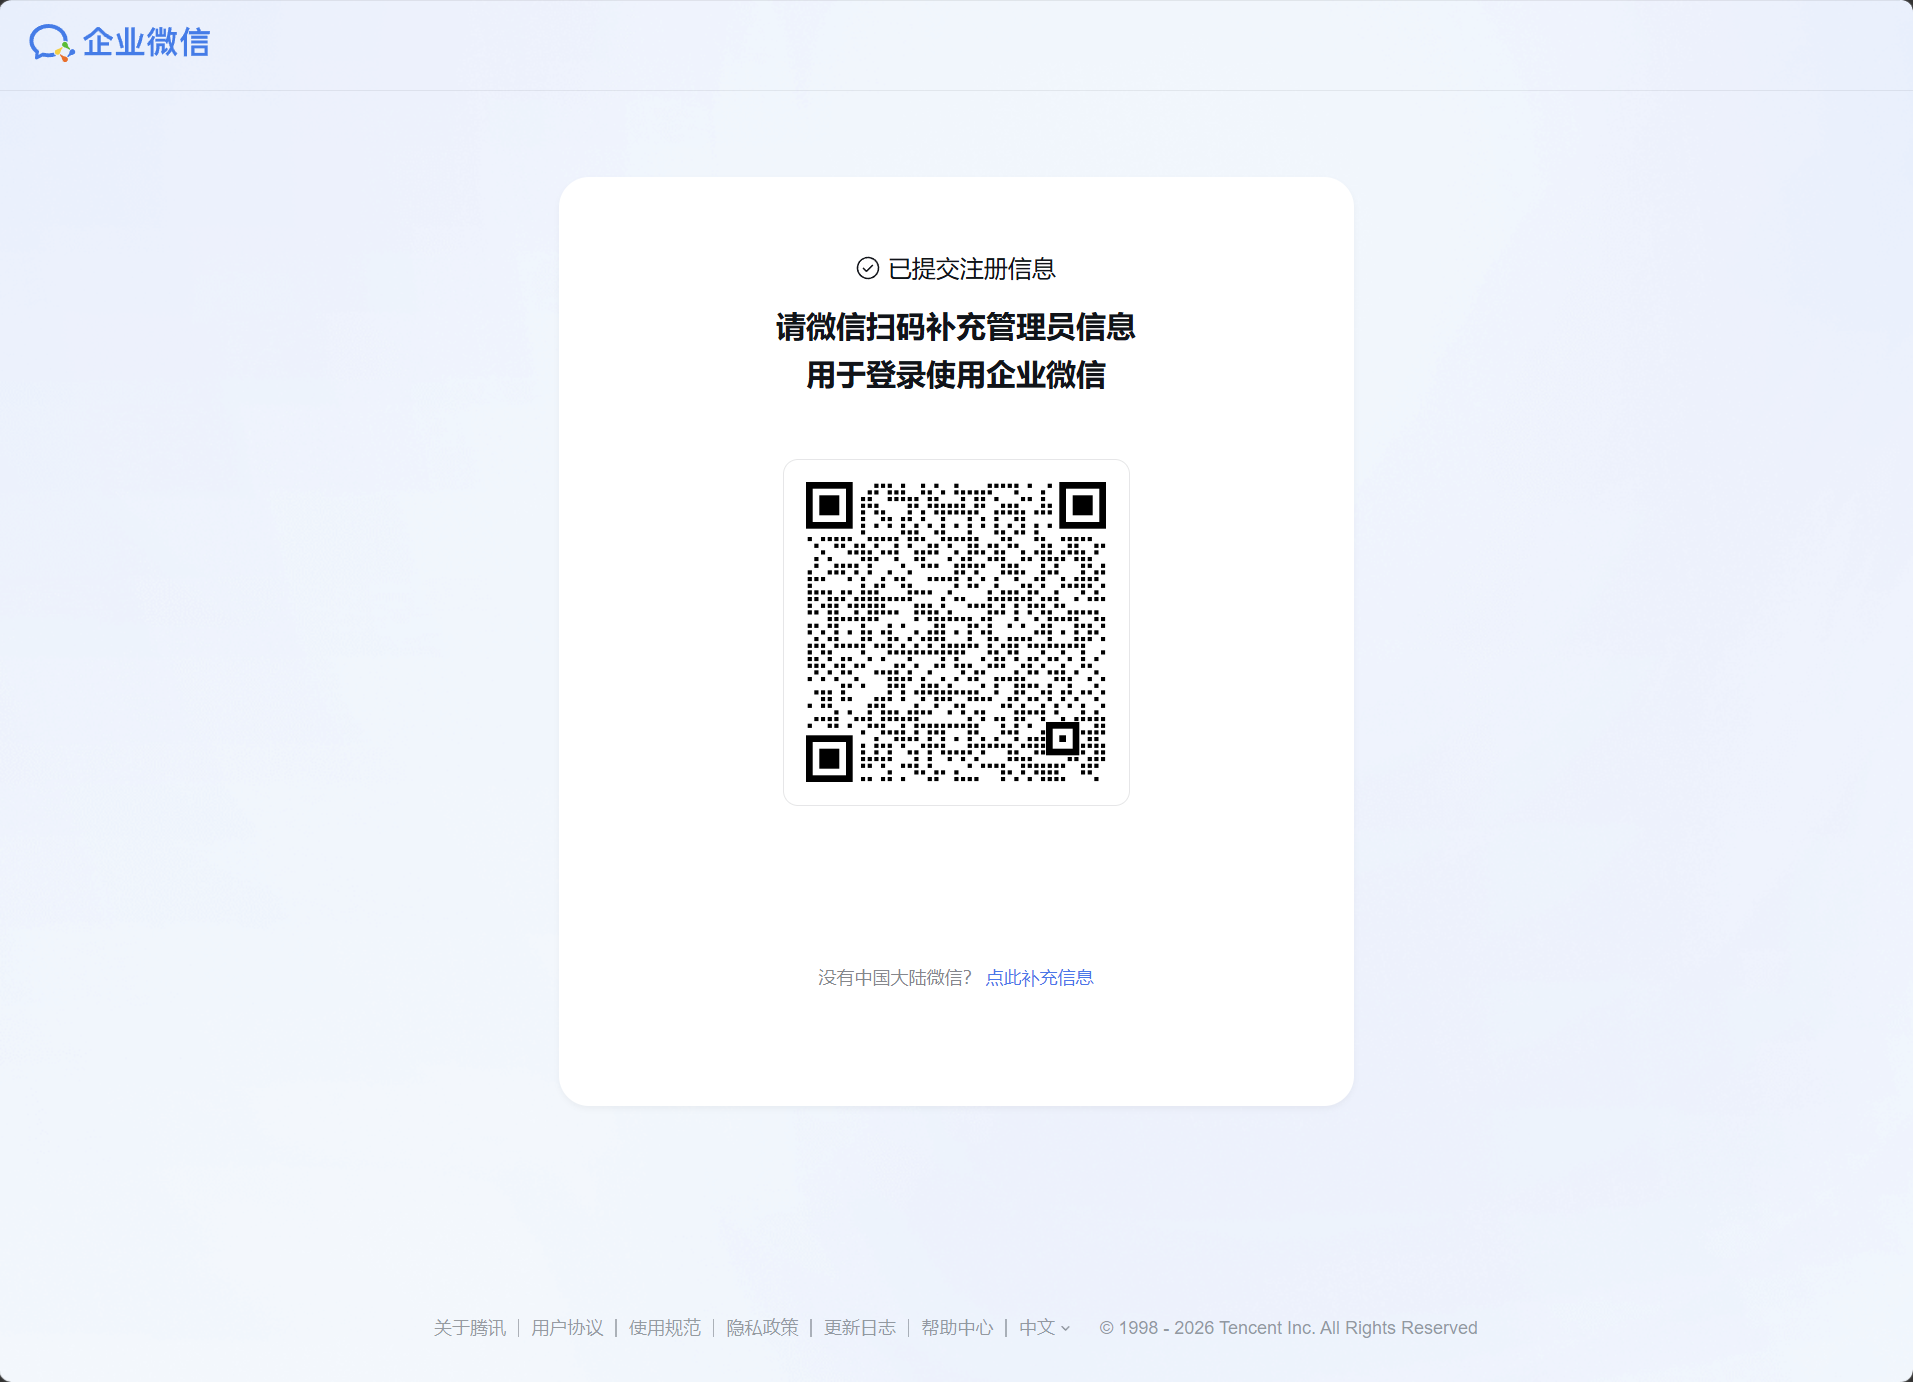
手机上填写完信息之后
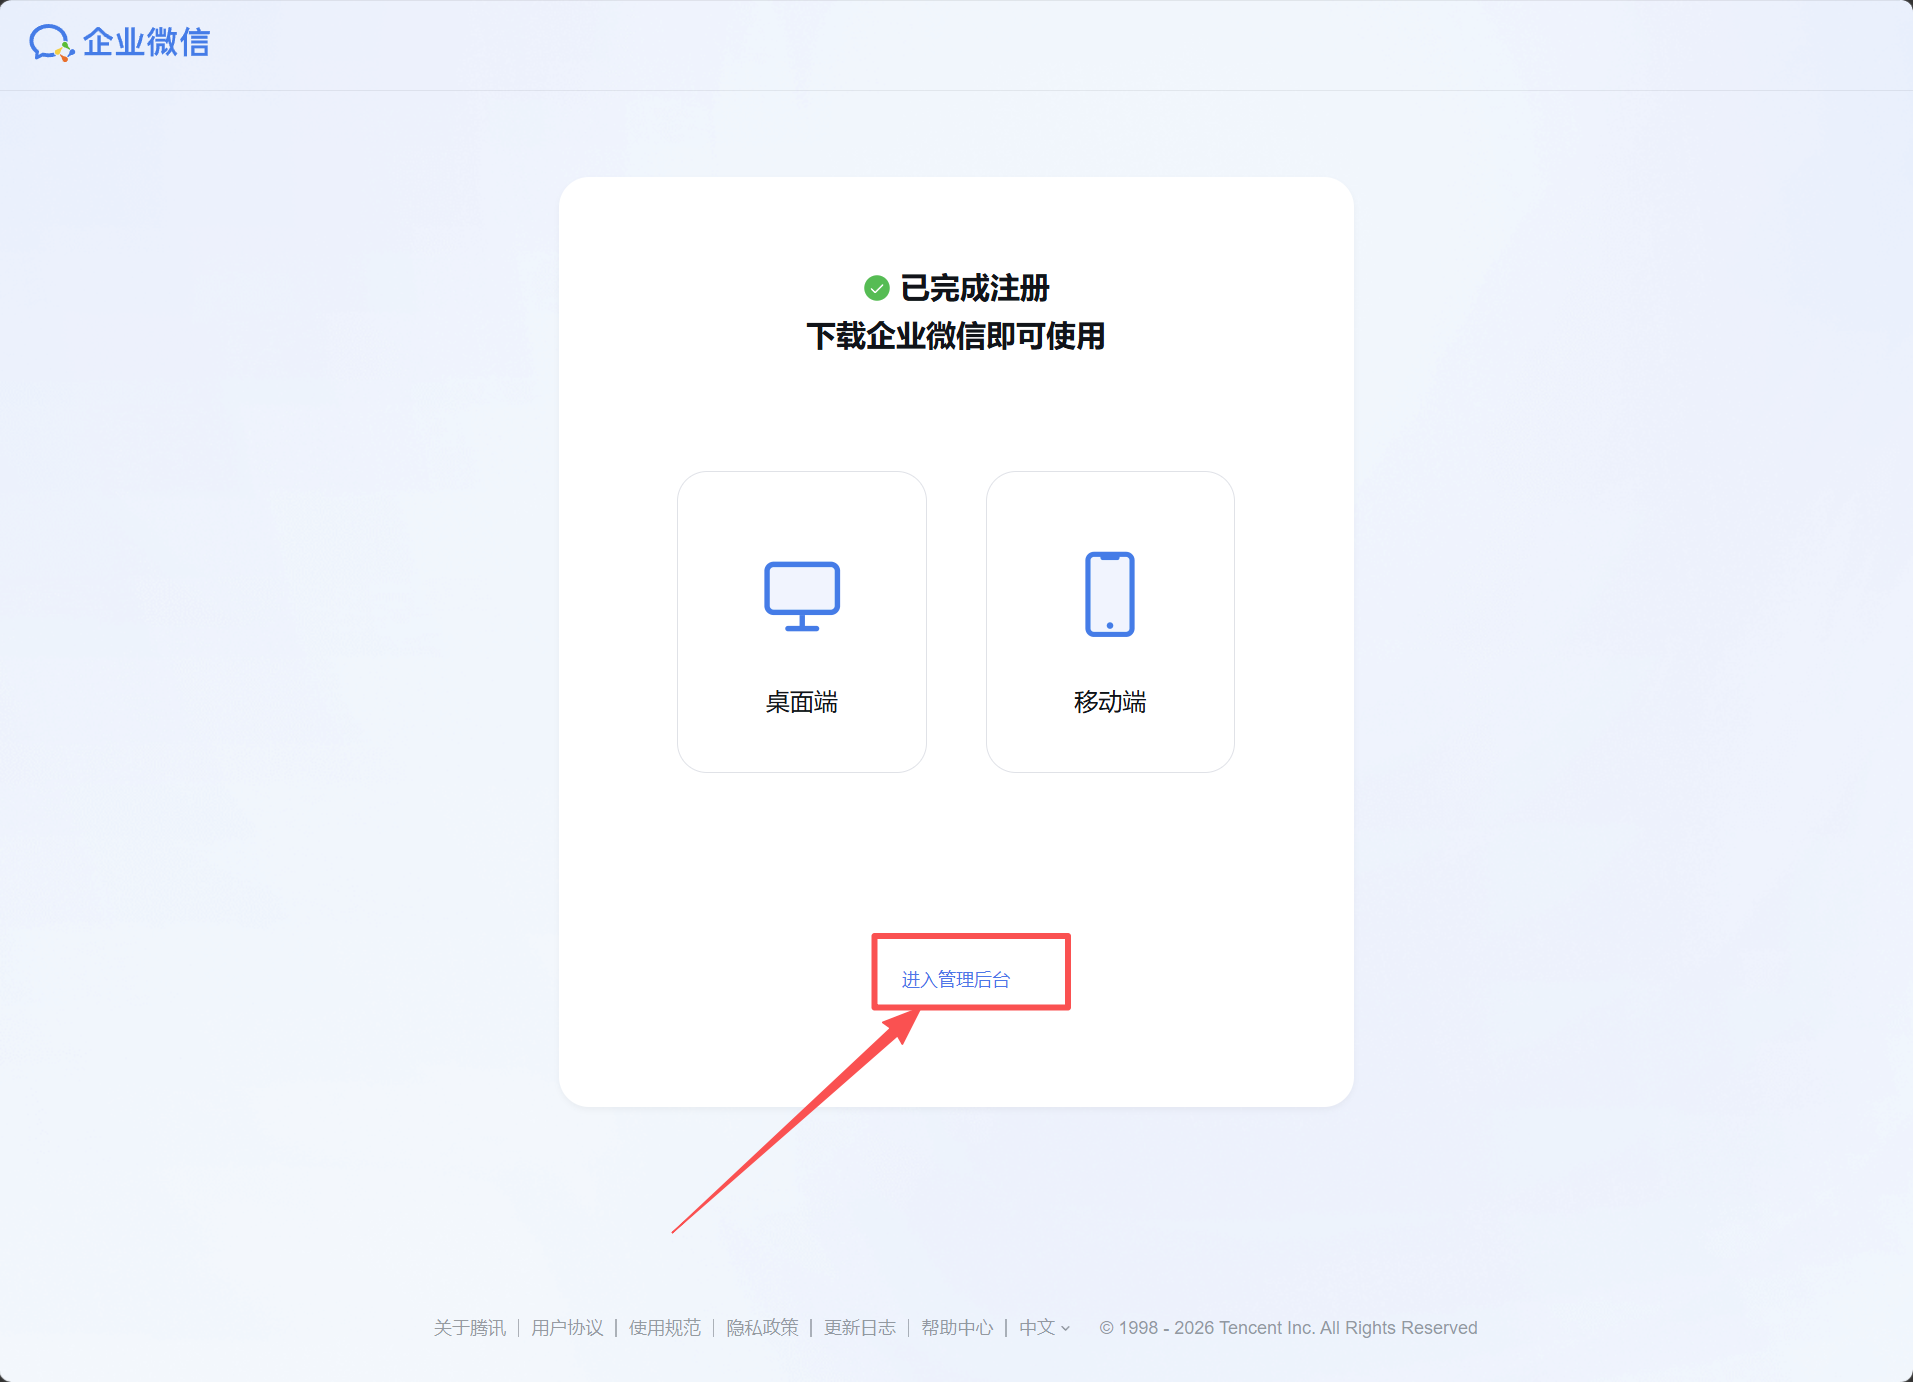
2.创建应用
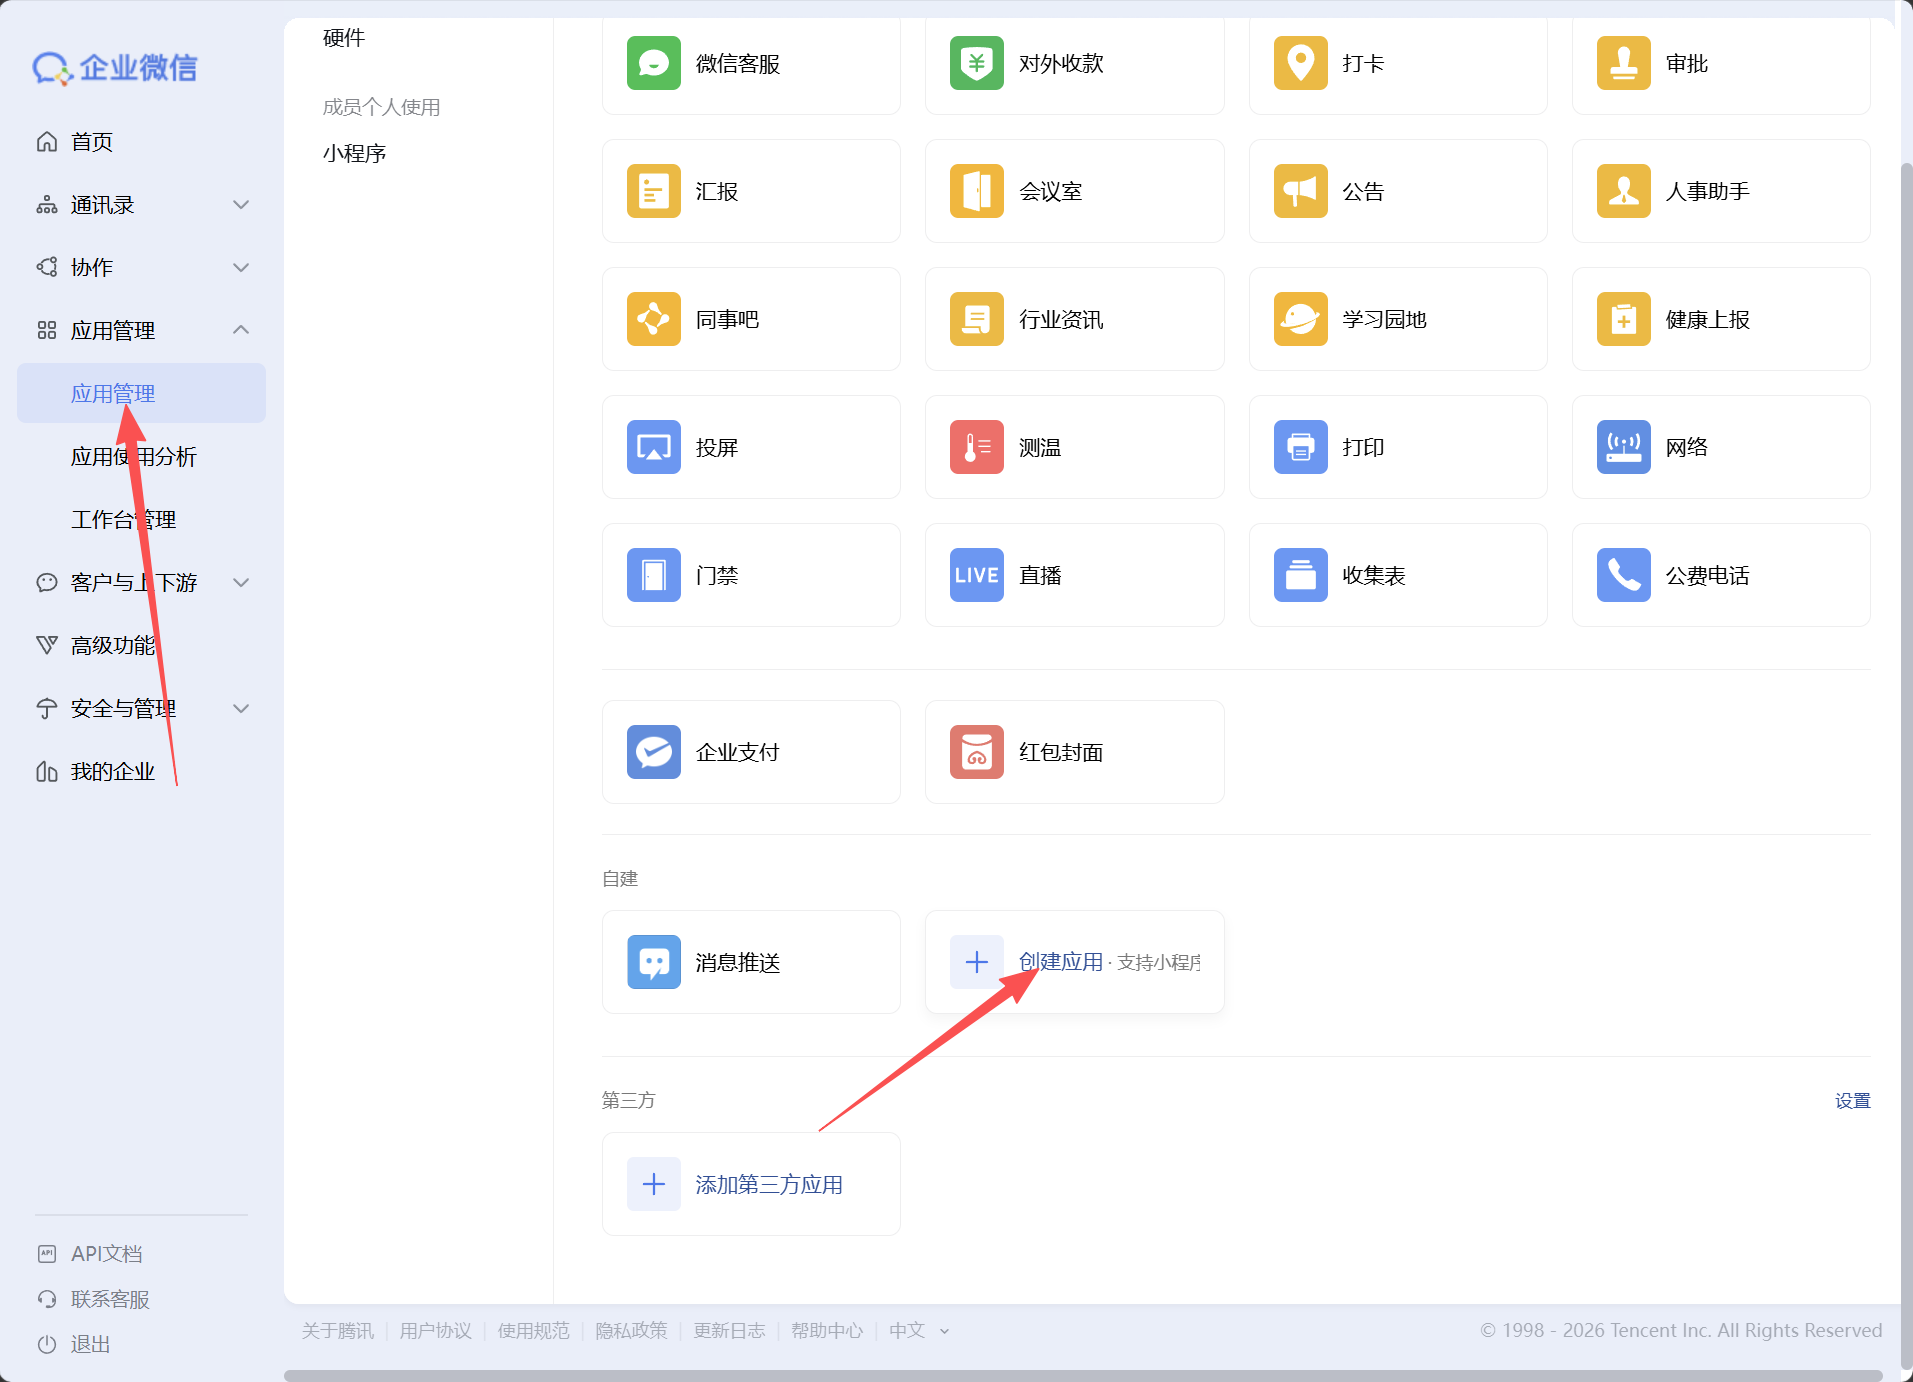
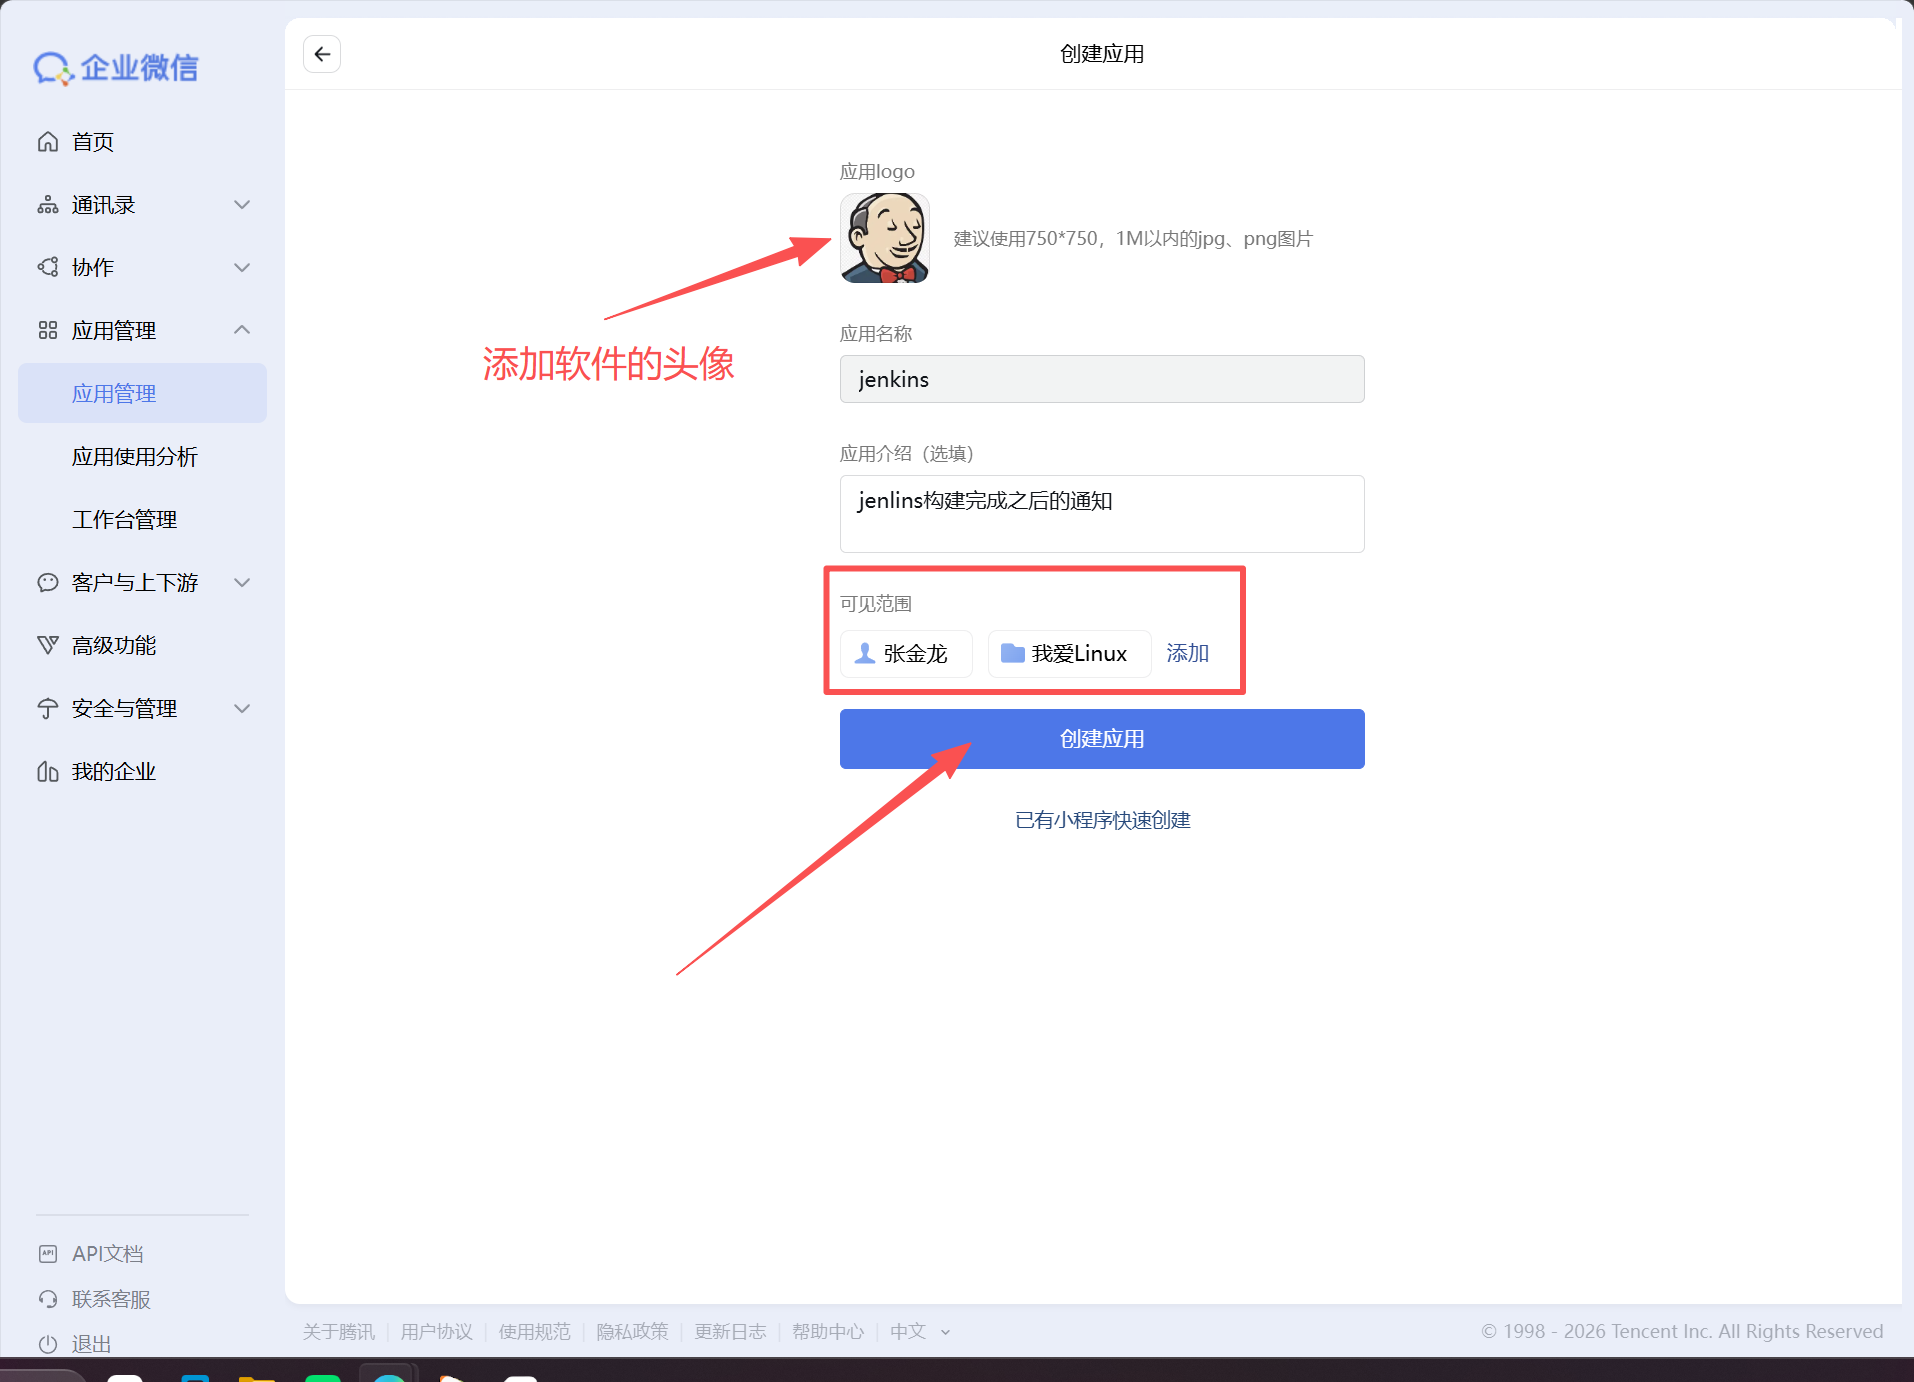
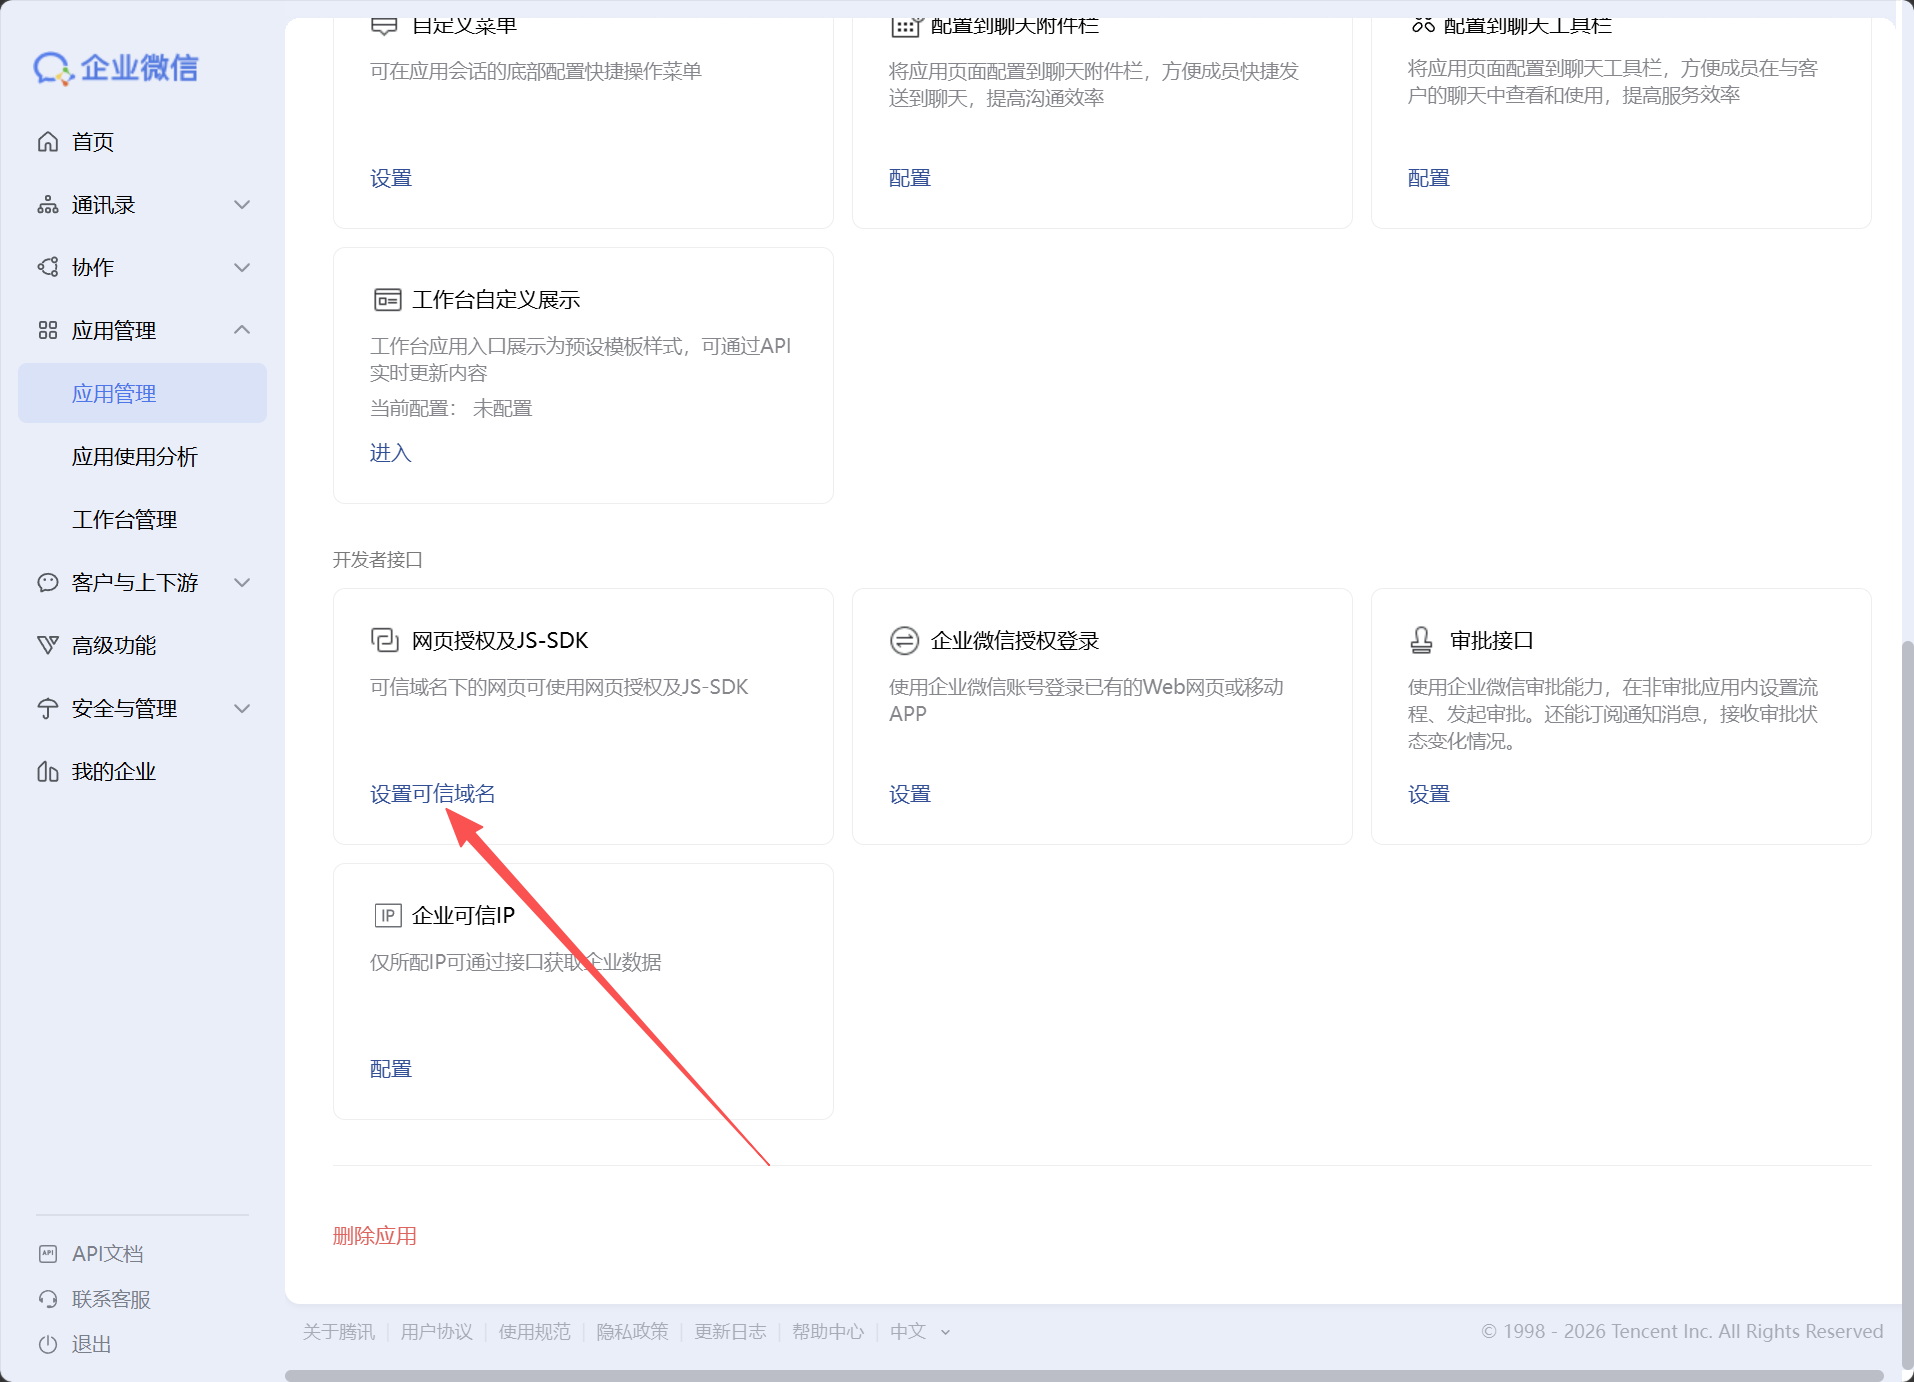
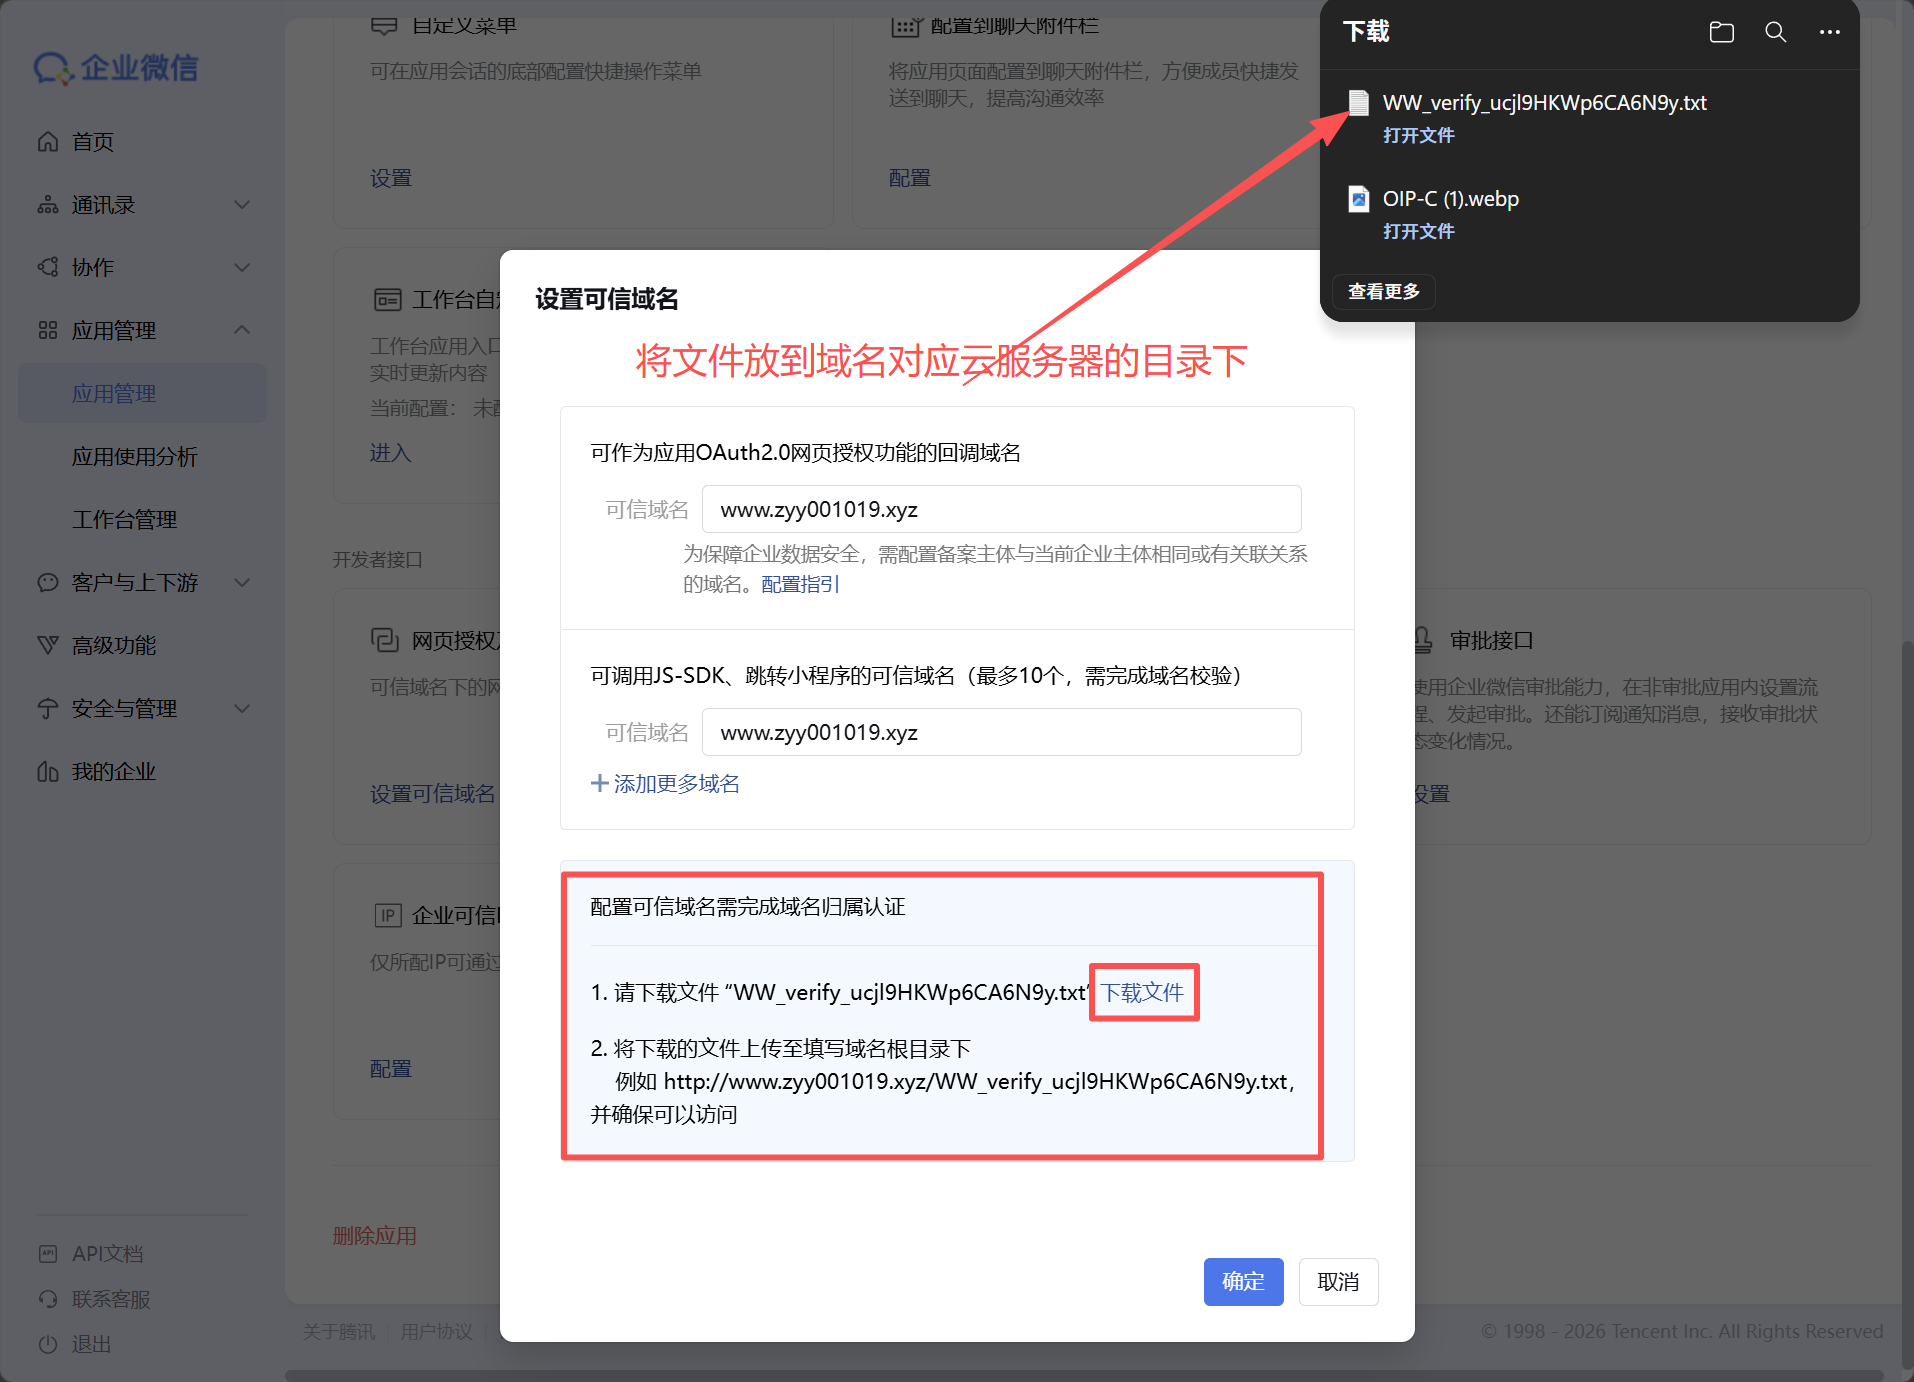
配置可信域名
需要一台有域名的云服务器
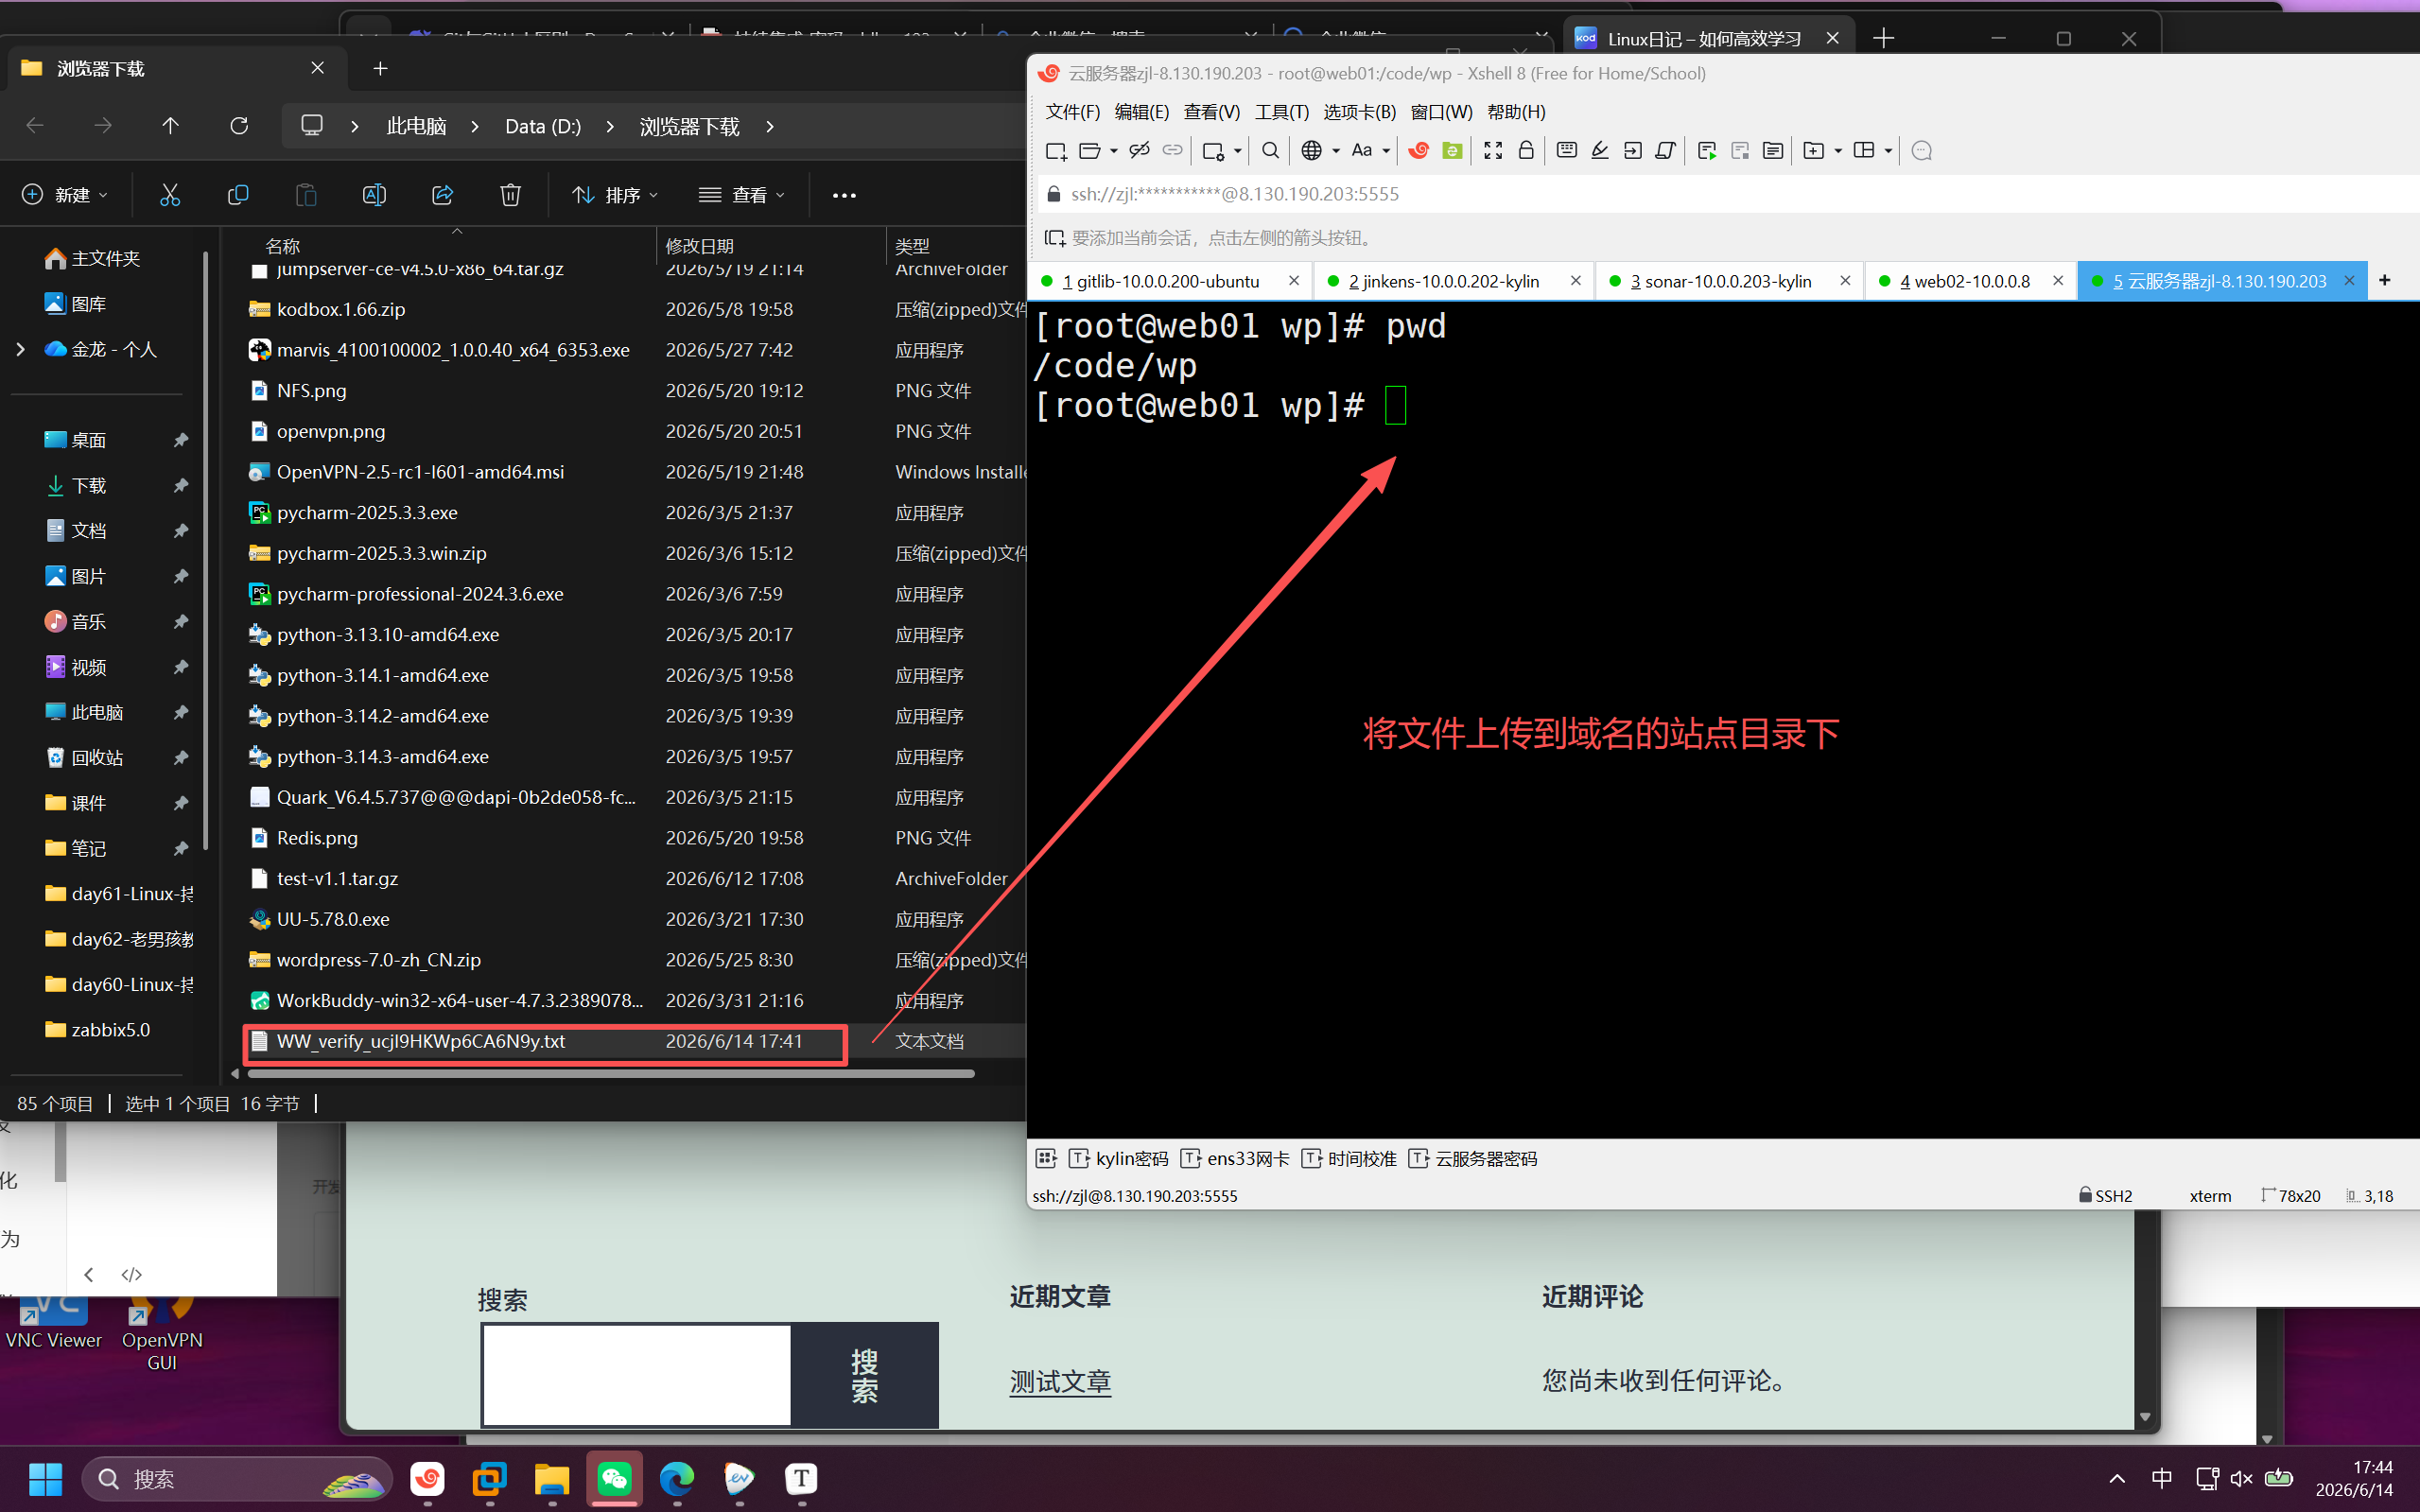
配置企业可信ip
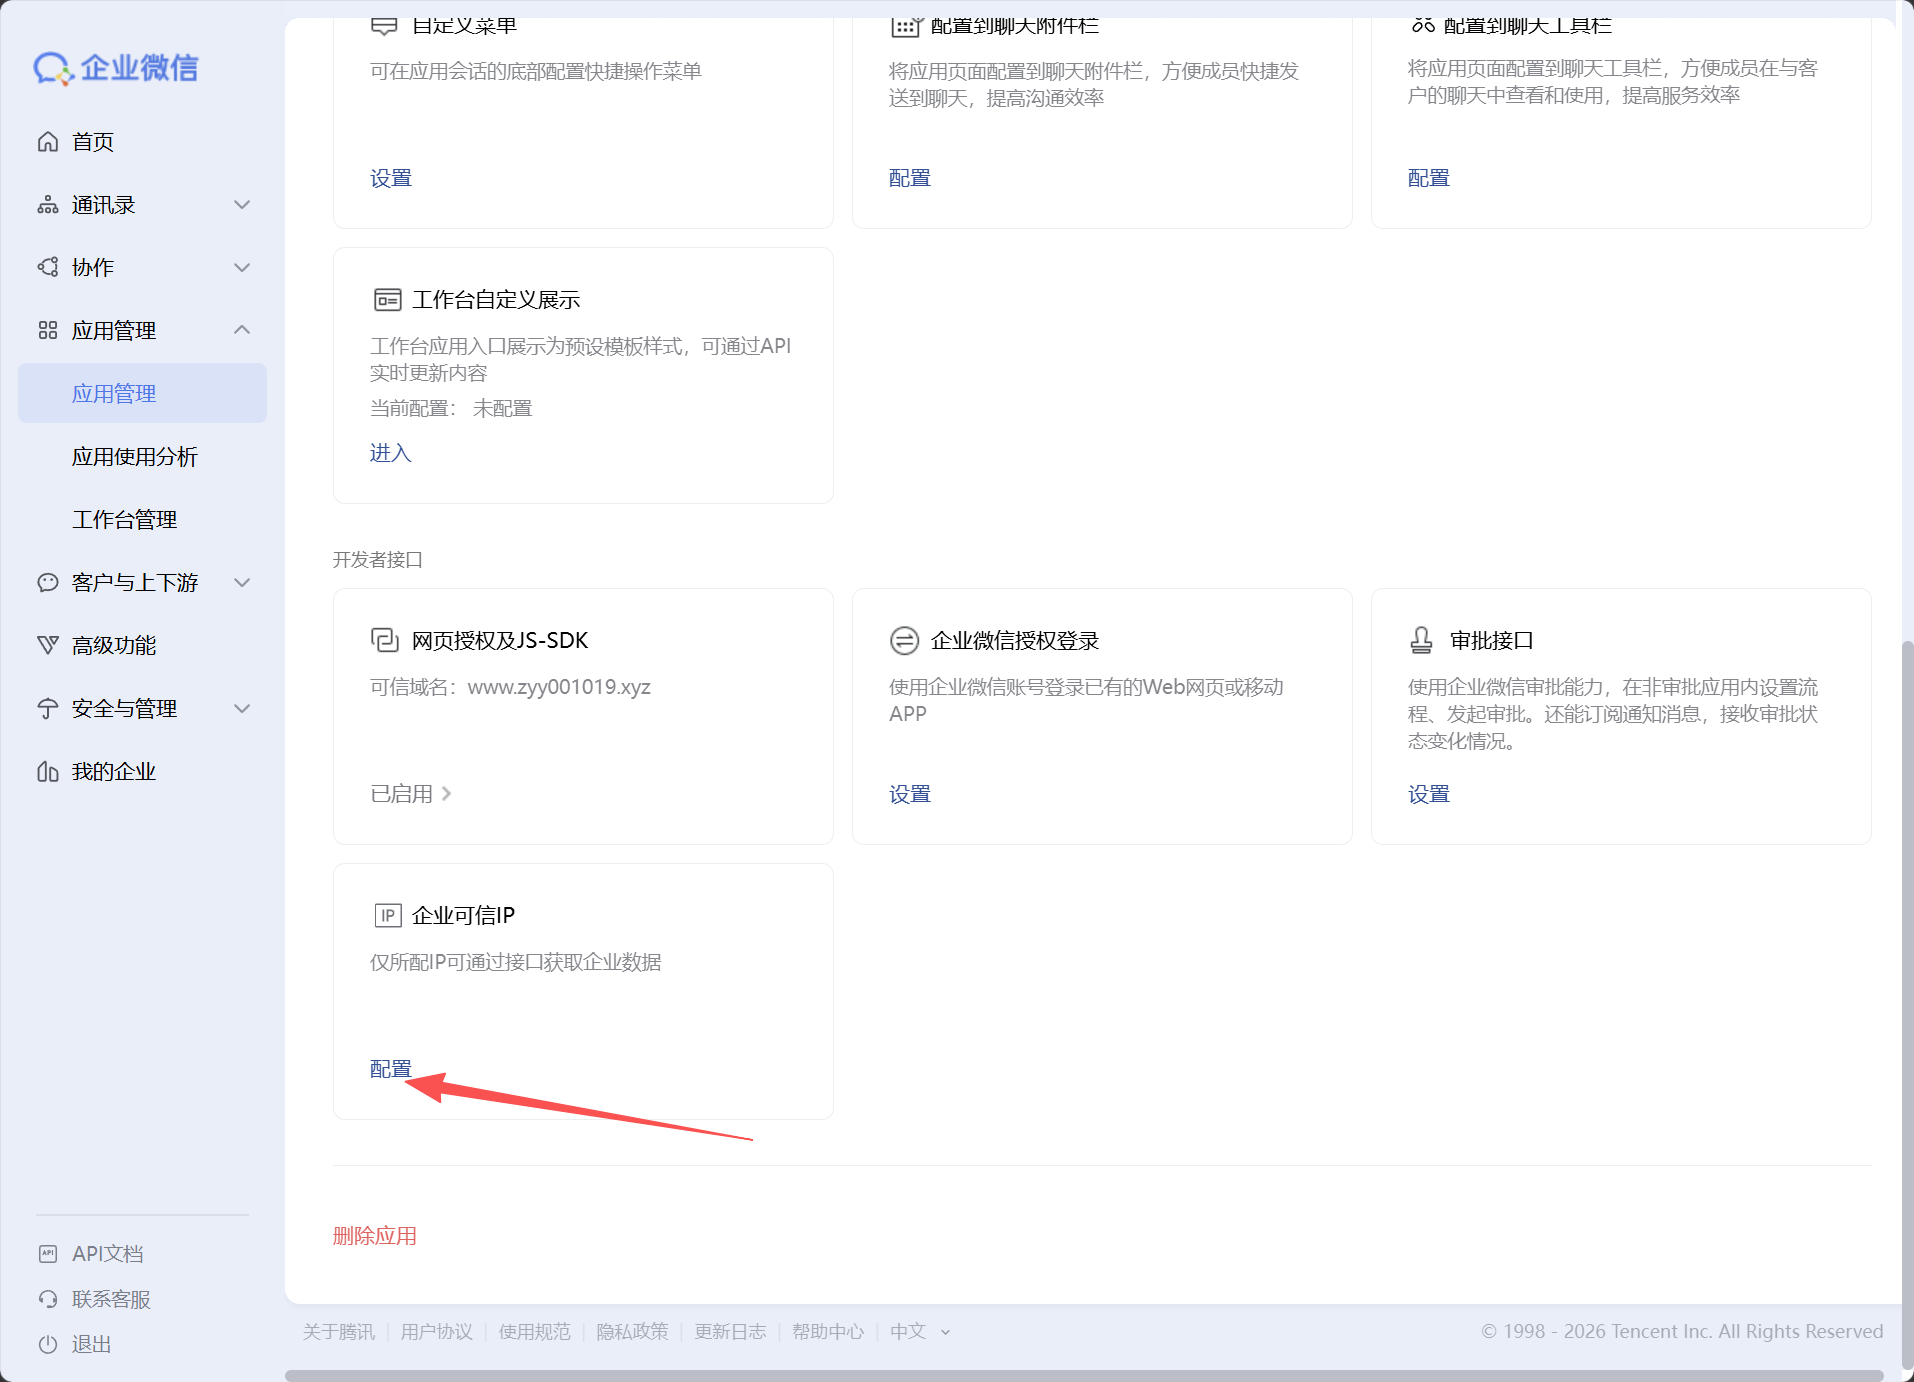
添加当前出口的公网IP地址(jenkins服务器的公网IP地址)
[root@jenkins ~]# curl cip.cc
IP	: 123.122.36.131
地址	: 中国 北京 北京
运营商	: 联通

数据二	: 中国 北京 北京 | 联通

数据三	: 中国 北京 北京市 | 联通

URL	: http://www.cip.cc/123.122.36.131
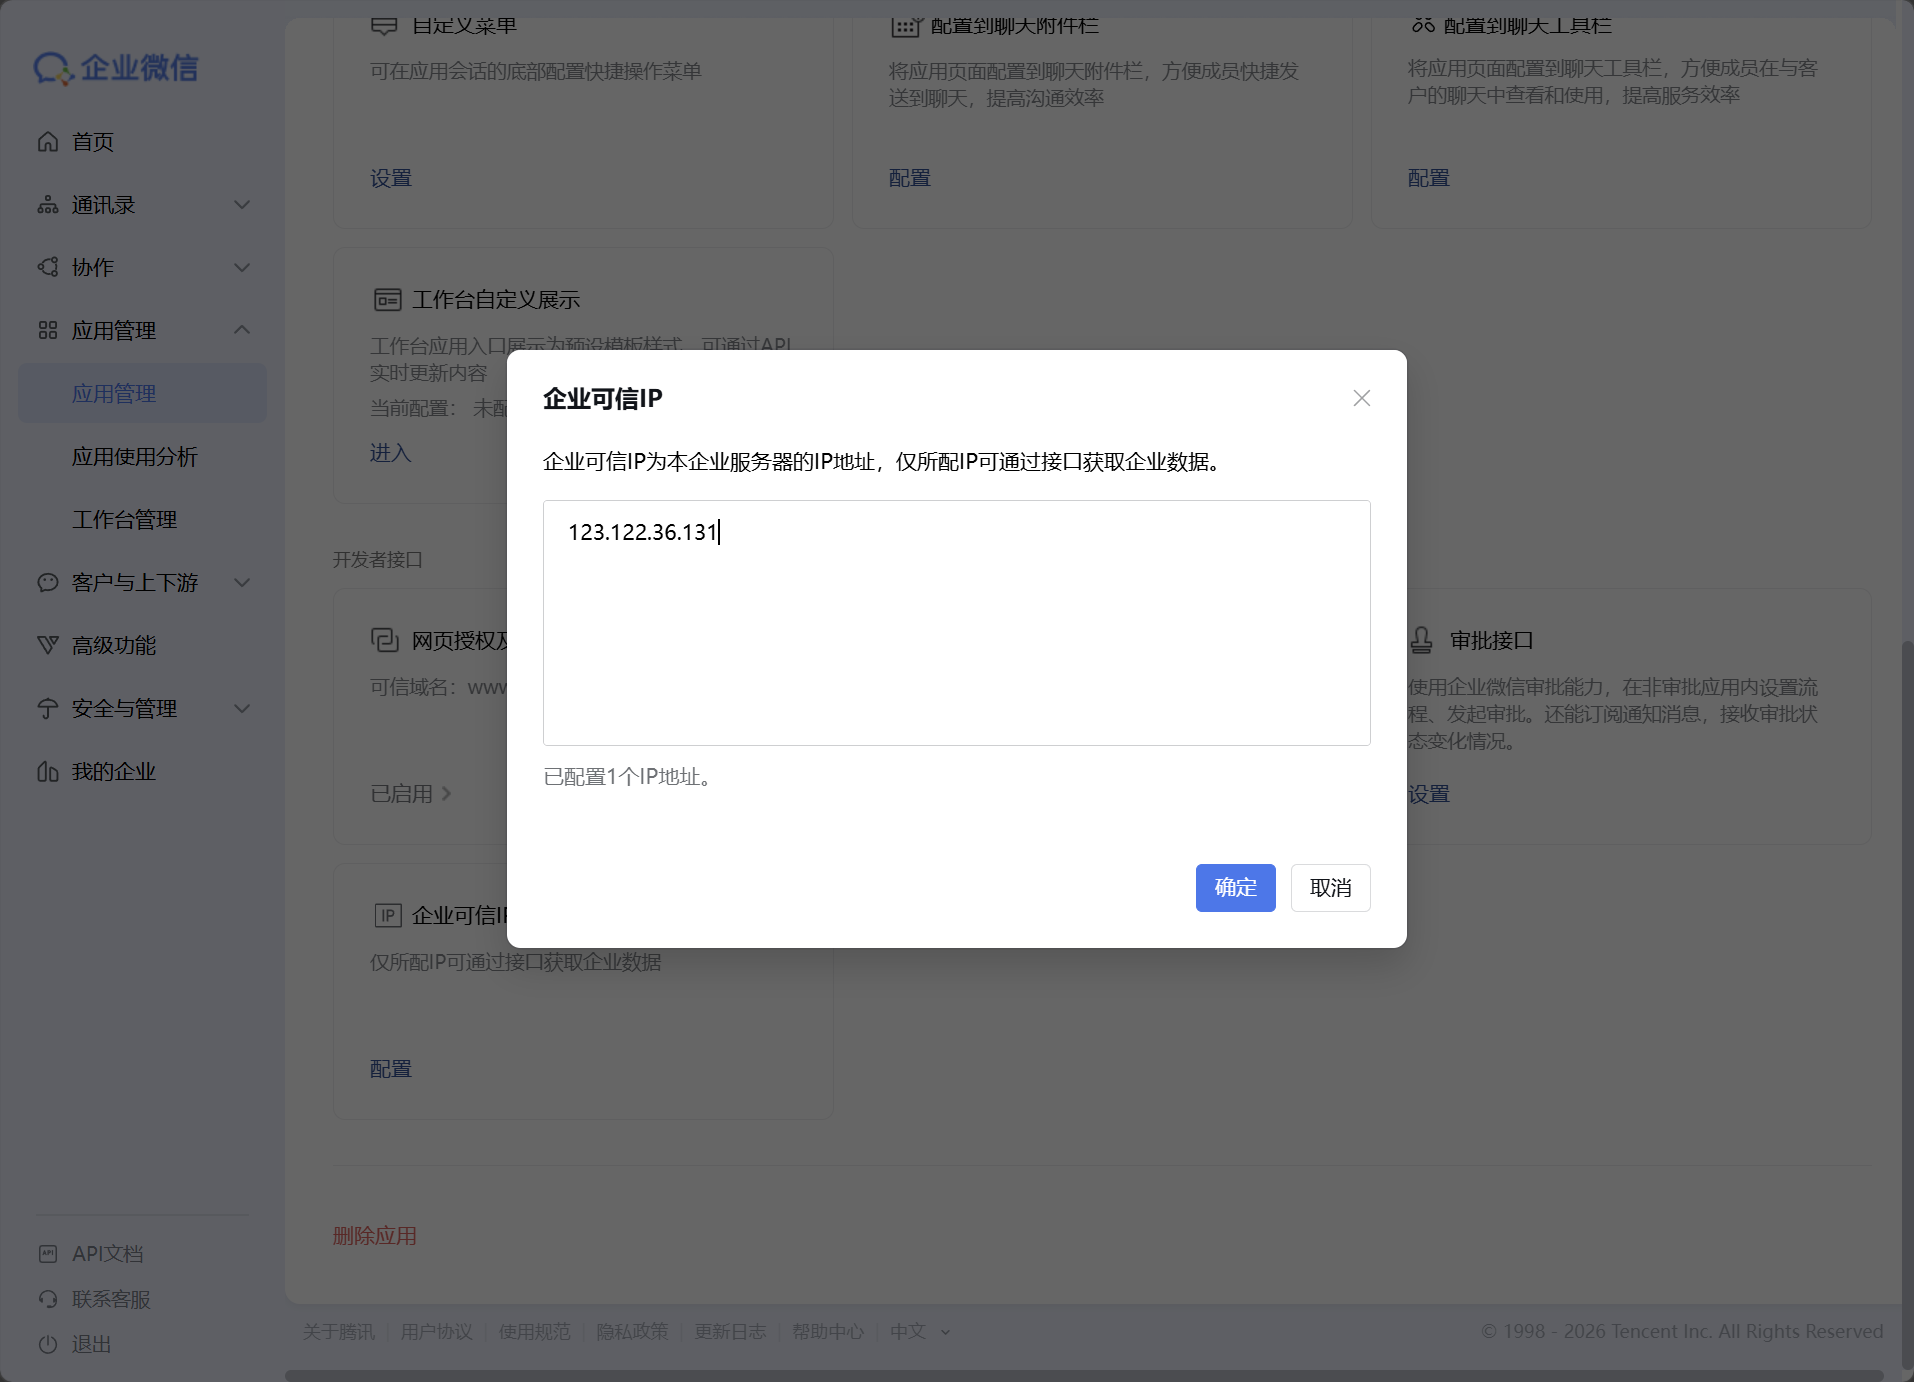
3.上传python脚本
在jenkins服务器上操作
[root@jenkins ~]# mkdir -p /server/scripts
[root@jenkins ~]# cd /server/scripts
[root@jenkins scripts]# rz -E
rz waiting to receive.
[root@jenkins scripts]# ll
总用量 4
-rw-r--r-- 1 root root 2008  9月 27  2024 jenkins_notify.py

#修改脚本信息
...
33     data = {
 34         "touser" : "ZhangJinLong",
 35         "msgtype" : "text",
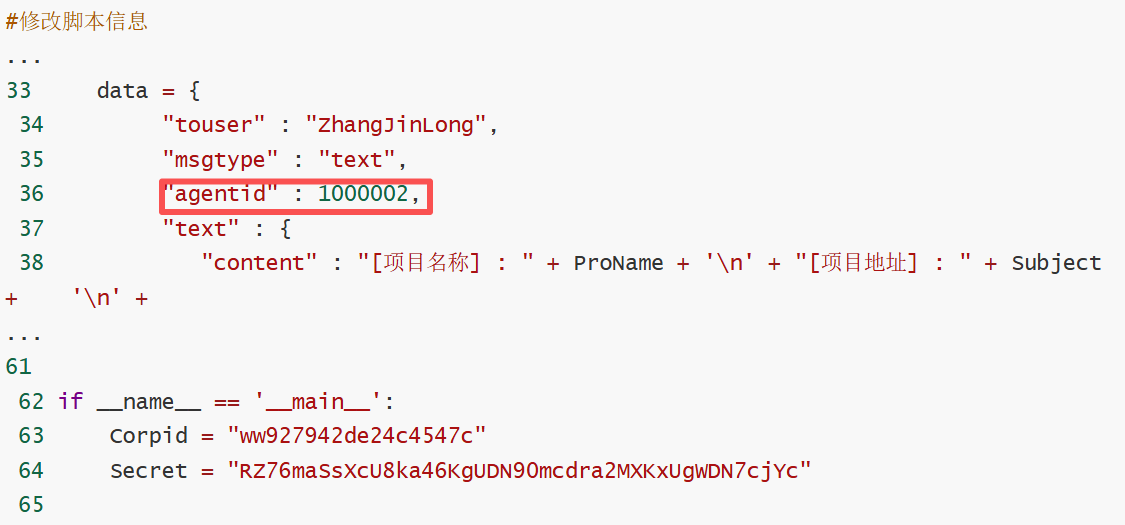
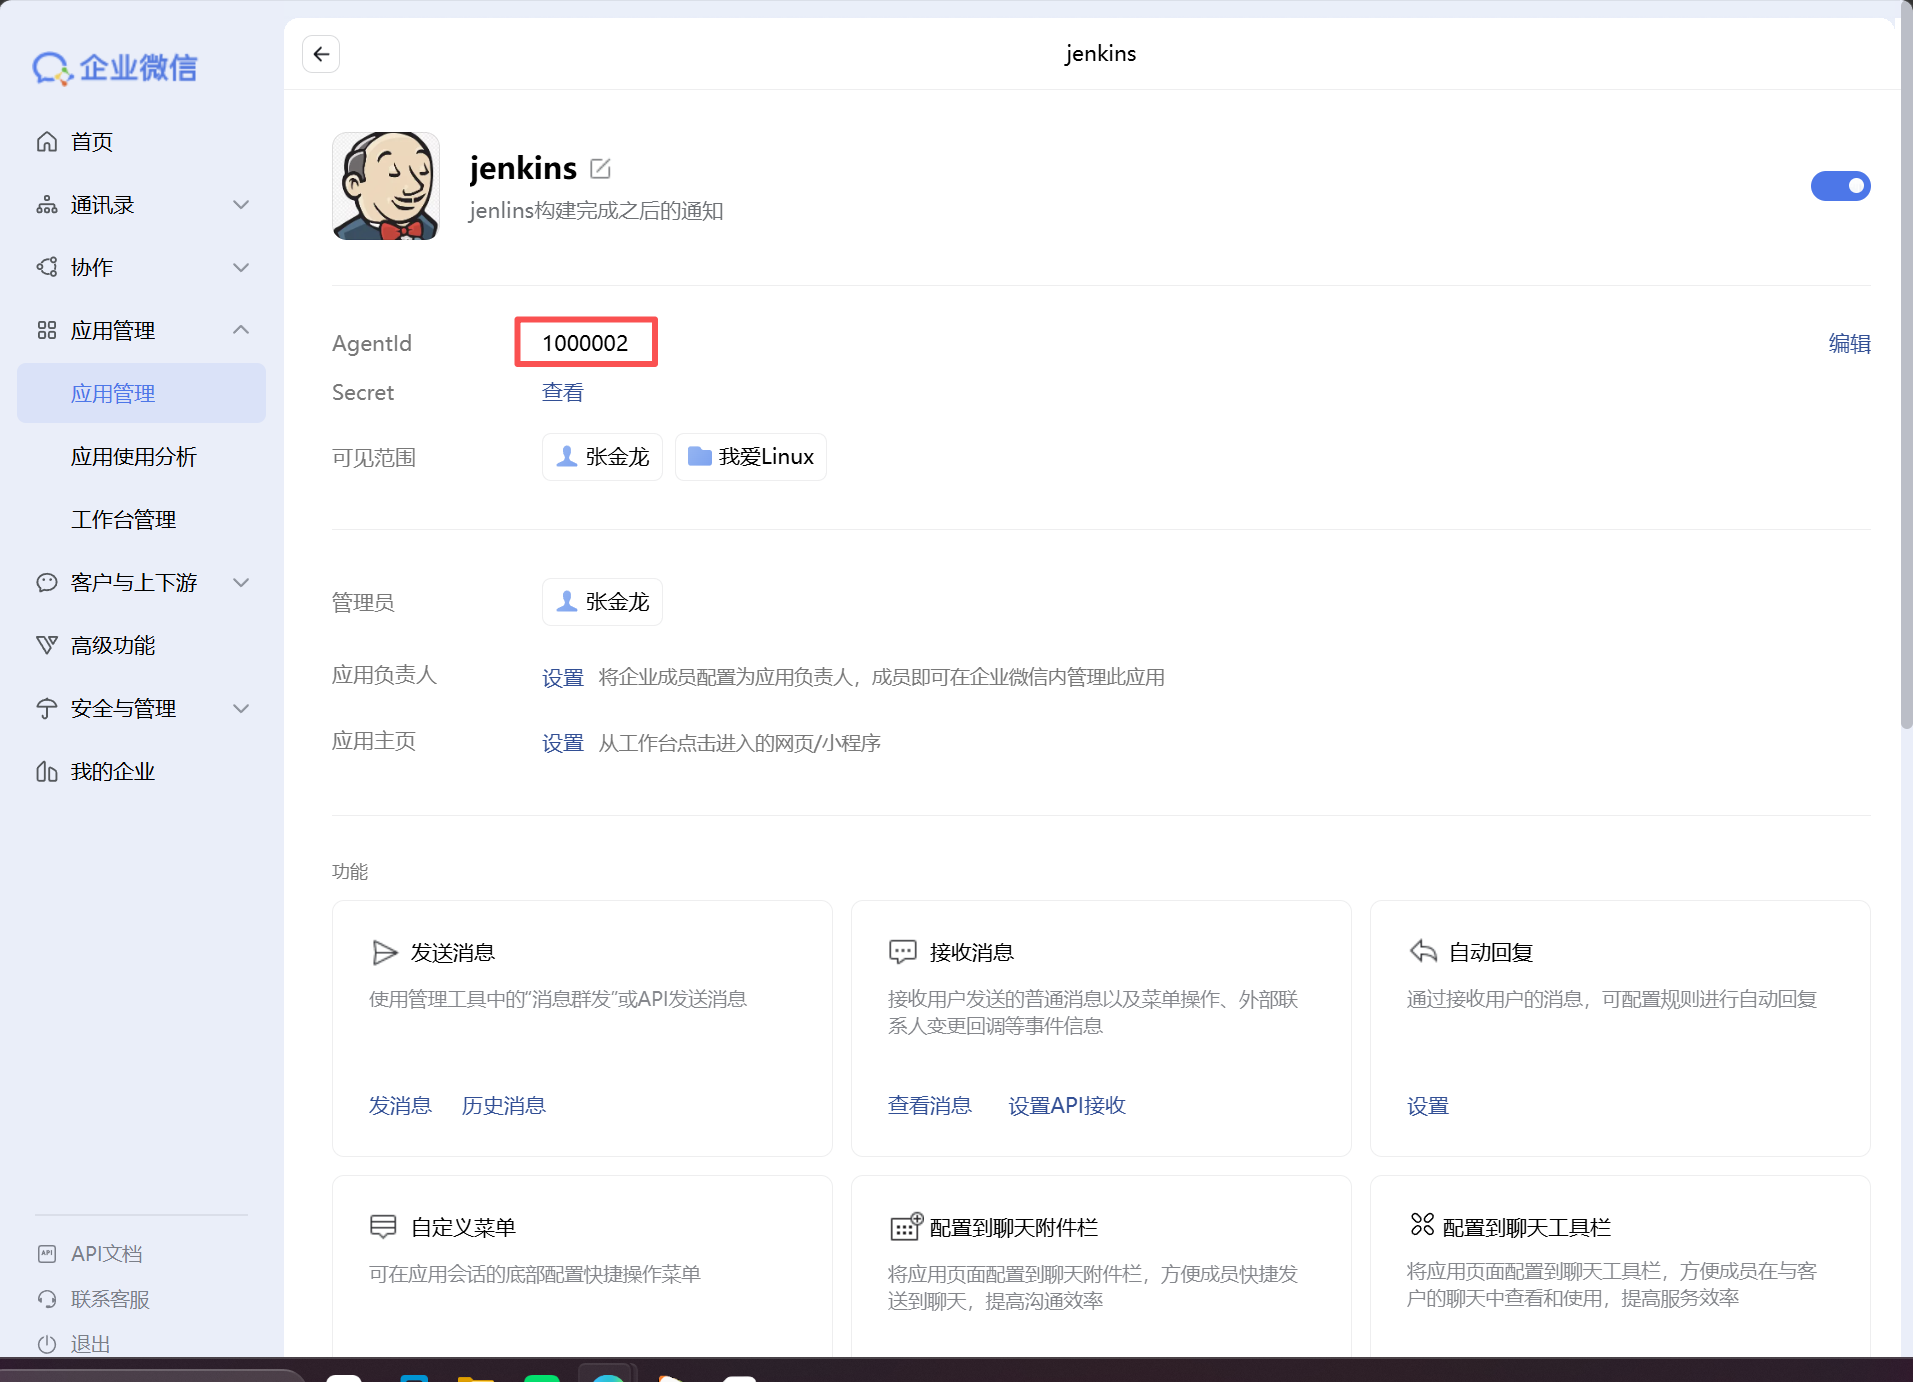
 36         "agentid" : 1000002,
 37         "text" : {
 38            "content" : "[项目名称] : " + ProName + '\n' + "[项目地址] : " + Subject +    '\n' +
...
61
 62 if __name__ == '__main__':
 63     Corpid = "ww927942de24c4547c"
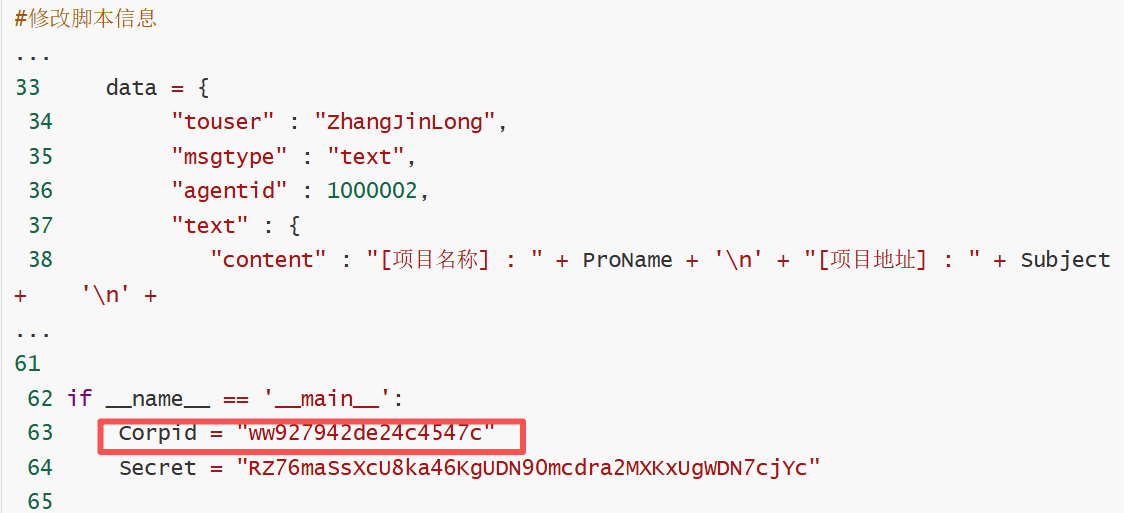
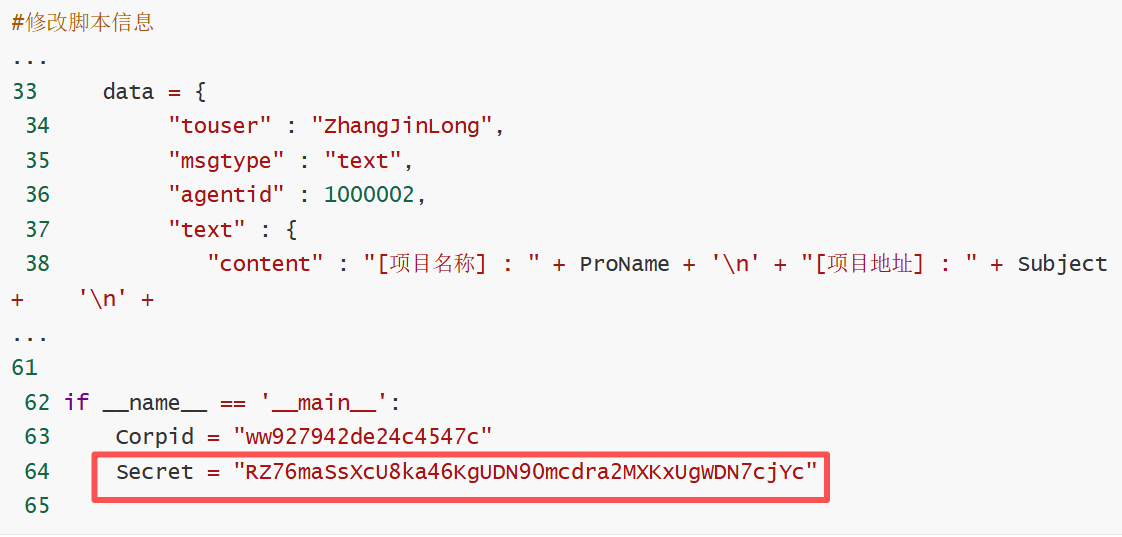
 64     Secret = "RZ76maSsXcU8ka46KgUDN90mcdra2MXKxUgWDN7cjYc"
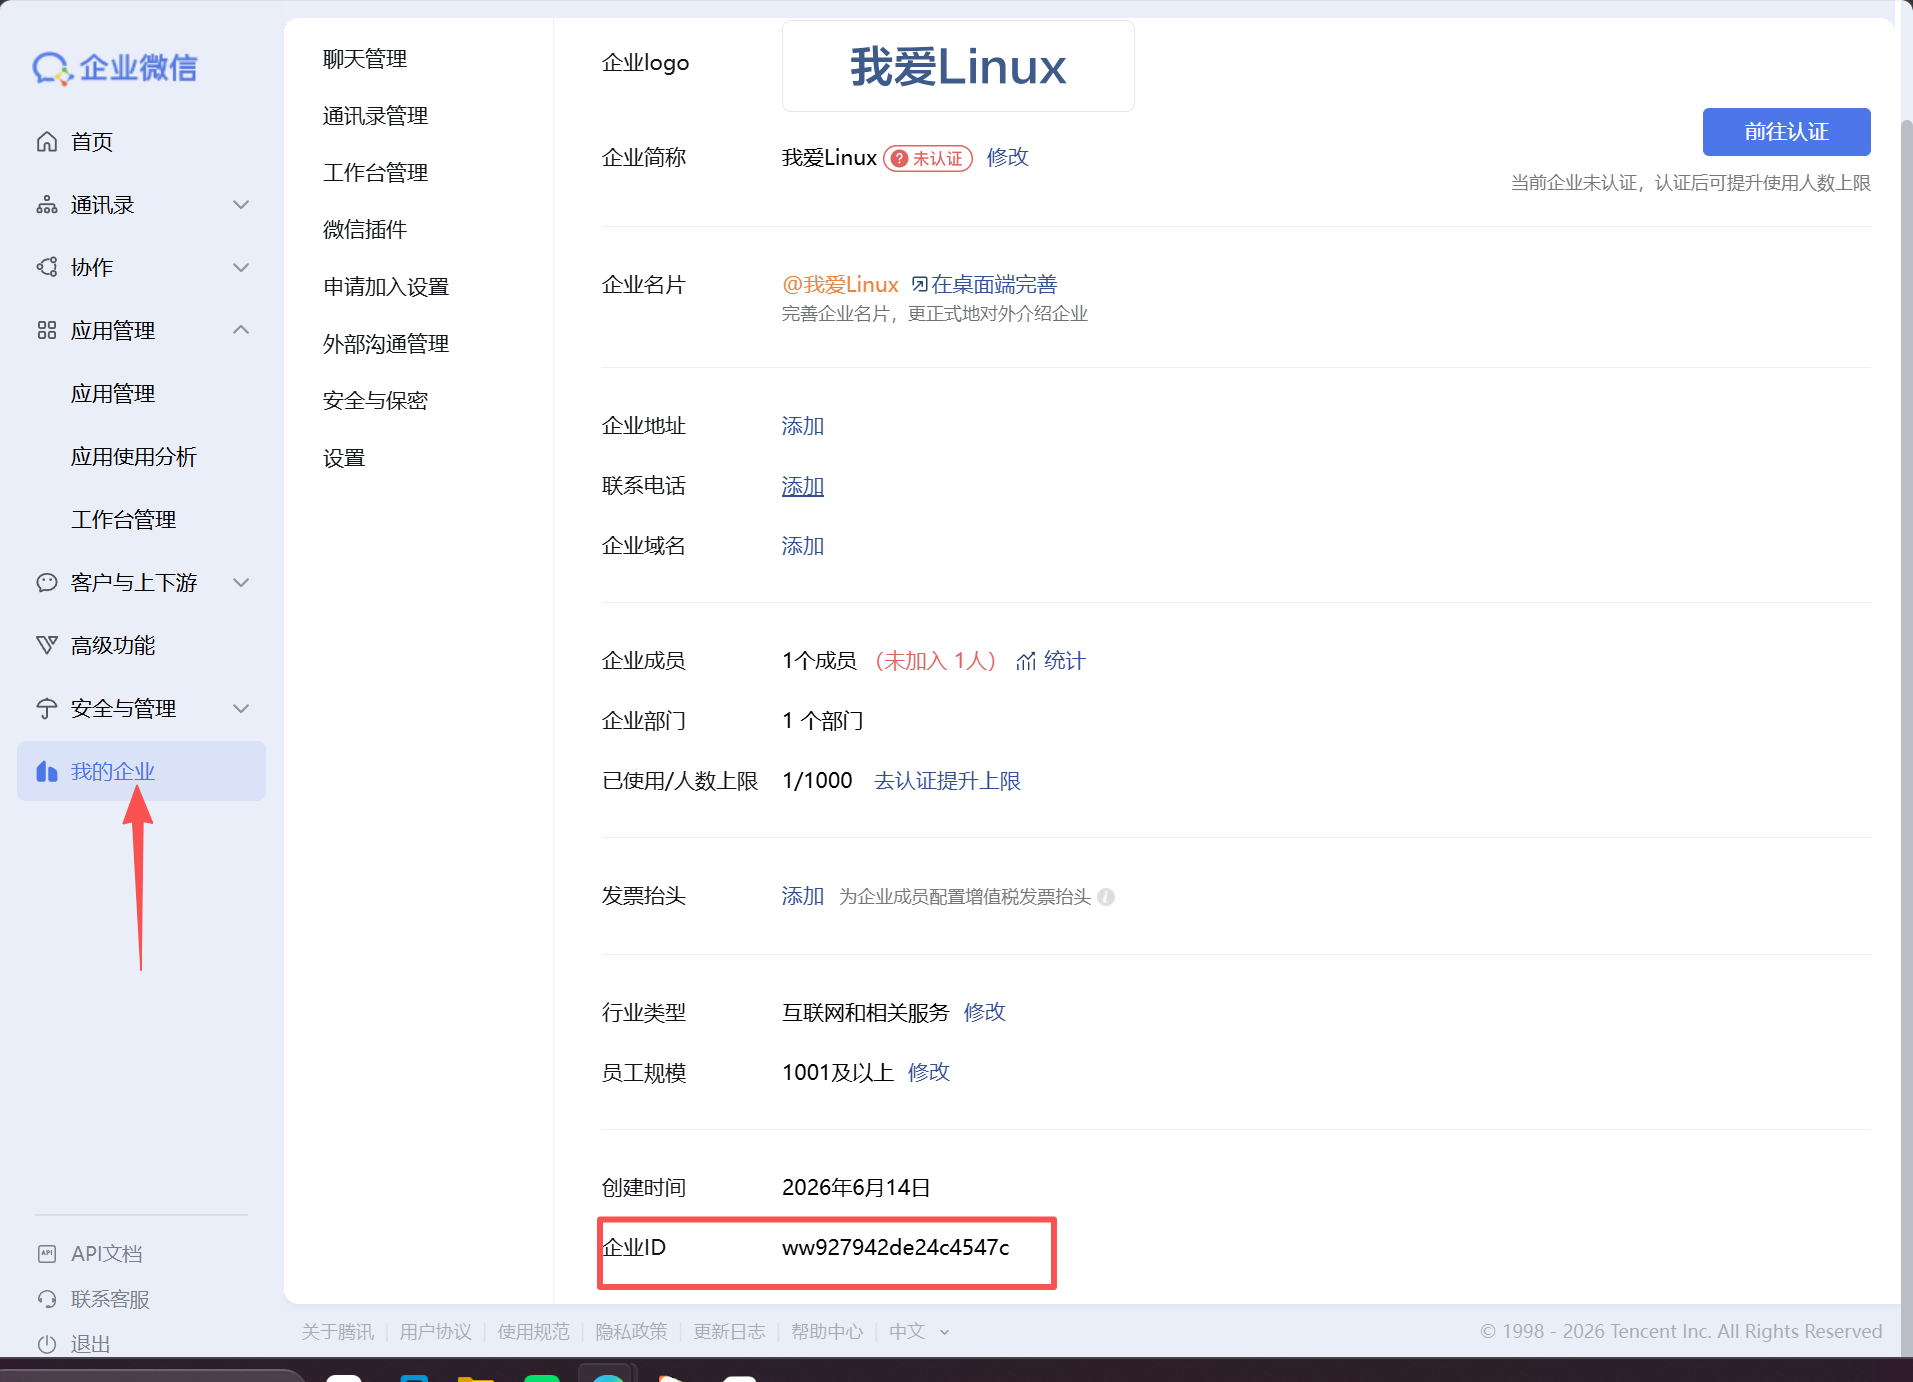
 65
以上的值都去下边找
touser
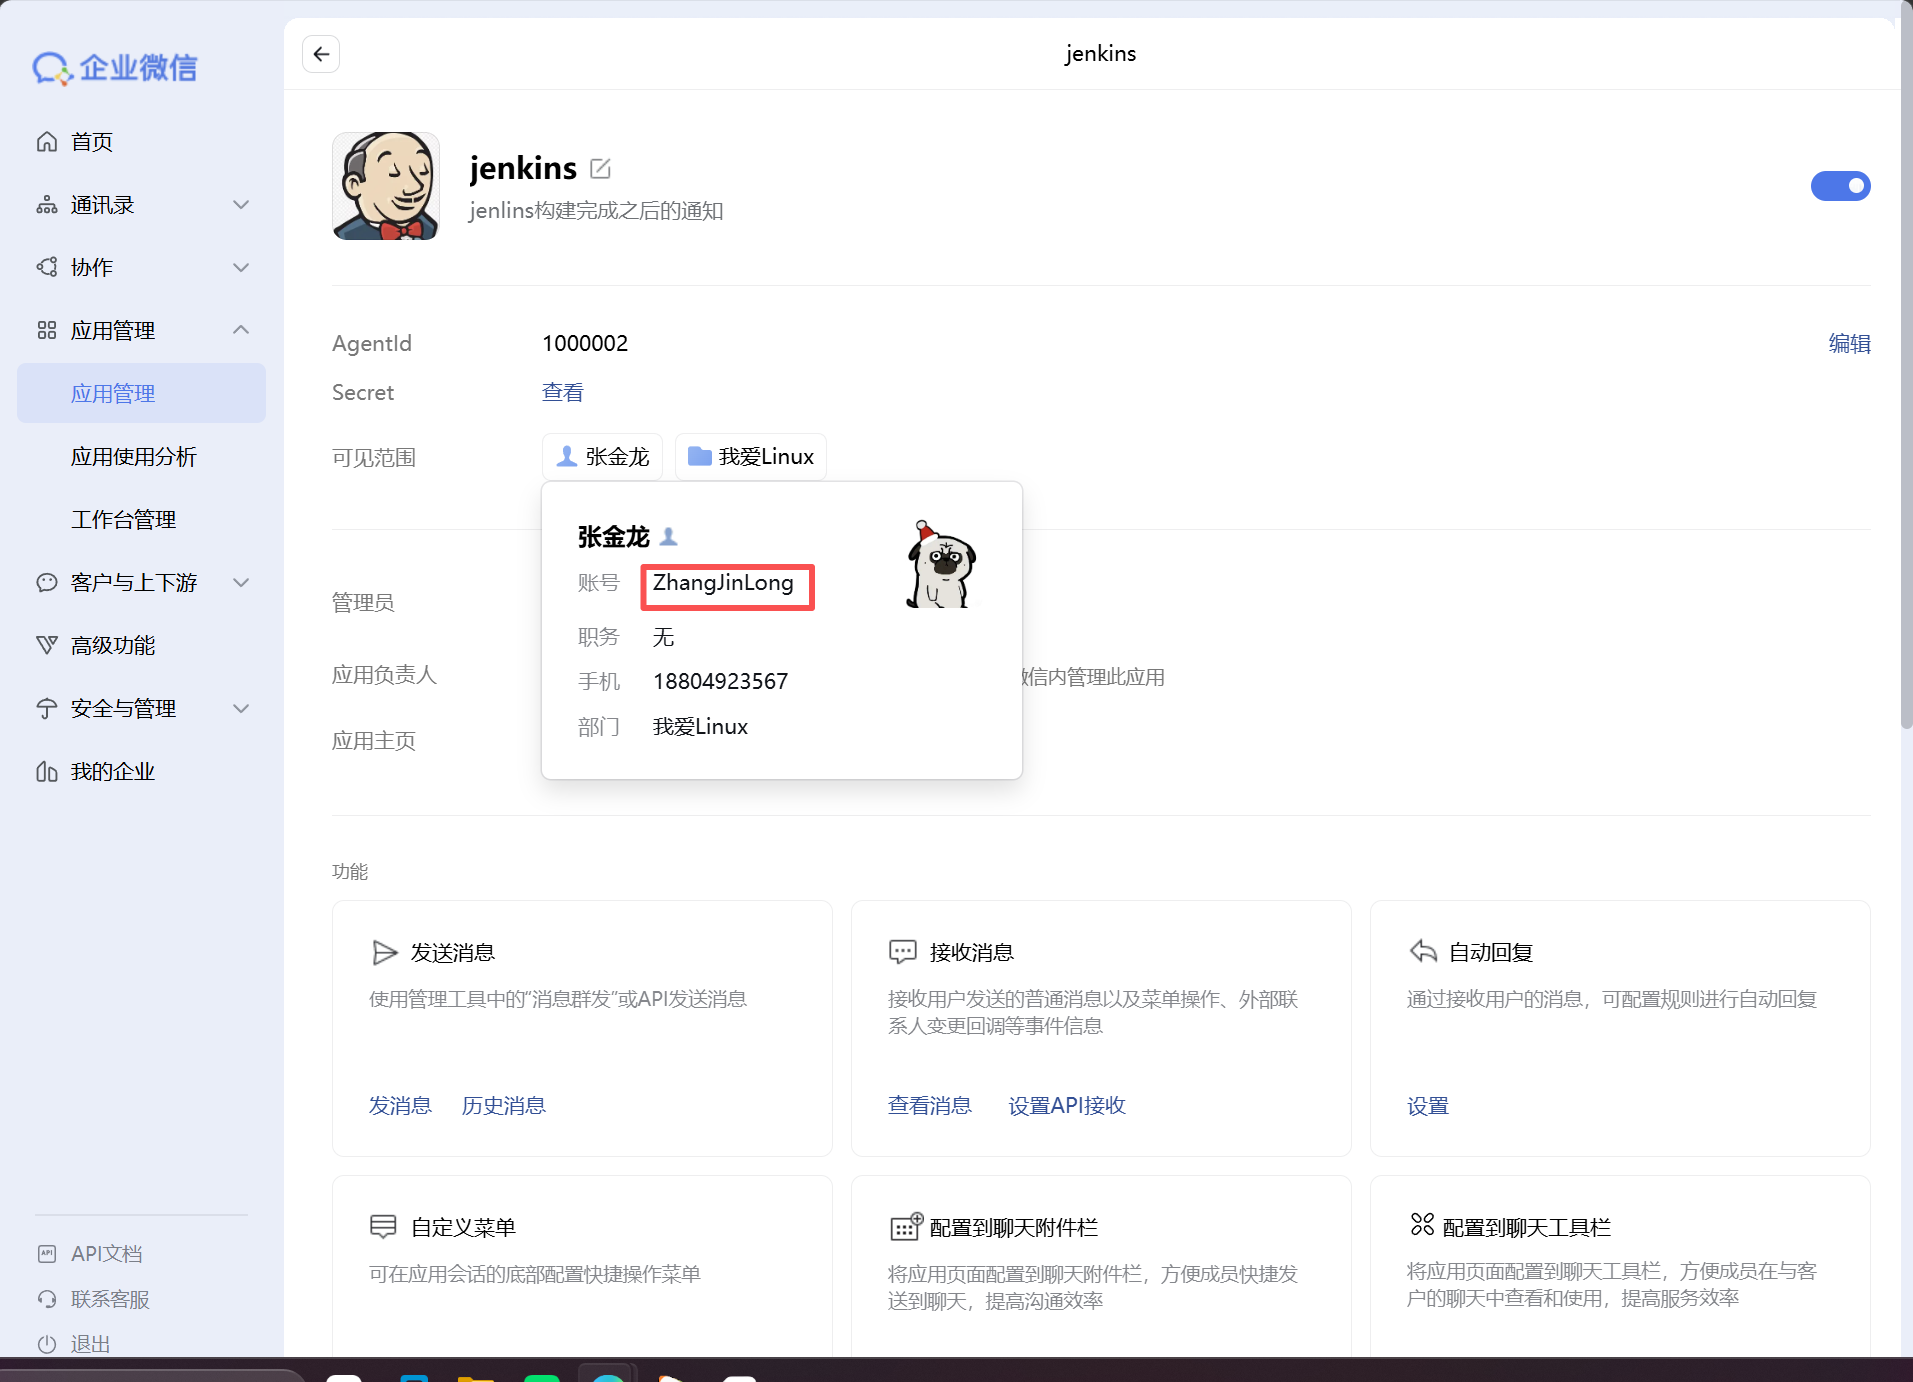
agentid
corpid
secret
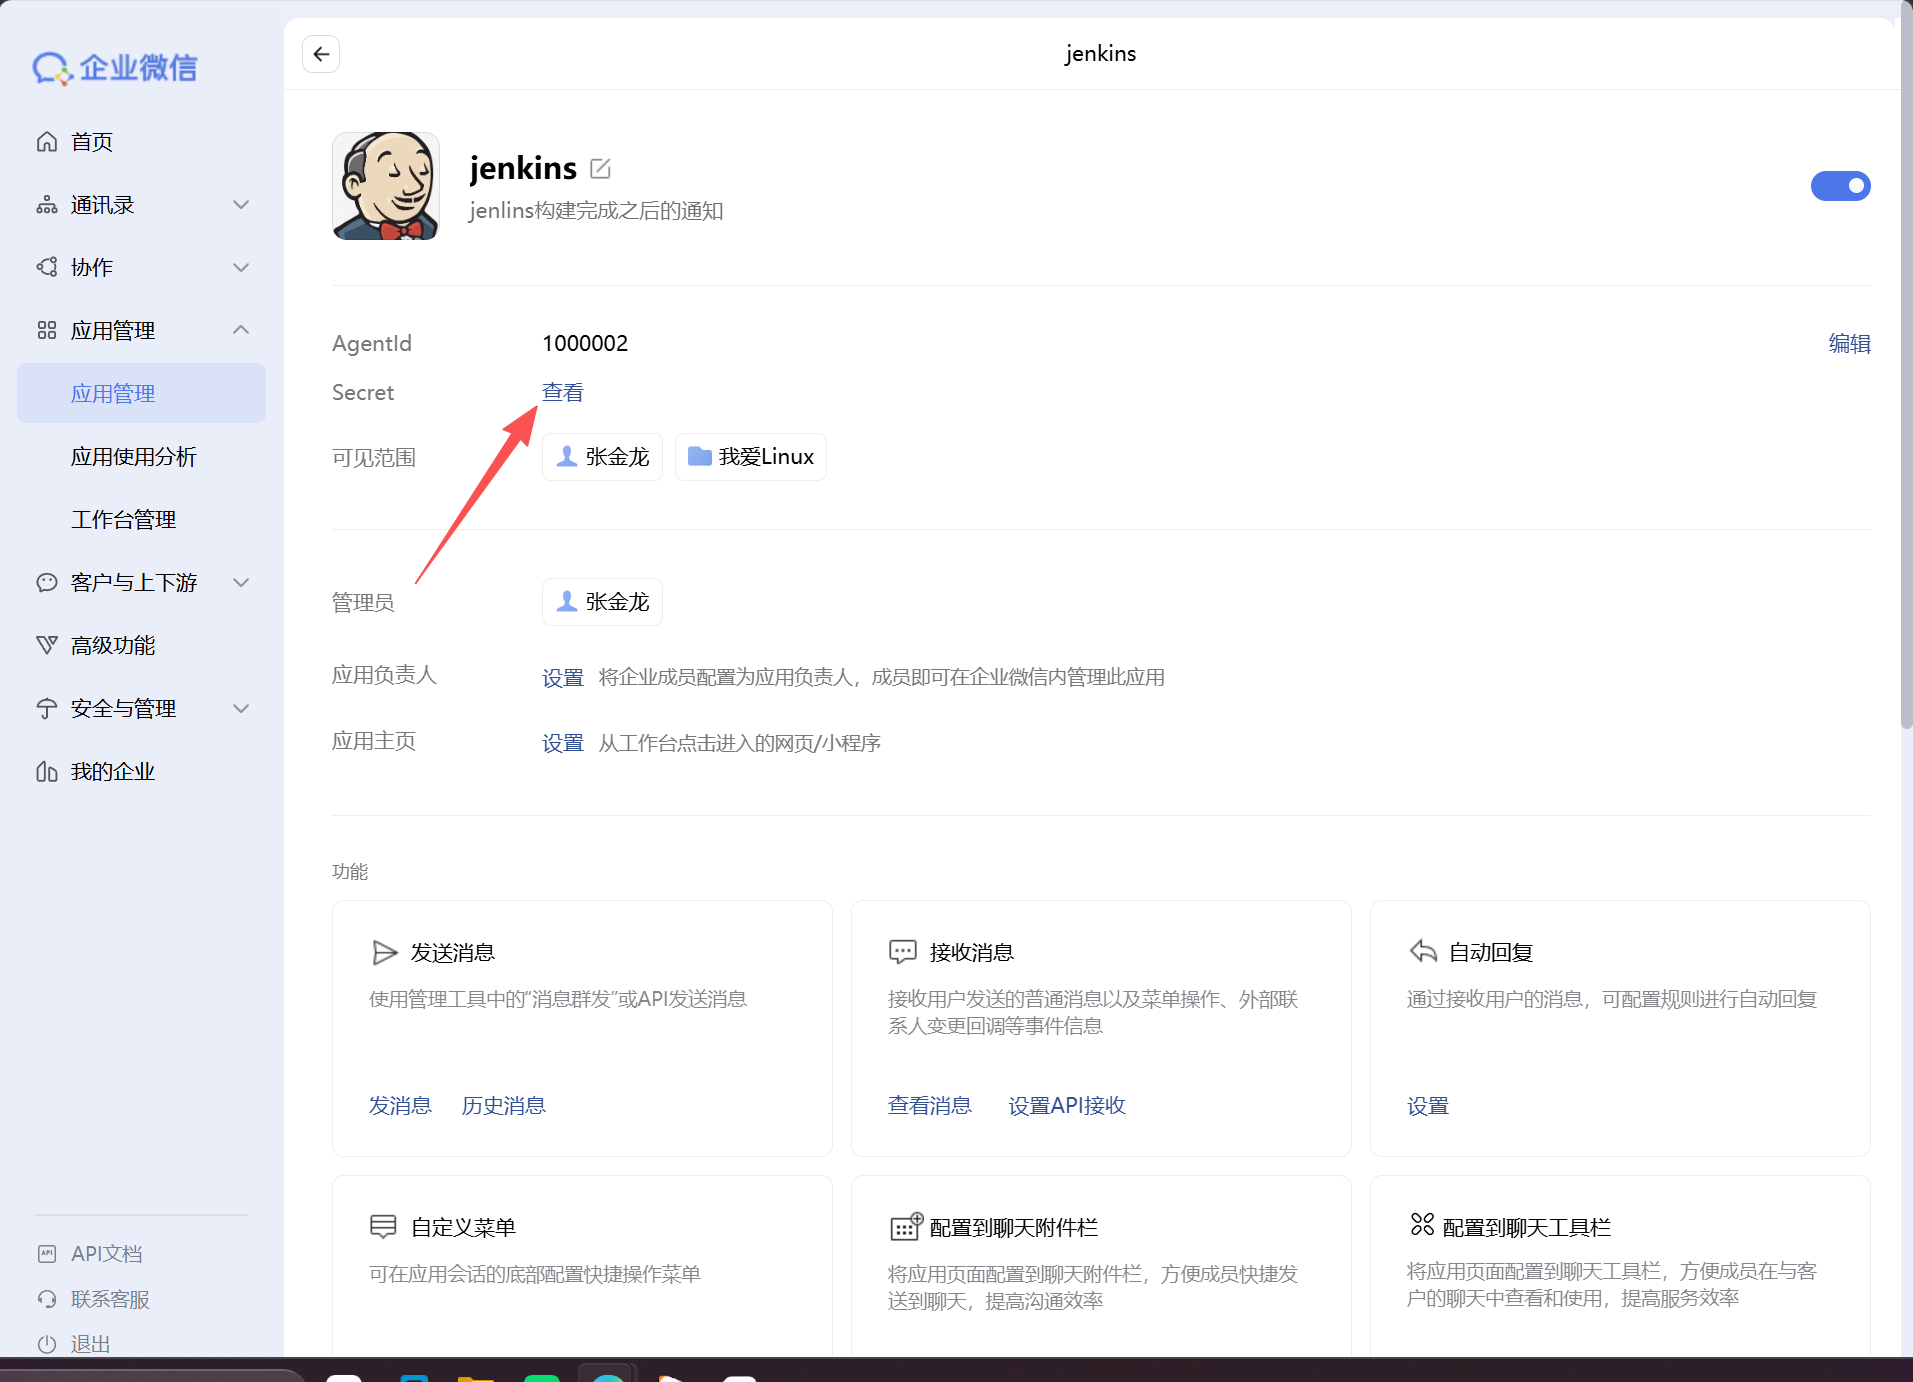
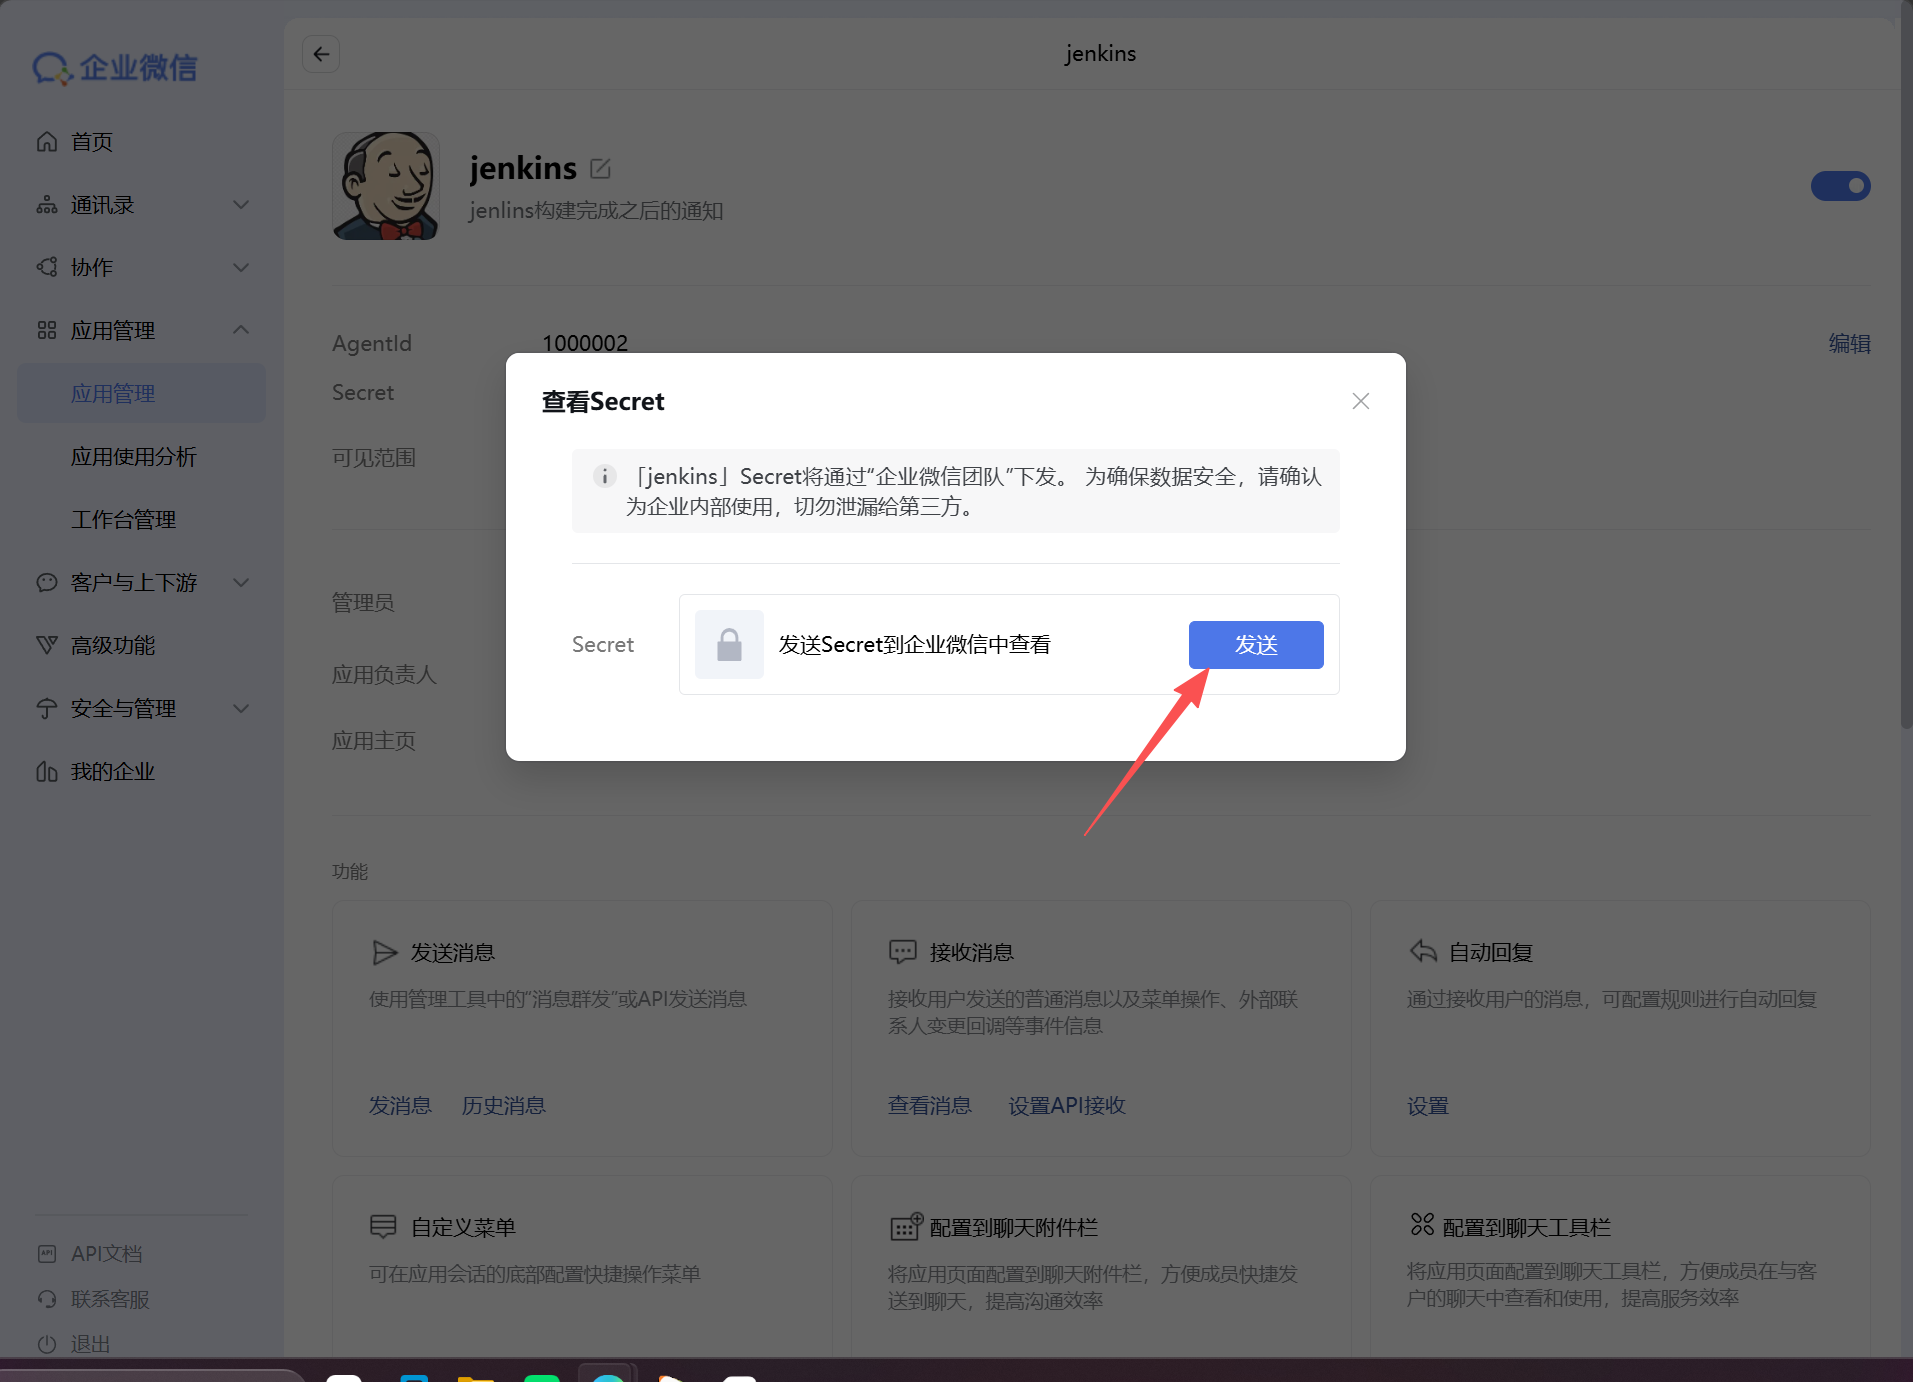
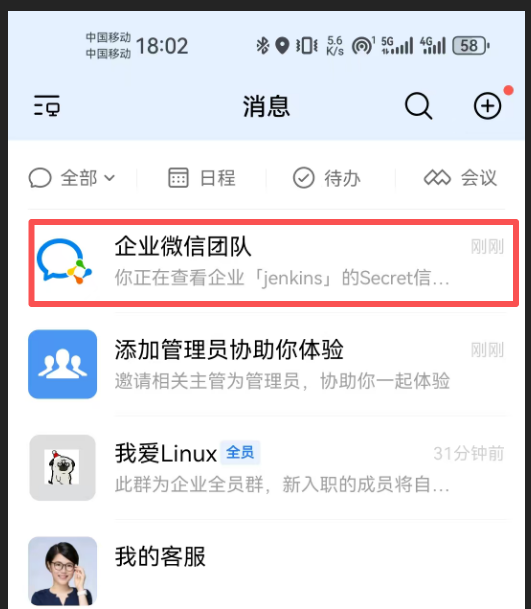
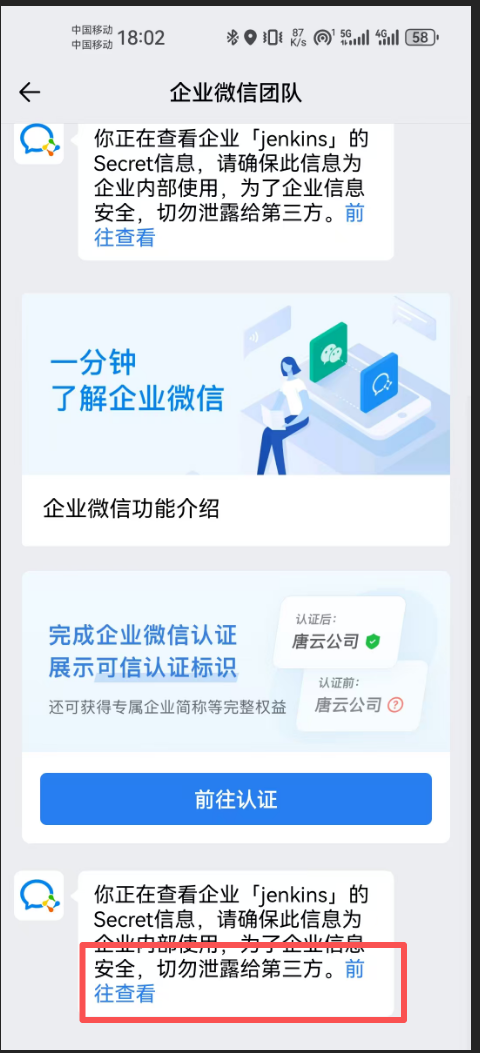
4.命令测试
[root@jenkins ~]# yum -y install python2
[root@jenkins ~]# yum -y install python2-pip
[root@jenkins ~]# pip2.7 install requests
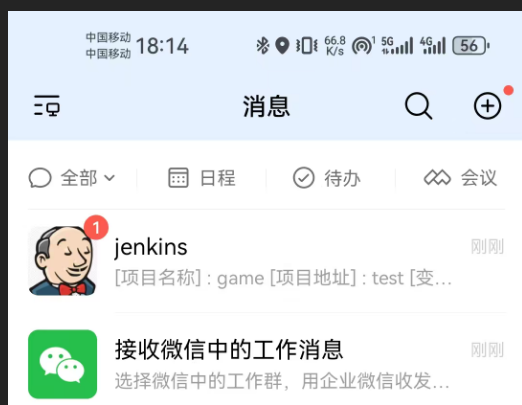
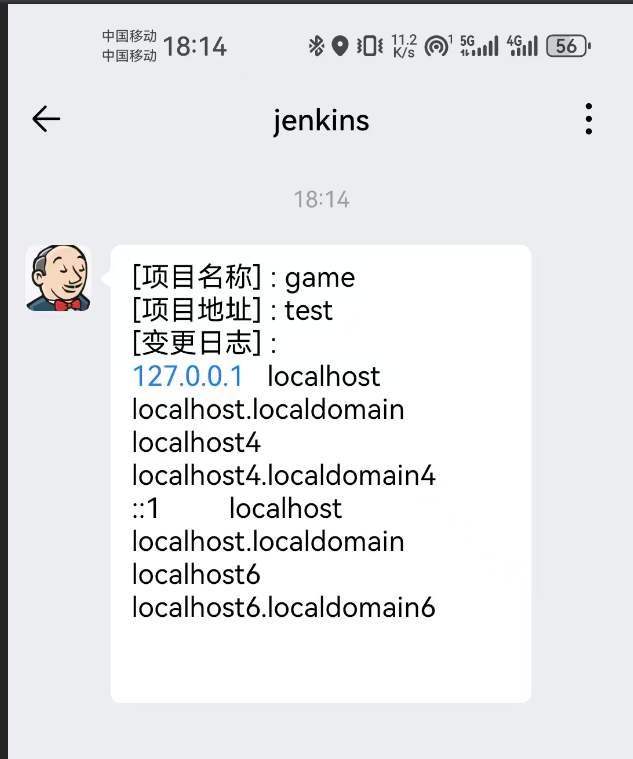
[root@jenkins scripts]# python2.7 jenkins_notify.py test /etc/hosts game
[变更日志] : 127.0.0.1   localhost localhost.localdomain localhost4 localhost4.localdomain4

[变更日志] : 127.0.0.1   localhost localhost.localdomain localhost4 localhost4.localdomain4
::1         localhost localhost.localdomain localhost6 localhost6.localdomain6

{"errcode":0,"errmsg":"ok","msgid":"oykM8gZThPh2qFctYhHlfMDcHxEgfC07YvKswKHxa-kT5TyVYTB_Pq1aEmdqf_yDxnHpIrjPd8bedciqEIgw-dgQ1_wZbNmNRHSgERSDCwKgOIoImRFwX7ue7BnCN7MD"}
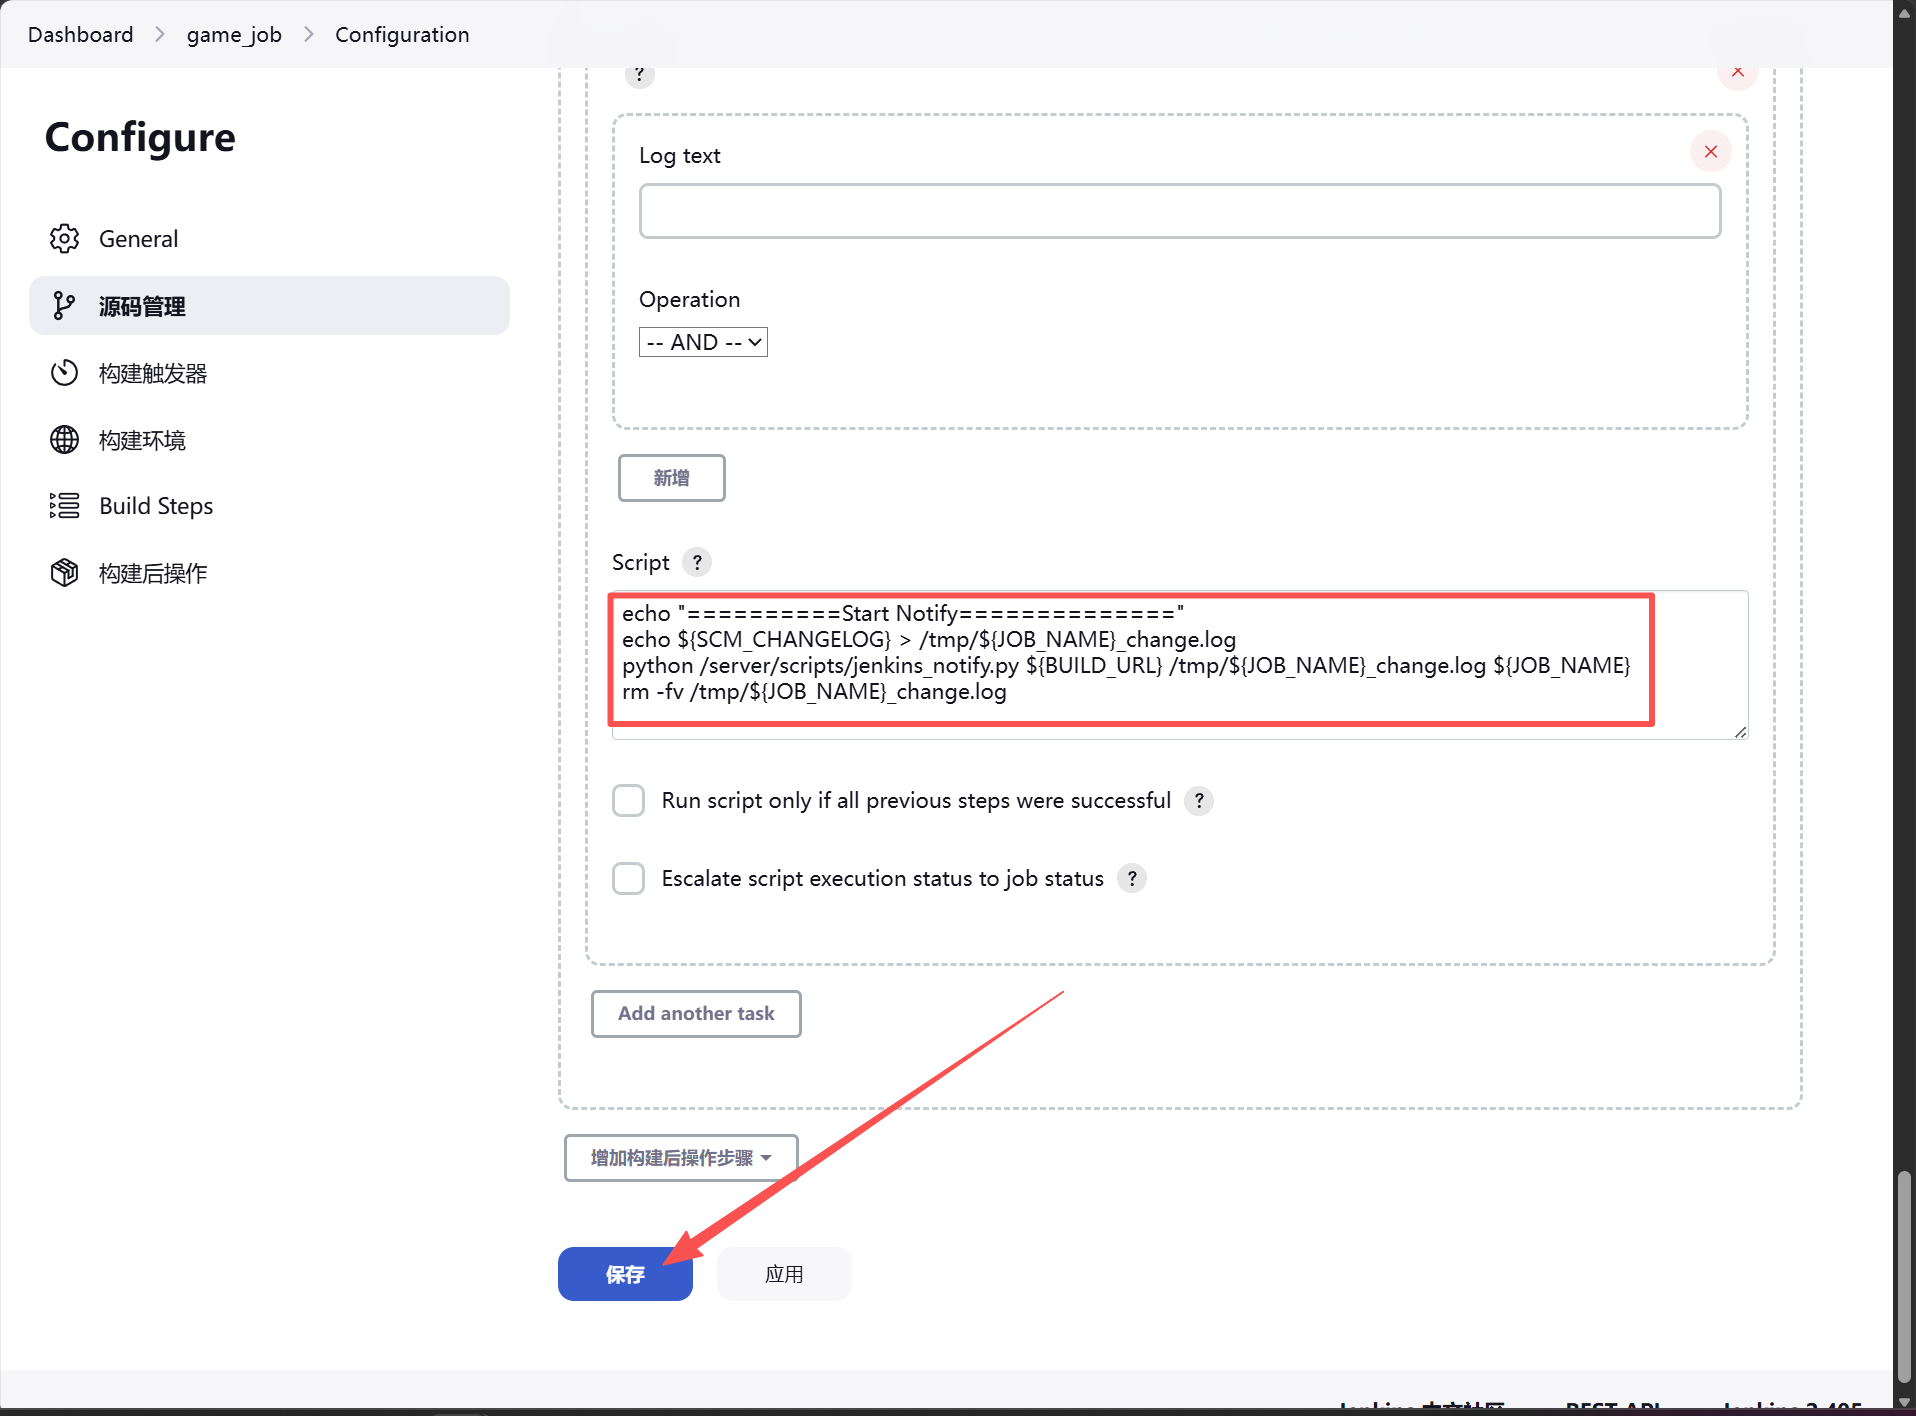
5.集成到jenkins
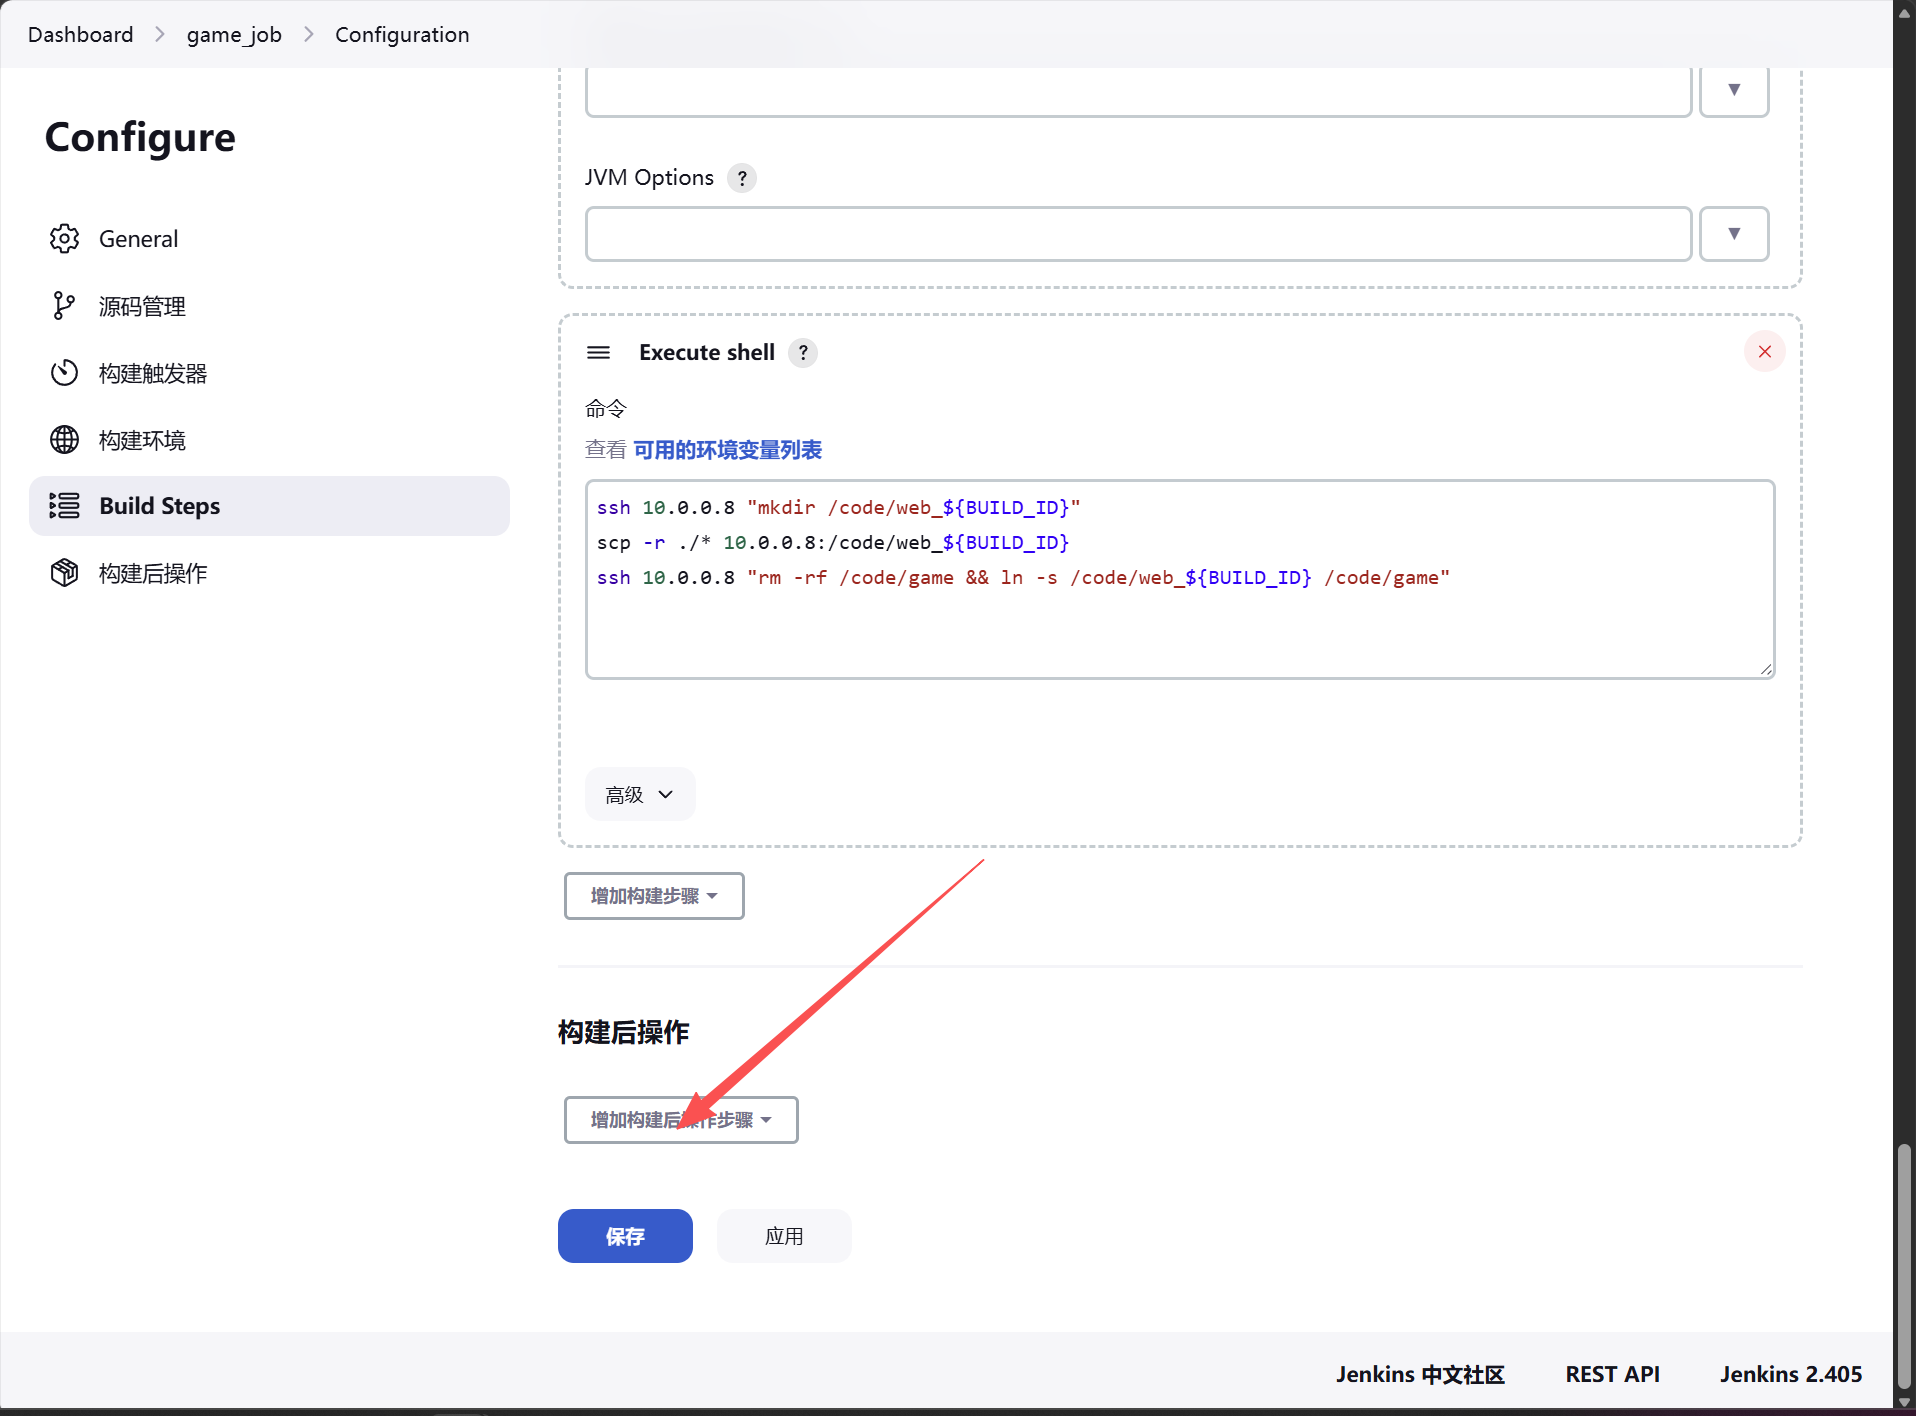
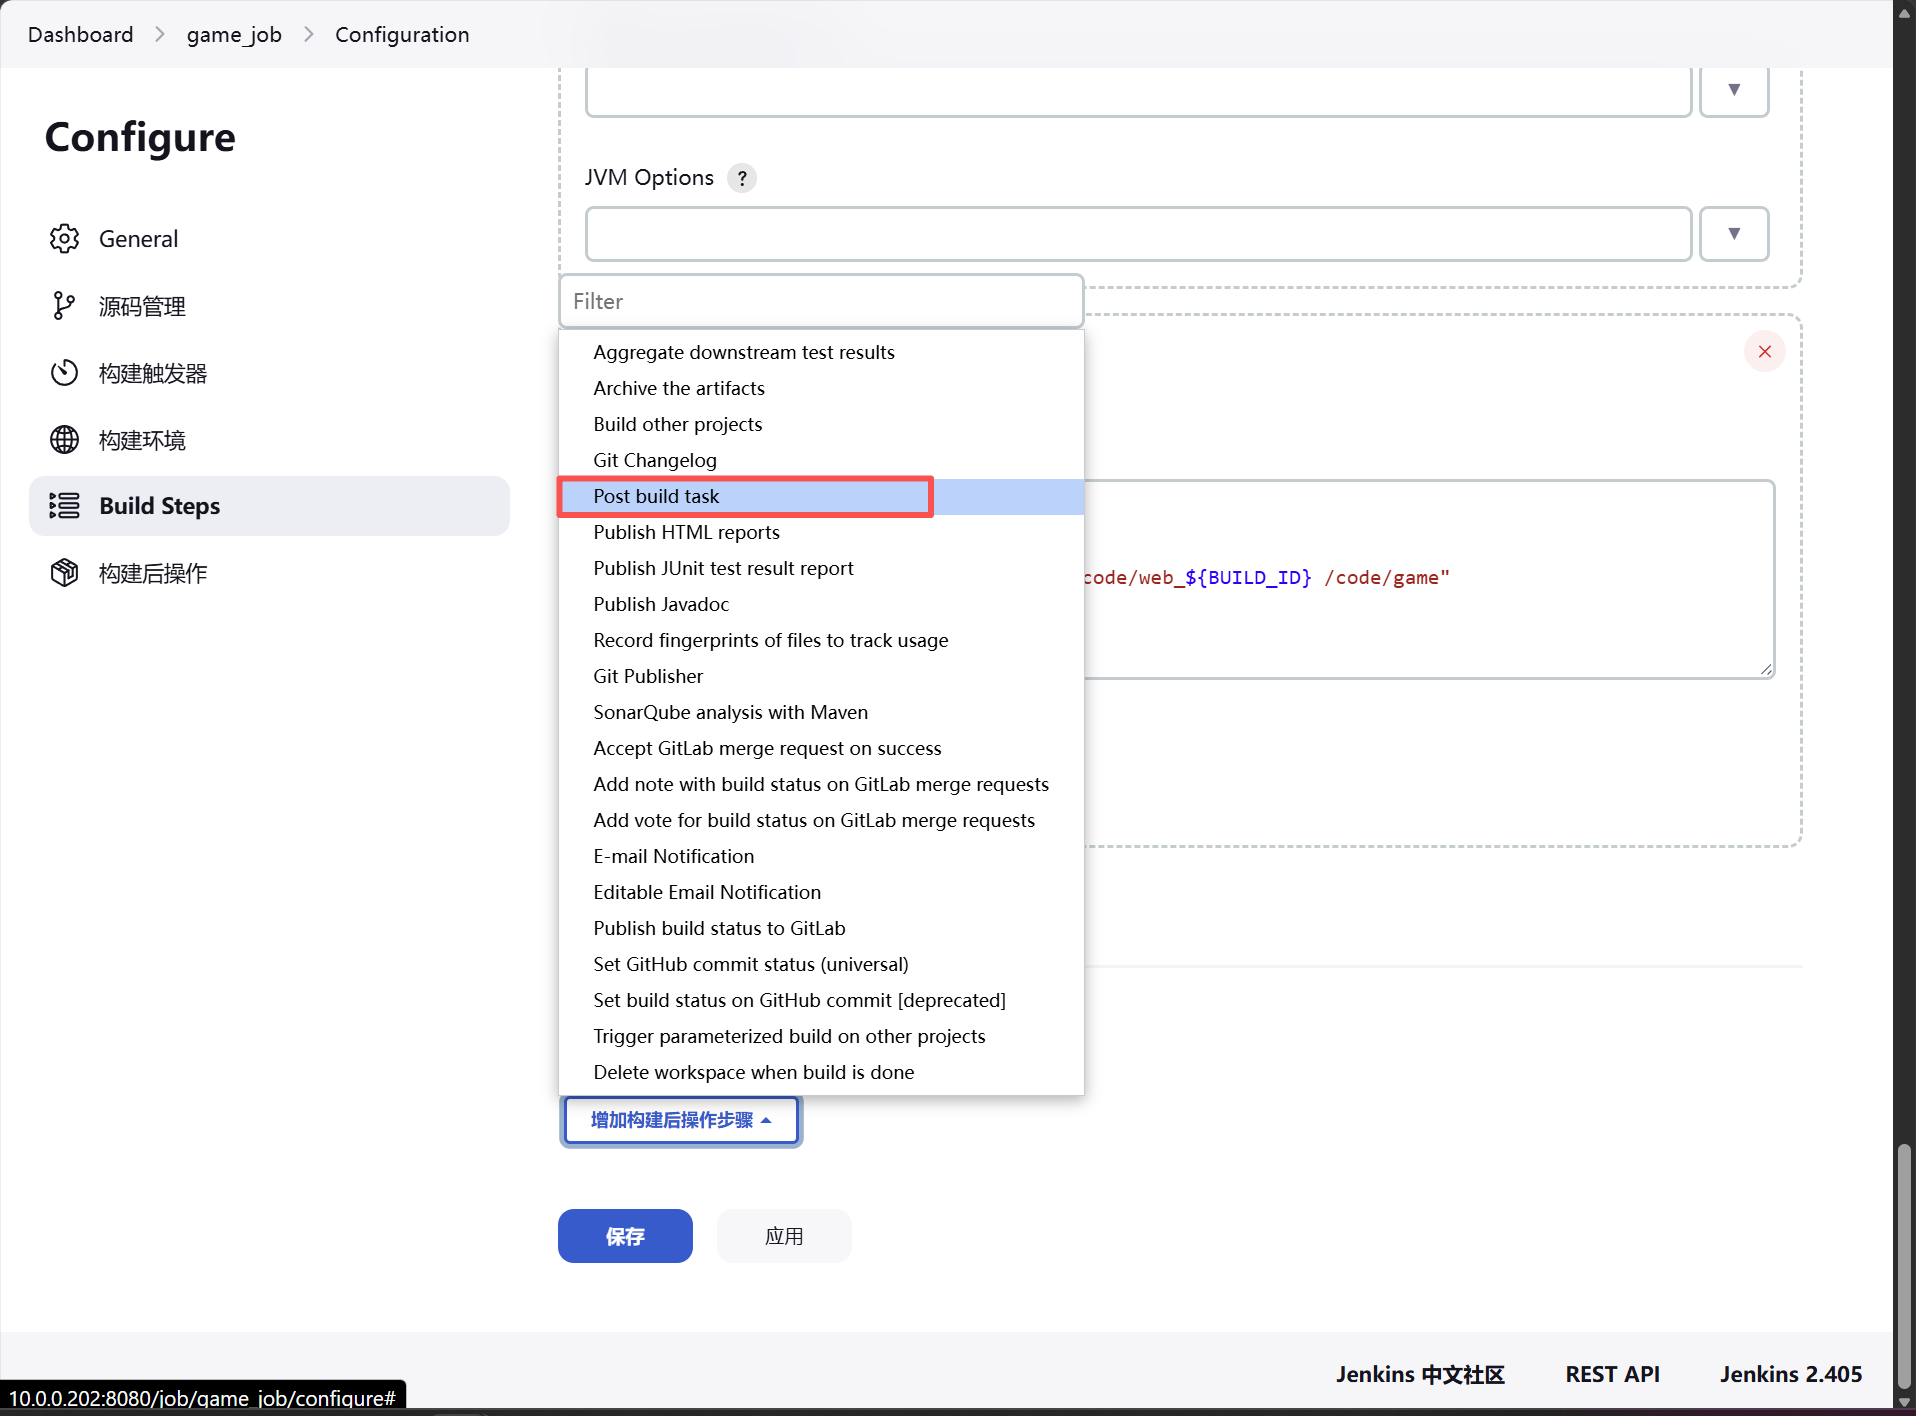
echo "==========Start Notify=============="
echo ${SCM_CHANGELOG} > /tmp/${JOB_NAME}_change.log
python /server/scripts/jenkins_notify.py ${BUILD_URL} /tmp/${JOB_NAME}_change.log ${JOB_NAME}
rm -fv /tmp/${JOB_NAME}_change.log
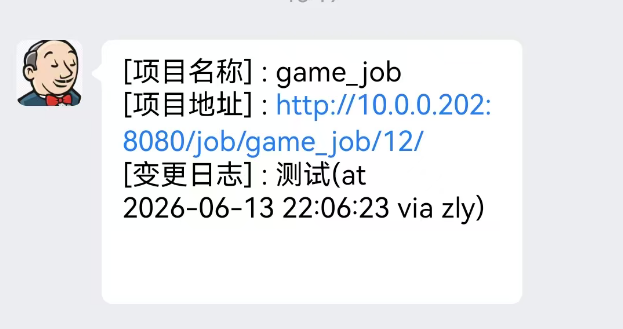
构建成功之后会显示这样的企业微信提示
八、线上发布流程
1.配置jenkins获取gitlab中所有的版本号
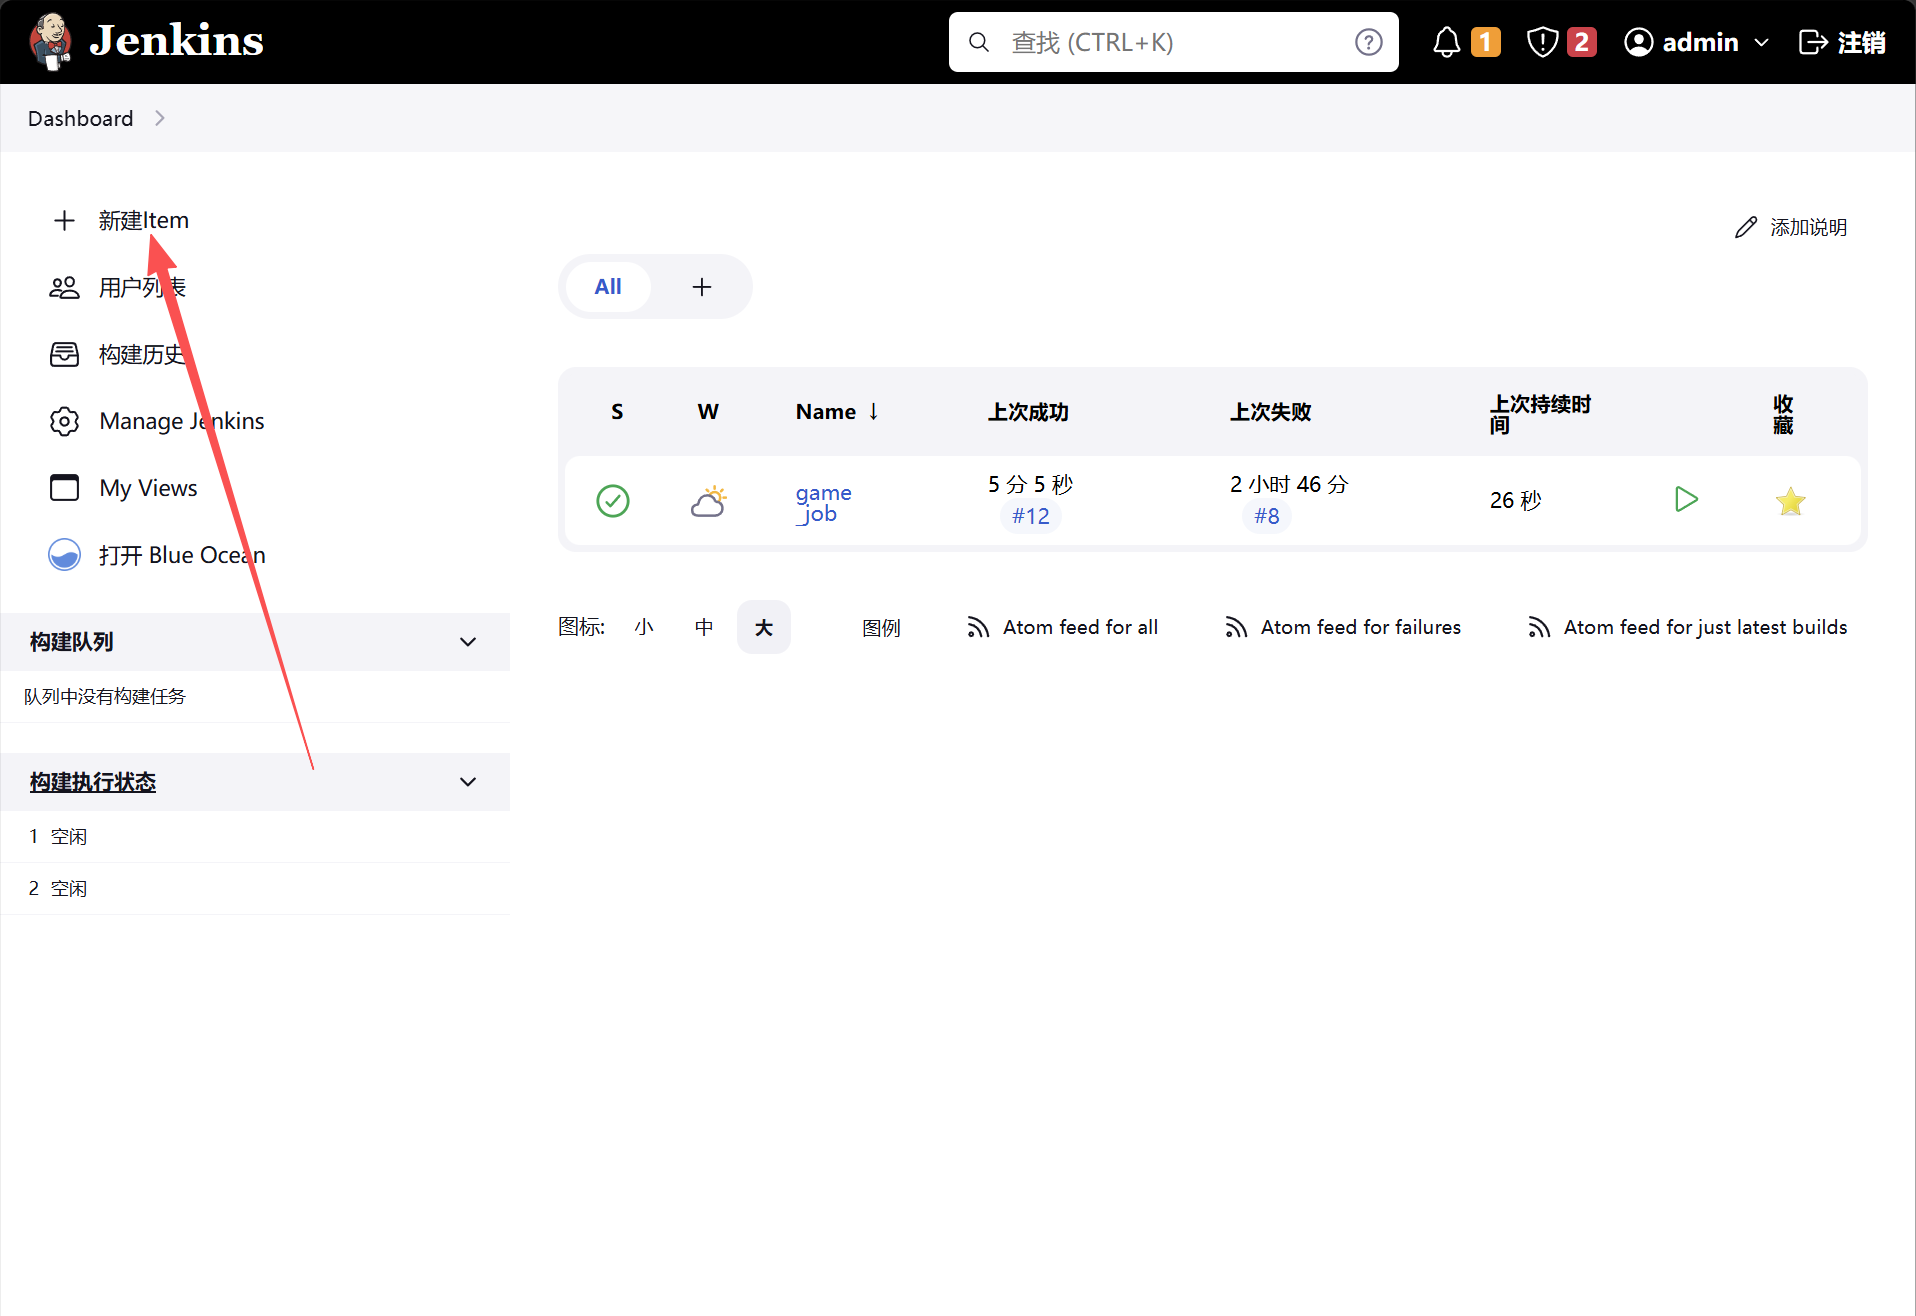
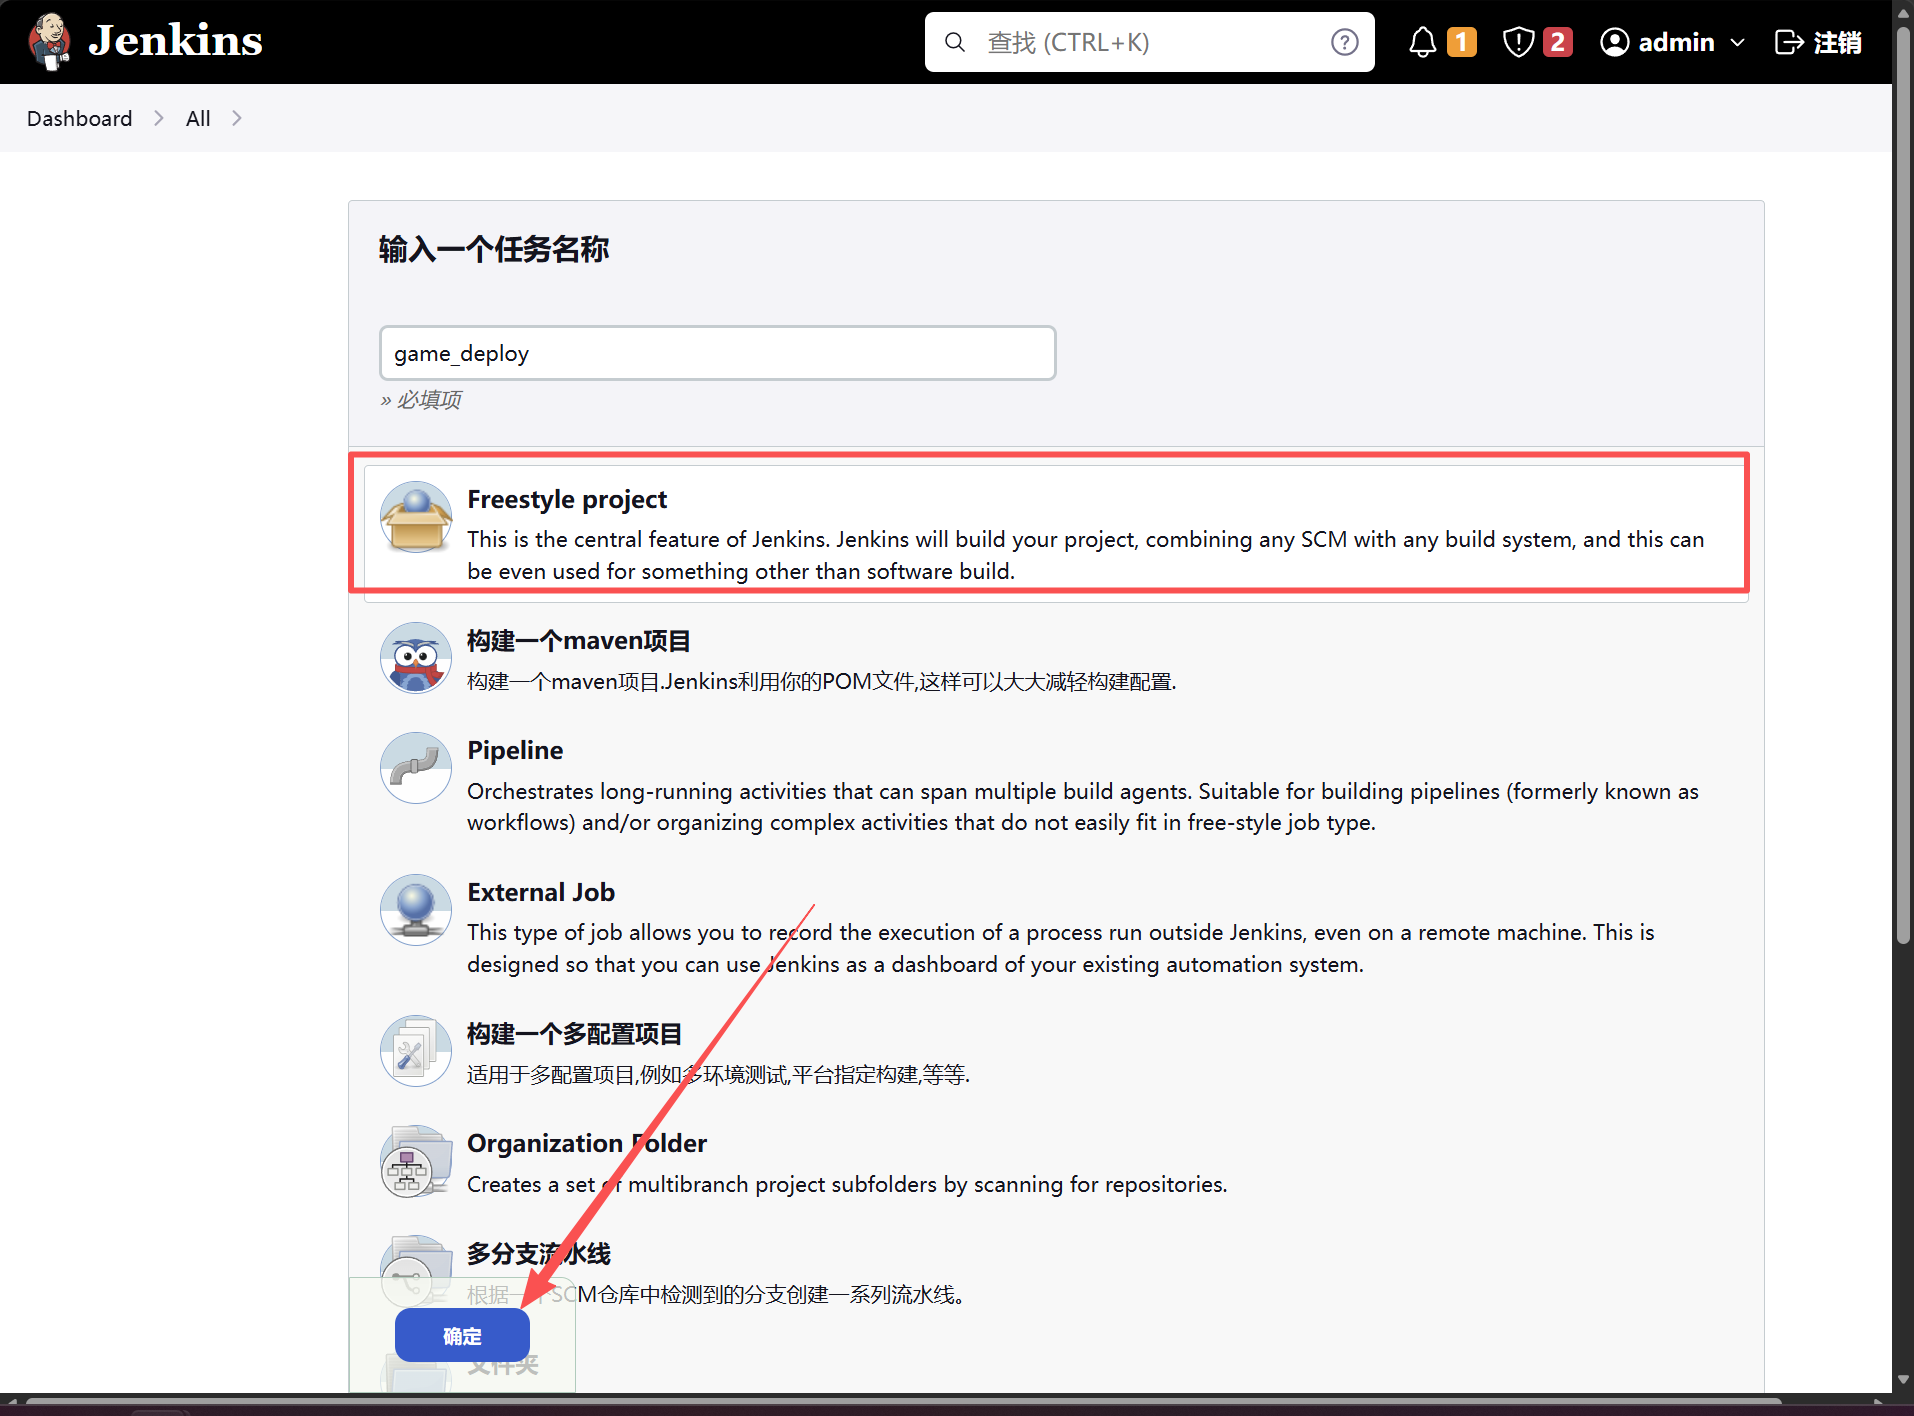
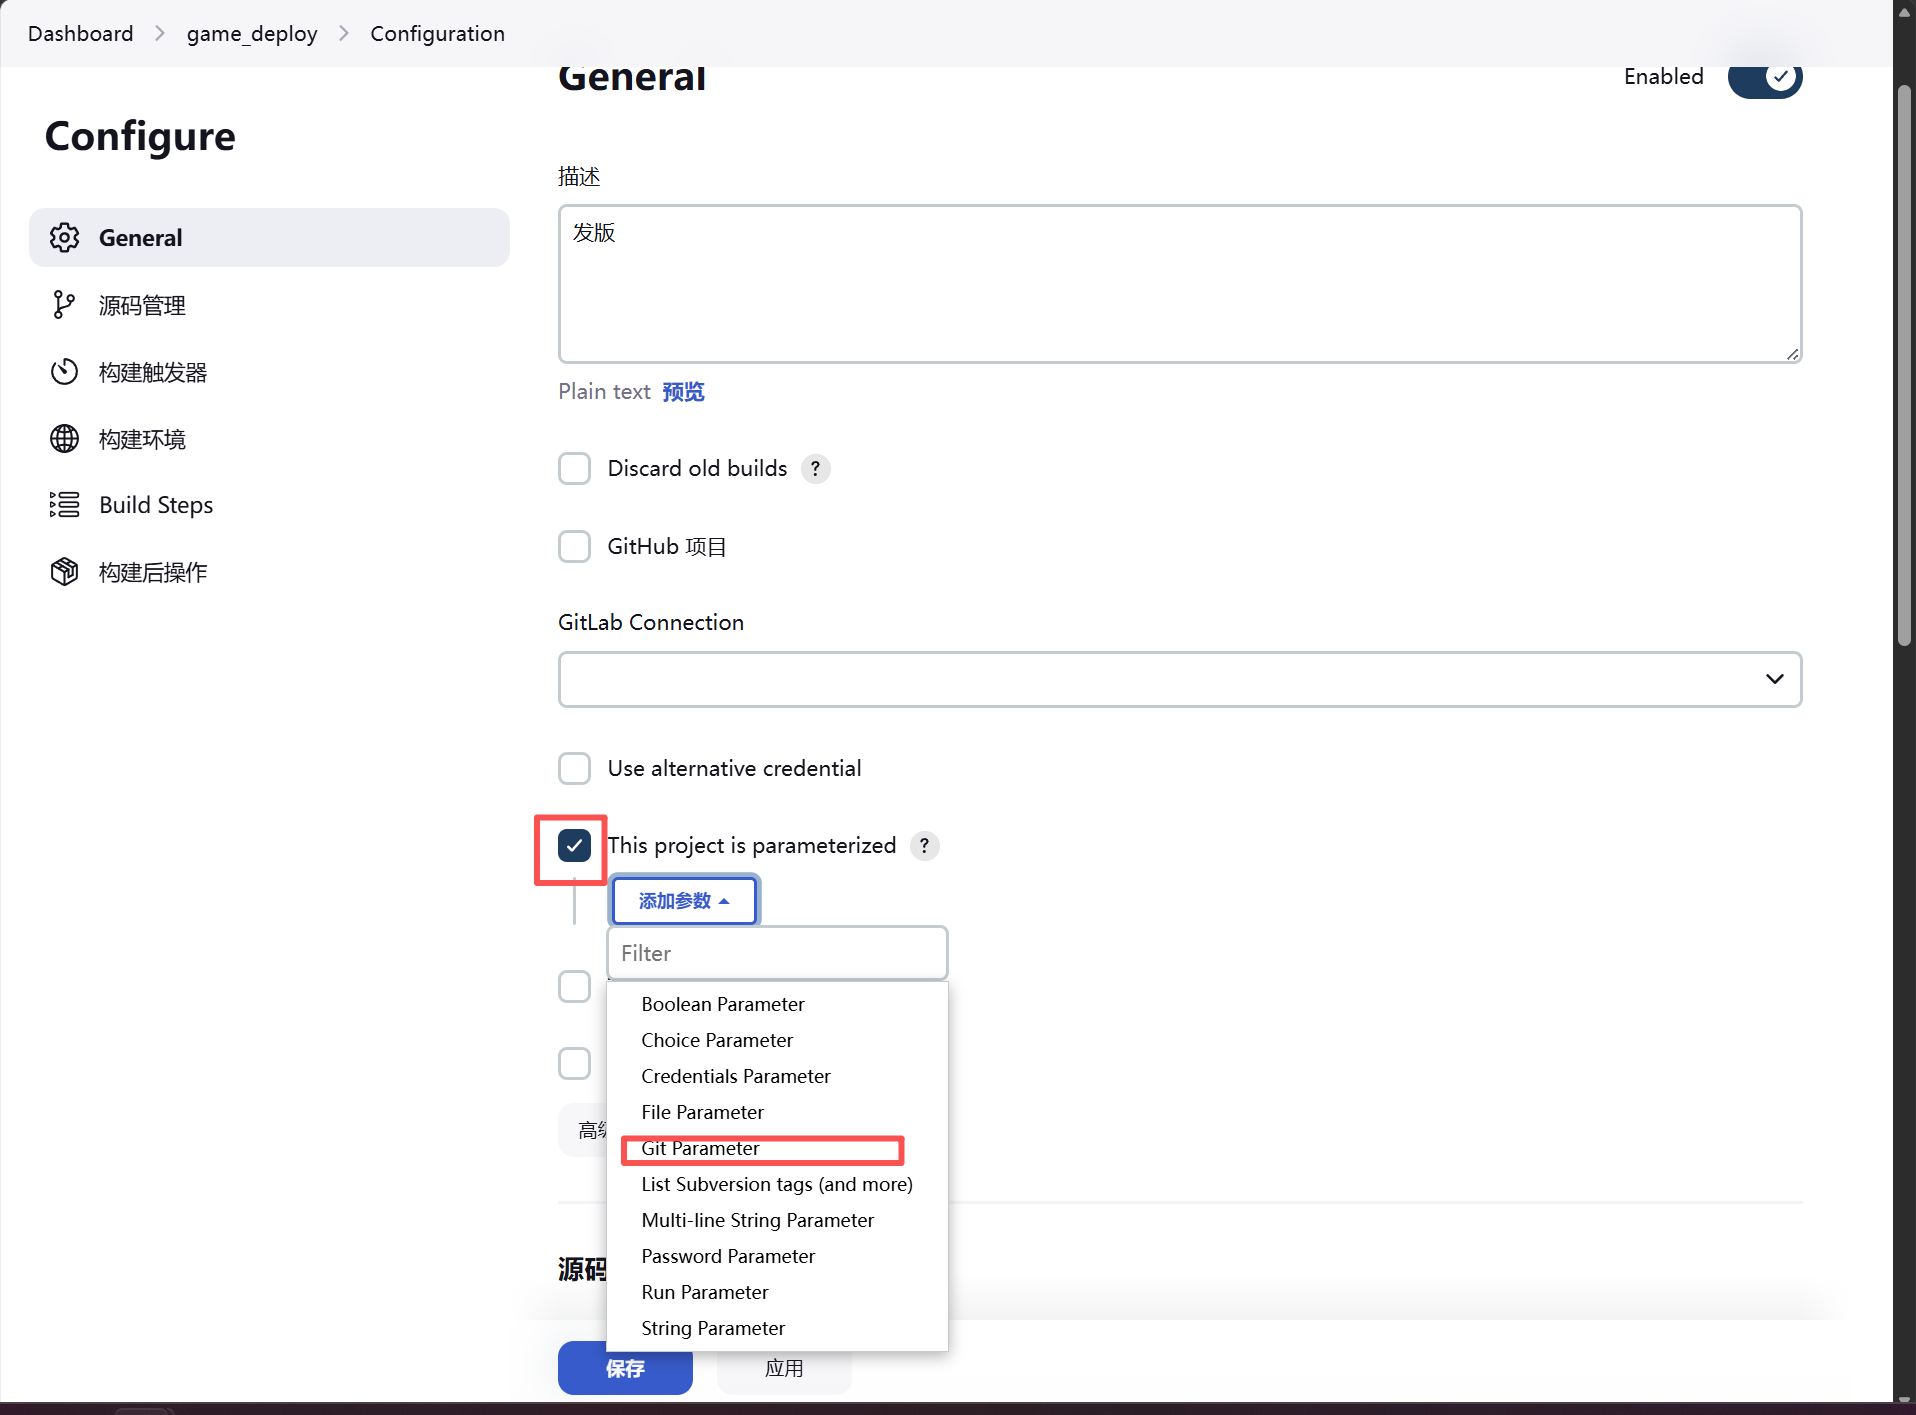
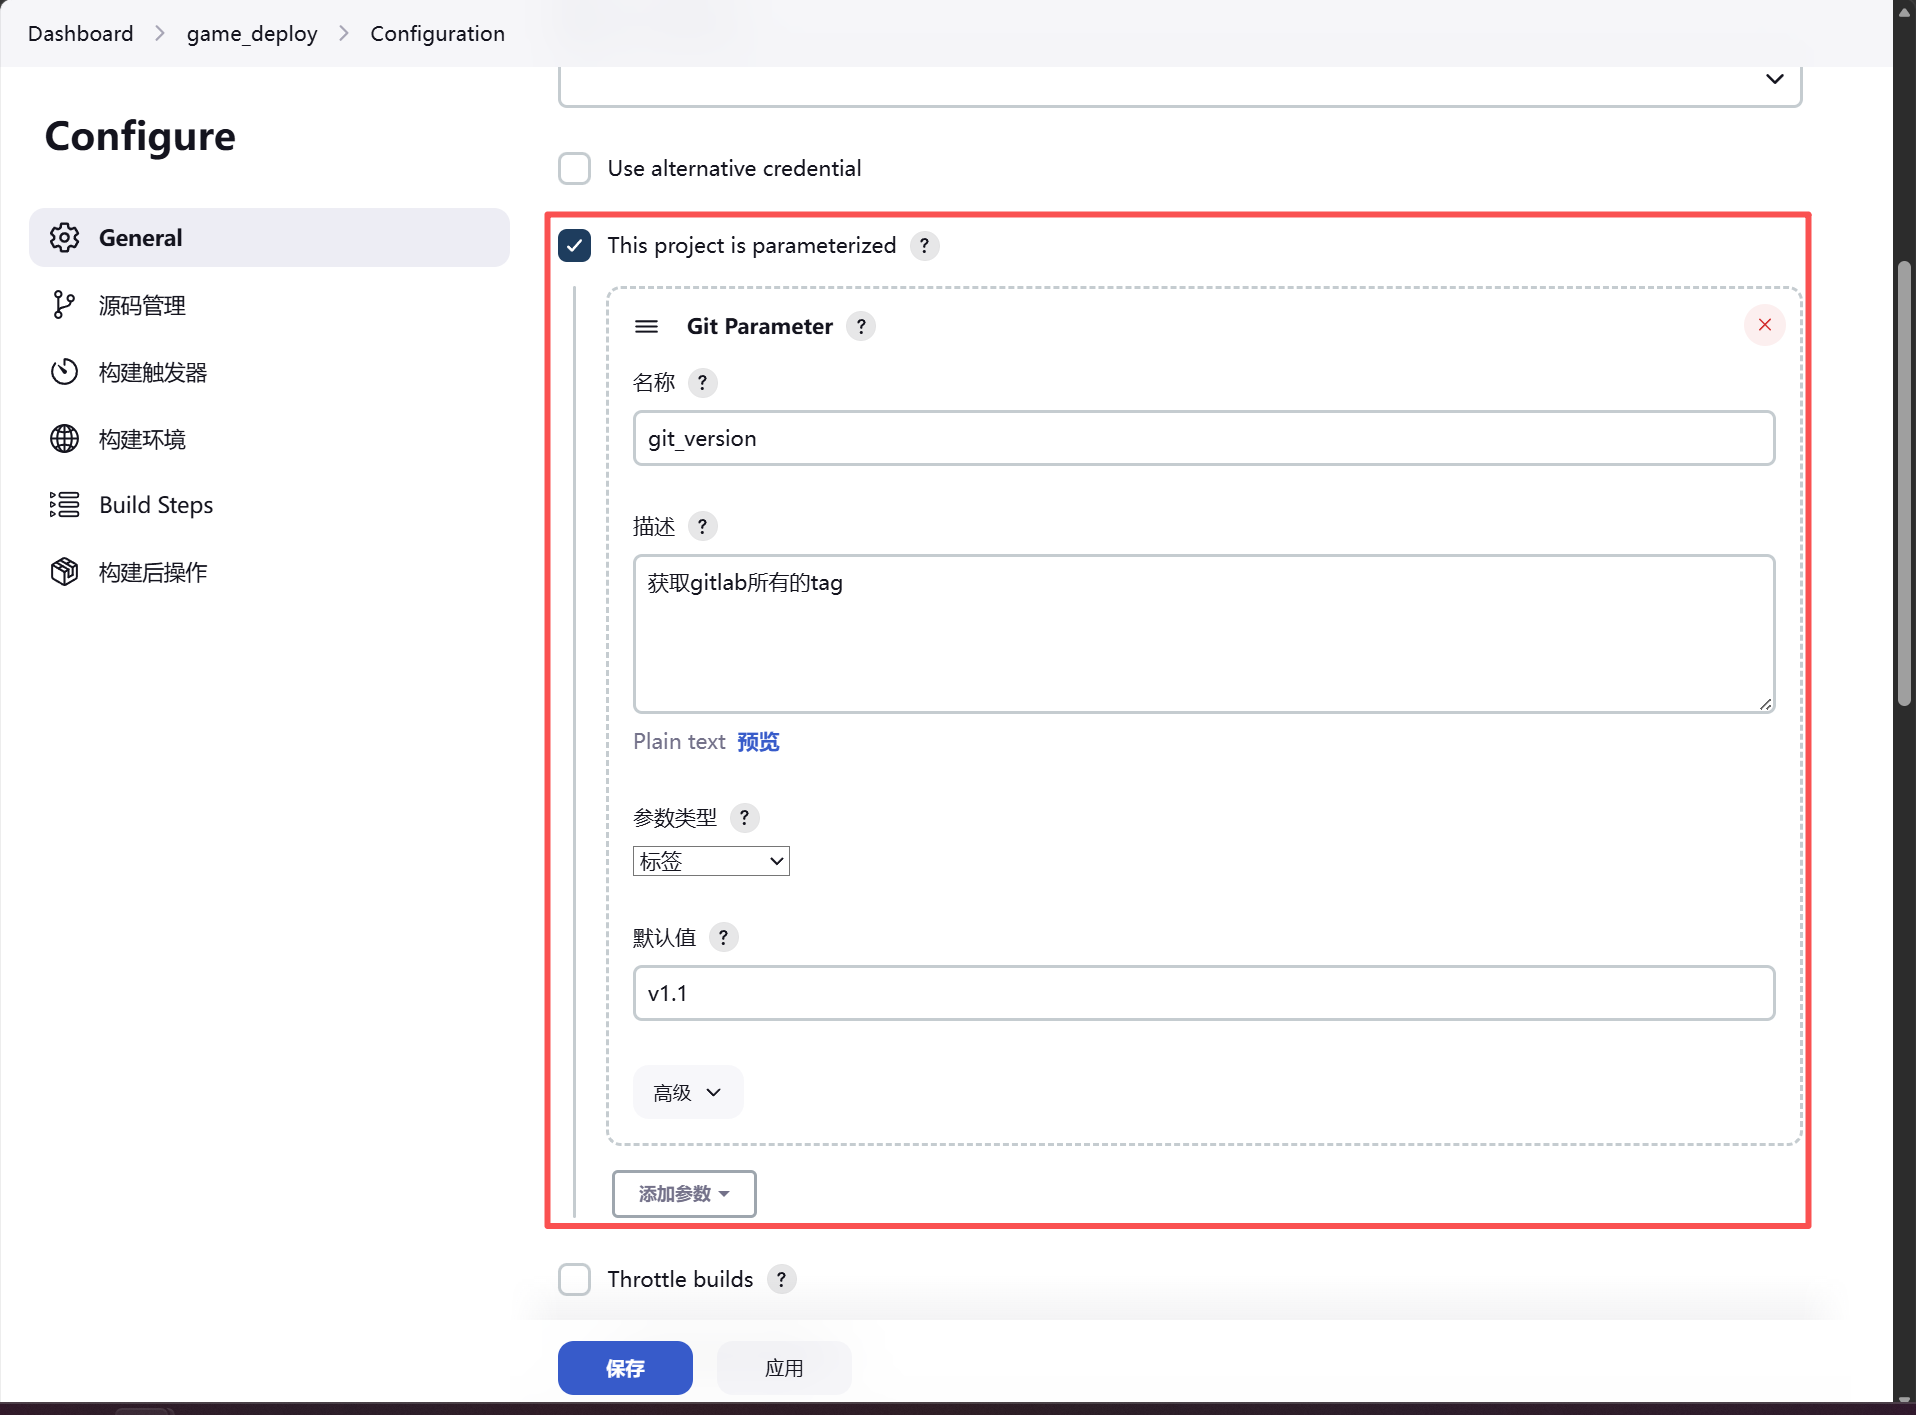
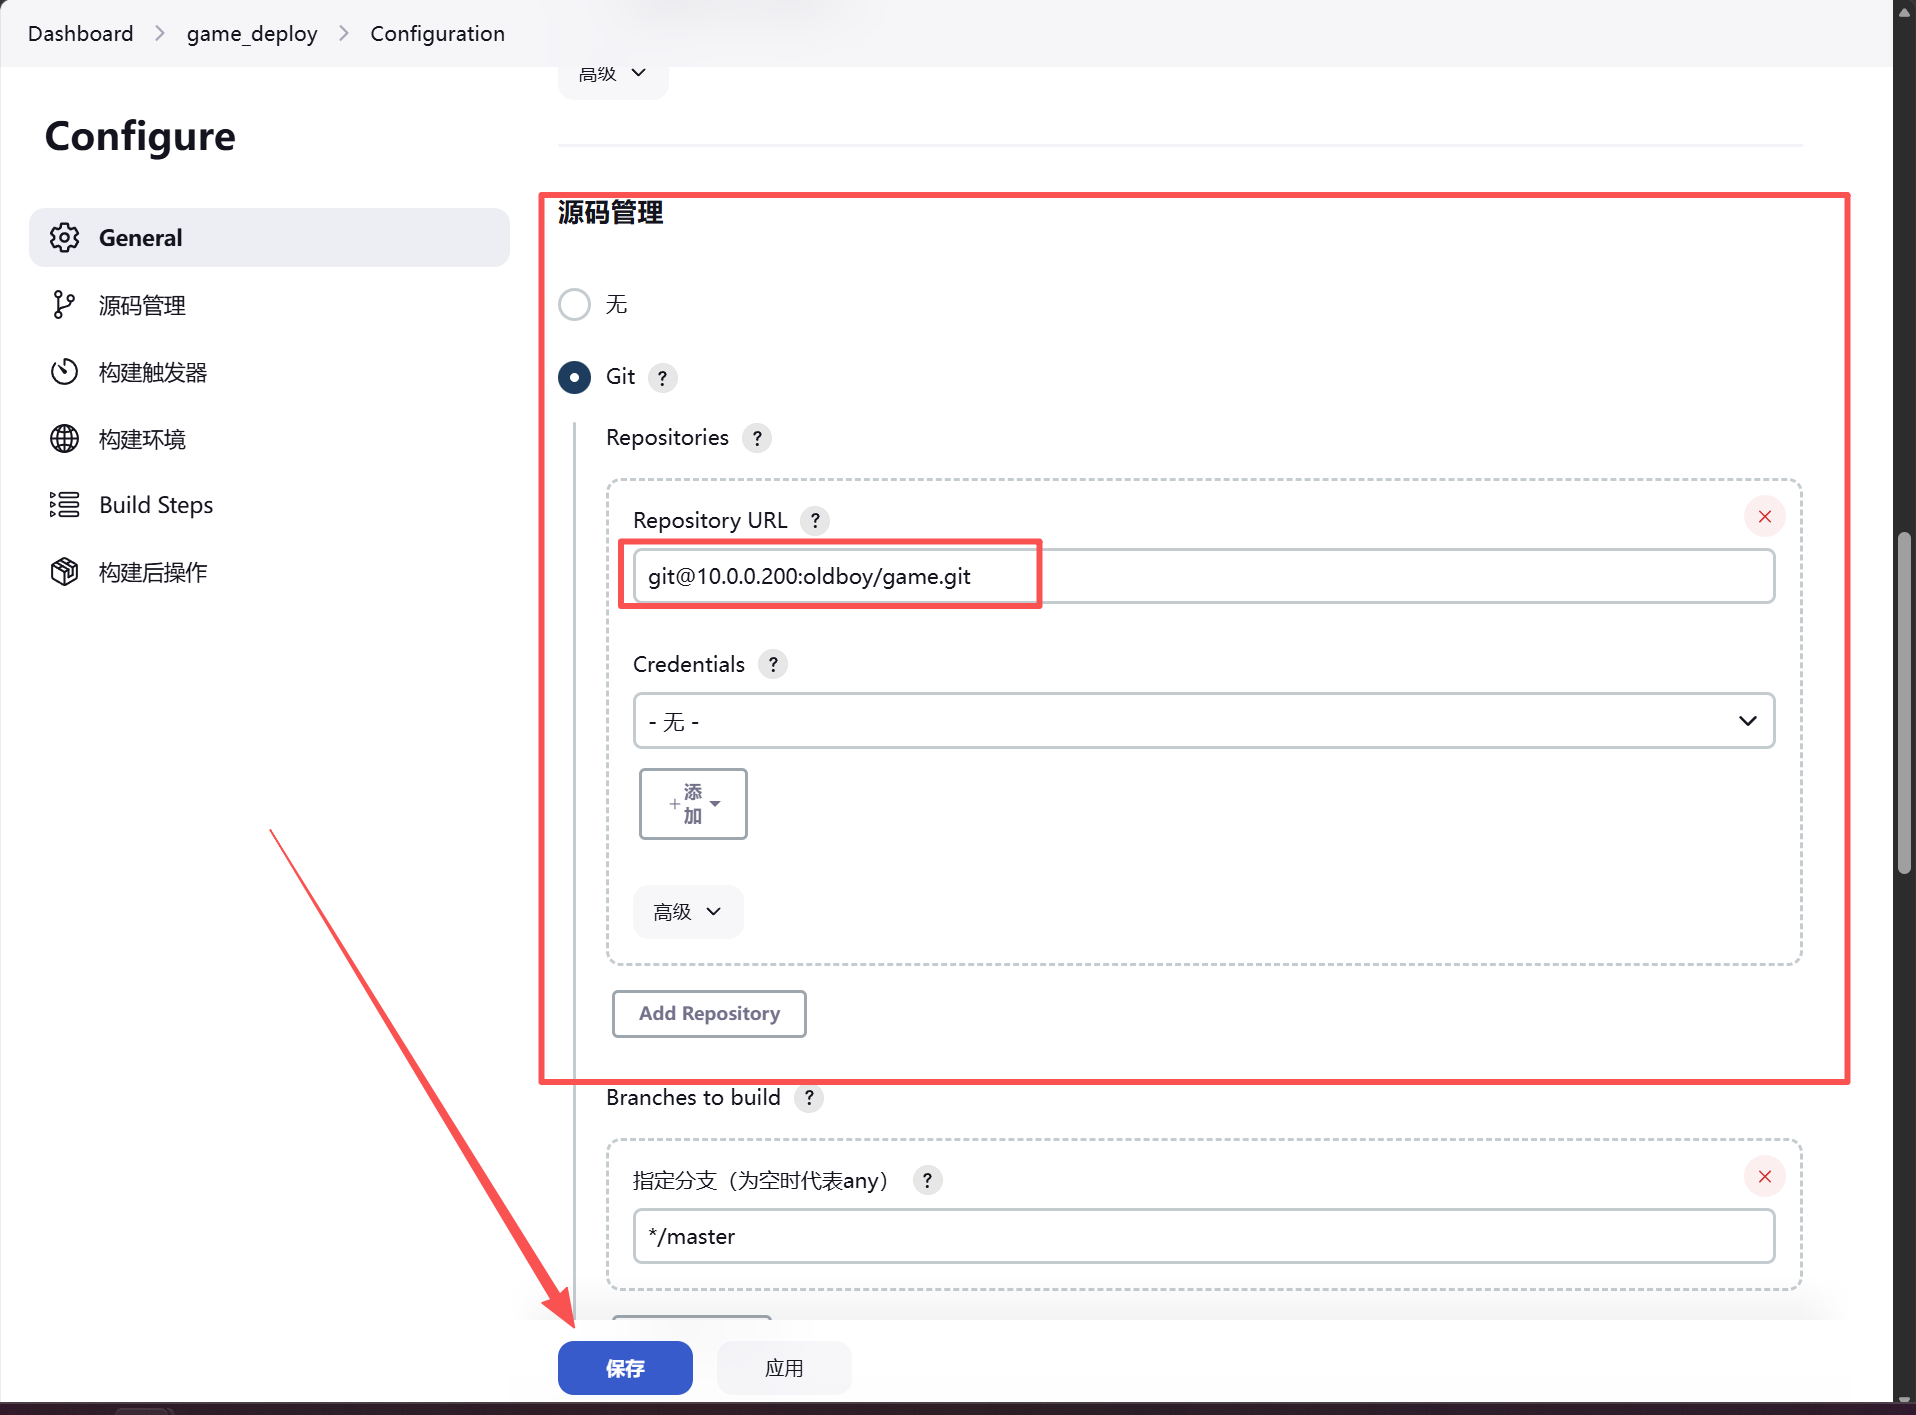
在git上手动打tag提交到远程仓库
root@Gitlab:~/game# git tag
root@Gitlab:~/game# git tag -a v1.1 -m "v1.1稳定版本"
root@Gitlab:~/game# git tag
v1.1
root@Gitlab:~/game# git push -u origin v1.1
Enumerating objects: 1, done.
Counting objects: 100% (1/1), done.
Writing objects: 100% (1/1), 171 bytes | 171.00 KiB/s, done.
Total 1 (delta 0), reused 0 (delta 0), pack-reused 0
To 10.0.0.200:oldboy/game.git
 * [new tag]         v1.1 -> v1.1

 增加一个1.2的tag
 root@Gitlab:~/game# grep V1.2 index.html
                    ['魂斗罗 V1.2', 'roms/Contra1(U)30.nes'],
                    ['功夫', 'roms/(J) (V1.2) Yie Ar Kung-Fu [!].nes'],
root@Gitlab:~/game# git commit -am "v1.2稳定版本"
root@Gitlab:~/game# git tag -a v1.2 -m "v1.2稳定版本"
root@Gitlab:~/game# git tag
v1.1
v1.2
root@Gitlab:~/game# git push -u origin v1.2
Enumerating objects: 6, done.
Counting objects: 100% (6/6), done.
Delta compression using up to 2 threads
Compressing objects: 100% (4/4), done.
Writing objects: 100% (4/4), 444 bytes | 222.00 KiB/s, done.
Total 4 (delta 2), reused 0 (delta 0), pack-reused 0
To 10.0.0.200:oldboy/game.git
 * [new tag]         v1.2 -> v1.2
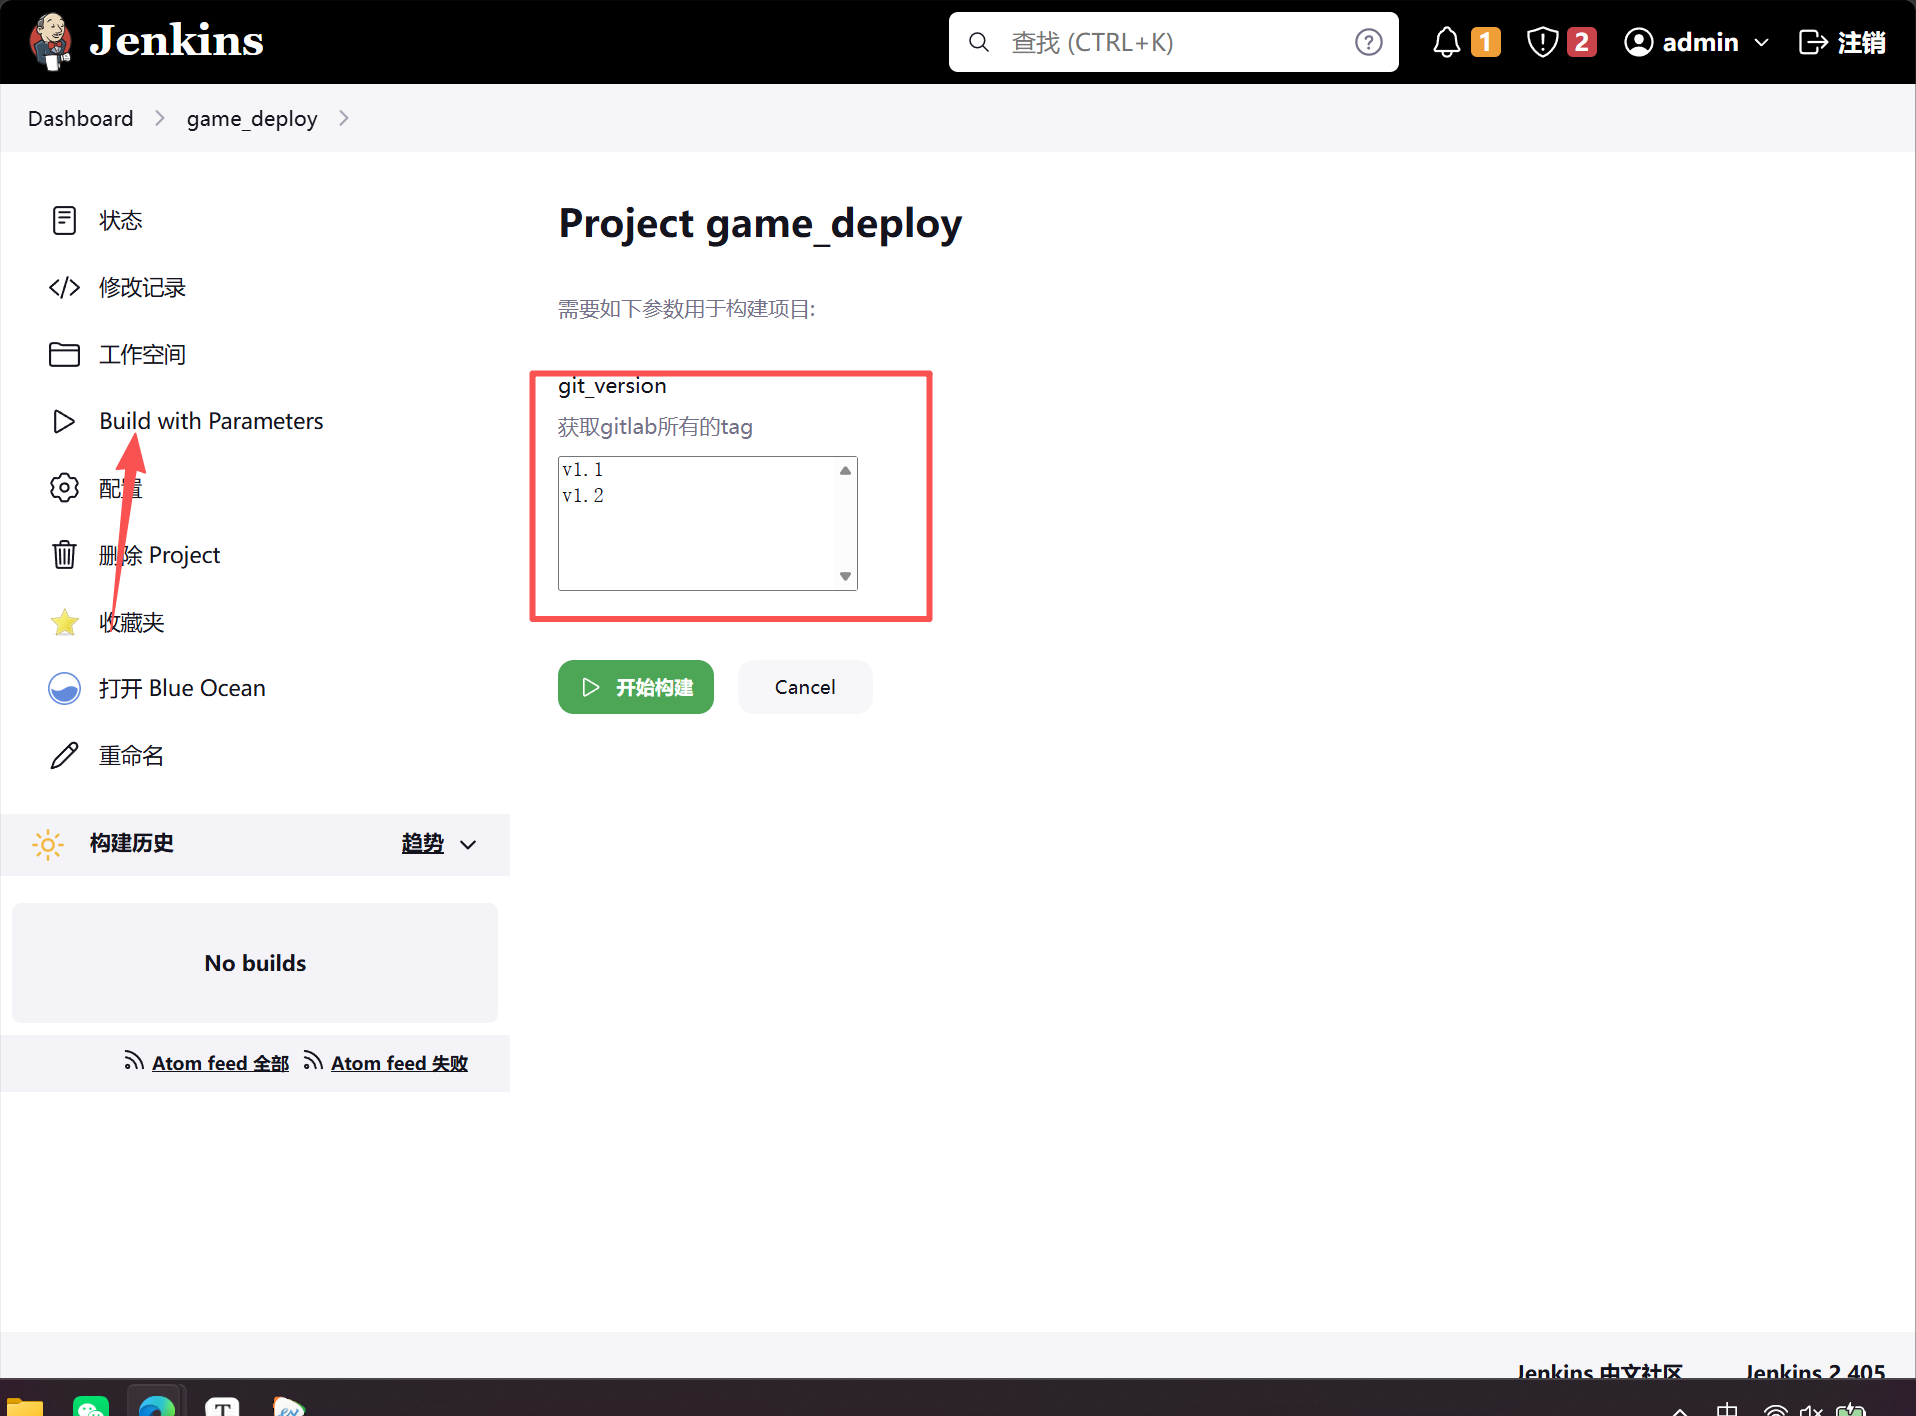
将10.0.0.7服务器模拟为工作环境的服务器
web工作服务器的nginx配置
[root@web01 conf.d]# cat game.conf
server {
    listen 80 default_server;
    server_name _;

    location /{
    root /code/game;
    index index.html;
   }
}
[root@web01 conf.d]# nginx -t
nginx: the configuration file /etc/nginx/nginx.conf syntax is ok
nginx: configuration file /etc/nginx/nginx.conf test is successful
[root@web01 conf.d]# systemctl restart nginx
jenkins服务器和10.0.0.7做免密钥
[root@jenkins ~]# ssh-copy-id 10.0.0.7
2.配置代码回滚
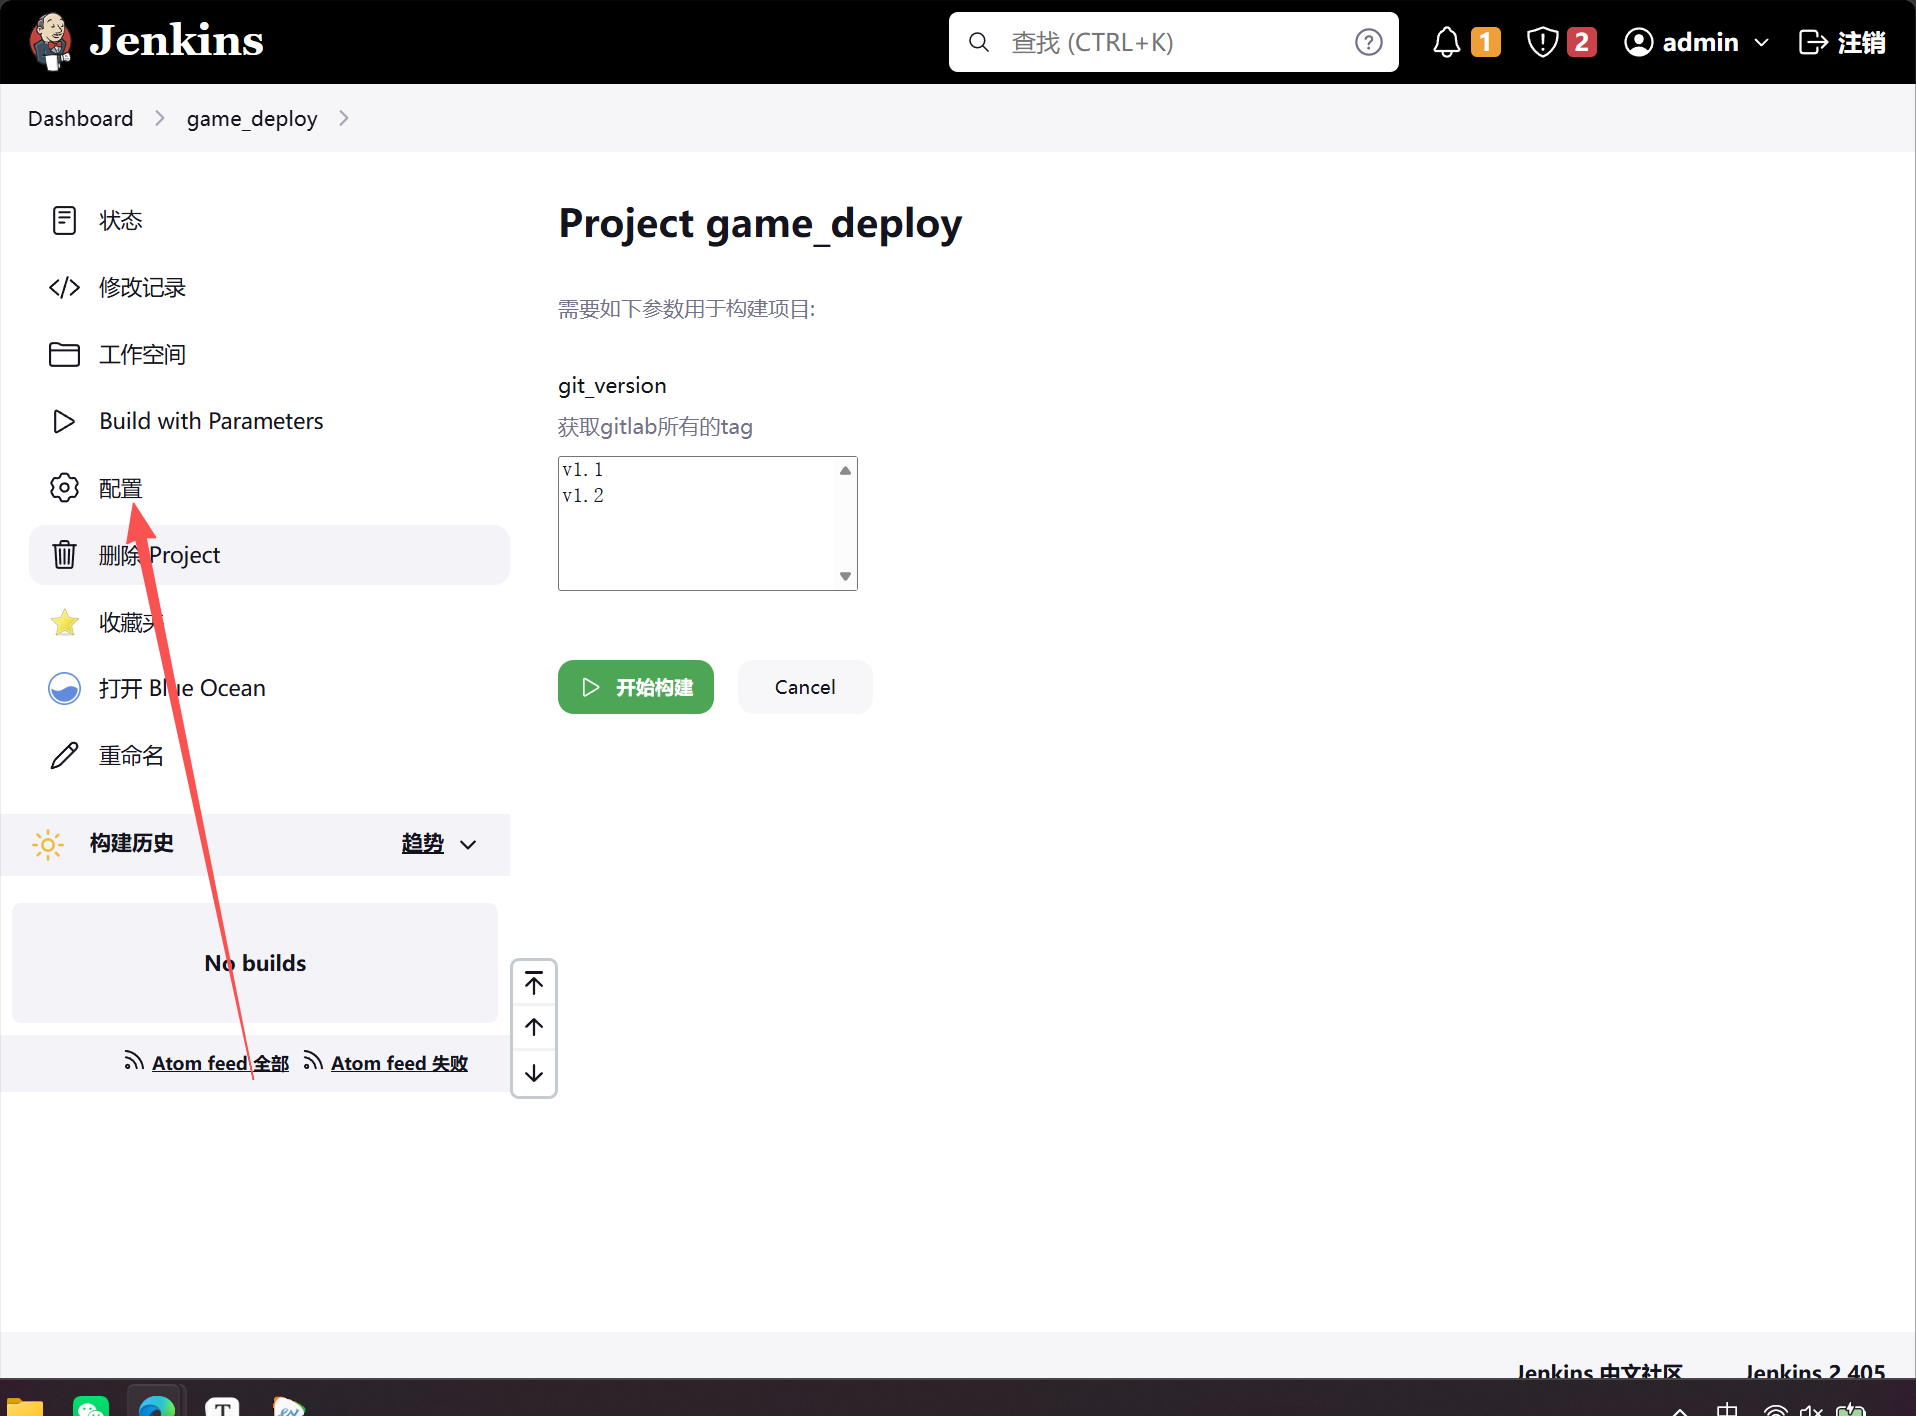
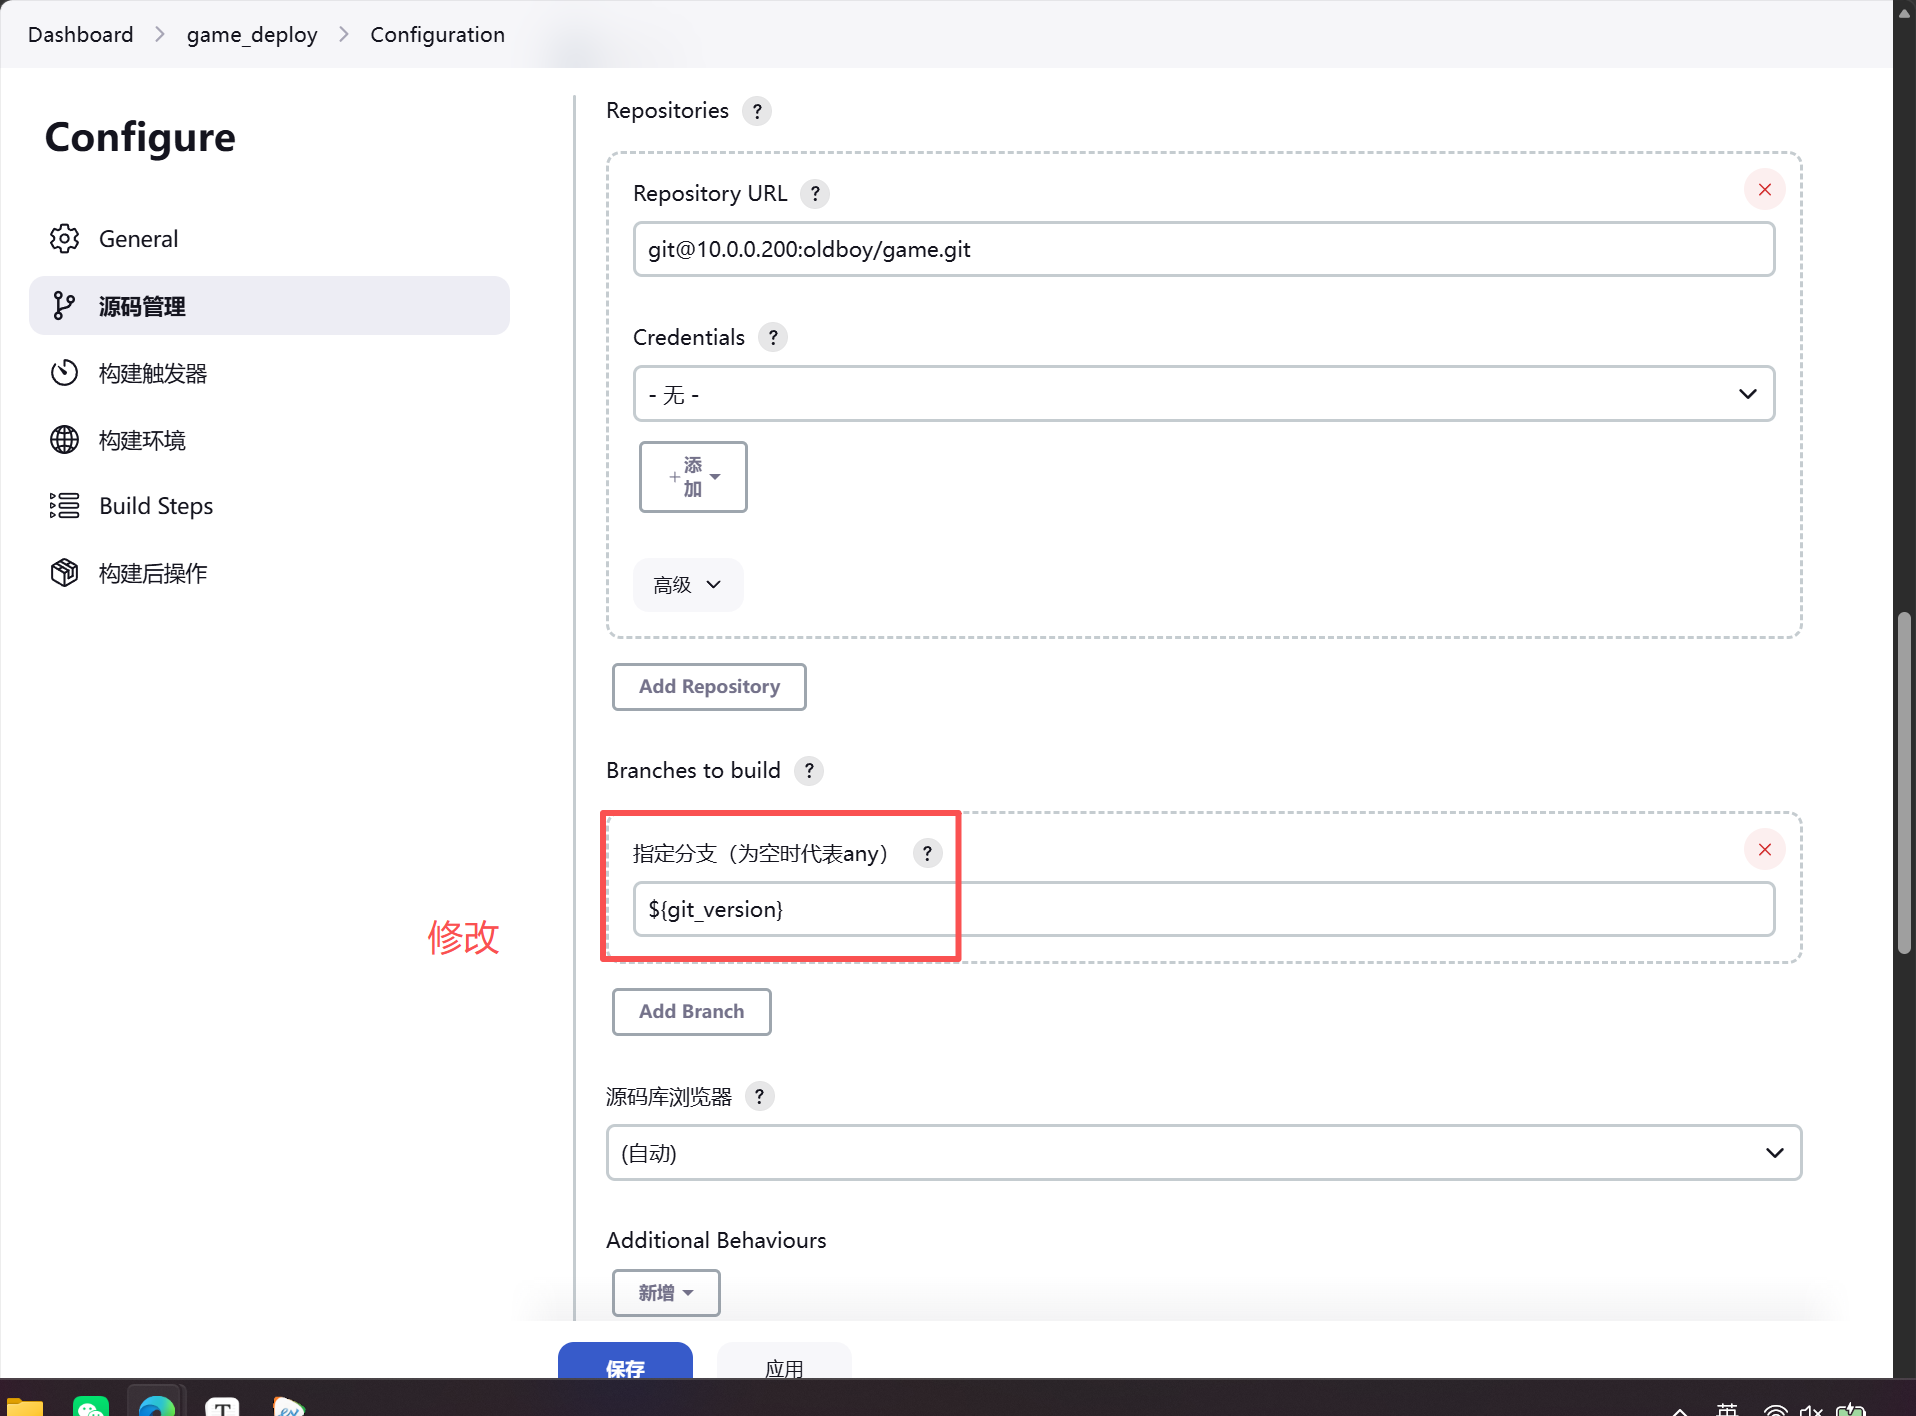
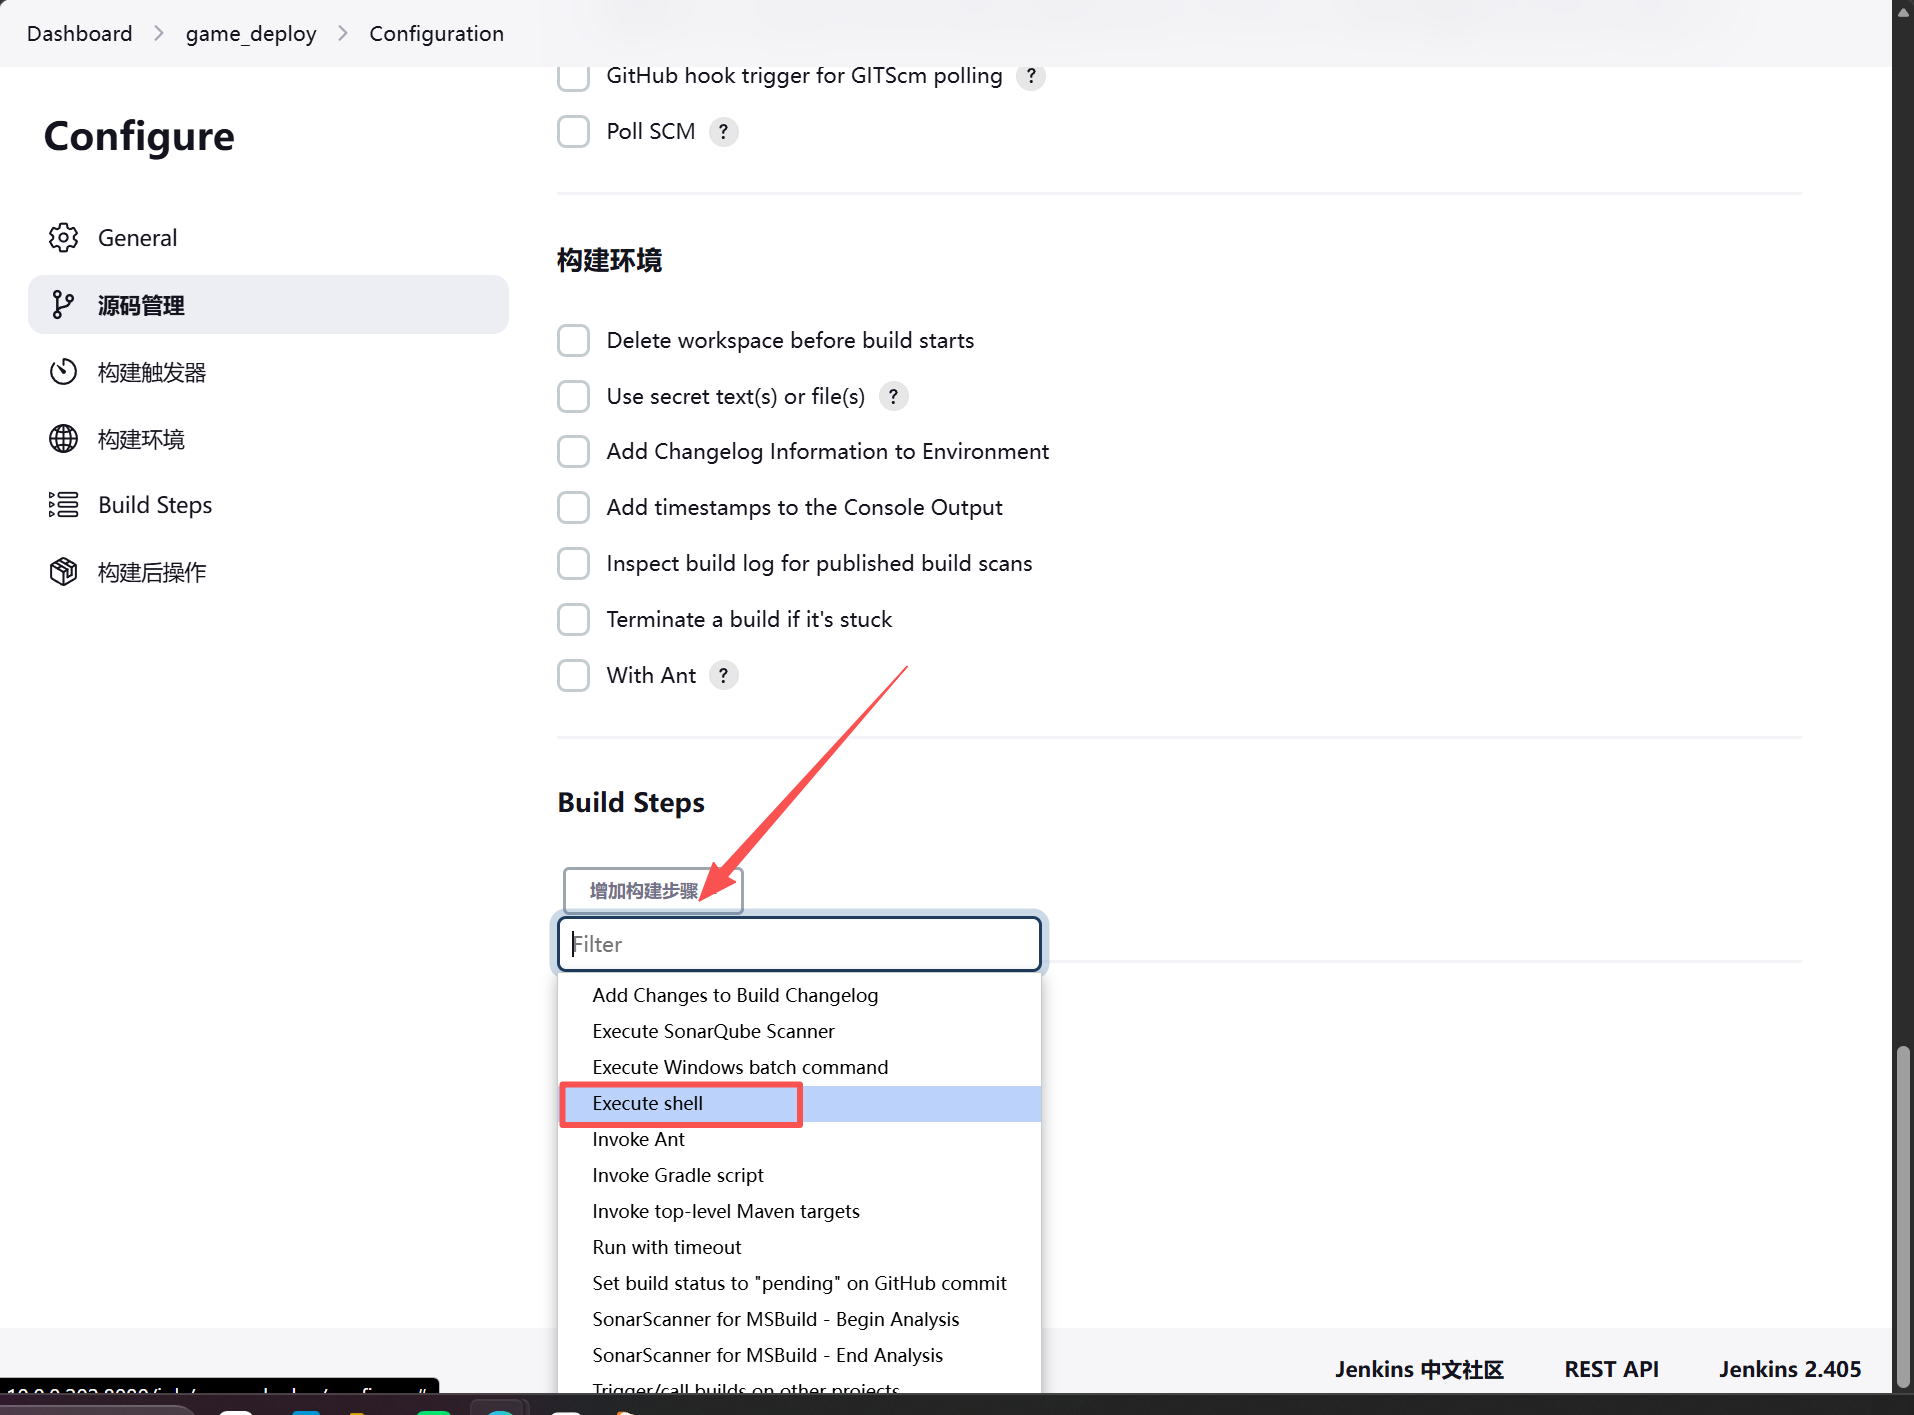
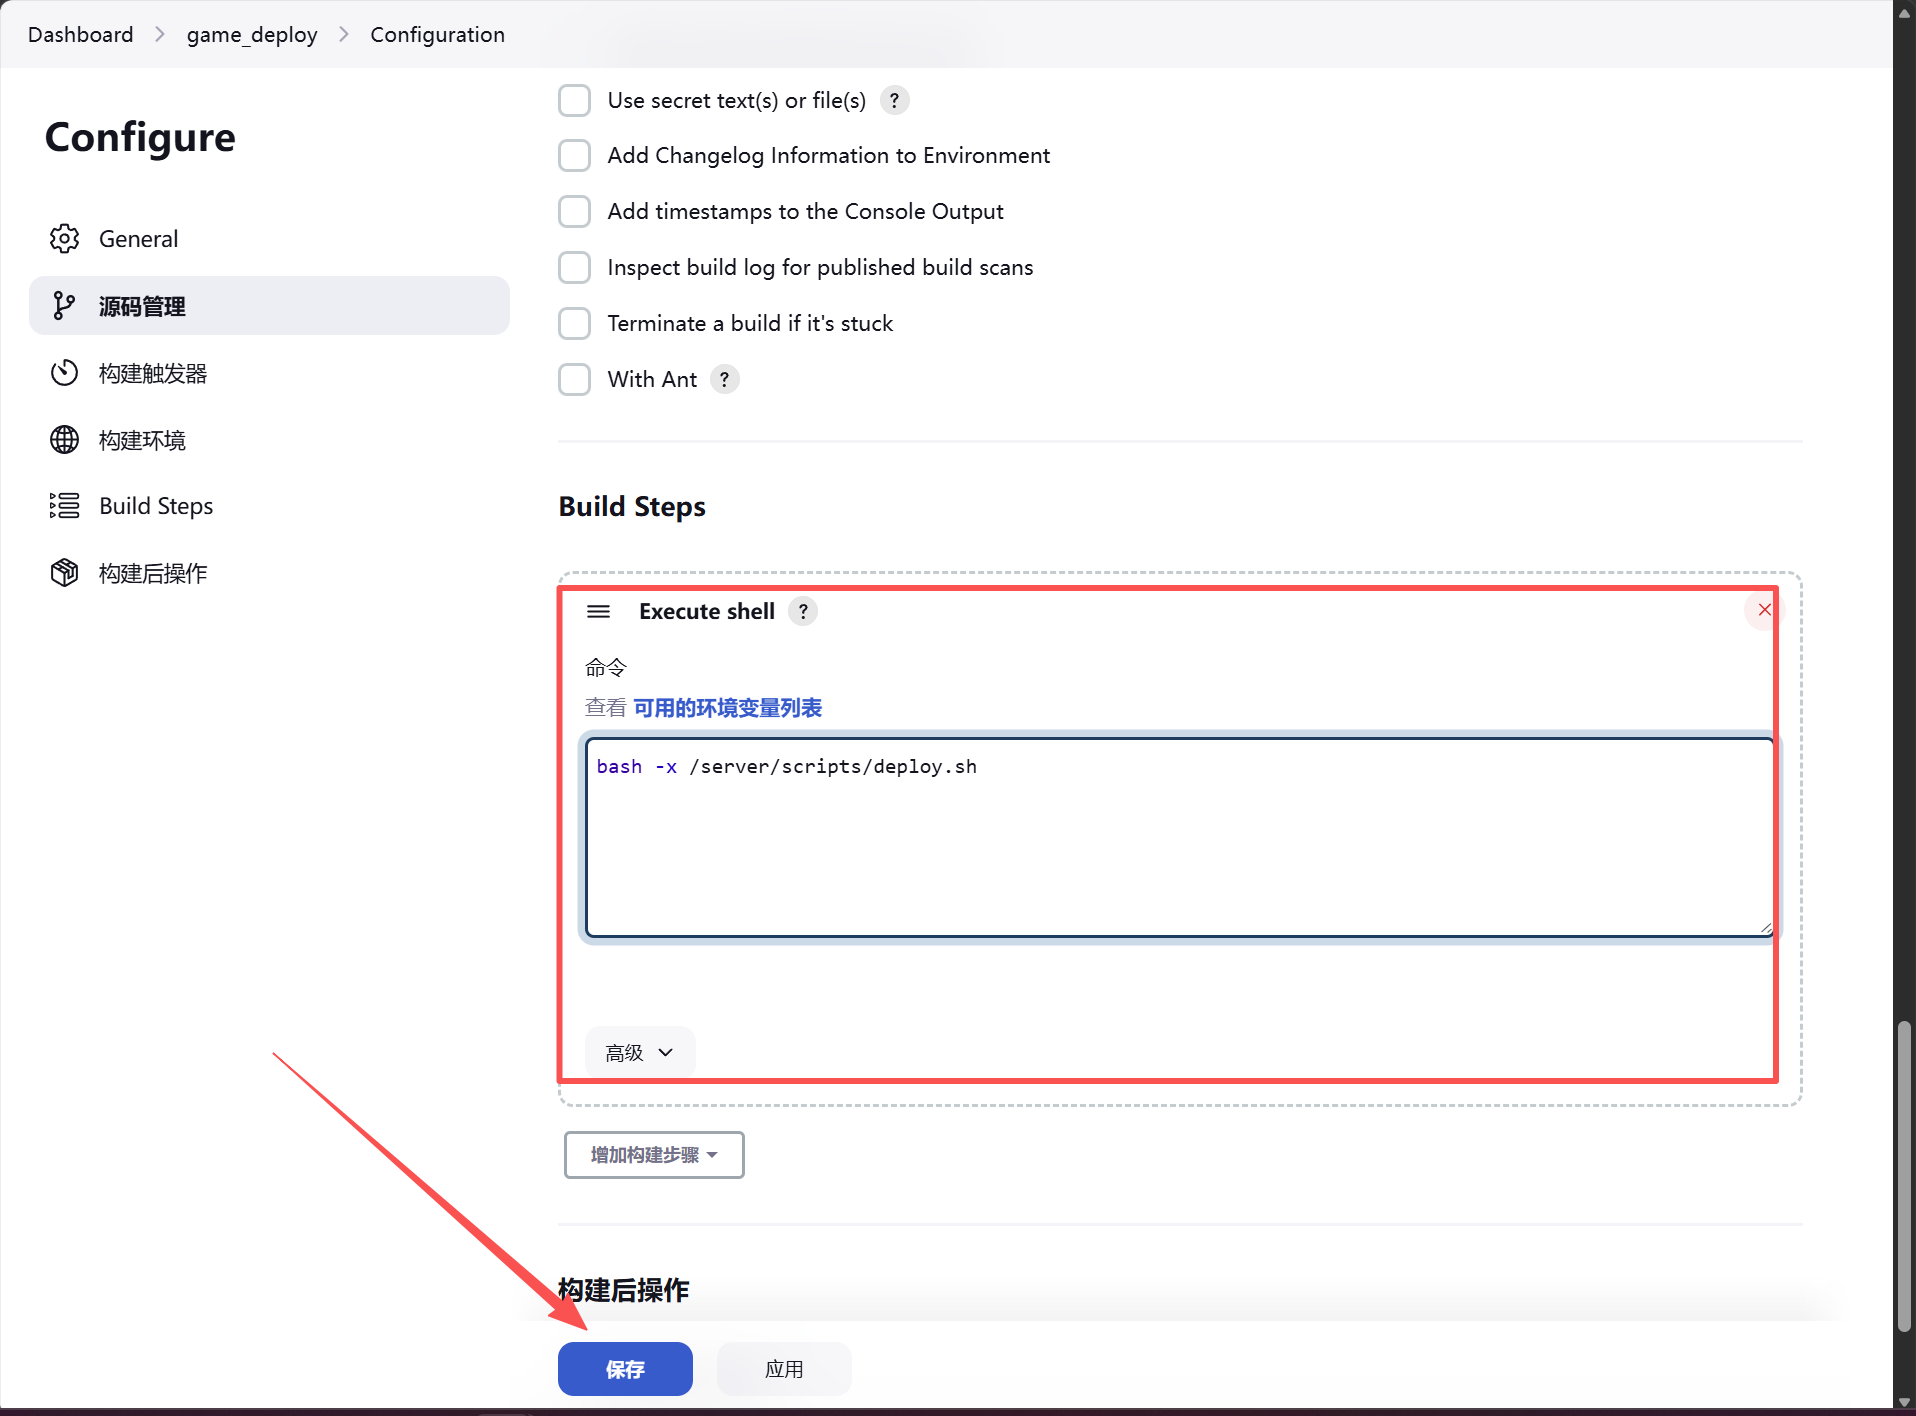
这里的deploy.sh脚本可以自己去写,大致内容就是将jenkins服务上拉取的代码打包发送到10.0.0.7的代码目录下,解压后目录的名称就是每个版本的名称,格式是web_v1.1。最后创建软连接game连接到这个目录上

例子:
#!/bin/bash
IP=10.0.0.7

TAR(){
	tar zcf /opt/web.tar.gz ./*
}
SCP(){
	scp /opt/web.tar.gz $IP:/code/
}
XF(){
	ssh $IP "mkdir /code/web_${git_version}"
	ssh $IP "tar xf /code/web.tar.gz -C /code/web_${git_version}"
	ssh $IP "rm -f /code/web.tar.gz"
}

LN(){
	ssh $IP "[ -d /code/game ] && rm -rf /code/game"
	ssh $IP "ln -s /code/web_${git_version} /code/game"
}

main(){
	TAR
	SCP
	XF
	LN
}

if  [ $deploy_env = "deploy"];then
        main
elif  [ $deploy_env = "rollback"];then
        LN
fi
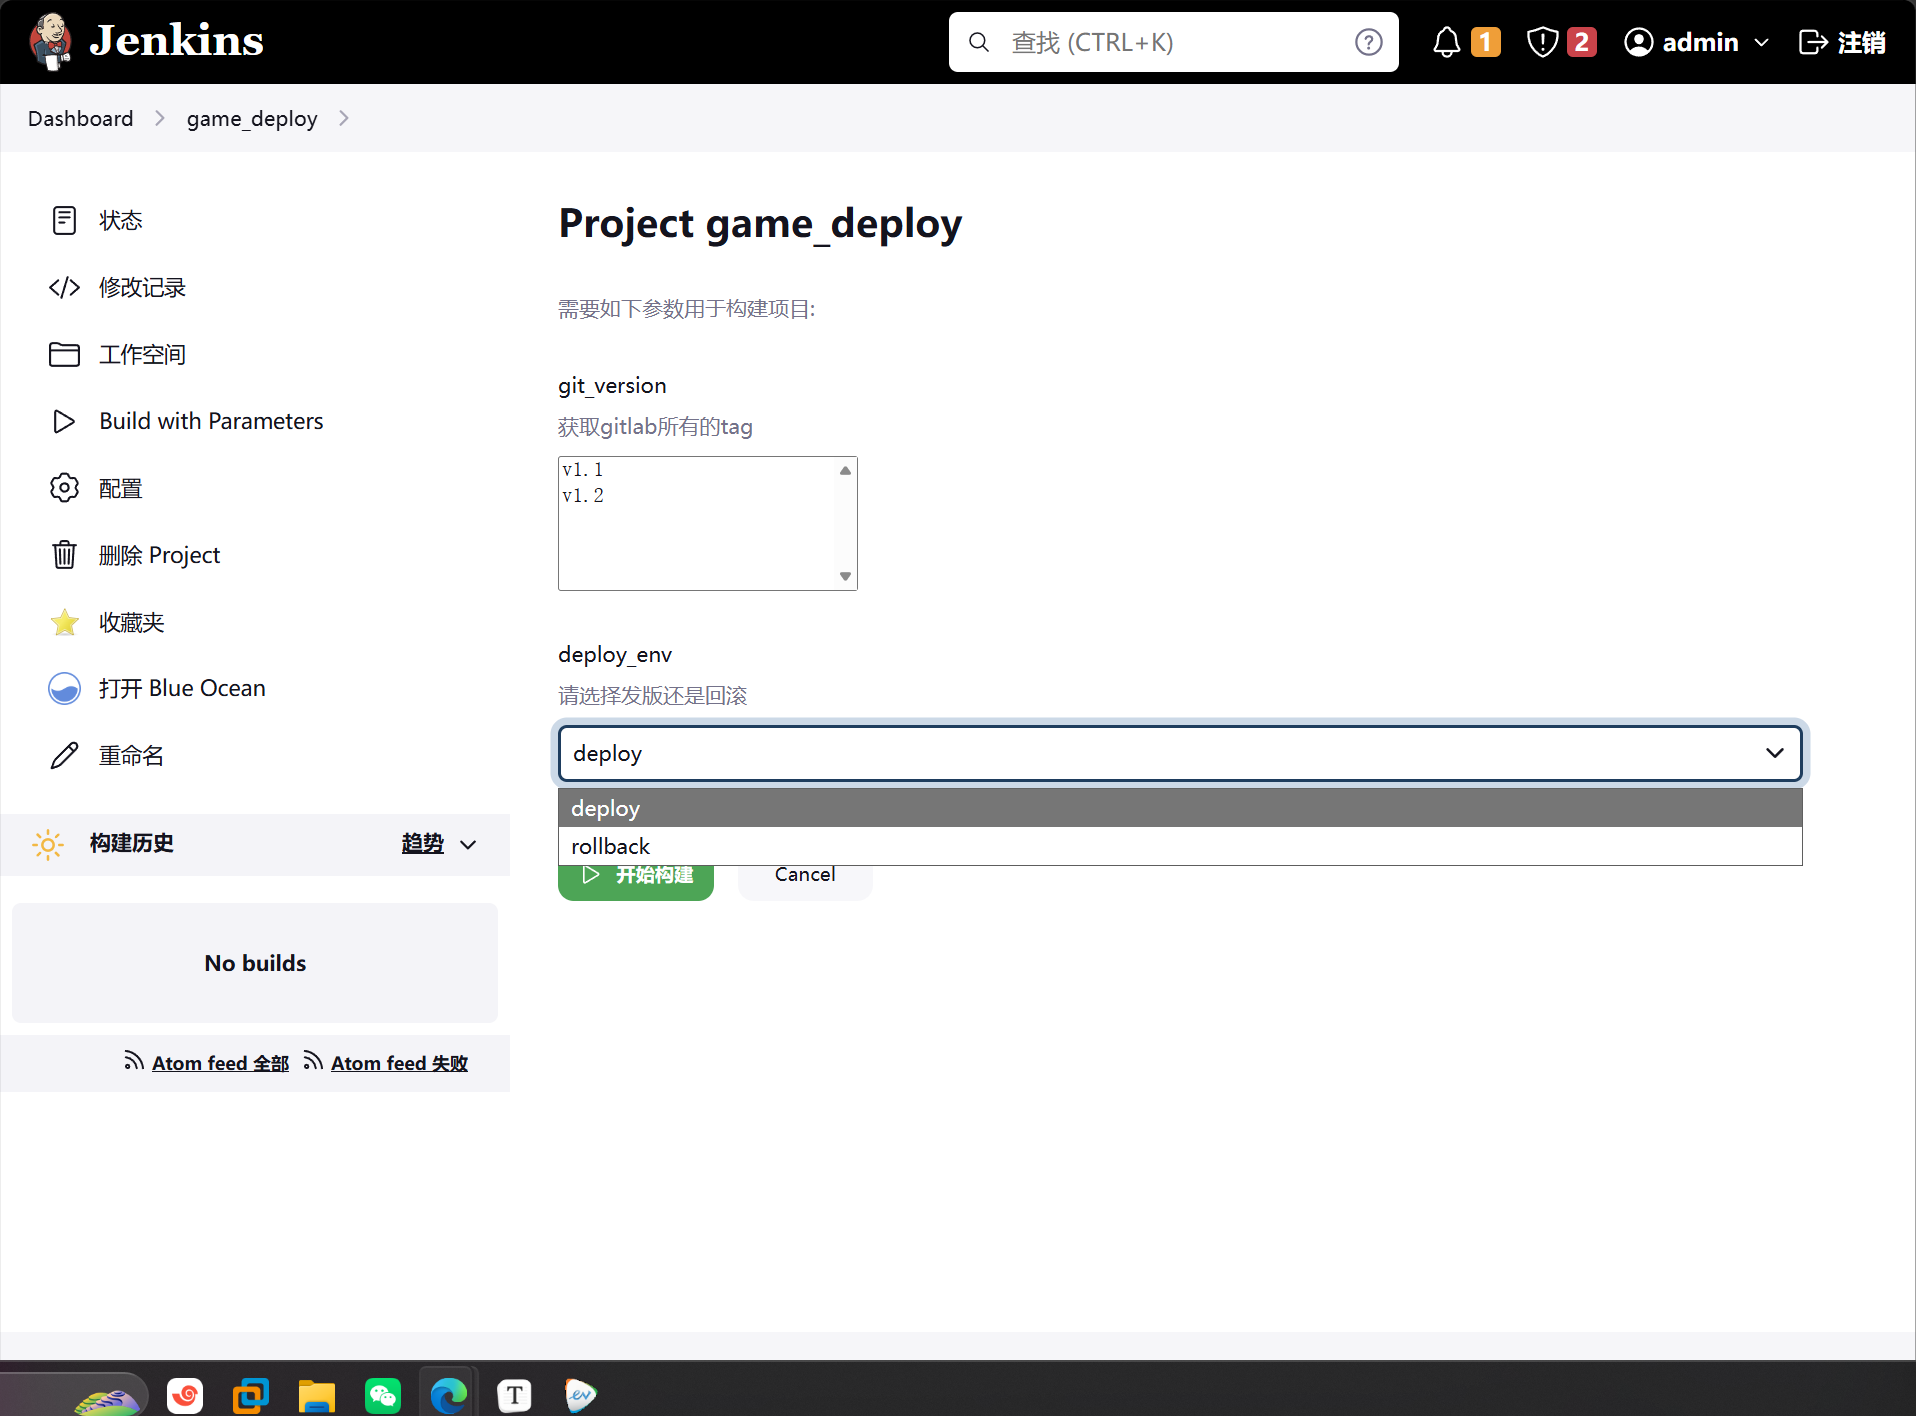
3.增加控制版本
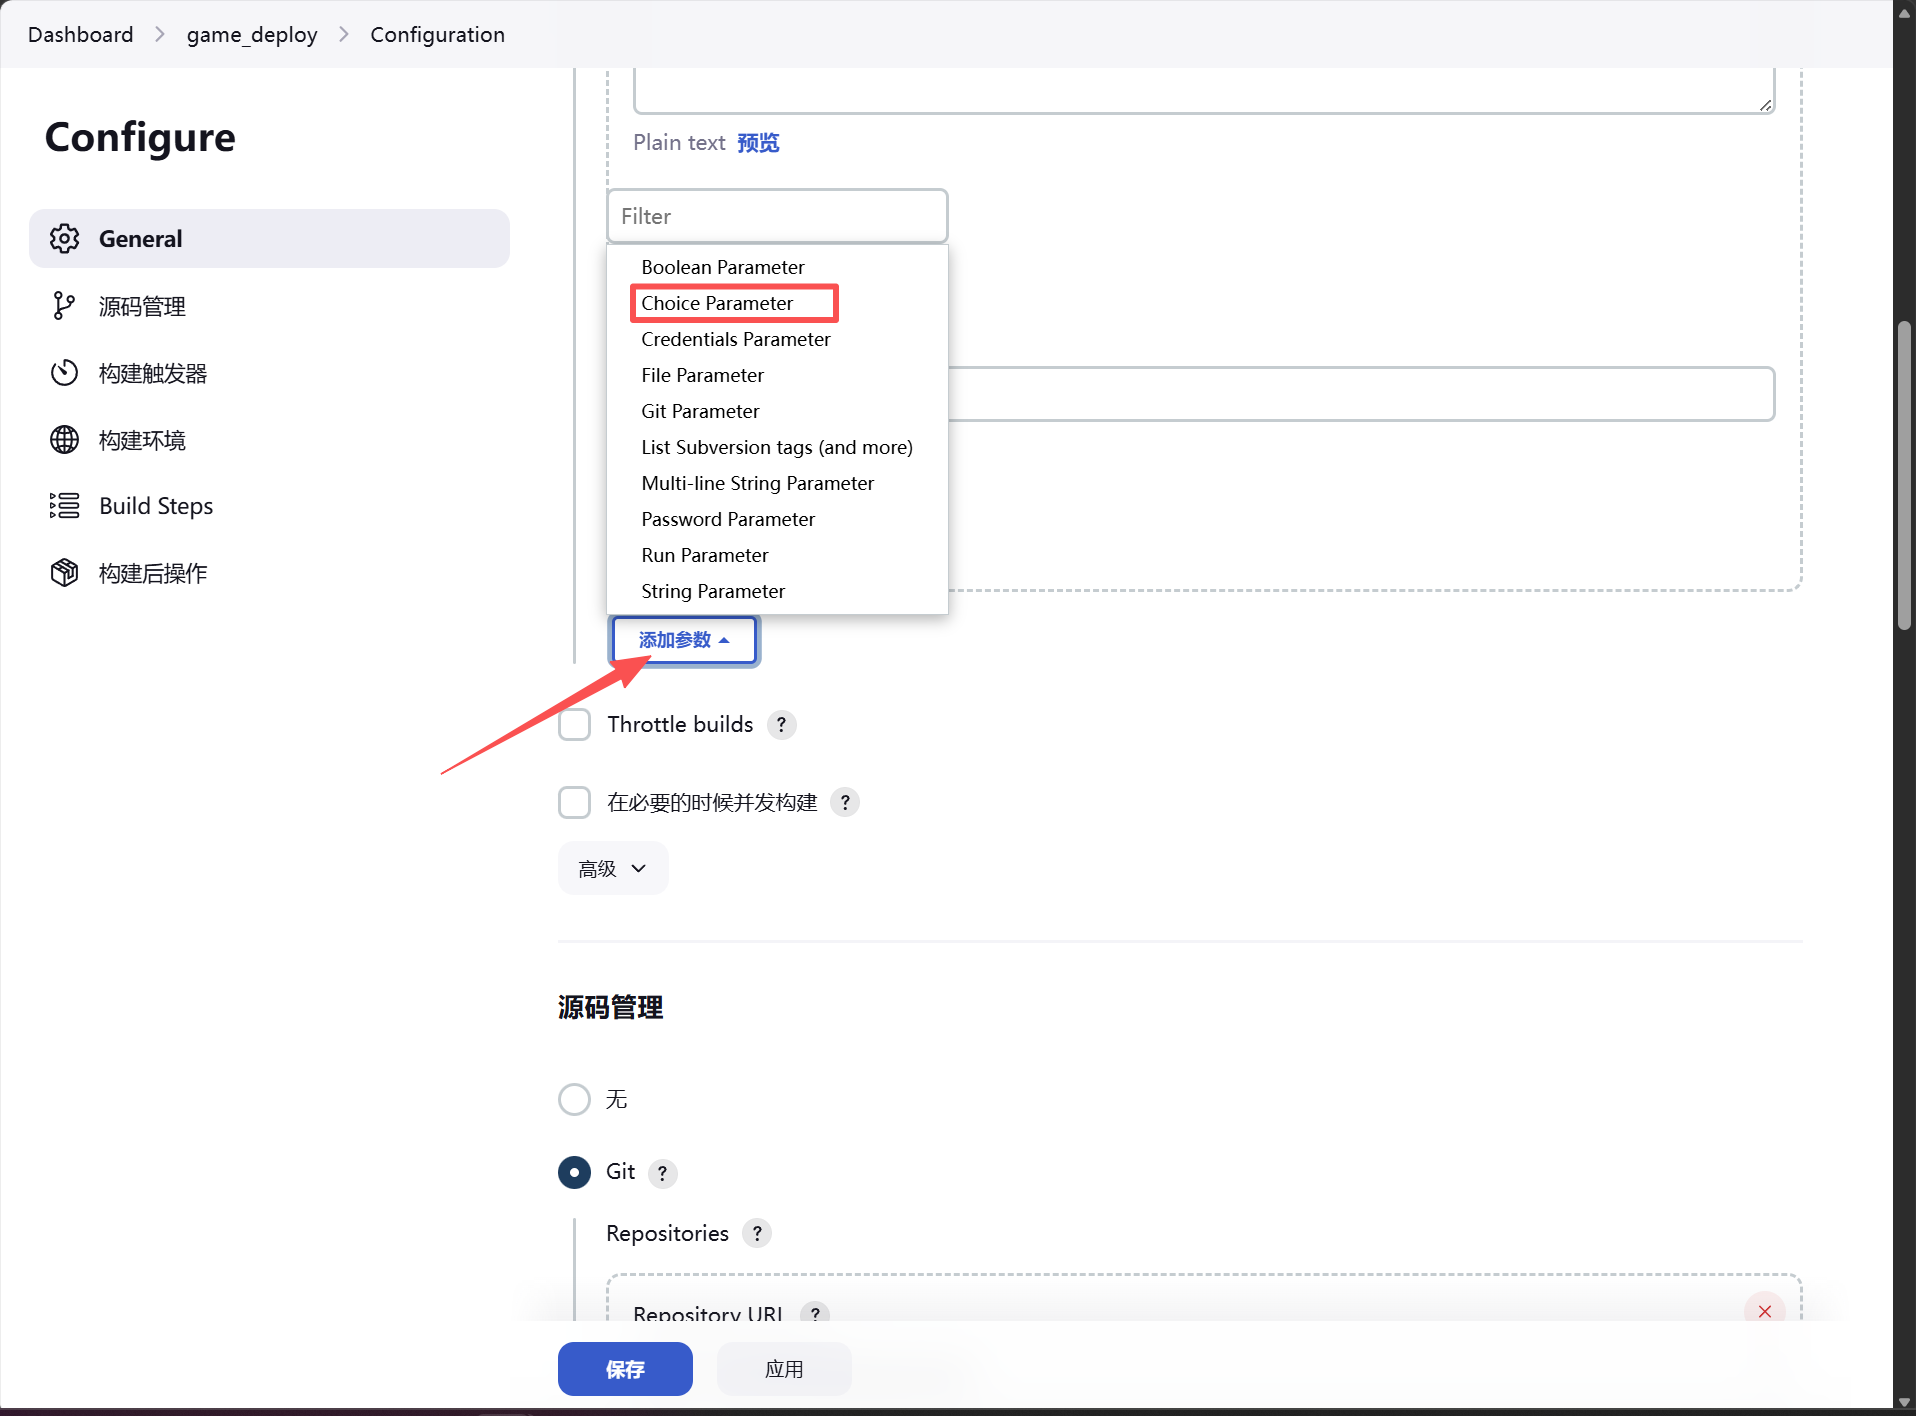
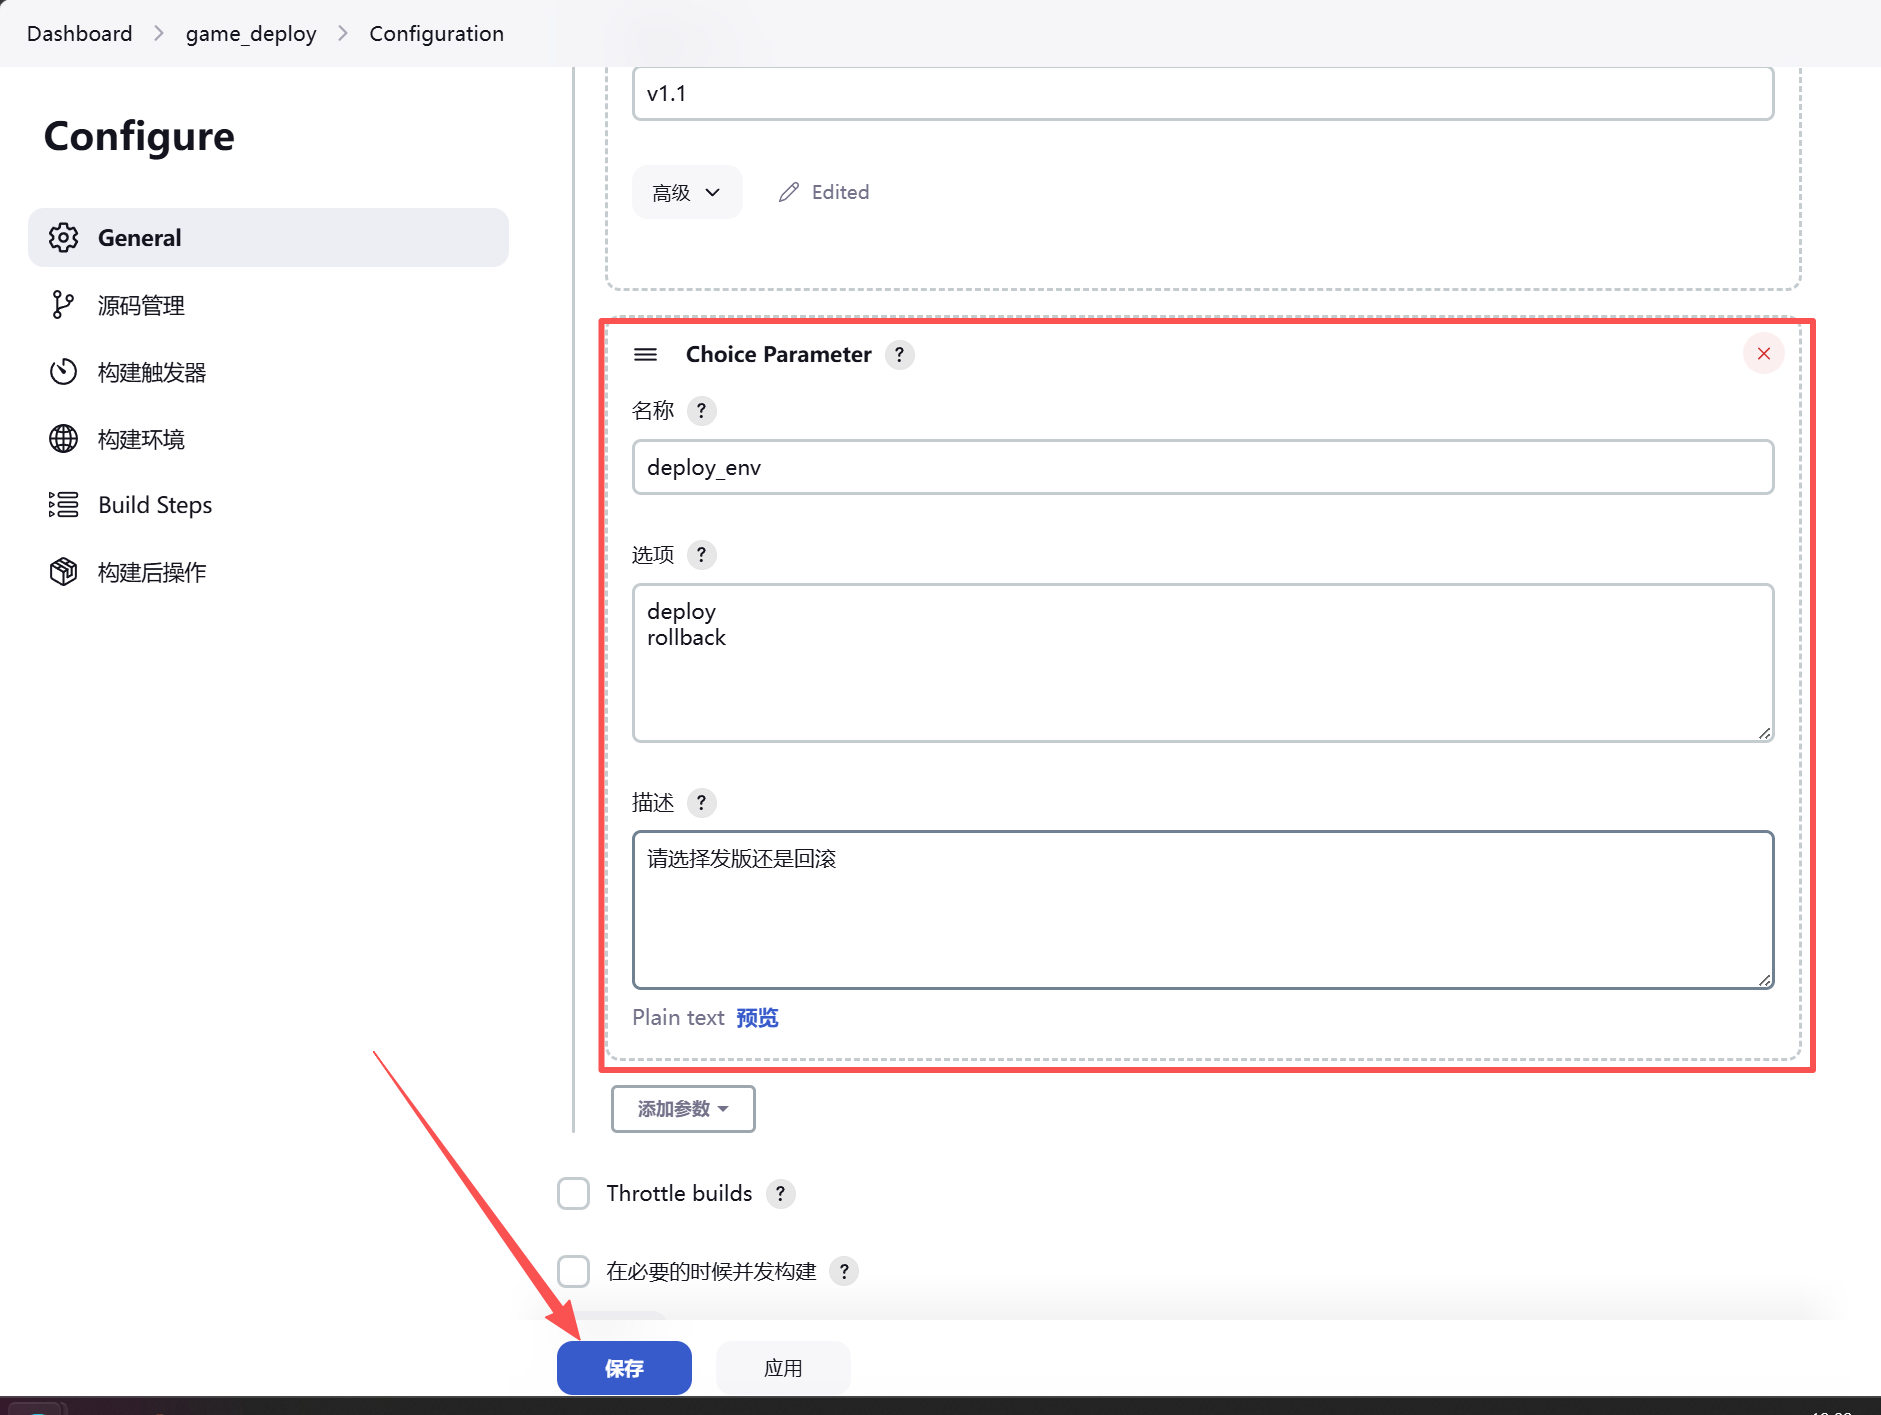
最后的显示是这样的
避免重复构建
当重复执行构建后会生成多个相同版本的文件,利用jenkins变量值解决重复性构建问题
jenkins变量
1. GIT_COMMIT 当前版本提交产生的哈希唯一值
2. GIT_PREVIOUS_SUCCESSFUL_COMMIT 已经提交过的版本的哈希唯一值
使用以上两个值做比较,如果已提交则退出,如果没有提交过则继续执行构建,更改脚本做判断

可以修改deploy.sh中的内容为
#!/bin/bash
IP=10.0.0.7

TAR(){
	tar zcf /opt/web.tar.gz ./*
}
SCP(){
	scp /opt/web.tar.gz $IP:/code/
}
XF(){
	ssh $IP "mkdir /code/web_${git_version}"
	ssh $IP "tar xf /code/web.tar.gz -C /code/web_${git_version}"
	ssh $IP "rm -f /code/web.tar.gz"
}

LN(){
	ssh $IP "[ -d /code/game ] && rm -rf /code/game"
	ssh $IP "ln -s /code/web_${git_version} /code/game"
}

main(){
	TAR
	SCP
	XF
	LN
}

if [ $deploy_env = "deploy" ];then
	if [ $GIT_COMMIT = $GIT_PREVIOUS_SUCCESSFUL_COMMIT ];then
		echo "已经部署过了"
		exit
	else
		main
	fi
elif [ $deploy_env = "rollback" ];then
	LN
fi
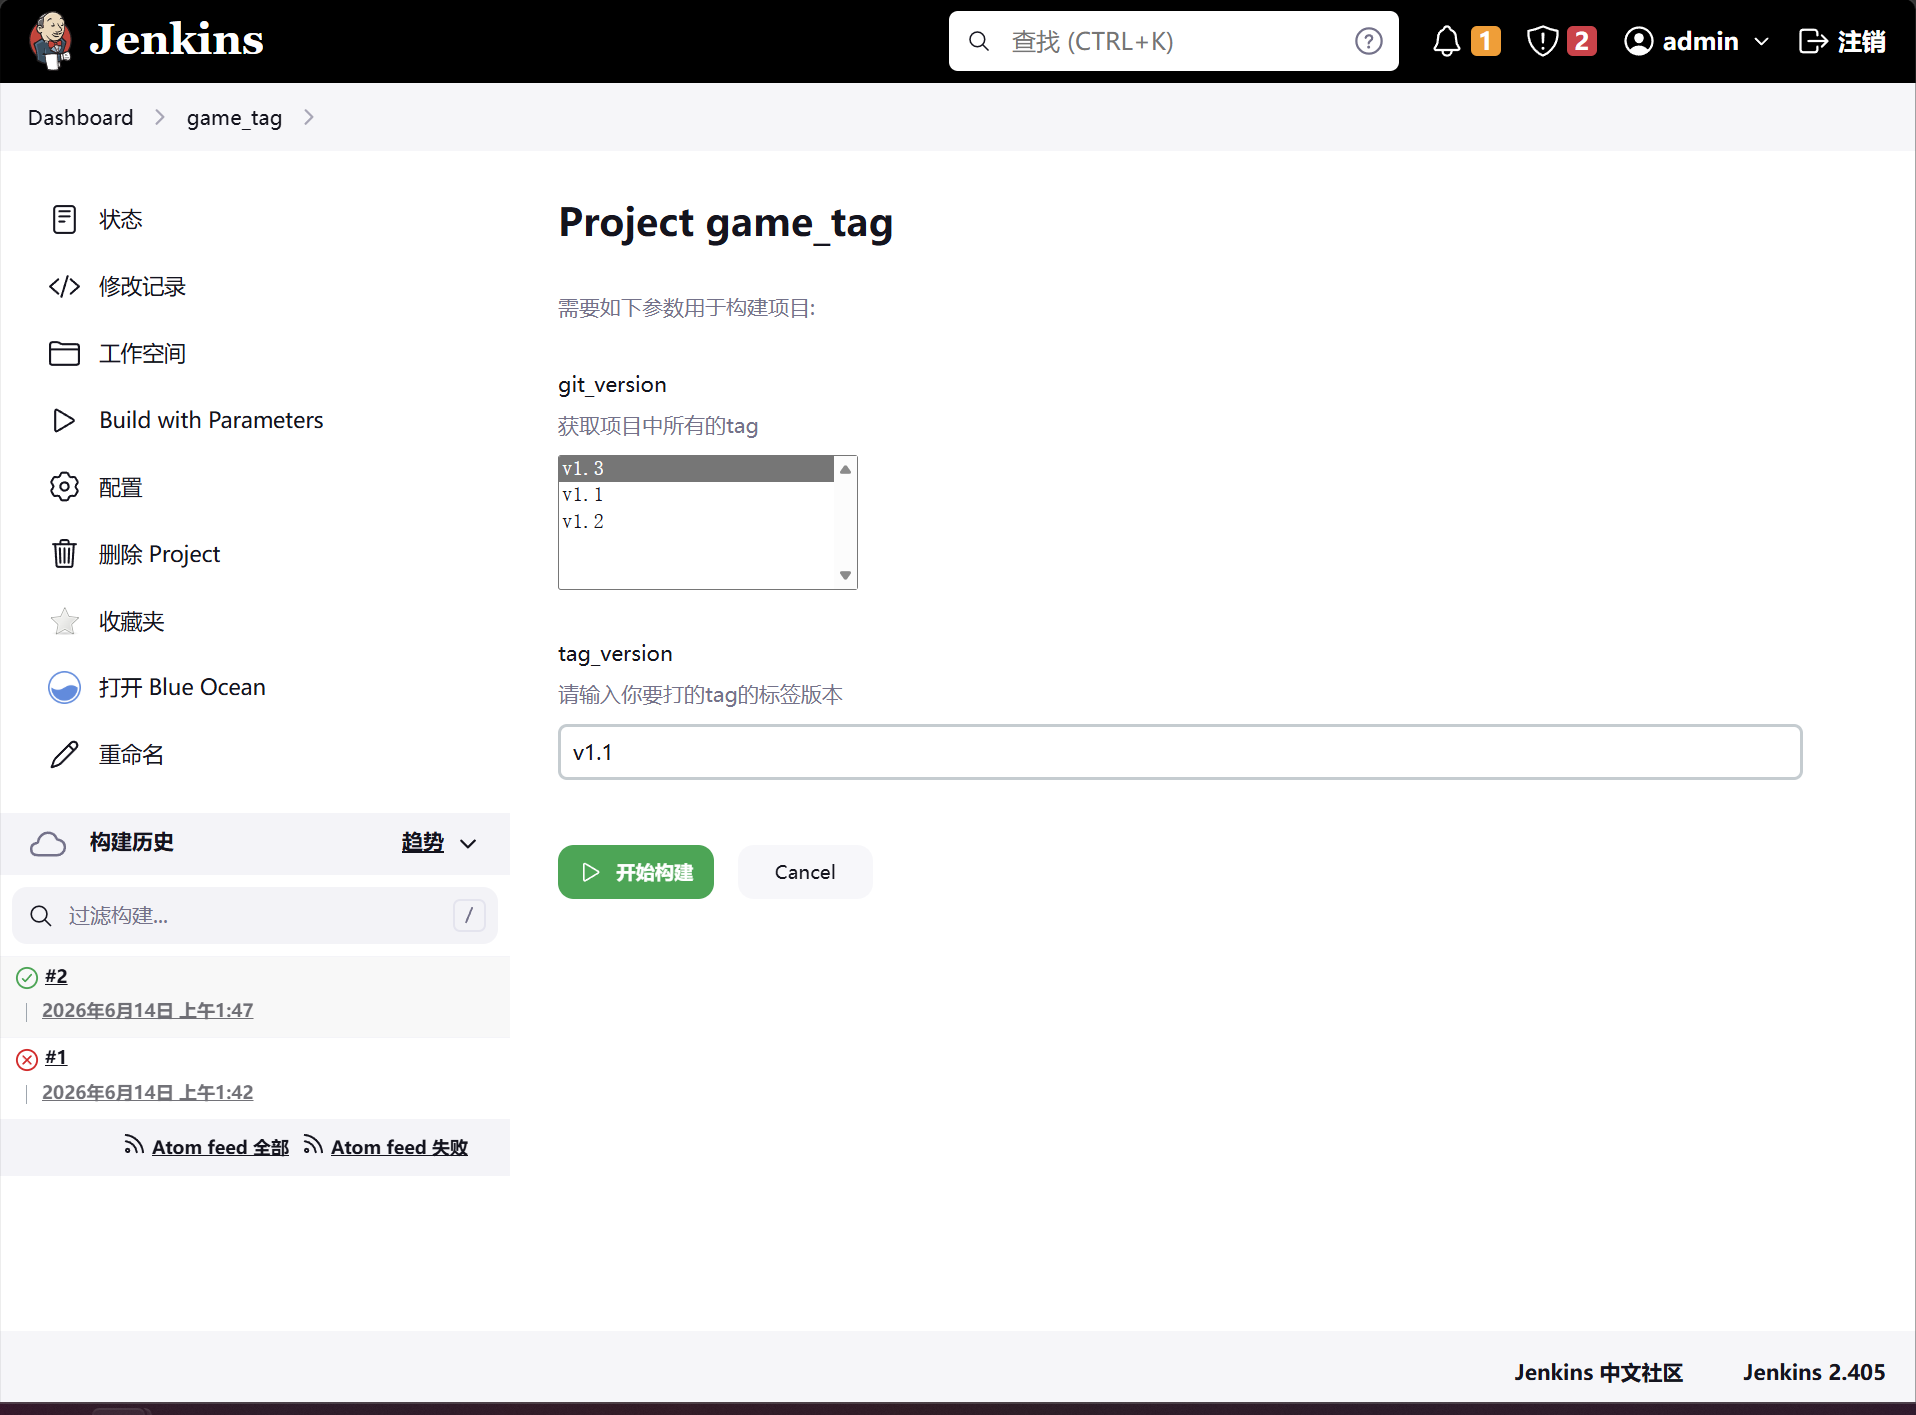
4.jenkins创建tag项目
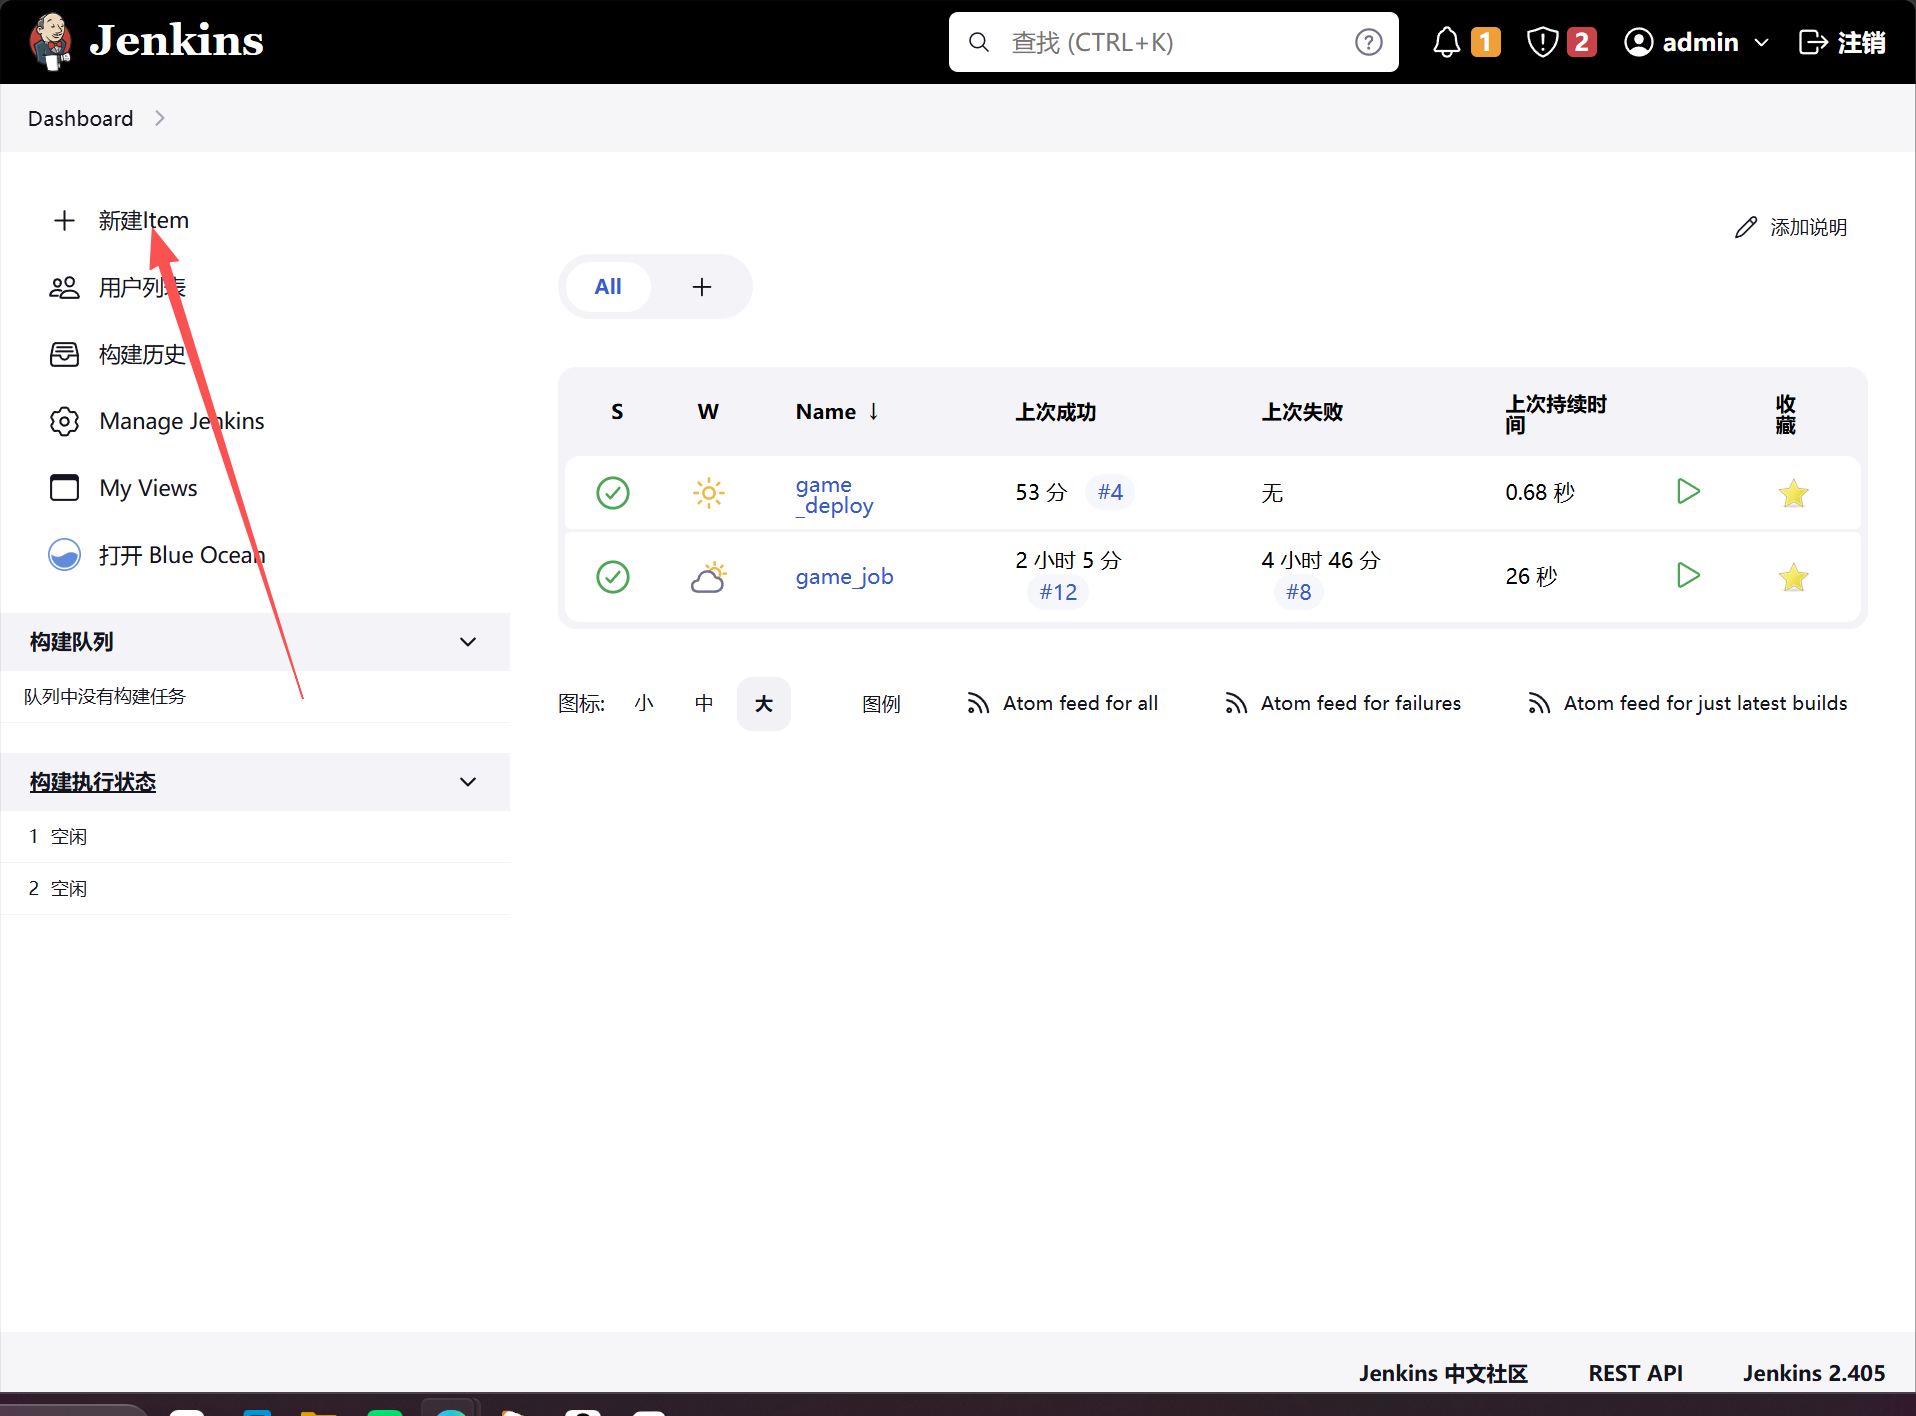
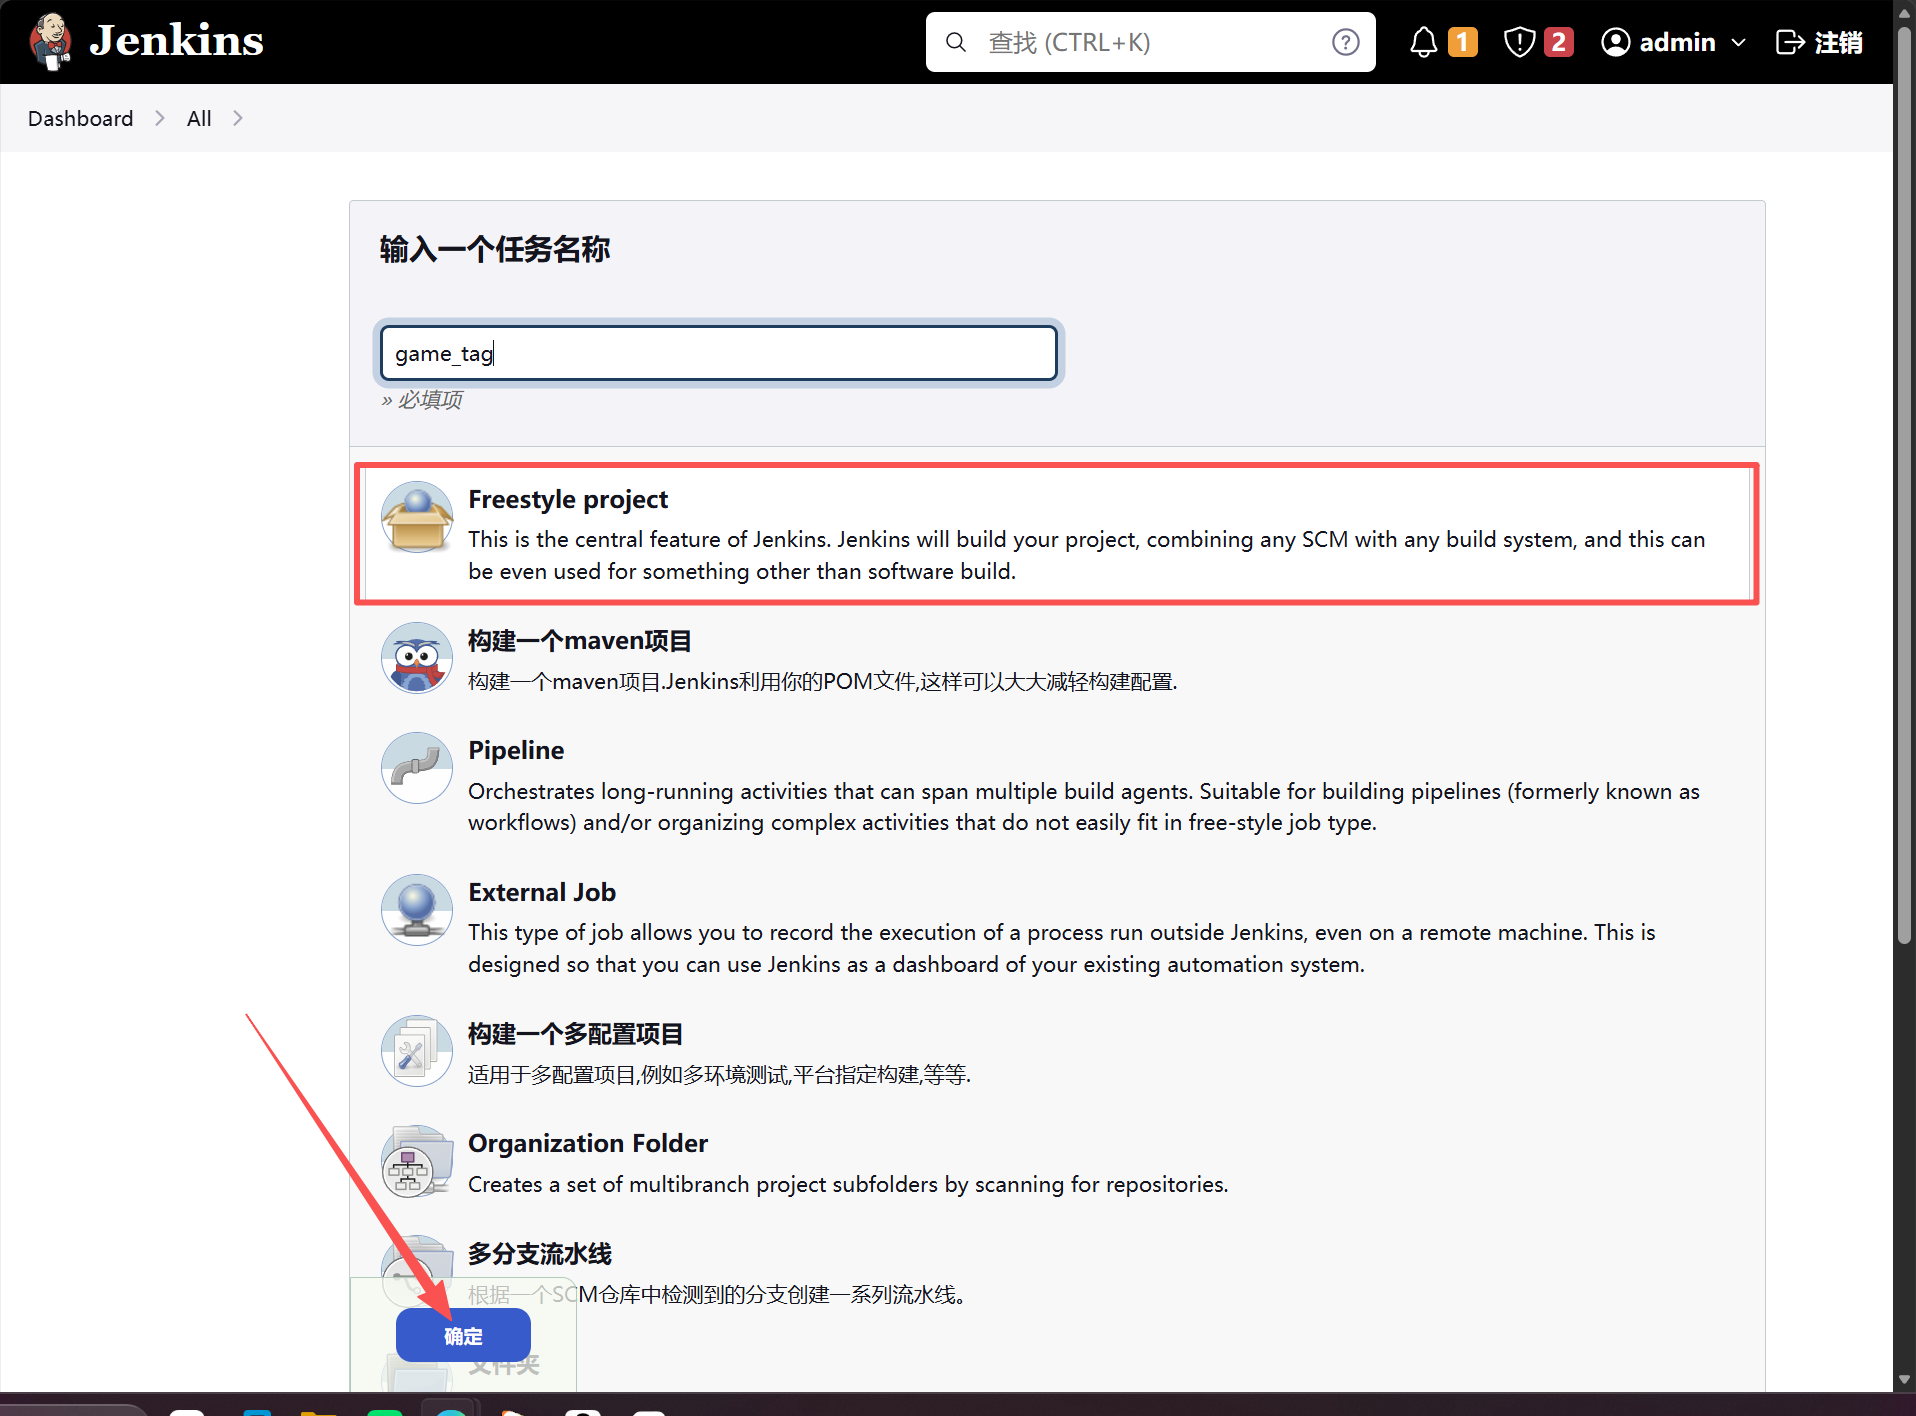
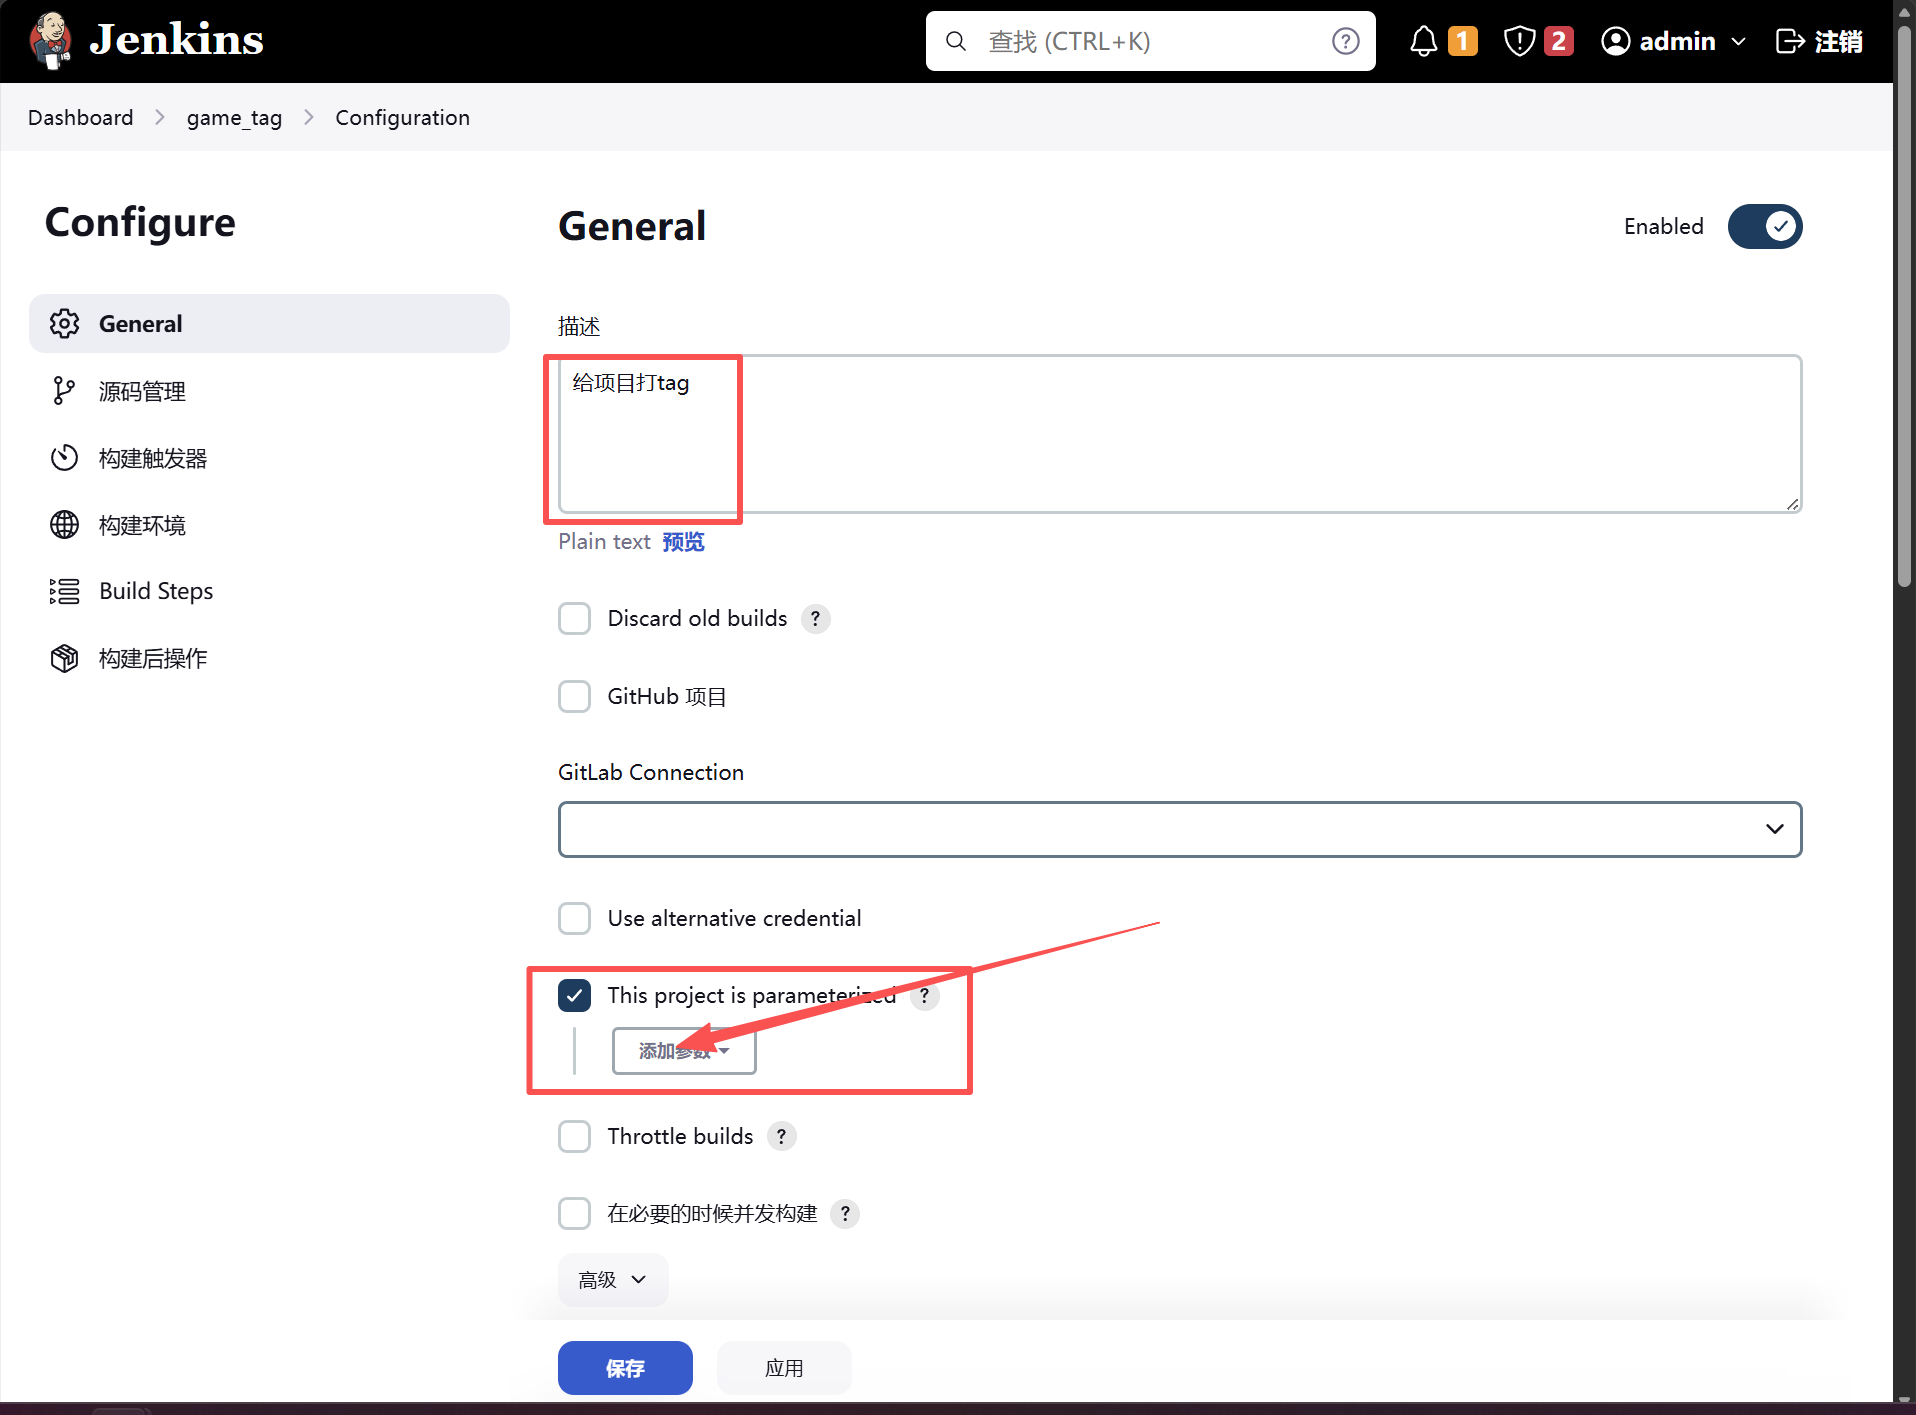
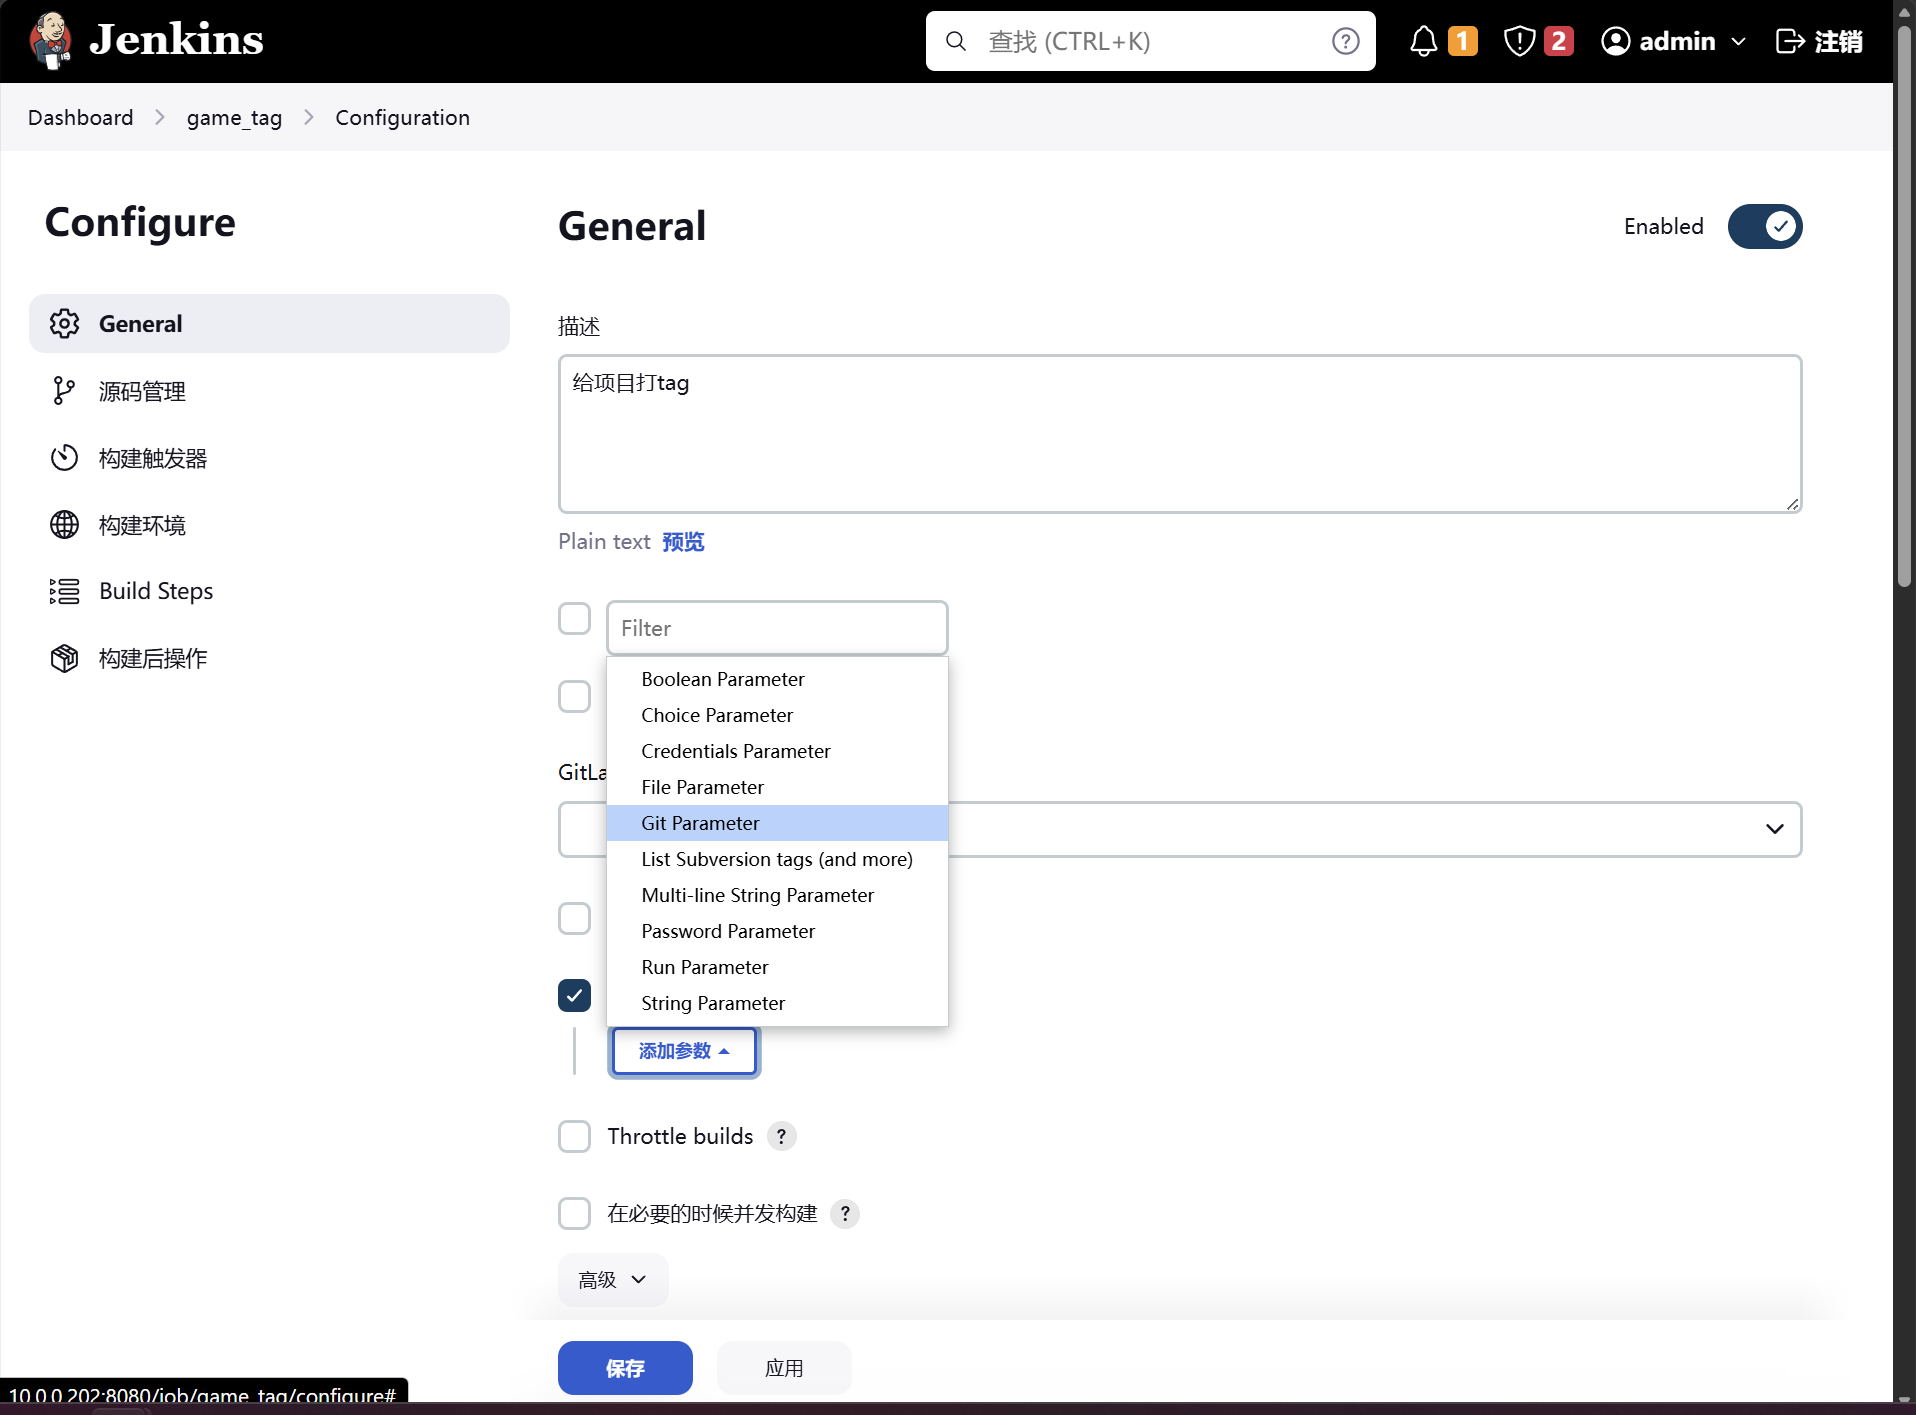
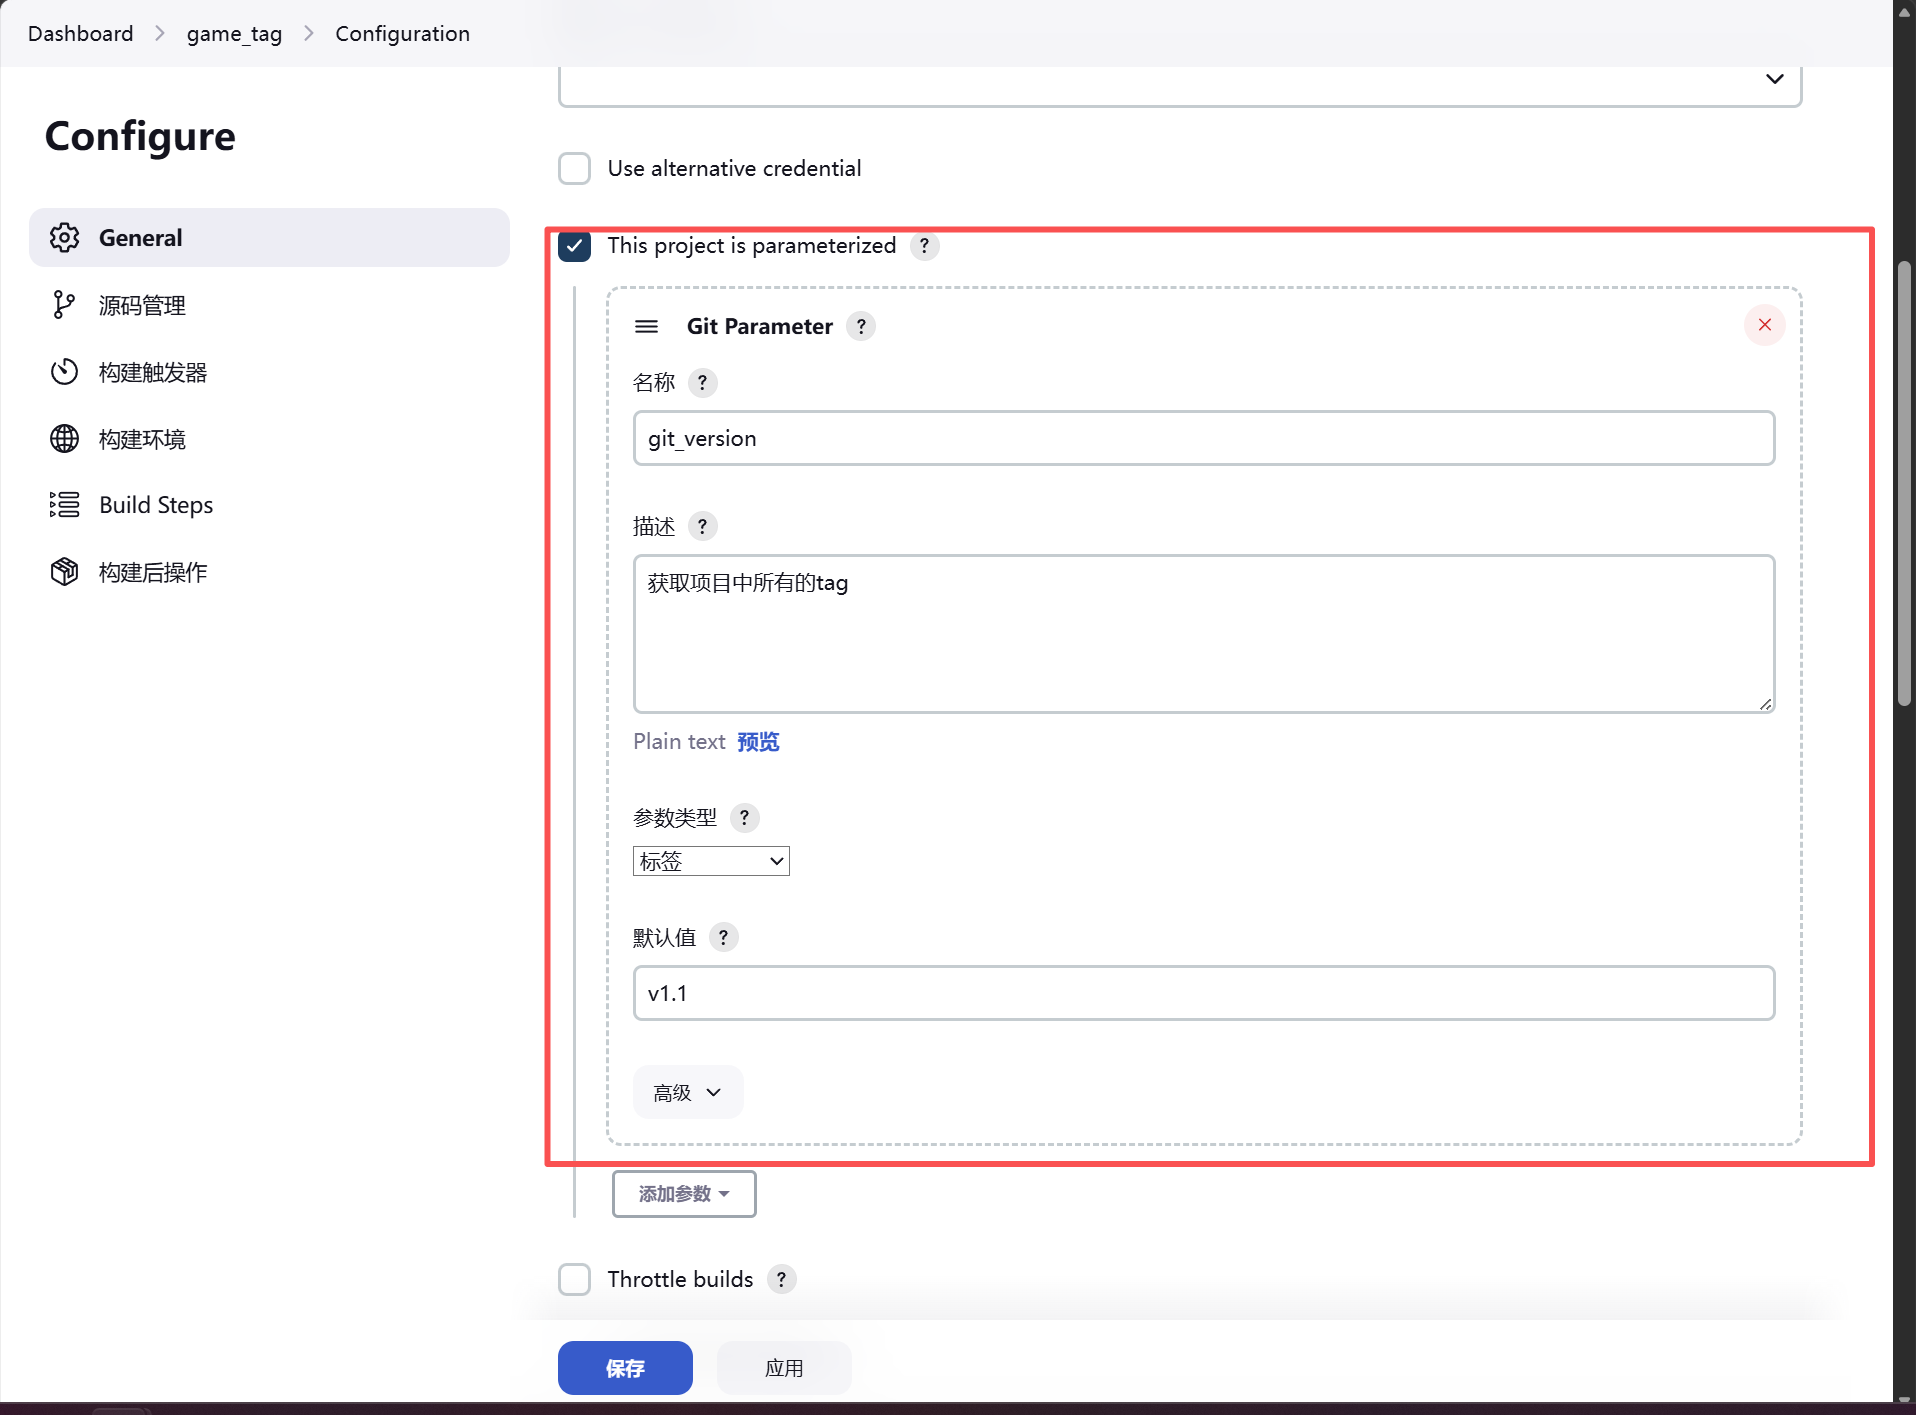
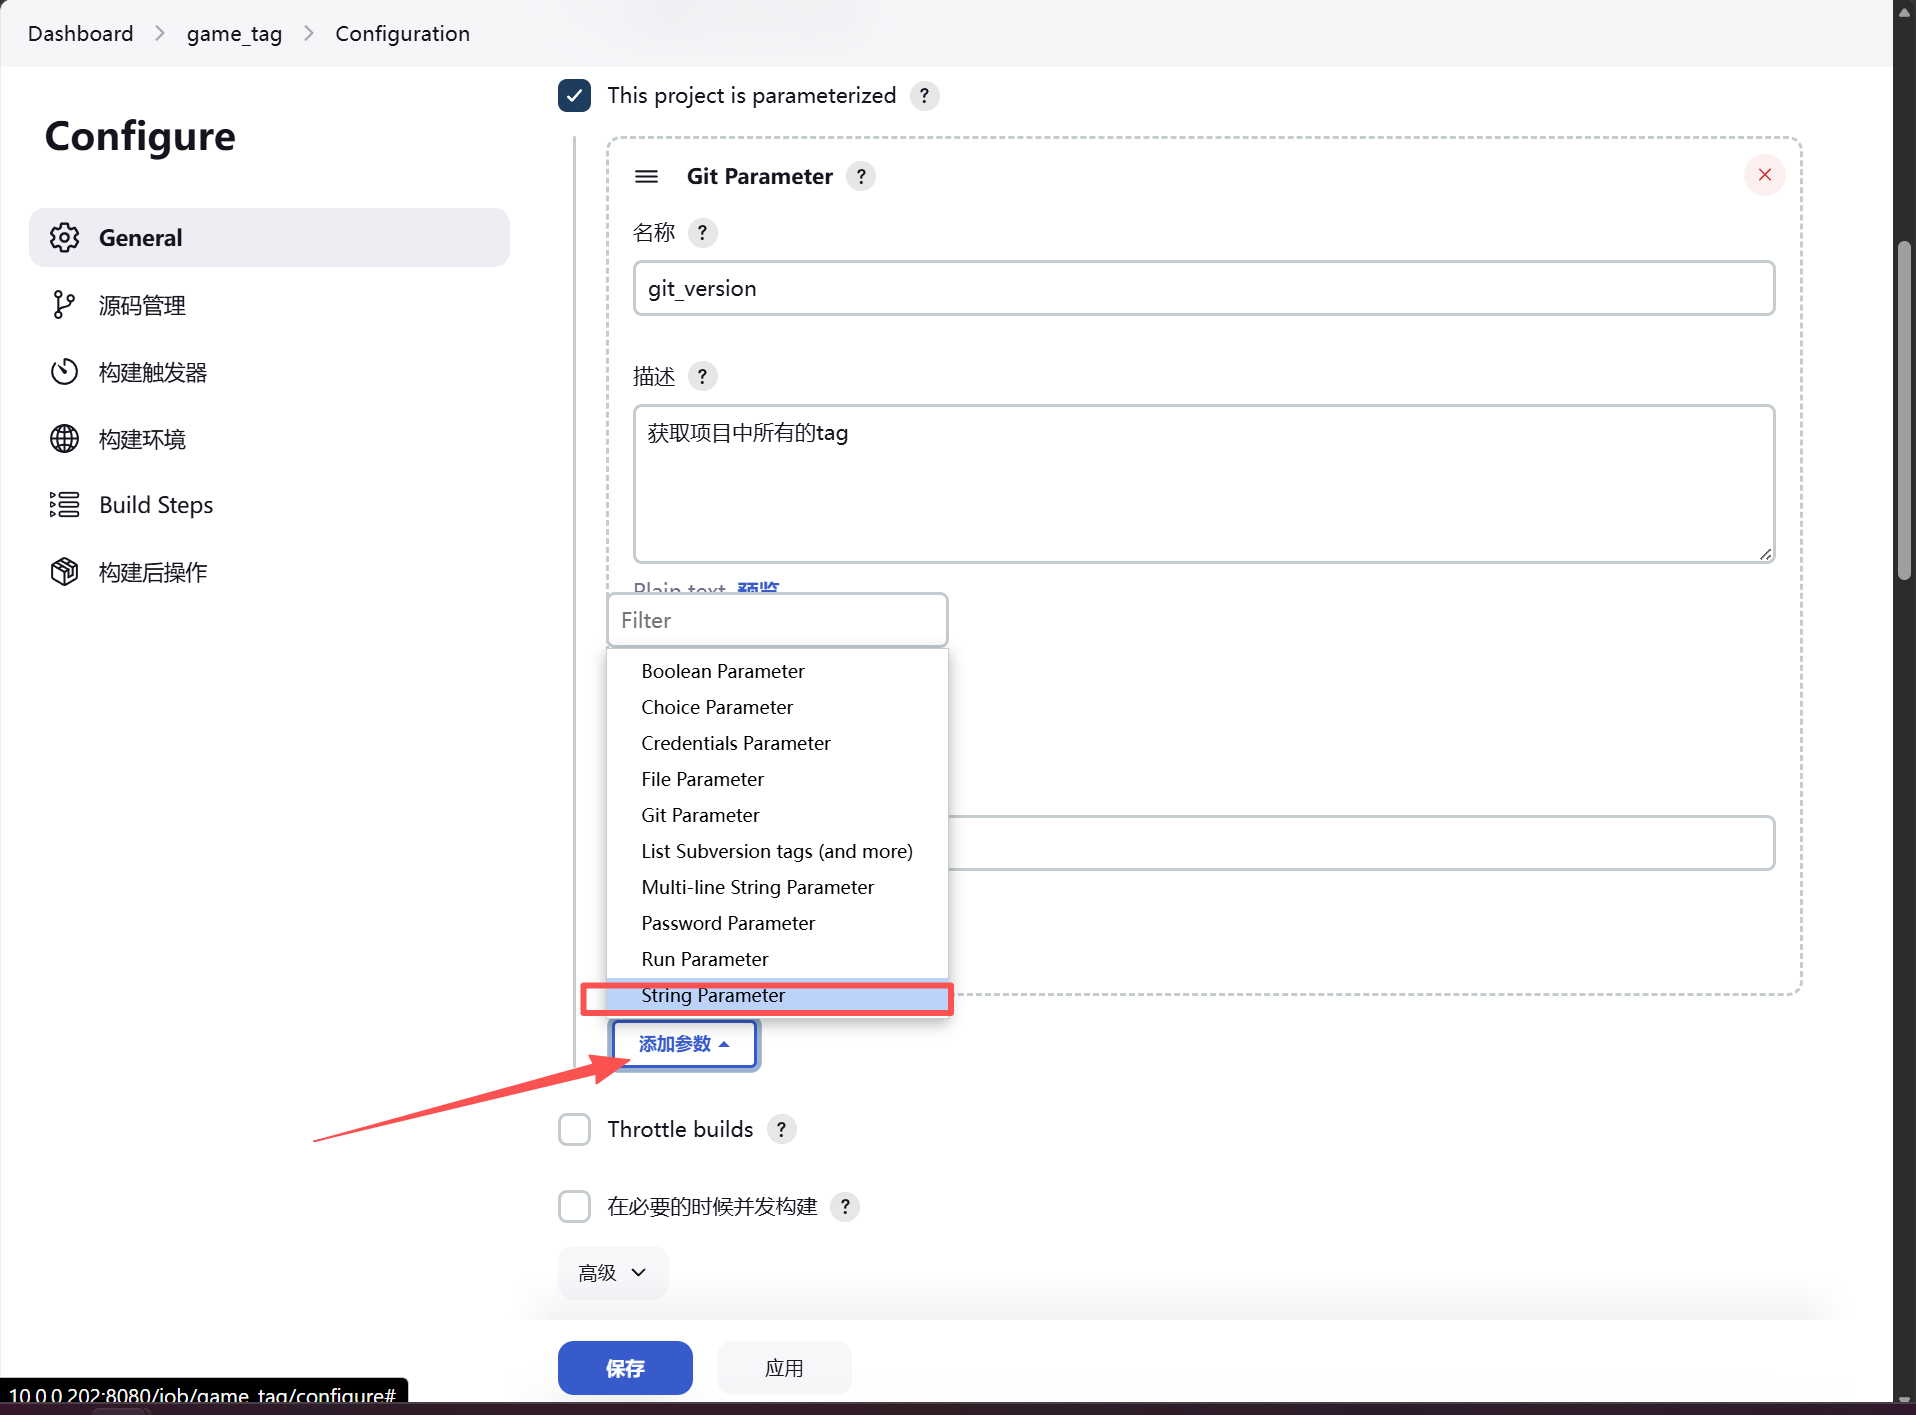
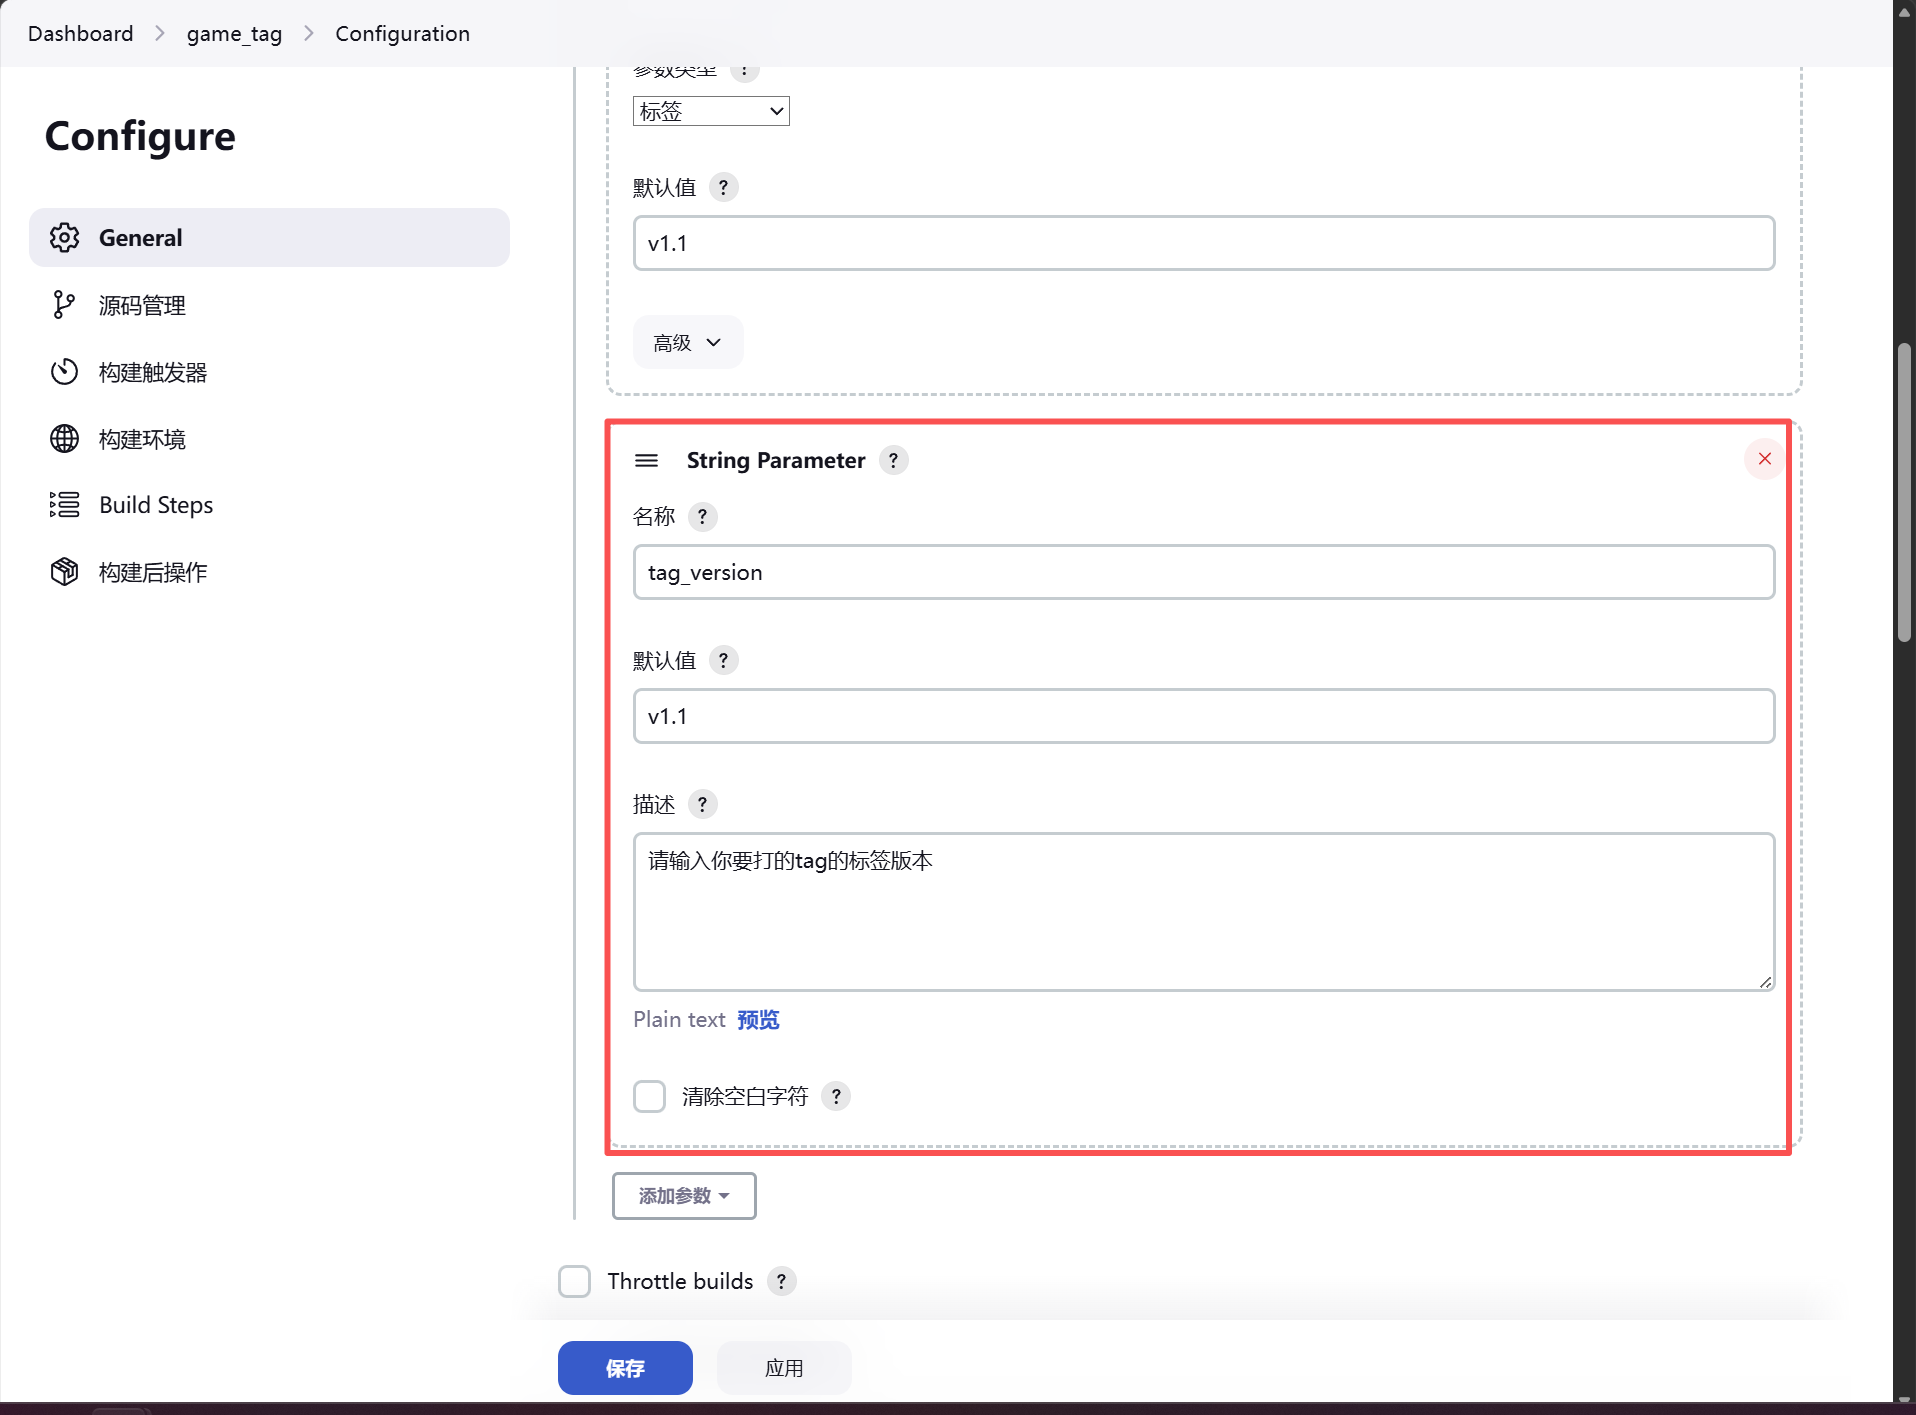
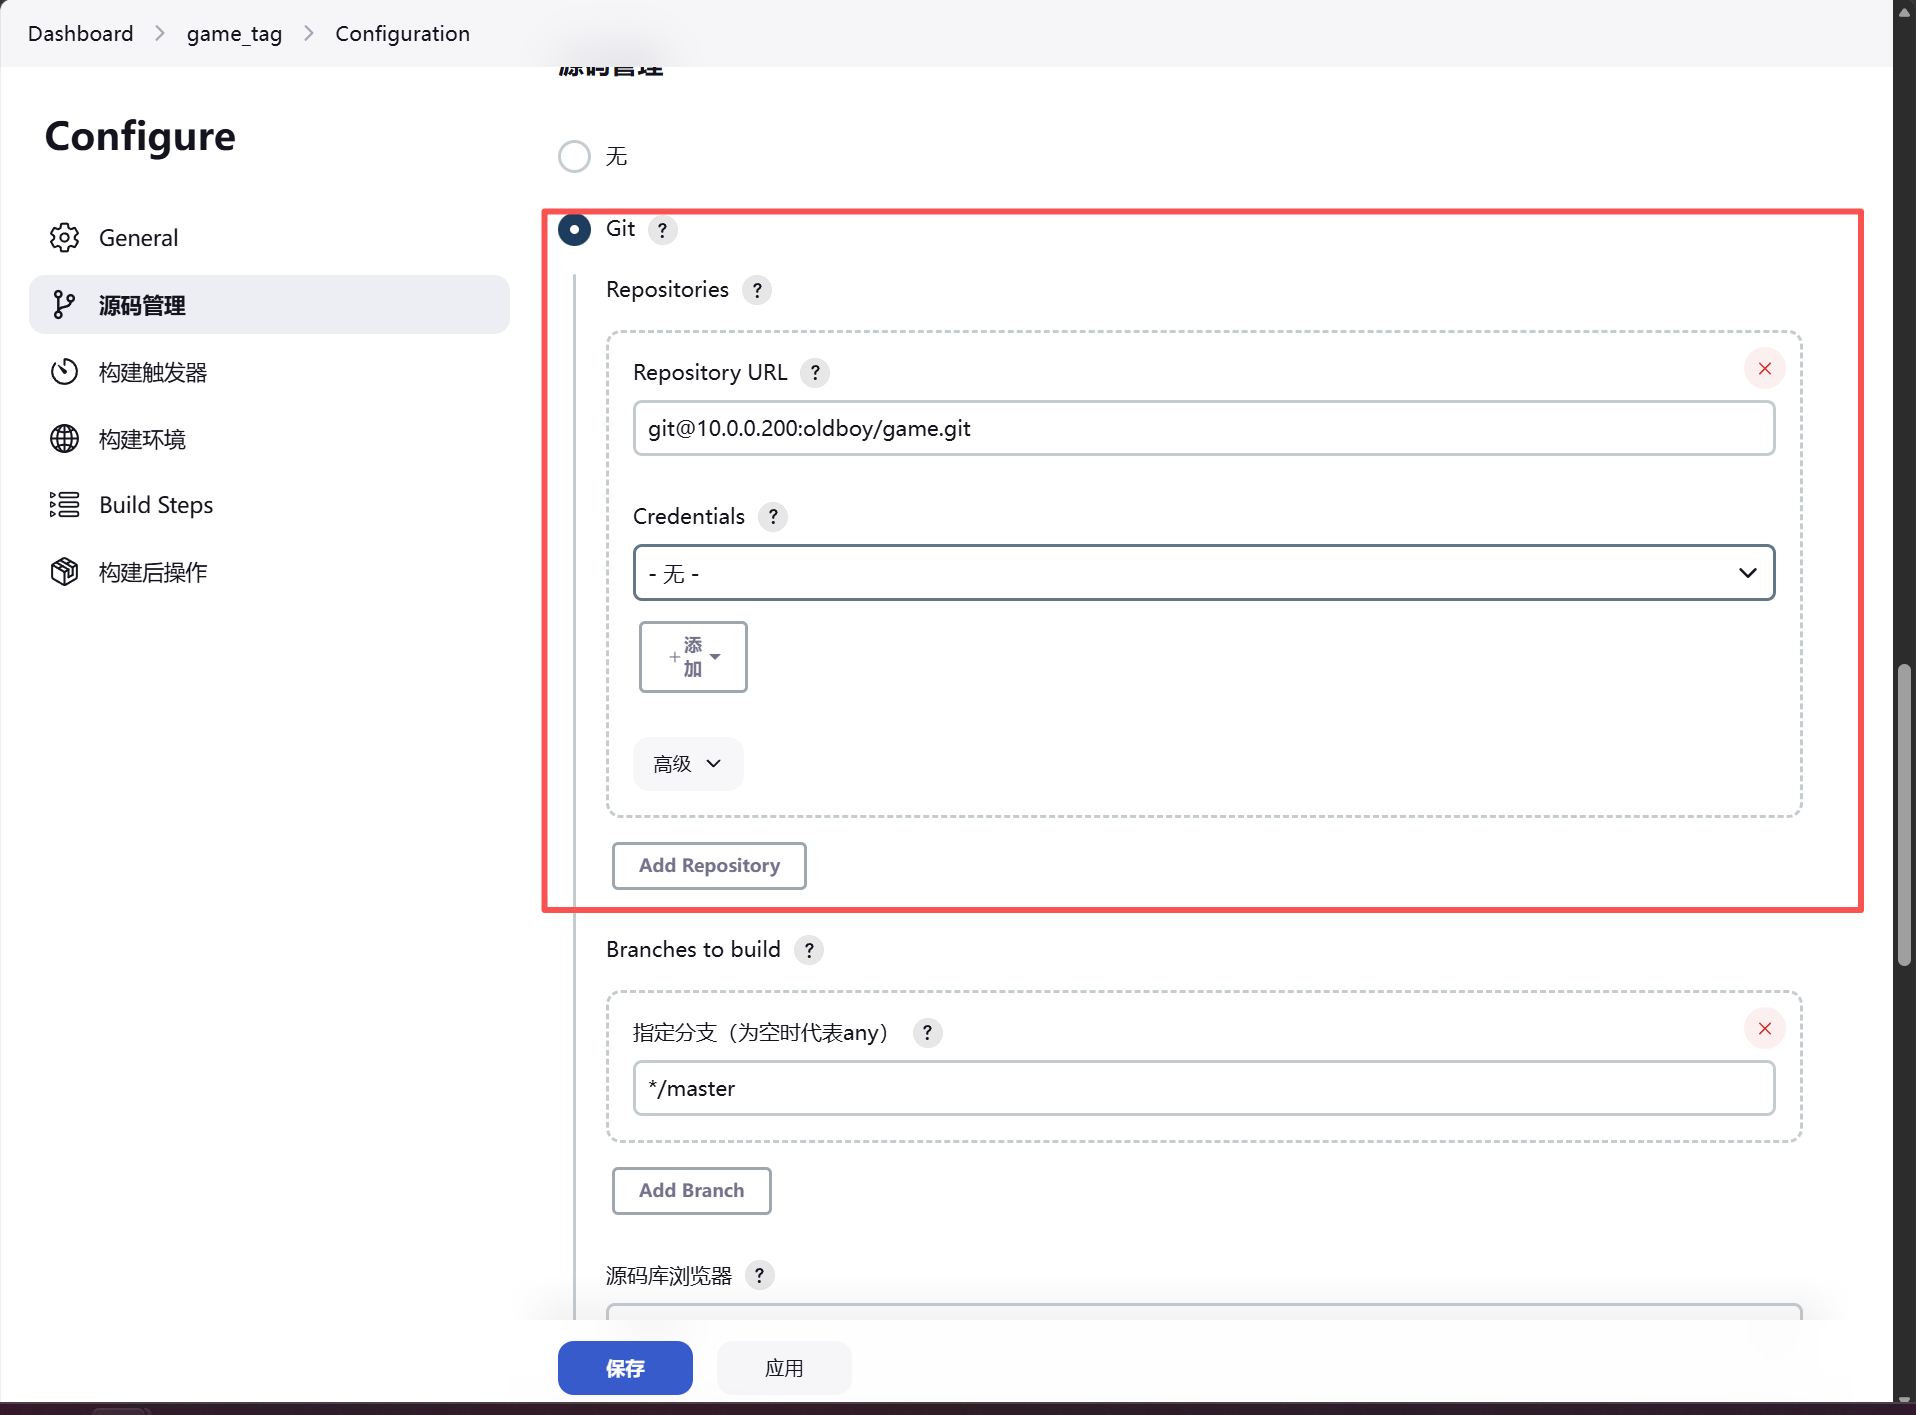
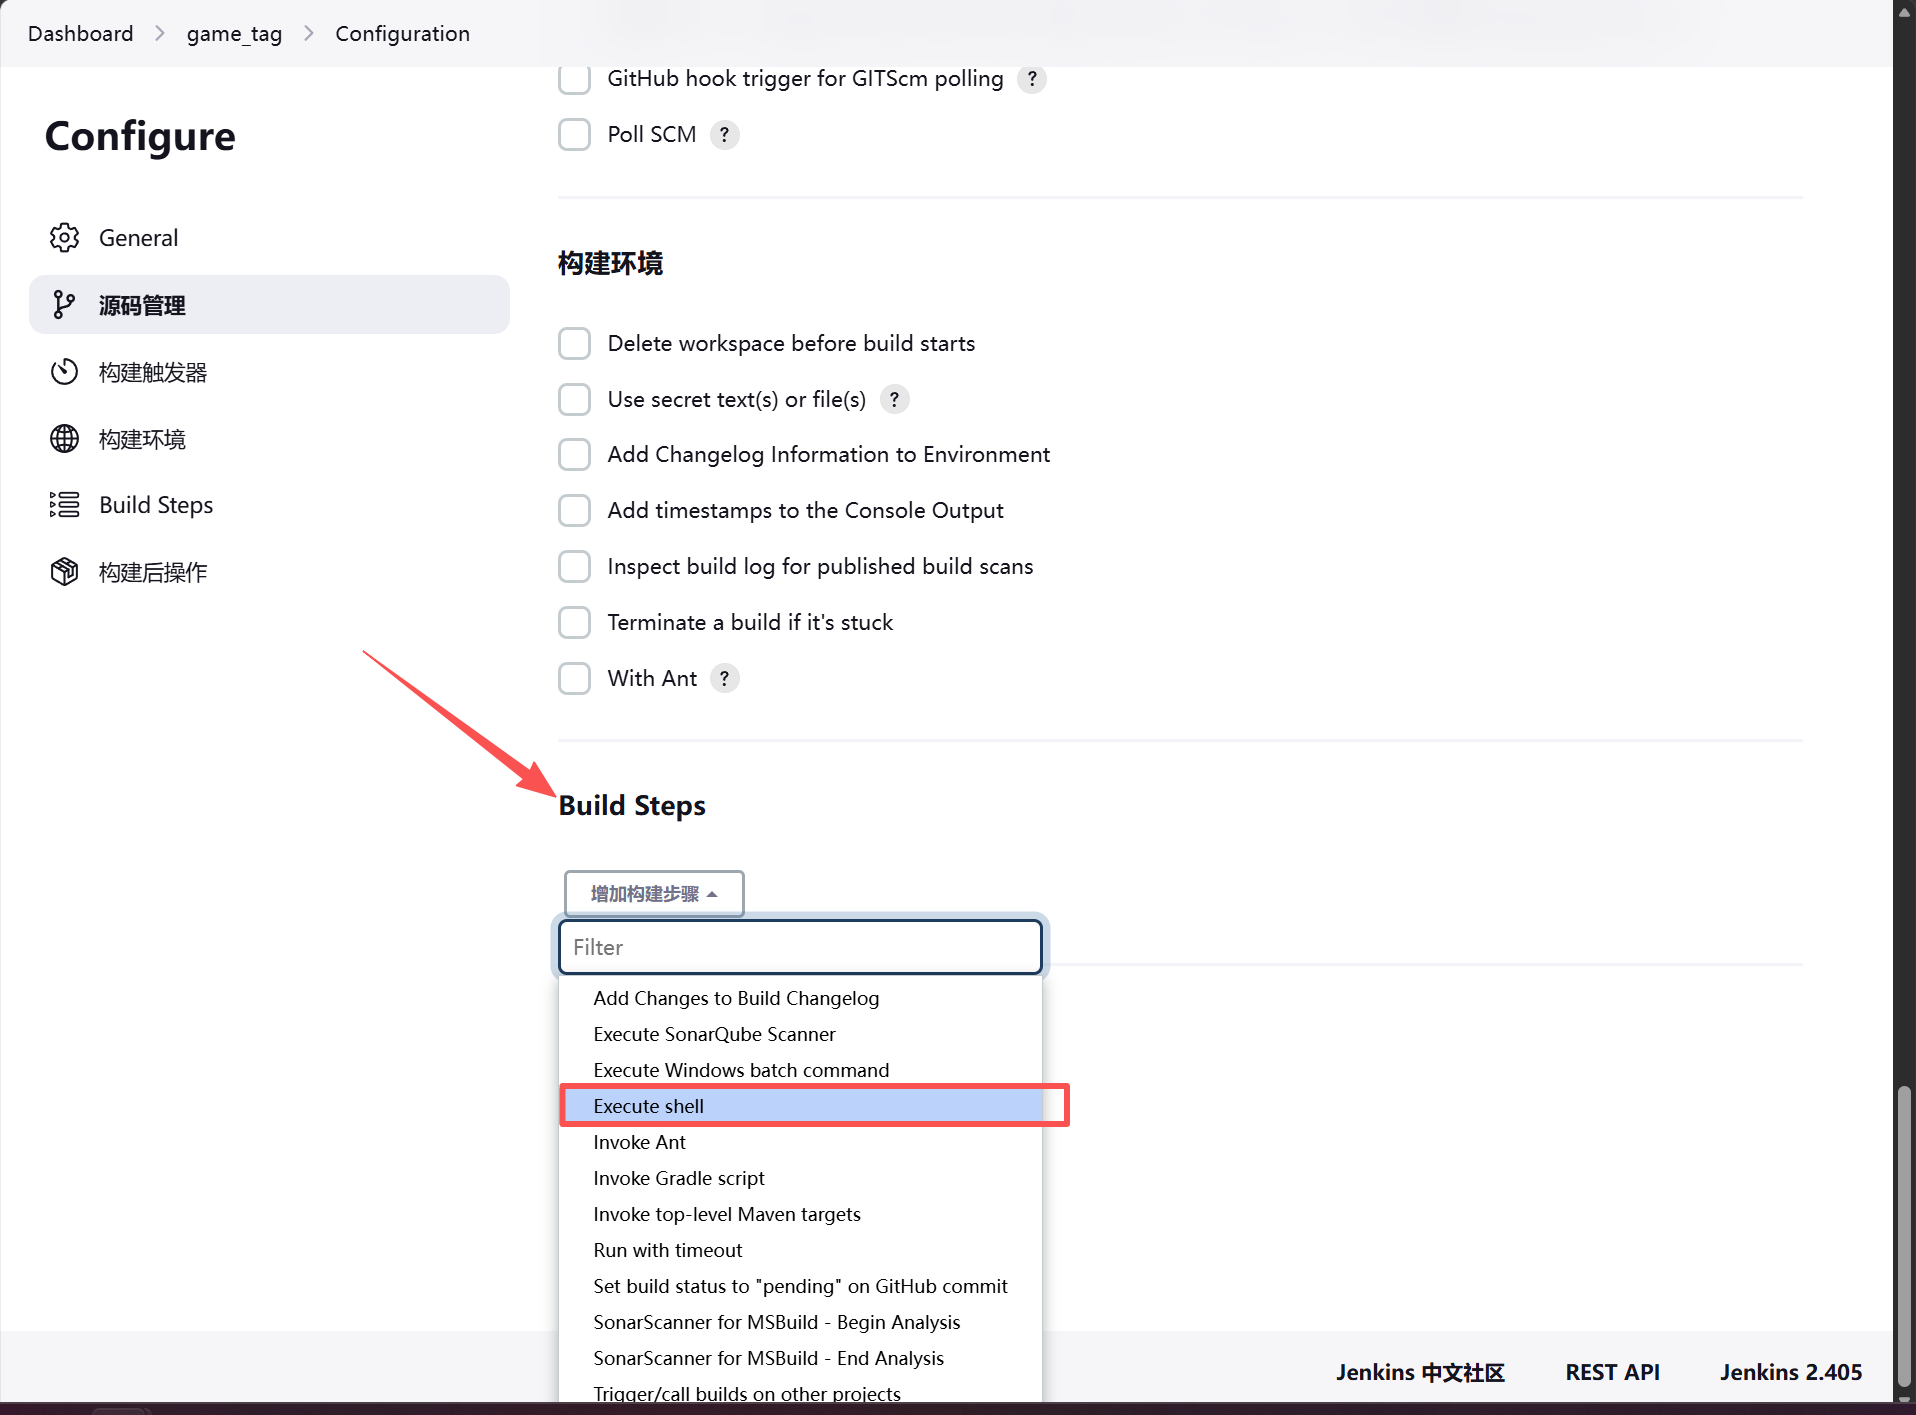
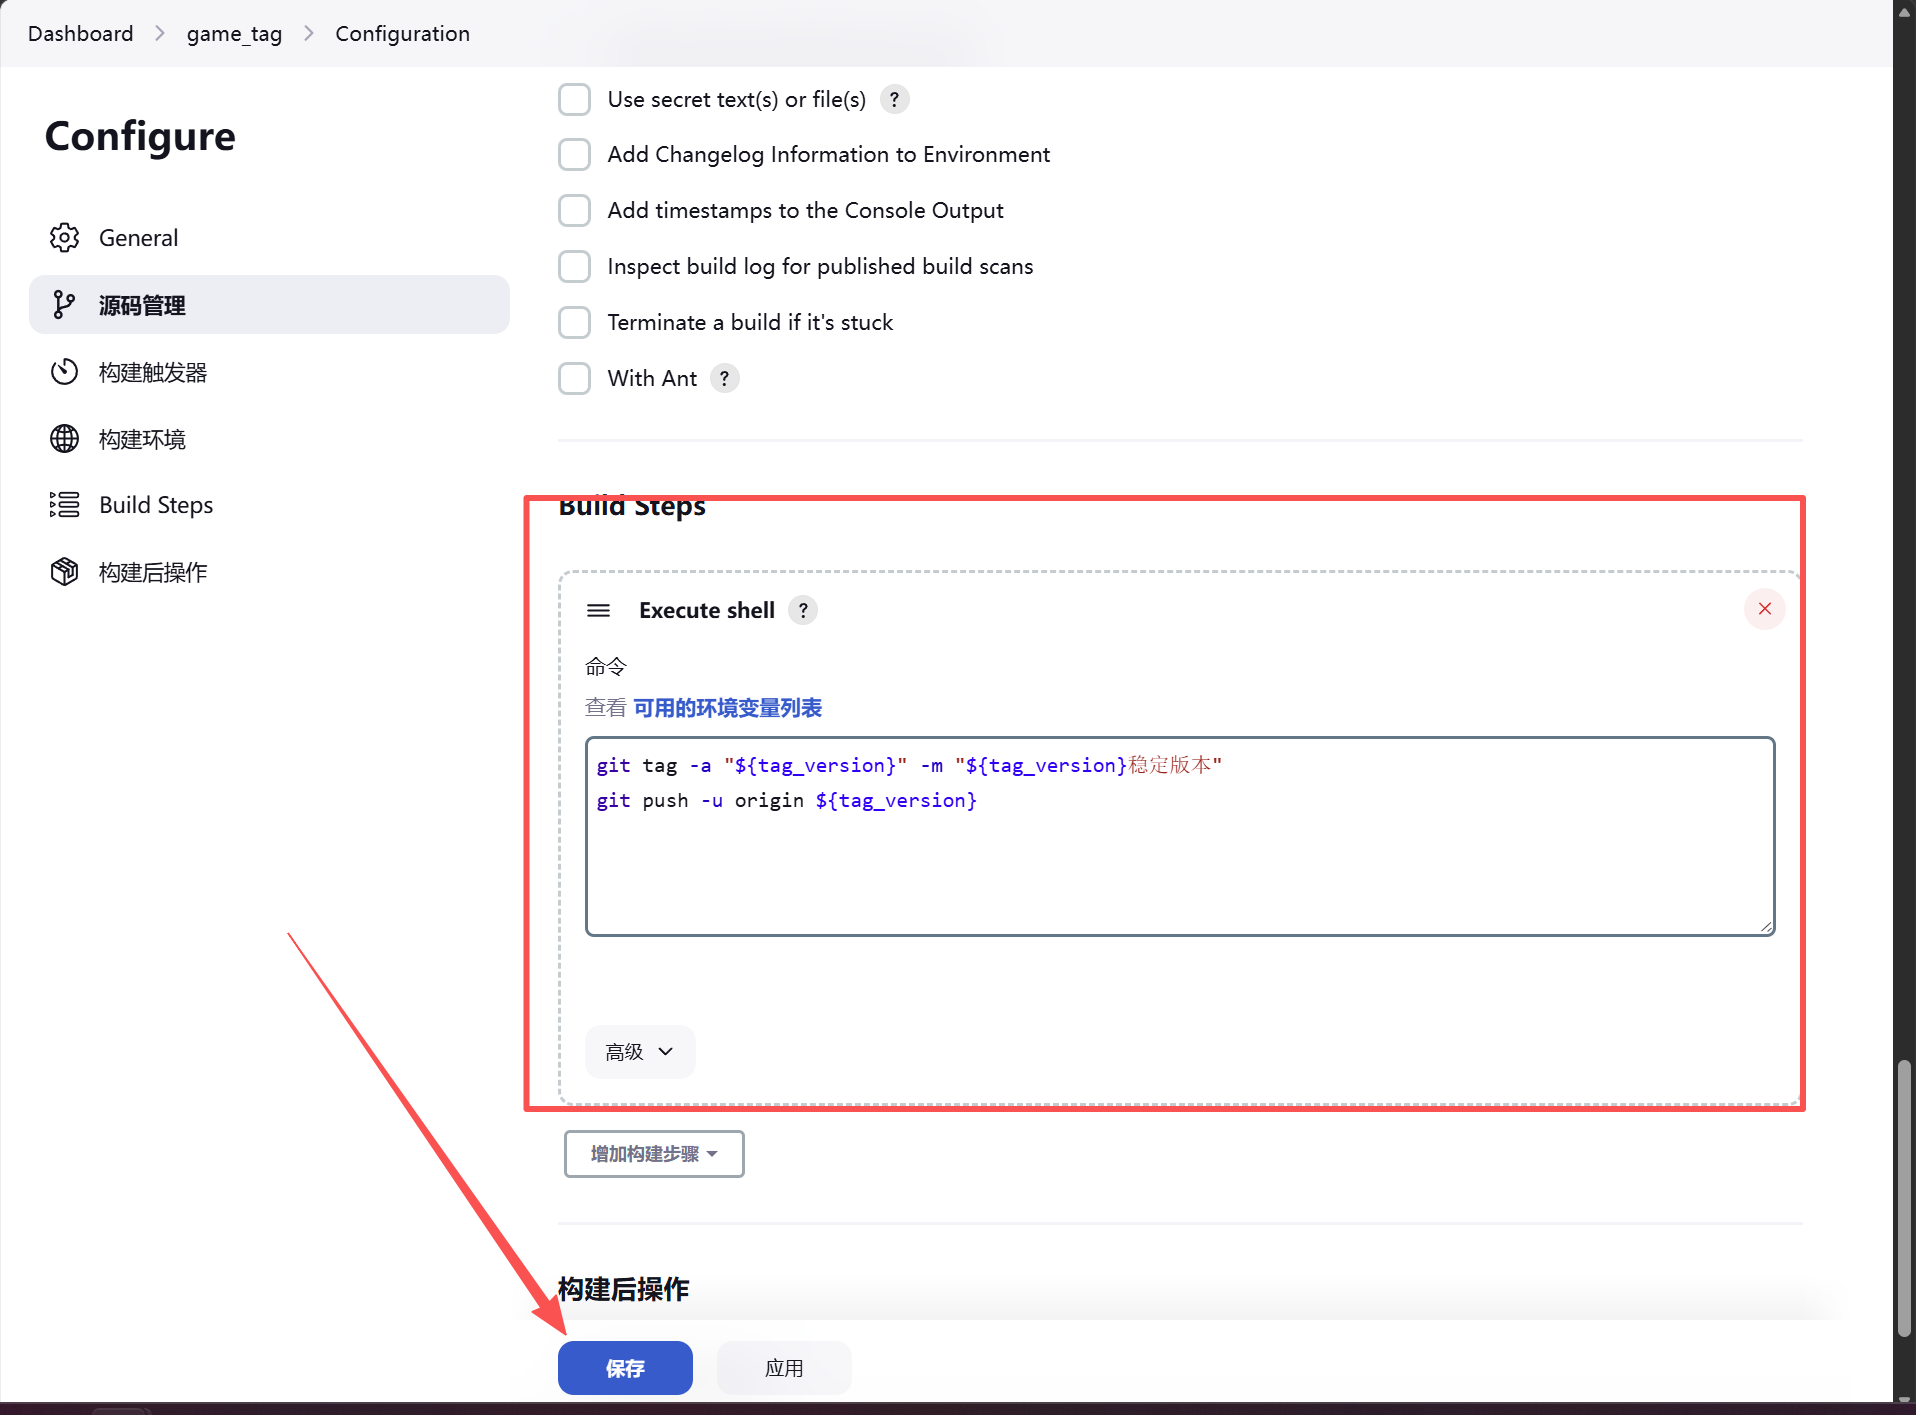
git tag -a "${tag_version}" -m "${tag_version}稳定版本"
git push -u origin ${tag_version}
配置完成之后在jenkins服务器上配置全局的使用者和邮箱
[root@jenkins scripts]#   git config --global user.email "lzy@example.com"
[root@jenkins scripts]#   git config --global user.name "lzy"
创建测试
先从git服务器上传新的代码
##注意,这次不从git服务器上打标签,修改完成之后直接上传到master主线
root@Gitlab:~/game# vim index.html
root@Gitlab:~/game# git commit -am "v1.3稳定版本"
[master b4d1259] v1.3稳定版本
 1 file changed, 1 insertion(+), 1 deletion(-)
root@Gitlab:~/game# git push -u origin master
Enumerating objects: 5, done.
Counting objects: 100% (5/5), done.
Delta compression using up to 2 threads
Compressing objects: 100% (3/3), done.
Writing objects: 100% (3/3), 300 bytes | 150.00 KiB/s, done.
Total 3 (delta 2), reused 0 (delta 0), pack-reused 0
To 10.0.0.200:oldboy/game.git
   a2bfe1f..b4d1259  master -> master
Branch 'master' set up to track remote branch 'master' from 'origin'.
推送完之后在jenkins页面上手动打标签
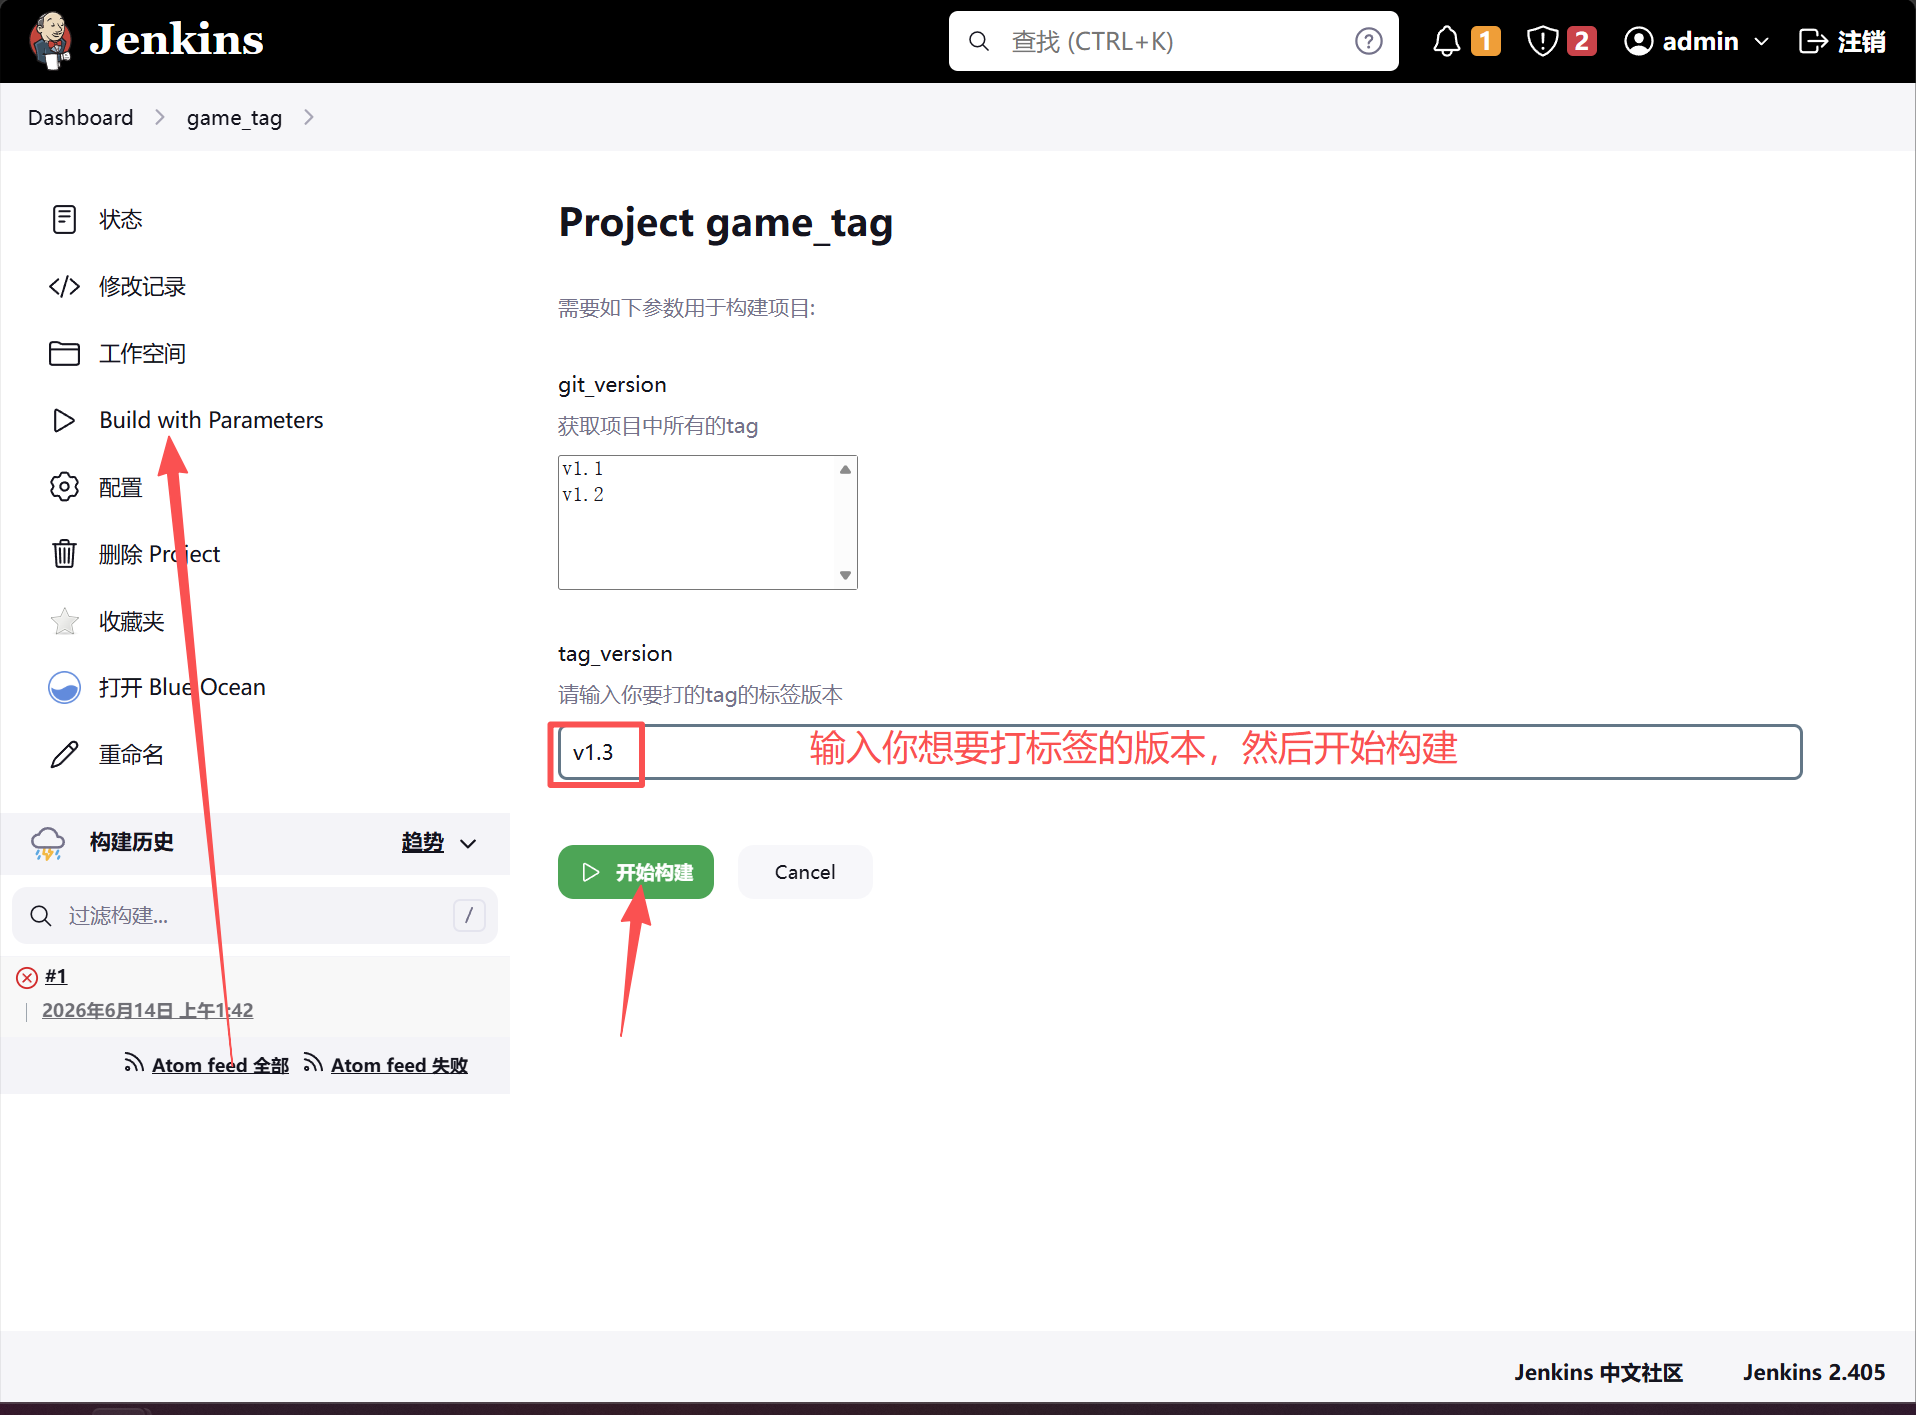
九、流水线
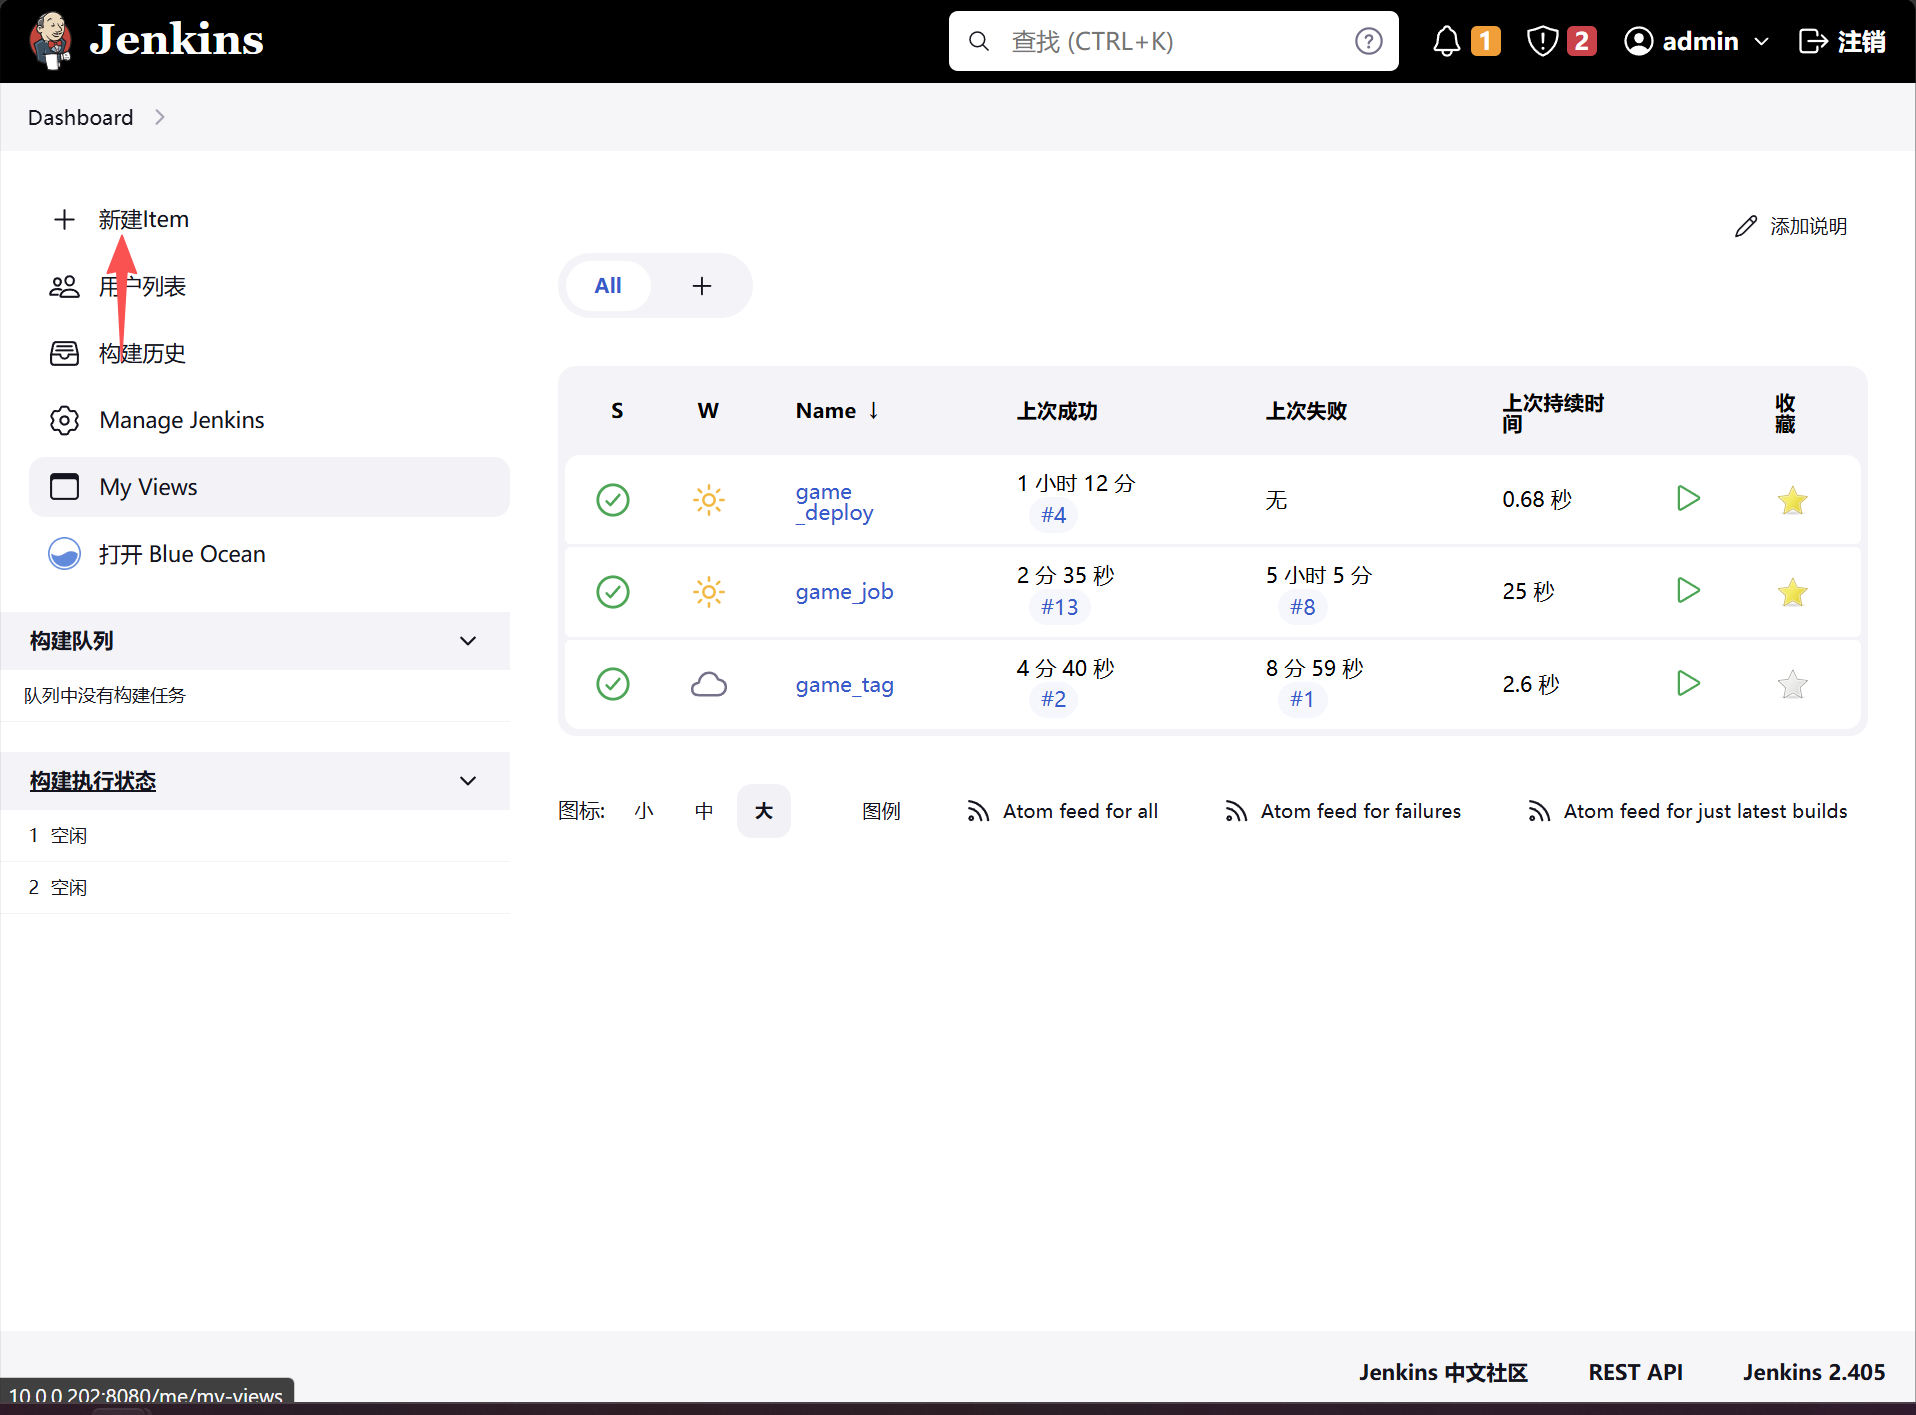
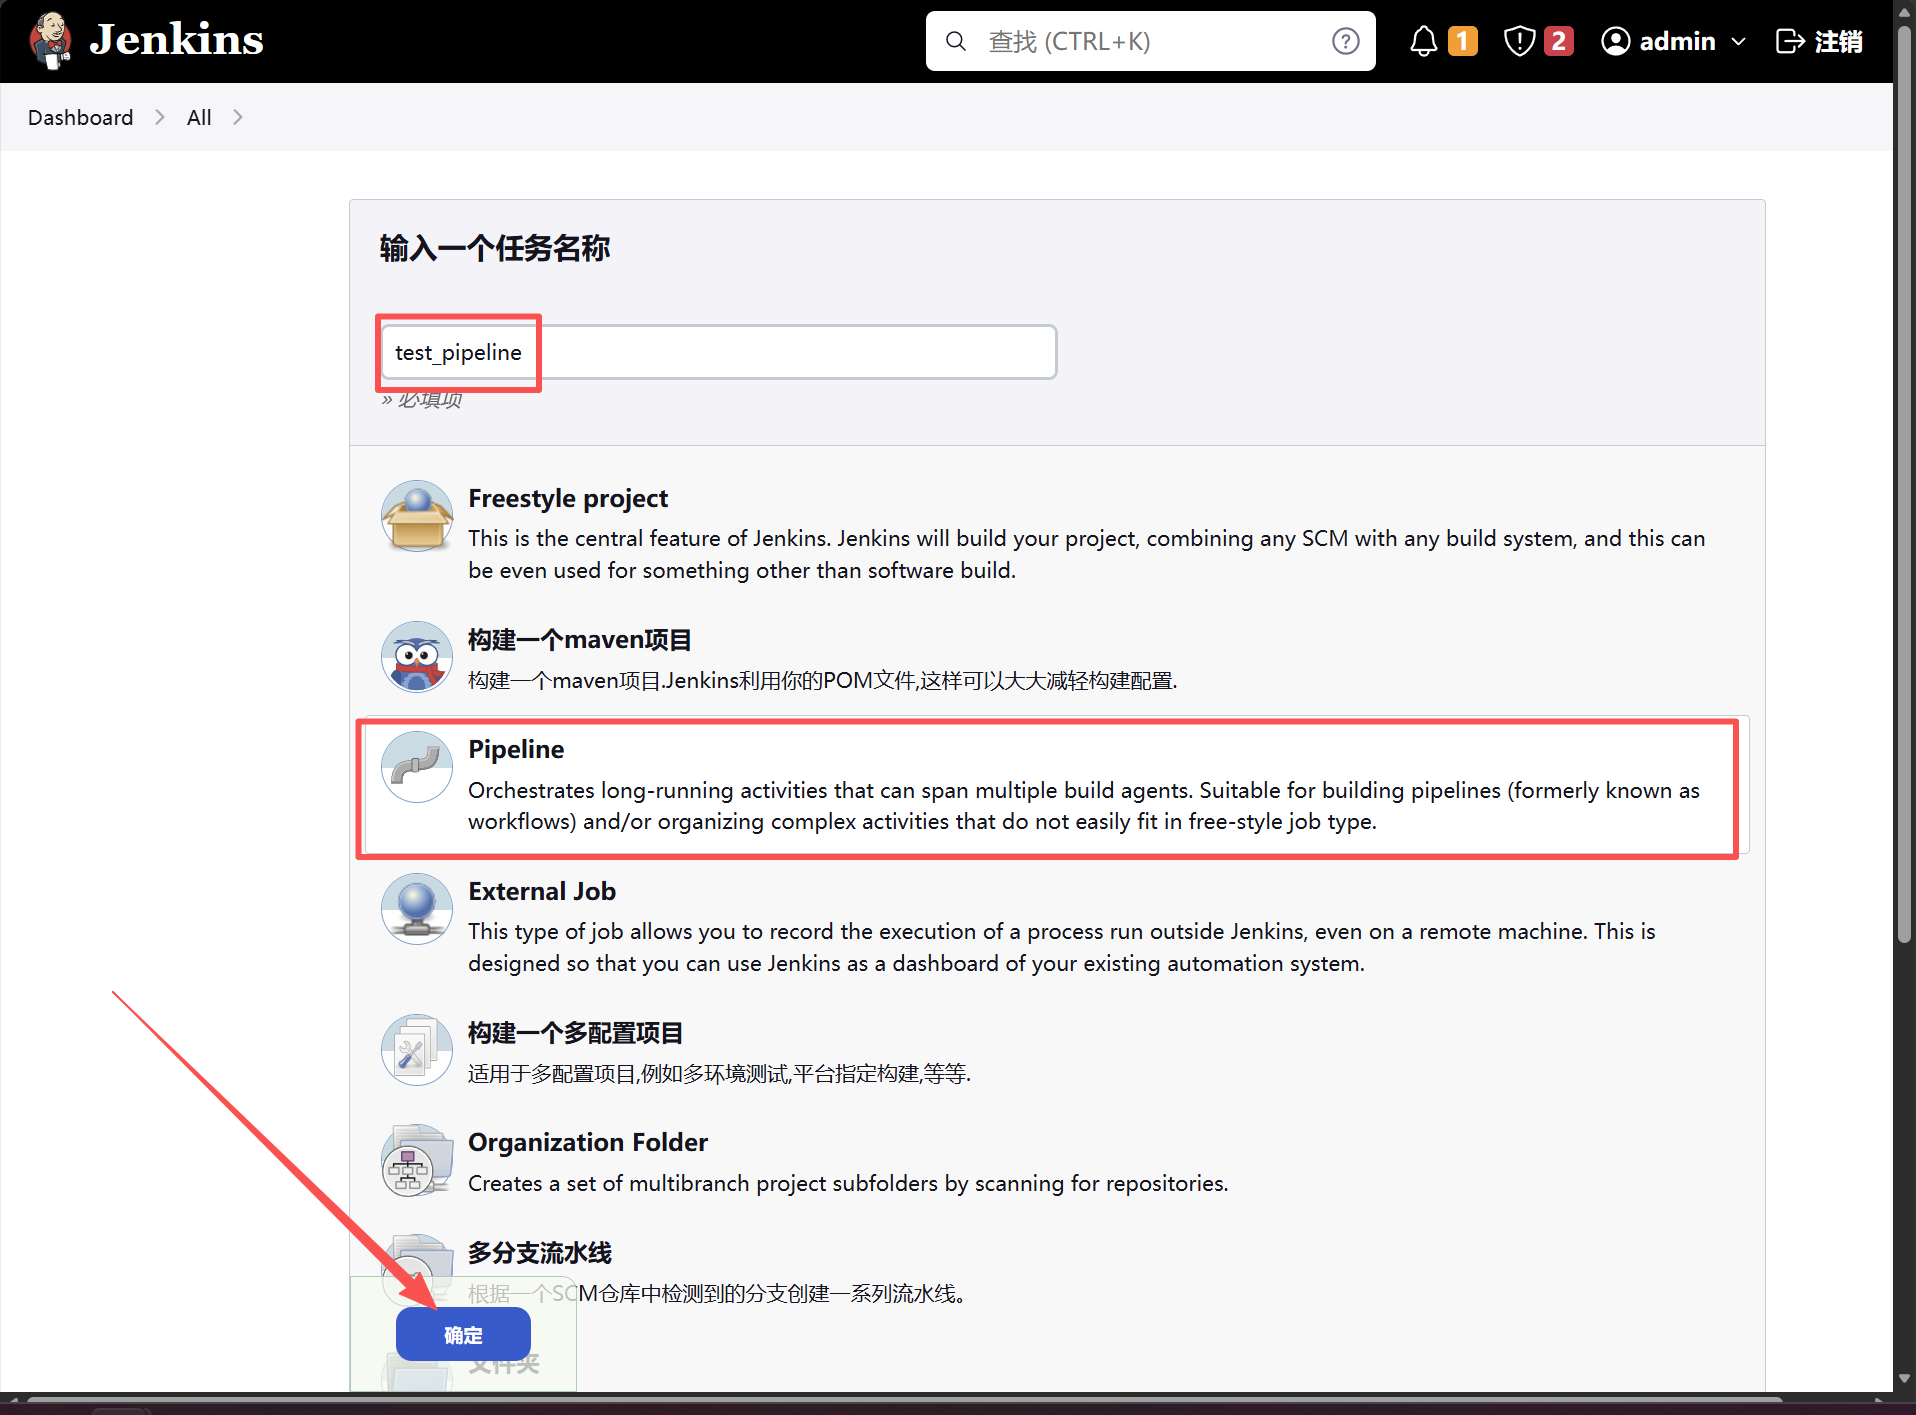
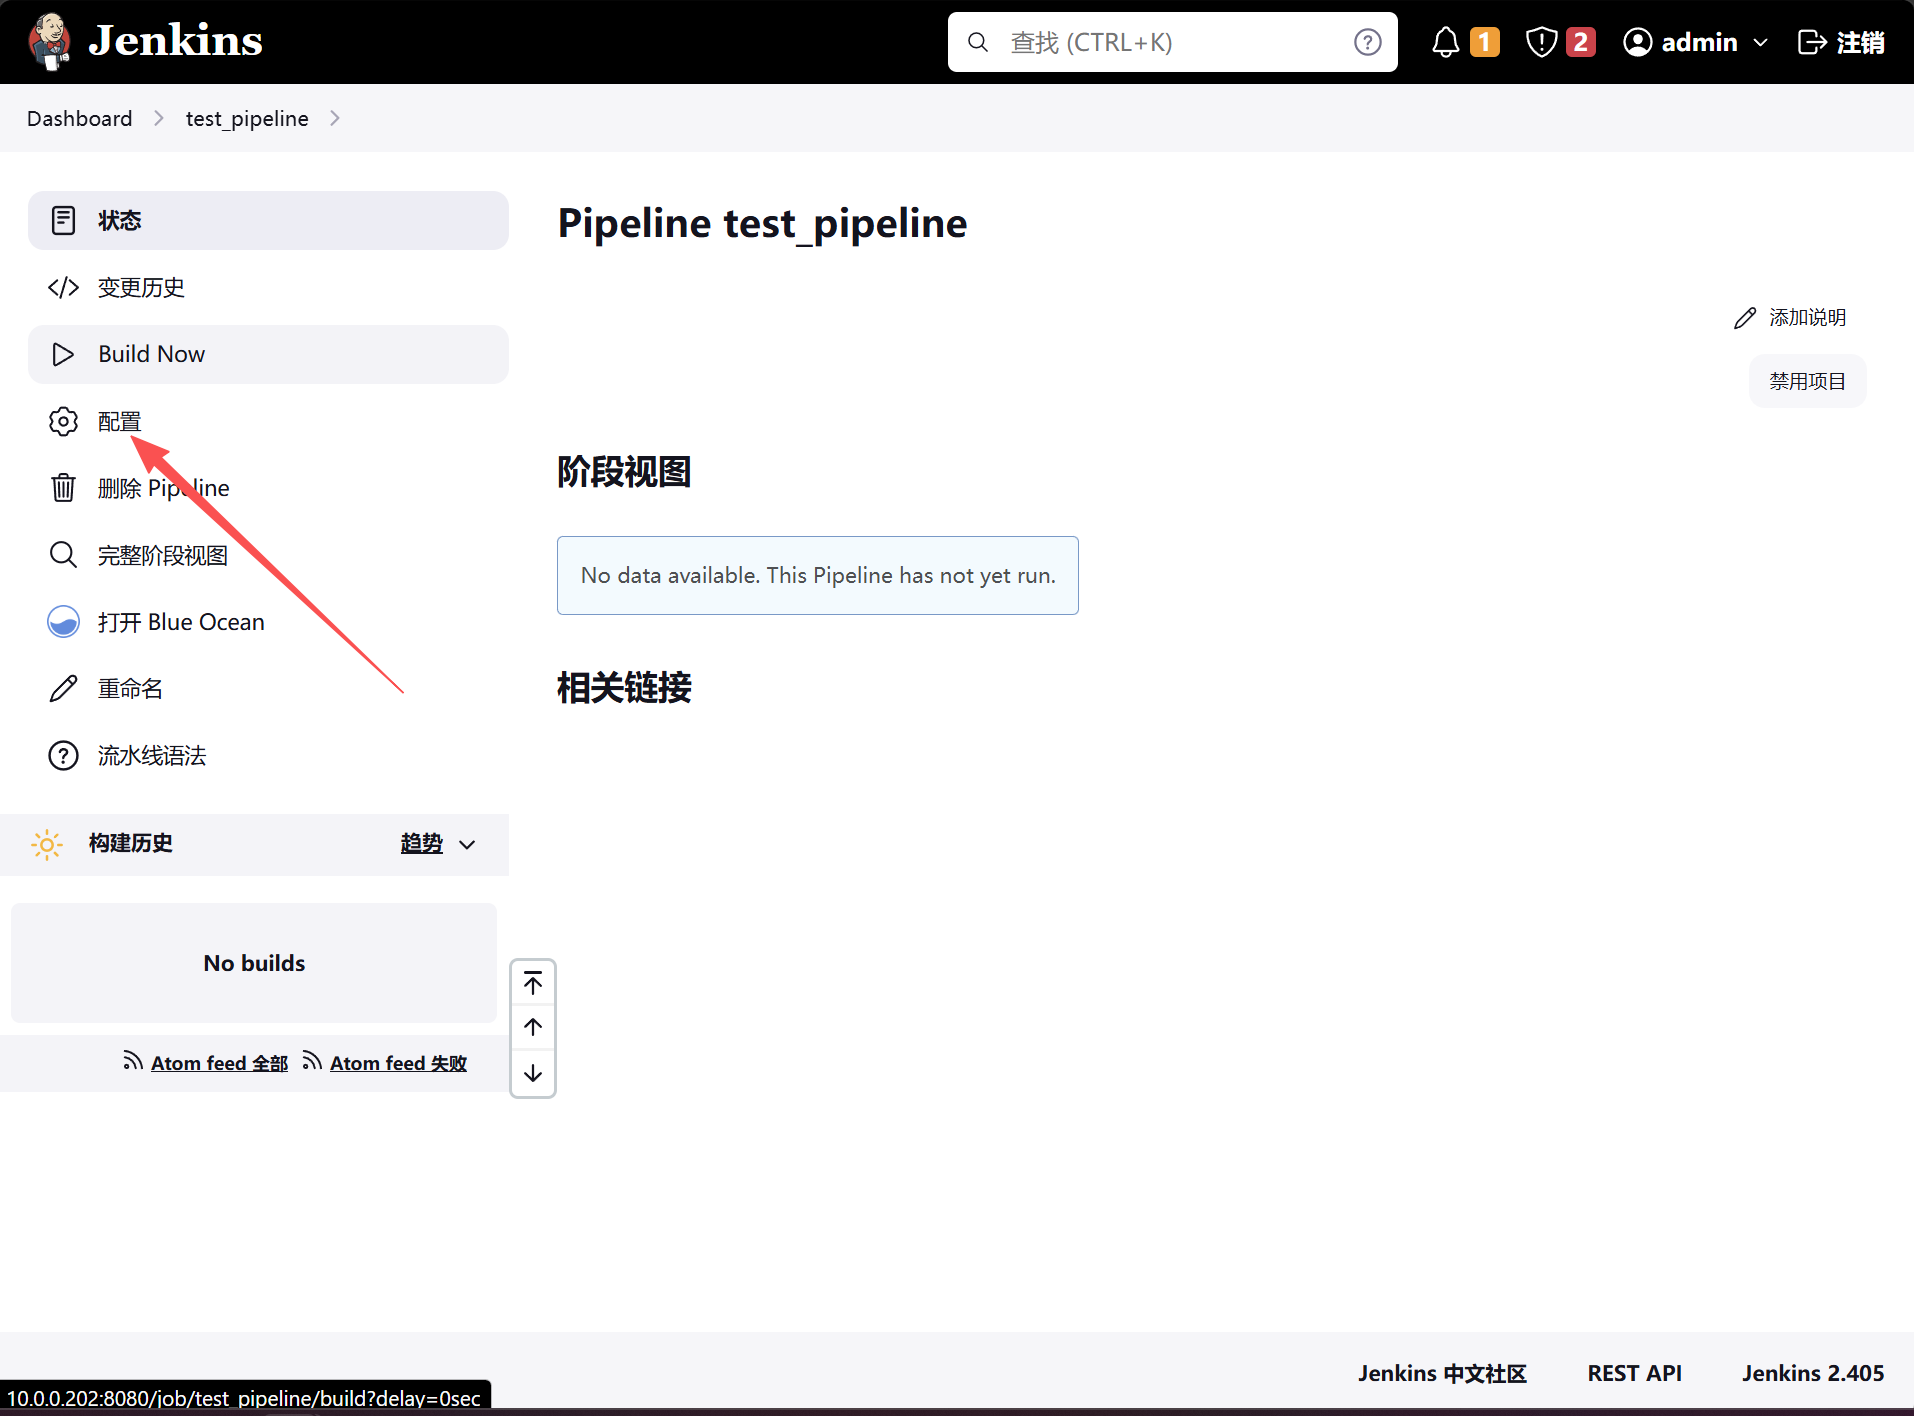
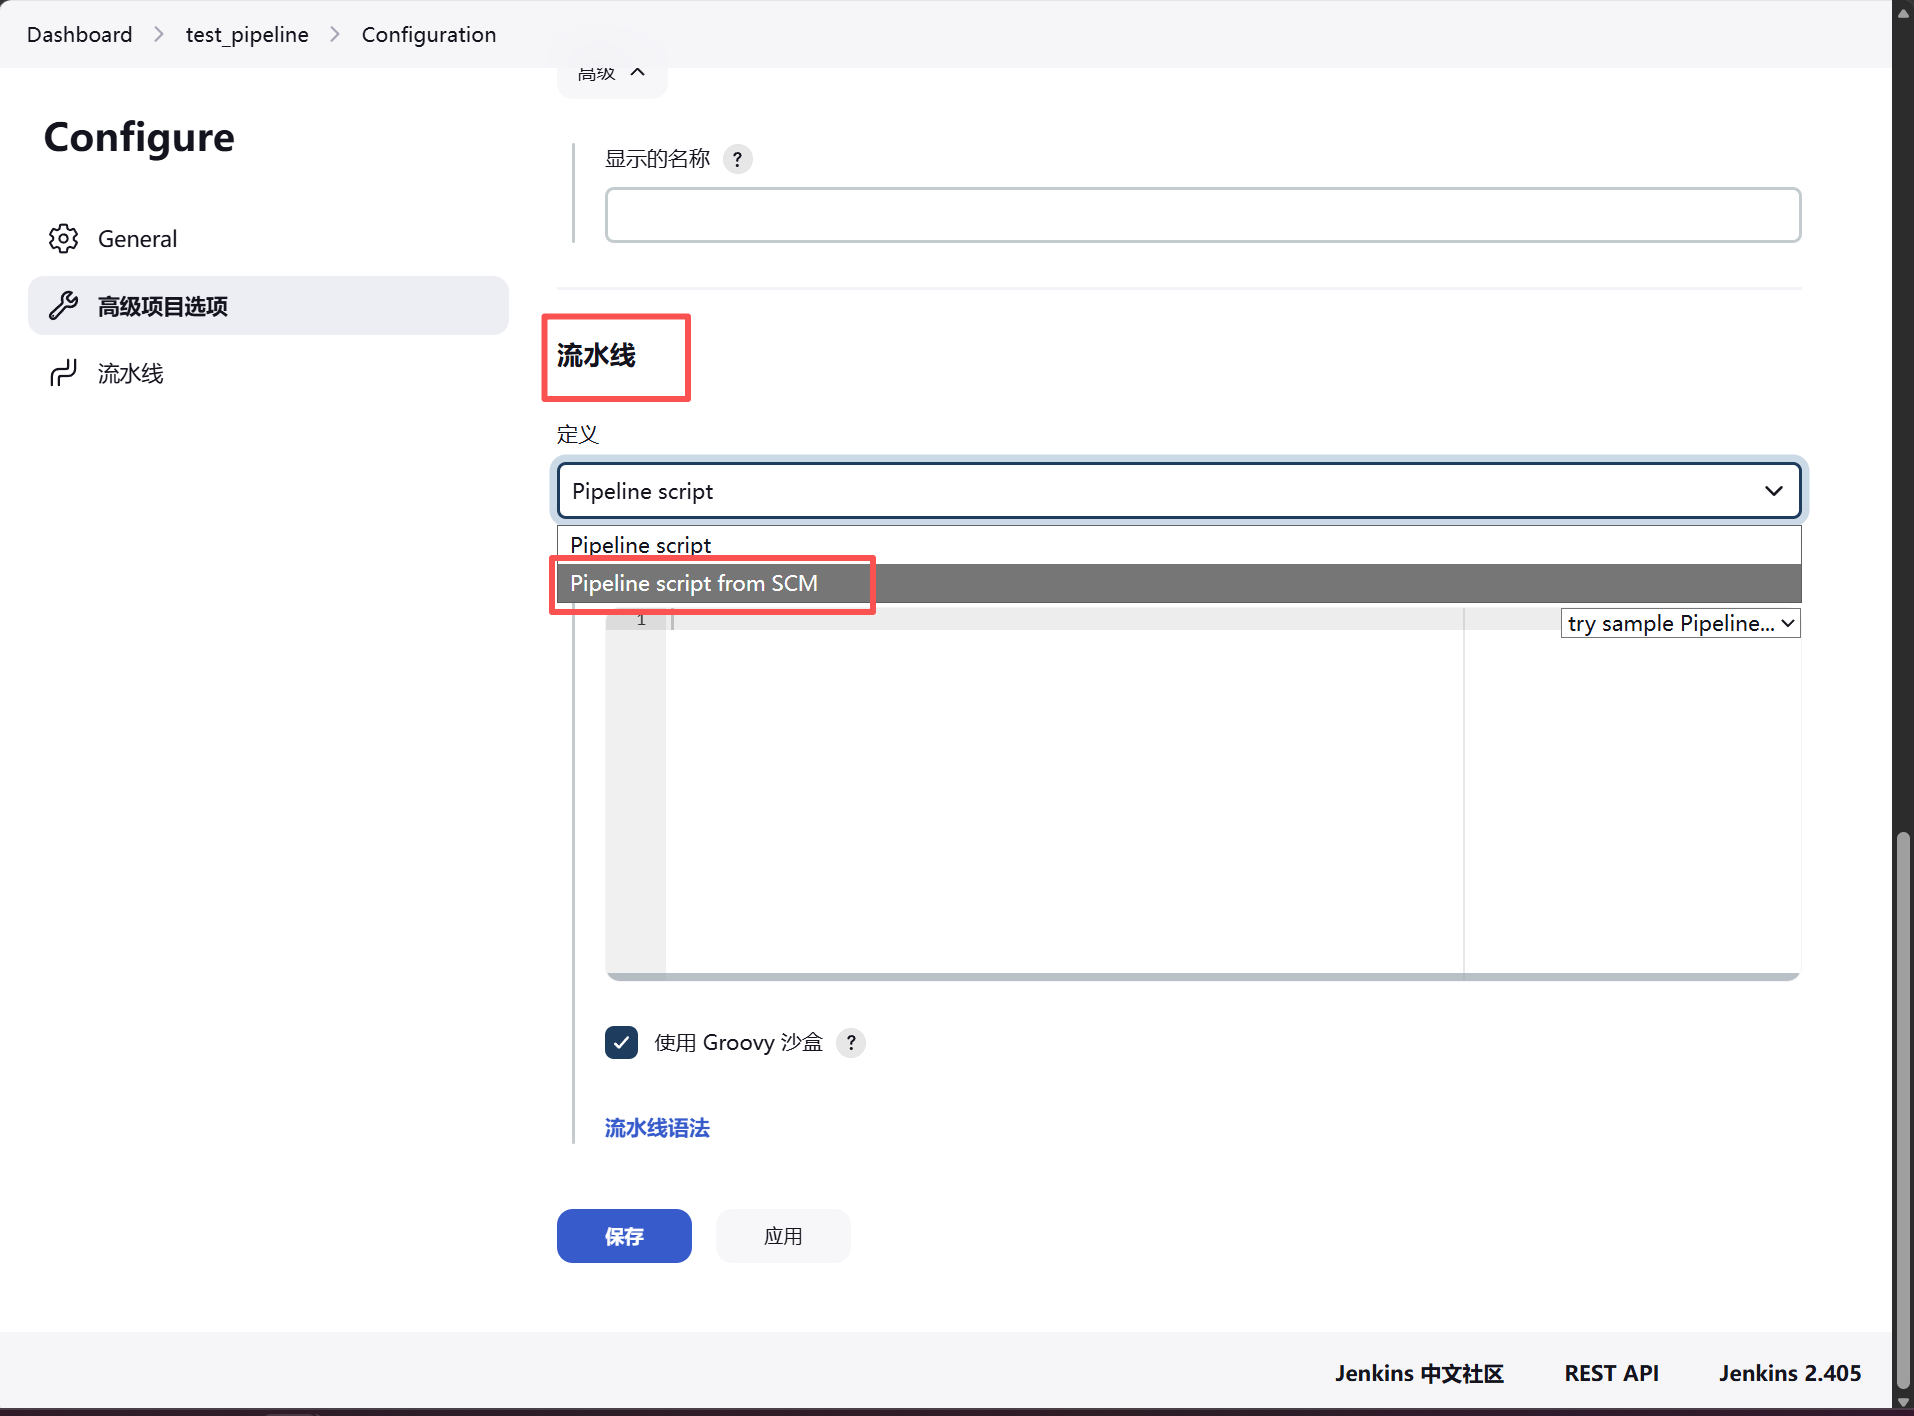
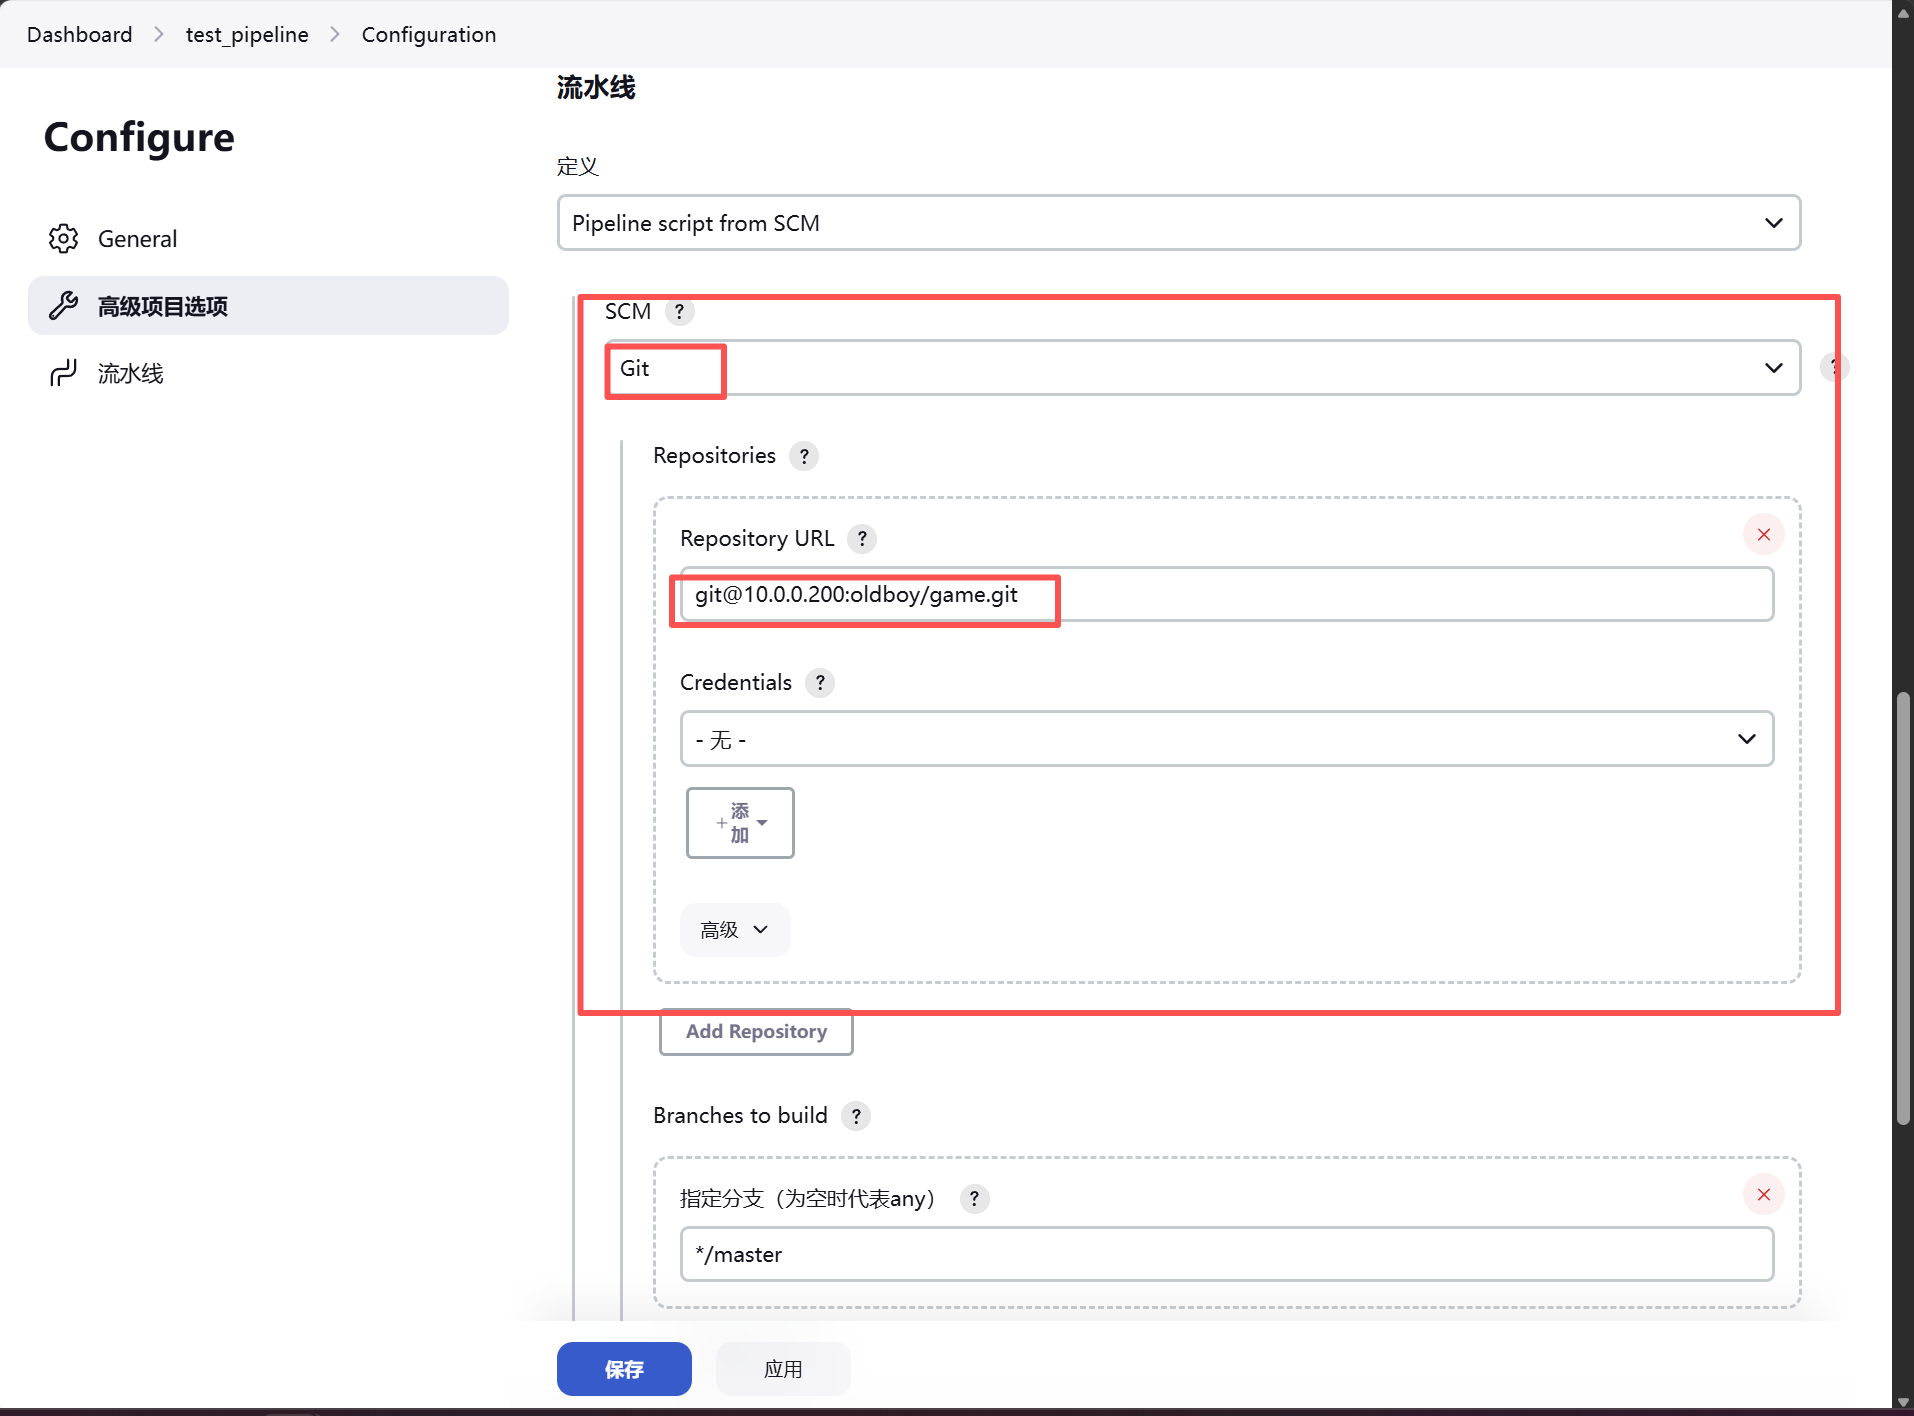
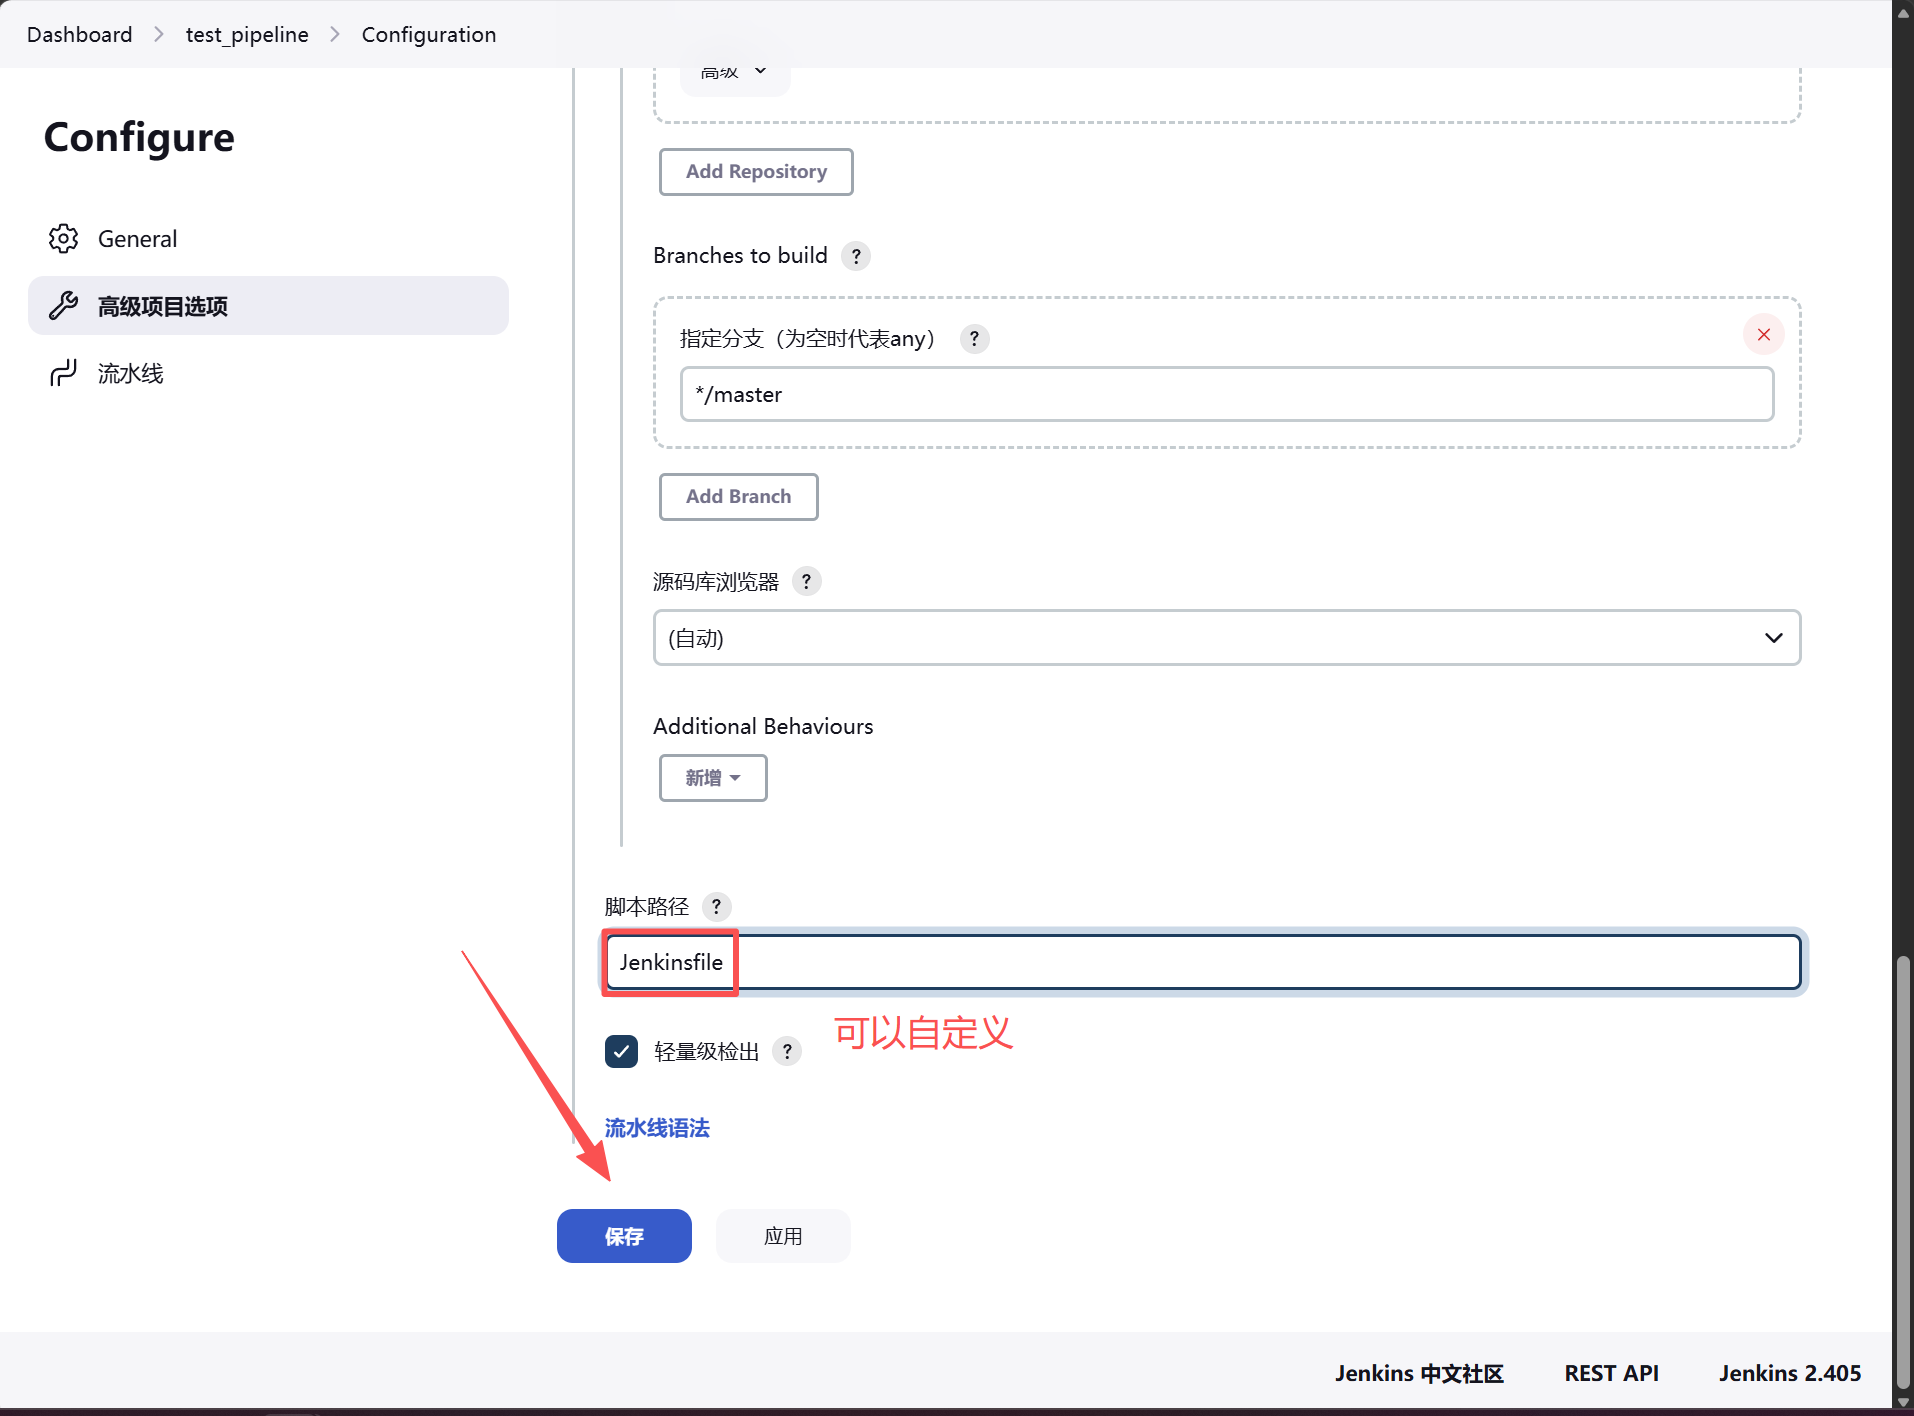
将git服务器的Jenkinsfile推送到远程服务器
使用测试服务器10.0.0.8

root@Gitlab:~/game# cat Jenkinsfile
pipeline{
    agent any
    stages{
        stage("get code"){
           steps{
                echo "get code"
           }
        }
        stage("unit test"){
           steps{
                sh '/usr/local/sonar-scanner/bin/sonar-scanner -Dsonar.projectKey=html  -Dsonar.projectName=${JOB_NAME} -Dsonar.sources=.'
           }
        }
        stage("package"){
            steps{
                sh 'tar zcf /opt/web-${BUILD_ID}.tar.gz  --exclude=./git --exclude=jenkinsfile ./*'
            }
        }
        stage("deploy"){
            steps{
                sh 'ssh 10.0.0.8 "cd /code && mkdir web-${BUILD_ID}"'
                sh 'scp /opt/web-${BUILD_ID}.tar.gz 10.0.0.8:/code/web-${BUILD_ID}'
                sh 'ssh 10.0.0.8 "cd /code/web-${BUILD_ID} && tar xf web-${BUILD_ID}.tar.gz && rm -rf web-${BUILD_ID}.tar.gz"'
                sh 'ssh 10.0.0.8 "cd /code && rm -rf game && ln -s web-${BUILD_ID} /code/game"'
            }
        }
    }
}


#推送到远端服务器
root@Gitlab:~/game# git add .
root@Gitlab:~/game# git commit -m "Jenkinsfile"
[master be75a41] Jenkinsfile
 1 file changed, 29 insertions(+)
 create mode 100644 Jenkinsfile
root@Gitlab:~/game# git push -u origin master
Enumerating objects: 4, done.
Counting objects: 100% (4/4), done.
Delta compression using up to 2 threads
Compressing objects: 100% (3/3), done.
Writing objects: 100% (3/3), 597 bytes | 298.00 KiB/s, done.
Total 3 (delta 1), reused 0 (delta 0), pack-reused 0
To 10.0.0.200:oldboy/game.git
   b4d1259..be75a41  master -> master
Branch 'master' set up to track remote branch 'master' from 'origin'.
测试构建
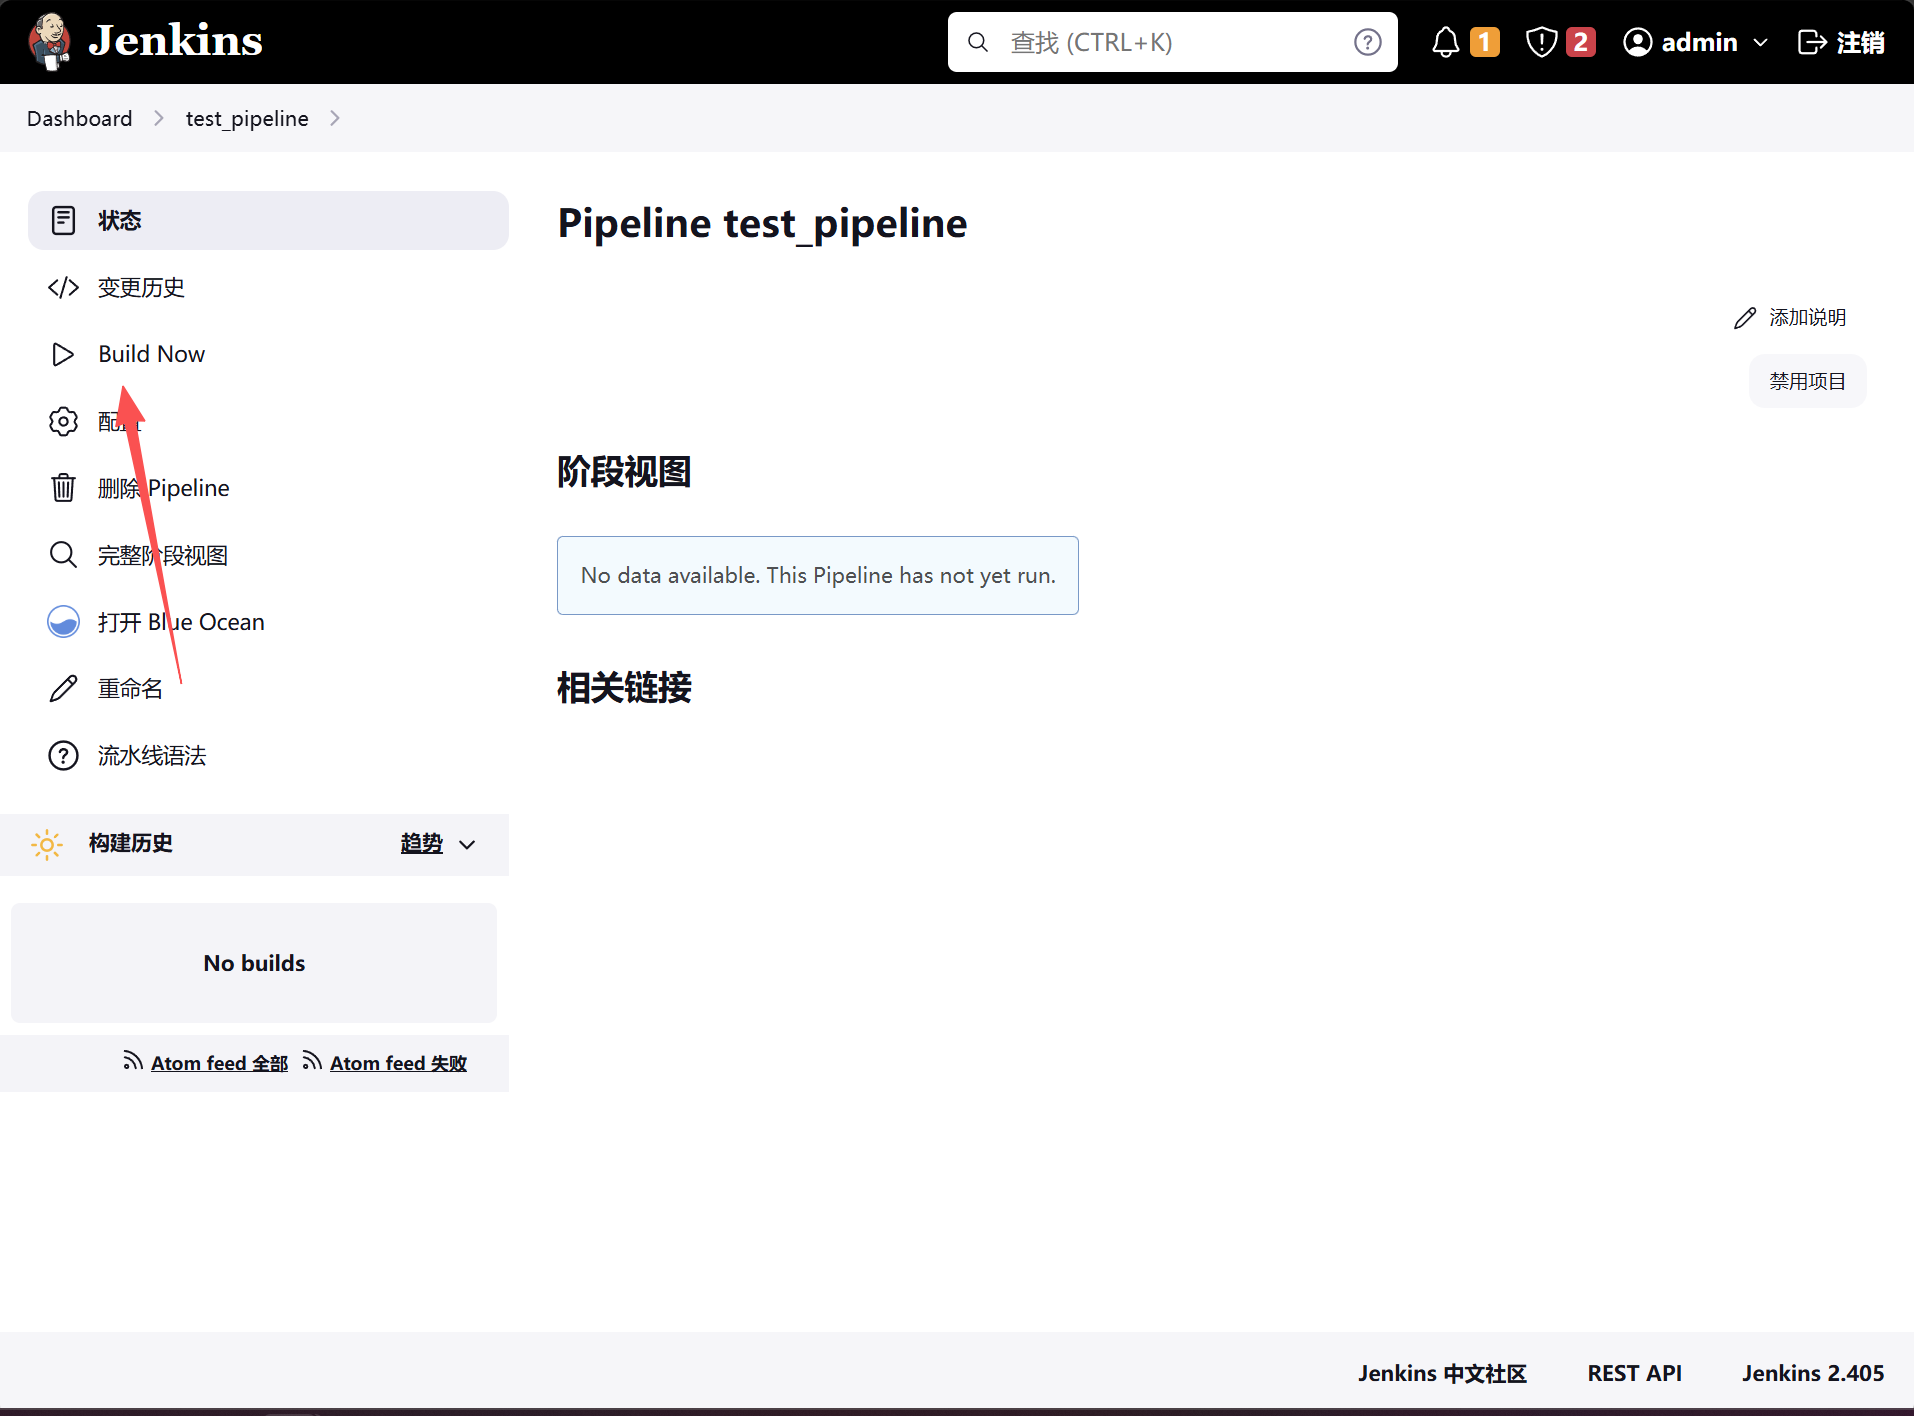
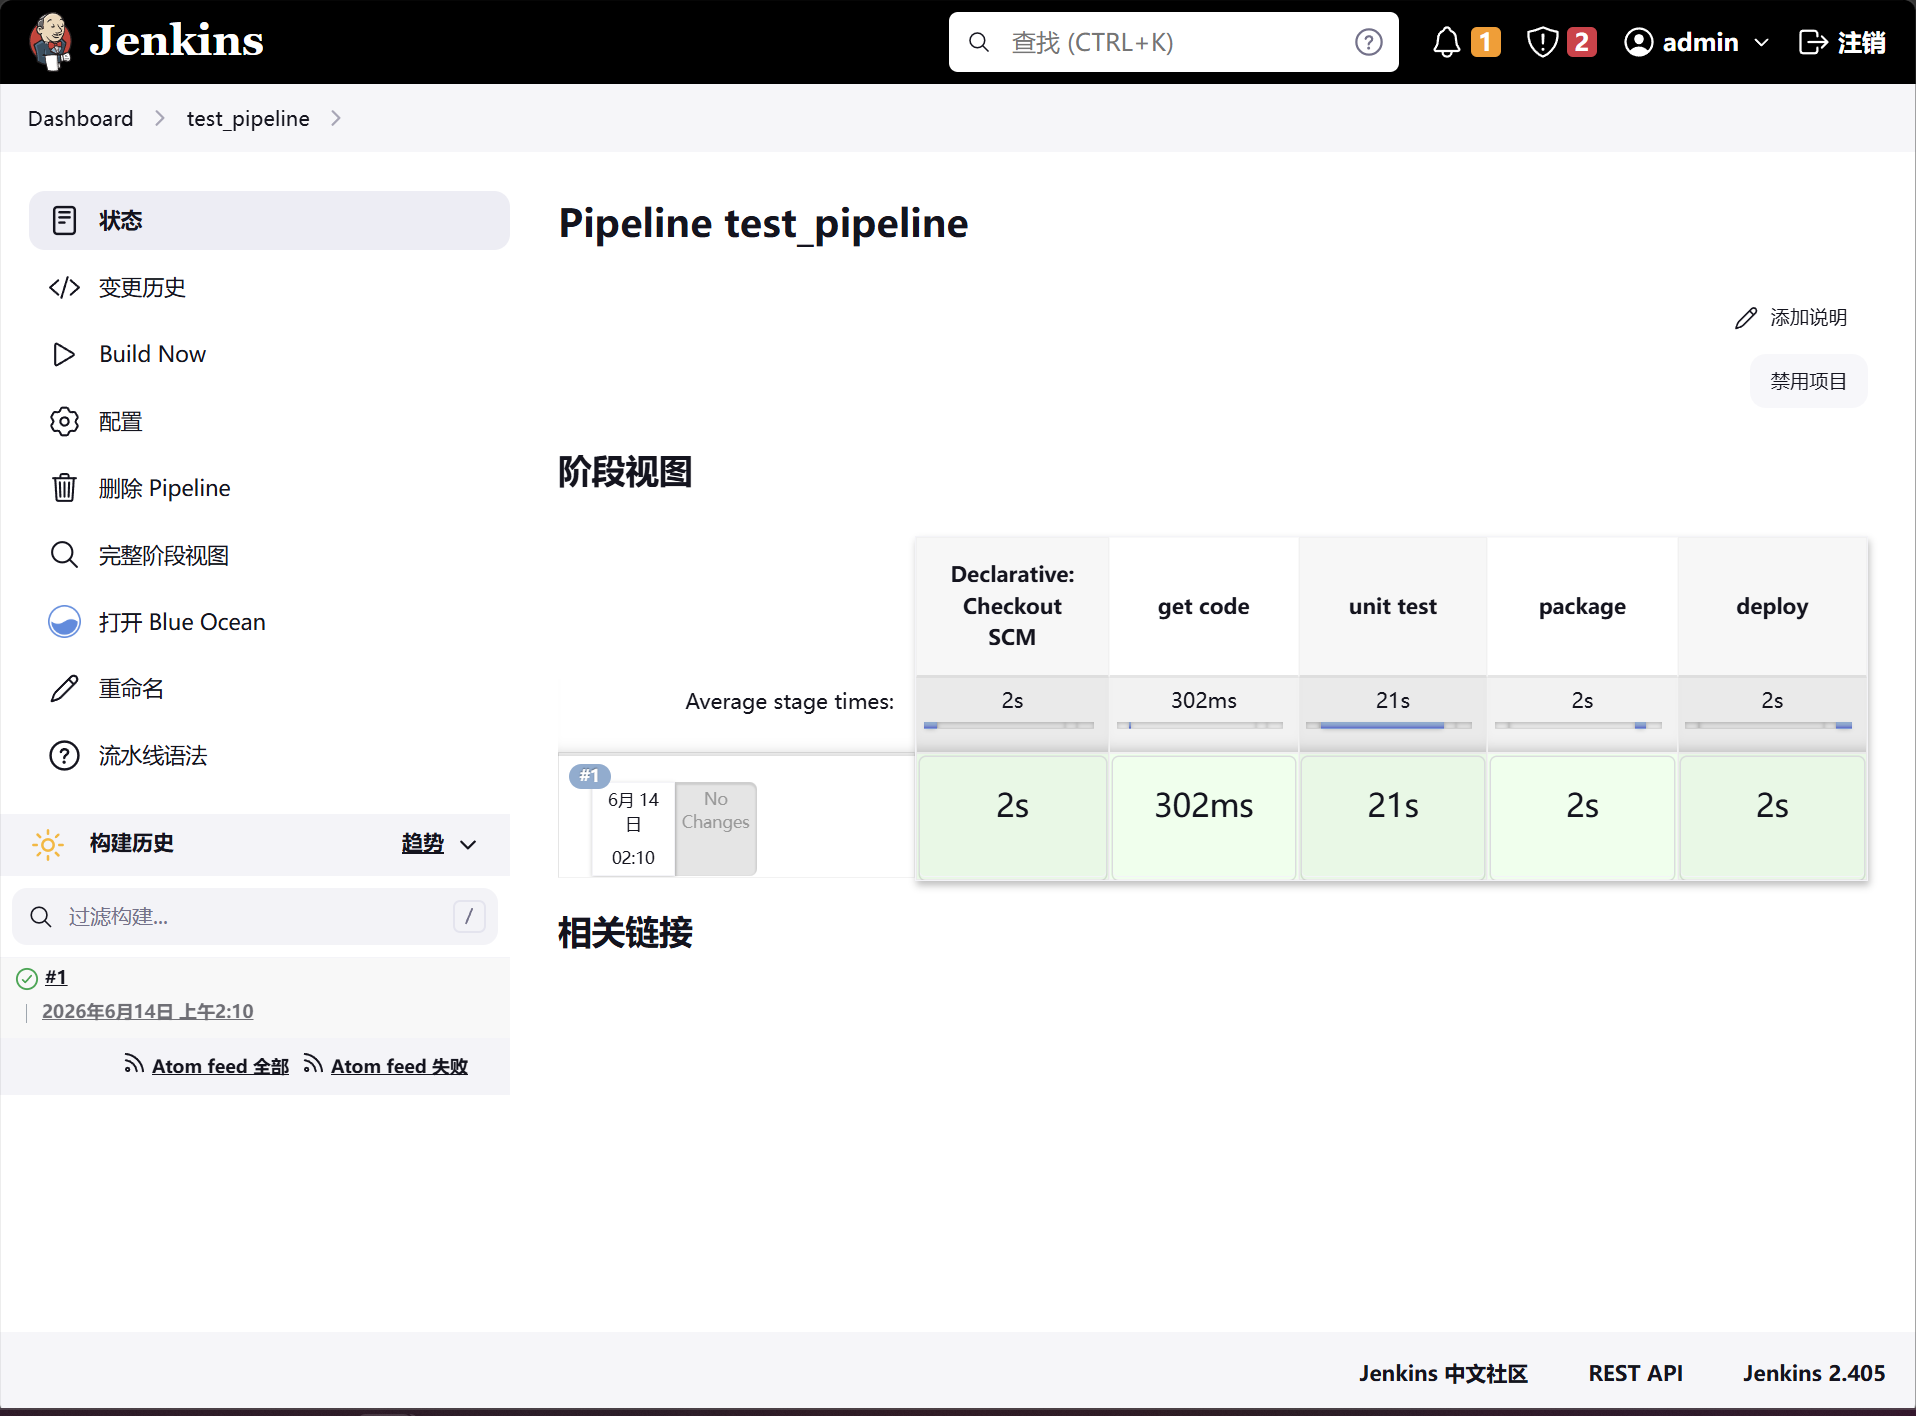
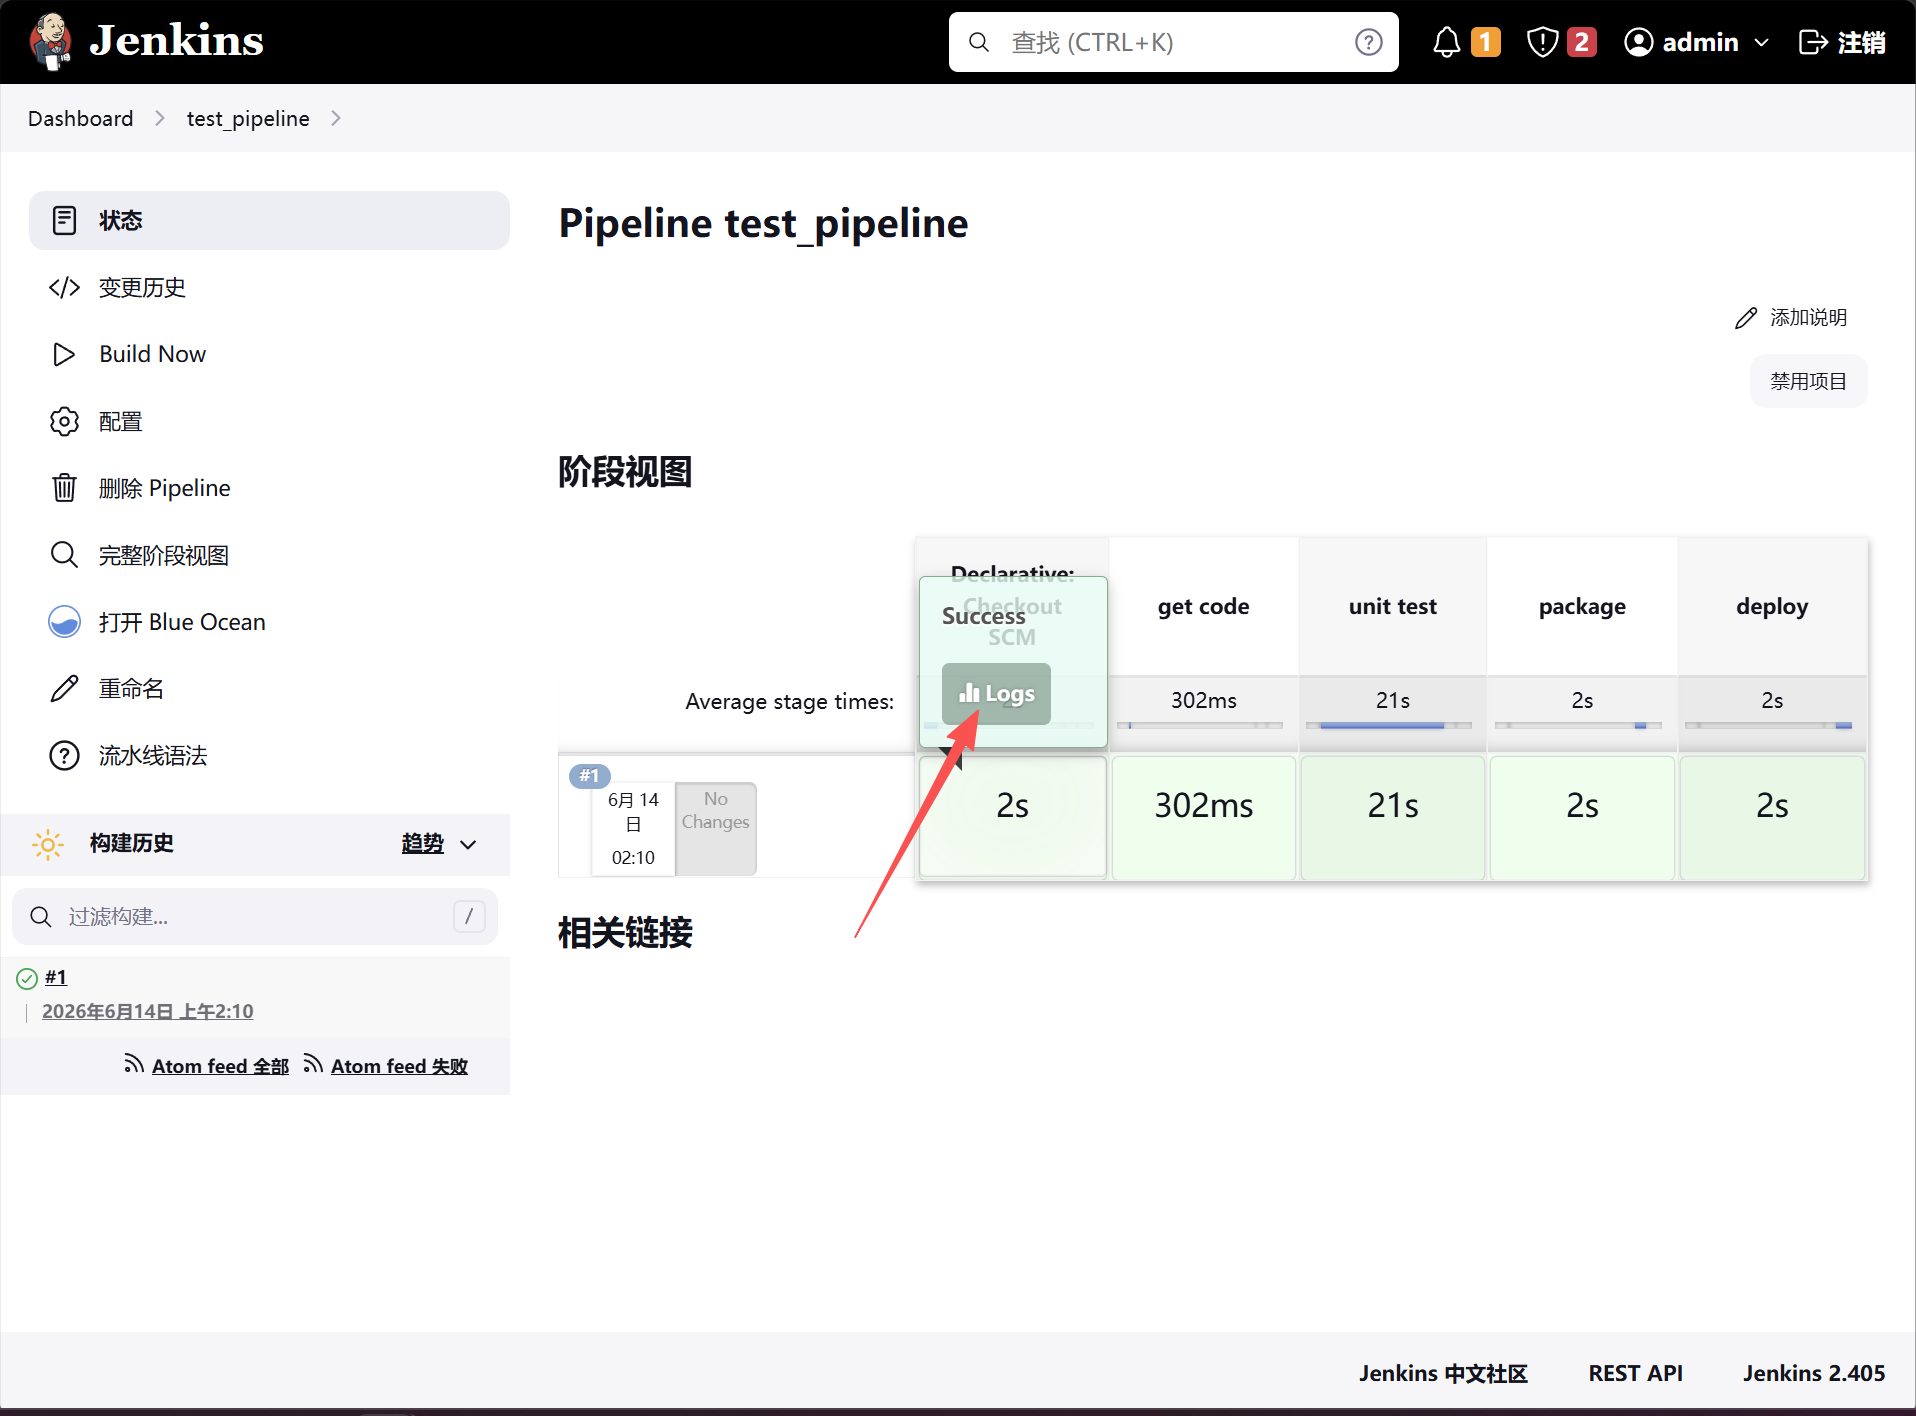
查看详细信息
十、java项目发布流程
1.Maven介绍
Maven是一个项目管理和综合工具。Maven提供给开发人员构建一个完整的生命周期框架。
开发团队可以自动完成该项目的基础设施建设,Maven使用标准的目录结构和默认构建生命周期。
Apache的开源项目主要服务于JAVA平台的构建、依赖管理、项目管理。
Project Object Model,项目对象模型。通过xml格式保存的pom.xml文件。该文件用于管理:源代码、配置文件、开发者的信息和角色、问题追踪系统、组织信息、项目权、项目的url、项目的依赖关系等等。该文件是由开发维护,我们运维人员可以不用去关心。
2.Maven安装
在jenkins服务器上操作
#下载M
官网:http://maven.apache.org/download.cgi
清华镜像:
https://mirrors.tuna.tsinghua.edu.cn/apache/maven/

#安装Maven
[root@jenkins ~]# ll apache-maven-3.3.9-bin.tar.gz
-rw-r--r-- 1 root root 8491533  9月 27  2024 apache-maven-3.3.9-bin.tar.gz
[root@jenkins ~]# tar xf apache-maven-3.3.9-bin.tar.gz -C /usr/local/
[root@jenkins ~]# ln -s /usr/local/apache-maven-3.3.9/ /usr/local/maven

#检查版本好
[root@jenkins ~]# /usr/local/maven/bin/mvn -v
which: no javac in (/usr/local/sbin:/usr/local/bin:/usr/sbin:/usr/bin:/root/bin:/usr/local/sonar-scanner/bin:/root/bin)
Warning: JAVA_HOME environment variable is not set.
Apache Maven 3.3.9 (bb52d8502b132ec0a5a3f4c09453c07478323dc5; 2015-11-11T00:41:47+08:00)
Maven home: /usr/local/maven
Java version: 11.0.30, vendor: BiSheng
Java home: /usr/lib/jvm/java-11-openjdk-11.0.30.7-4.p01.ky10.x86_64
Default locale: zh_CN, platform encoding: UTF-8
OS name: "linux", version: "4.19.90-52.22.v2207.ky10.x86_64", arch: "amd64", family: "unix"

#将maven的命令放到PATH变量中
[root@jenkins bin]# tail -n1 /etc/profile
export PATH="$PATH:/usr/local/sonar-scanner/bin:/usr/local/maven/bin"
[root@jenkins hello-world-war]# source /etc/profile

#上传一个简单的java项目包hello-world.tar.gz
[root@jenkins ~]# ll hello-world.tar.gz
-rw-r--r-- 1 root root 18950  9月 27  2024 hello-world.tar.gz
[root@jenkins ~]# tar xf hello-world.tar.gz

#进入目录执行打包命令
[root@jenkins ~]# cd hello-world-war/
[root@jenkins hello-world-war]# mvn package
[INFO] Packaging webapp
[INFO] Assembling webapp [hello-world-war] in [/root/hello-world-war/target/hello-world-war-1.0.0]
[INFO] Processing war project
[INFO] Copying webapp resources [/root/hello-world-war/src/main/webapp]
[INFO] Building war: /root/hello-world-war/target/hello-world-war-1.0.0.war
[INFO] ------------------------------------------------------------------------
[INFO] BUILD SUCCESS
[INFO] ------------------------------------------------------------------------
[INFO] Total time: 02:35 min
[INFO] Finished at: 2026-06-14T02:31:21+08:00
[INFO] Final Memory: 14M/83M
[INFO] ------------------------------------------------------------------------
测试服务器10.0.0.8部署Tomcat
1.先部署JDK包  #不同tomcat版本对应的JDK包不同,部署前到tomcat官网查看对应关系https://tomcat.apache.org/
rpm -ivh jdk-8u181-linux-x64.rpm
##检查是否安装成功
rpm -qa|grep jdk
jdk1.8-1.8.0_181-fcs.x86_64

2.下载tomcat 9
wget https://dlcdn.apache.org/tomcat/tomcat-9/v9.0.117/bin/apache-tomcat-9.0.117.tar.gz
#创建tomcat运行目录
mkdir /soft
##解压到指定的目录下
tar xf apache-tomcat-9.0.113.tar.gz -C /soft/
##为了方便查看创建软连接
ln -s /soft/apache-tomcat-9.0.113/ /soft/tomcat

##tomcat软件目录结构:
bin             ---主要包含启动和关闭tomcat的脚本(启停java脚本依赖jar包文件)
conf            ---tomcat配置文件的目录(站点配置:server.xml)
lib             ---tomcat运行时需要加载的jar包
logs            ---tomcat日志存放位置
temp            ---tomcat临时存放文件路径
webapps         ---tomcat默认站点目录
work            ---tomcat运行时产生的缓存文件

3.运行tomcat
cd /soft/tomcat/bin/
./startup.sh 		# 相对路径启动Tomcat
或者  /soft/tomcat/bin/startup.sh # 绝对路径启动Tomcat
##默认运行的是8080端口
netstat -tnulp
配置systemctl方式启动Tomcat
配置systemctl方式启动tmocat
4.以systemctl的方式启动tomcat
vim /usr/lib/systemd/system/tomcat.service

[Unit]
Description=Apache Tomcat Server
After=network.target remote-fs.target nss-lookup.target

[Service]
Type=forking
ExecStart=/soft/tomcat/bin/startup.sh
ExecStop=/soft/tomcat/bin/shutdown.sh
ExecRestart=/soft/tomcat/bin/shutdown.sh  && sleep2  && /soft/tomcat/bin/startup.sh

[Install]
WantedBy=multi-user.target

##重新加载systemctl
systemctl daemon-reload

##注意   同一时间只能用一种方式来管理启动方式要么是用命令、要么是用systemctl
#Nginx启停方式两种
1.systemctl start nginx
  systemctl stop nginx
  systemctl restart nginx
  systemctl reload nginx
  systemctl status nginx
  systemctl enable nginx
  systemctl disable nginx

2.使用命令运行
/usr/sbin/nginx # 启动
/usr/sbin/nginx -s stop # 停止
/usr/sbin/nginx -s reload # 重新加载
将jenkins服务器上的war包拷贝到Tomcat的站点目录下
测试环境直接拷贝到Tomcat默认的站点目录

#在10.0.0.8上执行(Tomcat安装的位置可能不相同)
[root@web02 soft]# cd /soft/tomcat/webapps/ROOT/
[root@web02 ROOT]# ll
总用量 144
-rw-r----- 1 root root  7089 12月  3  2025 asf-logo-wide.svg
-rw-r----- 1 root root   713 12月  3  2025 bg-button.png
-rw-r----- 1 root root  1918 12月  3  2025 bg-middle.png
-rw-r----- 1 root root  1401 12月  3  2025 bg-nav.png
-rw-r----- 1 root root  3103 12月  3  2025 bg-upper.png
-rw-r----- 1 root root 21630 12月  3  2025 favicon.ico
-rw-r----- 1 root root 12234 12月  3  2025 index.jsp
-rw-r----- 1 root root  6902 12月  3  2025 RELEASE-NOTES.txt
-rw-r----- 1 root root  5584 12月  3  2025 tomcat.css
-rw-r----- 1 root root 67795 12月  3  2025 tomcat.svg
drwxr-x--- 2 root root    21  5月 19 16:00 WEB-INF
[root@web02 ROOT]# rm -rf *
[root@web02 ROOT]# ll
总用量 0

#在jenkins服务器上将war包拷贝到tomcat的站点目录下
[root@jenkins hello-world-war]# scp target/hello-world-war-1.0.0.war 10.0.0.8:/soft/tomcat/webapps/ROOT/

#在10.0.0.8上解压war包,重启Tomcat访问
[root@web02 ROOT]# unzip hello-world-war-1.0.0.war
[root@web02 ROOT]# rm  -rf hello-world-war-1.0.0.war
[root@web02 ROOT]# systemctl restart tomcat
测试访问10.0.0.8:8080(注意之前做的Tomcat的会话保持,redis服务器没有启动会导致报500)
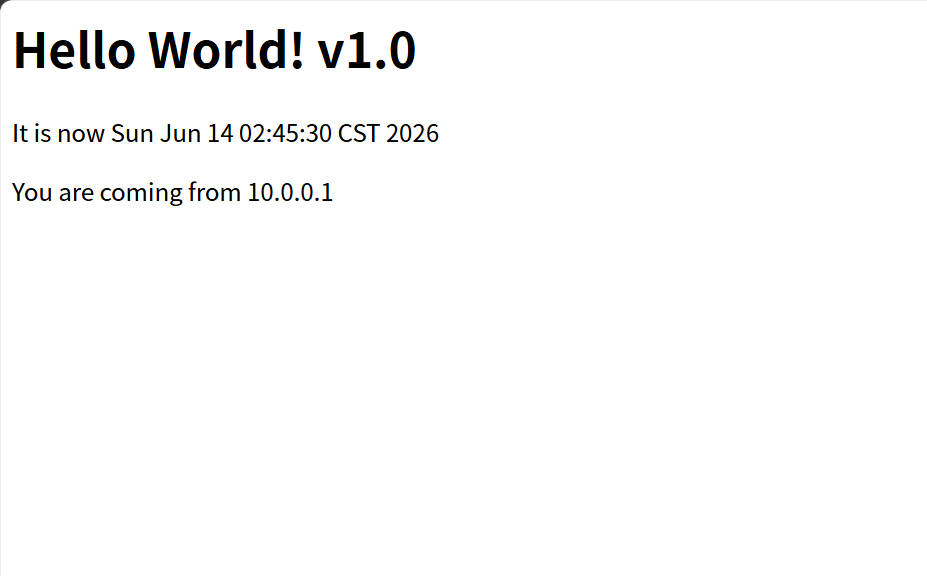
3.集成到jenkins
#将java代码推送到gitlab
新建gatlab项目
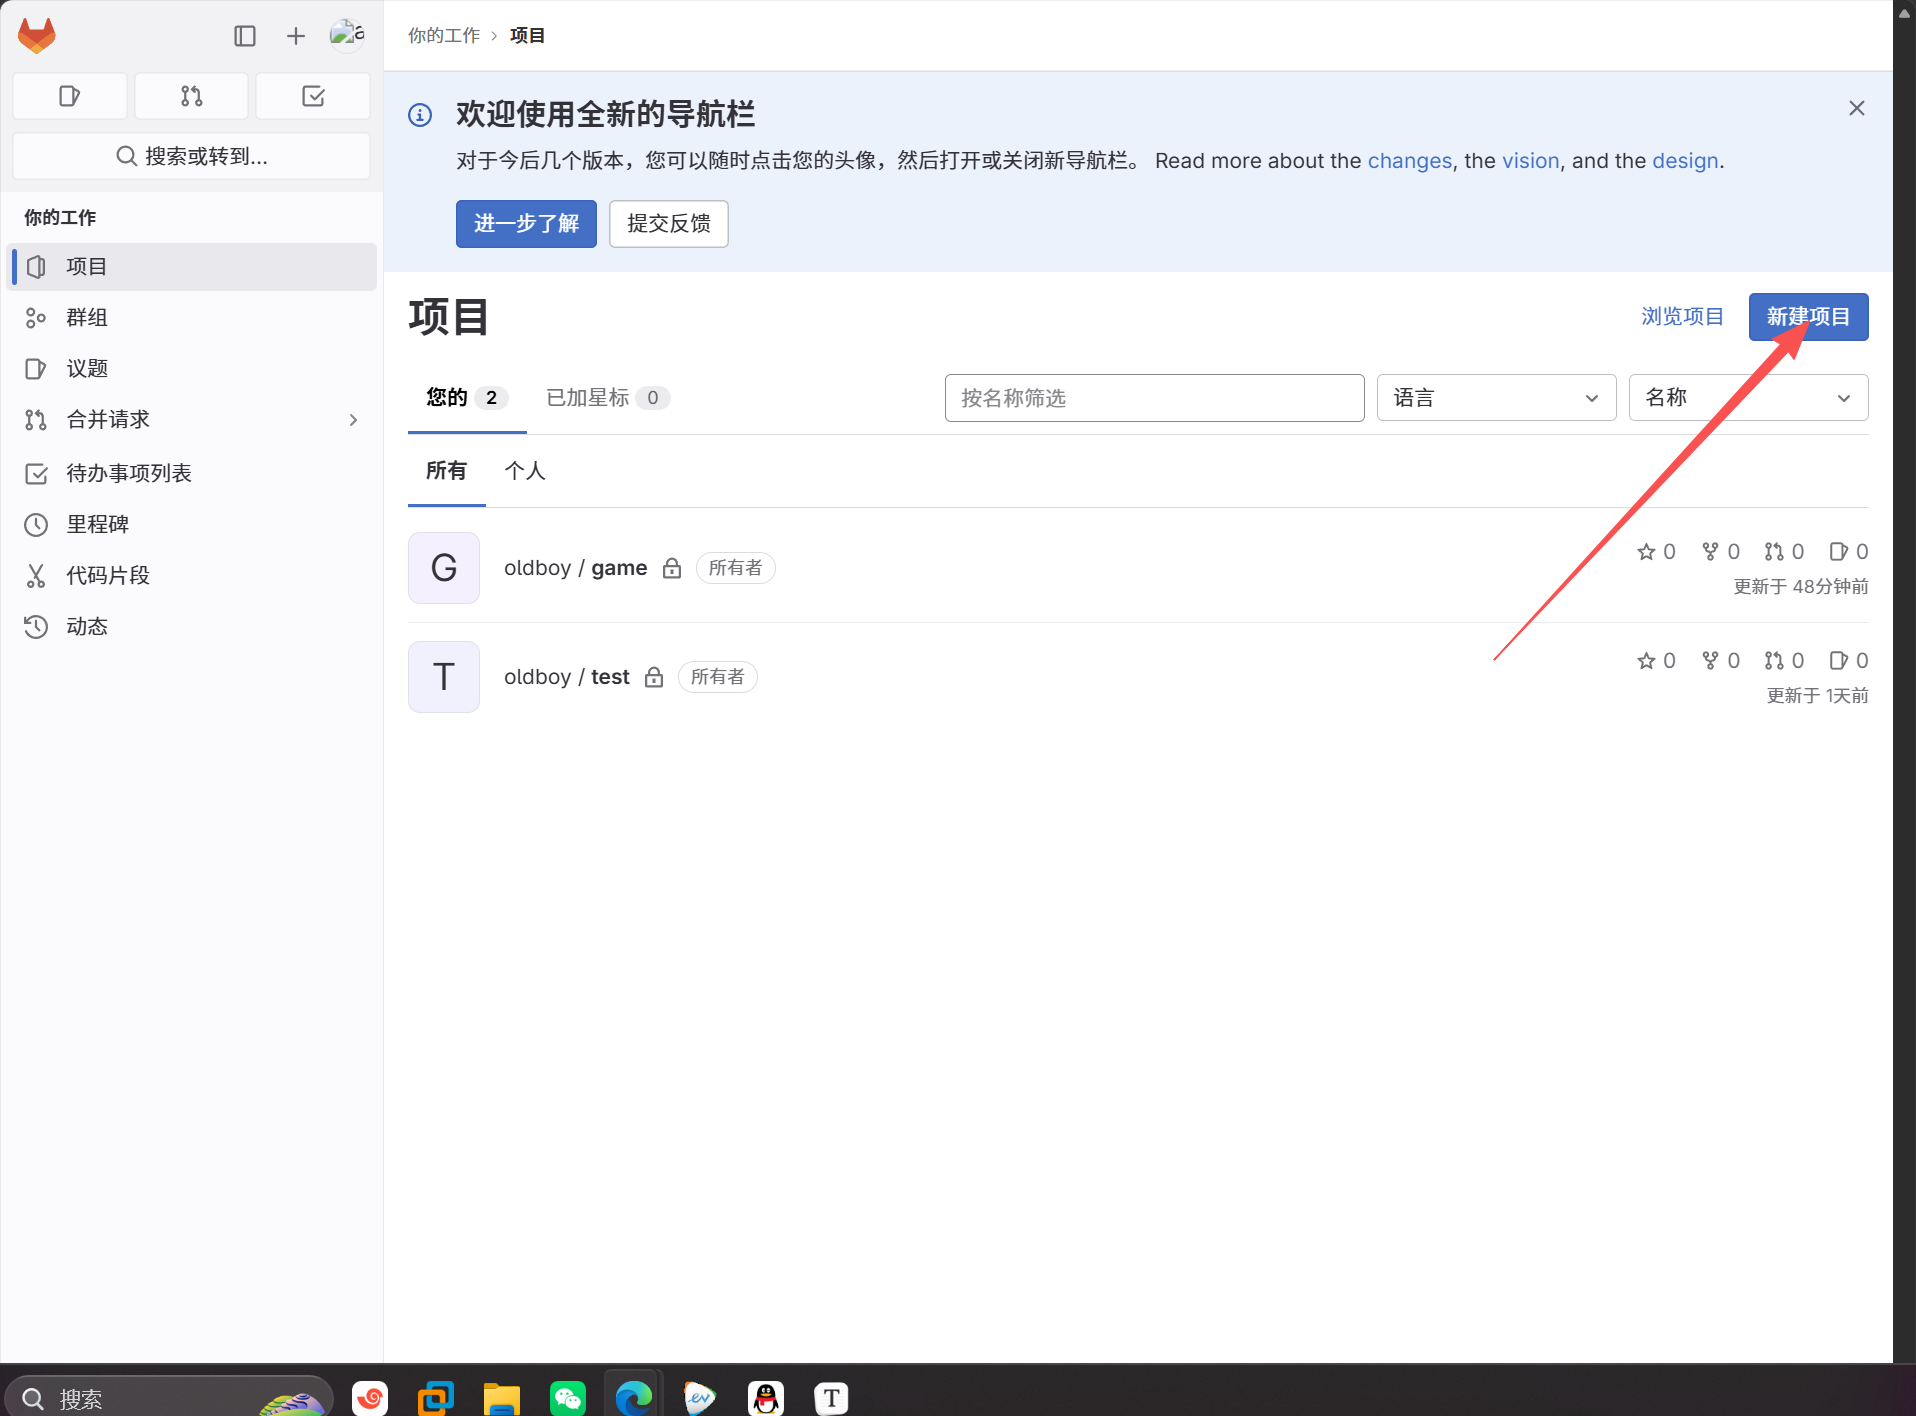
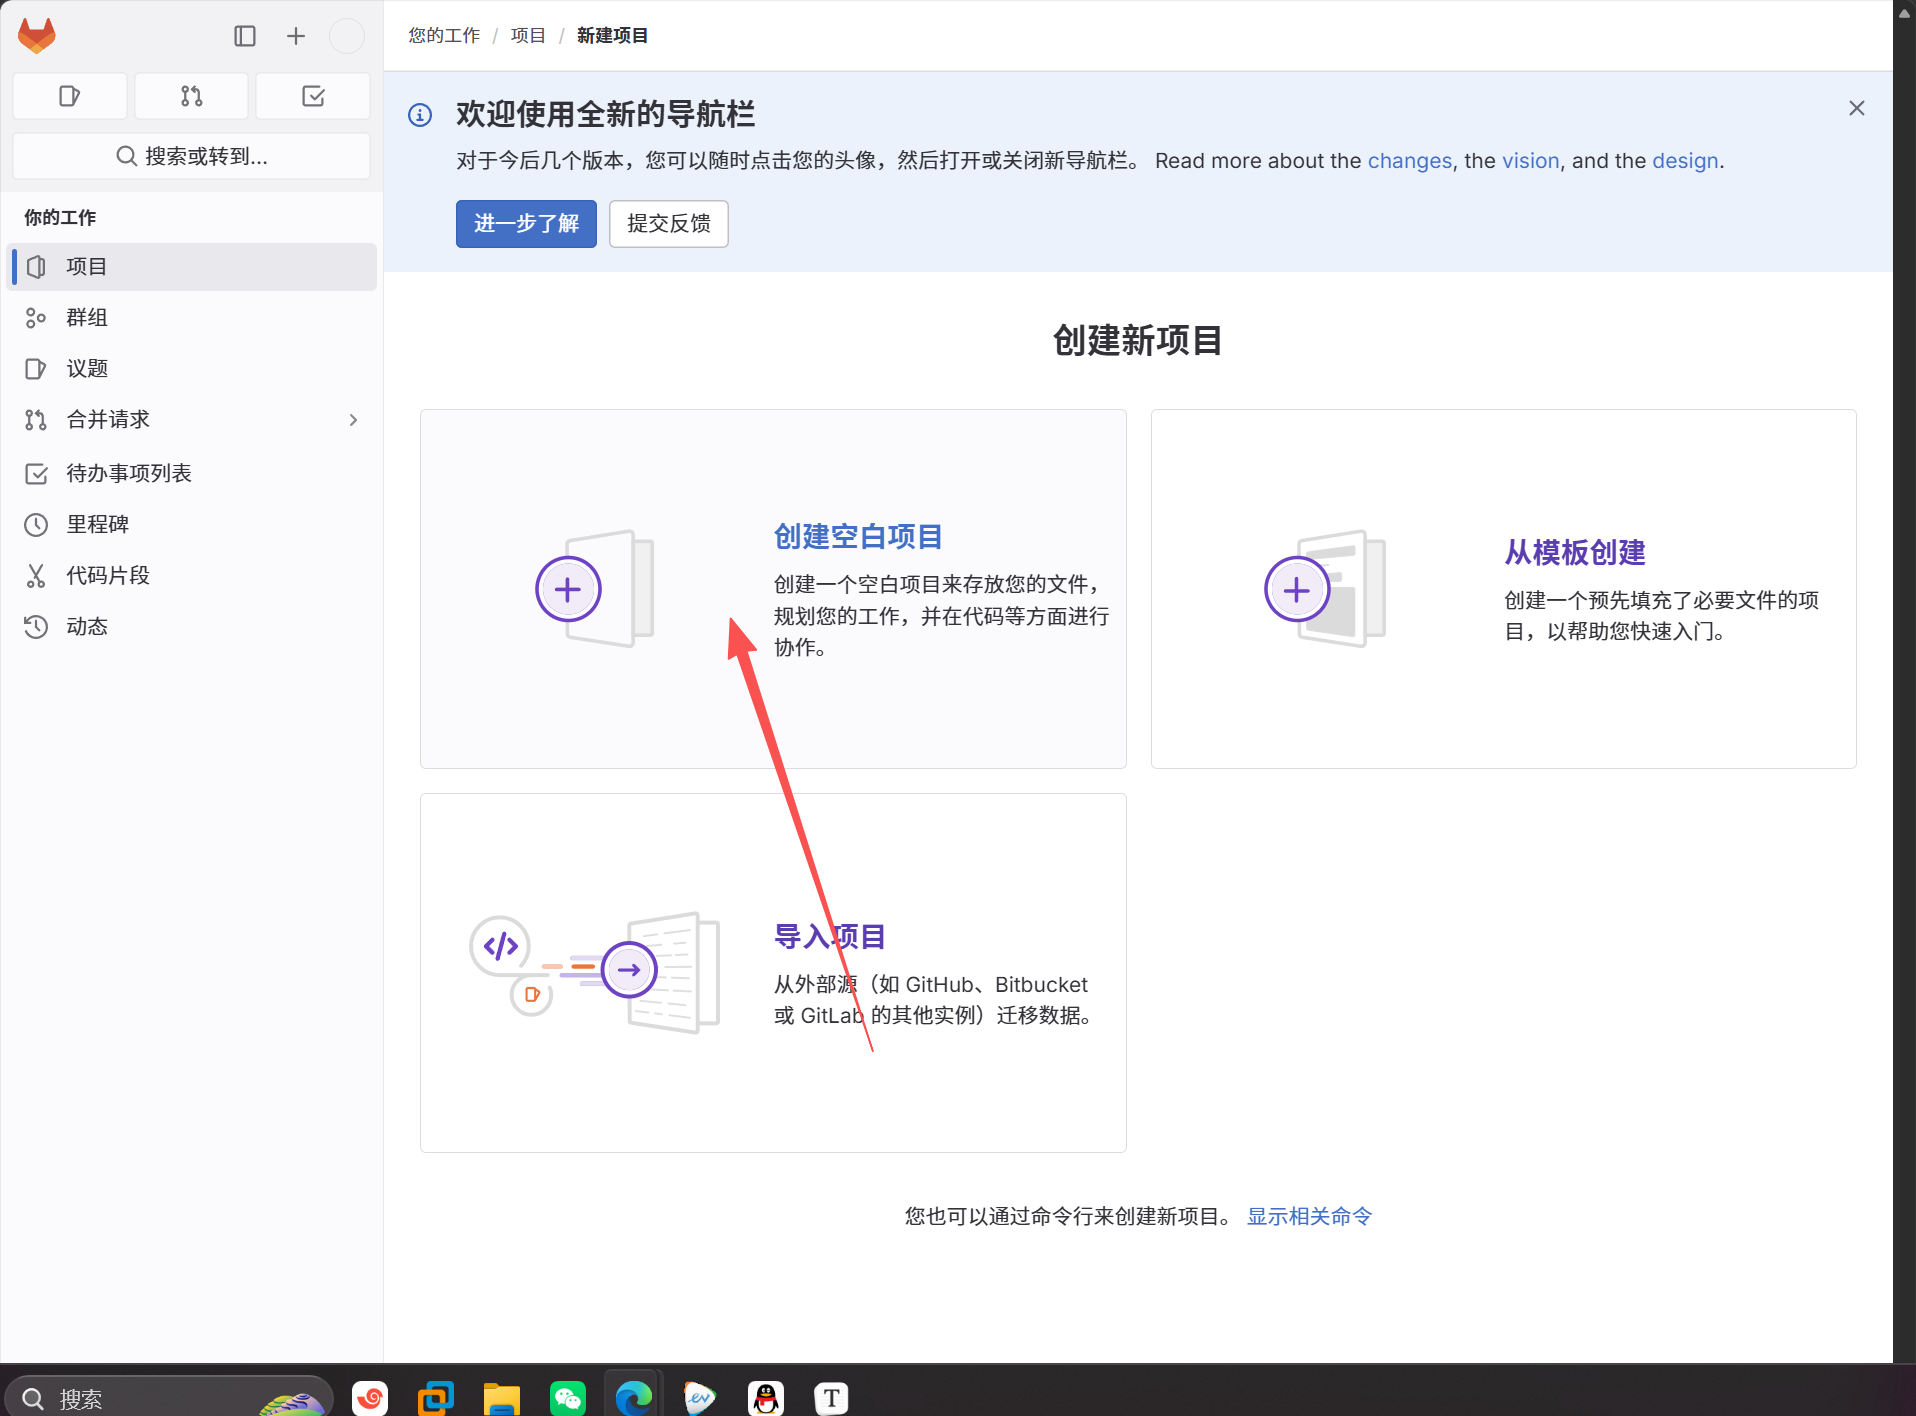
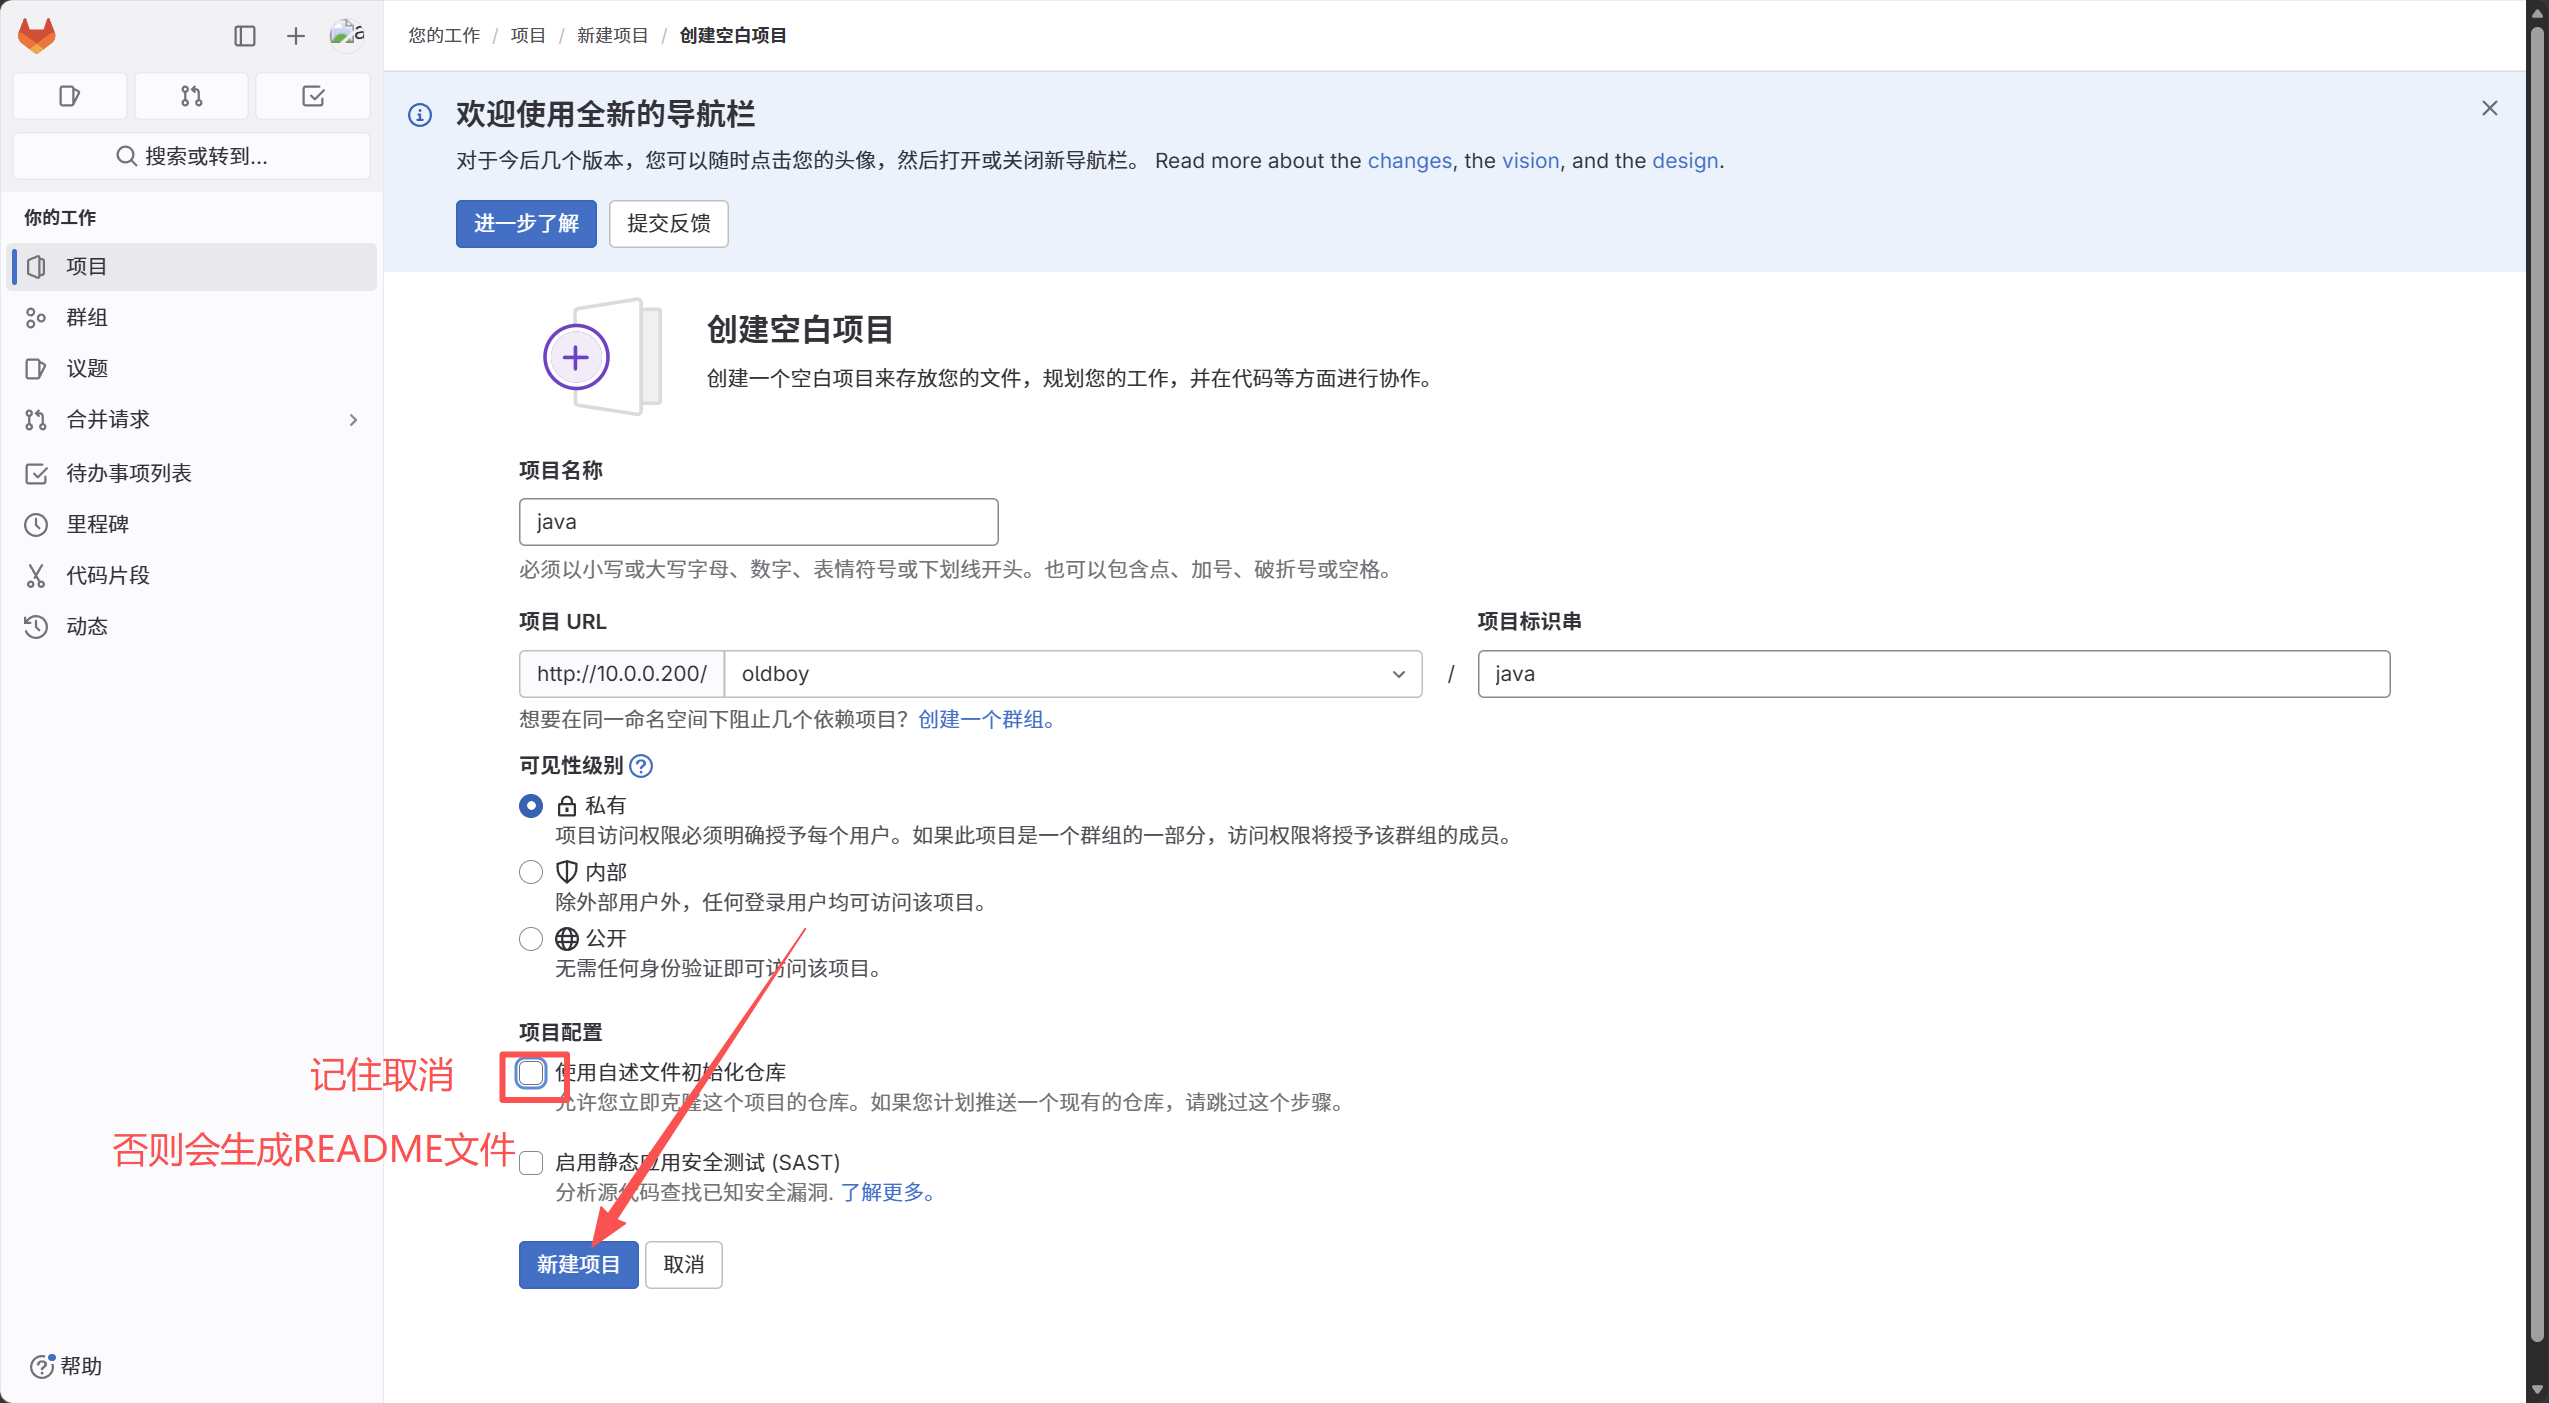
到jenkin服务器上将hello-world推到gatlab
由于之前的jenkins服务器上配置远程仓库地址是game项目的,在测试java项目之前要将远程仓库的地址替换java项目的
注意:如果是第一次部署项目,请先部署全局的推送用户的邮箱,并且将远程仓库的地址配置为java项目的
还需要放置密钥对还有手动连接输入yes
[root@jenkins hello-world-war]# git remote remove origin
[root@jenkins hello-world-war]# git remote add origin git@10.0.0.200:oldboy/java.git
[root@jenkins hello-world-war]# git remote
origin
[root@jenkins hello-world-war]# git remote -v
origin	git@10.0.0.200:oldboy/java.git (fetch)
origin	git@10.0.0.200:oldboy/java.git (push)

#将代码提交到java的远程仓库
[root@jenkins hello-world-war]# git add .
[root@jenkins hello-world-war]# git commit -m ".."
[master 32fc2ae] ..
 2 files changed, 3 insertions(+), 3 deletions(-)
[root@jenkins hello-world-war]# git push -u origin master
枚举对象: 44, 完成.
对象计数中: 100% (44/44), 完成.
压缩对象中: 100% (29/29), 完成.
写入对象中: 100% (44/44), 4.90 KiB | 1.63 MiB/s, 完成.
总共 44(差异 11),复用 0(差异 0),包复用 0
To 10.0.0.200:oldboy/java.git
 * [new branch]      master -> master
分支 'master' 设置为跟踪来自 'origin' 的远程分支 'master'。
jenkins创建maven项目
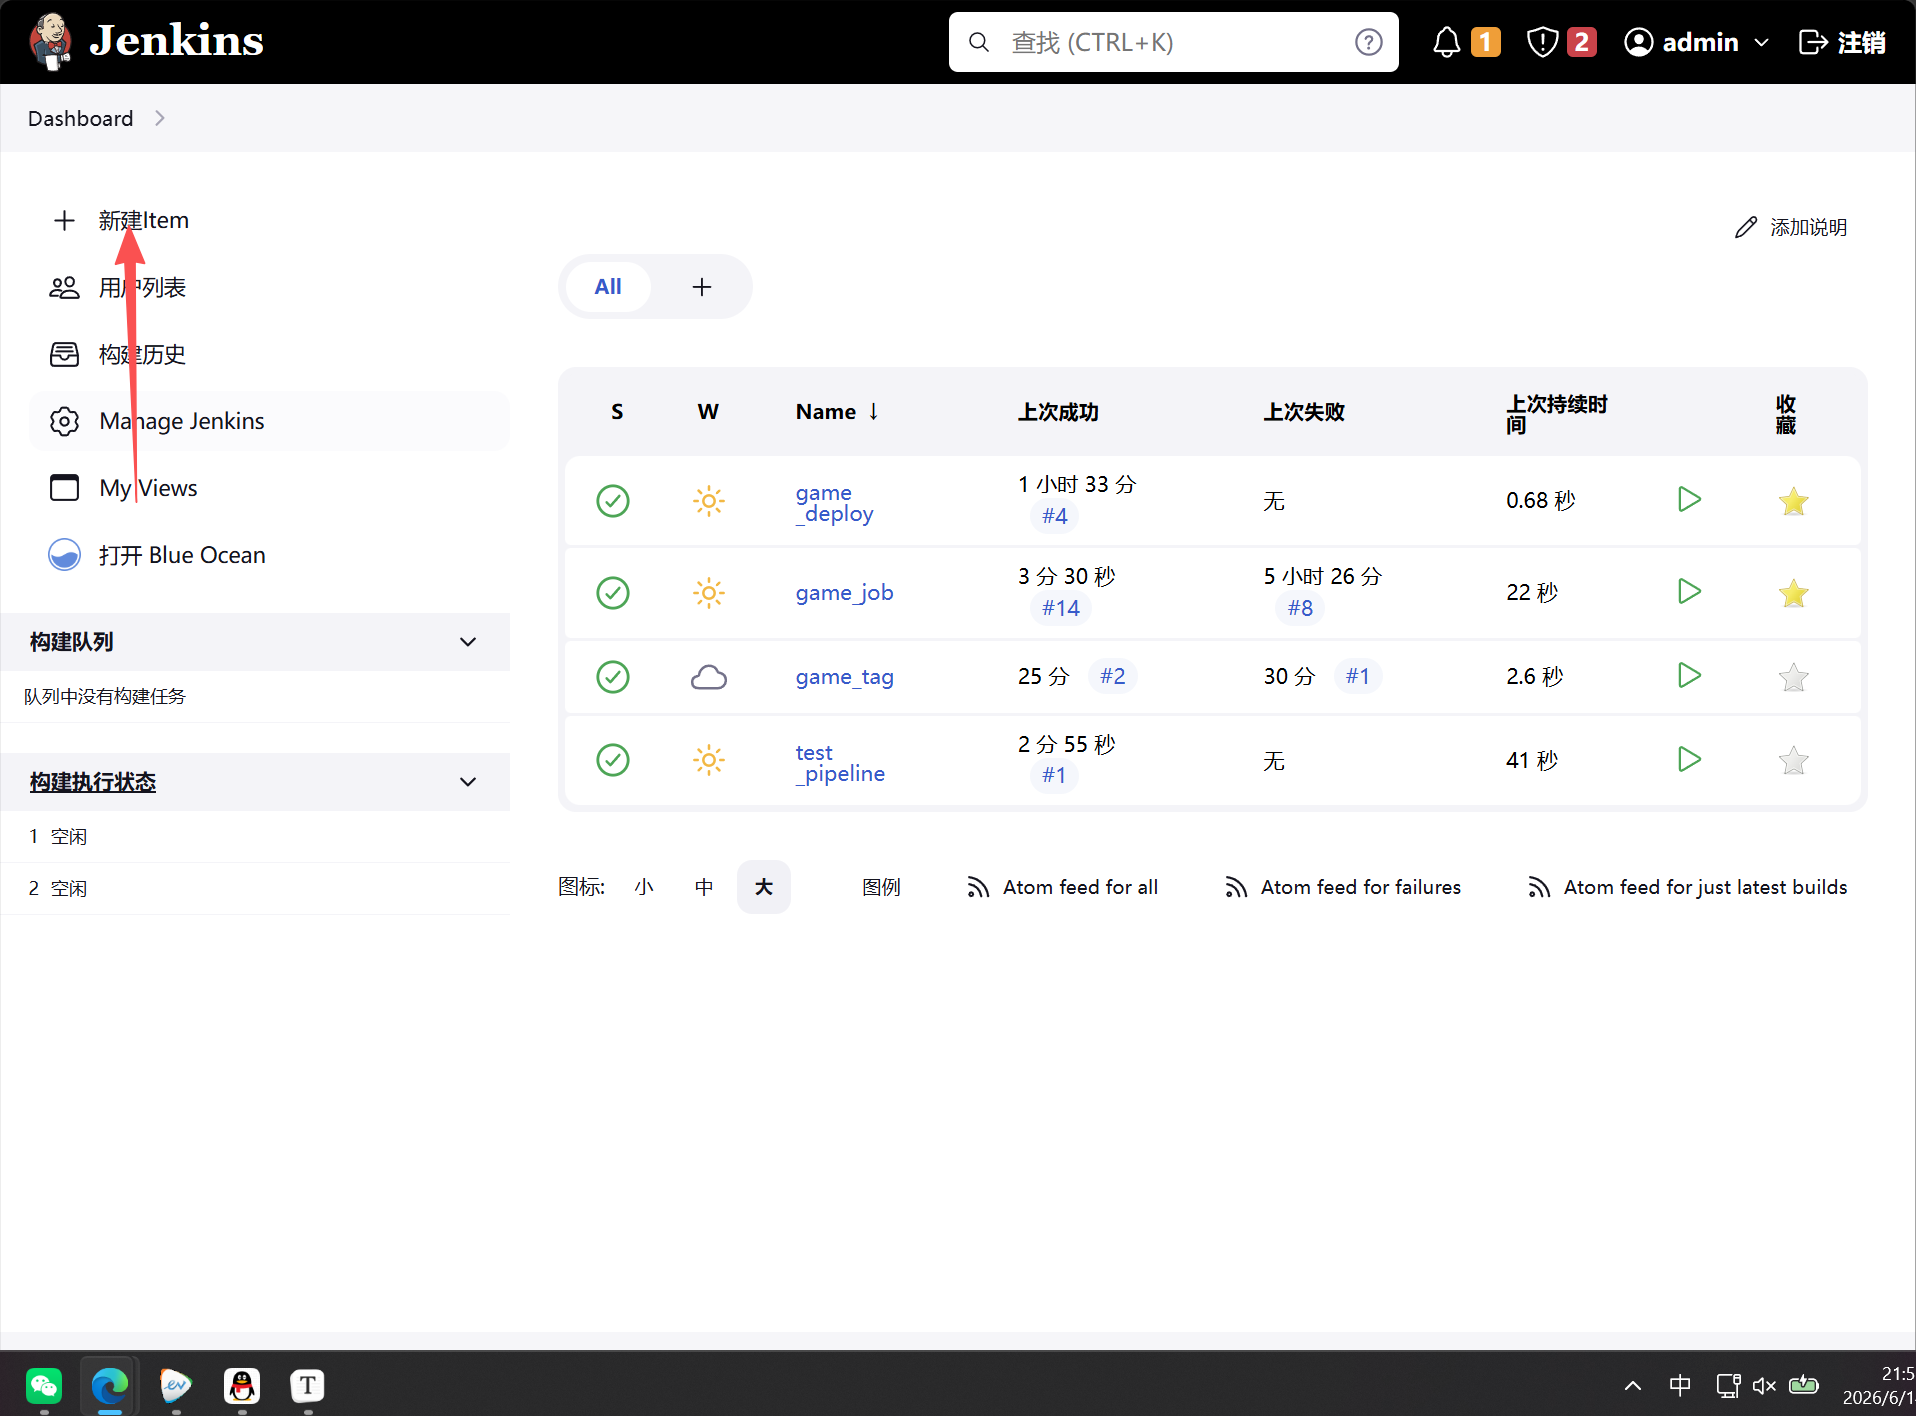
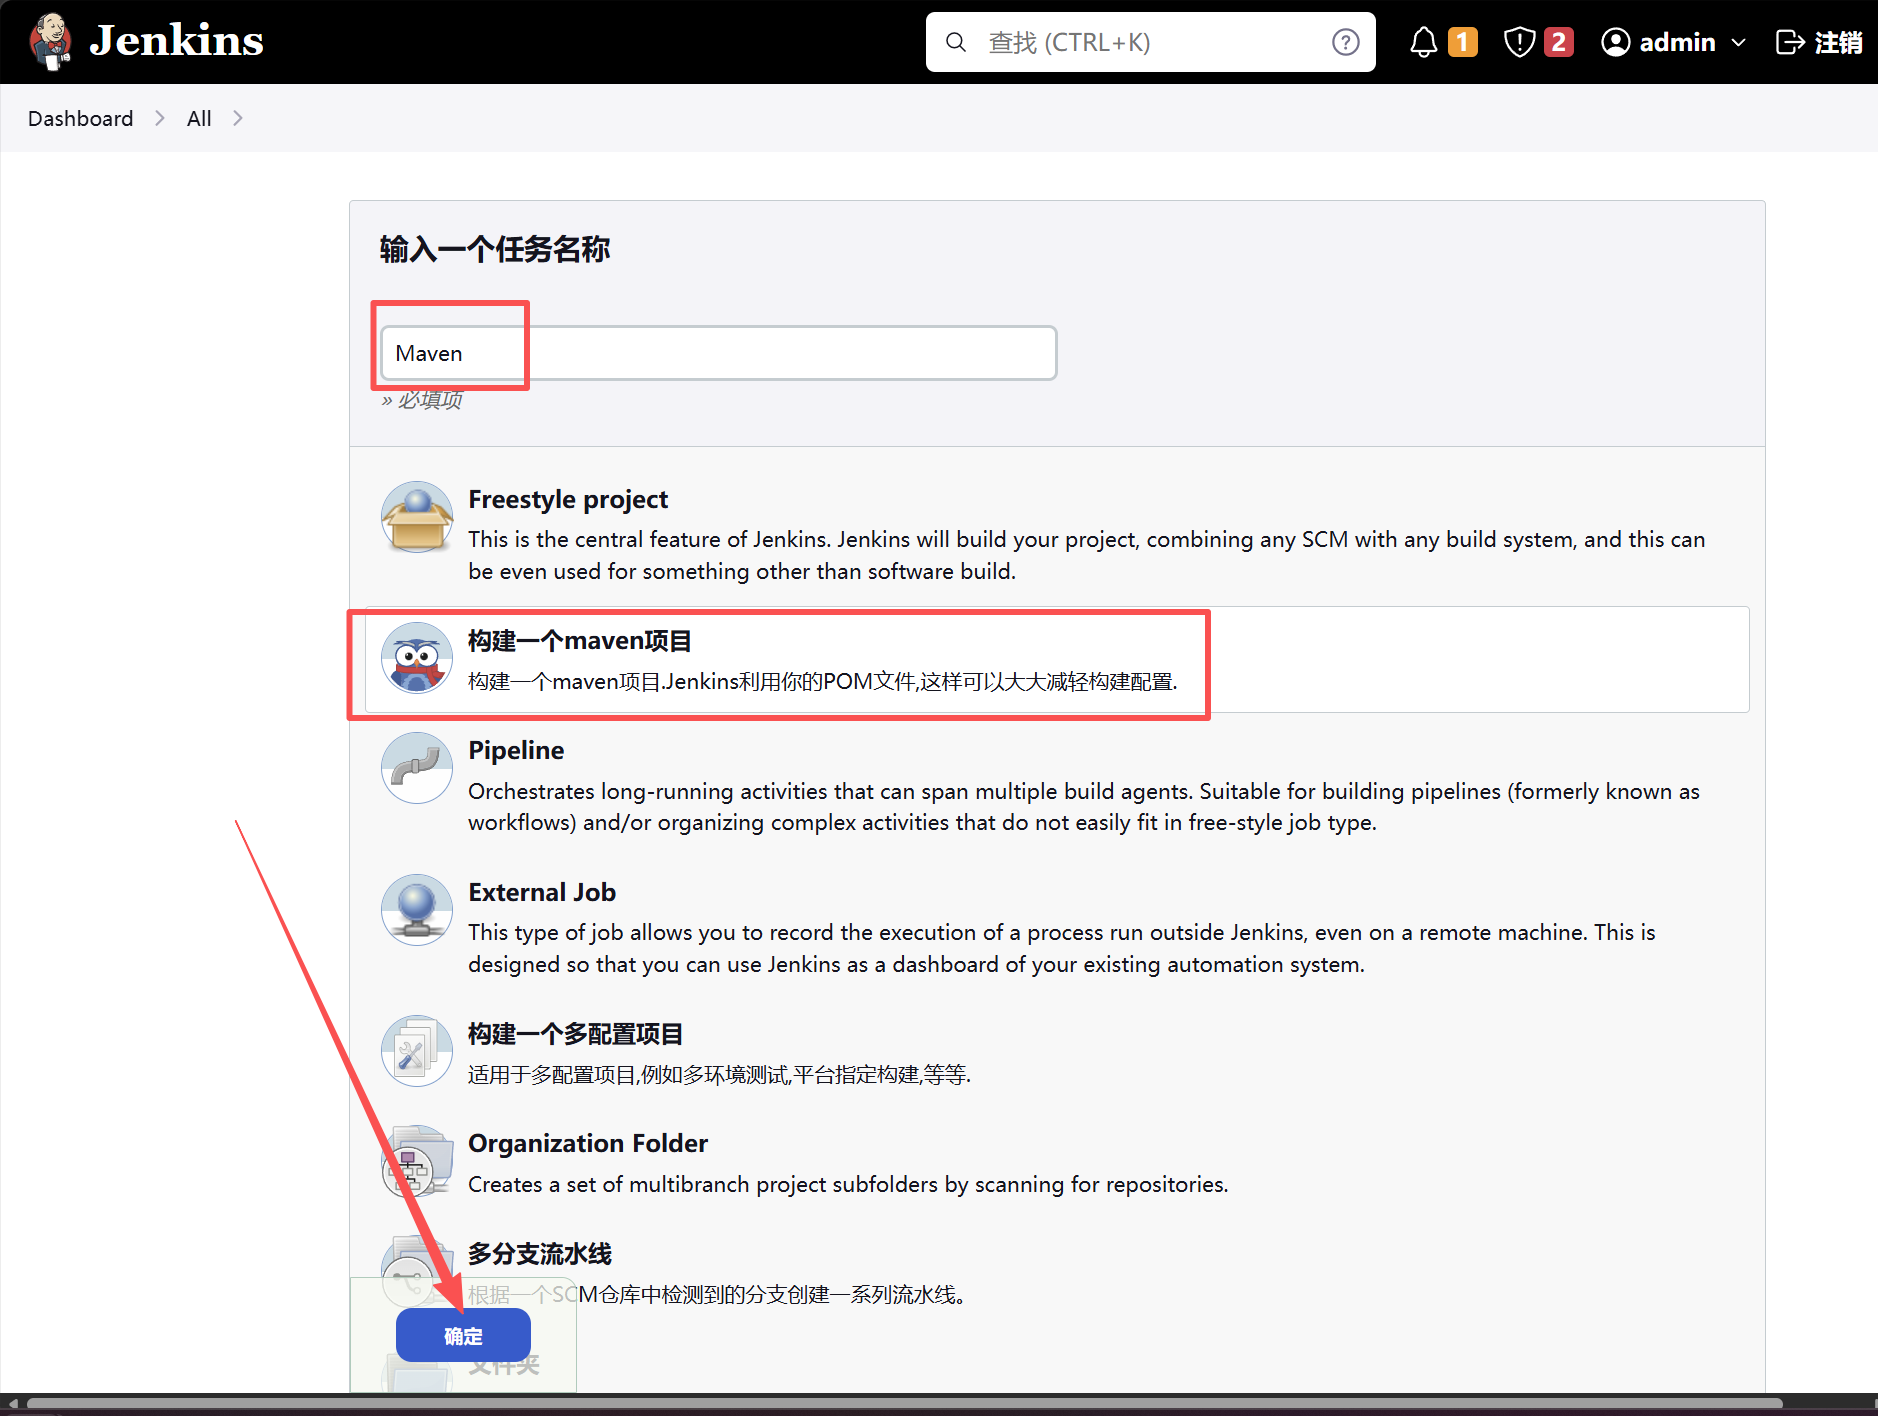
创建完成之后,先配置maven编译
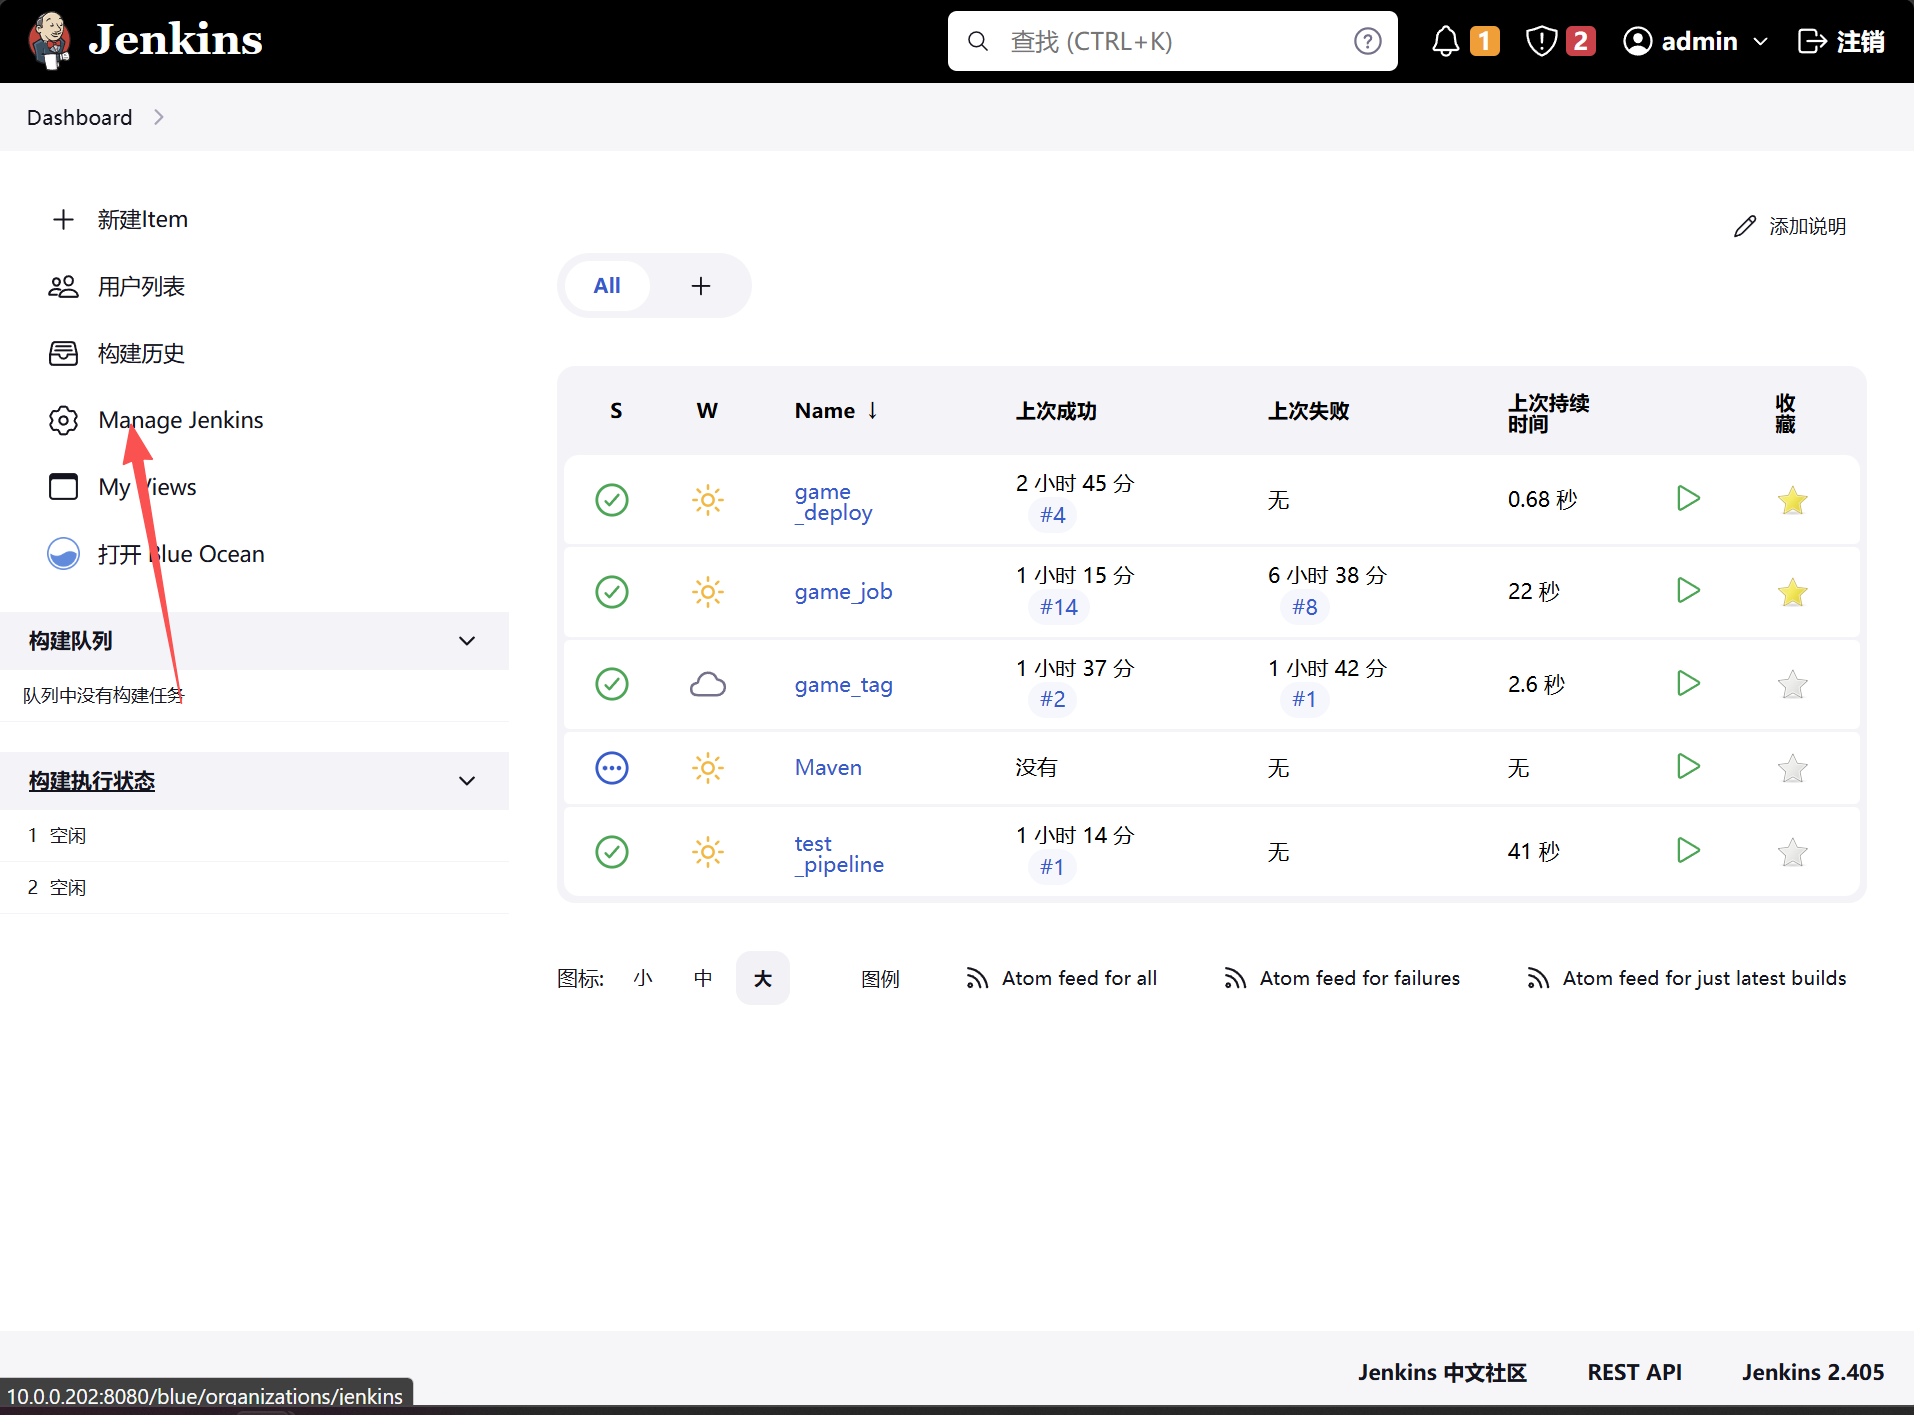
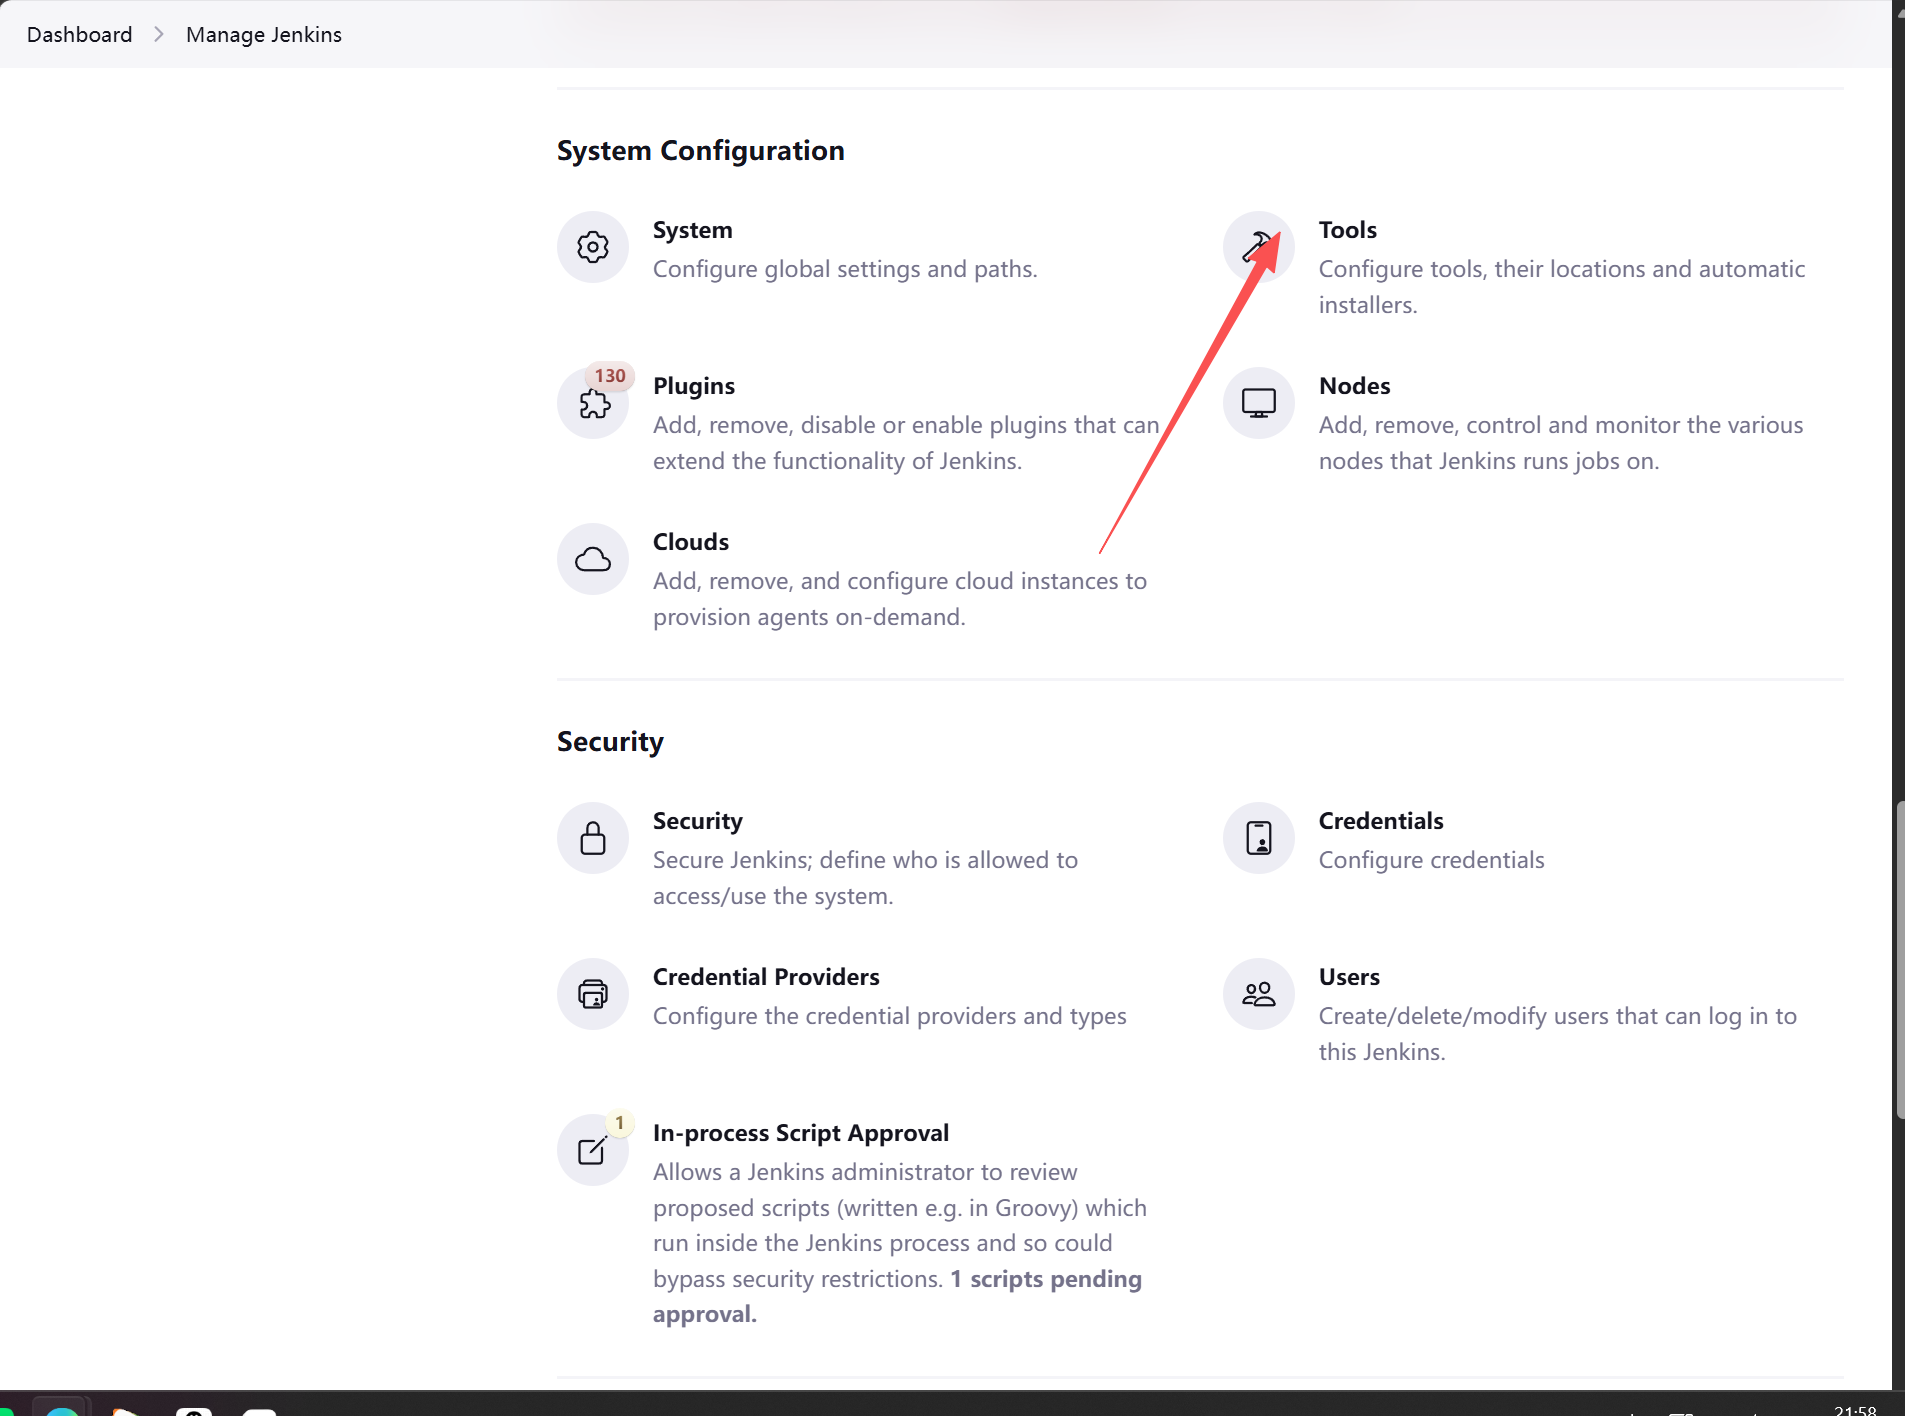
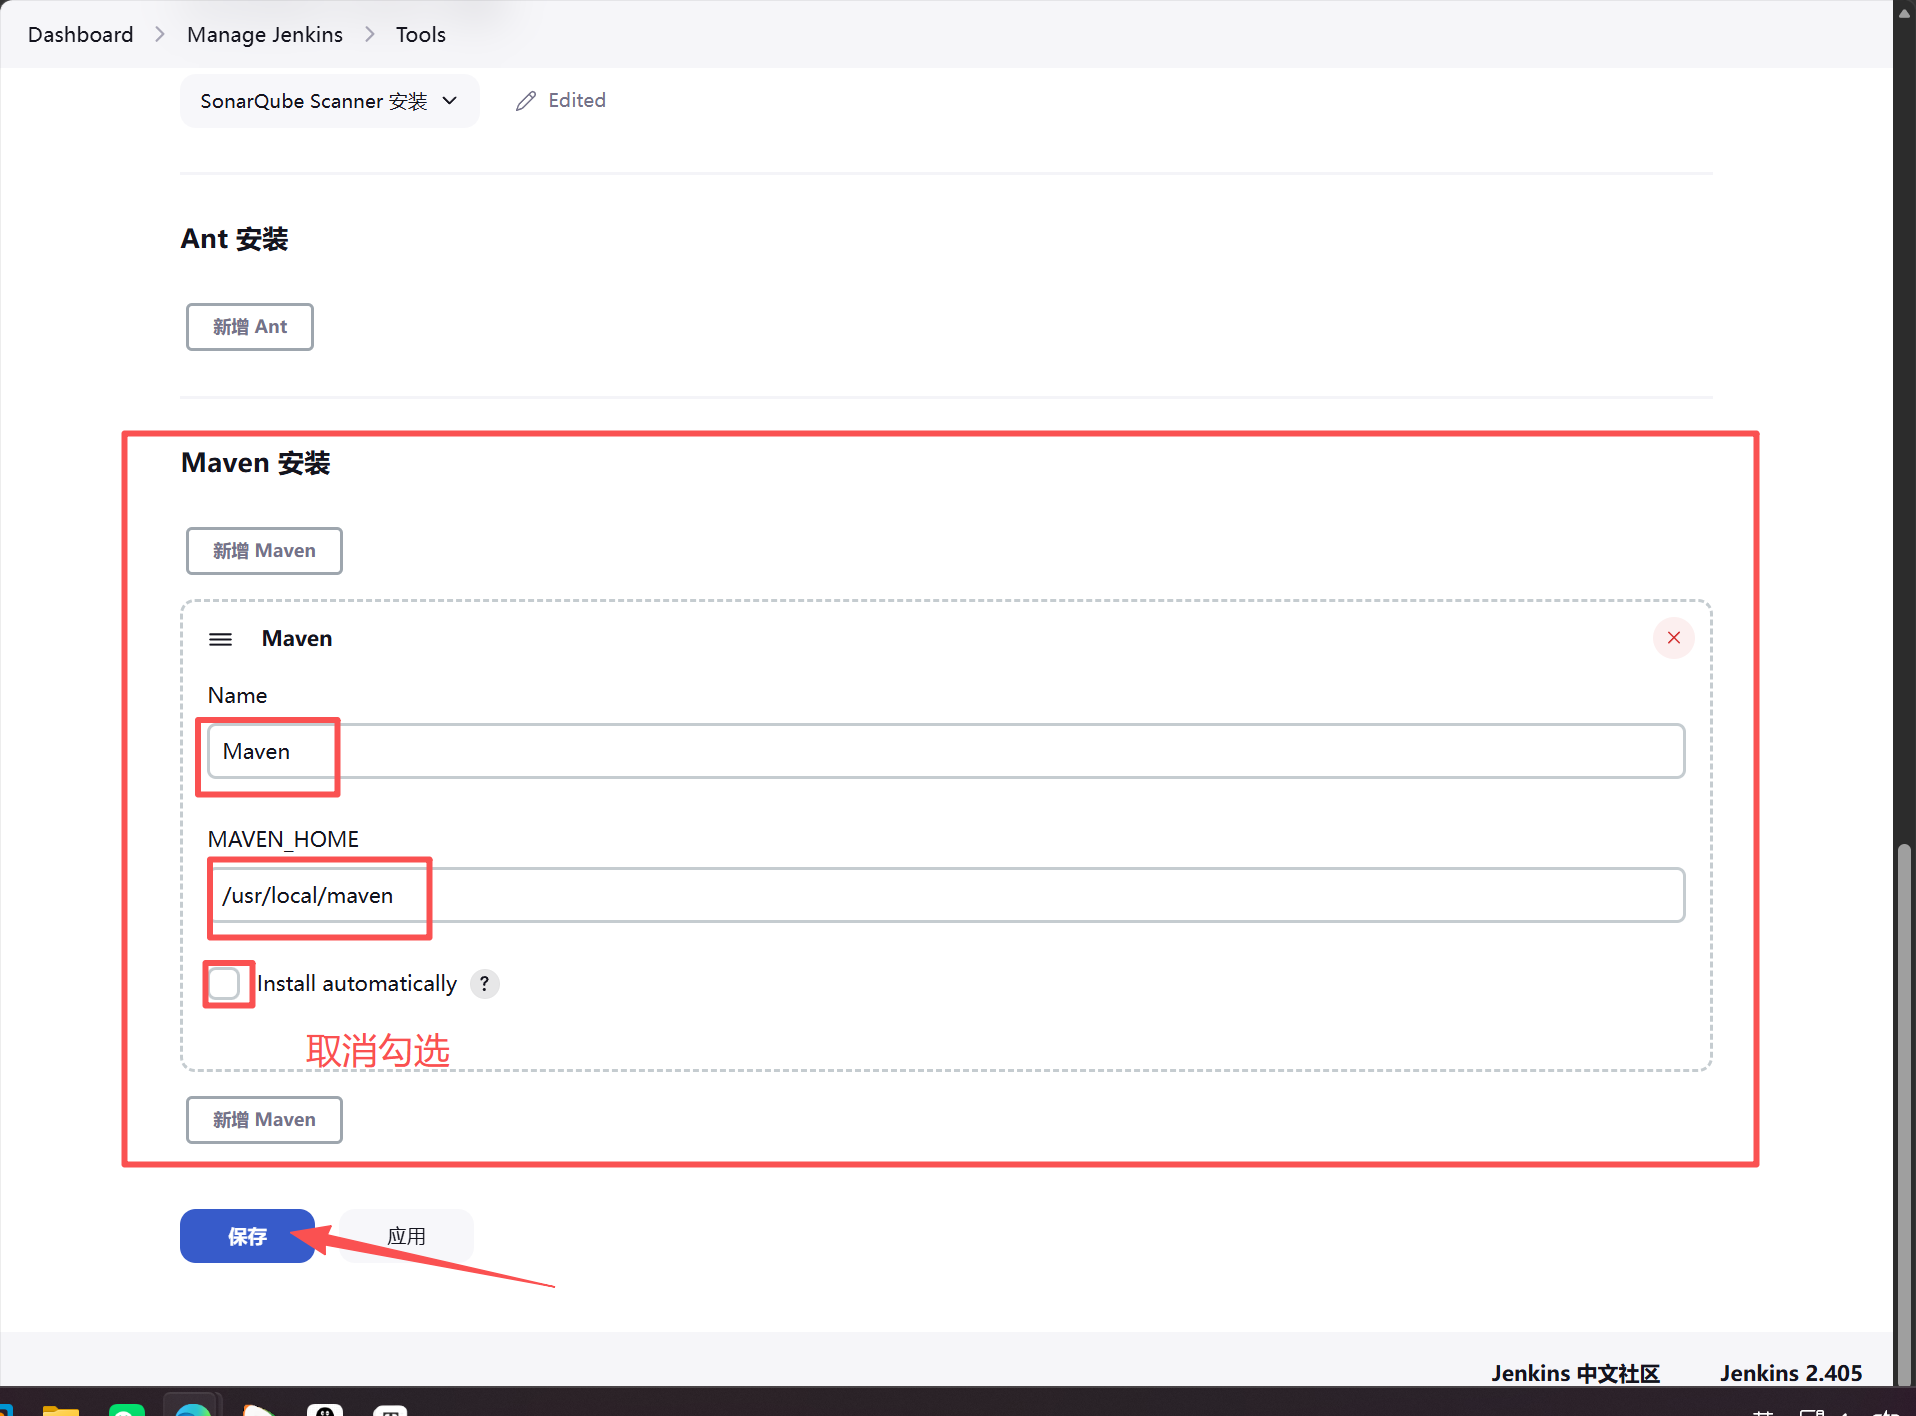
再配置maven项目
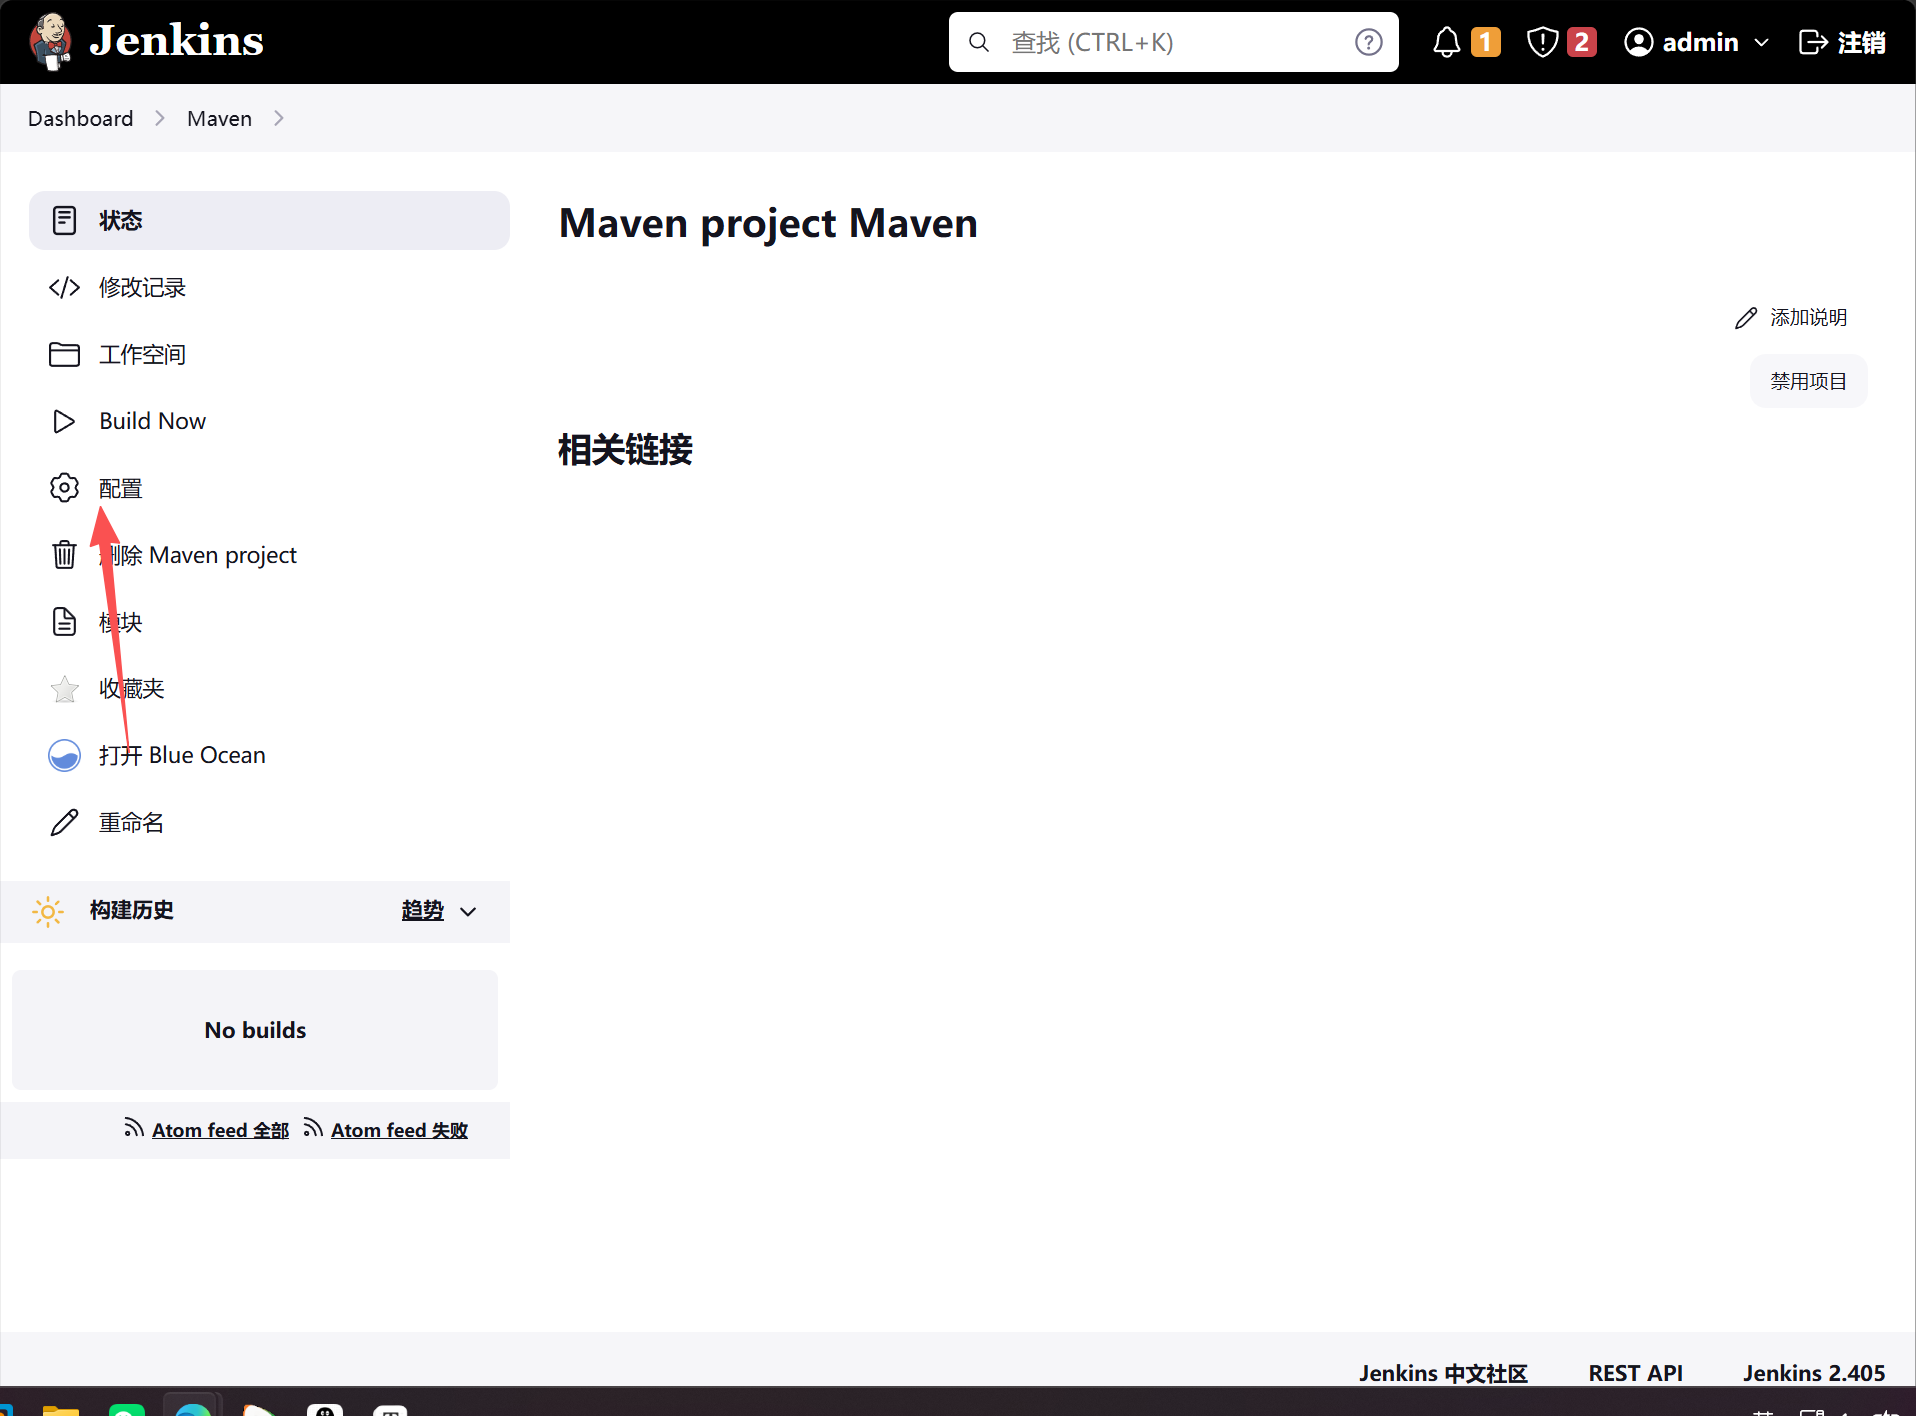
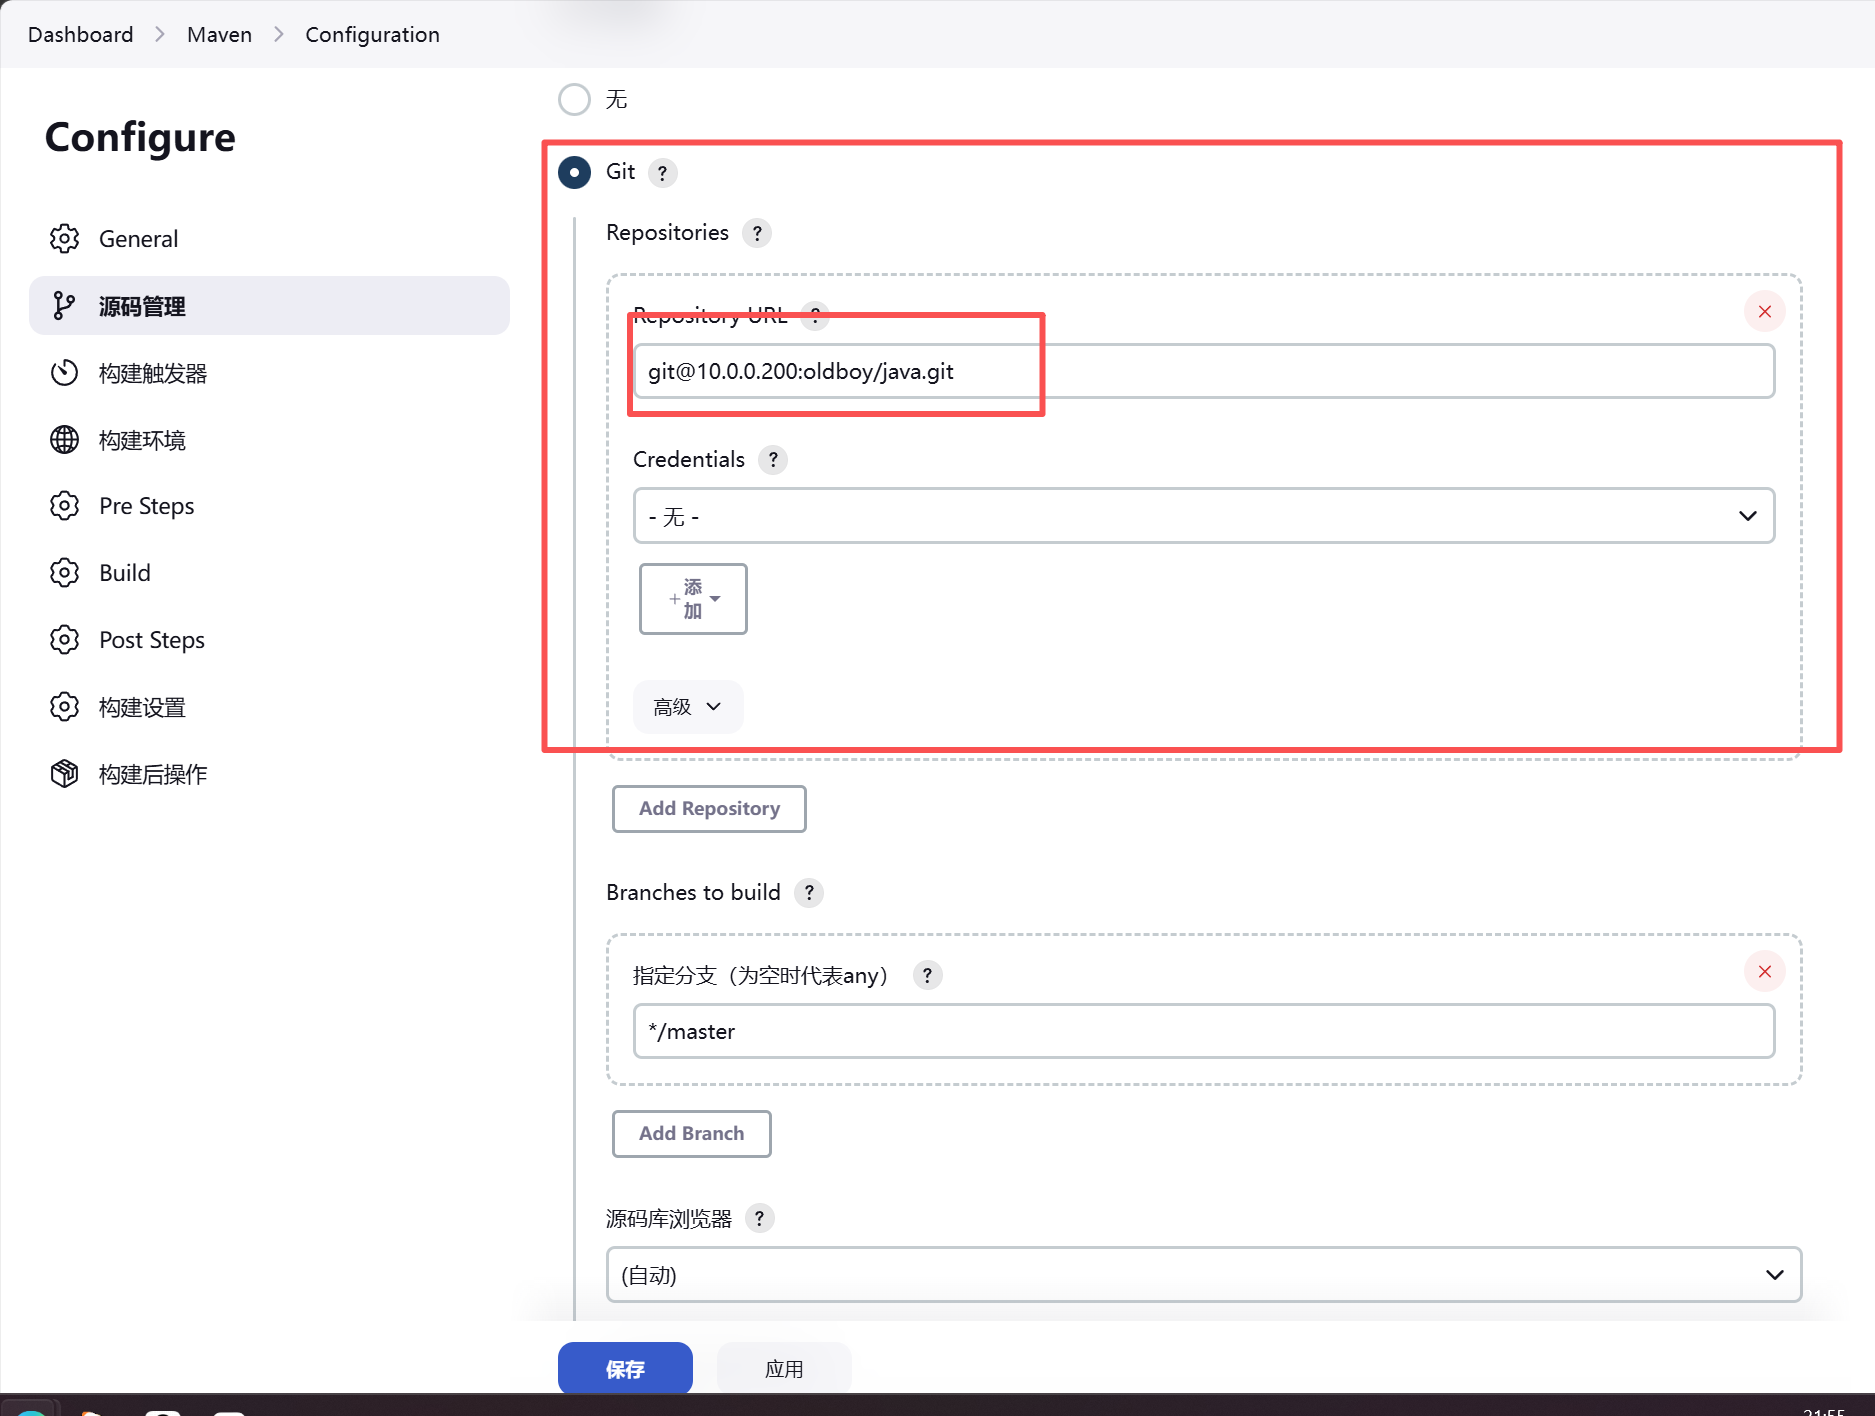
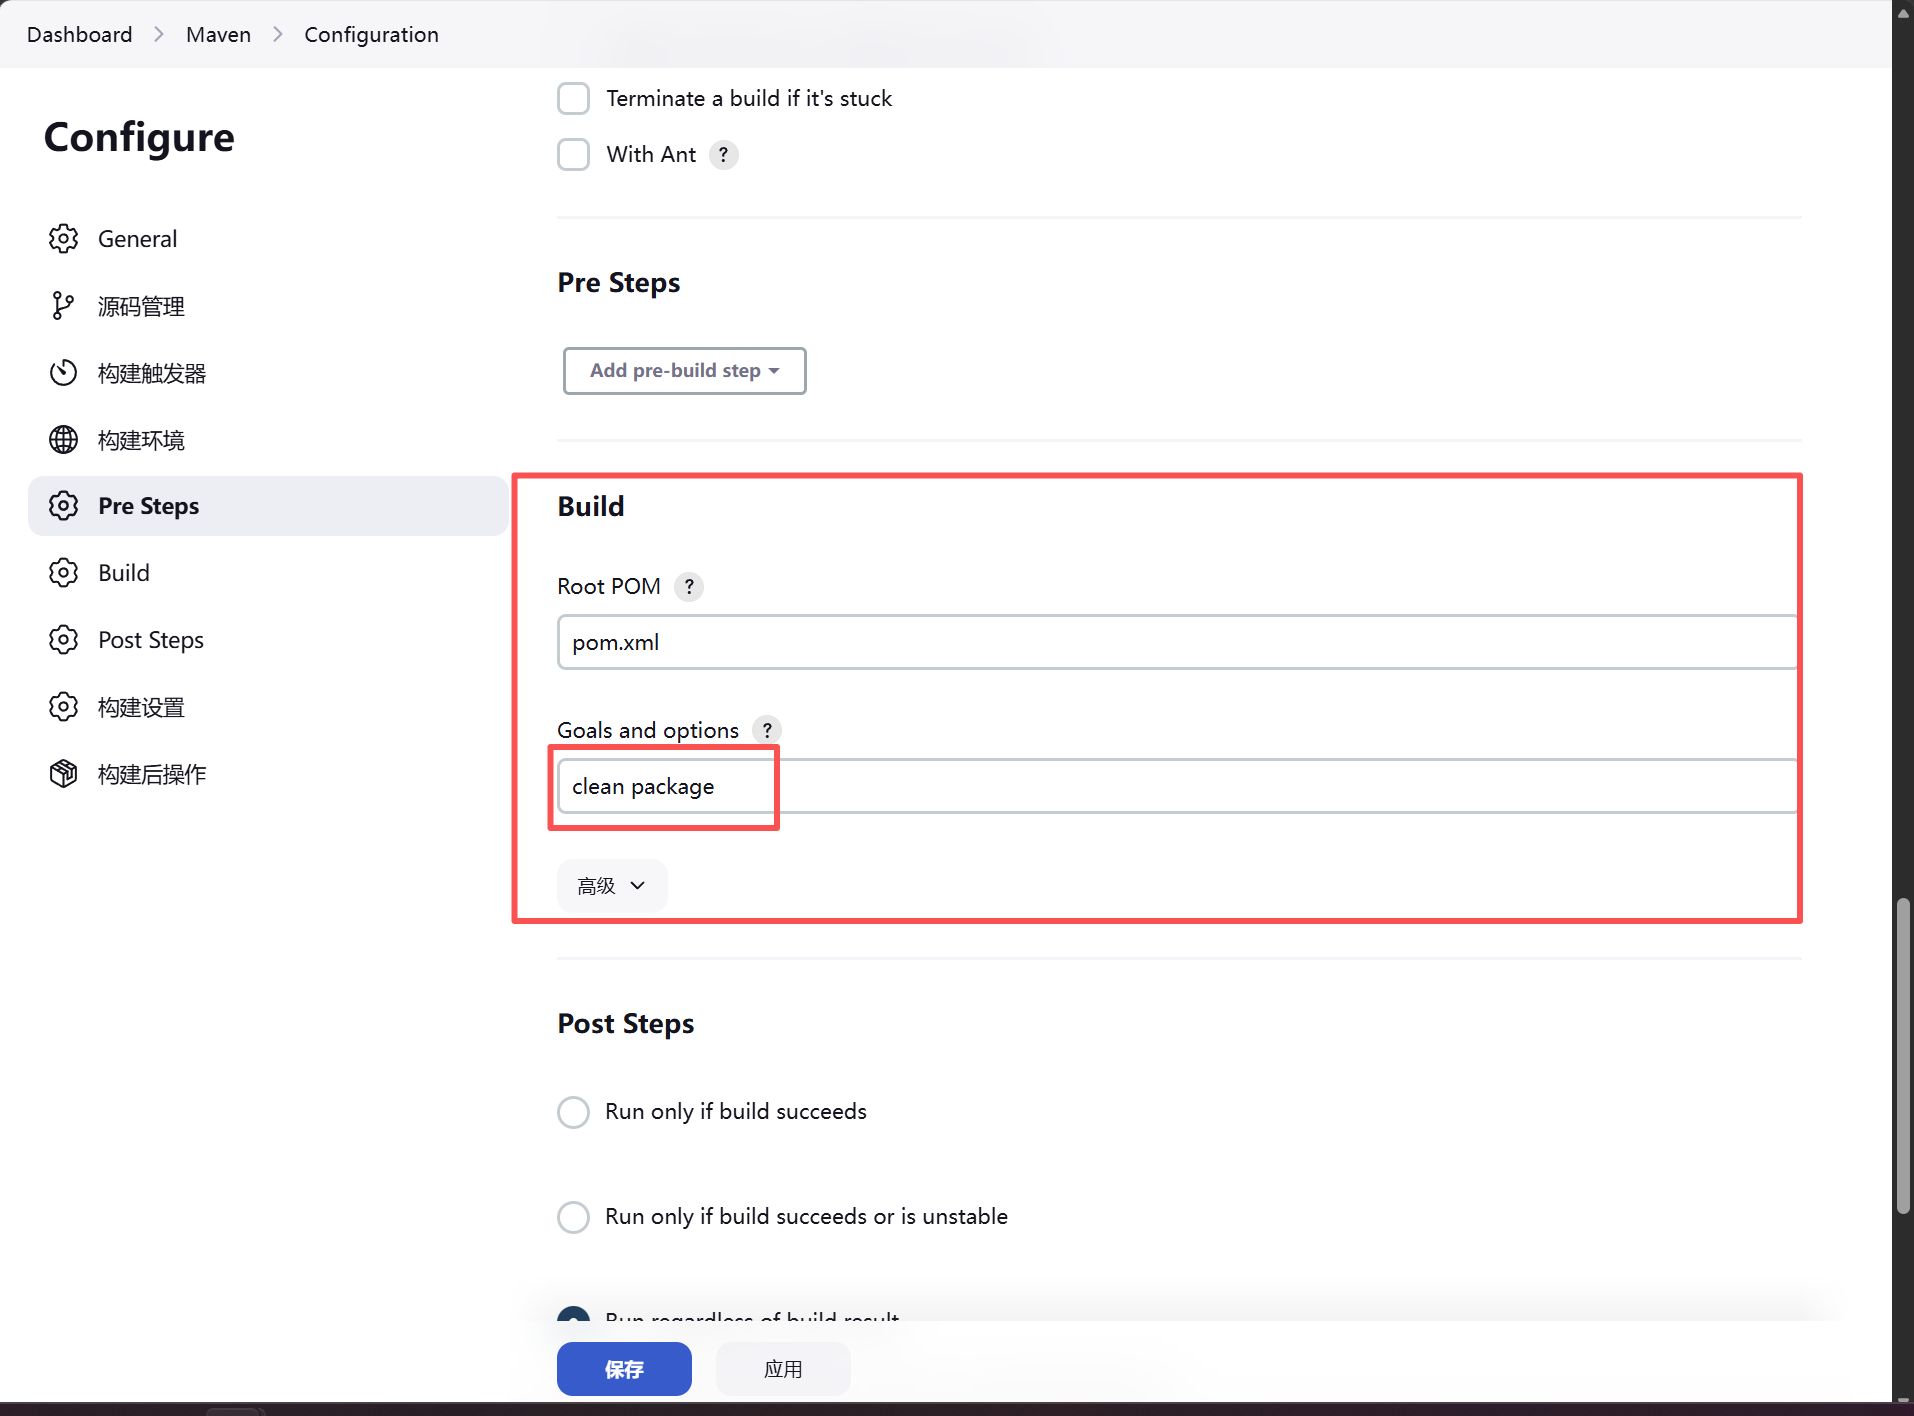
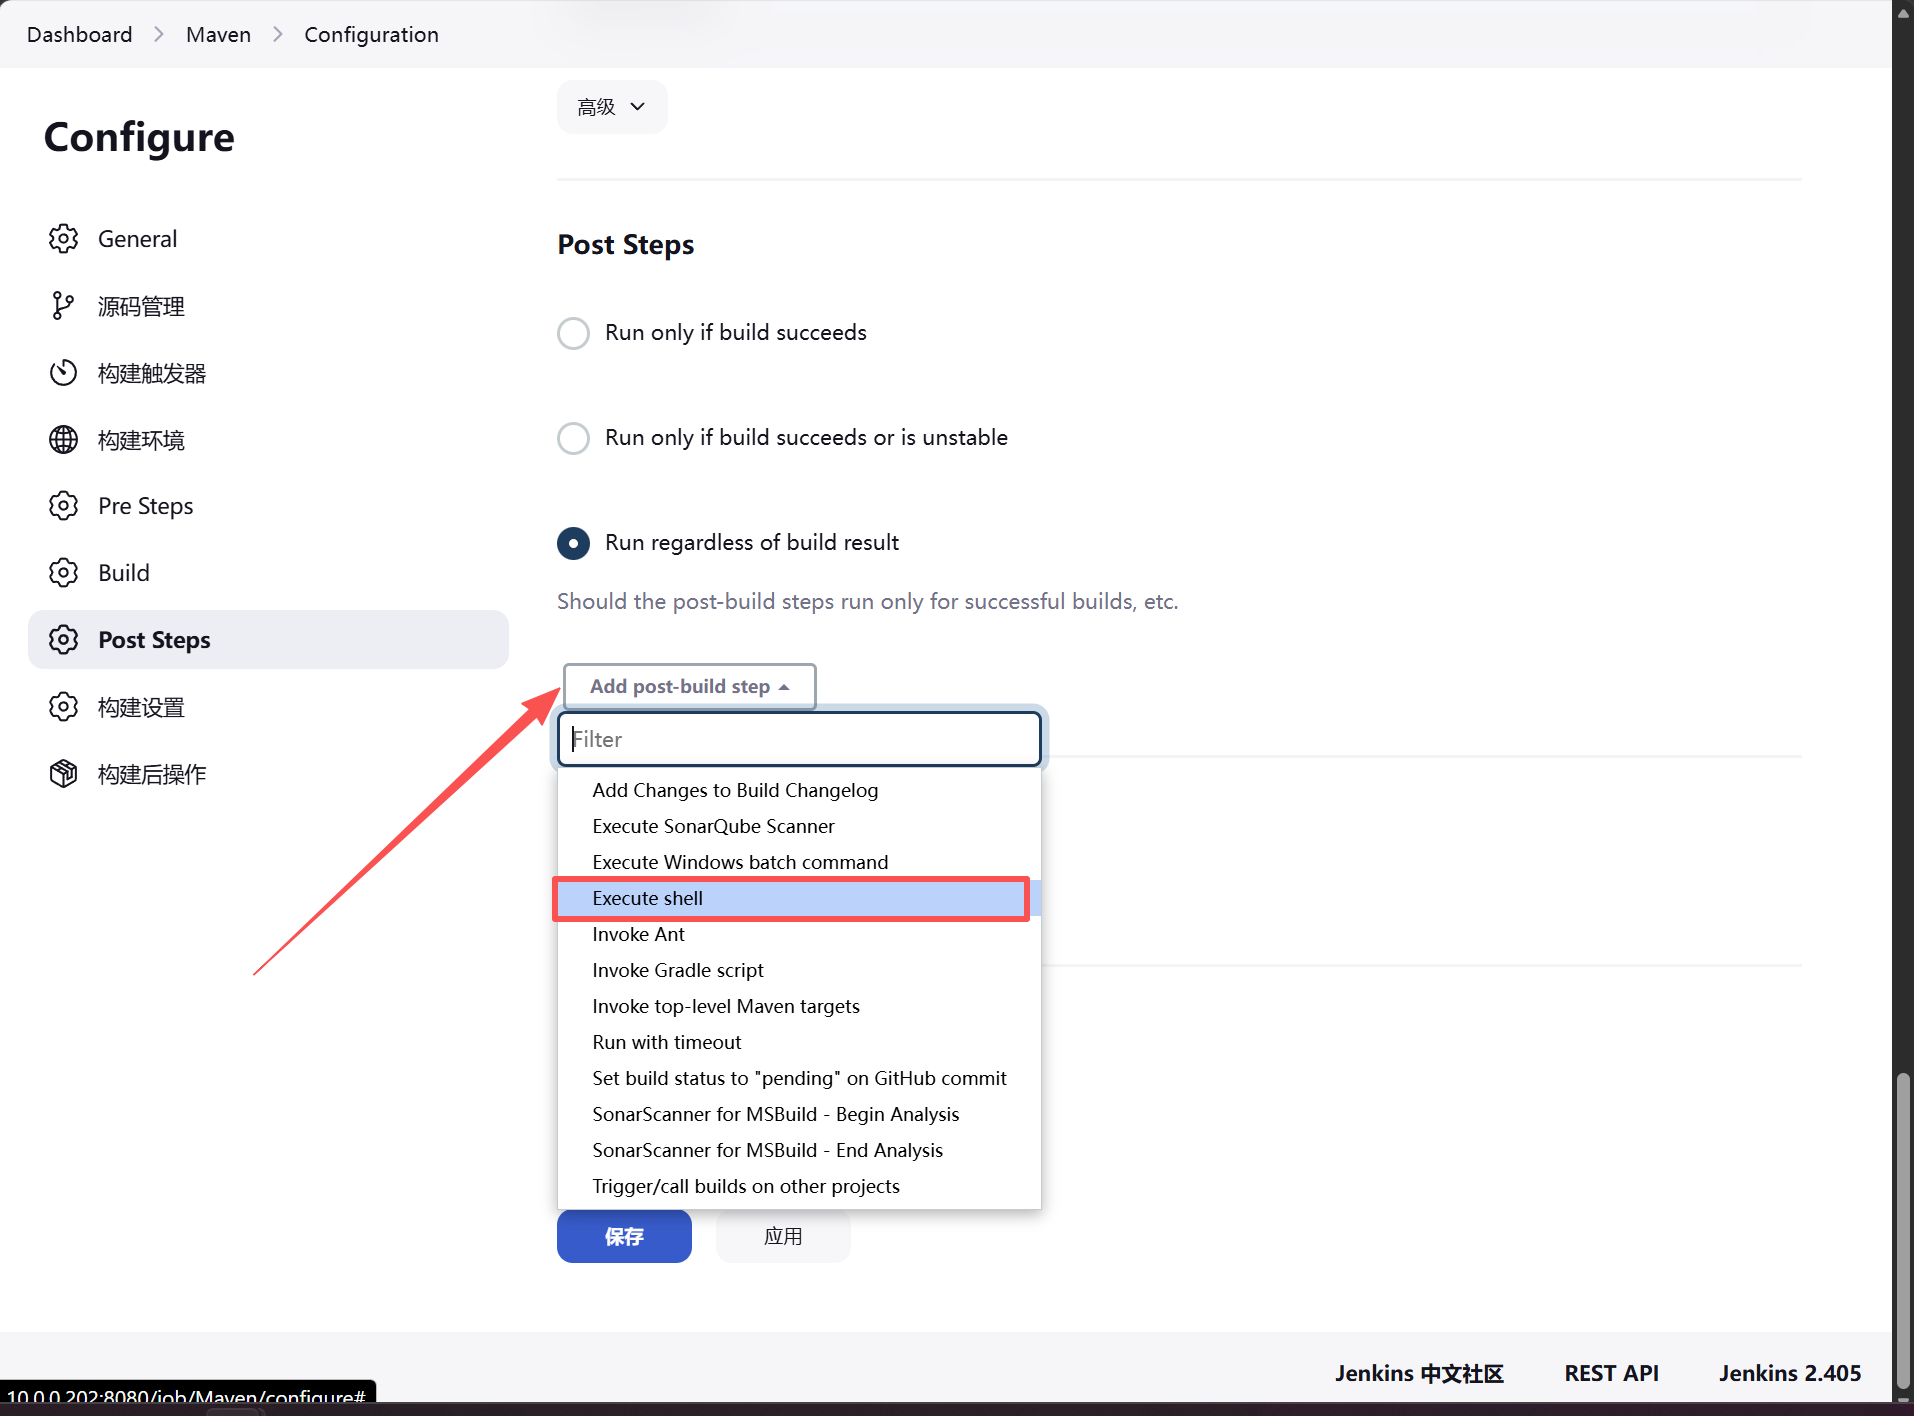
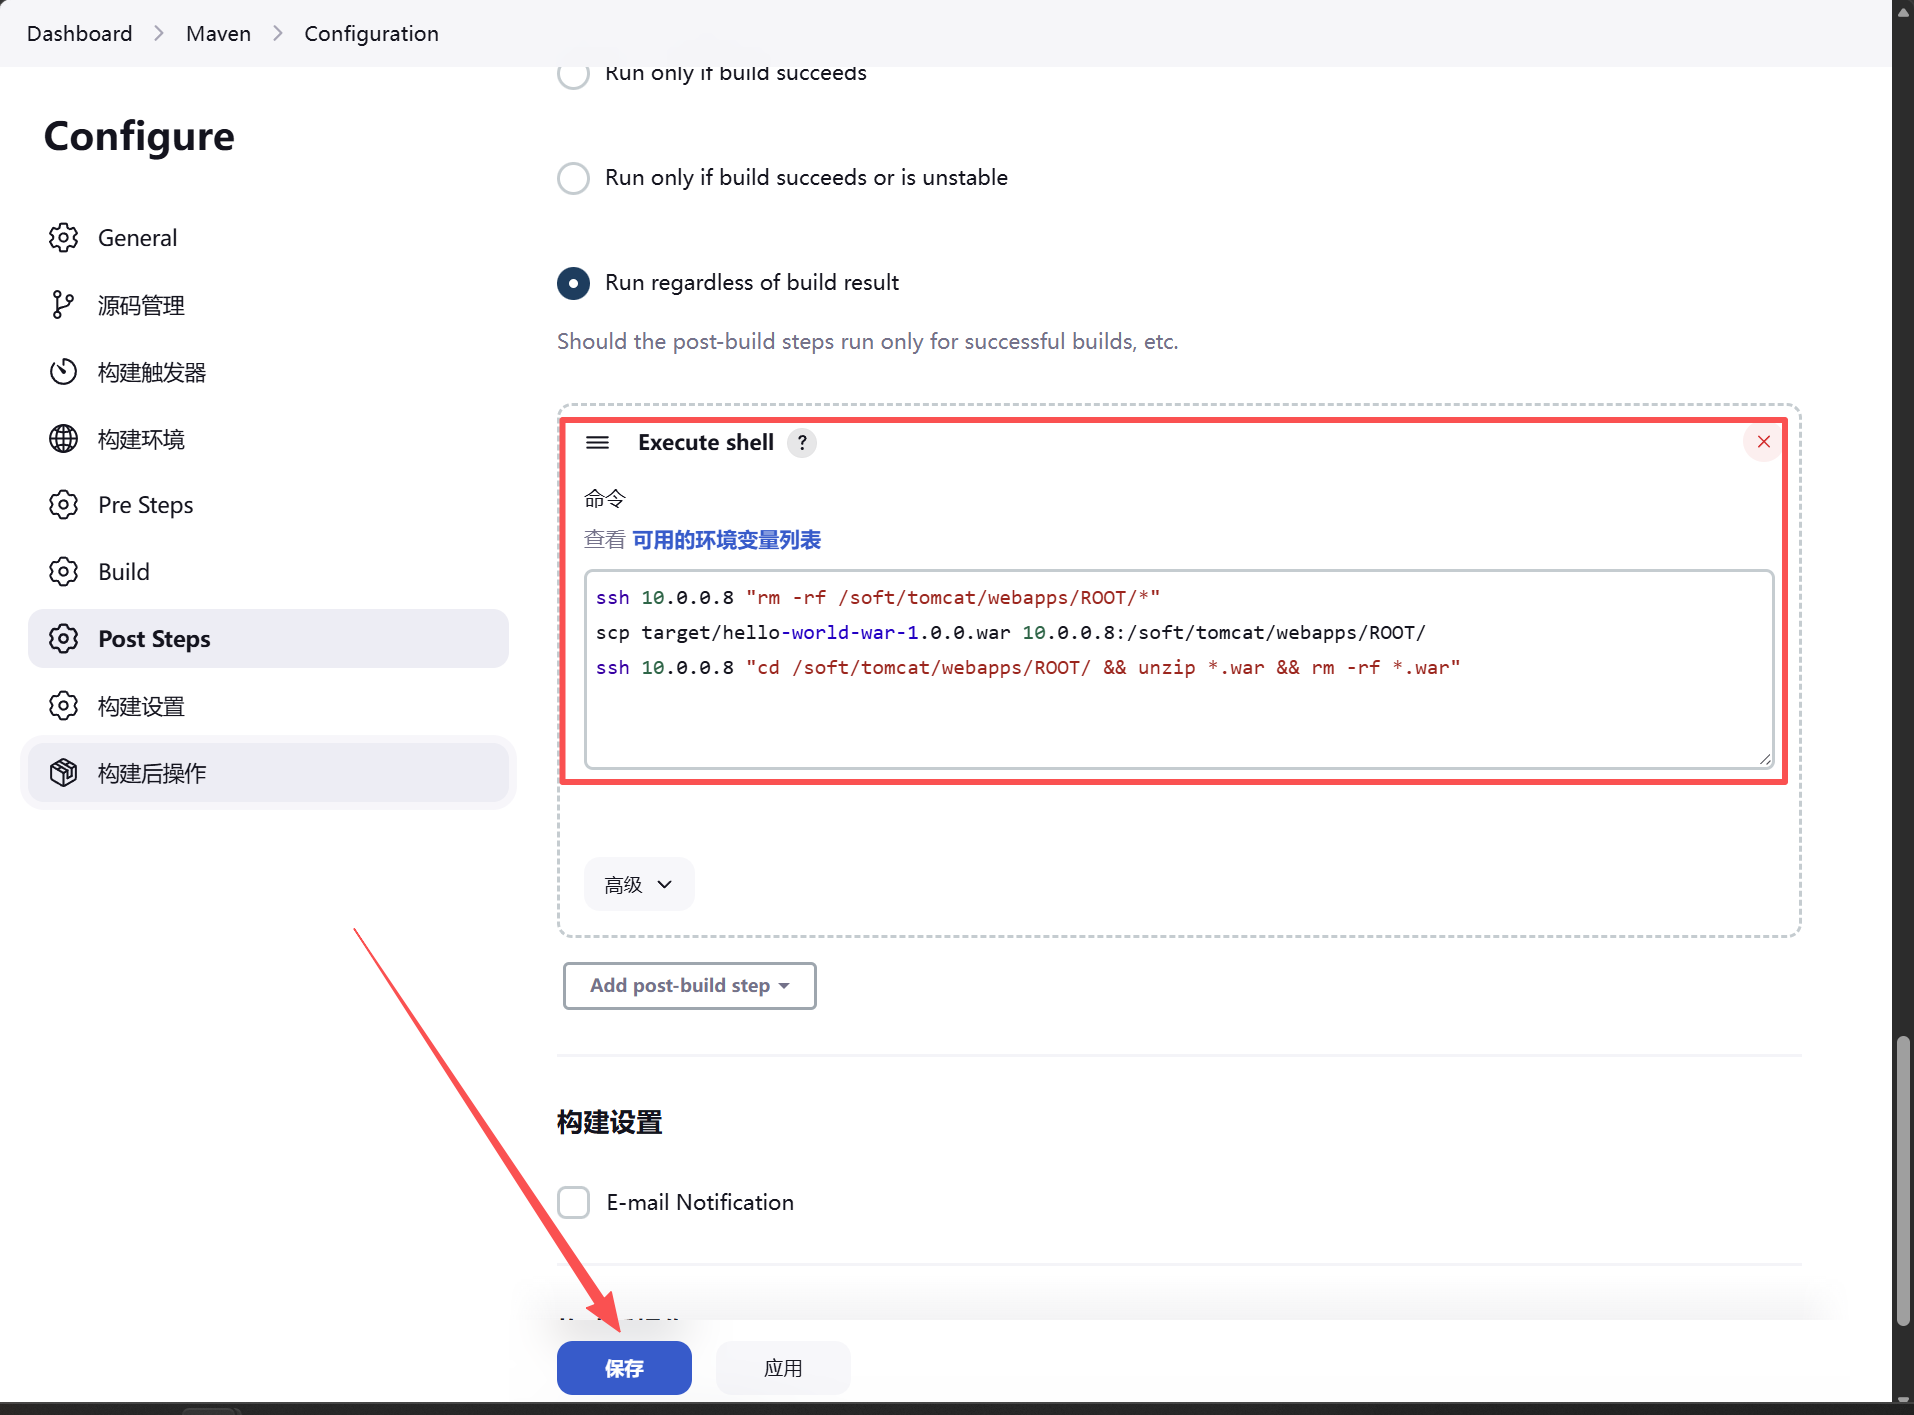
ssh 10.0.0.8 "rm -rf /soft/tomcat/webapps/ROOT/*"
scp target/hello-world-war-1.0.0.war 10.0.0.8:/soft/tomcat/webapps/ROOT/
ssh 10.0.0.8 "cd /soft/tomcat/webapps/ROOT/ && unzip *.war && rm -rf *.war"
配置webhook勾子拉取代码
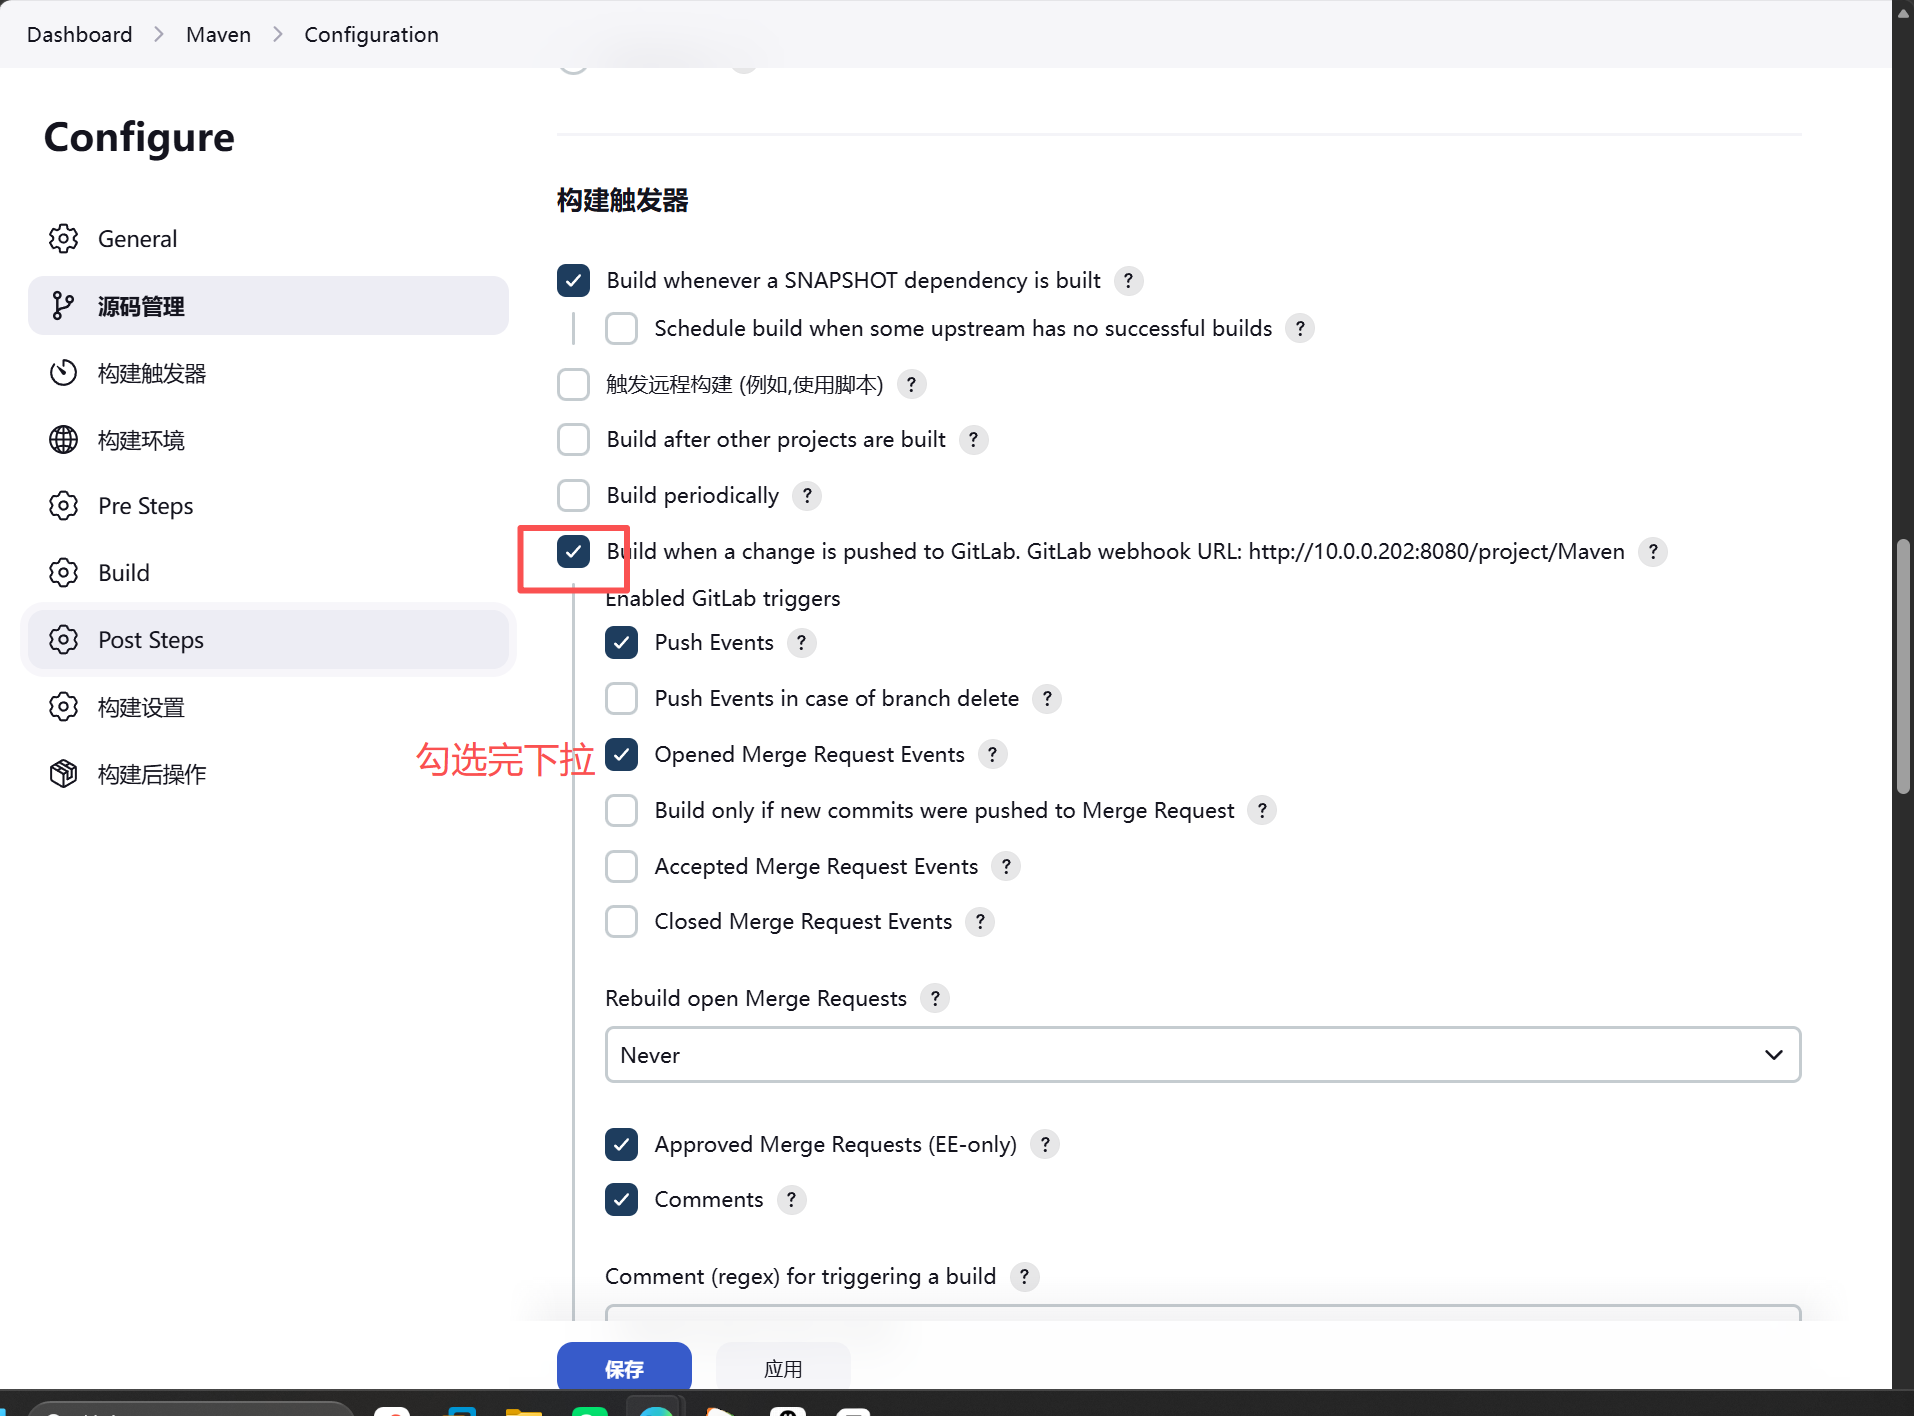
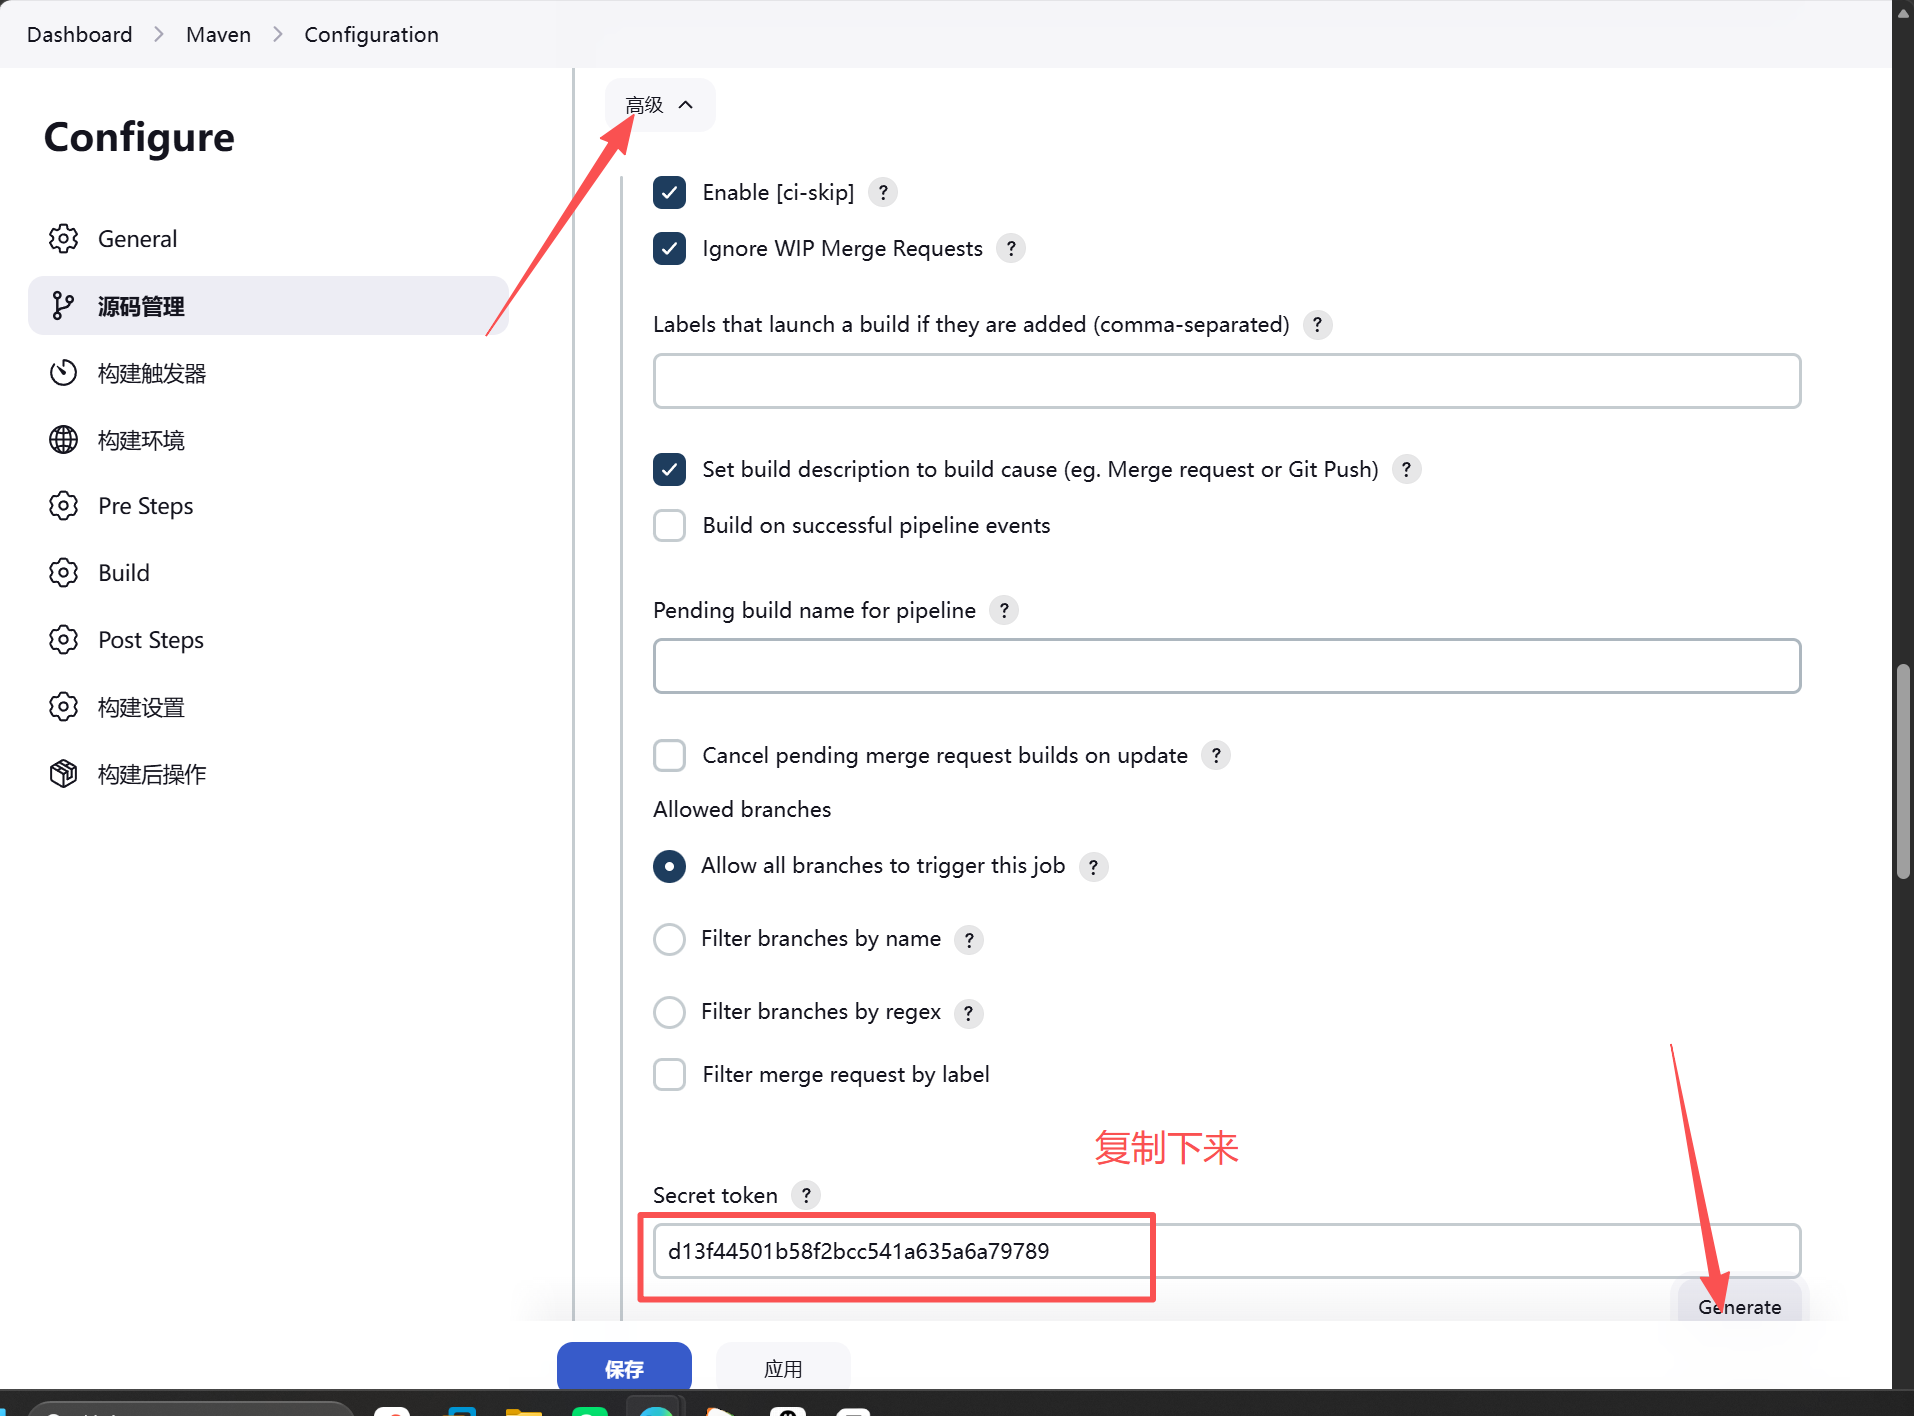
gitlab页面配置勾子(需要先开启网络请求,之前没有配置的请看jenkins的wbhook的配置)
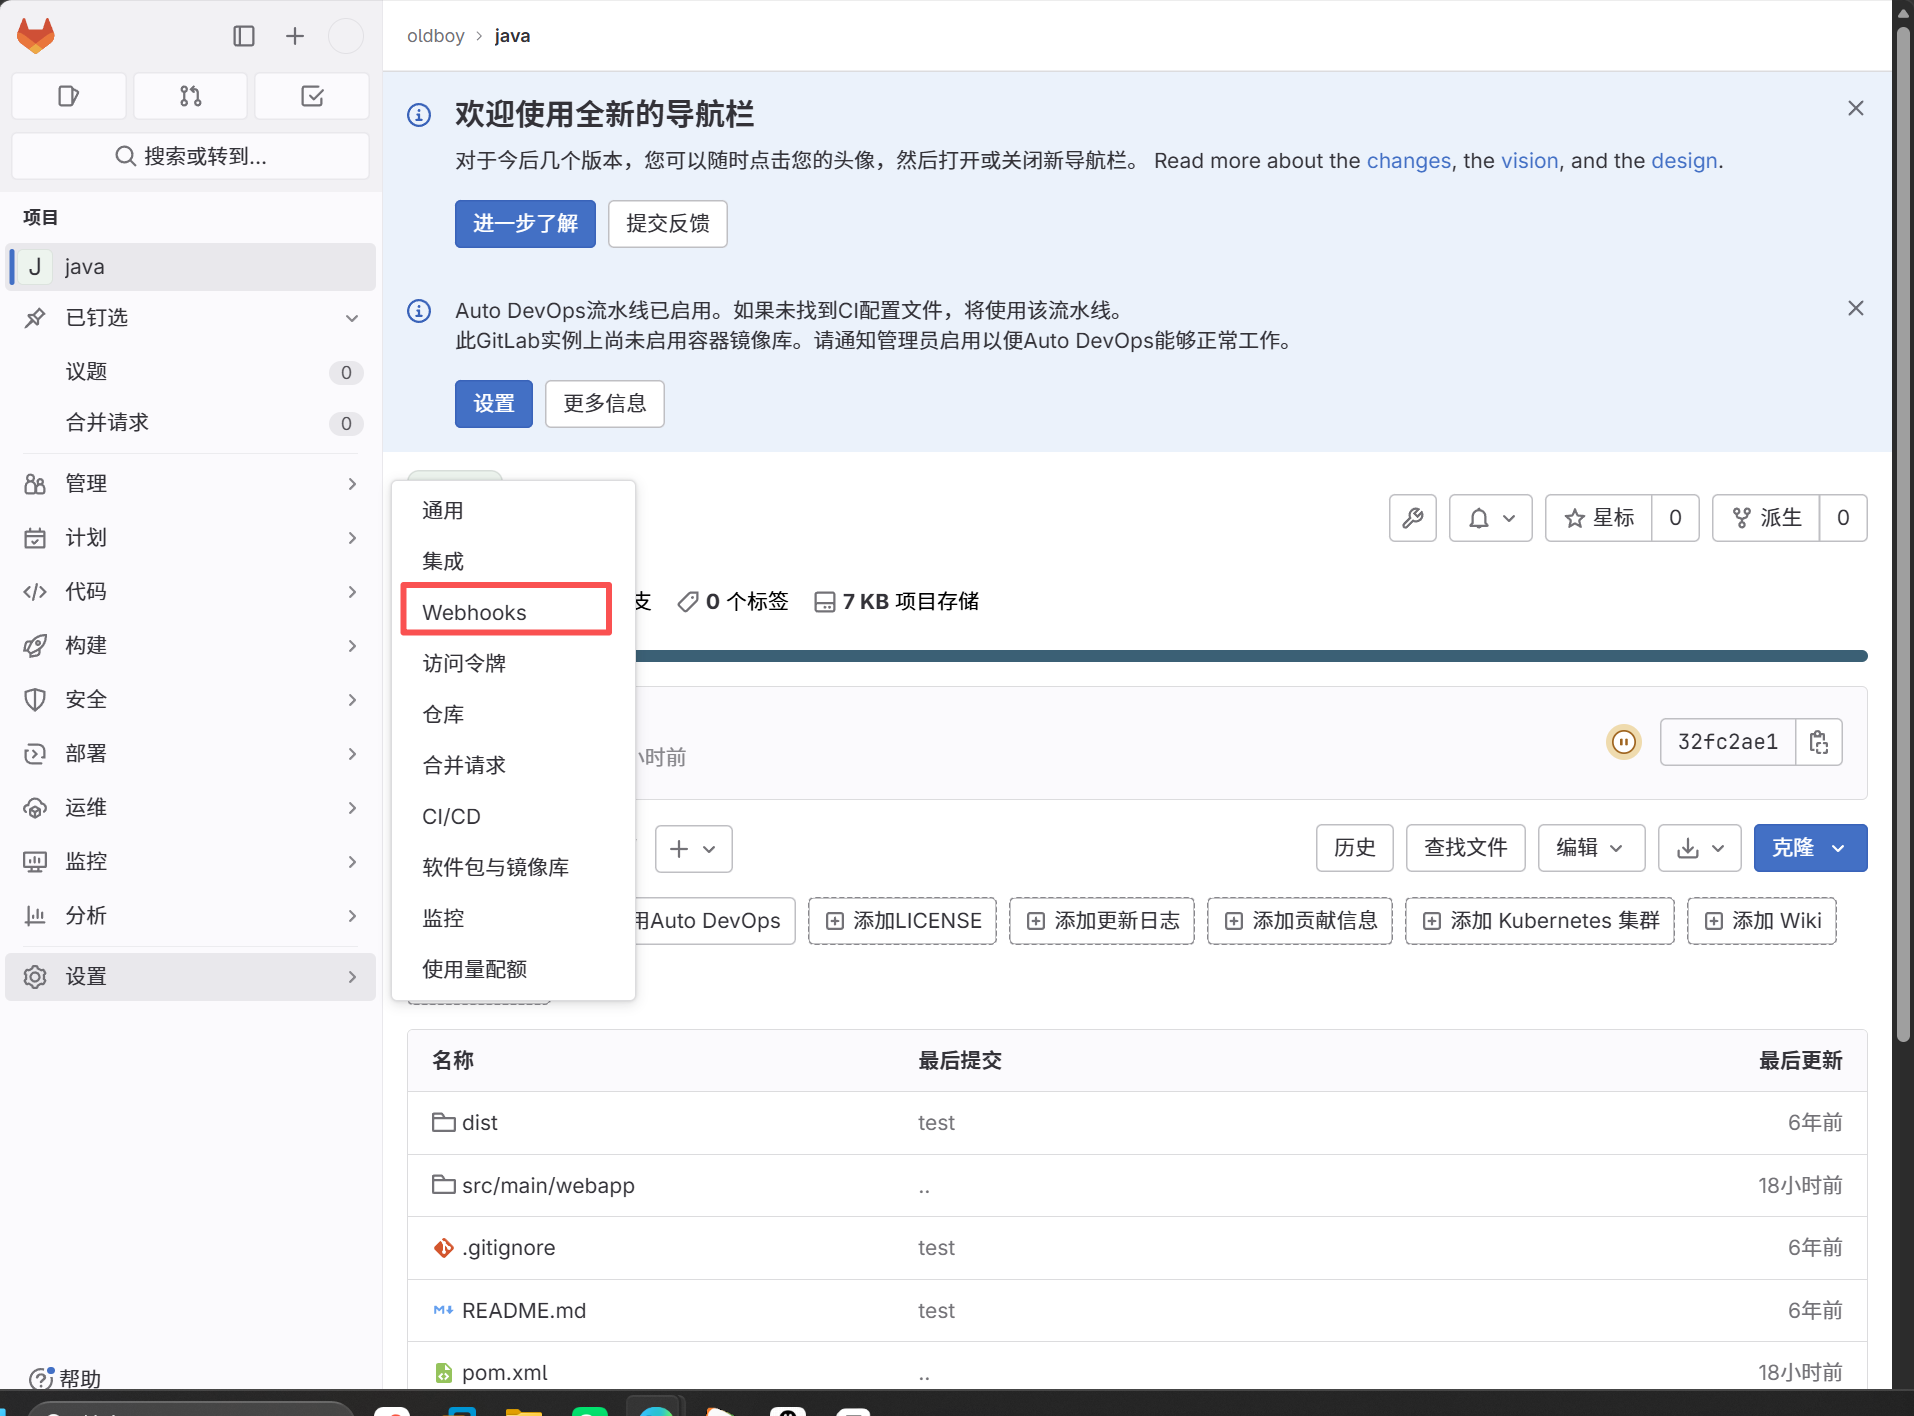
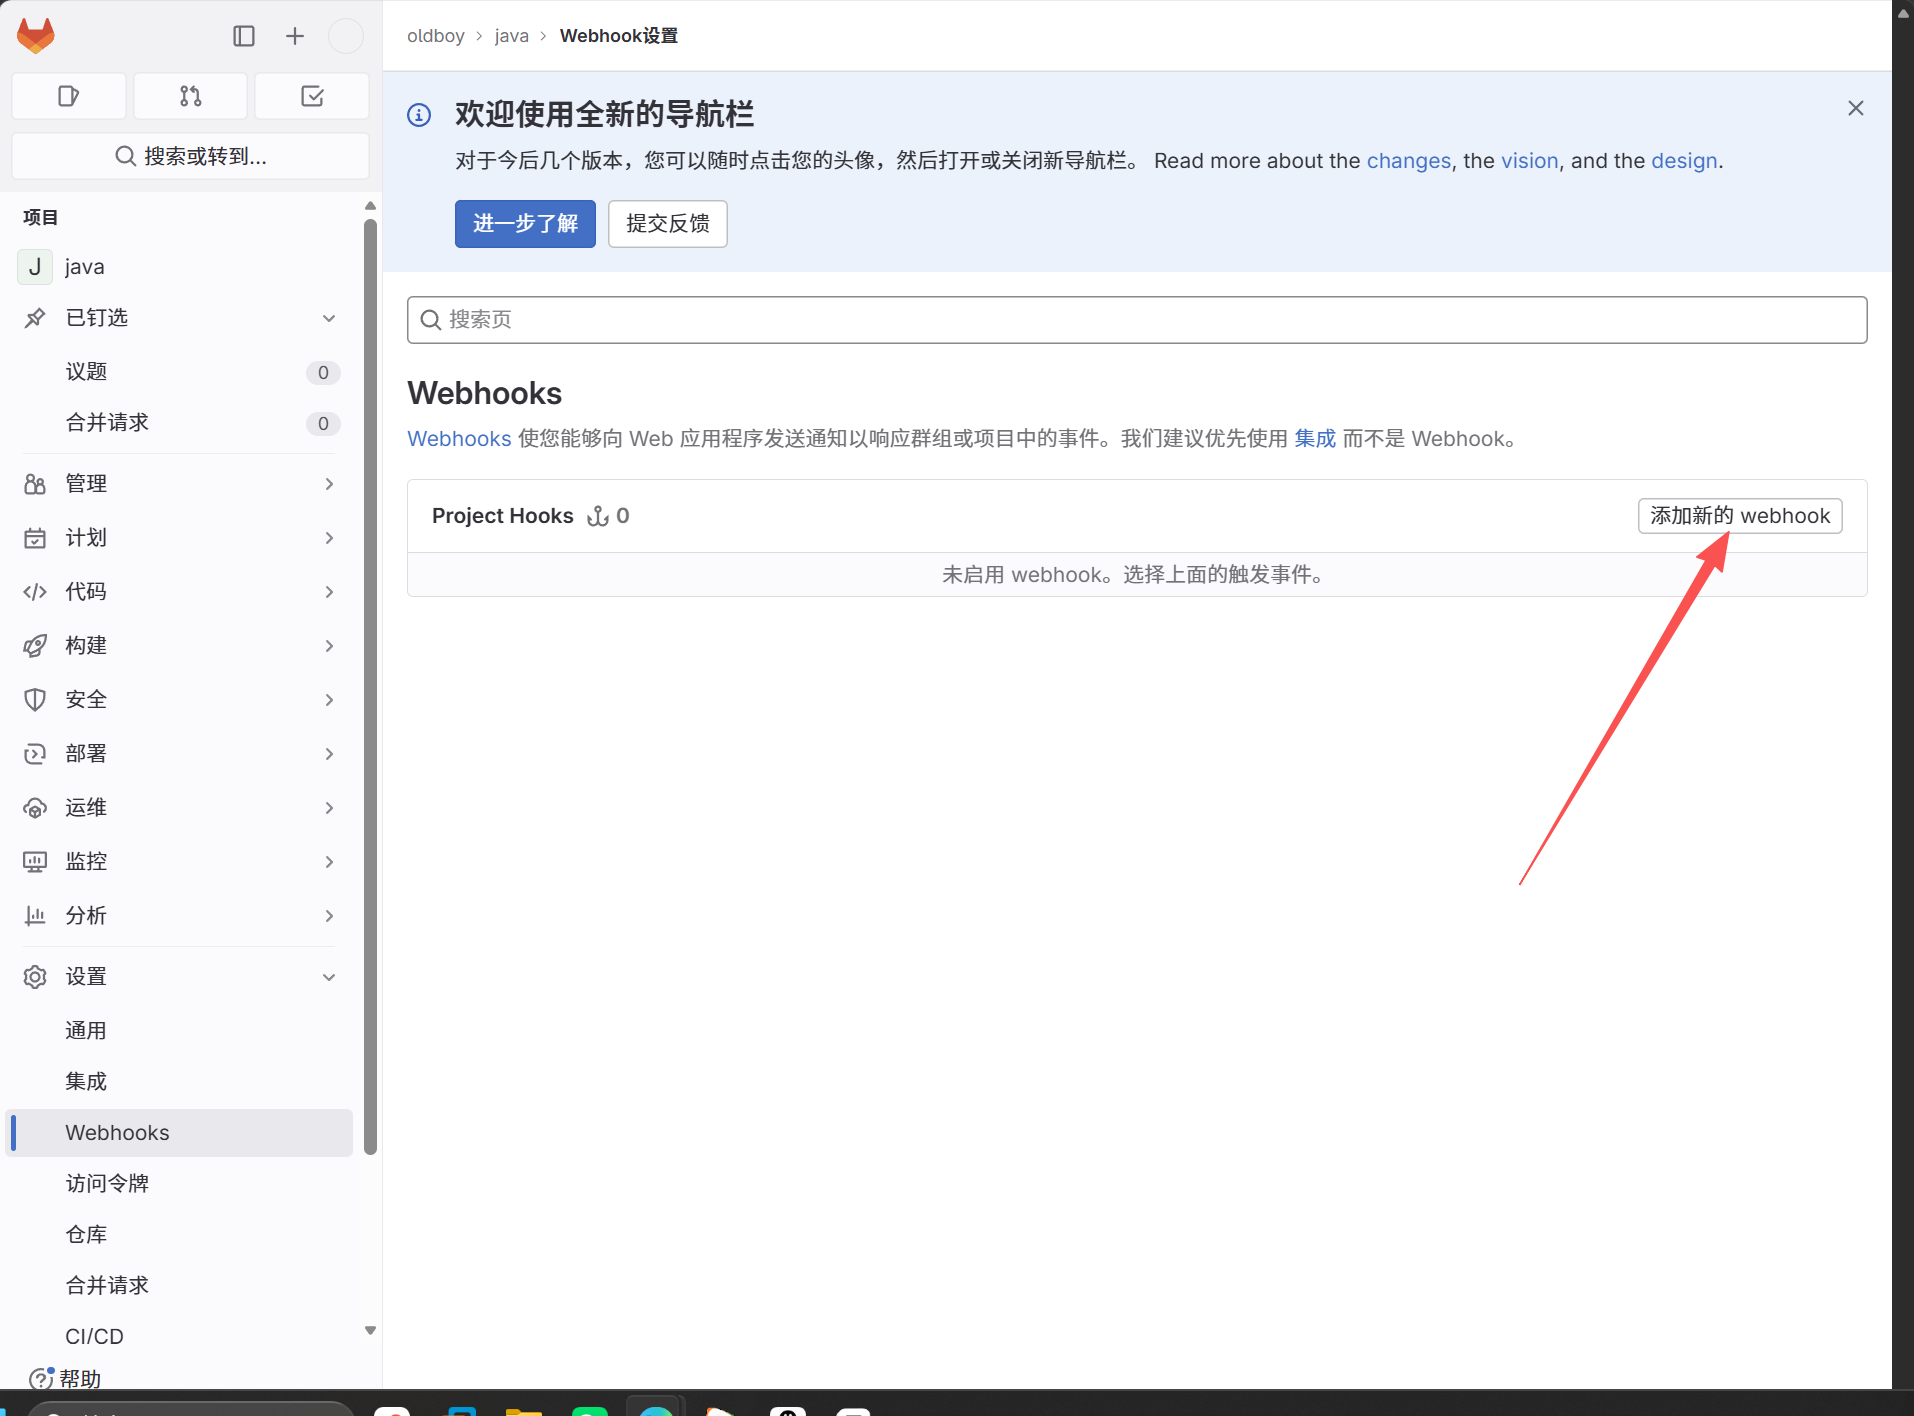
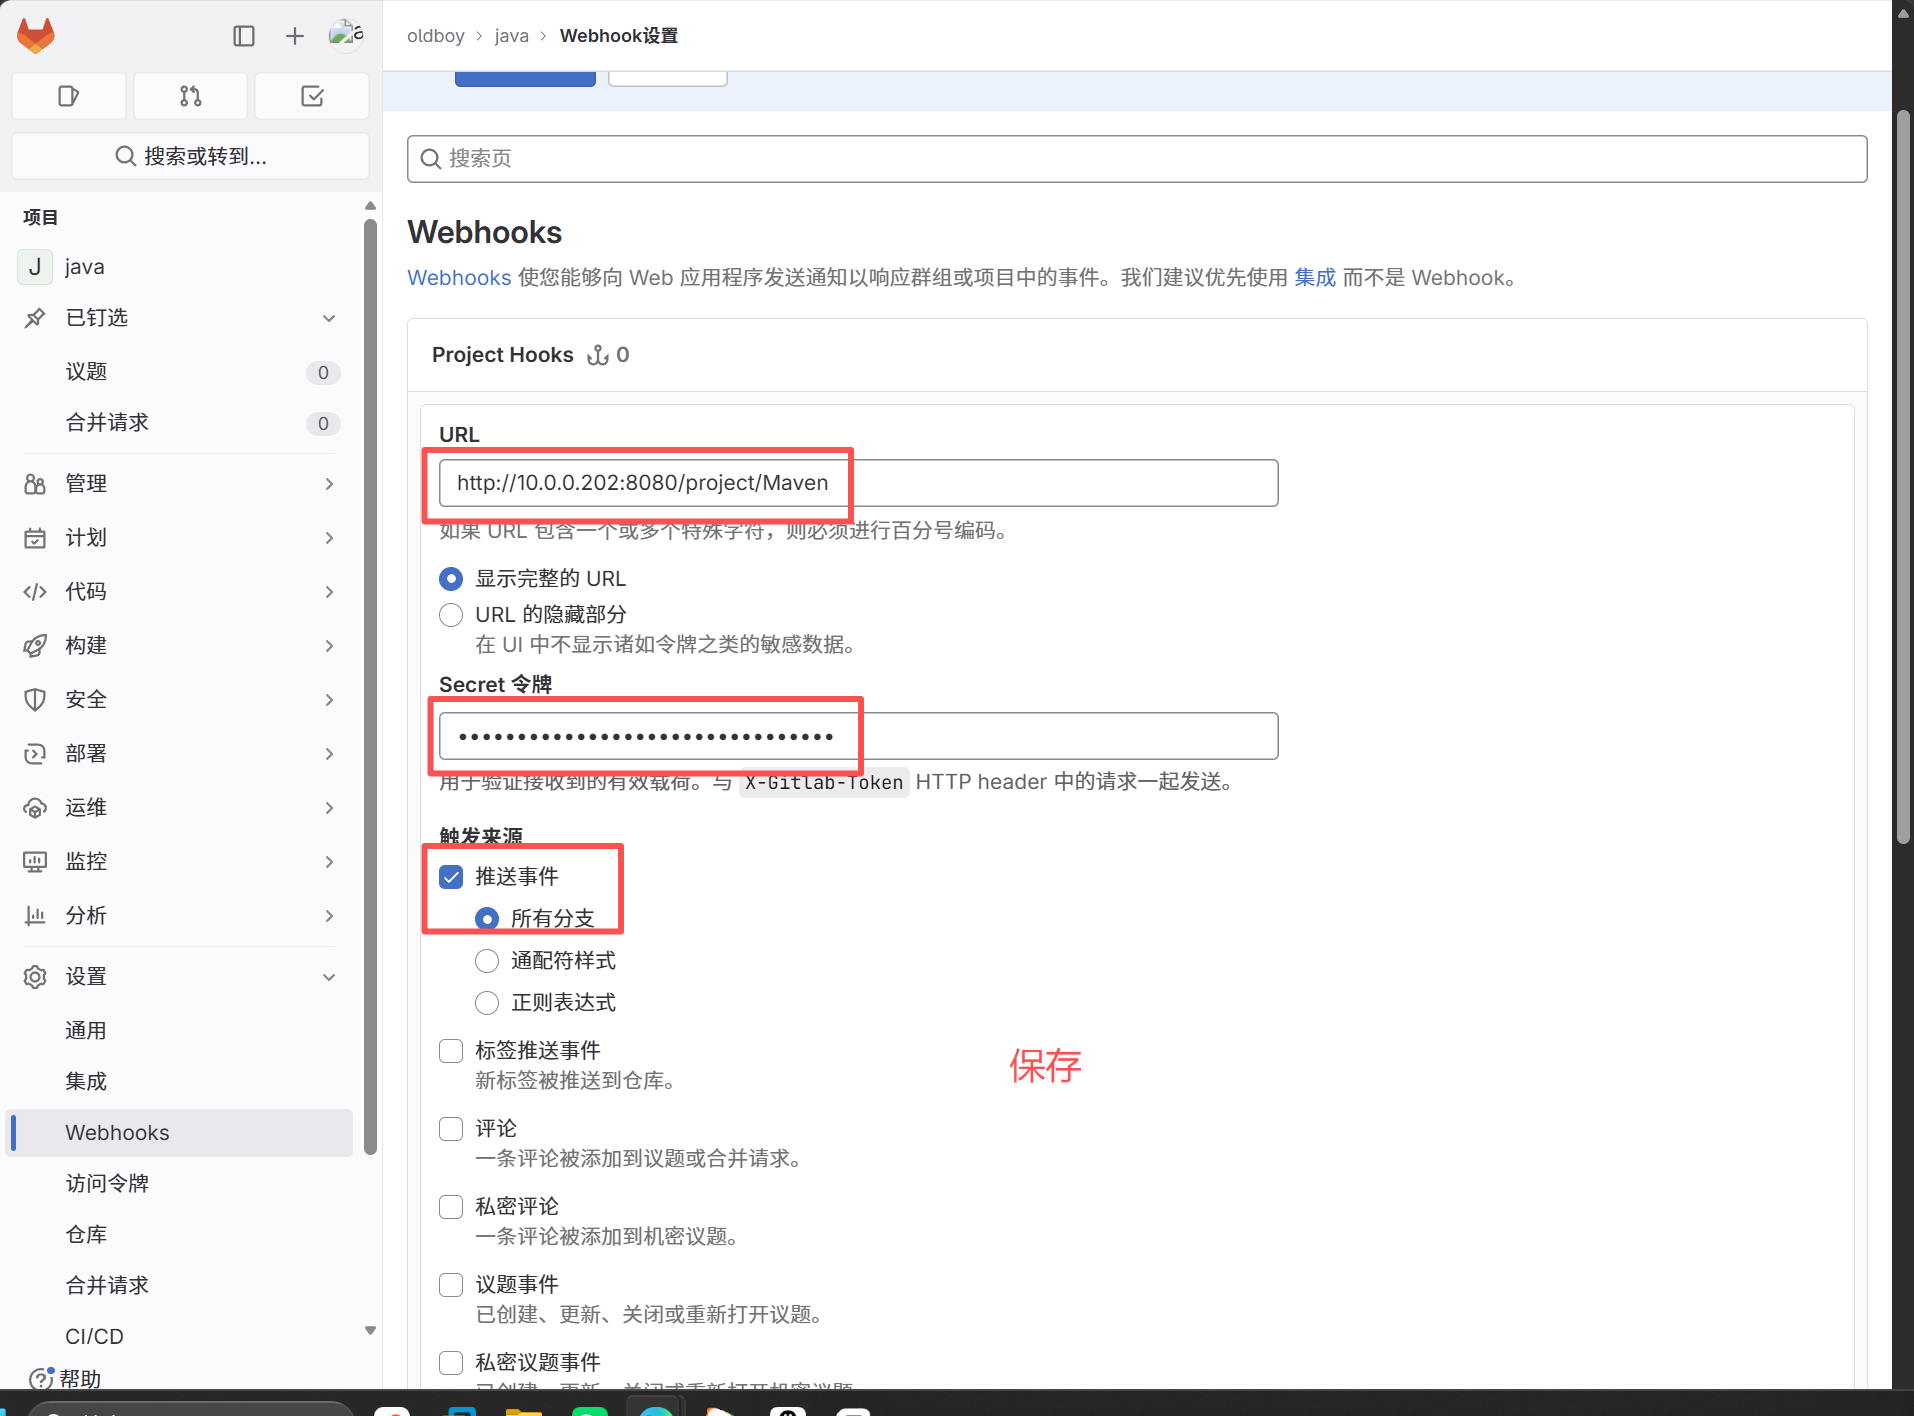
测试
#在jenkins服务器上,将修改后的hello-world推到远端服务器
[root@jenkins hello-world-war]# cd /root/hello-world-war/src/main/webapp/
[root@jenkins webapp]# ll
total 4
-rw-r--r-- 1 root root 210 Jun 14 03:52 index.jsp
drwxr-xr-x 2 root root  21 Jun 14 03:51 WEB-INF
[root@jenkins webapp]# vim index.jsp

#推送
[root@jenkins hello-world-war]# git commit -am "v1.2"
[master e85e5c0] v1.2
 1 file changed, 1 insertion(+), 1 deletion(-)
[root@jenkins hello-world-war]# git push -u origin master
Enumerating objects: 11, done.
Counting objects: 100% (11/11), done.
Compressing objects: 100% (4/4), done.
Writing objects: 100% (6/6), 437 bytes | 145.00 KiB/s, done.
Total 6 (delta 2), reused 0 (delta 0), pack-reused 0
To 10.0.0.200:oldboy/java.git
   32fc2ae..e85e5c0  master -> master
Branch 'master' set up to track remote branch 'master' from 'origin'.

访问10.0.0.8:8080
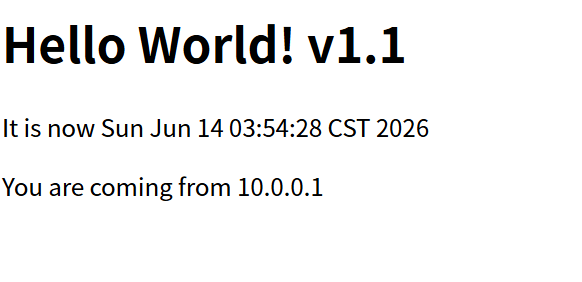
可以将代码检测也一并添加到构建的流程中,具体流程请看SonarQube代码扫描
4.将默认的maven仓库源修改为国内的
[root@jenkins ~]# cd /usr/local/maven/conf
[root@jenkins conf]# ll
总用量 16
drwxr-xr-x 2 root root    37 11月 11  2015 logging
-rw-r--r-- 1 root root 10216 11月 11  2015 settings.xml
-rw-r--r-- 1 root root  3649 11月 11  2015 toolchains.xml

#将以下内容复制粘贴到settings.xml中
<mirror>
<id>nexus-aliyun</id>
<mirrorOf>*</mirrorOf>
<name>Nexus aliyun</name>
<url>http://maven.aliyun.com/nexus/content/groups/public</url>
</mirror>
示例
[root@jenkins conf]# vim settings.xml
插入到源文件的158和159行之间
157     </mirror>
158      -->
159   </mirrors>
160


#修改后的文件
158     -->
159    <mirror>
160 <id>nexus-aliyun</id>
161 <mirrorOf>*</mirrorOf>
162 <name>Nexus aliyun</name>163 <url>http://maven.aliyun.com/nexus/content/groups/public</url>164 </mirror>165   </mirrors>
检测配置是否成功
[root@jenkins hello-world-war]# cd /root/hello-world-war/
#清理之前的
[root@jenkins hello-world-war]# mvn clean
#重新打包
[root@jenkins hello-world-war]# mvn package
查看是否是国内的镜像
十一、配置nexus私服
注意:如果公司部分java代码 不需要配置nexus私服,只需要将maven配置文件仓库指向阿里云仓库
如果公司是重java项目,则需要搭建私有的仓库nexus
配置需求
1.kylin v10
2.IP 10.0.0.201
3.1核2G

部署私服 xenus 下载
https://www.sonatype.com/download-osssonatype
配置仓库两个选项
1、项目下的pom.xml配置、只生效当前的项目
2、在maven配置全局所有项目生效

# 上传JDK
[root@nexus ~]# ll jdk-8u181-linux-x64.rpm
-rw-r--r-- 1 root root 170023183  9月 27  2024 jdk-8u181-linux-x64.rpm
[root@nexus ~]# rpm -ivh jdk-8u181-linux-x64.rpm

#安装nexus
[root@nexus ~]# ll nexus-3.13.0-01-unix.tar.gz
-rw-r--r-- 1 root root 122904706  9月 27  2024 nexus-3.13.0-01-unix.tar.gz
[root@nexus ~]# tar xf nexus-3.13.0-01-unix.tar.gz -C /usr/local/
[root@nexus ~]# mv /usr/local/nexus-3.13.0-01/ /usr/local/nexus

#启动nexus
[root@nexus ~]# /usr/local/nexus/bin/nexus start
WARNING: ************************************************************
WARNING: Detected execution as "root" user.  This is NOT recommended!
WARNING: ************************************************************
Starting nexus

#浏览器访问
10.0.0.201:8081
账号 admin
密码 admin123
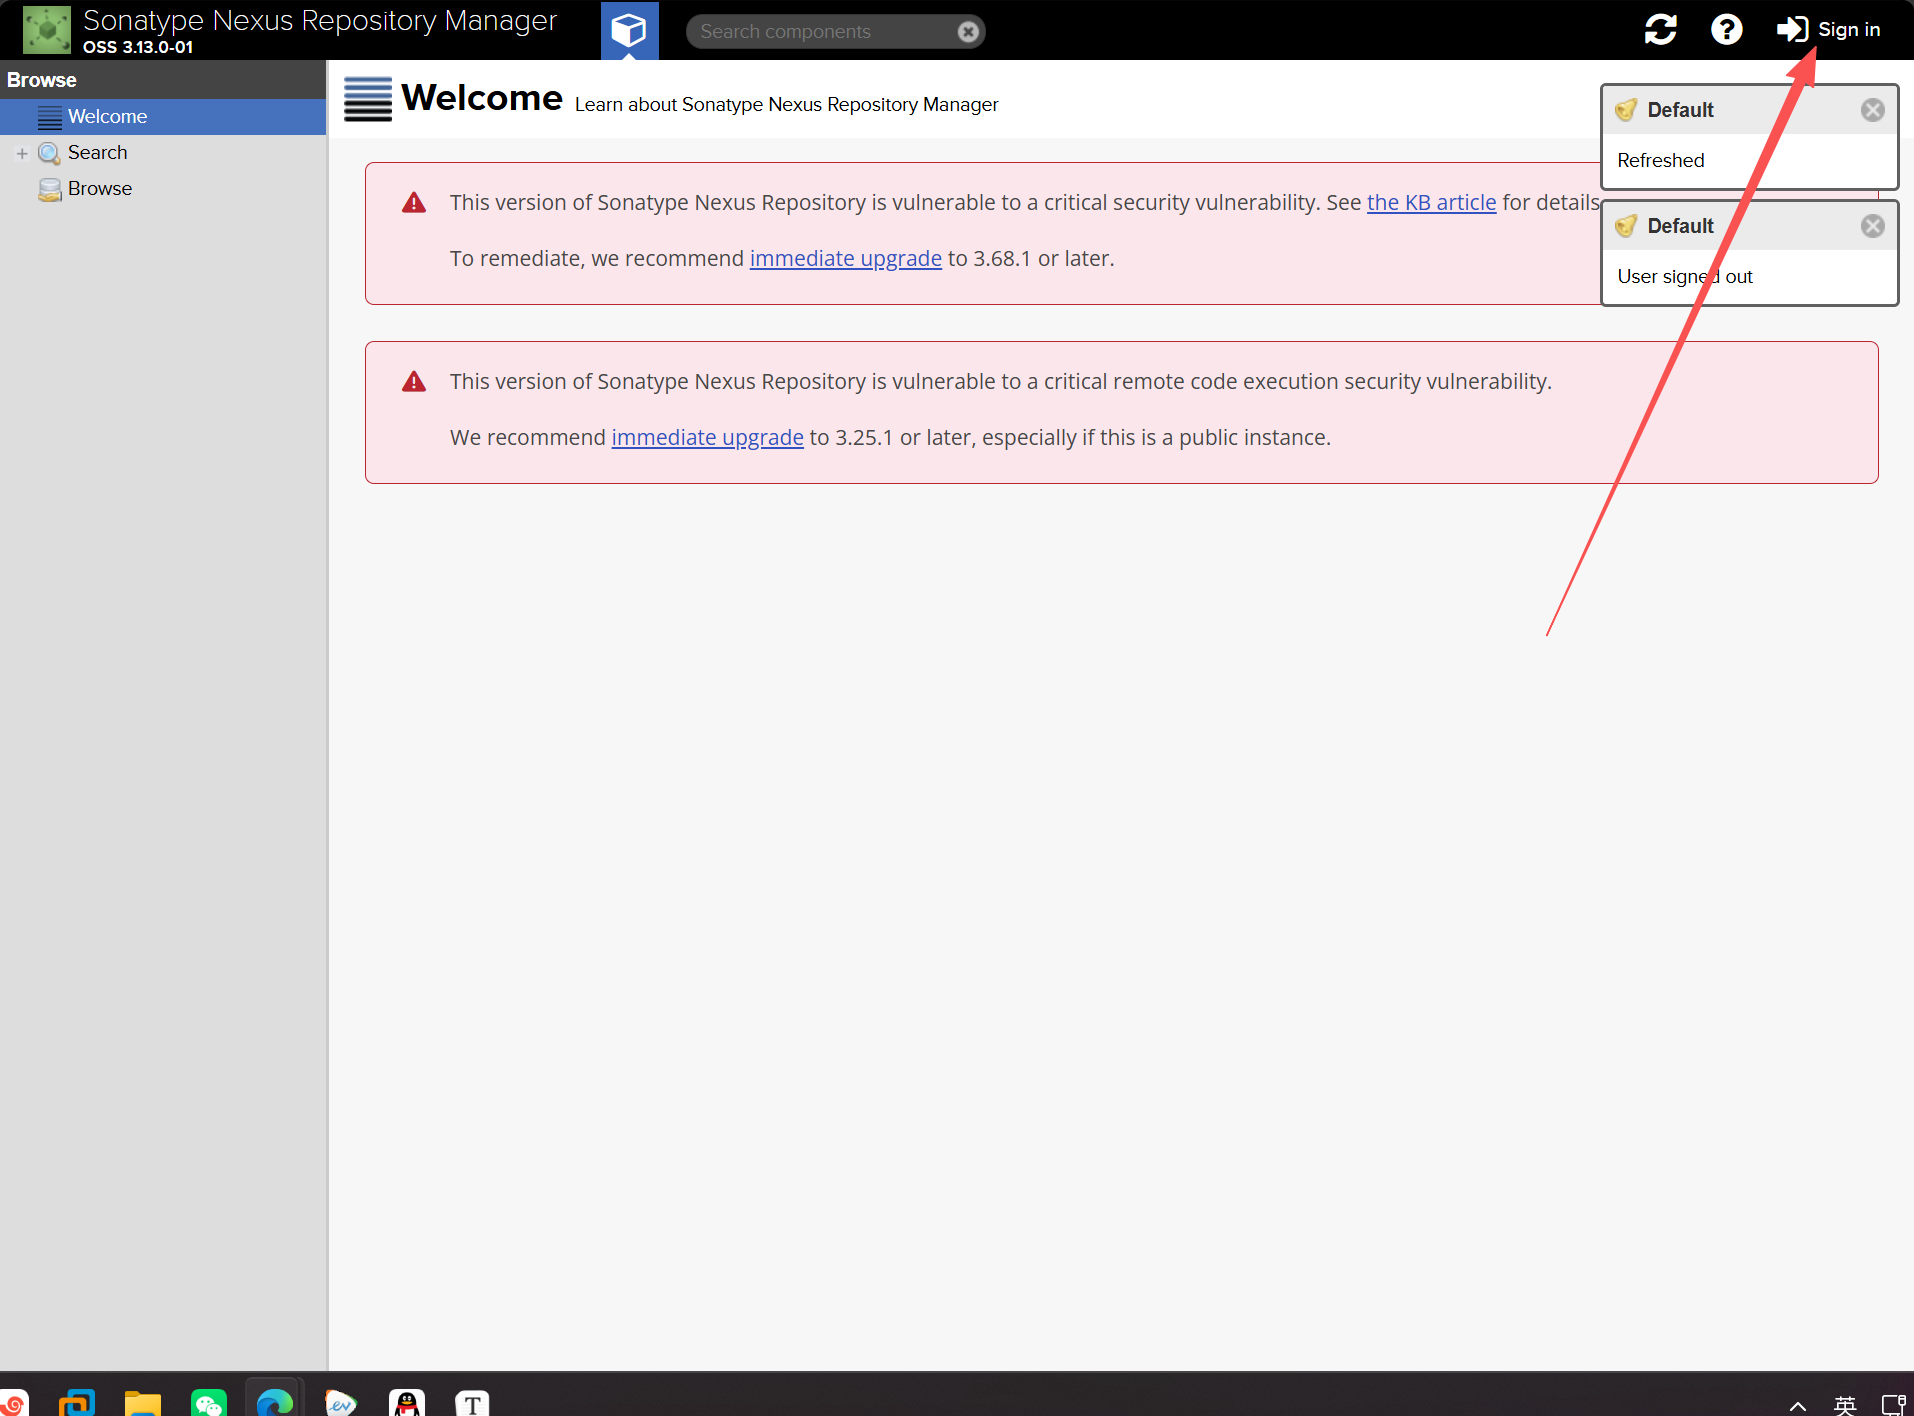
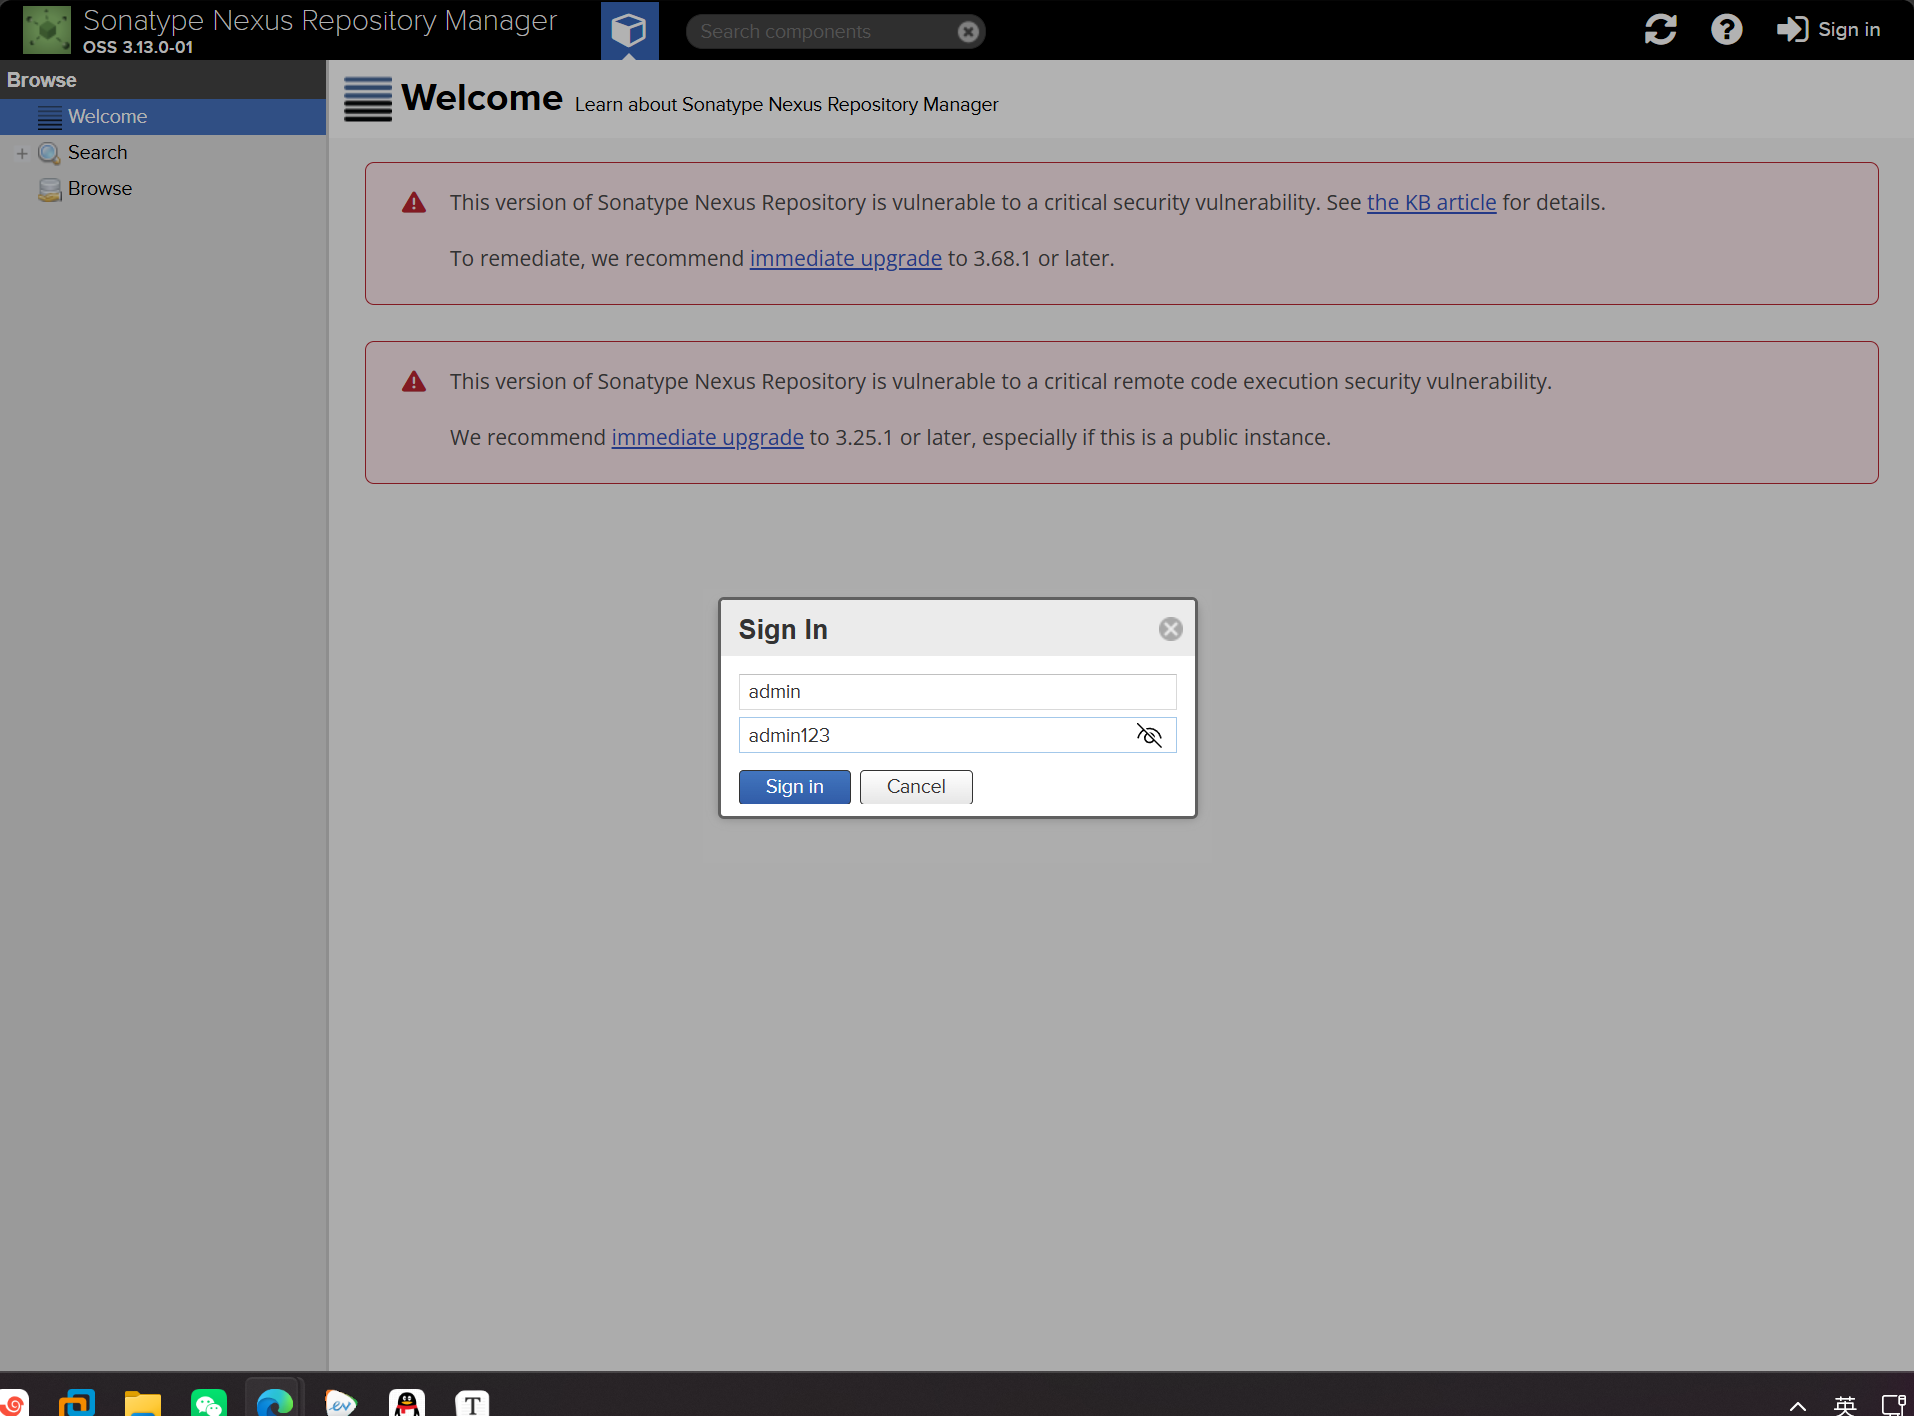
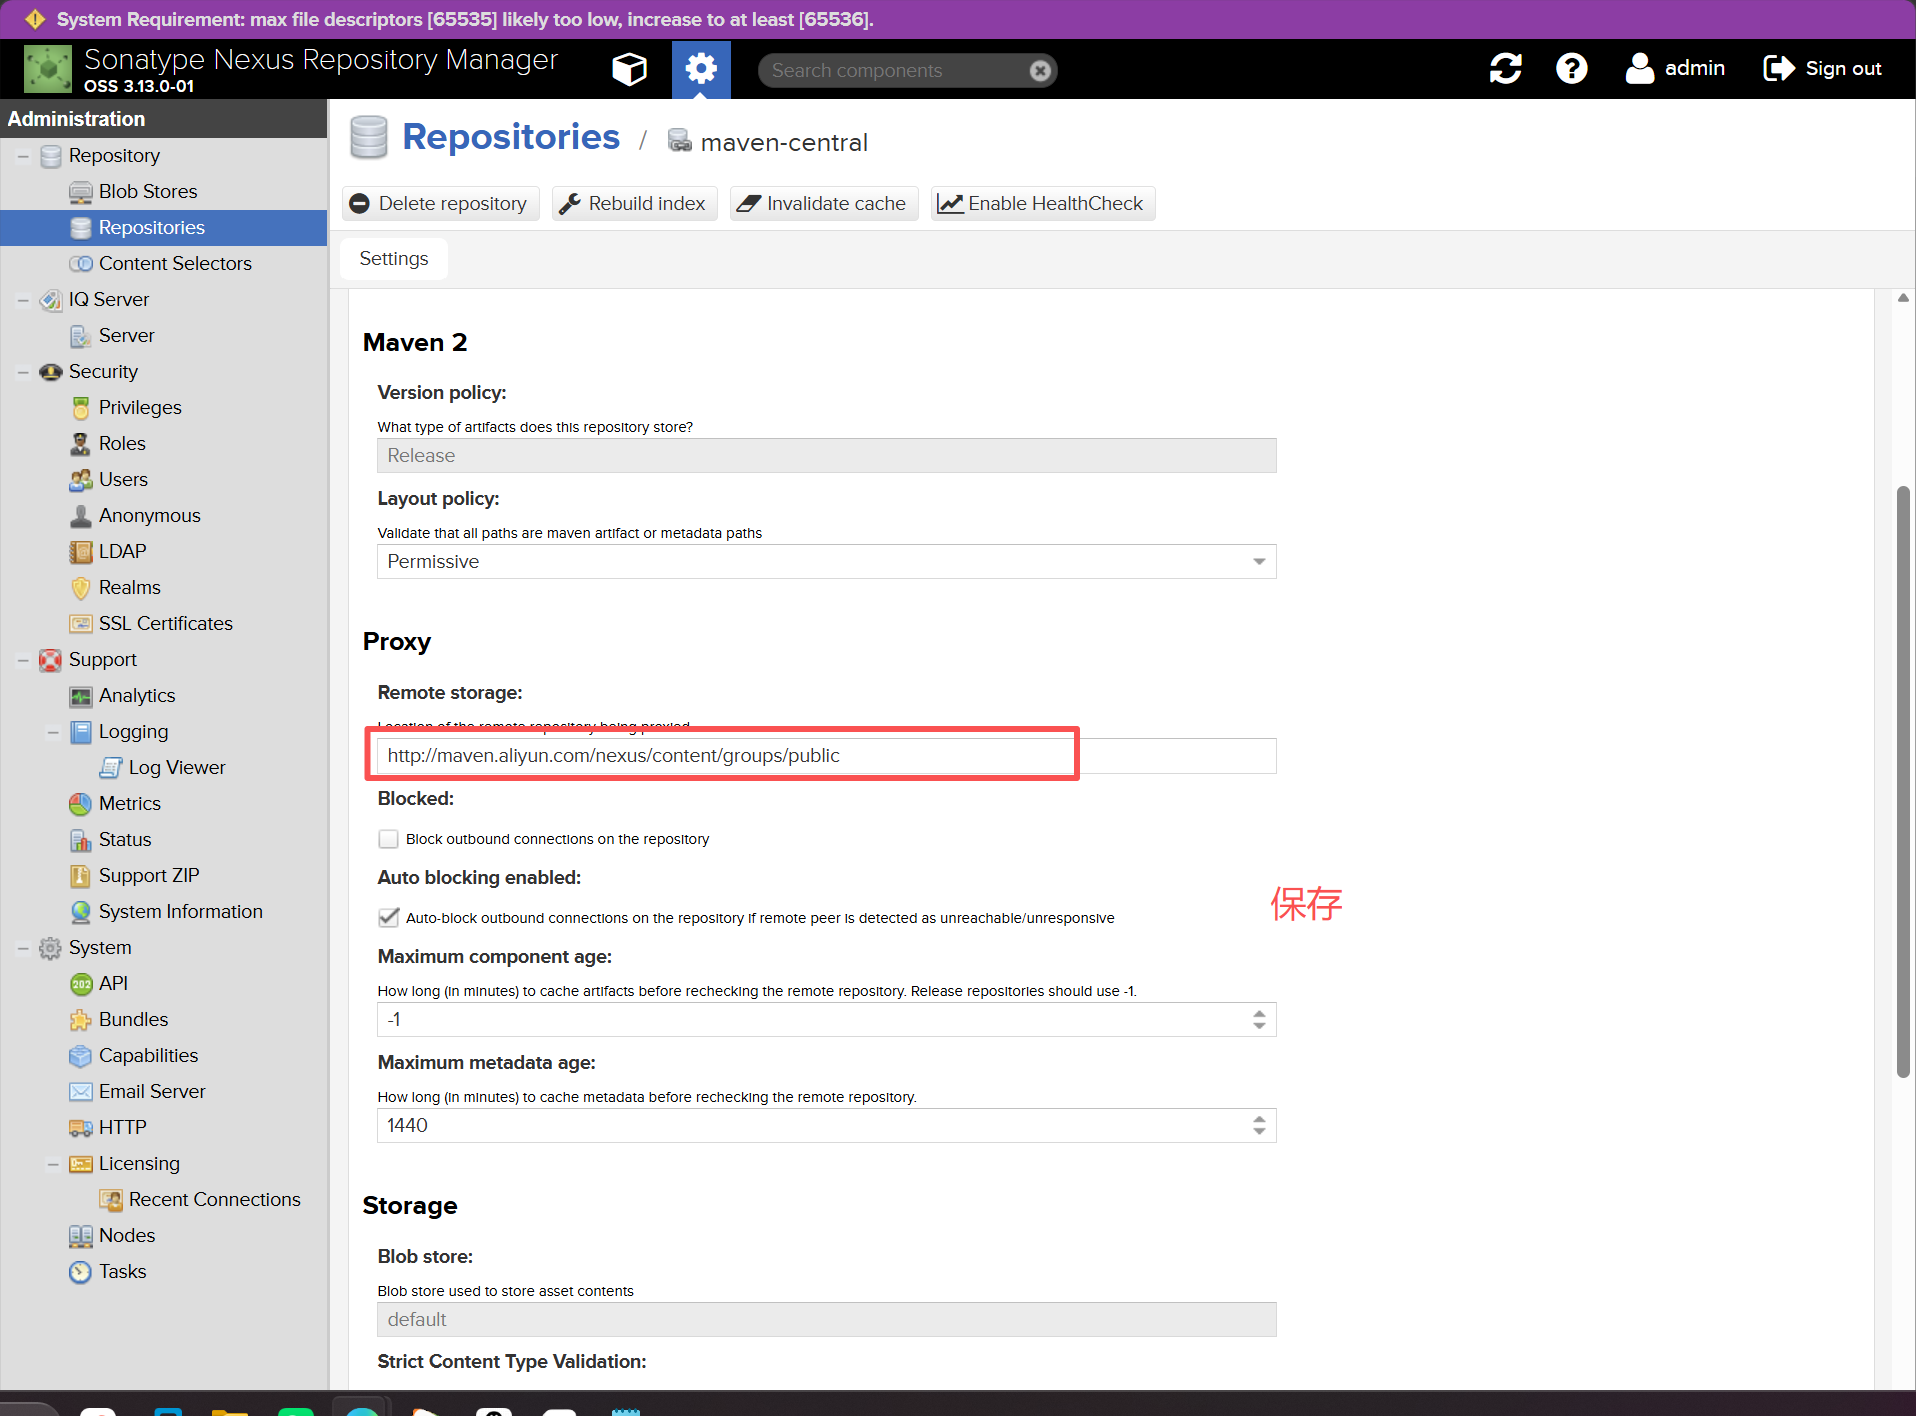
配置nexus仓库指向阿里云
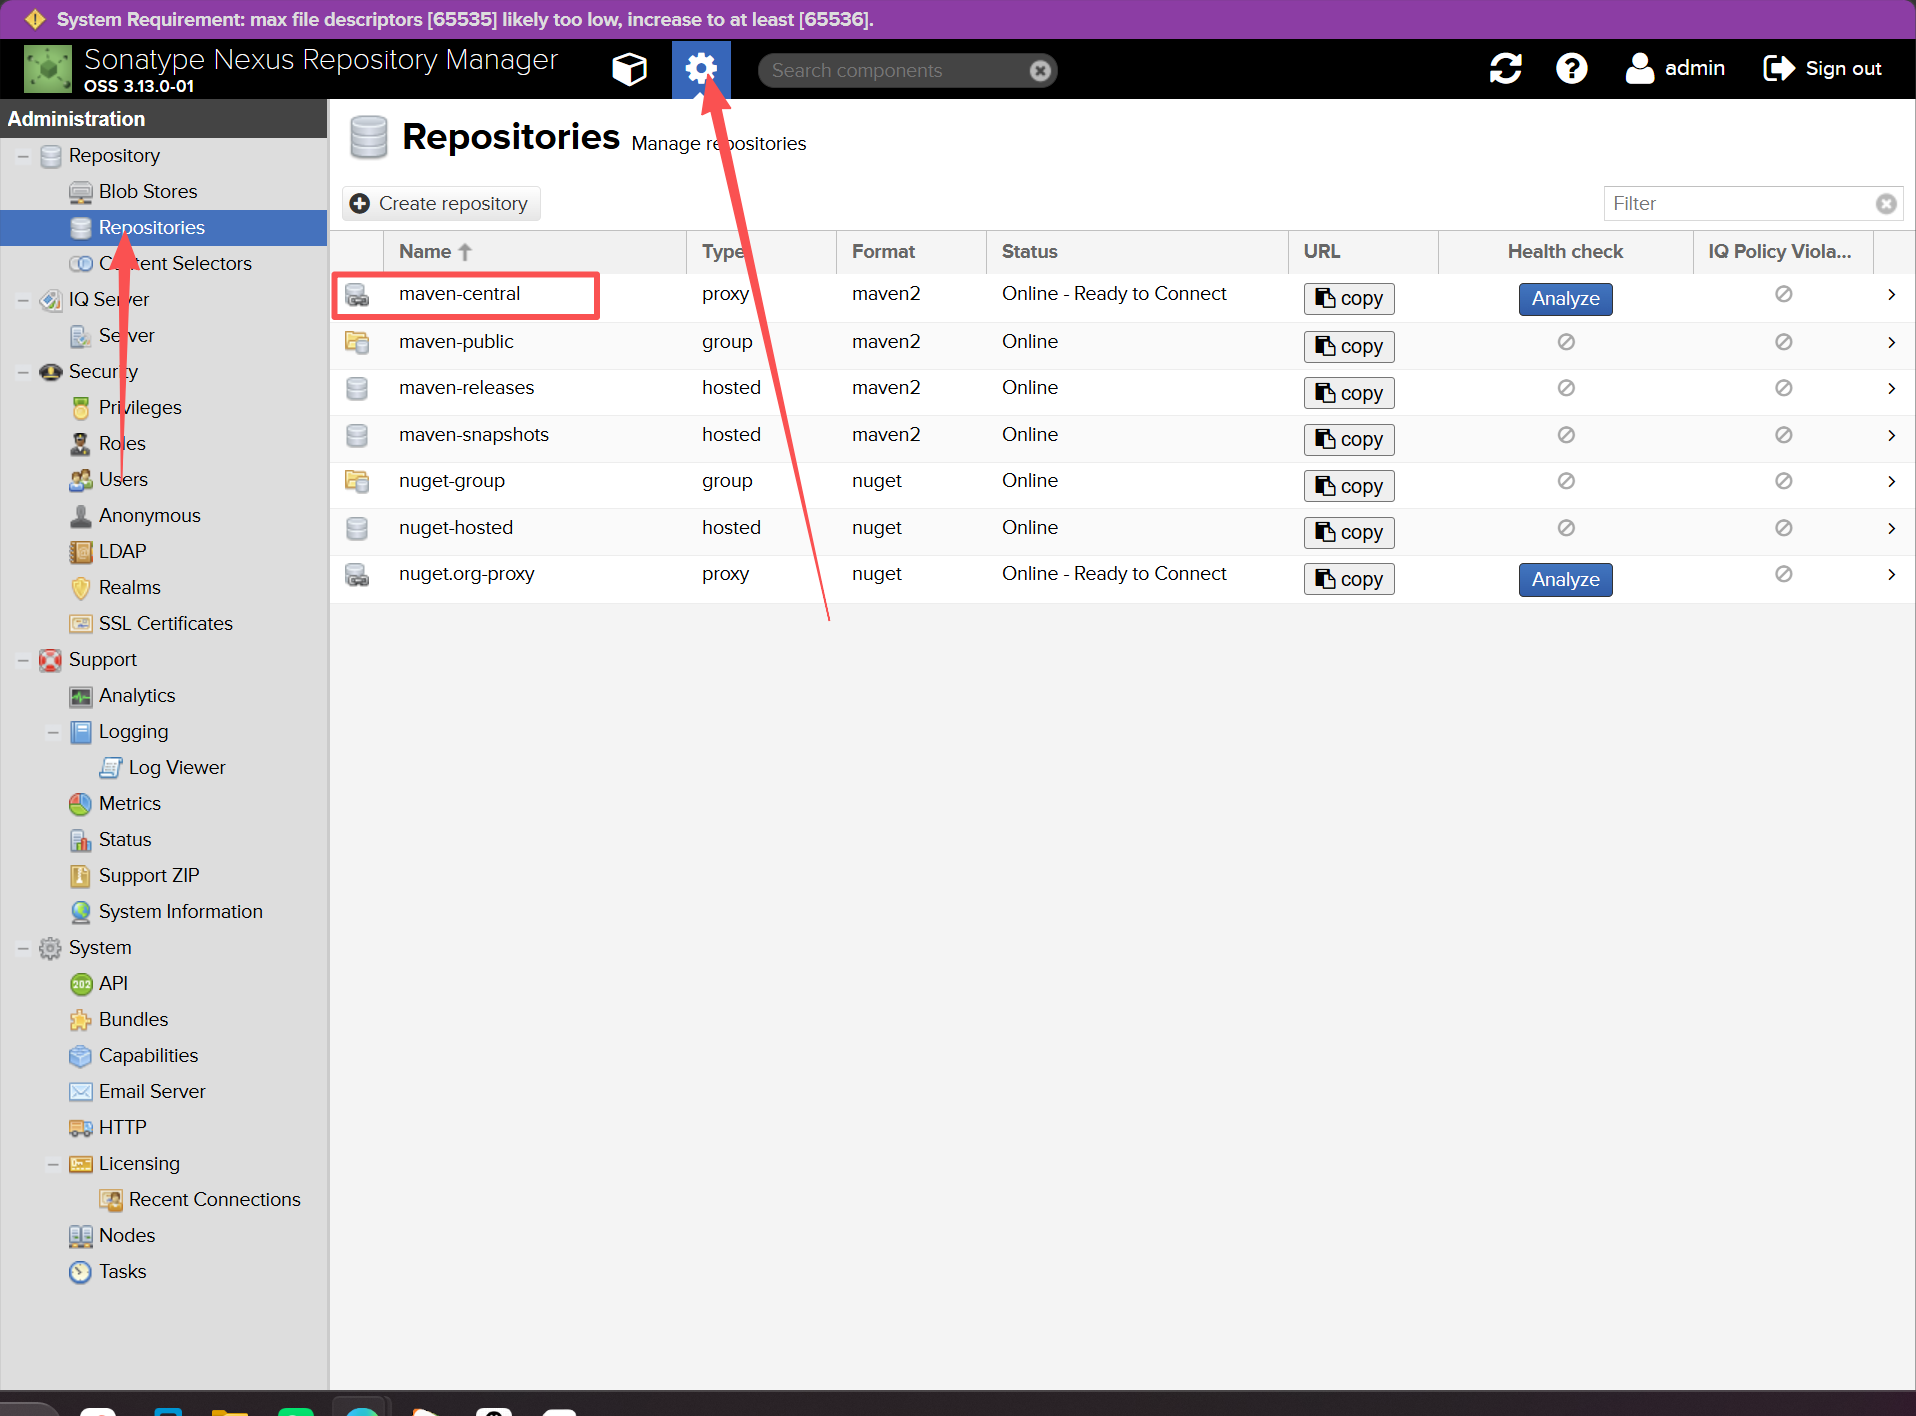
http://maven.aliyun.com/nexus/content/groups/public
修改jenkins编译指向nexus
[root@jenkins hello-world-war]# cd /usr/local/maven/conf/
#将源文件改为备份
root@jenkins conf]# mv settings.xml settings.xml.bak
#将文档中修修改好的文件上传
[root@jenkins conf]# ll
total 28
drwxr-xr-x 2 root root    37 Nov 11  2015 logging
-rw-r--r-- 1 root root 11280 Jun 14 04:31 settings.xml
-rw-r--r-- 1 root root 10371 Jun 14 04:08 settings.xml.bak
-rw-r--r-- 1 root root  3649 Nov 11  2015 toolchains.xml
#将源文件中干的地址改为现在的nexus的地址
[root@jenkins conf]# sed -i 's#202#201#g' settings.xml

编译测试
[root@jenkins hello-world-war]# cd /root/hello-world-war/
drwxr-xr-x 4 root root  90 Jun 14 04:32 target
[root@jenkins hello-world-war]# mvn clean
[root@jenkins hello-world-war]# mvn package

#首次编译下载的地址还是阿里云的,存到nexus中,后面没有的才去阿里云下载,nexus有的直接用n
Discussion
评论